WiebeTech HP-LT User manual

H o t P l u g U s e r ’ s M a n u a l - 1 -
HotPlug™ LT
USER’S MANUAL
Revised February, 15 2008
With WiebeTech’s HotPlug™, you can seize and move a computer without powering down the
computer!
HotPlug LT keeps power flowing to the computer while transferring the computer's power input
from one A/C source (such as a wall outlet or power strip) to another (such as a portable UPS).
Features
•Allows you to move a computer (or
other electronic device) without
shutting it down
•Smartly and instantly reroutes power of
a target device to a UPS for transport
•Use the same HotPlug to seize more
than one computer at a scene
Table of Contents
Accessories 2
Mouse Jiggler 2
HotPlug Control Panel 2
HotPlug Operation 3
Outlet Seizure Method 7
Wire Splitting Method 7
Warnings & Dangers 7
Frequently Asked Questions 8
Technical Specifications 8
WA
RNING:
Risk of lethal electric shock.
Live terminals exposed during normal usage
can carry sufficient voltage to be harmful or
deadly to particularly sensitive persons or
those wearing a pacemaker. Read this
manual in full before using HotPlug. Care
should be taken while using this product;
WiebeTech recommends product training.

WiebeTech LLC
H o t P l u g U s e r ’ s M a n u a l - 2 -
Accessories
Check the accessories packaged with your HotPlug™. Please contact WiebeTech if any items are
missing or damaged. The box should contain the following items:
HotPlug LT is contained inside a sturdy, waterproof carrying case. There is a built-in compartment for
storing the accessories.
Mouse Jiggler™
Before using HotPlug to move a computer, plug Mouse Jiggler into
one of the computer’s USB ports. This will prevent the computer
from entering screen saver or sleep modes, which may be protected
by passwords. For more information on the use of Mouse Jiggler,
see the instructions accompanying that product.
HotPlug Control Panel
AInput Power – power coming from the new power source, such as a portable UPS.
BPower Switch – Turns HotPlug unit on & off. Glows when HotPlug is connected to new power source.
CPower Status LED – Glows when HotPlug power switch is in the ON position.
D“Ready” LED – Glows when HotPlug is armed and ready for the power transfer.
EPower Output LED – Glows when HotPlug is connected to the computer’s original power source.
FArm Switch – When the cables are properly connected, pushing this switch will arm HotPlug so that it
is ready to transfer power.
GOutput Power – power line connected to the computer’s original power source, such as a surge
protector, power strip, or wall plug.
HotPlug LT 1
Input line cord 1
Output line cord 1
Mouse Jiggler™
(Mouse activity dongle)
1
(HP-LT5 contains 5)
Plug Capture Device 1
This user’s manual 1

WiebeTech LLC
H o t P l u g U s e r ’ s M a n u a l - 3 -
HotPlug™ Operation
1. Before plugging in any cables, make sure the HotPlug power switch is in the
OFF position.
2. Plug the black input line cord into the HotPlug unit (receptacle labeled “IN”).
3. Plug the other end of the input line cord into the new power source that you want to switch to
(such as a portable UPS). The HotPlug power switch will light up, indicating that HotPlug is
receiving power. Make sure that a second receptacle on the same circuit is available on the new
power source (i.e. a duplex outlet).
4. Plug the gray output line cord into the HotPlug unit (receptacle labeled “OUT”). YOU SHOULD
NOW ASSUME THAT THE PLUG AT THE OTHER END IS HOT. CONTINUE TO ASSUME
THAT IT IS HOT UNTIL HOTPLUG IS DISCONNECTED FROM THE CIRCUIT.
WARNING: The user should assume that the
plug on the output line cord is energized whenever
the other end of the cord is plugged in.
UPS HotPlug
(Power switch glows when
receiving power from UPS)
NOTE: Many UPSs have
both surge-protected and
battery-powered outlets.
Be sure to use HotPlug
with UPS outlets that
supply battery power.

WiebeTech LLC
H o t P l u g U s e r ’ s M a n u a l - 4 -
5. You will now establish a connection between HotPlug’s gray output line cord and the computer’s
original source of power. This is done one of two ways, depending on how the computer is
plugged in.
If the computer is plugged into a multi-outlet surge protector or power strip
This is by far the most common configuration you will encounter. First, unplug any unneeded
devices from the power strip from which the computer is currently receiving power. This will
reduce power draw and ensure there is a receptacle available for use with HotPlug. Next,
connect the gray output line cord into the power strip. After you have plugged the output line cord
into the power strip, HotPlug’s red LED (output power indicator) will light.
If the computer is plugged directly to a wall outlet
This is less common. You will need to use the Plug Capture Device (PCD) to create the
connection.
A) Install the PCD on the free plug end of the output line cord.
B) Next, carefully pull the computer’s A/C plug about 1/8-inch out
from the wall. Do not pull it more than 1/8-inch or the power
connection may be broken.
C) Slide the PCD’s end tab between the two power conductors in the plug and between the
wall outlet and the plug. Push down on the PCD until it makes electrical connection and
mechanically seats on the plug. HotPlug’s red LED should light, indicating that a solid
electrical connection is established.
(Red color indicates path of computer’s power)
1/8”
NOTE: You will not be able to
use PCD with European plugs
that have insulated prongs.
UPS
HotPlug

WiebeTech LLC
H o t P l u g U s e r ’ s M a n u a l - 5 -
6. Move the HotPlug power switch to the ON position. The power indicator (yellow) will light.
7. The cabling should now all be in place, and the yellow and red indicators on the HotPlug console
should both be lit. Push the button labeled “ARM” to ready the HotPlug for the power transfer.
The green indicator will light, showing that HotPlug is armed and ready. Note: At this point, the
computer is still receiving power from the original power source.
8. You are now ready to transfer the computer’s source of power. As with step 5, this process
varies slightly depending on the specific configuration.
If the computer is plugged into a multi-outlet surge protector or power strip
Be very careful when performing the following action: Unplug the power strip from the wall outlet
in one quick motion, and immediately plug it into an open receptacle on the new power source
(e.g. UPS). WHILE MOVING THE POWER STRIP’S PLUG FROM THE WALL OUTLET TO THE
NEW POWER SOURCE, THE EXPOSED PRONGS WILL BE “HOT” (ELECTRICITY WILL BE
PRESENT AT THE PLUG). Be careful not to touch yourself, other people, or any objects with the
plug while you move it.
1 2 3

WiebeTech LLC
H o t P l u g U s e r ’ s M a n u a l - 6 -
As soon as the power strip is unplugged from the wall outlet, HotPlug instantly begins supplying
the power strip with a new flow of power. The computer is now being powered by the new power
source.
If the computer is plugged directly to a wall outlet
Make sure Plug Capture Device (see step 5) has a solid electrical connection with the metal
prongs on the wall plug. HotPlug’s red LED should be lit.
Be very careful when performing the following action: Using PCD, pull the power plug from the
wall in one quick motion, and immediately insert it into the second receptacle on the new power
source (e.g. UPS). WHILE MOVING THE PLUG FROM THE WALL OUTLET TO THE NEW
POWER SOURCE, THE EXPOSED PRONGS WILL BE “HOT” (ELECTRICITY WILL BE
PRESENT AT THE PLUG). Be careful not to touch yourself, other people, or any objects with the
plug while you move it. After establishing electrical contact between the plug and the receptacle
on the UPS, you may disconnect PCD from the plug.
9. After the power plug has been connected to its new power source, HotPlug can be turned OFF.
10. Unplug the end of the (gray) output line cord NOT connected to HotPlug first.
11. Unplug HotPlug’s black input line cord from the new power source.
12. The operation is now complete. Unplug both the input and output line cords from HotPlug and
stow them within the HotPlug case.
WARNING: After
unplugging the original
power source from the
wall outlet, DO NOT
replug it back into the
same outlet.
WARNING: After
unplugging the original
power source from the
wall outlet, DO NOT
replug it back into the
same outlet.
1 2 3 4
WARNING: After disconnecting
Plug Capture Device from the plug,
the metal leads on PCD will still be
electrified until HotPlug is turned off.

WiebeTech LLC
H o t P l u g U s e r ’ s M a n u a l - 7 -
Using Wire Capture Kit for Outlet Seizure Method
1. Plug the 3 prong outlet tester into the desired outlet. Check the indicator lights and make sure the lights that
are showing indicate that wiring was done correctly. If that is not the case, skip to step 5.
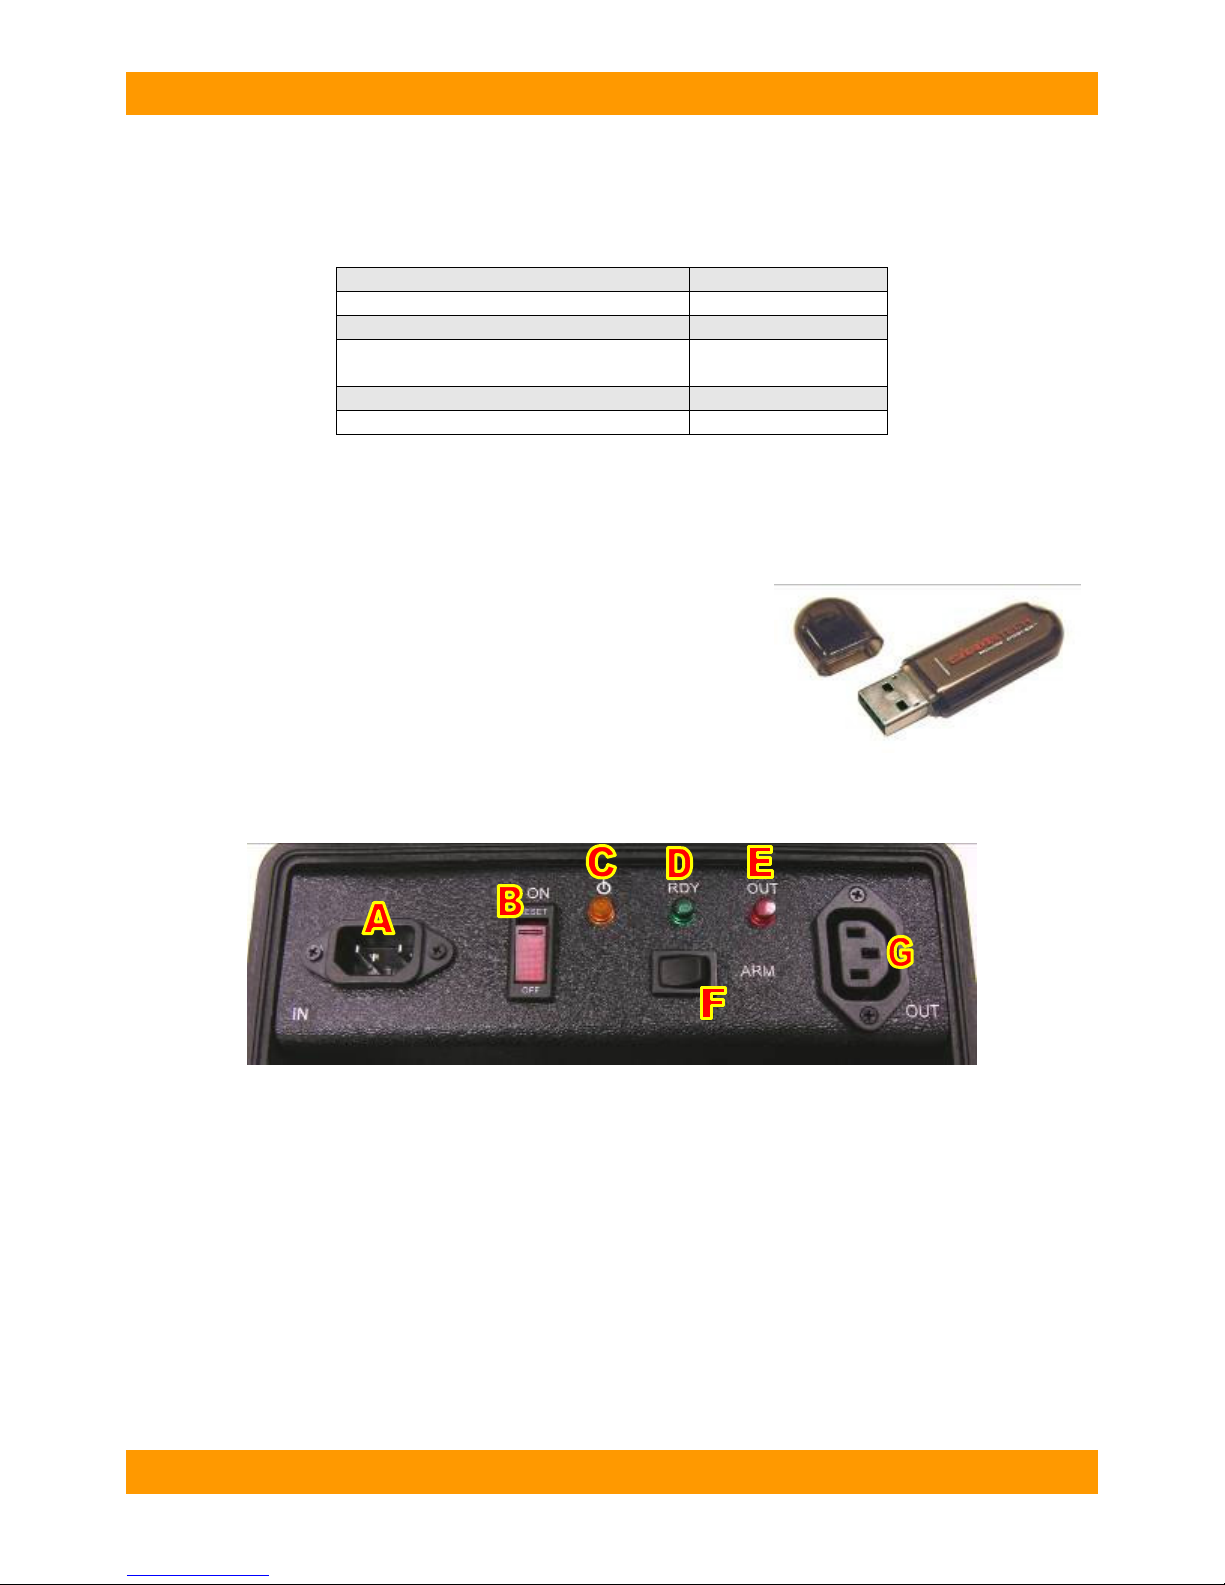
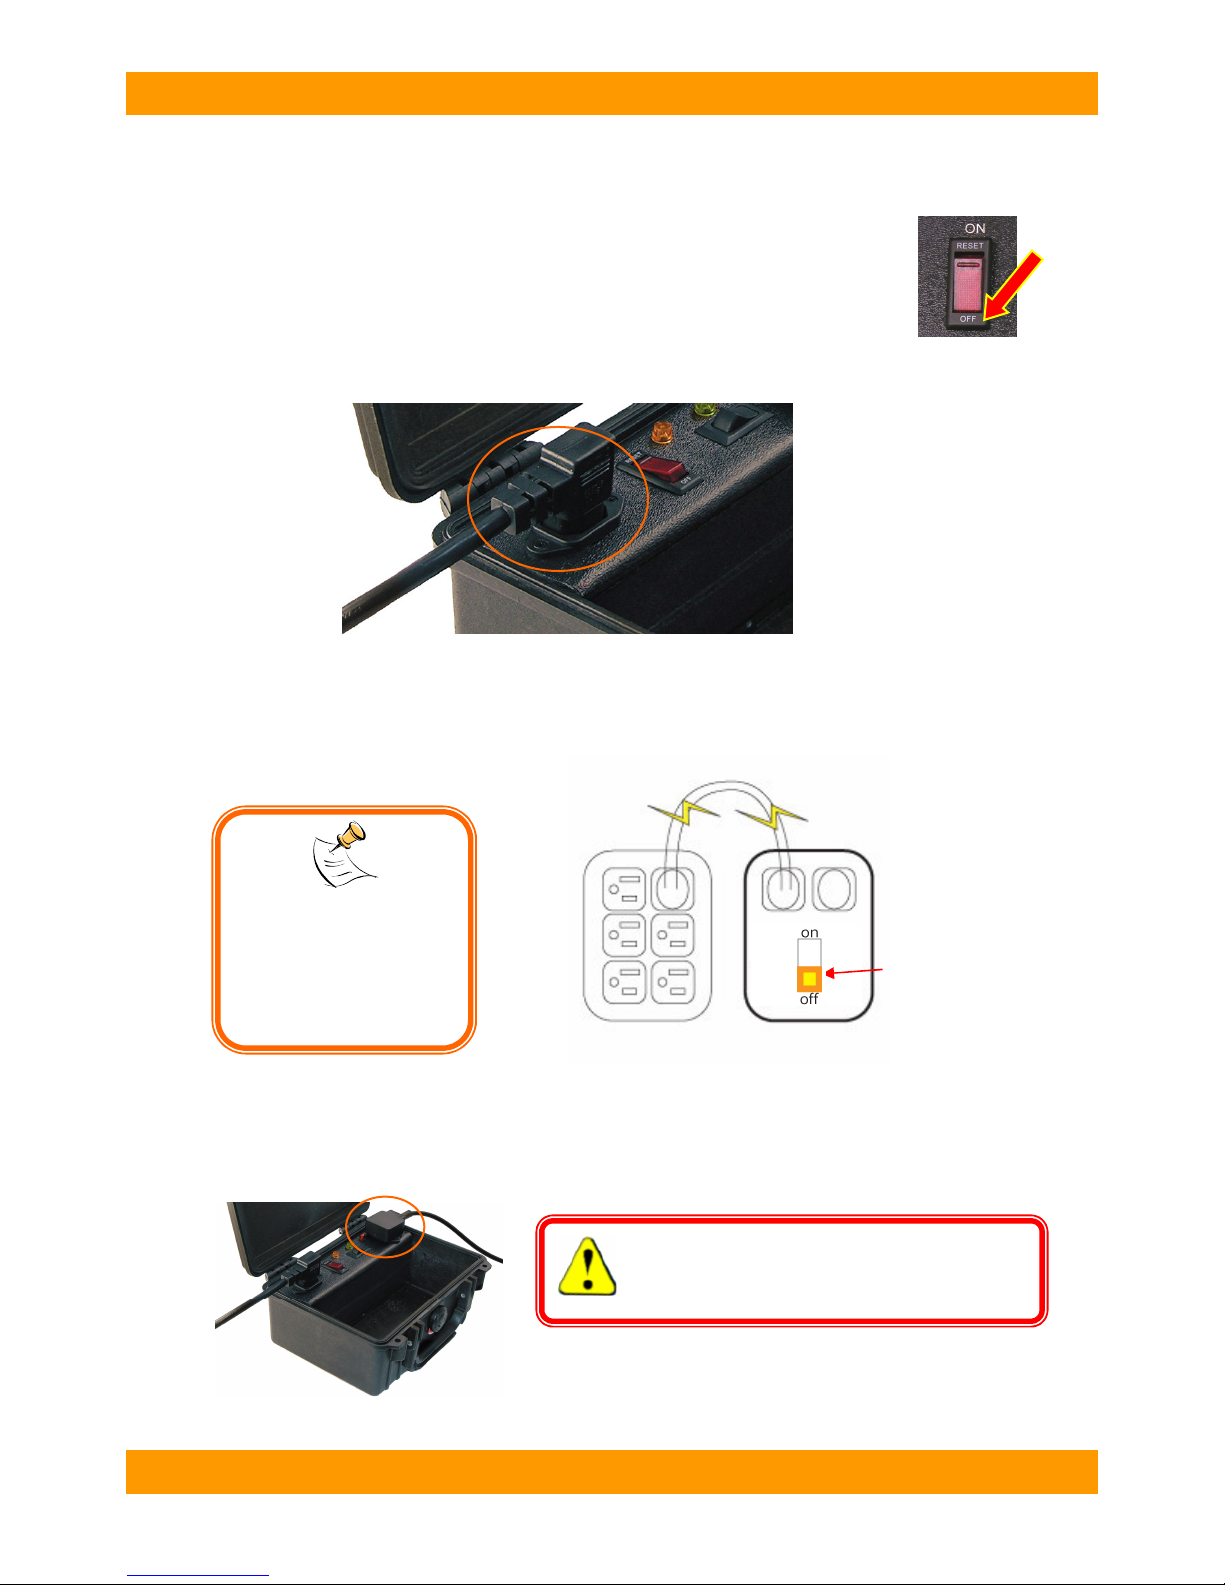
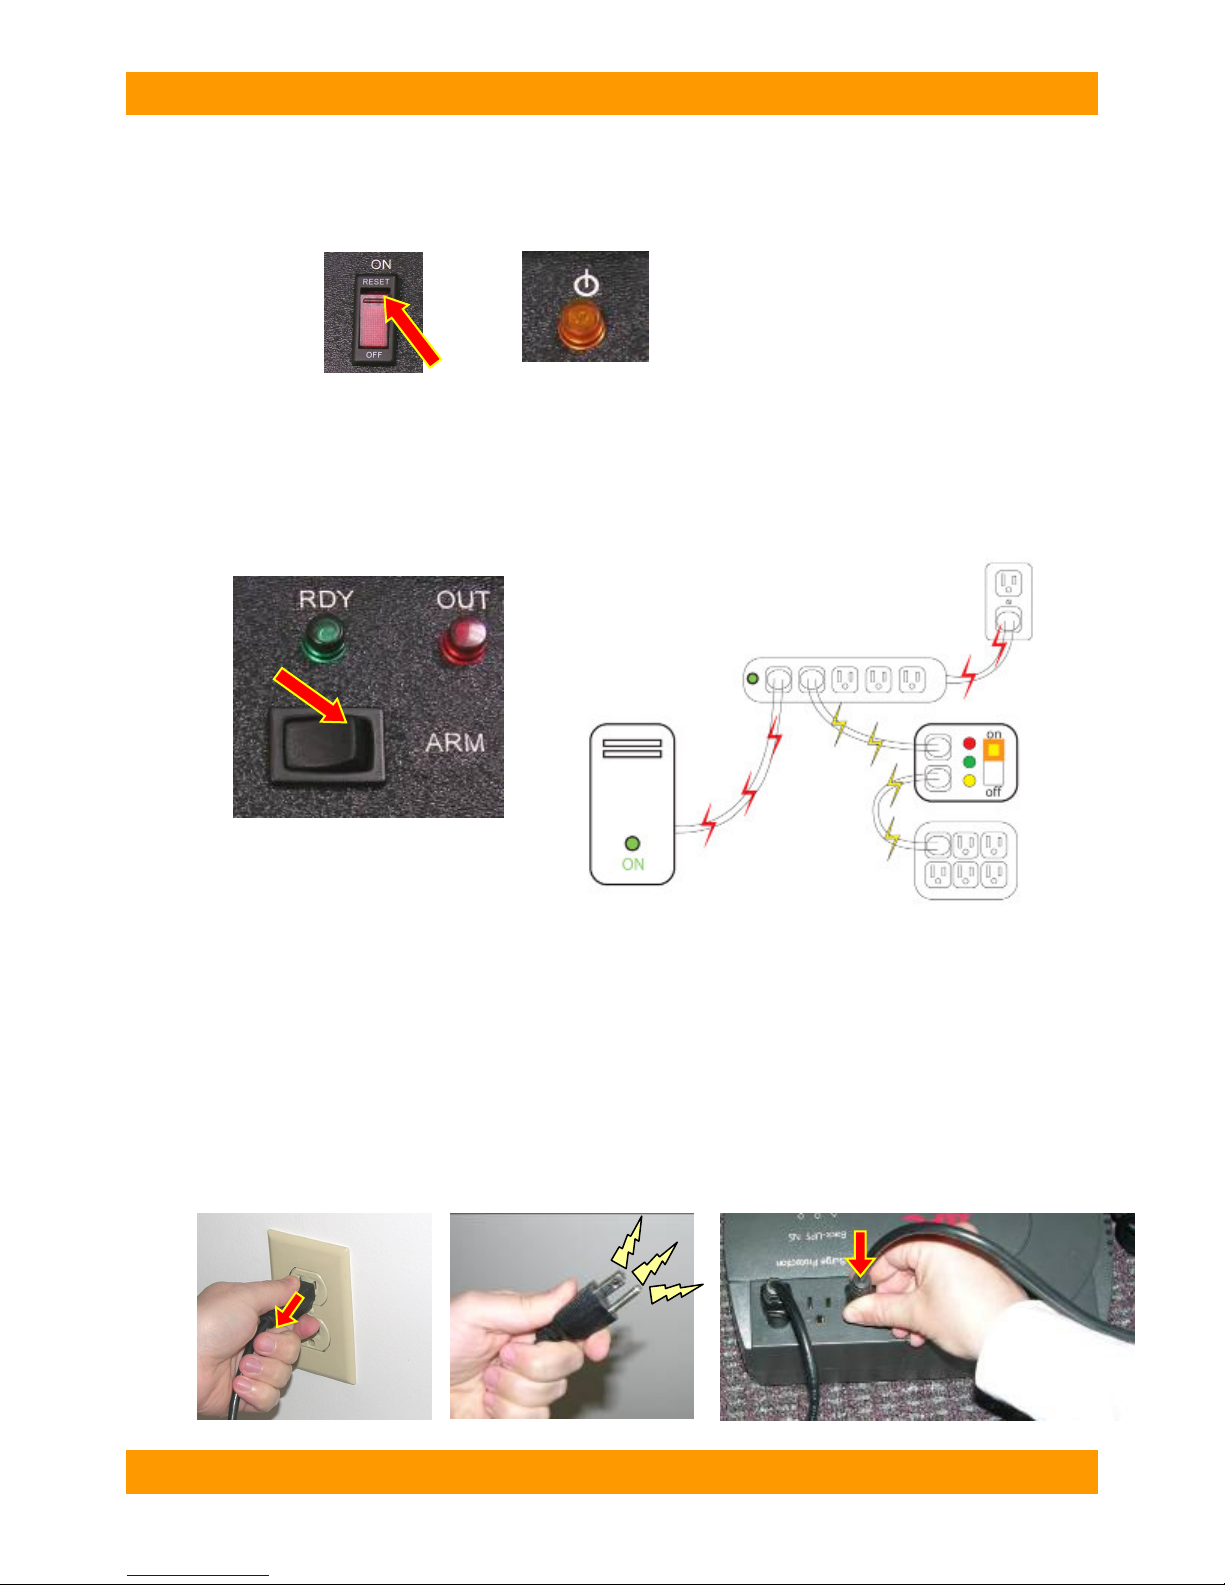
2. Plug HotPlug into a UPS and then into the outlet. Turn HotPlug on.
3. Disassemble the outlet by unscrewing the face plate. Slide the face plate out of the way and remove the
screws to pull out the outlet. If the outlet registered correctly with the 3 prong outlet tester, the red wire should be hot
(could be black), the white wire should be neutral, and the green wire should be ground.
4. Arm HotPlug. After HotPlug is armed, use insulated wire cutters to cut the ground wire first, and then the hot and
neutral wires. Use electrical tape to secure the ends of the cut wires. Install the outlet in the plastic outlet box
provided in kit. You are now free to take HotPlug and your UPS away from the capture site.
5. If the neutral and hot wires are inverted use the non polarized 3-prong to 2-prong adapter. If the outlet has
been wired completely wrong and you are not confident of the connections, STOP. Abandon the outlet capture and
proceed to the wire splitting method.
Using Wire Capture Kit for Wire Splitting Method
1. If the plug or outlet is inaccessible through conventional capture then you must slit the cable
with the cable sheath slitter.After you have carefully cut the sheath back enough to where the wires are
exposed, use the non-contact voltage tester to identify the hot wire. Pierce the neutral (typically white) wire with the
red piercer. Then pierce the hot (typically black) wire with the black piercer. Use electrical tape to secure the piercers
in place.
2. Turn on HotPlug and then arm it. Cut the hot wire between the outlet and the piercers. After that, cut the
neutral and ground wires in the same spot. We suggest using the electrical tape again to secure the ends of the cut
wires. You can now unplug the unit and take it and HotPlug away from the capture site.
Warnings & Dangers
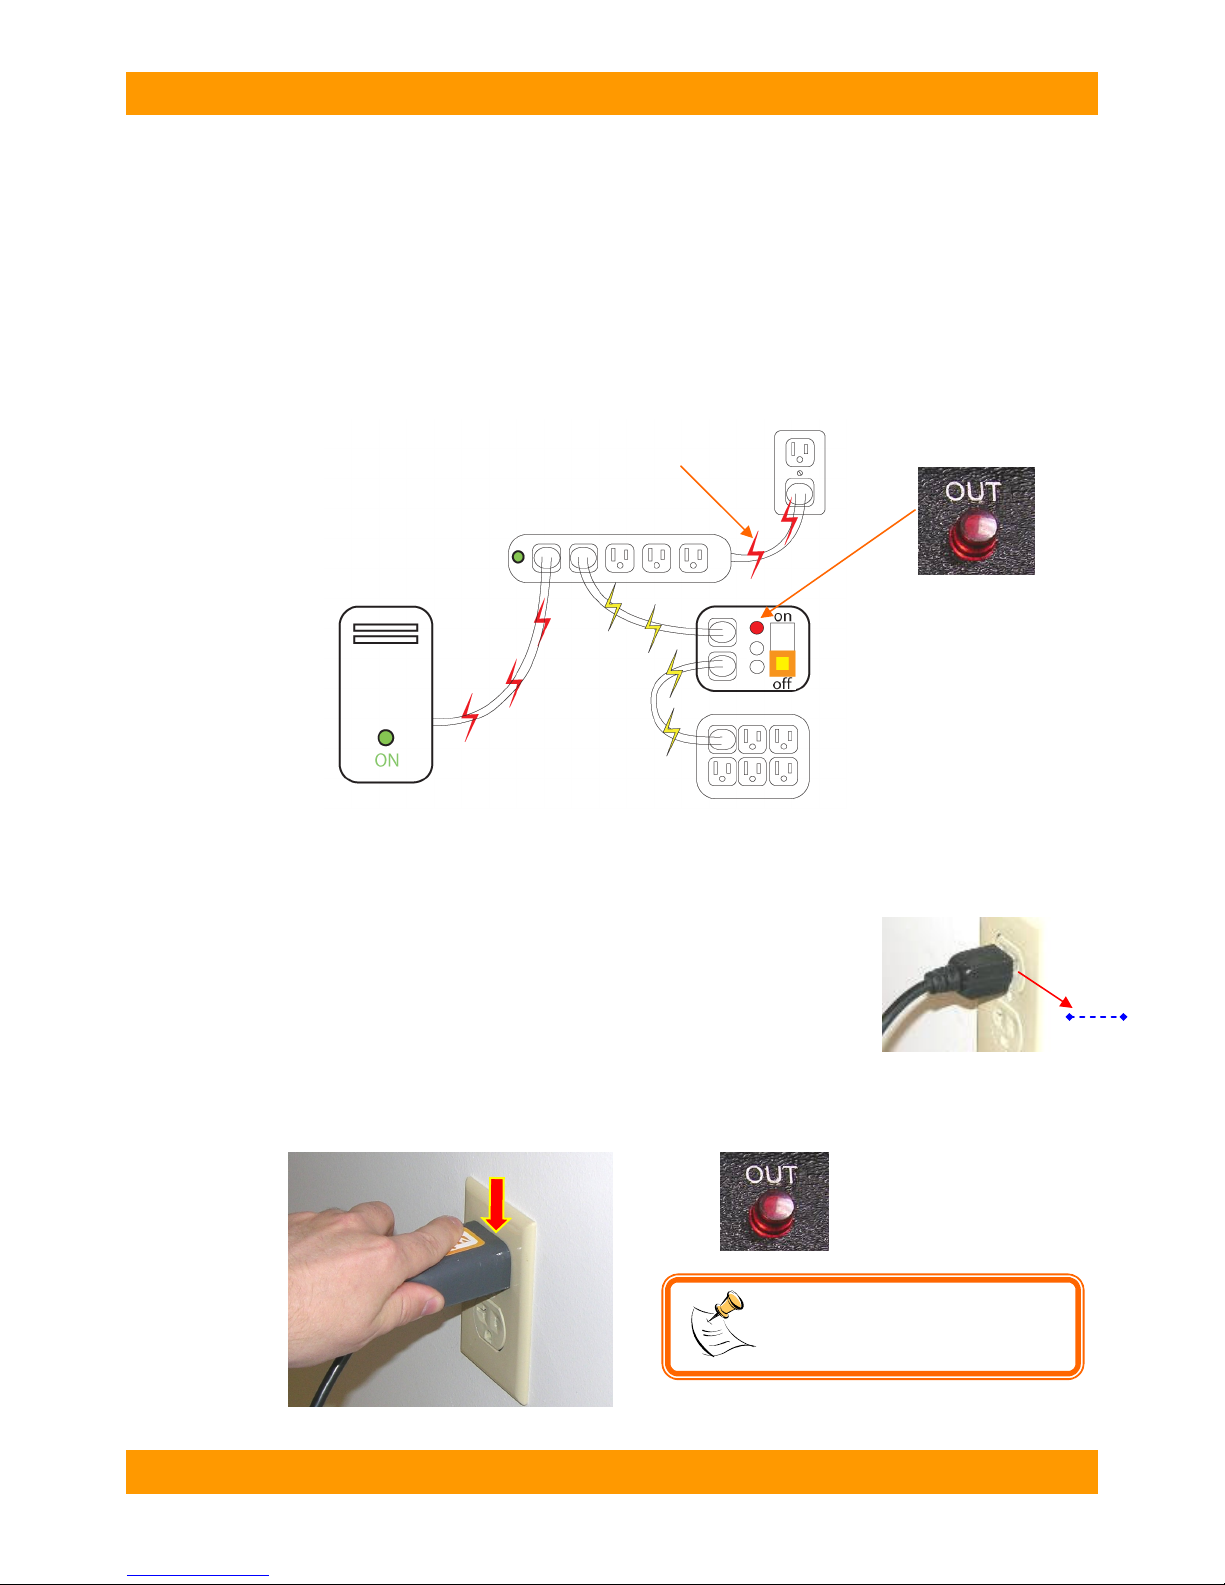
•Misuse of this product could result in lethal electric shock. Always assume that the plug on the output
line cord is electrified whenever either end is plugged in.
•Be careful not to touch yourself, other people, or any objects with the power plug while transferring it
from one power source to another.
•During the power transfer process, remove the power plug with one quick motion. Do not use slow or
stuttering motions when removing the power plug.
•After removing the power plug from the original power source, DO NOT REINSERT THE PLUG INTO
THE SAME OUTLET.
•Do not use HotPlug in a wet environment.
NOTE: These instructions for Wire Capture Kit do not
cover all instances one might encounter in the field. We
strongly recommend taking training from WiebeTech.

WiebeTech LLC
H o t P l u g U s e r ’ s M a n u a l - 8 -
Frequently Asked Questions (FAQs)
Q: How can I use HotPlug to seize a computer using an insulated European power plug?
A: You may need to dismantle the electrical outlet and establish electrical connection directly with the
outlet’s wires. This should not be attempted except by trained personnel. WiebeTech offers an accessory
kit containing several tools that may be useful for this purpose (p/n WC-KIT-1). See the HotPlug web
page for more details.
Q: Does WiebeTech offer training for this product?
A: HotPlug training seminars with an instructor from WiebeTech are available. Training is recommended -
while HotPlug is easy to use, there are bare terminals exposed during normal operation of HotPlug which
are potentially dangerous with misuse, or without proper care.
Technical Specifications:
Product Name
HotPlug LT
Product Codes
HP
-
LT1
(HotPlug LT with 1 Mouse Jiggler)
HP-LT5 (HotPlug LT with 5 Mouse Jigglers)
HP-LT1-UK (UK version of HotPlug – includes UK power cables)
HP-LT1-EURO (European version of HotPlug)
Case Construction
•Tough, high impact case material
•Watertight
•Lockable
Status Indicator
s
•Power on and armed indicators are discernible at a glance.
•Red indicator lights show which receptacles are powered
•Yellow indicator light shows the unit is turned on
•Green indicator light shows the unit is armed
Power Control
ON/OFF switch on front panel
Power
HP
-
LT1 or HP
-
LT5:
•120VAC, 60 Hz
•Usage – 3.5 VA
•Capacity - 5.0 Amps Max.
HP-LT1-UK or HP-LT1-EURO:
•240VAC, 50 Hz
•Usage – 3.5 VA
•Capacity - 5.0 Amps Max.
Operating Temperature
50 – 85°Fahrenheit (10 – 30°Celsius)
Operating Humidity
5% to 95%, noncondensing
Weight
Unit weight 3.5 lbs
Shipping weight 5 lbs.
Dimensions
9.12" x 7.56" x 4.37" 23.2 x 19.2 x 11.1 cm)
Warranty
1-year limited warranty. See warranty statement for details and limitations.
WiebeTech offers free phone support for 90 days after purchase (1-866-744-
HotPlug and Mouse Jiggler are trademarks of WiebeTech LLC. Other marks are the property of their respective
owners.
© 2008 WiebeTech LLC. All rights reserved.
If you have any questions or problems, please contact [email protected] for technical support. If you are
interested in purchasing more WiebeTech products, check our website or contact [email protected]. We
appreciate being able to serve you!
This manual suits for next models
1
Table of contents