WifiTrax Model Science WFD-60 User manual

WFD-60 Wi-Fi/DCC Interface Module Operating Manual
P a g e | 1 WifiTrax Model Science
www.wifitrax.com
WFD-60 Wi-Fi/DCC Interface Module
Operating Manual
This document is online at http://www.wifitrax.com/manuals/WFD-60/WFD-60-Manual.pdf.
Please see our website for information on our limited warranty.
WifiTrax Model Science
www.wifitrax.com
Version 1.0 November 30, 2020
© WifiTrax Model Science 2020 All Rights Reserved

WFD-60 Wi-Fi/DCC Interface Module Operating Manual
P a g e | 2 WifiTrax Model Science
www.wifitrax.com
This product is not a toy. Keep away from children. It is not suitable for use by persons under 14 years of age.
Warning: This product contains chemicals known to the state of California to cause cancer, birth defects or
other reproductive harm.

WFD-60 Wi-Fi/DCC Interface Module Operating Manual
P a g e | 3 WifiTrax Model Science
www.wifitrax.com
Version History
Version
Changes
1.0
First Release, Version 2 Firmware

WFD-60 Wi-Fi/DCC Interface Module Operating Manual
P a g e | 4 WifiTrax Model Science
www.wifitrax.com
Table of Contents
Version History........................................................................................................................................3
Table of Contents....................................................................................................................................4
Table of Figures.......................................................................................................................................7
Scope of this Document..........................................................................................................................9
What does WFD-60 DCC/Wi-Fi Gateway Do?.......................................................................................10
What is WiThrottle protocol?........................................................................................................12
What is JMRI?................................................................................................................................12
Let’s get Started!...................................................................................................................................13
A few Things to Know .......................................................................................................................13
Installing your new WFD-60 on Your Layout ....................................................................................13
Connecting your WFD-60 to your First Loco.....................................................................................14
Other Ways to Drive your Train.........................................................................................................19
Driving Trains with a Web Browser...................................................................................................19
Driving with TCS UWT-100 or UWT-50 .............................................................................................20
Connecting Your WFD-60 to Your Wifitrax Switch Machine Controllers..........................................25
Operating and Configuring Switch Machine Controllers ..................................................................30
Using the WFD-60 Web Pages ..............................................................................................................32
Accessing the WFD-60 Setup Web Pages .........................................................................................32
Limitations of the Built-in Web Browser included in the WiThrottle and Engine Driver apps.....32
Accessing WFD-60 Web Pages using Engine Driver..........................................................................32
Accessing WFD-60 Web Pages using WiThrottle..............................................................................32
Setup Advanced Features using a Web Browser...............................................................................33
General Settings Web Page...............................................................................................................35
IP Address......................................................................................................................................35
Region Code..................................................................................................................................35
Serial Number ...............................................................................................................................35
Firmware Version..........................................................................................................................35
Module Name ...............................................................................................................................36
Wi-Fi Channel................................................................................................................................36
Net Number ..................................................................................................................................36
First Scan Address.........................................................................................................................36
Last Scan Address..........................................................................................................................36
WiThrottle Gateway Enabled........................................................................................................37
Rail Mesh Scanning Enabled .........................................................................................................37

WFD-60 Wi-Fi/DCC Interface Module Operating Manual
P a g e | 5 WifiTrax Model Science
www.wifitrax.com
Treat All as Online.........................................................................................................................37
LEDs Disabled................................................................................................................................37
Stop Time ......................................................................................................................................37
Home Net Web Page.........................................................................................................................37
FindModules App..........................................................................................................................41
Changing IP Addresses due to Router Restart ..............................................................................42
Locomotive Roster............................................................................................................................42
How Locomotives are Added to the Roster by Scanning..............................................................43
Adding a New Locomotive Manually ............................................................................................44
Function Labelling Web Page........................................................................................................45
Deleting and Moving Locos Up or Down ......................................................................................46
Clearing the Entire Locomotive Roster .........................................................................................47
Downloading Locomotives to a File..............................................................................................47
Accessing the Roster Download File on Windows 10...................................................................48
Accessing the Roster Download File on Apple IOS .......................................................................50
Accessing the Roster Download File on Android..........................................................................50
Uploading a Previously Downloaded Locos File............................................................................51
Uploading a Locomotive from a JMRI Export ...............................................................................52
Driving a Loco from the Roster Page ............................................................................................54
Accessing Locomotive Module Web Pages from the WFD-60......................................................55
Accessories........................................................................................................................................56
How Accessories are Added to the List by Scanning.....................................................................57
Adding a New Accessory Manually...............................................................................................57
Deleting and Moving Accessories Up or Down.............................................................................59
Clearing the Entire Accessory List.................................................................................................60
Accessory Initialization..................................................................................................................60
Operating Accessories from the Accessories List Page.................................................................60
Downloading Accessories to a File................................................................................................60
Accessing the Accessory Download File on Windows 10..............................................................62
Accessing the Accessory Download File on Apple IOS..................................................................63
Accessing the Accessory Download File on Android.....................................................................64
Uploading a Previously Downloaded Accessories File..................................................................64
Factory Reset ....................................................................................................................................65
Using the WFD-60 DCC Input................................................................................................................66
Tips to Manage your Home Network....................................................................................................68
Connection to your Home Router.....................................................................................................68

WFD-60 Wi-Fi/DCC Interface Module Operating Manual
P a g e | 6 WifiTrax Model Science
www.wifitrax.com
Why does my module fail to connect to the router? .......................................................................68
Home Net IP Address Assignment ....................................................................................................68
Finding the IP Address Assigned to your WFD-60 Module...............................................................69
Reserving a Fixed IP Address.............................................................................................................71
More Information..................................................................................................................................72
FCC Information....................................................................................................................................73
EU Declaration of Conformity................................................................................................................73

WFD-60 Wi-Fi/DCC Interface Module Operating Manual
P a g e | 7 WifiTrax Model Science
www.wifitrax.com
Table of Figures
Figure 1 WFD-60 in Operation ..............................................................................................................10
Figure 2 Connections and switches on the WFD-60.............................................................................11
Figure 3 Mounting the WFD-60 on a Baseboard ..................................................................................13
Figure 4 Direct Operation of a Locomotive Fitted with a Wi-Fi Interface Module such as WDMI-32 or
WDMI-27...............................................................................................................................................14
Figure 5 Configuration with one Locomotive and a WFD-60 both on the Home Network..................15
Figure 6 Main Menu of WDMI-32 Module shown in a Browser...........................................................15
Figure 7 The Settings page of the WDMI-32. Make sure the two checkboxes circled are clear, then
Save.......................................................................................................................................................16
Figure 8 Locomotive Page in the WDMI-32..........................................................................................16
Figure 9 The Home Net page of the WDMI-32. Enter the Correct SSID of your Router and its
Password...............................................................................................................................................16
Figure 10 The Main Menu of the WFD-60 ............................................................................................17
Figure 11 The Settings Page for the WFD-60. Make sure both the Circled Checkboxes are Checked .17
Figure 12 The Home Net page of the WFD-60. Enter the Correct SSID of your Router and its
Password...............................................................................................................................................18
Figure 13 The Main Menu of the WFD-60 once it is Connected to a Home Net. The IP Address is
Assigned by Your Router and is Circled in Red. ....................................................................................18
Figure 14 The Scanned Locomotive Roster of the WFD-60, Showing Your First Locomotive ..............19
Figure 15 The WDMI-32 Drive Page Opened from the WFD-60...........................................................20
Figure 16 Selecting the Network Options menu on the UWT-100.......................................................21
Figure 17 Select the Add Network option.............................................................................................21
Figure 18 Select Scan for Wi-Fi .............................................................................................................22
Figure 19 Select the Home Wi-Fi Network............................................................................................22
Figure 20 The WFD-60 WiThrottle server has been found. Now save it!.............................................23
Figure 21 Select a Locomotive from the Roster –in this case the only one.........................................24
Figure 22 Direct Operation of a WFS-87 Switch Machine Controller. Two Switch Machines are Shown
Connected, 8 Channels are Available for Coil or Stall Motor Switch Machines. ..................................25
Figure 23 Configuration with one Switch Machine Controller and a WFD-60 both on the Home
Network ................................................................................................................................................25
Figure 24 Main Menu of WFS-87 Module shown in a Browser............................................................26
Figure 25 The Home Net page of the WFS-87. Enter the Correct SSID of your Router and its Password
..............................................................................................................................................................26
Figure 26 The Main Menu of the WFD-60 ............................................................................................28
Figure 27 The Settings Page for the WFD-60. Make sure both the Circled Checkboxes are Checked .29
Figure 28 The Home Net page of the WFD-60. Enter the Correct SSID of your Router and its
Password...............................................................................................................................................29
Figure 29 The Main Menu of the WFD-60 once it is Connected to a Home Net. The IP Address is
Assigned by Your Router and is Circled in Red. ....................................................................................30
Figure 30 The Scanned Accessory List of the WFD-60, Showing the Switch Machine Channels..........30
Figure 31 The WFD-60 Web Setup Main Menu....................................................................................34
Figure 32 The WFD-60 General Settings Web Page..............................................................................35
Figure 33 The Home Net Web Page......................................................................................................38
Figure 34 The FindModules Screen.......................................................................................................41
Figure 35 The FindModules tool shows that the correct subnet has been found................................42
Figure 36 The FindModules tool shows that the WFD-60 Module has been found.............................42

WFD-60 Wi-Fi/DCC Interface Module Operating Manual
P a g e | 8 WifiTrax Model Science
www.wifitrax.com
Figure 37 The Locomotive Roster Page.................................................................................................42
Figure 38 The Scanning Status Shown on the Locomotive Roster Page...............................................44
Figure 39 The Locomotive Roster Page after the New Loco Button is Clicked.....................................44
Figure 40 The Loco Edit Page. Setting the Properties of a New Locomotive to Useful Values. ...........45
Figure 41 The function labels displayed for a given locomotive...........................................................46
Figure 42 Editing a function key for a given locomotive.......................................................................46
Figure 43 Deleting a loco from the roster.............................................................................................47
Figure 44 The Roster Download Page...................................................................................................48
Figure 45 A Download in Progress........................................................................................................48
Figure 46 Download Complete on Windows using Edge Browser........................................................49
Figure 47 The Downloaded Roster File in Windows Explorer...............................................................49
Figure 48 A loco entry in a JSON Roster File.........................................................................................50
Figure 49 Opening a Previously Saved Locomotives File......................................................................51
Figure 50 The Chosen File to be Uploaded is Displayed.......................................................................51
Figure 51 A Locomotive File in XML Exported from JMRI.....................................................................52
Figure 52 Uploading a Locomotive Roster Entry from a JMRI Export File............................................53
Figure 53 Choosing a JMRI Locomotive Export File ..............................................................................53
Figure 54 Click the Upload Button, once the file is Selected................................................................53
Figure 55 A new JMRI Loco has been Uploaded...................................................................................54
Figure 56 The Drive Page for Web Browser Driving .............................................................................55
Figure 57 The Accessory List Page ........................................................................................................56
Figure 58 The Scanning Status Shown on the Accessories List Page....................................................57
Figure 59 The Accessories List Page after the New Accessory Button is Clicked..................................58
Figure 60 The Accessory Edit Page. Setting the Properties of a New Accessory to Useful Values.......58
Figure 61 Deleting an accessory from the list.......................................................................................59
Figure 62 The Accessories Download Page...........................................................................................61
Figure 63 Accessory Download in Progress ..........................................................................................62
Figure 64 Accessory Download Complete on Windows using Edge Browser.......................................62
Figure 65 The Downloaded Roster File in Windows Explorer...............................................................63
Figure 66 Accessory Entry in a JSON Accessory List File.......................................................................63
Figure 67 Opening a Previously Saved Accessories File........................................................................64
Figure 68 The Chosen File to be Uploaded is Displayed.......................................................................64
Figure 69 Factory reset confirmation page...........................................................................................65
Figure 70 DCC Command Station/Booster Connected to a WFD-60. NCE Power Pro is used only as an
Example.................................................................................................................................................66
Figure 71 Using ipconfig to find your computer's IP Address and Default Gateway............................69
Figure 72 Access your router by using the IP Address of your default gateway in a browser .............69
Figure 73 A typical router admin page..................................................................................................70
Figure 74 Typical "Attached Devices" page of a router ........................................................................70
Figure 75 Use the IP Address to open the main menu web page.........................................................71
Figure 76 An IP Address reservation table in a router..........................................................................71
Figure 77 Adding an address reservation .............................................................................................72
Figure 78 Identifying Illustration for WifiTrax Model WFD-60 EU Declaration of Conformity.............74

WFD-60 Wi-Fi/DCC Interface Module Operating Manual
P a g e | 9 WifiTrax Model Science
www.wifitrax.com
Scope of this Document
This document describes detailed use of the WFD-60 Wi-Fi/DCC Interface Module. For a simple
starting guide, please see the leaflet at http://www.wifitrax.com/appNotes/quickStart/WFD-60-
Quick-Start.pdf.
This manual applies to firmware version 2, i.e., version numbers 2.X.X. Some features described may
not be present in early versions.
WFD-60 Wi-Fi/DCC Interface Module Operating Manual
P a g e | 10 WifiTrax Model Science
www.wifitrax.com
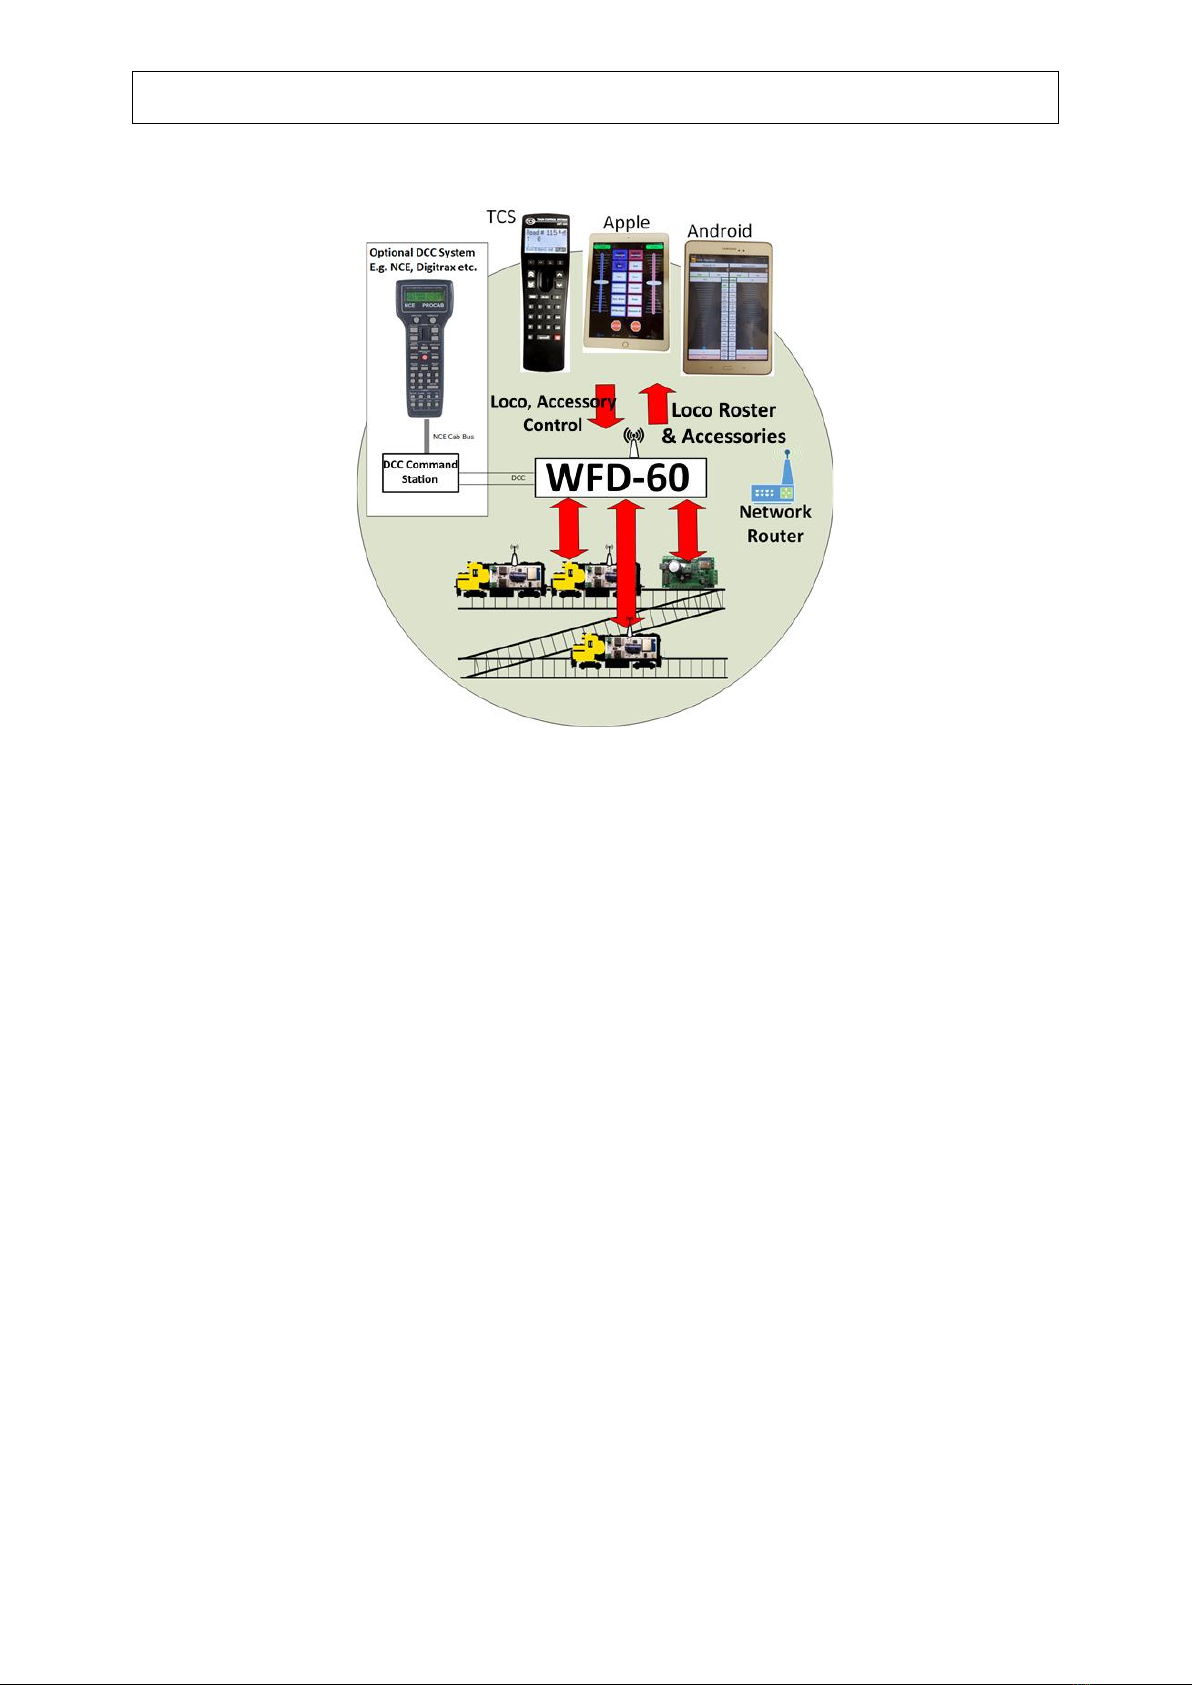
What does WFD-60 DCC/Wi-Fi Gateway Do?
Figure 1 WFD-60 in Operation
The WFD-60 DCC/Wi-Fi Gateway provides three capabilities:
(1) Control of Locos and Points fitted with Wifitrax modules via a WiThrottle interface using
apps such as Android Engine Driver and Apple IOS WiThrottle or the TCS UWT-100 or UWT-
50.
(2) Control Locos and Points fitted with Wifitrax modules via the WFD-60 in-build web pages
using a browser such as Edge on Windows, Safari on Apple IOS or Chrome on Android.
(3) Control Locos and Points fitted with Wifitrax modules from any DCC system using the DCC
input to the WFD-60.
The WFD-60 may be mounted on your layout to act as a WiThrottle Server. A WiThrottle Server
allows you to connect using a phone or tablet with a suitable app using WiThrottle protocol such as
Apple IOS WiThrottle and Android Engine Driver or the TCS UWT-100, and control trains on your
layout that are fitted with WifiTrax Wi-Fi DCC interface modules such as WDMI-27, WDMI-32,
WDMI-37 for locos and WFS-47 or WFS-87 for points.
WFD-60 provides a set of Web Pages that are internally generated that allow you to control points or
other accessories as well as drive trains using the Web Pages of the modules in the locos. You do not
need to be connected to the internet.
WFD-60 also provides a DCC input to which a DCC command station may be connected.
WFD-60 is thus a WiThrottle and DCC gateway.
•WFD-60 must connect to your home network and will scan to discover WifiTrax Modules e.g.,
WDMI-27, WDMI-32, WFS-47 etc. These will be added to its internal roster of locomotives and
accessories (points). You can also add these manually and save them to your computer or tablet
to be reloaded later.

WFD-60 Wi-Fi/DCC Interface Module Operating Manual
P a g e | 11 WifiTrax Model Science
www.wifitrax.com
•WFD-60 delivers this as a Loco Roster and Accessory List to connected WiThrottle devices –
Android Engine Driver, Apple WiThrottle, TCS UWT-100. Select from these rosters to drive your
train or operate your points.
Firmware
Update
Interface
Track
DCC/Power Alternative
Power
Power
DCC Active
Home Net
Connected
Factory Reset
Power Source
Switch
Figure 2 Connections and switches on the WFD-60
Figure 2 shows the WFD-60 module with its connectors labelled. There is a pair of screw connectors
at the bottom left of the module, marked DCC Input. These can be optionally used to provide Bipolar
DCC input to the module. DCC Commands appearing on this input will control locomotives and
points that are included in the roster of the WFD-60. This input can optionally also be used as power
for the module. The polarity does not matter.
The socket marked Alternative Power may be used to supply power to the module whether or not
the DCC input is connected. Of course, if you do not use DCC input, power must be supplied at this
connector.
The Power Source switch is used to select either the DCC input or Alternative Power input as the
source of the module’s power. This must be set correctly or the module will not work.
The 6-Pin connector at the top right is used for firmware update via a Wifitrax FWA-20 module and
the Wifitrax Workshop software for Windows.
The Factory Reset button will reset the module to its factory default settings when pressed and held
for 8-10 seconds. The green LED will flash rapidly when reset has been started. All loco and
accessory roster entries will be lost as well as any home net settings.
The LEDs on the right are:
(1) Red LED - Power: Lights whenever power is applied to the module.
WFD-60 Wi-Fi/DCC Interface Module Operating Manual
P a g e | 12 WifiTrax Model Science
www.wifitrax.com
(2) Green LED –Network: Flashes when the module receives Wi-Fi Network Traffic. Lights
continuously when the module is connected to a home network router and flashes briefly
off when module receives traffic.
(3) Blue LED –DCC: Lights continuously when a valid DCC input is present at the module.
The WFD-60 uses the same protocol as JMRI but you don’t need to install JMRI on any computer to
use the WFD-60.
What is WiThrottle protocol?
WiThrottle protocol is a set of commands and data formats, authored by B. Hoffman and used by JMRI, that
allows devices such as iPhone, Android phones and tablets to control trains and turnouts through a WiThrottle
server. It has become something of a de-facto standard and is used by other products. You can find technical
information here:
https://www.jmri.org/help/en/package/jmri/jmrit/withrottle/Protocol.shtml
What is JMRI?
JMRI (Java Model Railroad Interface) is a system of computer programs and support software that can be
installed on a computer to do many things with your model railroad including running trains, controlling
turnouts and programming DCC decoders. JMRI provides a WiThrottle server to allow you to run trains from
phones etc. You can learn about JMRI here:
https://www.jmri.org/
WFD-60 Wi-Fi/DCC Interface Module Operating Manual
P a g e | 13 WifiTrax Model Science
www.wifitrax.com
Let’s get Started!
A few Things to Know
Here are a few technical sounding terms that we’re going to use repeatedly in this manual. They
might sound clever but they are really very simple so let’s bite the bullet and get used to them right
away!
IP Address. This stands for Internet Protocol Address. We all use the internet and this is crucial. All it
means, is the address given to any computer or other device on the internet. It’s got four numbers,
each 0 to 255. For example, 10.0.0.27, 192.168.15.5 and 59.48.123.5 are all IP Addresses. You’ll see
192.168.(something).(something) a lot because it’s defined as a private part of the internet, and the
local network in your house is private.
Subnet. The internet has lots of networks all connected together by gateways. A subnet is a local
group of computers or devices. A subnet almost always has the first three digits of an IP Address
followed by a zero. So, 192.168.15.0 is a Subnet and 192.168.15.4 or 192.168.15.17 are IP Addresses
in that subnet. It’s like a street in your neighbourhood where each house has a number.
Router. A router is a box of electronics that joins two or more subnets and routes messages from
one to the other. It’s like the Post Office. It also allocates IP Addresses to computers and devices on
the subnet it manages.
Wi-Fi Access Point. This is an electronic device that allows a device to access a subnet using Wi-Fi.
Wi-Fi is a special form of Radio. Usually, a Router has a Wi-Fi Access Point. All Wifitrax modules also
have their own Access Point. An Access Point is identified by an SSID and often requires a password.
Sometimes routers have more than one SSID. Wifitrax products can only use the 2.4GHz access
point on a router and NOT the 5GHz or Guest Network access points.
SSID. It stands for “Service Set Identifier” but it’s just the name of a Wi-Fi Access Point.
That’s it, now let’s really get started!
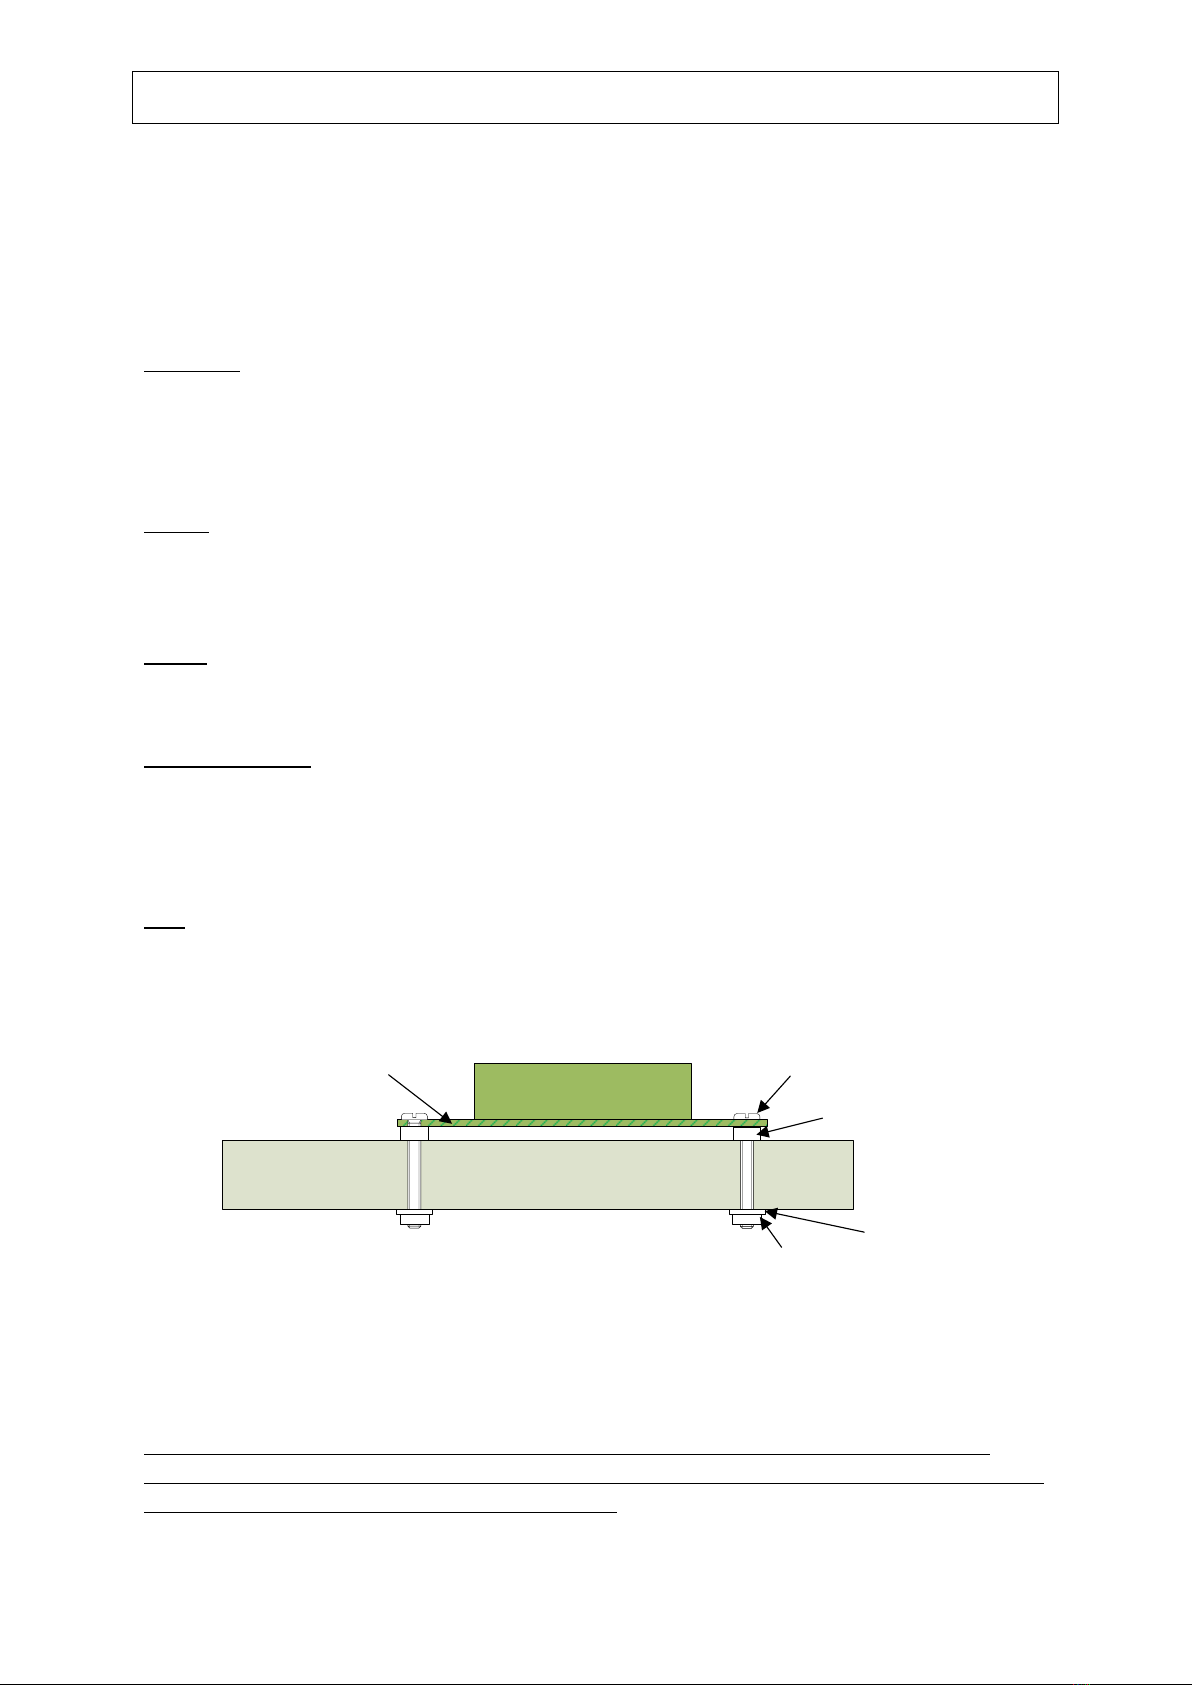
Installing your new WFD-60 on Your Layout
Board
Components On WFD-60
WFD-60 PCB M3 Screw
Plastic Spacer
M3 Nut M3 Washer
Figure 3 Mounting the WFD-60 on a Baseboard
Mount the WFD-60 module on a convenient board on your layout using the mounting kit provided.
You may also mount it inside a suitable plastic box. Do not use a metal box as this will affect the Wi-
Fi signal.
It is most important that the module never comes into contact with any metal objects or any
power such as your track! The electronics uses 3.3 Volts provided by an on-board voltage stabilizer
and contact with any higher voltages will destroy it.

WFD-60 Wi-Fi/DCC Interface Module Operating Manual
P a g e | 14 WifiTrax Model Science
www.wifitrax.com
You must use the WFD-60 with a Wi-Fi Router, so it is a good idea to place it near to the router if
possible. The locomotives and points fitted with Wifitrax modules should also be as near as possible
to your router. It may be best to get a simple router and place it in your railroad room if your house
is large. The router does not need to be connected to the internet, though if it is, your phones and
computers can access the internet while also running trains.
Connecting your WFD-60 to your First Loco
Locomotive
Computer or tablet
Locomotive Access Point
E.g. wftrx_WDMI32_1_XXXXXXXX_7 WDMI-32 Wi-Fi
Range
Figure 4 Direct Operation of a Locomotive Fitted with a Wi-Fi Interface Module such as WDMI-32 or WDMI-27
Let’s assume that you already have a locomotive with a Wifitrax Wi-Fi Interface Module such as
WDMI-32, WDMI-27 or WDMI-37 already installed and working, in Direct mode. If not, please
consult the Getting Started Leaflet or manual for those modules. Figure 4 shows a computer, tablet
or phone connected directly to the Wi-Fi Access Point of a loco fitted with a WDMI-32. The module’s
access point will be called wftrx_WDMI32_1_XXXXXXXX_7 where XXXXXXXX is the module’s serial
number. In this situation, you could be driving your locomotive using the Web Drive Page of the
WDMI-32 using any browser, or you could be driving the locomotive using an app such as Engine
Driver on Android or WiThrottle on Apple IOS, or indeed you could be using a TCS UWT-100.
Now that you’ve obtained a WFD-60, you want to connect your Engine Driver or WiThrottle apps as
well as your UWT-100 to the WFD-60’s WiThrottle Server and control your existing loco and any
more locos that you might add (as well as any points) through that module. So, here’s the
procedure. We’ll use the WDMI-32 as an example, but it could be a WDMI-27 or WDMI-37.

WFD-60 Wi-Fi/DCC Interface Module Operating Manual
P a g e | 15 WifiTrax Model Science
www.wifitrax.com
Locomotive
Network
Router
Computer
or tablet
WFD-60
Module
Network Router
Wi-Fi Range
Figure 5 Configuration with one Locomotive and a WFD-60 both on the Home Network
The aim is to have a system as shown in Figure 5 where both the WDMI-32 in the locomotive and the
WFD-60 are connected to the Wi-Fi network of the Network Router. The phone, tablets and
computers are also connected to the Network Router. The WFD-60 will scan the network to discover
the locomotive and send commands to control it when that loco is driven through the WFD-60.
So, here is the setup procedure:
(1) The first thing you have to do is make the WDMI-32 in the loco connect to your router. So,
using a computer, tablet or phone connect to its access point
wftrx_WDMI32_1_XXXXXXXX_7. You don’t need a password of course.
(2) Now open a browser such as Chrome, Edge or Safari and enter 192.168.7.1 into the URL text
box and hit enter. This will display the main menu of the WDMI-32 module as Figure 6.
Figure 6 Main Menu of WDMI-32 Module shown in a Browser
(3) Tap or click “Settings”and find the checkbox labelled “WiThrottle Gateway Enabled”. Tap
this checkbox to clear it. Also clear the checkbox labelled “Rail Mesh Scanning Enabled” as in
Figure 7. Now tap the Save button. Once you have done this, you will no longer be able to
use WiThrottle protocol apps to connect directly to the module. However, you can always
connect with a browser.

WFD-60 Wi-Fi/DCC Interface Module Operating Manual
P a g e | 16 WifiTrax Model Science
www.wifitrax.com
Figure 7 The Settings page of the WDMI-32. Make sure the two checkboxes circled are clear, then Save
Notice that the convention adopted here is that the module is named according to the road
number of the loco #115. The DCC address of the loco is also set to 115 on the Locomotive
page in Figure 8.
Figure 8 Locomotive Page in the WDMI-32
(4) Now hit the Back hyperlink to go back to the Main Menu, then hit Home Net to display the
Home Net page. Then enter the SSID of your router and the Password as in Figure 7. You
must not connect to the 5GHz Wi-Fi Access Point since the modules do not support that.
Also make sure you don’t add any spaces at the end of your password and that the case of
all the characters is correct. When you are sure everything is correct, tap the Install button.
Figure 9 The Home Net page of the WDMI-32. Enter the Correct SSID of your Router and its Password

WFD-60 Wi-Fi/DCC Interface Module Operating Manual
P a g e | 17 WifiTrax Model Science
www.wifitrax.com
Your WDMI-32 module will now connect to your home net router. The green LED should
come on continuously.
(5) Now you are ready to start working on your WFD-60. On your computer, tablet or phone
connect to its Wi-Fi Access Point, wftrx_WFD60_1_XXXXXXXX_7, where XXXXXXXX is its
serial number.
(6) Open a browser and type 192.168.7.1 into the URL textbox, then hit enter. This should
display the main menu as in Figure 10.
Figure 10 The Main Menu of the WFD-60
(7) After leaving the factory or after a factory reset, the settings are configured to make it easy
for you but it’s not a bad idea to check so tap “Settings” and verify that the appear as in
Figure 11.
Figure 11 The Settings Page for the WFD-60. Make sure both the Circled Checkboxes are Checked
(8) Notice that both “WiThrottle Gateway Enabled” and “Rail Mesh Scanning Enabled” are both
checked, and make sure you leave it that way. The WFD-60 will act as your WiThrottle Server
so all the phones using Engine Driver or WiThrottle (or any TCS UWT-100) will find and

WFD-60 Wi-Fi/DCC Interface Module Operating Manual
P a g e | 18 WifiTrax Model Science
www.wifitrax.com
connect to that server. The WFD-60 will also scan your home network to find all locos and
accessories. This we call the Rail Mesh.
(9) Hit the Back hyperlink to return to the Main Menu then click Home Net. Type the SSID of
your home net router and its password, in Figure 12, exactly as you did for the WDMI-32 in
your loco. Then tap Install. The WFD-60 should reset and connect to your home-net router.
The green LED should light continuously.
Figure 12 The Home Net page of the WFD-60. Enter the Correct SSID of your Router and its Password.
(10)Now take your phone or tablet and use the Android or Apple Settings to connect to your
home net.
(11)Start Engine Driver or the full version of WiThrottle and make sure that it finds the
WiThrottle Server of the WFD-60 and connect to it.
(12)Go to the Web Pages so that you see the Main Menu. An example is shown in Figure 13.
Make a note of the IP Address circled in Figure 13. This is assigned by your router. In this
example the subnet is 192.168.3.0 and the IP Address 192.168.3.20 is the first one found
available by the router. Yours might be different like 192.168.15.5 of even something like
10.0.0.9.
Figure 13 The Main Menu of the WFD-60 once it is Connected to a Home Net. The IP Address is Assigned by Your Router and
is Circled in Red.
(13) Now tap Remote Locomotives. You see the WFD-60 Locomotive Roster as in Figure 14. This
shows that the loco fitted with the WDMI-32 has been scanned and recorded in the roster.

WFD-60 Wi-Fi/DCC Interface Module Operating Manual
P a g e | 19 WifiTrax Model Science
www.wifitrax.com
Figure 14 The Scanned Locomotive Roster of the WFD-60, Showing Your First Locomotive
(14)You can now leave the Web Pages and go back to the Throttle page on Engine Driver or
WiThrottle, select the loco from the Roster and drive it. Check that all functions work and
the loco can be driven forward and backwards.
Other Ways to Drive your Train
You can drive trains using any of the Apps in Table 1. WiThrottle and Engine Driver are apps that use
the WiThrottle protocol and provide driving of trains, and control of accessories. The WFD-60 does
not currently support routes, layout power or JMRI style panels.
App Name
Author
Get From:
Operating System
Notes
Advanced
Features
WiThrottle
Beth
Hoffman
Apple App Store
Apple IOS, iPhone,
iPad, Mac?
Via Web Pages
WiThrottle
Lite
Beth
Hoffman
Apple App Store
Apple IOS, iPhone,
iPad, Mac?
No Accessories,
No web page
Via Web Pages
using Safari
Engine
Driver
Steve
Todd
Google Play
Store
Android. Phones,
Tablets
Via Web Pages
UWT-100 or
50
Train
Control
Systems
(TCS)
Buy from TCS
and dealers
None, Special
Purpose Handheld
Throttle Device
Can’t access web
pages. Use
browser on
another device.
Browser
e.g., Edge,
Chrome,
Safari
Microsoft,
Google,
Apple
Download free
or included with
device.
Windows, Apple IOS,
Android
Hyperlink in
WFD-60 Loco
Roster opens
Web Drive page
in Wifitrax Loco
Controller
Use to access all
web pages. Use
IP address for
WFD-60, and
hyperlinks to
Loco Controller
Web Pages
Table 1 Recommended Apps that work with the WFD-60
Driving Trains with a Web Browser
You can also drive trains using a web browser such as Edge, Safari or Chrome by displaying in the
browser the Locomotive Roster, Figure 14, and tapping the Drive hyperlink. This will open a new tab

WFD-60 Wi-Fi/DCC Interface Module Operating Manual
P a g e | 20 WifiTrax Model Science
www.wifitrax.com
in the browser displaying the Drive Web Page of the locomotive module –in this case the WDMI-32
–shown in Figure 15.
Figure 15 The WDMI-32 Drive Page Opened from the WFD-60
You can also configure the locomotive module using its web pages starting at its Main Menu
accessible via the IP Address hyperlink for the loco in the Remote Module column in Figure 14.
Driving with TCS UWT-100 or UWT-50
To use the UWT-100, you need to connect it to the WFD-60 WiThrottle Server in a similar way to any
of the apps in Table 1.
(1) Press the menu button (3 horizontal lines), then the Network option (6) as in Figure 16.
Other manuals for WFD-60
2
Table of contents
Other WifiTrax Model Science Recording Equipment manuals


