Wiggo WO-E505R User manual

Freestanding Oven |
Stove Manual
Instructions
Safety manual
Installation manual
2 YEARS
GUARANTEE
User Manual
Models
WO-E505R
WO-E603R
wiggo.eu
Fast Delivery
InstallationFast Repair
Maintenance
OUR SERVICES

Dear Customer,
We would like to thank you for purchasing WIGGO product. We hope you get the best
results from your product, which is manufactured with the latest high quality
technology.
Read this manual carefully before using the product. Follow all warnings and
information in this manual.
Please remember that this manual may also apply to other models.
The following symbols are used in this user manual.
Important information or useful
instructions about using this
device
Warning of life-threatening
situations and damage
properties
Warning of fire hazard
Warning for entire surfaces
Warning of electric shock
Explanation of symbols:
NB! Please read the user manual first!

1) Your Product
General overview
Technical specifications
Accessories
2) General safety instructions
General safety
Child safety
Electrical safety
Intended use
3) Installation
For Installation Installation & connection
Electric-Gas connection
Leakage control
Disposal of the product - destruction of the packaging
Future transportation
Disposal of the old product
Preliminary preparation
Energy saving tips
First use – First cleaning – First heating
4) Using the oven
General information about baking, roasting and grilling
Using the electric oven
Using a gas hob
Using a gas oven
How to operate the grill
Description of roasting chicken
Operating modes
Use of furnace timer
Cooking times table
Grilling cooking times table
5) use of the electric oven
6) Maintenance and care
General information
Cleaning the control panel
THE oven Cleaning
Replacing the oven lamp
7) Troubleshooting
Contents
Voltage/frequency
220-240 V 50-60 Hz
Total power consumption
Min. 0.006 KW – Max 5.6 kW
Fuse
Min. 16 A
Kabel type/section
3 X 0.75 PVC – 3 X 1 PVC – 3 X 1.5 PVC – 3 X2.5
PVC H05VV-F.....
Cable length
Max 1.5 m
Outer dimensions (h/w/d)
(60 x 60) 890x600x600mm (57x57)
890x570x570mm (50x60) 880x500x585mm
(50x55) (50x50)
Oven
Static furnace (optional)
Energy efficiency class
A
Internal lighting
25 X
Grill power consumption
2000 X
Usable volume of the furnace
50x50x l
50x60 l
60x60 l
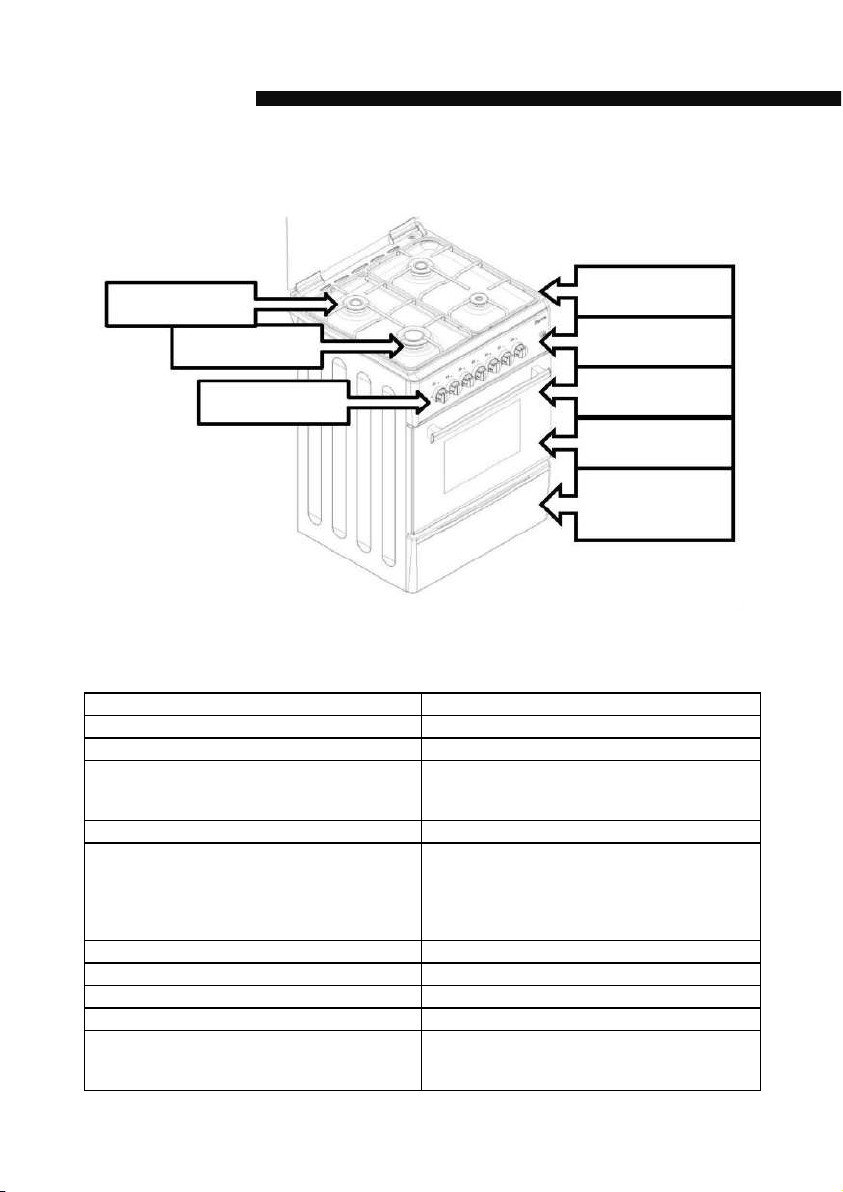
Tray
Normal burner
Sterkbrander
Function button
Bed. panel
Handle
Oven door
Lower part
Your Product1 |
Technical specifications

Basic information: Information about the energy label of electric ovens is given in accordance with the EN 50304
standard. The values are determined under standard power with bottom - top heater or hot air heating functions
(if relevant)
The technical specifications are subject to change without notice.
The images in this manual are schematic and may not correspond exactly to your product.
Values stated on the product labels or in the accompanying documentation are obtained under laboratory
conditions in accordance with the relevant standards. These values may vary depending on the operating
and environmental conditions of the product
The accessories supplied may vary depending on the product model. It is possible that your product does
not contain all accessories described in the manual.
ACCESSORIES
Wire grid
OPTION Chicken
roasting stand
Oven tray is used for pastries, frozen
foods and large roasts
OPTION Trivet grate
(grate in tray)
Wire rack: Used when roasting and placing foods to be
baked, roasted or boiled in stews on the desired rack.

General safety instructions2 |
This appliance is not intended for use by persons (including children) with reduced physical, sensory or mental
capabilities, or lack of experience and knowledge, unless they are supervised. Do not allow children to play with
the appliance.
Always connect the device to an earthed socket/mains protected by a fuse suitable for the values in the
"Technical specifications" table. In the event that the product is used before it has been properly grounded in
accordance with local regulations, the manufacturer will not be held liable for any resulting damage.
Installation and repairs must be carried out by an authorized service agent. The manufacturer is not liable for
damage resulting from work by unauthorized persons.
Do not use the device if it is defective or shows visible damage.
Do not repair or modify the device yourself. See the suggested solutions for the problems on pages 37-38.
Never clean the device by spraying or pouring water on the product! Risk of electric shock!
Do not use the product if your judgment is impaired by taking drugs and/or alcohol.
Disconnect the product from electricity during installation, maintenance, cleaning and repair.
Always call the authorized Service Center for installation and repairs. The manufacturer will not be held liable
for any damage that may occur as a result of repairs by unauthorized persons and this may void the warranty.
Be careful about using alcohol in your food. Alcohol evaporates at high temperatures and when it comes into
contact with hot surfaces it can pose a fire hazard.
Do not heat closed tin cans and glass jars in the oven. The pressure that develops in the can/jar may cause it to
burst.
No flammable materials near the appliance as the sides become hot during use.
Do not place baking trays, dishes or aluminum foil directly on the bottom of the oven. Heat accumulation can
damage the bottom of the oven.
Keep all ventilation slots free of obstacles.
The appliance and accessible parts become hot during operation. Make sure not to touch heating elements.
Always use heat-resistant oven gloves when placing or removing dishes from the oven.
Never use the oven if the door glass is broken or removed.
The back of the oven becomes hot when it is in use. Make sure that the gas/electric connection does not touch
the back; this could damage the connection.
Make sure that the power cord is not trapped between the oven and the frame and do not route it over hot
surfaces. Otherwise, the cable insulation may melt and cause a fire due to a short circuit.
Check that the product's function buttons are disabled after each use. Product and accessible parts of the
product is hot during operation.
Do not lower the lid until the hotplates or burners have cooled down.
Do not use sharp and piercing materials to clean inside and glass of the product; such materials may give
damage to your product.
As hot oil may cause fire risk, always be alert when the product operations.
In case of any possible fire, do not attempt to extinguish the fire with water; immediately cut off the power
connection of the product and cover the burning part by help of a wet blanket.
Never make available any flammable or consumable materials in the product.
Do not use steam cleaners to clean the device.
Do not use abrasive abrasives or sharp metal scrapers to clean the oven door glass.
CAUTION: Make sure the appliance is turned off before replacing the lamp to avoid the possibility of electric
shock.
Do not store items (nylon, heat-sensitive materials, etc.) on the hobs.
Always place the pans on the cooking zones centered.
Important Instructions Safety Warnings
General Safety
This section contains safety instructions to help prevent personal injury or property damage. Failure to follow
these tips and advice will void all warranty.

Child safety
Safety related Electrical Operations
Intended use
Accessible parts may become hot during use. Keep young children away.
Please note: During grill operation, accessible parts may be hot. Keep small neighborhood children.
It is risky for the children under 8 years old without supervision from elders.
The device can be used from 8 years and persons with physical, sensory weakness or mental condition, or with
a lack of experience and knowledge if supervised.
Do not allow children to play with the device.
The packaging materials may be dangerous for children. Keep the packaging materials out of the reach of
children. Dispose of all parts of the packaging material in accordance with environmental standards.
Do not place heavy objects on an open door or allow children to sit on it. The oven may tip over or door hinges
may be damaged.
All operations of the electrical equipment and systems must be carried out by the authorized and
competent persons.
This product is not for use with a remote control system.
In case of malfunction, switch off the product and disconnect the device from the electricity supply.
Make sure the current fuse matches that of the product.
This product is intended for domestic use. It is not allowed for commercial use.
“PLEASE NOTE: This product should only be used for cooking.
This product should not be used for room heating or any other purpose.
This product should not be used for heating plates under the grill, drying towel or clothes on the handle or for
general heating product.
The manufacturer is not liable for damage caused by incorrect use or operation.
The oven can be used for defrosting, baking, roasting and grilling food.

Installation
Before Installation
3 |
Make sure that the electrical and/or gas installation is correct. If this is not the case, call a certified
electrician and installer for the required operations.
Site preparation and electrical and gas installation for the product are the responsibility of the customer.
The product must be connected in accordance with local gas and electrical regulations.
Before installing the product, check whether it has any visible defects. If so, do not install it. Damaged
products pose a risk to your safety.
Product must be installed by a competent person.
To ensure that all air openings under the appliance remain unobstructed, this appliance must be placed on
a hard surface so that the feet do not sink into carpet or soft floor coverings.
The air for combustion is taken from the room air and the exhaust gases are excluded directly into the
room.
Good room ventilation is essential for the safe operation of the appliance. If no window or door is available
for room ventilation, additional ventilation must be installed.
The surface area of the kitchen is greater than 8 m2. The volume of the kitchen is greater than 20 m3.
The height of the kitchen is at least 1.80 m from the floor and the ventilation size is 150 mm.
Provide a minimum distance of 750 mm above the cooking surface.

Installation and connection
Foot assembly
Electrical connection
Do not carry or move the product using the door and/or handle.
The manufacturer is not liable for damage resulting from use of the product without an earthing
installation in accordance with local regulations.
Connect the product to a grounded output/line!
When the product is first installed, the feet must be mounted on the product. The feet of the product is in a bag in
the oven. Place the feet of your product and adjust the distance to the countertop.
In the case of gas versions, if the feet are not mounted, the oven does not get sufficient amount of oxygen,
resulting in combustion problem.
Carry the product with at least two people.
NO

E=GREEN and Yellow / N = BLUE / L= BROWN
Electric shock, short circuit and fire hazard may arise due to installation by unprofessional people! Mains
connection of the product can only be done by authorized and qualified persons and the warranty of the
product starts when it is properly installed.
Electric shock, short circuit and fire hazard may arise due to a defective power cord! The power cord must
not be clamped, folded or pinched or come into contact with hot parts of the product. A damaged power
cable must be replaced by a qualified electrician.
Gas hose must not be clamped, bent, compressed or come into contact with hot parts of the product.
Take great care to ensure that the gas hose and gas relief valve you connect to your oven are safe. Fix the gas
delivery hose to the hose nozzle on the back of the oven and tighten it by a blade clamp and screwdriver (Figure 6).
Make sure it is properly tightened. Length of the oven gas hose should not exceed 1500m. Pressure relief valve to
be used for LPG must be 300mmSS and certified.
Electrical connection is schematically indicated on the back of the product. The product's connection
cable must comply with the technical specifications.
Disconnect the product from the mains before starting any work on the installation.
There is a risk of electric shock.
Gas coupling
LPG coupling
Product may only be connected to the gas supply system by an authorized and qualified person.
Check gas installation for safe installation and tightness.
figure 6

figure 7
NG (natural gas) connection
Final check
Disposal of old product
Destruction packing material
Moving instructions
Disposal of the old product
Natural gas connection of your product is ½". If you wish to convert your equipment from natural gas to LPG,
request assistance from the nearest service point.
1- Connect the cable, check that the house fuse is on.
2- Check electrical functions
Turn on the tap and use very foamy soapy water to check for gas leaks on the connection you have made. Never
control the paintwork with a flame.
The packaging materials may be dangerous for children. Keep the packaging materials
out of the reach of children. Dispose of all parts of the packaging material in accordance with environmental
standards.
Keep the original packaging of the product and move the product in the original one packaging. Follow the
instructions on the box. If the original box is not available, wrap it with blister packing material or thick
cardboard and tape it securely.
To prevent damage to the inside of the rack and the container in the oven the oven door, place a strip on the
inside of the oven door so that it lines up with these drawers.
Tape the caps and tray securely in place.
Do not use the door handle when transporting the oven.
Dispose of the old product so that it does not harm the environment. This product has a symbol
(WEEE), which indicates that electrical and electronic equipment must be collected separately. In
other words, it means that in order to recycle this equipment it must comply with the European
Directive 2002/96/EC. For more information, please contact the relevant local and regional
authorities.
Electronic products that are not subject to a controlled waste collection process pose potential
risks both to the environment and human health as they contain harmful substances.
You can refer to your dealer or waste collection of your municipality for disposal of the product.
Always cut the plug and break the door lock, if applicable, so that children are not exposed to
danger
Leakage control
Never check the paintwork with an open flame.
Do not place objects on the product. The product must be moved upright.
Checking the overall view of the product for any damage that may occur during transportation.
Preparation for first use
Using the oven
First use
4 |
What should be done to save energy The following information will help you use the product ecologically for energy
saving:
• When cooking the food, preheat the oven if it is to be done according to the recipe or table in the instruction
manual.
• Do not leave the oven door open often when cooking.
• Try to put more than one food in the oven at the same time. You can do that by putting two cooking pots on the
rack.
• Cook more than once in a row. This way the oven will not lose its heat.
• Switch off the oven a few minutes before the cooking time expires.
In that case, do not open the oven door.
• Defrost frozen products before cooking
First cleaning
Some detergents and cleaning agents can damage the surface.
1. Remove all packaging materials.
2. Wipe the surface of the product with a damp cloth or sponge and rub it dry with a cloth.
First heating
Preheat the oven for about 30 minutes and then turn it off. So no waste may still be left in the oven. The oven is
cleaned during the first heating.
Hot surfaces can cause burns! Do not touch hot surfaces of the device. Keep children away from the product and
use oven gloves! ome detergents or cleaning agents may give damage to the surface.
Electrical oven
Remove all oven dishes and rack from the oven.
Close the oven door.1.
Select the static position.2.
Select the highest temperature; see Using the electric oven.3.
Operate for about 30 minutes.4.
Switch off the oven; see Using the electric oven.5.
Odor and smoke may occur during first heating step.6.
Ensure good ventilation7.
General information about cooking, roasting, grilling in the oven
Danger of burns from hot steam. Be careful when opening the oven door as you may be exposed to hot steam.
Tips for cooking in the oven
Use appropriate metal plates with non-stick coating or aluminum trays or heat-resistant silicone molds.
Use the space on the shelf in an optimal way.
Place the cooking tin in the center of the shelf.
Select the correct shelf position prior to operating the oven or grill. Do not move the baking tray position when
the oven is hot.
Keep the oven door firmly closed.
Tips for roasting
When cooking whole chicken, turkey and much of the meat, cooking performance will be improved if you
marinate them through the use of lemon juice and black pepper.
Frying the bone-in-meat would take 15-30 minutes longer than the boneless ones.
Calculate the cooking time as approximately 4-5 minutes per centimeter of the thickness of the meat.
After the cooking time has elapsed, keep the meat in the oven for 10 minutes.
Meat juice is better distributed over the roast and when the meat is cut.
Fish should be placed on the medium or lower shelf on a fireproof plate
Risk of fire if it is not suitable for grilling. Only use food that is suitable for grilling. Do not place too much
food at the back of the grill. This is the hottest part of the oven.

Temperature button1.
function button2.
Timer3.
Light and chicken roasting4.
Electric spark ignition 6 Spark ignition on 7 Electric heating5.
Burner left rear6.
Gas burner left front 7.
Use of electric oven
Adjustable temperature and working method

Pipe versions:
Electric temperature button 1.
Electric function button 2.
Timer button 3.
Light and kitchen roasting switch4.
Lighter button 5.
Electric heater button 6.
Gas stove button 7.
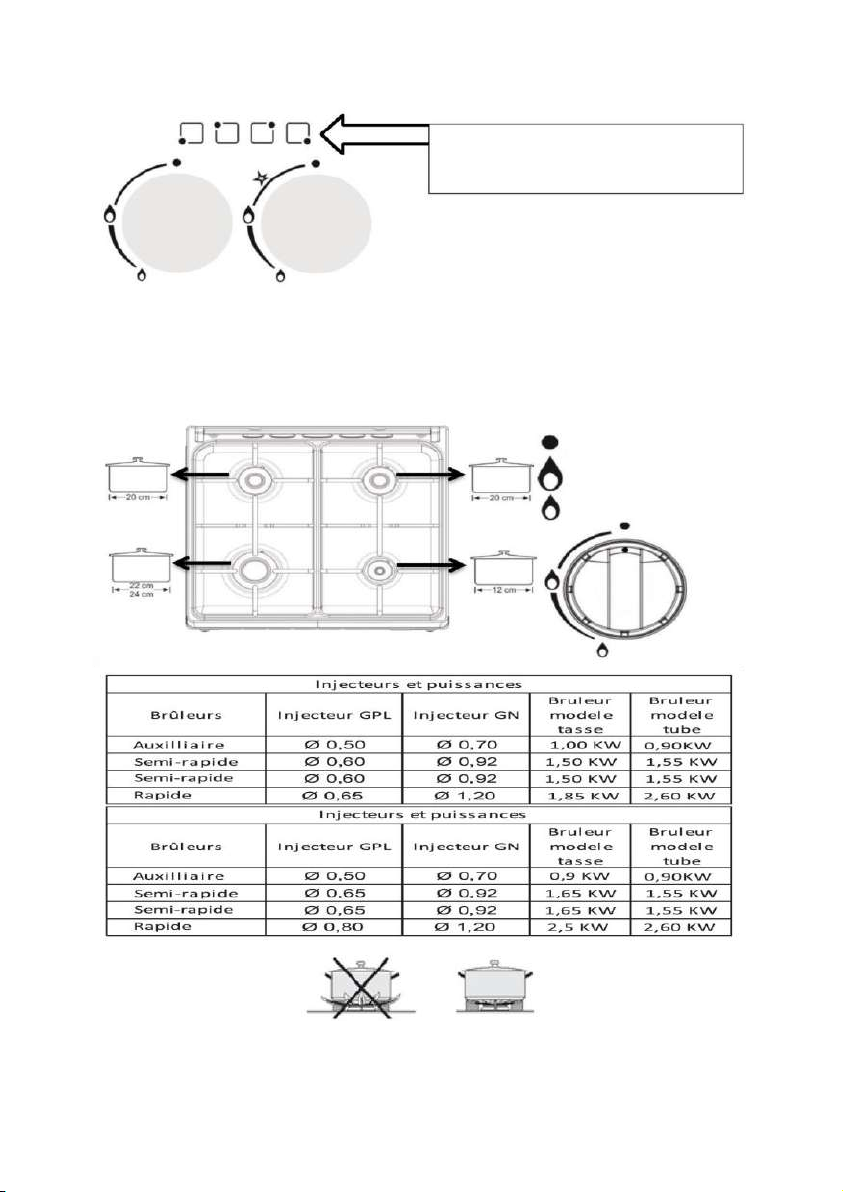
Using the gas stove:
Package size and dimensions of the gas flame must match. Adjust the gas flame so that it does not protrude from
the holder base. Place the pan on the pot carrier with centering.
Press the button and turn counterclockwise to high heat and/or temperature position on the
panel.
1.
Ignite the lighter according to the version of your oven.2.
Set to desired flame position.3.
After cooking, turn the knob to the right to turn off the top point of the oven. 4.
Gas supply end .
High flame. Low
flame.
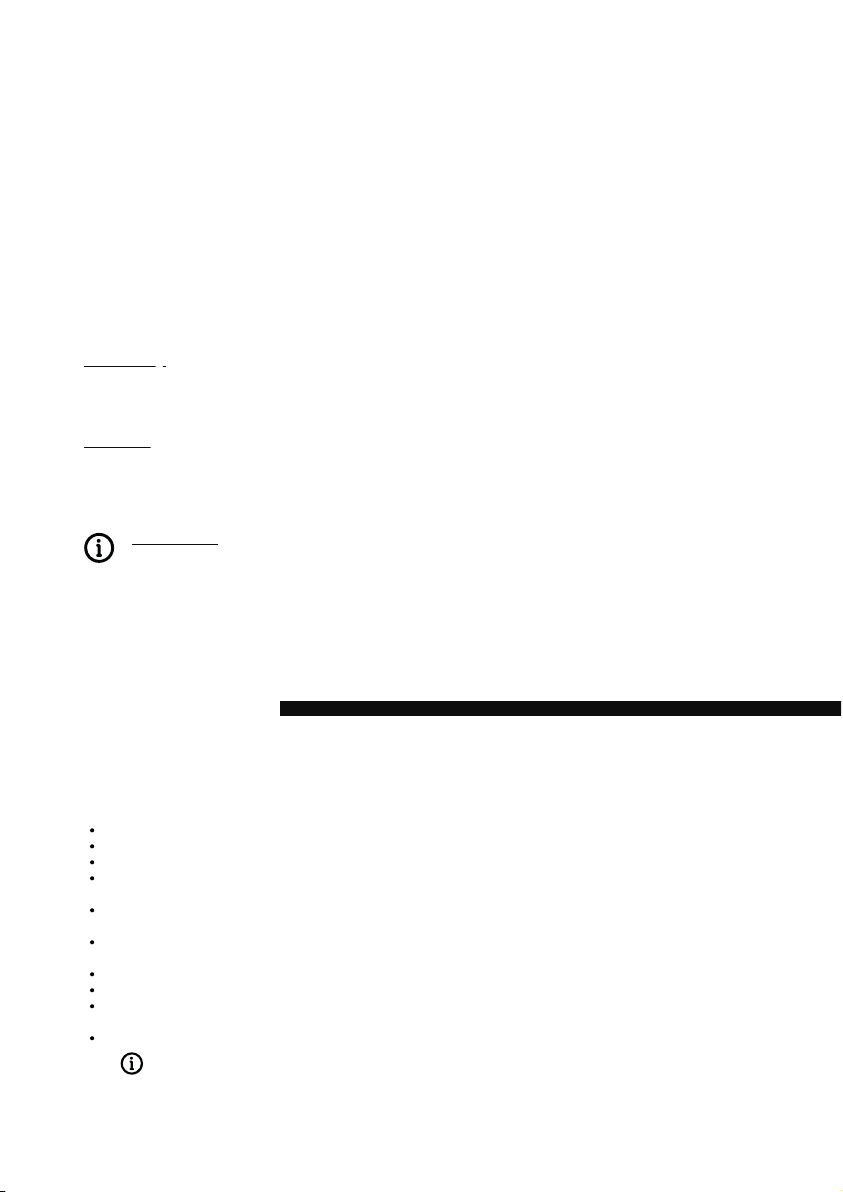
Switch symbols on the control panel

Gas safety mounting (for versions with heating element)
Using the Gas Oven
S The symbols on the control panel indicate the position of the knob.
In the case of thermal element of upper
burners, safety mechanism is activated
and cuts the gas immediately against
shutdown due to liquid overflow.
Figure 8 Figure 9 Figure 10 Figure 11
Press the knob and turn counterclockwise to high heat and/or temperature position on the panel.1.
If, as shown in Figure 11, the oven plug controls the top heater burner, press the knob and turn clockwise to the
grill/flame sign.
2.
Light the lighter according to the version of your oven. 3.
Press the Gas button and turn counterclockwise to high heat position.1.
Ignite the lighter according to the version of your range.2.
After ignition, push and hold the button for 3-5 seconds to activate the safety mechanism.3.
If no ignition occurs after pressing and releasing the switch, repeat the same action by pressing and holding the
switch for 15 seconds.
4.
Set to desired flame position.5.
After cooking is complete, move the oven switch to the right to turn off the top tip of the burner. 6.
Manual ignition hole
Furnace injector and power table
Fuel
LPG Injector
NG Injector
Upper burner
Ø 0.70
Ø 0.92
Lower burner
Ø 0.75
Ø 1.10
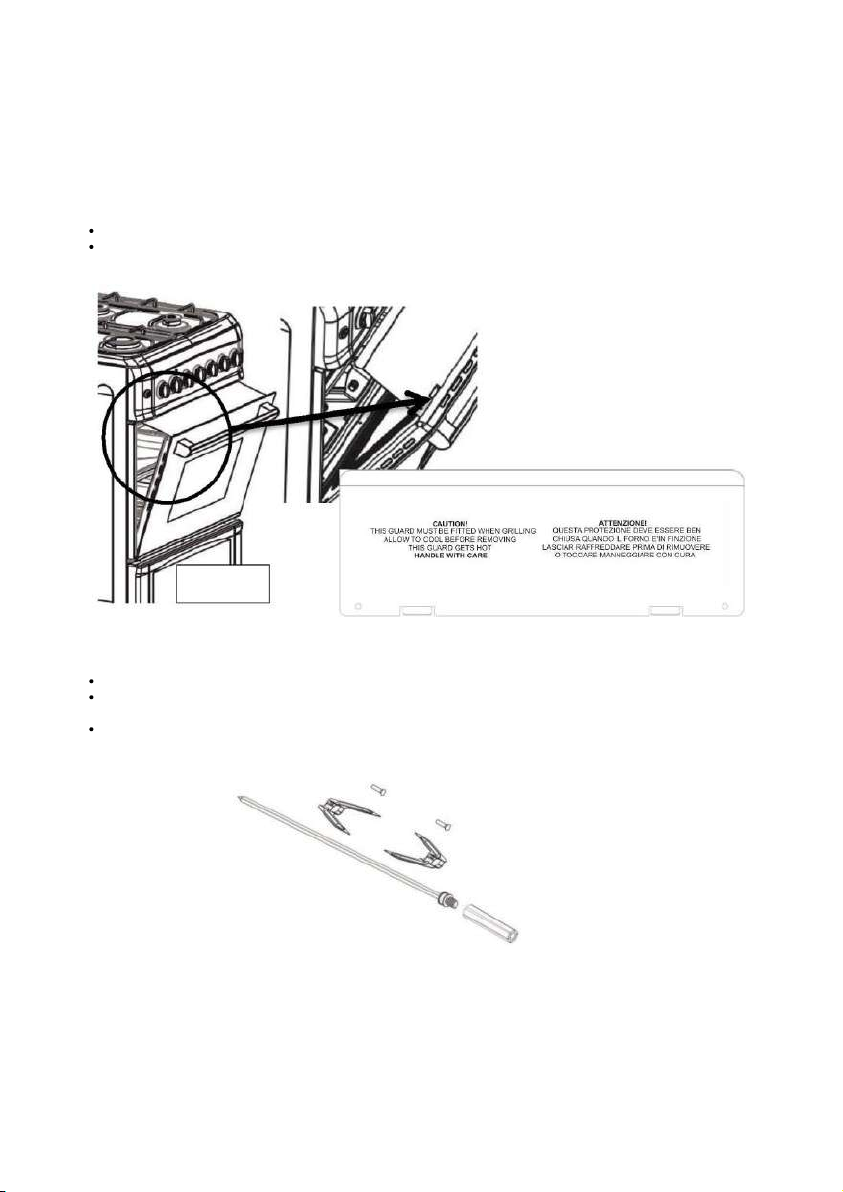
Figure 12
If your product has rotisserie accessories, take the spit under the accessories and
tighten the screw of the V-sheet (dovetail) on the spit. And insert the spit into the chicken and replace V-skin
firmly and tighten the screw.
Bakelite part behind the spit will help you carry the product easily. Attach a maximum of 1 chicken weighing a
maximum of 8kg to the spit.
For When you turn on the top burner in the case of the gas ovens, the oven door opens, as shown in figure 12.
Grill blade is mounted on the rollers located under the control panel; the lid becomes pushed forward to
contact the grill plate.
Using the grill plate
Using the rotisserie spit (optional)
On versions with thermal element, after ignition, press and hold the button for 3-5 seconds to activate the
safety mechanism.
1.
If no ignition occurs after pressing and releasing the switch, repeat the same action by pressing and holding
the switch for 15 seconds.
2.
Set the desired flame position.3.
When cooking is complete, move the oven switch to the right to turn off the top of the oven.4.

Operation of the electronic oven is selected using the function switch. The temperature is controlled by the
temperature switch. All oven functions are disabled by adjusting the respective switch to the off (upper) position.
Set the oven timer for the cooking time; see Using the oven timer.1.
Adjust the temperature to the desired mode.2.
Set the function switch to the desired mode.3.
<< The oven heats to the set temperature and maintains its temperature.4.
Light illuminates during heating5.
Turning off the electric oven.
Bring the oven timer to 'off' position. If the timer is set to a certain time, the timer will automatically stop; see Using
the oven timer. Move the function switch and the temperature switch to the off (upper) position.
Upper and lower heating are in operation. The food is heated from below and above at the same time. For example,
suitable for cakes, pies and cookies in the baking tins and casseroles. Cooking with one bowl.
the top heating is in operation. So it is suitable for pastries with bright surface food you wish to be brown on the
surface.
Operation of the oven Top
and bottom heating
Top heating Only
Underheating
Bottom/top heating with hot air (optional)
Grill (optional)
High Grill (optional)
Turbo engine (optional)
Only the bottom heater is in operation. This is exactly the case for pizza and for further browning of dishes at the
bottom.
Top and bottom heating and fan (in the back wall) are in operation. The fan quickly distributes hot air evenly
throughout the oven. Cook with a bowl.
The grill on the oven shelf is in operation. It is suitable for grilling large quantities of meat.
Place large and medium portions in the correct rack position under the grill marble for grilling.
Set the temperature to the maximum level.
Turn the food after half the grilling time.
Grill on the oven shelf is in operation. This is suitable for grilling large quantities of meat.
Place large and medium portions in the correct rack position under the grill heater for grilling.
Set the temperature to the maximum level.
Turn the food after half of the grilling time.
The oven is not heated. Only the fan (in the rear) is working. Frozen food is defrosted slowly at room temperature
and prepared food is cooled.
use of the electric oven5 |

Turbo resistance and Turbo Fan (optional)
Grill + chicken roasting (optional)
Grill and rotisserie (optional)
Turbo resistance and turbo fan heating are in operation. Foods are heated more homogeneously thanks to the
turbo fan. Suitable, for example, for pastries, yoghurt, pies and cakes in baking tins and casseroles. Do the cooking
using a single bowl.
It is suitable for cooking by help of the grill and chicken roasting motor.
It ensures uniform roasting and cooking of the meat, chicken and similar food arranged on the shish.
Bring the temperature to the maximum level.
It is suitable for preparing using the grill and rotisserie motor.
Make sure that the food is placed on the spit in the shape of the grill such as meat, chicken, etc. Bring the
temperature to the maximum value.
Using the oven timer
Model 2
Model 4
MECHANICAL TIMER (model 2)
As the timer as shown in version 2:Turn the timer clockwise to cook.
Set the duration.
ANALOGUE TIMER (model 4)
1- TIMER SETTING Press the button to set the time and turn counterclockwise.
2- SETTING THE COOKING TIME It is possible to set the cooking time of the analogue
timer up to 180 minutes. Alarm ring starts automatically after the set time has elapsed.
To turn off the alarm ringer, turn the knob counterclockwise without pressing and
continue until it reaches the manual symbol appears on the display. Alarm will be
turned off at this position.
This manual suits for next models
1
Table of contents
Popular Oven manuals by other brands


Midea
Midea PS30L22Z user manual

Samsung
Samsung BF64CCST Installation and operating instructions

Maytag
Maytag CWG3100AAS - 24"Gas Single Oven installation instructions

Lainox
Lainox COMPACT CEV Series user manual

Kleenmaid
Kleenmaid TO60X owner's manual

Cata
Cata cm-760 Operating and maintenance instructions