WIK CREMAROMA Cappuccinatore 1097.2 User manual
CREMAROMA
ZUBEHÖR MOD. 1097.2
ACCESSORIES MOD. 1097.2
ACCESSOIRE MOD. 1097.2
Cappuccinatore
DE
GB
FR
Autocappucinatore_9757_DE_GB_FR_final.qxd:Layout 1 18.01.2010 11:29 Uhr Seite 1

2
Allgemeine Hinweise
Achtung! Die Funktion des Cappuccinatore kann durch angetrocknete oder alte
Milch beeinflusst werden! Halten Sie die Geräteteile stets sauber. Hinweise dazu
finden Sie im Kapitel „Cappuccinatore reinigen“.
Vor dem ersten Gebrauch sollte das Gerät mit 200ml Wasser ohne Reinigungsflüs-
sigkeit gespült werden. Hinweise dazu finden Sie im Kapitel „Cappuccinatore reini-
gen“.
Der Cappuccinatore ist ausschließlich für die Modellnummer 9752 und deren Va-
rianten zu verwenden. Bei Zweckentfremdung, falscher Bedienung oder nicht fach-
gerechter Reparatur wird keine Haftung für eventuelle Schäden übernommen.
Ebenso sind Garantieleistungen in solchen Fällen ausgeschlossen. Der Cappuccina-
tore ist nicht für den gewerblichen Gebrauch bestimmt!
Symbolik in dieser Anleitung
Achtung!
Hinweise auf Verletzungsgefahr und Geräteschutz.
Hilfreiche Informationen, die Ihnen den Umgang mit der Cappuccinatore erleichtern
sollen.
Inhaltsverzeichnis
Symbolik in dieser Anleitung . . . . . . . . . . . . . . . . . . . . . . . . . . . . . . . . . . . . . . . . . . . . . . . . . . . .Seite 2
Allgemeine Hinweise . . . . . . . . . . . . . . . . . . . . . . . . . . . . . . . . . . . . . . . . . . . . . . . . . . . . . . . . . . . .Seite 2
Lieferumfang . . . . . . . . . . . . . . . . . . . . . . . . . . . . . . . . . . . . . . . . . . . . . . . . . . . . . . . . . . . . . . . . . . .Seite 3
Pflegezubehör . . . . . . . . . . . . . . . . . . . . . . . . . . . . . . . . . . . . . . . . . . . . . . . . . . . . . . . . . . . . . . . . . .Seite 3
Service-Hotline . . . . . . . . . . . . . . . . . . . . . . . . . . . . . . . . . . . . . . . . . . . . . . . . . . . . . . . . . . . . . . . . .Seite 3
Übersicht der Geräteelemente . . . . . . . . . . . . . . . . . . . . . . . . . . . . . . . . . . . . . . . . . . . . . . . . . . .Seite 4
Cappuccinatore montieren . . . . . . . . . . . . . . . . . . . . . . . . . . . . . . . . . . . . . . . . . . . . . . . . . . . . . .Seite 5
Milchschaum für Milchkaffee/Latte Macchiato zubereiten . . . . . . . . . . . . . . . . . . . . . . . . .Seite 6
Warme Milch zubereiten . . . . . . . . . . . . . . . . . . . . . . . . . . . . . . . . . . . . . . . . . . . . . . . . . . . . . . . . .Seite 7
Warmes Wasser zubereiten . . . . . . . . . . . . . . . . . . . . . . . . . . . . . . . . . . . . . . . . . . . . . . . . . . . . . .Seite 7
Cappuccinatore reinigen . . . . . . . . . . . . . . . . . . . . . . . . . . . . . . . . . . . . . . . . . . . . . . . . . . . . . . . .Seite 8
Entkalkung . . . . . . . . . . . . . . . . . . . . . . . . . . . . . . . . . . . . . . . . . . . . . . . . . . . . . . . . . . . . . . . . . . . .Seite 10
Gewährleistung . . . . . . . . . . . . . . . . . . . . . . . . . . . . . . . . . . . . . . . . . . . . . . . . . . . . . . . . . . . . . . . .Seite 32
DE
Autocappucinatore_9757_DE_GB_FR_final.qxd:Layout 1 18.01.2010 11:29 Uhr Seite 2

3
Lieferumfang
:Cappuccinatore :Ansaugschlauch :Entkalkungsschlauch
:Bedienungsanleitung :spezial Reinigungsflüssigkeit
Pflegezubehör
Reinigen Sie den Cappuccinatore mit einer spezial Reinigungsflüssigkeit. Sie erzielen so ein
Optimum an Sauberkeit.
Beachten Sie bei Reinigungsflüssigkeiten die im Einzelhandel erhältlich sind, dass diese
speziell für die Reinigung von Milchaufschäumern geeignet sind.
CremAroma Zubehör wie z. B. die Reinigungstabletten oder die spezial Reinigungsflüssig-
keit für den Cappuccinatore können Sie über die unten angegebene Service-Hotline bestel-
len.
Service-Hotline
Für Fragen oder Anregungen rufen Sie bitte die gebührenfreie Kunden Service-Hotline:
Autocappucinatore_9757_DE_GB_FR_final.qxd:Layout 1 18.01.2010 11:29 Uhr Seite 3

4
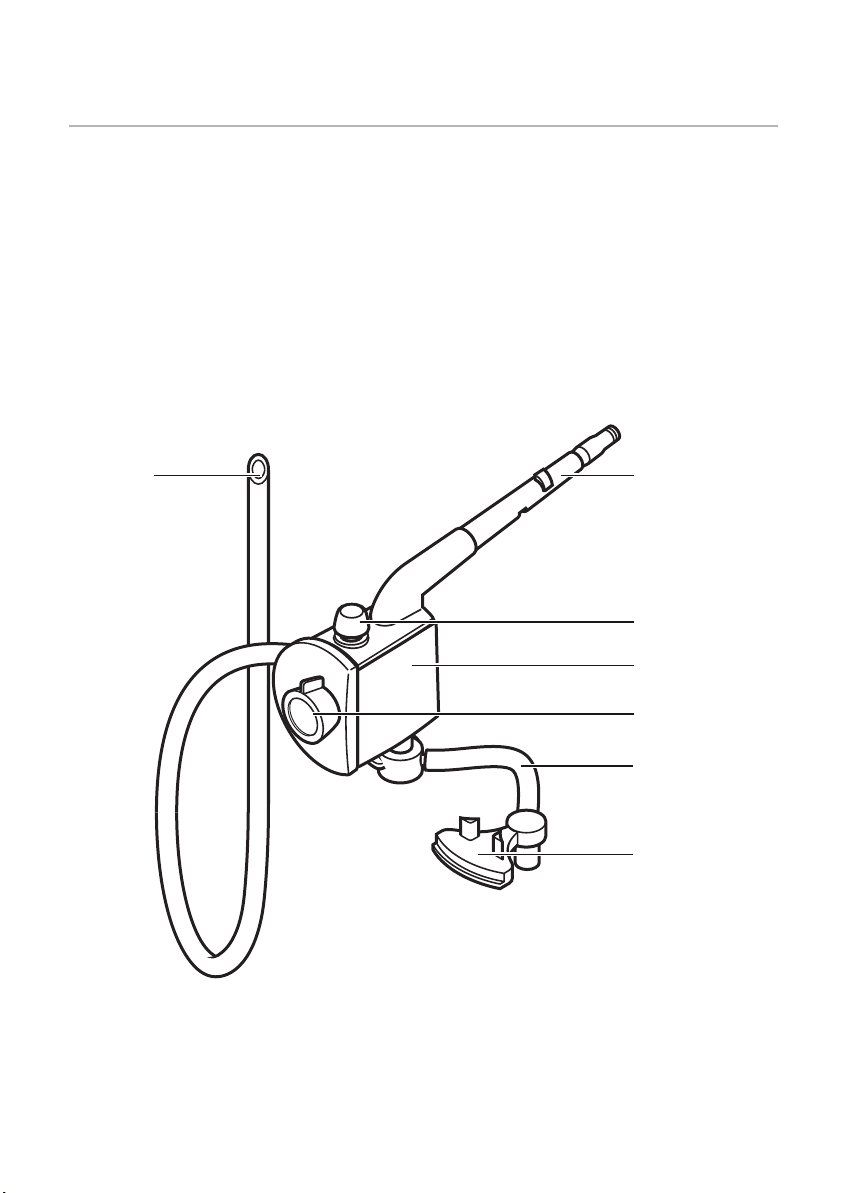
Cappuccinatore mit Ansaugfunktion
Übersicht der Geräteelemente
AAnschlussadapter mit Düse
BEinstellschraube,
(Milchschaumqualität)
CZentraleinheit
DWahlschalter
– aufgeschäumte Milch
– warme Milch
– Heißwasser
EAusgabeeinheit
FAuslauf mit Magnethalter
GAnsaugschlauch
AG
B
C
D
E
F
Autocappucinatore_9757_DE_GB_FR_final.qxd:Layout 1 18.01.2010 11:29 Uhr Seite 4

5
Cappuccinatore montieren
Montage nur dann erforderlich, wenn an Ihrer CremAroma eine Dampfdüse montiert ist
Servicetür öffnen
und abnehmen.
Brüheinheit
herausziehen.
: : 1. Dampfdüse gegen
den Uhrzeigersinn bis
zum Anschlag drehen.
2. Dampfdüse
herausziehen.
:
1.
Cappuccinatore wie
abgebildet halten.
Anschlussadapter
A
mit Cappuccinatore
kräftig bis zum An-
schlag durchdrücken.
2. Ca. 90° mit dem Uhr-
zeigersinn drehen.
Servicetür einsetzen und
schließen.
: : 1.
Ansaugschlauch
G
in
die Öffnung schieben.
2.
Ausgabeeinheit
E
von
unten in die Öffnung
der Zentraleinheit
C
einstecken.
:
Auslauf mit Magnet-
halter
F
unter den
Kaffeeauslauf platzie-
ren.
:Einstellschraube Bfür
die Milchschaumquali-
tät locker bis zum An-
schlag drehen.
:
2. 1.
1.
2.
1.
2.
Autocappucinatore_9757_DE_GB_FR_final.qxd:Layout 1 18.01.2010 11:29 Uhr Seite 5
6
Milchschaum für Milchkaffee / Latte Macchiato
zubereiten
Achtung! Verbrühungsgefahr durch heiße Milch
Tägliche Reinigung ist erforderlich – siehe Kapitel „Reinigung“
1. Ansaugschlauch G
in ein Gefäß mit
ausreichend Milch
tauchen.
2. Kaffeetasse unter
den Kaffeeauslauf
stellen. Höhenver-
stellung gemäß Tas-
senhöhe anpassen.
1. Wahlschalter Dauf
„aufgeschäumte
Milch“ stellen.
2. Am Kaffeeautomaten
durch Drücken der
Taste “B“ in den
Dampfmodus wech-
seln und Aufheiz-
phase abwarten.
: : START!
Hebel am Kaffeeauto-
maten nach oben auf
Dampffunktion dre-
hen. Die Milch wird
nun angesaugt, er-
hitzt, geschäumt und
durch den Auslauf F
ausgegeben.
:
Die Milchschaumqualität
ist u. a. abhängig von
Milchart, Fettgehalt und
Temperatur. Die Milch-
schaumqualität kann mit
der Einstellschraube B
geregelt werden:
(+) Linksdrehung : Hö-
here Luftbeimischung –
mehr Schaum
(-) Rechtsdrehung: Ge-
ringere Luftbeimischung
– weniger Schaum
STOP!
Wenn die gewünschte
Milchschaummenge er-
reicht ist, Hebel am Kaf-
feeautomaten nach
unten auf„O“ drehen.
Vorgang wird beendet.
Bei nachtropfender Cap-
puccinatore drehen Sie
nach dem Bezug ggf.
den Wahlschalter in Po-
sition „Heißwasser“.
: : Beziehen Sie Ihren ge-
wünschten Kaffee,
indem Sie den Dampf-
modus wieder verlas-
sen. Drücken Sie
hierzu Taste “B“ und
wechseln Sie wieder
zurück in den Kaffee-
modus (siehe auch
Bedienungsanleitung
CremaAroma).
:
1. 2.
1.
2.
Autocappucinatore_9757_DE_GB_FR_final.qxd:Layout 1 18.01.2010 11:29 Uhr Seite 6
7
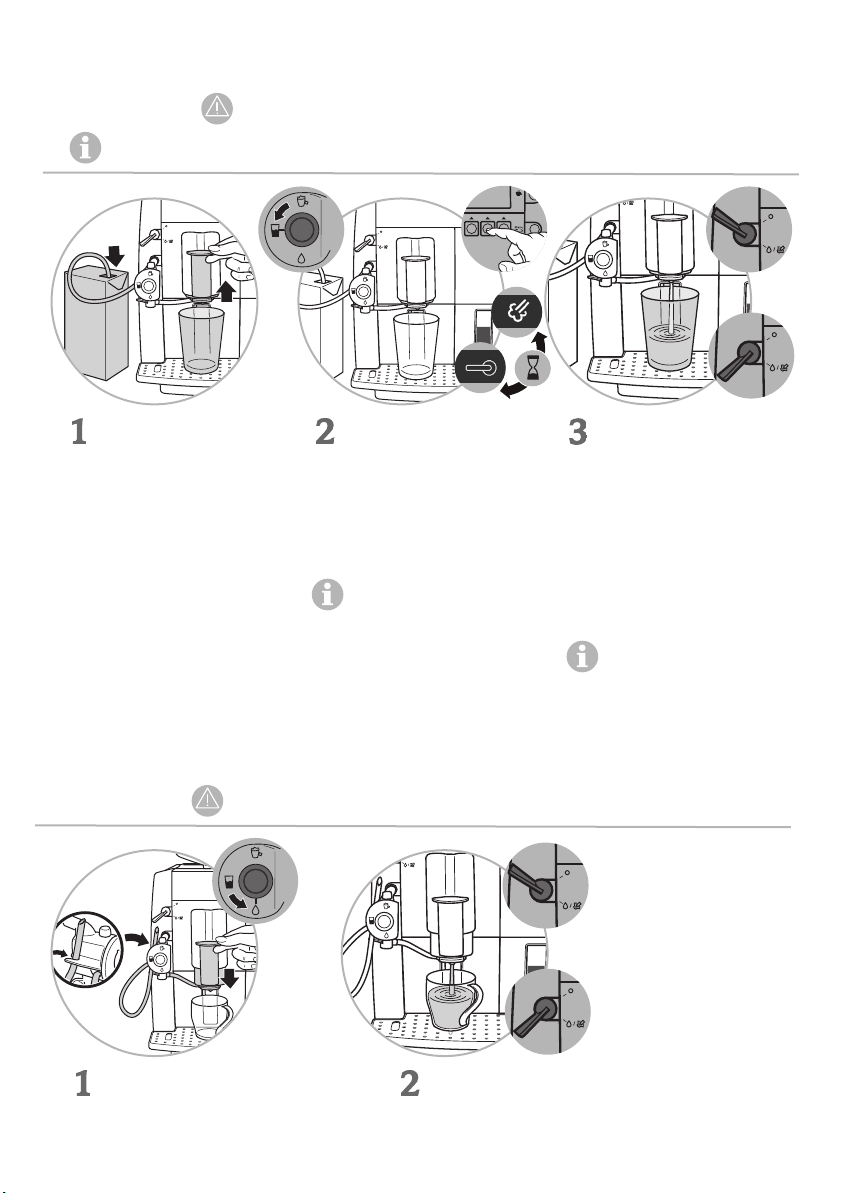
Warme Milch zubereiten
Achtung! Verbrühungsgefahr durch heiße Milch
Tägliche Reinigung ist erforderlich – siehe Kapitel „Cappuccinatore Reinigung“
1. Ansaugschlauch G
in ein Gefäß mit
ausreichend Milch
tauchen.
2. Milchglas unter
den Kaffeeauslauf
stellen. Höhenver-
stellung gemäß
Glashöhe anpas-
sen.
1. Wahlschalter Dauf
„warme Milch“ stellen.
2. Am Kaffeeautomaten
durch Drücken der
Taste “B“ in den
Dampfmodus wech-
seln und Aufheizphase
abwarten.
Beim Bezug von warmer
Milch ist eventuelle Ge-
räuschbildung normal.
: : 1. START!
Hebel auf Dampffunk-
tion drehen. Warme
Milch wird ausgegeben.
2. STOP!
Hebel auf„O" drehen.
Um wieder Kaffee zu be-
ziehen, Taste“B“ am Kaf-
feeautomaten drücken
und zurück in den Kaf-
feemodus wechseln.
Bei nachtropfender Cap-
puccinatore drehen Sie
nach dem Bezug ggf.
den Wahlschalter auf Po-
sition „Heißwasser“.
:
1. Ansaugschlauch Gin
Klemmvorrichtung fixieren.
2. Wahlschalter Dauf„Heiß-
wasser“ stellen.
:
1. START!
Hebel auf Heißwasserfunktion drehen.
Heißwasser wird zubereitet.
2. STOP!
Hebel auf„O" drehen.
:
Heißes Wasser zubereiten
Achtung! Verbrühungsgefahr durch heißes Wasser
1. 2. 1.
2.
1.2.
2.
1.
2.
1.
Autocappucinatore_9757_DE_GB_FR_final.qxd:Layout 1 18.01.2010 11:29 Uhr Seite 7
8
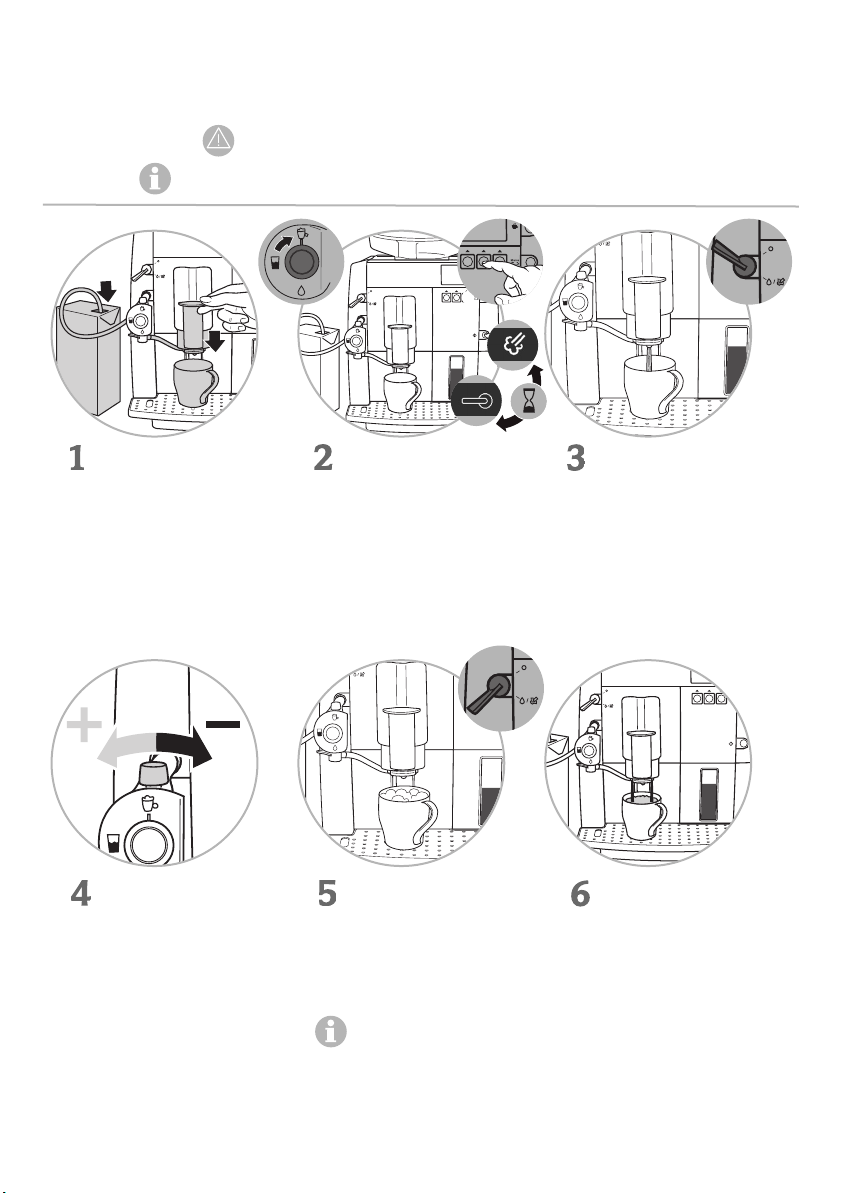
Cappuccinatore reinigen
Tägliche Reinigung
Achtung! Vor dem ersten Gebrauch sowie beim Spülen, Schritte 1–4 ohne
Reinigungsflüssigkeit durchführen. NUR 200ML KLARES LEITUNGSWASSER BENUTZEN!
Reinigungsflüssigkeit,
gemäß Anweisung auf
der Verpackung, ver-
dünnt in ein Glas
geben.
1. Wahlschalter Dauf
„aufgeschäumte
Milch“ stellen.
2. Ansaugschlauch G
in das Gefäß mit der
Reinigungsflüssigkeit
tauchen.
3. Behältnis unter den
Milchauslauf stellen
und den
Auslauf mit
Magnethalter
F
unter den Kaffeeaus-
lauf platzieren.
: : Am Kaffeeautomaten
durch Drücken der
Taste “B“ in den
Dampfmodus wech-
seln und Aufheiz-
phase abwarten.
:
1. START! System reinigen.
Hebel am Kaffeeautomaten nach oben auf Dampffunktion drehen.
Heißwasser wird
nun zubereitet und durch den Auslauf
F
ausgegeben.
Lassen Sie gemäß Anweisung
auf der Verpackung soviel Reinigungsflüssigkeit durchlaufen wie angegeben.
2. STOP!
Hebel am Kaffeeautomaten nach unten auf„O" drehen. Vorgang wird beendet.
Achtung, spülen! Nach dem Reinigungsvorgang muss das Gerät mit 200ml
Wasser ohne Reinigungsflüssigkeit gespült werden. Wiederholen Sie hierzu
die Schritte 1 - 4, benutzen Sie dazu ausschließlich klares Leitungswasser.
Beachten Sie auch die Hinweise des Herstellers der Reinigungsflüssigkeit!
:
1.
1.
2.
2.
3.
Autocappucinatore_9757_DE_GB_FR_final.qxd:Layout 1 18.01.2010 11:29 Uhr Seite 8

9
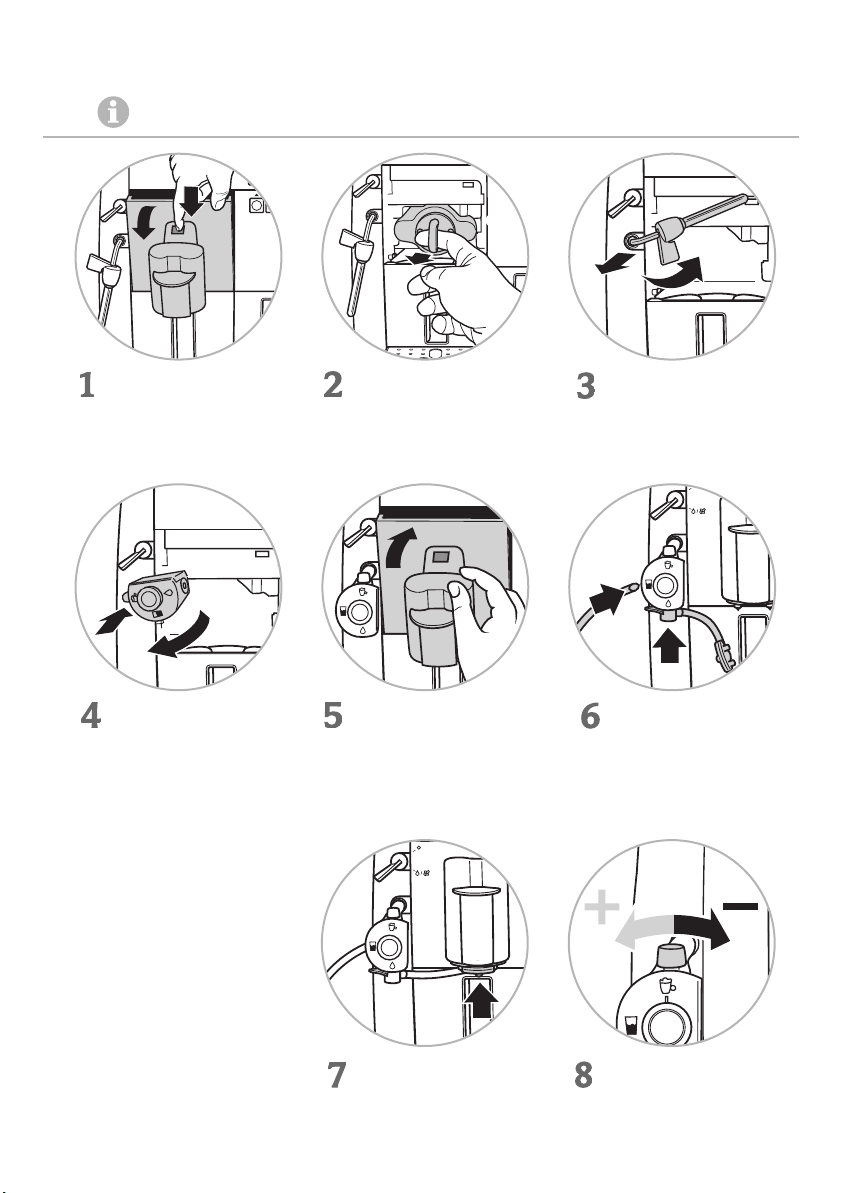
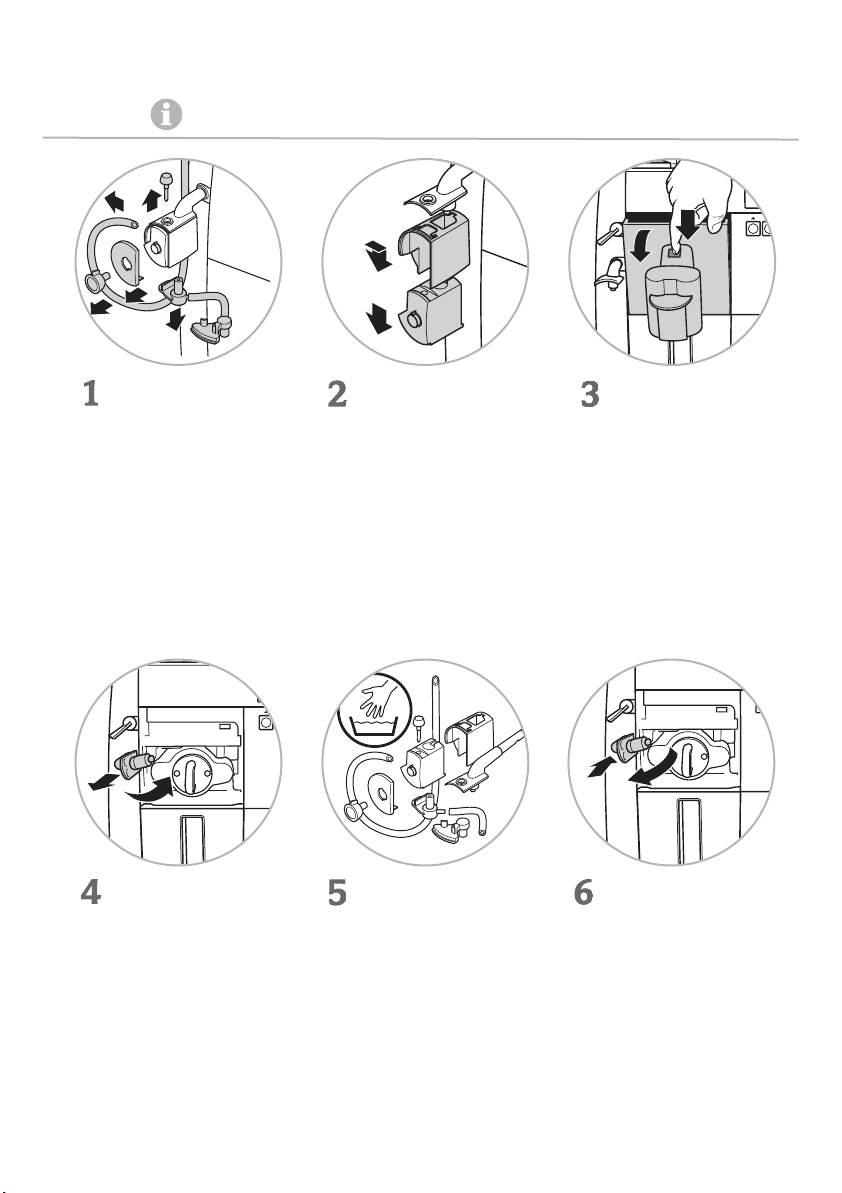
Cappuccinatore reinigen
Wöchentliche Reinigung empfohlen – häufiger bei intensiverer Nutzung
Cappuccinatore wie
abgebildet demontie-
ren.
Befolgen Sie die Rei-
henfolge der Schritte
wie angegeben.
Zentraleinheit Cwie
abgebildet demontie-
ren.
Schritt 6: Ziehen Sie
zuerst das Innenteil
der Zentraleinheit C
aus dem Gehäuse
bevor Sie Sie dann in
Schritt 7 das Gehäuse
der Zentraleinheit C
aushaken und nach
unten wegziehen.
::Servicetür öffnen und
abnehmen.
:
1. Anschlussadapter A
ca. 90° gegen den
Uhrzeigersinn bis
zum Anschlag dre-
hen.
2. Anschlussadapter A
herausziehen.
Alle Teile gründlich in
warmem Wasser von
Hand reinigen.
::
1.
2.
3. 6.
7.
1. Anschlussadapter A
wieder einsetzen.
2. Anschlussadapter A
ca. 90° mit dem Uhrzei-
gersinn wieder in die
Ausgangsposition dre-
hen.
:
4.
5.
1.
2. 1. 2.
Autocappucinatore_9757_DE_GB_FR_final.qxd:Layout 1 18.01.2010 11:29 Uhr Seite 9

10
Cappuccinatore reinigen
Wöchentliche Reinigung empfohlen – häufiger bei intensiverer Nutzung
Servicetür montieren
und schließen
Zentraleinheit Cwie
abgebildet montieren.
Schritt 1: Haken Sie das
Gehäuse der Zentralein-
heit Cin den An-
schlussadapter Aein,
bevor Sie dann in
Schritt 2 das Innenteil in
das Gehäuse schieben.
::Cappuccinatore wie
abgebildet montie-
ren.
Befolgen Sie Reihen-
folge der Schritte wie
angegeben.
:
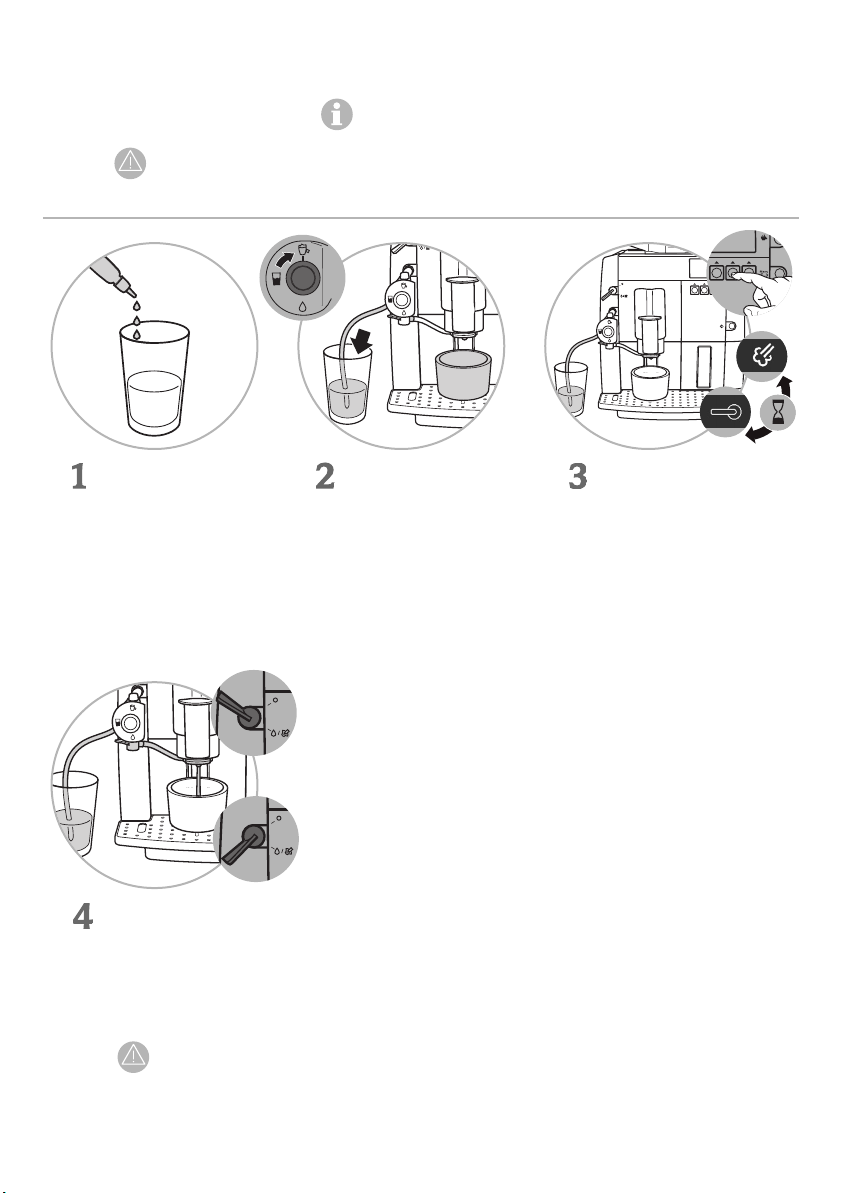
Entkalkung
Der Entkalkungsschlauch muss vor dem Start des Entkalkungsprogramms
der CremAroma auf den Anschlussadapter gesteckt werden
Hinweise zum Entkalken finden Sie in der Bedienungsanleitung der CremAroma
Zentraleinheit Cwie
abgebildet demon-
tieren.
Cappuccinatore wie
abgebildet demon-
tieren.
Befolgen Sie Rei-
henfolge der
Schritte wie ange-
geben.
::Die Düse vom Anschluss-
adapter Amittels des
Werkzeuges am Kaffee-
löffel abschrauben.
:
2.
1.
6.
3.
4.
5.
7.
6.
7.
1.
2.
3.
4.
5.
1.
2.
Autocappucinatore_9757_DE_GB_FR_final.qxd:Layout 1 18.01.2010 11:29 Uhr Seite 10

11
Entkalkung
Der Entkalkungsschlauch muss vor dem Start des Entkalkungsprogramms
der CremAroma auf den Anschlussadapter gesteckt werden
Hinweise zum Entkalken finden Sie in der Bedienungsanleitung der CremAroma
Entkalkungsschlauch
auf die Düse aufschie-
ben.
Die gelöste Düse vom
Anschlussadapter A
abziehen.
::Das untere Ende des
Entkalkungsschlauch in
das Langloch der Tropf-
schale führen.
Starten Sie das Entkal-
kungsprogramm und
folgen Sie den Hinwei-
sen auf dem Display
bzw. den Hinweisen in
der Bedienungsanlei-
tung der CremAroma.
:
Nach der Entkalkung die Düse auf den Anschlussadapter Aaufstecken und mittels
des Werkzeuges am Kaffeelöffel aufschrauben. Restlichen Teile gründlich in warmen
Wasser von Hand reinigen.
Anschließend den Cappuccinatore wieder montieren.
:
1.
2.
Autocappucinatore_9757_DE_GB_FR_final.qxd:Layout 1 18.01.2010 11:29 Uhr Seite 11

12
General information
Attention! Operating of the Cappuccinatore can be impaired by dried or old milk!
Always keep the appliance parts clean. For more detailed information please refer
to Chapter“Clean Cappuccinatore”.
Prior to the first use the appliance should be rinsed with 200ml of water without
cleaner. For more detailed information please refer to Chapter“Clean Cappuccina-
tore”.
The Cappuccinatore must be used solely for model no. 9752 and the corresponding
variants. No liability is accepted for any damage resulting from its use for any other
purpose, faulty operation or non-professional repairs. Warranty services are also
excluded in such cases. The Cappuccinatore is not intended for commercial use!
User manual symbols
Attention! Information on risk of injury and protection of appliance.
Helpful information to facilitate handling of the Cappuccinatore.
Table of contents
User manual symbols . . . . . . . . . . . . . . . . . . . . . . . . . . . . . . . . . . . . . . . . . . . . . . . . . . . . . . . . . .Page 12
General information . . . . . . . . . . . . . . . . . . . . . . . . . . . . . . . . . . . . . . . . . . . . . . . . . . . . . . . . . . . .Page 12
Scope of supply . . . . . . . . . . . . . . . . . . . . . . . . . . . . . . . . . . . . . . . . . . . . . . . . . . . . . . . . . . . . . . . .Page 13
Cleaning accessories . . . . . . . . . . . . . . . . . . . . . . . . . . . . . . . . . . . . . . . . . . . . . . . . . . . . . . . . . . .Page 13
Service-Hotline . . . . . . . . . . . . . . . . . . . . . . . . . . . . . . . . . . . . . . . . . . . . . . . . . . . . . . . . . . . . . . . .Page 13
Overview of appliance elements . . . . . . . . . . . . . . . . . . . . . . . . . . . . . . . . . . . . . . . . . . . . . . . .Page 14
Install Cappuccinatore . . . . . . . . . . . . . . . . . . . . . . . . . . . . . . . . . . . . . . . . . . . . . . . . . . . . . . . . .Page 15
Prepare milk froth for caffe latte/latte macchiato . . . . . . . . . . . . . . . . . . . . . . . . . . . . . . . .Page 16
Prepare warm milk . . . . . . . . . . . . . . . . . . . . . . . . . . . . . . . . . . . . . . . . . . . . . . . . . . . . . . . . . . . . .Page 17
Prepare hot water . . . . . . . . . . . . . . . . . . . . . . . . . . . . . . . . . . . . . . . . . . . . . . . . . . . . . . . . . . . . . .Page 17
Clean Cappuccinatore . . . . . . . . . . . . . . . . . . . . . . . . . . . . . . . . . . . . . . . . . . . . . . . . . . . . . . . . . .Page 18
Descaling . . . . . . . . . . . . . . . . . . . . . . . . . . . . . . . . . . . . . . . . . . . . . . . . . . . . . . . . . . . . . . . . . . . . . .Page 20
Warranty . . . . . . . . . . . . . . . . . . . . . . . . . . . . . . . . . . . . . . . . . . . . . . . . . . . . . . . . . . . . . . . . . . . . . .Page 32
GB
Autocappucinatore_9757_DE_GB_FR_final.qxd:Layout 2 EN 18.01.2010 11:35 Uhr Seite 12

13
Scope of supply
:Cappuccinatore :Intake hose :Descaling hose
:User manual :Special cleaner
Cleaning accessories
Clean your Cappuccinatore with a special cleaner in order to achieve optimal cleanliness.
For cleaning agents available in retail please regard that they have to be especially suitable
for cleaning milk frothers.
CremAroma accessories e.g. cleaning tablets or special cleaning agents for the Cappuccina-
tore can be ordered via the service hotline stated below.
Service-Hotline
For questions and/or comments please do not hesitate to call the toll-free customer service
Autocappucinatore_9757_DE_GB_FR_final.qxd:Layout 2 EN 18.01.2010 11:35 Uhr Seite 13
14
Cappuccinatore with intake function
Overview of appliance elements
AAdapter with nozzle
BSetting screw,
(quality of milk froth)
CCentral unit
DSelector switch
– frothed milk
– warm milk
– hot water
ESpout unit
FOutlet with magnet holder
GIntake hose
AG
B
C
D
E
F
Autocappucinatore_9757_DE_GB_FR_final.qxd:Layout 2 EN 18.01.2010 11:35 Uhr Seite 14
15
Install Cappuccinatore
Installation required only if a steam nozzle is installed on your CremAroma
Open and remove
service door.
Pull out brewing unit.
: : 1. Turn steam nozzle
anti-clockwise to
the stop.
2. Pull out steam
nozzle.
:
1. Hold Cappuccina-
tore as shown.
Firmly push adap-
ter
A
with Cap-
puccinatore
through to the
stop.
2. Turn clockwise by
approx. 90°.
Insert and close
service door.
: : :
Place outlet with
magnet holder
F
under the coffee
spout.
:Loosely turn setting
screw Bfor the milk
froth quality to the stop.
:
1.
2. 1.
1.
2.
1. Push intake hose G
into the opening.
2. Put spout E
from
below into the ope-
ning of the
central unit
C
.
1.
2.
Autocappucinatore_9757_DE_GB_FR_final.qxd:Layout 2 EN 18.01.2010 11:35 Uhr Seite 15
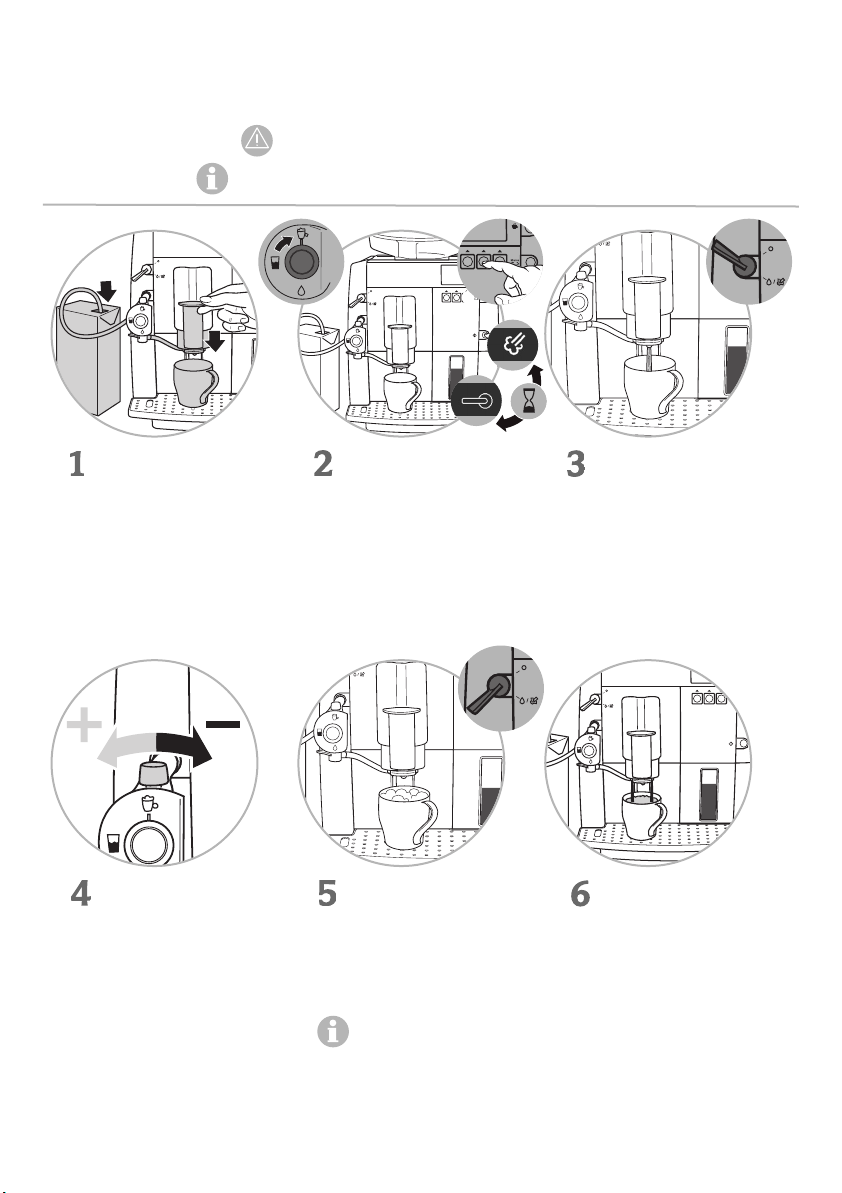
Prepare milk froth for caffe latte /
latte macchiato
Attention! Risk of scalding by hot milk!
Daily cleaning required – see Chapter “Cleaning”
1. Set selector switch
Dto“frothed milk”.
2. Press button“B” on
the coffee machine
to change to the
steam function and
wait for the heating
phase.
: : START!
Turn lever on coffee
machine upwards to
steam function. Now
the milk is taken in,
heated, frothed and
released through
spout F.
:
The milk froth quality
depends, among other
factors, on the type of
milk, fat content and
temperature. The qual-
ity of the milk froth can
be adjusted with setting
screw B:
(+) clockwise: addition
of more air – more froth
(-) anti-clockwise:
addition of less air – less
froth
STOP!
When the desired quan-
tity of milk froth has
been prepared, turn
lever on coffee machine
downwards to“O“.
Process is stopped.
If the Cappuccinatore
drips, turn the lever to
the “Hot Water” position
after the milk is frothed.
: : Take out the desired
amount of coffee by
exiting the steam
function. To do this,
press button“B” again
and return to the
coffee function .
(please also see the
CremaAroma user
manual).
:
1. 2.
1.
2.
16
1. Put intake hose G
into a container
holding a sufficient
quantity of milk.
2. Place coffee cup
under coffee spout.
Adjust height
according to the
height of the cup.
Autocappucinatore_9757_DE_GB_FR_final.qxd:Layout 2 EN 18.01.2010 11:35 Uhr Seite 16
17
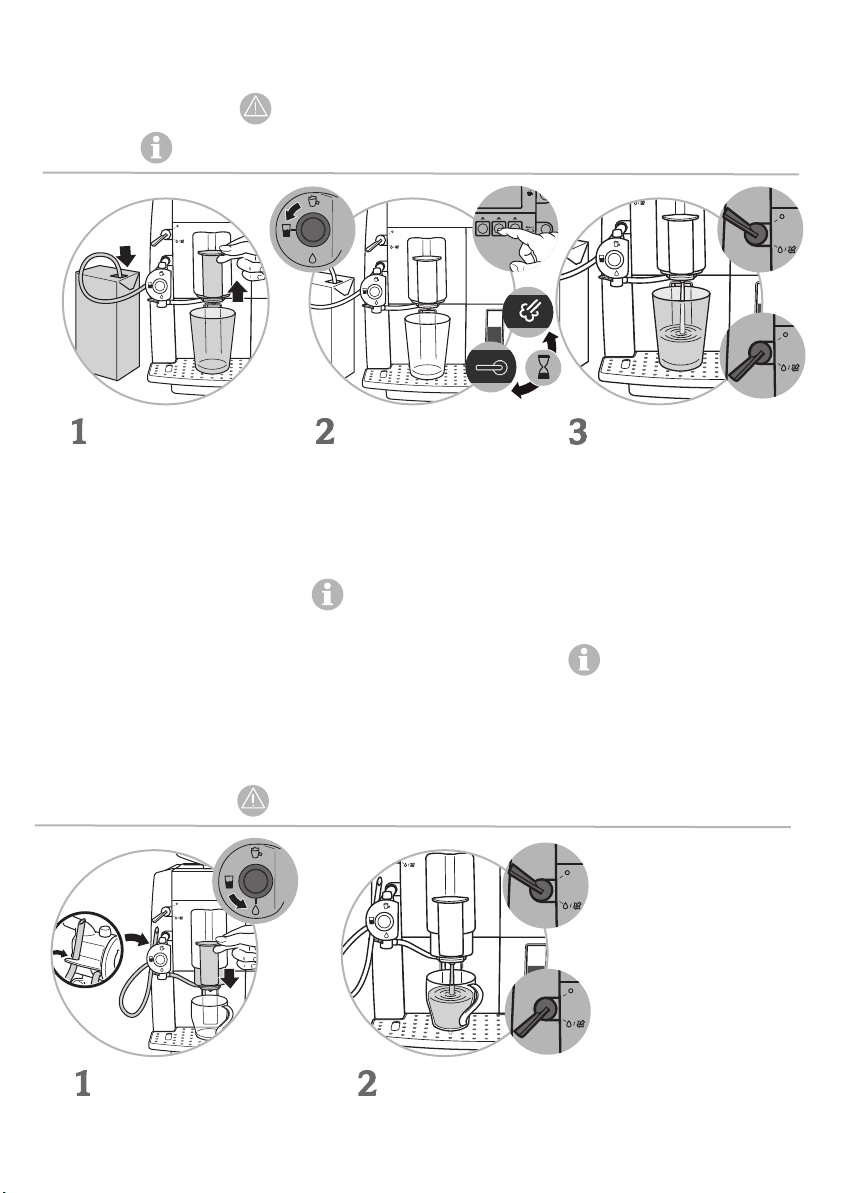
Prepare warm milk
Attention! Risk of scalding by hot milk!
Daily cleaning required – see Chapter “Clean Cappuccinatore”
1. Put intake hose
Ginto a contai-
ner holding a suf-
ficient quantity of
milk.
2. Place milk cup
under coffee
spout. Adjust
height according
to glass height.
1. Set selector switch D
to“warm milk”.
2. Press button“B” on
the coffee machine to
change to the steam
function and wait for
the heating phase.
When preparing warm
milk possible machine
noises are normal.
: : 1. START!
Turn lever to steam
function. The heated
milk is released.
2. STOP!
Turn lever to“O”.
To take out coffee again,
press button“B” on the
coffee machine and
return to the coffee
function.
If the Cappuccinatore
drips, turn the lever to
the “Hot Water” posi-
tion after the milk is
frothed.
:
1. Fix intake hose G
in clamping device.
2. Set selector switch
Dto“hot water”.
:
1. START!
Turn lever to hot water function.
Now hot water is being prepared.
2. STOP!
Turn lever to“O”.
:
Prepare hot water
Attention! Risk of scalding by hot water
1.2.
2.
1.
1. 2. 1.
2.
1.
2.
Autocappucinatore_9757_DE_GB_FR_final.qxd:Layout 2 EN 18.01.2010 11:35 Uhr Seite 17

18
Clean Cappuccinatore
Daily cleaning
Attention! Prior to first use as well as for rinsing, carry out steps 1-4
without cleaning agent.
USE 200ML OF CLEAR TAP WATER ONLY!
Pour diluted cleaner
into a glass according
to instructions on
packing.
1. Set selector switch D
to“frothed milk”.
2. Put intake hose G
into container with
cleaning solution.
3. Place container under
the milk spout
and
place outlet with
magnet holder
F
under the coffee
spout.
: : Press button“B” on
the coffee machine to
change to the steam
function and wait for
the heating phase.
:
1. START! Clean system.
Turn lever on coffee machine upwards to steam function. Now hot water is being
prepared and released through spout F
. Let as much cleaning agent flow through
as is stated in the instructions on the packing.
2. STOP!
Turn lever on coffee machine downwards to“O”. Process is stopped.
Warning, rinsing! After cleaning the appliance must be rinsed with 200ml of
water without cleaning agent. In order to do this, repeat steps 1 - 4, using clear
tap water only.
Please also observe the instructions of the cleaning agent manufacturer.
:
1.
1.
2.
2.
3.
Autocappucinatore_9757_DE_GB_FR_final.qxd:Layout 2 EN 18.01.2010 11:35 Uhr Seite 18
19
Clean Cappuccinatore
Weekly cleaning recommended – more often at intensive use
Dismantle Cappucci-
natore as shown.
Adhere to the order of
the steps as stated.
Dismantle central unit
Cas shown.
Step 6: Pull the inter-
nal part of central unit
Cout of the casing
first before proceed-
ing to step 7 in which
you unhook the casing
of central unit Cand
pull it out downwards.
::Open and remove
service door.
:
1. Turn adapter A
anti-clockwise by
approx. 90° to the
stop.
2. Pull out adapter A.
Thoroughly clean all
parts by hand in warm
water.
::1. Reinsert adapter A.
2. Turn adapter Aclock-
wise by approx. 90°
into the initial position.
:
1.
2.
3. 6.
7.
4.
5.
1.
2. 1. 2.
Autocappucinatore_9757_DE_GB_FR_final.qxd:Layout 2 EN 18.01.2010 11:35 Uhr Seite 19

20
Clean Cappuccinatore
Weekly cleaning recommended – more often at intensive use
1. Insert and close
service door. Install central unit C
as shown.
Step 1: Hook casing of
central unit Cinto
adapter Abefore pro-
ceeding to Step 2 in
which you push the
internal part into the
casing.
::Assemble Cappucci-
natore as shown.
Adhere to the order of
the steps as stated.
:
Descaling
The descaling hose must be connected to the adapter prior to the start
of the descaling programme of the CremAroma.
For information on descaling please refer to the CremAroma user manual
Dismantle central
unit Cas shown.
Dismantle Cappuc-
cinatore as shown.
Adhere to the order
of the steps as
stated.
::Unscrew nozzle of
adapter Aby means of
the tool on the coffee
measuring spoon.
:
6.
3.
4.
5.
7.
2.
1.
6.
7.
1.
2.
3.
4.
5.
1.
2.
Autocappucinatore_9757_DE_GB_FR_final.qxd:Layout 2 EN 18.01.2010 11:35 Uhr Seite 20
Table of contents
Languages:
Other WIK Coffee Maker manuals


