Wildlife Acoustics Echo Meter Touch 2 User manual

1 Overview
1.1
Echo Meter Touch Ultrasonic Modules
1.2
App Features
1.3
Leave Feedback or Review the App
2 Using Echo Meter Touch
2.1
Connecting the Ultrasonic Module
2.2
Navigating the app
2.3
Monitoring in Live Mode
2.4
Configuring Auto-ID
2.5
Recording in Live Mode
2.6
The Recording List
2.7
Viewing Spectrograms of Recordings
2.8
GPS View
2.9
Advanced Settings Screen
2.10
Restore Defaults
3 Recordings
3.1
Filenames for Recordings
3.2
Metadata Included in Recordings
3.3
Sharing Recordings via Email or Text Message
3.4
Backing Up Recordings
3.5
Transferring Recordings to a Computer
3.6
Importing Recordings using iTunes
3.7
Analysis Software
4 Testing the Microphone Element
4.1
Calibration Mode Microphone Testing
4.2
Chirp Mode System Testing
5 Specifications
5.1
Physical
5.2
Audio
5.3
Storage Requirements
5.4
Module Firmware Updates
5.5
Battery Life
5.6
iOS Hardware Compatibility

1
Overview
Echo Meter Touch app with an Echo Meter Touch Ultrasonic
Module allows you to listen to, record, and identify bats with your
Apple iPad, iPhone, or iPod Touch. The Echo Meter Touch offers
exclusive features and unprecedented ease-of-use for a handheld
bat detector.
Echo Meter Touch Ultrasonic Modules are available from
www.wildlifeacoustics.com/products/echo-meter-touch
This guide is available for printing at:
www.wildlifeacoustics.com/support/documentation
1.1 Echo Meter Touch Ultrasonic Modules
The app is compatible with the original Echo Meter Touch
Ultrasonic Module as well as the upcoming Echo Meter Touch 2
and Echo Meter Touch 2 Pro Modules.
Echo Meter Touch (original)
The original Echo Meter Touch was
released in 2014 and discontinued
in early 2017.
Echo Meter Touch 2
Echo Meter Touch 2 ($179) is intended for
nature enthusiasts and batting
hobbyists.

Echo Meter Touch 2 Pro
The Echo Meter Touch 2 Pro ($349) is
designed for bat professionals and
features a higher quality
microphone, adjustable gain, and
higher sample rate.
1.2 App Features
Listen to bat echolocations in real time
Echo Meter Touch translates bat echolocations into frequencies
that are audible to humans using two technologies.
Wildlife Acoustics’ patented Real Time Expansion (RTE) allows you
to listen to bats in real time with unparalleled fidelity. RTE
maintains the timing and tonality of the original echolocations.
Heterodyne (HET) listening is also available, for those accustomed
to that way of hearing bats. Manual and automatic tuning is
available.
View the echolocations on a spectrogram
A real-time spectrogram shows the frequencies and timing of the
echolocations. Scroll back in time and zoom in on previous "bat
passes."
See most likely bat species in real time
The Auto ID feature analyzes the echolocation calls and shows
the two most likely bat species matches in real time. In North
America, a portrait of each bat taken by renowned bat expert
Merlin Tuttle will be show as well. This is the same technology
used in our professional Kaleidoscope Pro Bat Auto Identification
software. Currently, the app can identify 38 species in North
America, 31 in Europe, 63 in the neotropics and 20 in South

Africa. For more information on Kaleidoscope and a full list of
species, visit our website.
AUTO-ID FINE PRINT: Because bats vary their echolocation
calls in response to a wide variety of needs, no automated
call identification can achieve 100% accuracy in species
identification. Nevertheless, in the hands of well-trained
experts, bat detector recordings can be used to identify
many species, providing invaluable discoveries. The Echo
Meter Touch allows high quality recording suitable for
analysis by experts. The built-in Auto-ID feature also
suggests the two most likely bat species for each recording,
for the enjoyment of enthusiasts hoping to learn more about
bats. These automated identifications, though largely
accurate, should not be relied on as a basis for scientific
research. Auto-ID is intended for use in analyzing recordings
of single bats in free flight in low clutter environments.
Recordings of roost emergence, multiple or captive bats,
bats in high clutter environments, or bat social calls are not
suitable for Auto-ID. In addition, the Auto-ID feature does not
include every possible bat for each of the covered regions.
Therefore, if a bat that is not included is recorded, it will be
identified by the app as a species with a similar echolocation
call type. In North America, there are seven species included
in the species list that do not have classifiers. They are
included so as to allow the user to learn about every species
that occur in their state.
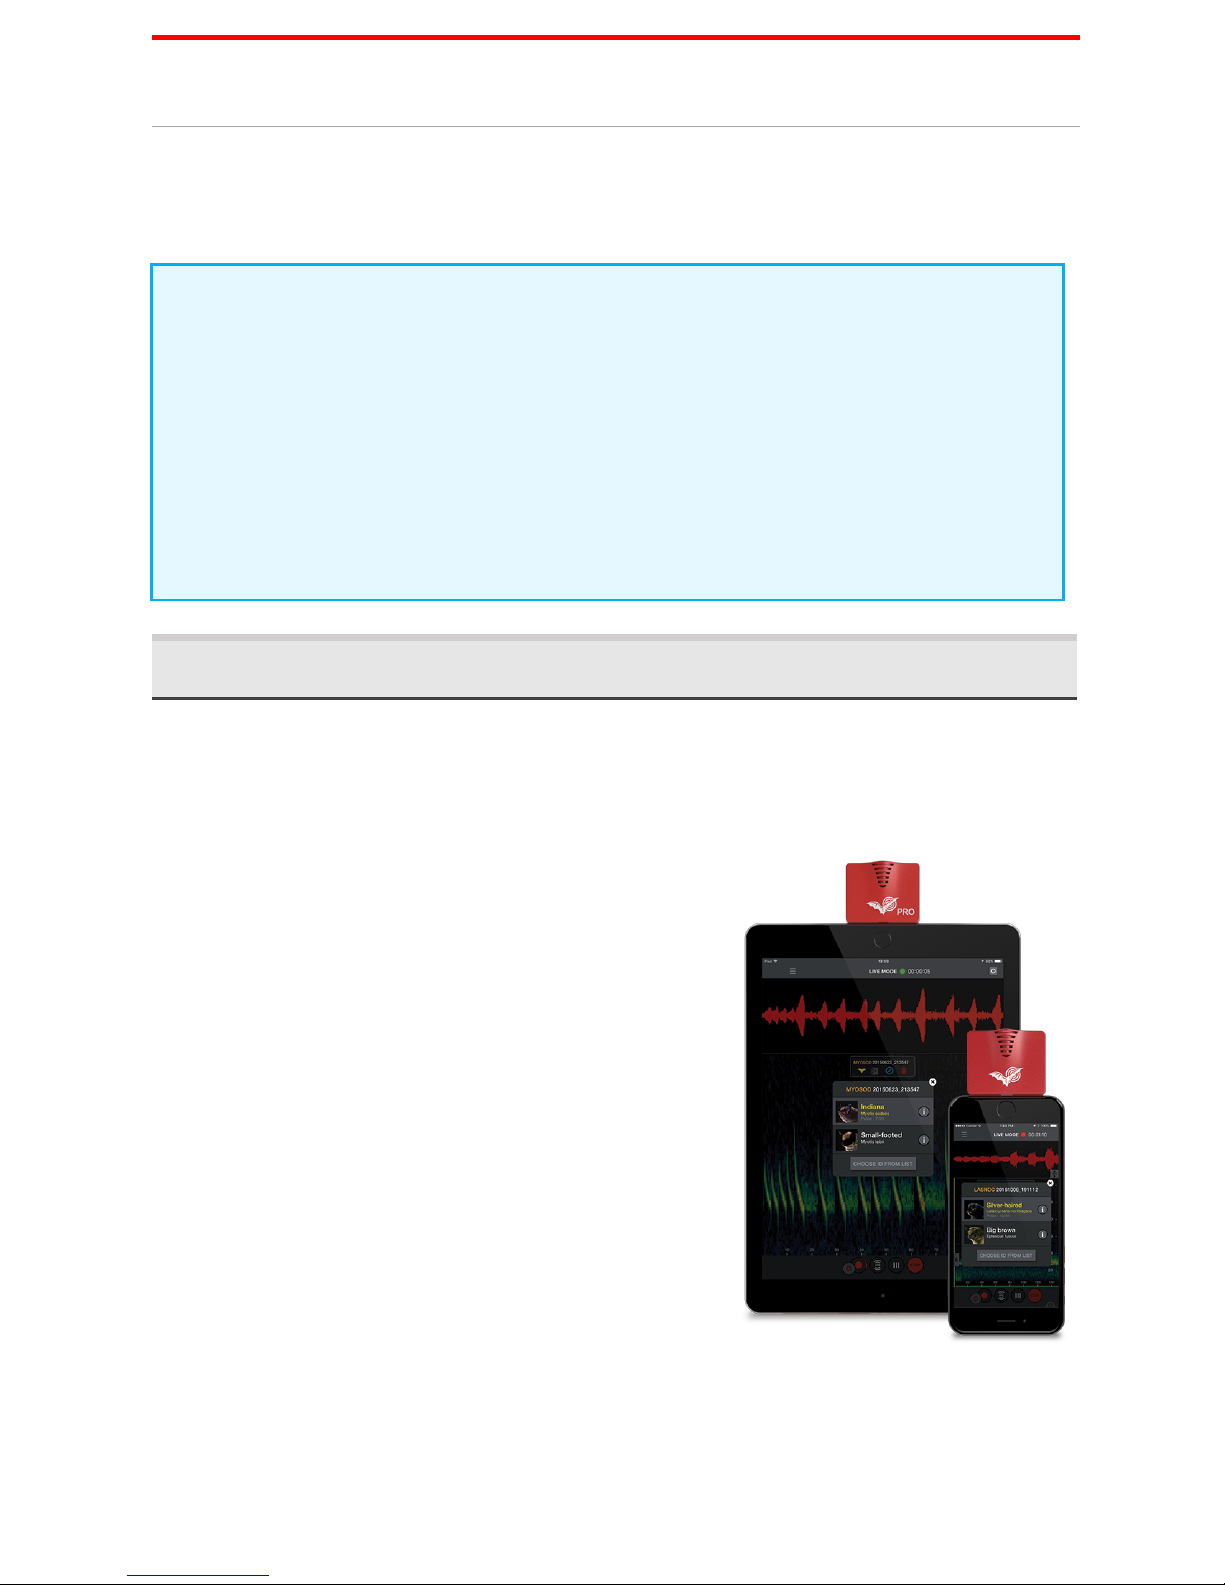
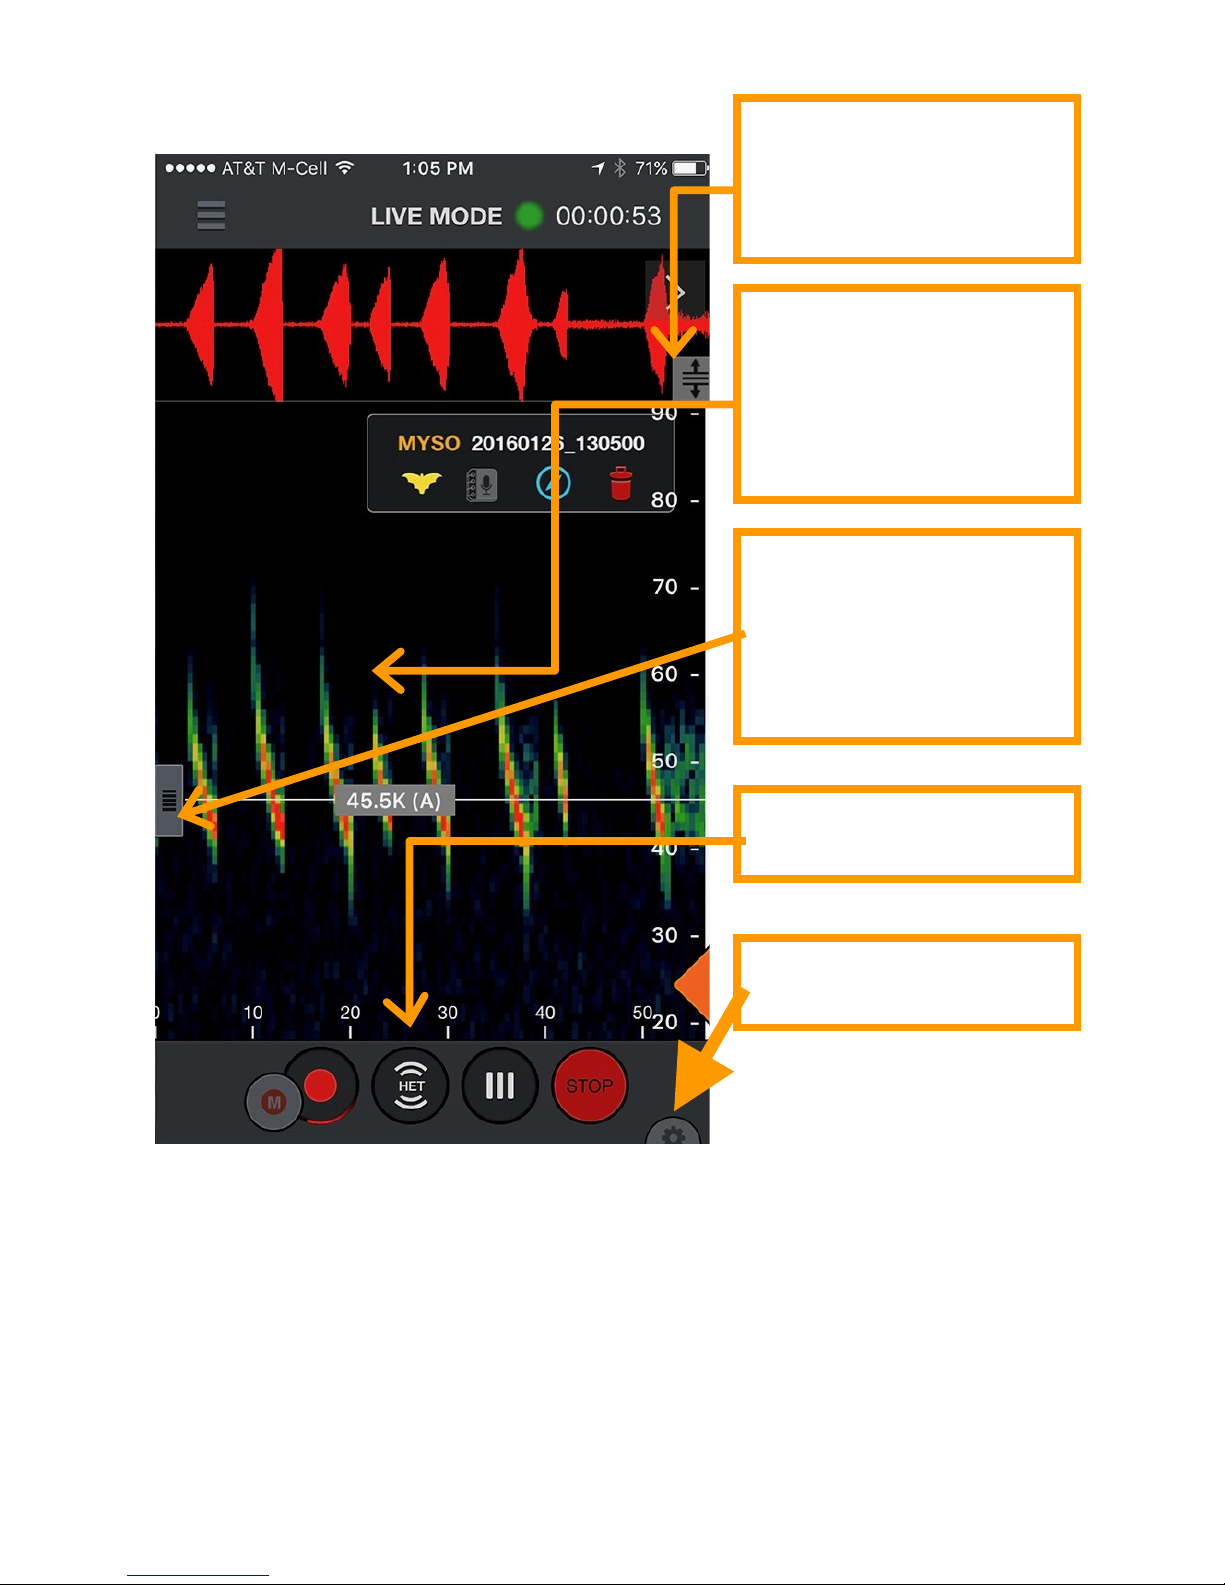
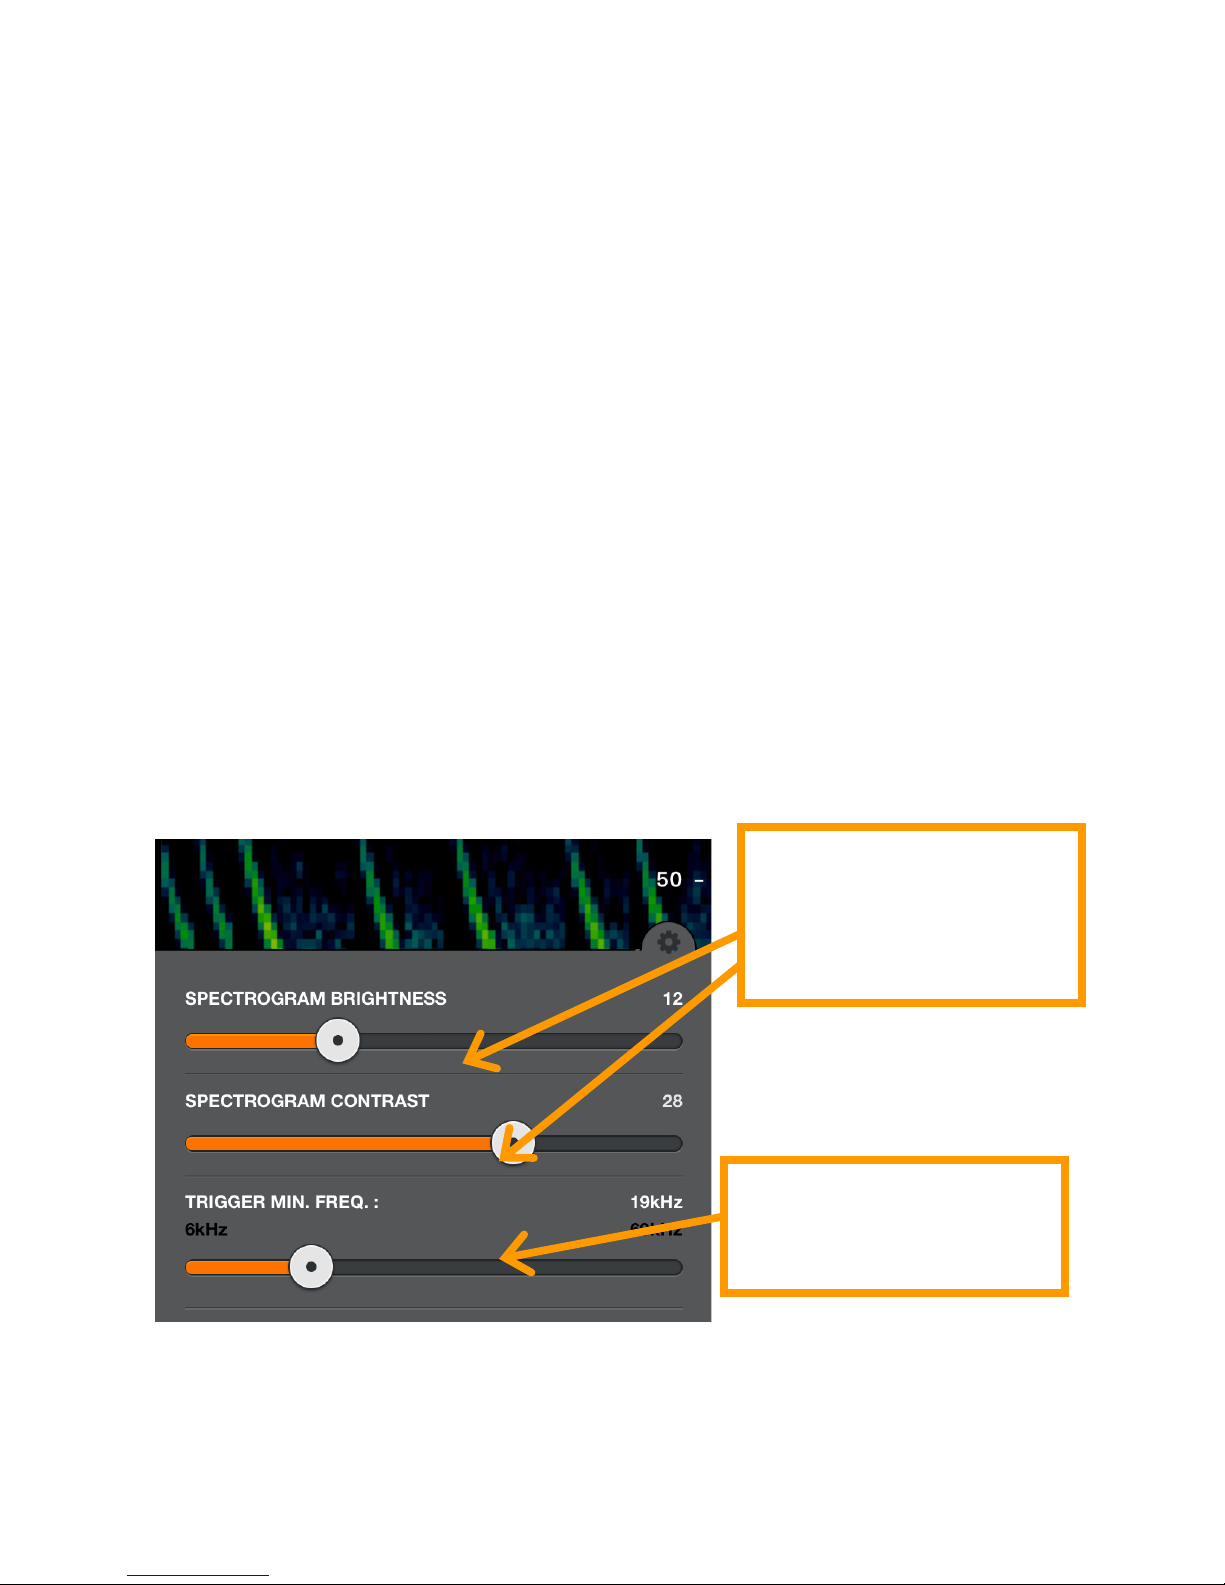
Record to WAV files
Use triggered recording to automatically save bat passes to full
spectrum WAV files for analysis on a computer or to view on your
iOS device. Or use manual record mode to control start and stop
of recording. View the recording spectrogram and add voice or
text notes. Listen to the recording using RTE, HET, or traditional
Time Expansion Playback (playback at fractional speed to make
the ultrasound audible).

See your path and recording locations
View your path, including recording locations in satellite or road
map view. View identified species codes directly on the map. Go
to the recording's spectrogram from the map view. Transfer to
your computer to view in Google Earth. Your iOS device must
have GPS capability or you must use a Bluetooth GPS receiver for
this functionality.
NOTE: This feature requires an iPad or iPhone with a GPS
capability or a Bluetooth GPS receiver.
Transfer recordings to your computer
The Echo Meter Touch can transfer full spectrum WAV recordings
to your computer over a wireless network or cabled through the
iTunes software. Using Wi-Fi, the app bundles the recordings in a
.zip folder and allows download by entering a URL in any web
browser. The recordings can also easily be uploaded to iCloud or
other online storage services.
Share recordings via email or MMS messaging
You can share recordings via email or MMS messaging and
import and open files that have been shared with you.
1.3 Leave Feedback or Review the App
Please contact us with any suggestions, issues, questions, or
comments. We are always looking for ways to improve the app
for you. Tap Email Feedback on the Information page of the app
to send your feedback.
If you like the app, please let others know by selecting Review
this App from the Information page.

2
Using Echo Meter Touch
This section describes how to use the Echo Meter Touch app to
monitor bats.
NOTE: The display examples in this guide were composed on
iPhone in portrait orientation. You can also view the app in
landscape mode. On iPad, there are minor differences in layout
due to the larger display size. In addition, the app supports
Apple’s Split View which allows you to display two apps on an
iPad's screen at the same time. You can view Echo Meter Touch
at the same time as another app, for example a GPS app, a
weather app, or a notes app.
2.1 Connecting the Ultrasonic Module
The Echo Meter Touch Ultrasonic Modules sense ultrasonic
signals, digitize the signal, and transmit the ultrasonic data to the
iPad, iPhone or iPod Touch.
Plug an Ultrasonic Module into the
Lightning connector of your iOS device
and you can immediately start
listening to, recording, and identifying
bats.
1. Plug the Ultrasonic Module into
the Lightning connector of your
iOS device.
2. The iOS device asks you to open
the Echo Meter Touch app if it is
not already open.
3. Press the START button to begin streaming the ultrasonic
data.

NOTE: The module should be pointed in the general direction
of the bats which requires the iOS device to be turned upside
down as shown above. iPhone X, XR and XS require the user to
flip Live Mode with a rotate icon that appears at the top of the
screen. Apple does not permit automatic flipping on those
models.
2.2 Navigating the app
To na vi ga te th rou gh th e a pp, pres s th e main menu symbol. You
can go to other sections of the app while still hearing and
recording bats. You can even continue to monitor and record bats
in the background while using other apps.
2.3 Monitoring in Live Mode
In LIVE MODE, ultrasonic data is streamed to your iPhone or
iPad. The frequency and duration of the bat echolocation calls are
visually represented in a scrolling spectrogram.
The main menu symbol

In LIVE MODE you can scroll back and zoom into portions of the
scrolling spectrogram. After scrolling back in time, a “Return to
real-time” button appears at the top right of the screen; press to
jump forward to real-time. You can scroll back in time through up
to 10 minutes of history. The app will intelligently reduce the
history if the iOS device is nearly full. A frequency reference line
allows viewing a specific frequency.
Spectrogram
Waveform
Frequency scale in kHz
Time scale in
milliseconds

You can listen to bats using Wildlife Acoustics patented Real Time
Expansion (RTE) or Heterodyne (HET). RTE translates the
ultrasonic sounds to a range that is audible to humans by taking
tiny snippets of the sound and slowing it down. Since there is
quite a bit of space in between bat echolocation calls relative to
the length of the call, the space in between is used to play back
the slowed down call. When in HET mode, double tap the grey
frequency reference control to go into auto-het mode. This will
constantly tune to the frequency with the most energy above the
RTE/HET/OFF toggle
off
Pinch and zoom in
time or frequency on
the spectrogram or
waveform
Tap to activate
frequency reference
line (drag to move)
Spectrogram Settings
Slide to change
waveform display size

Trigger Minimum Frequency setting (see below) or a minimum of
10 kHz for EMT1 and EMT2 Pro or 16 kHz for EMT2. Just drag the
grey slider on the left side to manually tune.
A bandpass filter is implemented based on the zoom level of the
frequency axis in all listening modes. If you zoom in frequency,
you will only hear the frequencies visible on the screen. If there is
a quite a bit of low frequency noise, or the recorder is picking up
its own output, you can zoom such that the noise is not seen on
the screen and filter for a cleaner sound. You can also filter out
the higher frequency noise of the EMT2 if you do not have very
high frequency bats. Auto-HET will only tune to frequencies
visible on the spectrogram based on zoom level.
Ta p the Settings icon to open the spectrogram settings panel.
Here you can adjust the brightness and contrast of the
spectrogram as well as adjust the minimum frequency to trigger
a recording. In portrait orientation, it appears as shown; in
landscape orientation it appears at the top right of the screen.
In Compressed mode, the Echo Meter Touch only shows
spectrograms containing ultrasonic signals. The spectrogram
does not scroll unless there is a signal such as bat echolocations.
In Expanded mode, the spectrogram scrolls in real time. Use this
mode to examine the timing between previous bat
Brightness and
Contrast of the
spectrogram
Recording Frequency
Threshold

echolocations. Because the signals scroll too quickly, this mode is
not recommended for monitoring.
Ta p th e STOP button to stop streaming data and put the
Ultrasonic Module into a low-power state. Press START to
resume.
2.4 Configuring Auto-ID
Enter Auto ID mode to view a list of available regions. Current
regions are North America, Europe and United Kingdom, and
Neotropics. There is also a South African region that is in beta.
Check a region to select all bats in that region. Tap a region to
learn more about the species and to select only bats in your area.
A dropdown menu allows you to easily select only bats in your
North American state or Canadian province.
Toggle between
Compressed and
Expanded Mode
(Expanded shown)
Select region

After you select the bats to identify, you can automatically
identify them in LIVE MODE.
2.5 Recording in Live Mode
There are two methods of initiating a recording; using triggers
and manually. Using triggered recording, a recording is triggered
only when bat activity is detected and is ended when there is no
activity or 15 seconds have elapsed, whichever comes first. As
long as recording is turned on, the device records automatically
when bats are present, even when the app is running in the
background. There is also a small manual record button which
you can use to initiate a recording. This can be used on its own or
while triggered recording is activated if the trigger misses
something. When you press the manual button, a recording
starts 5 seconds back in time and continues until you hit the
button again or 15 total minutes is reached. The NOISE filter will
Tap a species to learn
more about the species
or view the Merlin
Tuttle portrait.
Use dropdown to
select only bats in your
area for most accurate
results
Grey checks indicate
the species is in your
area but the app can’t
yet identify it.

not act on manual recordings and Auto-ID will only run in real
time if the length is under 60 seconds.
During triggered recording, the Trigger Minimum Frequency, in
the Spectrogram Settings panel, should be set as high as
possible but lower than any expected bat echolocation. For North
America and the UK, 12 kHz works well. Lower frequency signals
will not initiate a recording. The Threshold can be set between 6
kHz and 60 kHz.
During recording, animation appears around the Record button.
A white outline forms around the recording on the spectrogram
when a recording is in process. In addition, a glowing red orb
appears on all title bars in the app when recording is activated
and glows green when a recording is triggered. The duration of
the current recording is shown to the right of the orb. Using
triggered recording, the duration of the current session is shown
and using manual recording, the duration of the current
recording is shown. At the conclusion of the recording, a label
shows the filename. Tap appropriate icon in the label to:
■ Identify the species of bat automatically, or override the
species tag.
■ Append voice or text notes to that recording.
■ Navigate to the recording location in GPS view.
■ Delete the recording.
Recordings with no bat detected are automatically tagged as
“NOISE” and automatically deleted. You can choose to not auto-
delete NOISE files in the Advanced Settings screen.
Using triggered recording, each time you press the Record
button a session is started. The session is concluded when you
toggle recording off. Each session is given a distinctive color bar
in the recording List and as a path in GPS View. An option in the
Advanced Settings screen organizes sessions into nightly
sessions (noon to noon) regardless of the number of times

recording is stopped and started. Each nightly session exports in
its own folder with its own KML file.
Using manual recording, the app automatically uses nightly
session mode for those recordings so as to avoid making a folder
for every recording.
The recording timer at the top of the screen starts at the
beginning of triggered recording session. Or at the beginning of
a manual recording. If a manual recording is made during a
triggered recording session, then after the manual recording is
over, the timer returns to the elapsed time for the triggered
session rather than restarting.
The top two bat’s scientific and common names appear in the
Auto-ID pop-up, which is shown for 10 seconds after
identification. This is not intended to ID two species of bats that
might appear simultaneously in a recording, though it might in
some circumstances. It is intended to give more information in
order to help you make the best ID possible and also to allow
you to see common confusions so you can learn the ID’s
limitations. You can a lso get a sense of the accura cy ID from the
pulse count. This shows the number of echolocation pulses that
match the top bat and the number of total pulses. More
matching pulses can indicate a stronger match. You can select the
runner-up species on the Auto-ID pop-up to immediately tag the
recording with that bat instead of the front-runner. Click on the “i"
icon to learn more about that species. If you know that both
species are incorrect, select “CHOOSE ID FROM LIST” to label the
recording with any other selected species of bat or enter your
own six letter species code. The Auto-ID pop-up also shows the
ratio of echolocation calls of the top bat to the total detected
calls. This helps give a sense of confidence in the identification.
You can also run ID on one or all recordings from the recording
list or while viewing spectrograms from the icon in the recording
label. Each recording takes a second or two to identify. If Real

Time ID is set on, the app will not be able to trigger for a couple
seconds following a recording while ID takes place. The species
code or NoID is assigned as a prefix to the recording name. You
can rerun Auto-ID if you should choose to select different bat
species to ID. In addition, from the recording you can choose
another label from your selected bat species by pressing the
yellow bat in the recording label.
Ta p th e reco rdin g la be l icon to open th e NOTES page. Voice and
text notes are saved as metadata in the recording so they can be
transferred with the recording to a computer.
Triggered recording
and/or manual
recording
Auto-ID pop-up
Recording timer
Click to label recording
with alternate bat
Label recording with
another species of bat
Learn more about bat
species
Pulse count

2.6 The Recording List
Here you can see a list of all of your recordings. The list can be
sorted by Time or Species. The latter is useful to sort by species
for identified recordings or to sort out noise or NoID recordings.
Tapping again will reverse the sort order. Tap o n a reco rd in g in
the list to view the spectrogram or leave notes. If you are
monitoring and recording in the background you will be advised
that you are leaving Live Mode.
Ta p th e Edit button at the top right to delete recordings, transfer
recordings to your computer via Wi-Fi, share recordings or
identify the bat species in the recordings. Press a box to
individually ‘check it’ in the list. You can select multiple recordings
from the list by checking the box of any recording, then pressing
and holding the checkbox of any recording above or below. This
will check all boxes in between.
Record voice note: tap
to start and stop
Write text note
Save Note

Press the Summary button to show a pop up screen with the
number of recordings with each identified species, NoIDs, and
the NOISE files. This will summarize all recordings if none are
checked, or a subset if only some have been selected with the
checkboxes.
Use the search bar to search for species IDs or to search the text
of any text notes you have added.
In addition to running ID or manually labeling recordings, the
Auto-ID button will also give the option to remove all IDs from
the checked recording. This will remove the ID meta data as well
as the filename prefix.
Icons indicate
recordings with voice
or text notes and
recordings with an
identified species
Colored recording
session identifier
Show summary pop-
up

The app has a limit of 10,000 recordings and recordings will need
to be transferred or deleted to activate recordings once that limit
has been reached.
2.7 Viewing Spectrograms of Recordings
Tap a recording from the Recordings list or from GPS view to view
the spectrogram of the recording, leave a voice or text note,
identify the bat, and listen to the recording. You can listen using
RTE, (HET), or Time Expansion (TE) playback. Use TE to play the
recording at a slow speed that renders ultrasound into audible
sound. In compressed view, you will only hear visible signals
during playback, not the space in between echolocations. For
HET and RTE, the playback occurs on all samples as though
expanded view is selected, whether in compressed or expanded
view. This lets you hear exactly how the bat would have sounded
in live mode. As in Live Mode, heterodyne can be tuned
automatically or manually.
Delete checked recordings
Check individually
Transfer checked
recordings via Wi-Fi or
share via Email or MMS
Identify checked
recordings or manually
label bat species
Check all recordings
Exit Edit mode

Press the up or down buttons to go to the next or previous
recording in the recording list. The order of the recordings will
match the sorting chosen in the list. Colored vertical bars at the
beginning of each recording show the corresponding recording
session and match the color shown in the recording list as well as
the path in GPS view.
You can filter the audio for better fidelity as in Live Mode by
zooming to only the frequencies of interest.
Spectrograph settings are available as in LIVE MODE.
Scroll and Zoom
spectrogram or
waveform as in Live
Mode
Playback
Choose RTE, HET, or TE
Recording label -
write/edit notes, run ID,
delete file or go to map
view
Go to next or previous
recording in the list

2.8 GPS View
In GPS VIEW, you can see the locations of recordings and species
ID and the track of your recording session on a map. Each
recording session is shown with a different path color. NOISE files
are not shown in GPS view.
A KML file is generated and stored with the session recordings in
the session folder. If any recording from a recording session is
transferred via Wi-Fi, a KML file will be included in the session
folder with all recording’s waypoints shown. You can also
download the files through iTunes as described in this User
Guide. KML files can be opened directly in Google Earth to show
the recording locations, species IDs and recording path
Tap to go to recordings
Toggle between map
and satellite views
Zoom or scroll map
view
Center and follow
mode
Turn Paths On and Off
This manual suits for next models
2
Table of contents
Popular Control Unit manuals by other brands

BERMAD
BERMAD 400E-5D Installation operation & maintenance

Telit Wireless Solutions
Telit Wireless Solutions GL865 QUAD Hardware user's guide

Neoway
Neoway N75-NA user manual

Kolver
Kolver EDU2AE/FR Operational manual

Hans Grohe
Hans Grohe 13444181 Installation/User Instructions/Warranty

AMX
AMX RDM-DC Wiring diagram

Kilowatt Labs
Kilowatt Labs SIRIUS 1860-24-B-1C-M-SD-A-X-X-G user manual

Girard Systems
Girard Systems GC946G installation guide

Aqua Computer
Aqua Computer aquaduct mark 3 user manual

Data Translation
Data Translation DT9857 user manual

joucomatic
joucomatic ASCO 343 Series Installation

Azbil
Azbil ACTIVAL VY5302A Series Specifications & instructions