manuals.online logo
Brands
  1. Home
  2. •
  3. Brands
  4. •
  5. Wildtronics
  6. •
  7. Microphone
  8. •
  9. Wildtronics 2021 User manual

Wildtronics 2021 User manual

Other Wildtronics Microphone manuals

Wildtronics Amplified Parabolic Microphone User manual

Wildtronics

Wildtronics Amplified Parabolic Microphone User manual

Popular Microphone manuals by other brands

Betzold 760932 operating instructions

Betzold

Betzold 760932 operating instructions

Shure A88SM user guide

Shure

Shure A88SM user guide

JTS UF-10TH/12 instruction manual

JTS

JTS UF-10TH/12 instruction manual

Shure BETA 58A User giude

Shure

Shure BETA 58A User giude

Shure SM7 user guide

Shure

Shure SM7 user guide

Sony ECM-Z200 Service manual

Sony

Sony ECM-Z200 Service manual

Electro-Voice 652 engineering data

Electro-Voice

Electro-Voice 652 engineering data

mantona 21150 instruction manual

mantona

mantona 21150 instruction manual

Loewe We. SEE 55 user manual

Loewe

Loewe We. SEE 55 user manual

IK Multimedia iRig Stream MIC PRO user manual

IK Multimedia

IK Multimedia iRig Stream MIC PRO user manual

DAPAudio RM-101 user manual

DAPAudio

DAPAudio RM-101 user manual

AKG CHM 21 User instructions

AKG

AKG CHM 21 User instructions

Sennheiser evolution wireless series EM 100 instruction manual

Sennheiser

Sennheiser evolution wireless series EM 100 instruction manual

Sony C-48 operating instructions

Sony

Sony C-48 operating instructions

GIGAMEDIA GGM PAMICUHFG user manual

GIGAMEDIA

GIGAMEDIA GGM PAMICUHFG user manual

Shure WH30TQG user guide

Shure

Shure WH30TQG user guide

auna PRO MIC-900 manual

auna PRO

auna PRO MIC-900 manual

Shure MV51 manual

Shure

Shure MV51 manual

manuals.online logo
manuals.online logoBrands
  • About & Mission
  • Contact us
  • Privacy Policy
  • Terms and Conditions

Copyright 2025 Manuals.Online. All Rights Reserved.

Wildtronics, LLC
All Purpose
Parabolic Microphone
Instruction Manual
2021 Model
Referring to the photo on page 2, the part names of the All Purpose
Parabolic Microphone are labeled. These names will be used throughout
the manual to describe parts. The parabolic dish is not in the photo.
1. Handle -includes a hand stop and a hole for a carrying strap.
4. Adapter Sleeves -used for mounting different diameter microphones.
5. 1/4-20 Screw -for mounting mini recorders that have tripod mount.
7. Inward Facing Windscreen -has hole on both sides.
8. Outward Facing Windscreen -has hole on one side.
Parts Identification:
9. Mic Tube
2. Backplate -includes the hub assembly.
Thank you for purchasing the Wildtronics All Purpose Parabolic Kit.
Your new kit was designed for years of service, ease of use, superior
performance, and allows mounting almost any existing microphone
including the Wildtronics Micro Mic PIP, Micro Mic XLR, and
Amplified Omni Microphones. The All Purpose Parabolic is a modular
system that will require some assembly. This manual will describe the
many different ways this versatile microphone can be used and
assembled. You may only use one method of mounting a microphone, but
everything is included to meet your future needs. Use commonly
available cables to connect your microphone to your recorder. Read the
entire manual before installing your microphone.
3. Foam Cable Clamps
6. Tube Retainer O-rings
3. Mic Shock Mount Kit
10. Mic Clamp Thumbscrew
11. Front Plate -includes lip to hold a Secondary Windscreen Accessory
An optional Secondary Windscreen Kit is an available accessory. The kit
includes the frame kit, secondary windscreen, and an o-ring mic mount
kit.
4. Secondary Windscreen Frame Spacers
2. Secondary Windscreen Frame screws
1. Secondary Windscreen Frame
5. Secondary Windscreen
1
2
All Purpose Parabolic Microphone Parts
12
4
3
6
5
7
8
9
11
10
Optional Secondary Windscreen Frame Kit Accessory
123
45
3
To assemble the Hub assemble to the parabolic dish, pick up and hold the
Front Plate so that the flat side is pointed down and the beveled side is
pointed up. Place the Parabolic Dish over the Front Plate. Now, place the
Backplate over the rear of the Parabolic Dish. Insert the threaded hub of
the Backplate into the Front Plate threads and gently rotate the hub
clockwise to begin tightening. It should turn easily. Finish tightening the
hub until it hits the stop.
Assembly of Dish and Handle:
Place Dish over Front Plate &
place Backplate hub into threads.
Align Backplate and tighten
hub by rotating clockwise.
Next, place the Handle onto the hub of the Backplate. The Handle may
need some loosening to fit over the hub. To loosen, rotate the foam grip
part of the handle counter clockwise relative to the metal clamp part of
the Handle. Fit the Handle clamp over the hub. Tighten the Handle clamp
firmly by rotating clockwise; the Mic Tube should then also be clamped.
Don’t tighten all the way until you install either the Mic Tube or the Mic
Tube Eliminator into the hub. The Mic Tube Eliminator is only used if
using the Shock Mount system to mount your microphone.
Place Handle clamp over hub. Tighten Handle clamp.
4
Using the Mic Tube to mount a microphone:
The Mic Tube has a number of features and associated parts. Focusing
works as follows, the Mic Tube has an integral focus gauge with colored
lines, A, B, and C that correlate to the microphone focal points FI, the
end of the tube, and FO. When in use, lines A, B, or C will align at the
rear edge of the Backplate hub depending on which mic mounting
method you use. All Mic Tubes are now black and do not have colored
markings, but the below illustration clarifies the focus lines. When using
a microphone pointed towards the dish, align the Mic Tube line A at the
rear hub edge for perfect focus. When using a mic pointed away from the
dish, align line C at the rear hub edge. Sometimes it is preferred to
defocus a subject that is less than twenty feet away by pushing the focal
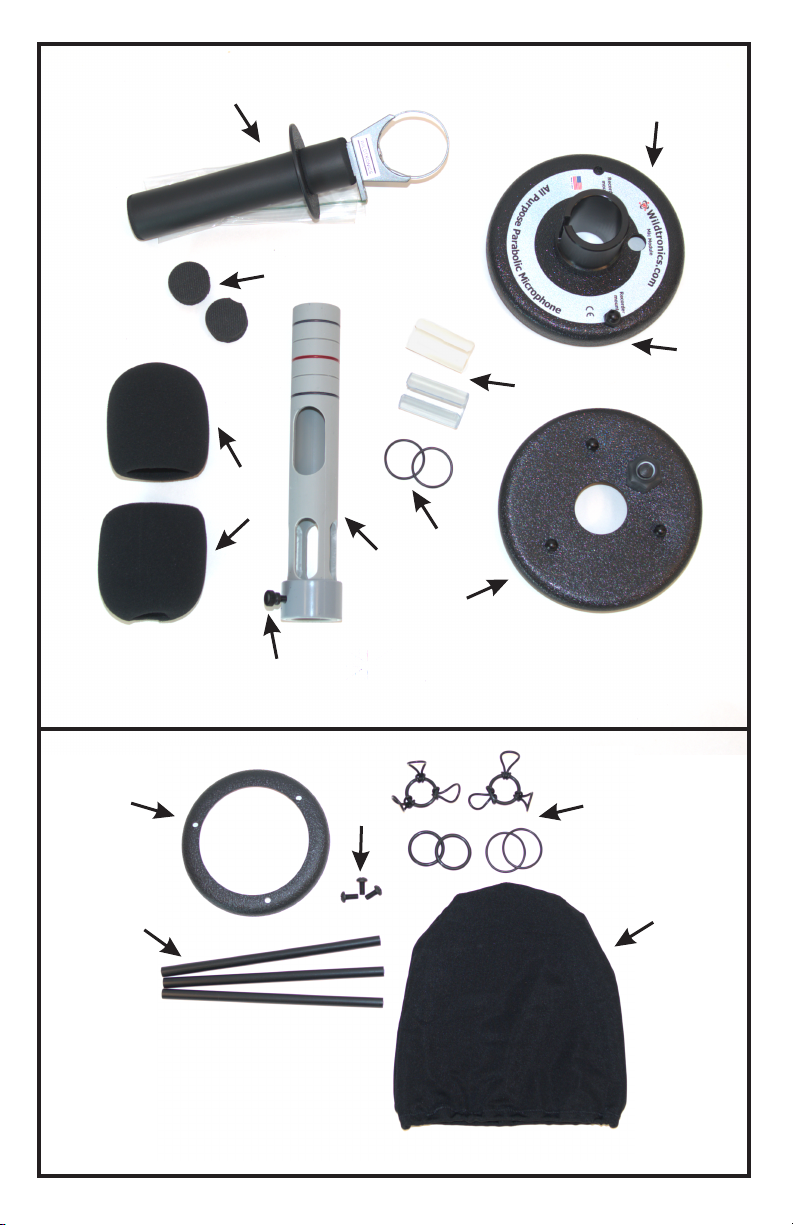
Mic Tube and related parts.
point away from the dish by 6mm,
and by 12mm if closer than 10 feet.
Installing a mic pointed towards
the dish is the preferred way to use
any parabolic microphone, and
works well with modern, shorter
mics. Omnidirectional microphones
are preferred, but you may use a
cardioid microphone.
To install a mic pointed towards the dish: First, install one of the Foam
Cable Clamps, 4, inside the Mic Tube between the cable slot, 3, and the
beginning of the open slots. This foam piece blocks sound from the Mic
Tube causing inference with the microphone. Install your microphone so
that the element is flush with FI, and clamp using thumb screw, 6. FI is at
the end of the open slots, exactly 1.0 inch deep. You may need to use one
of the Adapter Sleeves on your microphone so that it fits snugly into the
Mic Tube. See more about using the Adapter Sleeves later in the manual.
Next, install the Windscreen, the one with holes on both ends. Place the
larger hole onto the small end of the Mic Tube and slide it towards and
over the larger end where the thumb screw is located, until it hits the
thumb screw. The smaller opening will have a tight fit over the Mic Tube.
Next, install one of the o-rings, 1x1/16 inch, onto the Mic Tube. Place the
o-ring at point 5, this will become a cable retainer. Attach your mic cable
to the mic and route the other end of the cable under the o-ring you place
at point 5, through the cable slot, 3, and out the end of the Mic Tube.
Assemble the other Foam Cable Clamp onto the cable by opening the
slice cut in the foam, placing it around the cable and into the end of the
5
Inward facing mic in Mic Tube Assembled & at focus point.
the Mic Tube. This will retain the cable in the Mic Tube. Slide the mic
cable and the Mic Tube into the Front Plate, and through the Backplate
hub towards the Handle. Assemble o-ring, 2, onto the Mic Tube at focus
position A. This o-ring retains the Mic Tube from falling out when the
handle is loose, and helps set the focal point. Align point A to the rear
edge of the hub. Position and tighten the Handle, so it is near the rear of
the hub. You are ready to use the parabolic microphone.
Installing a microphone pointed away from the dish will result in
decreased performance, but maybe necessary when using longer
microphones. Microphones used this way must be omnidirectional
microphones. Foam cable clamp, 4, and o-ring, 5 are not used with this
method. Install your microphone cable. Insert your microphone and cable
into the small end of the Mic Tube until the element is even with focal
point FO, which is 1.0 inch or 25mm out from the edge of the Mic Tube.
This is the same distance as the thick section on the one end of the Mic
Tube, which you can use as a ruler. You may need to use a mic Adapter
Sleeve so your microphone will fit snug into the end of the Mic Tube. See
the section on using Adapter Sleeves below. Secure the microphone in
place by tightening thumb screw, 6. Install a Foam Cable Clamp around
the mic cable that exits the end of the Mic Tube, and insert it into the end
of the Mic Tube to retain the cable. If you have a very long microphone,
the Foam Cable Clamp may not be needed, as the mic body or mic
connector may exit the Mic Tube. Insert the mic cable and Mic Tube into
the Front Plate and through the hub of the Backplate until line C is even
with the back edge of the hub. Install o-ring, 2, onto the Mic Tube in
position C. Position and firmly tighten the Handle to the hub so the
Handle is near the rear of the hub. Either slide the included Windscreen,
the one with only one hole, or your own windscreen, over the end of the
mic. The parabolic microphone is ready to use.
Outward facing mic in Mic Tube. Assembled & at mic focus
Sleeve Use Table
Microphone Diameter
Sleeve Needed
18 -19.5 mm
Thick - Clear
19.5 - 22.5 mm
Thin - Clear
22 - 26 mm
No Sleeve Needed
Using mic Adapter Sleeves:
To adapt to a number of different microphone diameters, Wildtronics uses
adapter sleeves that fit over the microphone and into the Mic Tube. Select
the adapter you need from the table below. When using the thick sleeve, it
6
is easier to insert the sleeve into the Mic Tube first then to place it on the
microphone. When using a mic pointed towards the dish, be sure that the
sleeve does not extend into the slots, of the Mic Tube past the F1
position. Align the slot in the sleeve 90 degrees from the thumb screw for
best clamping.
Inward pointing mic sleeve install
7
Assembled Micro Mic PIP Store mic cable inside Mic Tube
Using the Wildtronics Micro Mic PIP:
Installing the Micro Mic PIP uses the same instructions read earlier about
using the Mic Tube to install a microphone. There are just a few
differences. There is no need to use a Mic Sleeve. The o-ring on the
Micro Mic PIP sets the depth of insertion, whether you install it pointed
towards or away from the dish. A 6 foot cable is included with the Micro
Mic PIP. When used pointed towards the dish, use the 90 degree
connector to connect to the mic. When used pointed away from the dish,
use the straight connector to connect to the mic. This will make cable
routing easier. You may curl any excess cable not used into the Mic Tube
before installing the Foam Cable Clamp into the rear end of the Mic
Tube.
The Wildtronics Micro Mic Pip microphone is a great, low noise,
lightweight, inexpensive microphone to use with your All Purpose
Parabolic Microphone. It is powered using Plug-in Power, or PIP that is
available on many 3.5mm input devices. It requires 3-5 volt PIP, and the
microphone is driven only on the left channel. The right channel is
grounded. It will work with many DSLR and video cameras as well as
mini audio recorders that have a 3.5mm microphone input. Our
Amplified Omni Mics are better suited for use with other lower cost mini
recorders, since these recorders have higher input noise.
The optional Shock Mount Kit is another way to mount a microphone in
the All Purpose Parabolic Microphone. Using the shock mount isolates
accidental bump sounds from reaching the microphone. The Shock
Mount Kit includes a number of o-rings that assemble onto the optional
Secondary Windscreen Frame. The 1x1/16 inch o-rings attach to the
Secondary Windscreen Frame tubes, and around the 3/32 inch thick o-
rings. See the included assembled photos. There are two sizes of 3/32
inch thick o-rings given that fit different microphones. The 11/16 inch ID
o-rings fit microphones that are 16-22mm in diameter. The 13/16 inch ID
o-rings fit microphones 19-25mm in diameter. This range covers most
microphones, but if you have a different microphone, you can source an
o-ring to fit it at a hardware store. You can also use the Micro Mic PIP in
this mount.
Select the correct 3/32 thick o-ring that will fit over your microphone.
Assemble 3, 1x1/16 o-rings onto the 3/32 o-ring, by looping the 1/16
thick o-ring around itself, and around the 3/32 thick o-ring. Assemble two
of the these o-ring assemblies. Remove the top plate from the Secondary
Windscreen by removing the three screws retaining it. Place the o-ring
assemblies over the tubes and slide them down towards the Front Plate.
Reassemble the top plate onto the Secondary Windscreen Frame. Insert
the Mic Tube Eliminator into the Backplate hub and tighten the handle.
Now, slide the o-ring assemblies away from the Front Plate and insert
Using the Shock Mount Kit to install microphones:
Assemble o-rings onto frame.
your microphone into them. You can
use your microphone pointed
towards the dish, recommended, or
away from the dish. Align your
microphone so that the element of
the mic is exactly 3 13/16 or 97mm
from the surface of the Front Plate.
Connect and route your mic cable.
Insert Foam Cable Clamps around
the mic cable and into the Mic Tube
Eliminator. Install your mic’s
windscreen. Your parabolic
microphone is now ready to use.
8
Mic pointed in using shock mount. Mic pointed out using shock mount.
Using the Parabolic Microphone:
Parabolic microphones are highly directional microphones that have
acoustical gain. They are intended to be used to increase the signal
strength and isolate single subjects beyond the abilities of any other type
of microphone. They have many uses including recording distant birds,
animals, insects, people, background reinforcement, etc. Generally, point
the microphone within 10-15 degrees of your subject. Since the
microphone becomes more directional as the frequency increases, you
should aim the microphone within two degrees of the subject for full
frequency response. This is more critical for recording higher pitched
birds and insects. The All Purpose Parabolic Microphone allows you to
mount microphones in many different ways, but in general, the
microphone will either be pointed towards or away from the dish. The
recommended way to use a parabolic microphone is to point the
microphone towards the dish. You may use a cardioid, but an
omnidirectional microphone is recommended when pointed towards the
dish. Sometimes, you may need to point the mic away from the dish due
to microphone length or other experimental needs. You will not obtain all
the gain and performance as you would if pointed towards the dish, and
you must use an omnidirectional microphone when pointed away from
the dish, since the microphone is operating backwards. You may read our
articles on Parabolic Microphone Theory and Use on our website to
better understand parabolic microphones. Keep all the parts included in
the All Purpose Parabolic Microphone kit. If you don’t need all the parts
now, you may have a need for a different application in the future that
will make use of the parts. If you haven’t already purchased one, we
highly recommend purchasing and using the Secondary Windscreen
accessory for any outdoor application. Adding the Secondary Windscreen
will allow you to record in winds up to 20MPH. Any higher than that,
9