Williams OVERTURE III User manual

OVERTURE III
owner's manual
digital piano with bluetooth® audio
20453755 Williams Overture III Owner's Manual_V3.indd 120453755 Williams Overture III Owner's Manual_V3.indd 1 8/2/21 1:57 PM8/2/21 1:57 PM

OWNER'S MANUAL
2
IMPORTANT SAFETY INSTRUCTIONS
• Donotusenearwater.
• Cleanonlywithasoft,drycloth.
• Donotblockanyventilationopenings.
• Donotplacenearanyheatsourcessuchasradiators,heatregisters,
stoves,oranyotherapparatus(includingampliers)thatproducesheat.
• Donotremovethepolarizedorgrounding-typeplug.
• Protectthepowercordfrombeingwalkedonorpinched.
• Onlyusetheincludedattachments/accessories.
• Unplugthisapparatusduringlightningstormsorwhenunusedforalongperiodoftime.
• Referallservicingtoqualiedservicepersonnel.Servicingisrequiredwhentheapparatushasbeen
damagedinanyway,suchaspower-supplycordorplugisdamaged,liquidhasbeenspilledorobjects
havefallenintotheapparatus,theapparatushasbeenexposedtorainormoisture,doesnotoperate
normally,orhasbeendropped.
FCC STATEMENTS
1.Caution:Changesormodicationstothisunitnotexpresslyapprovedbythepartyresponsibleforcompliancecouldvoidtheuser’sauthorityto
operatetheequipment.
2.NOTE:ThisequipmenthasbeentestedandfoundtocomplywithaClassBdigitaldevice,pursuanttoPart15oftheFCCRules.Theselimitsare
designedtoprovidereasonableprotectionagainstharmfulinterferenceinaresidentialinstallation.Thisequipmentgenerates,uses,andcanradiate
radiofrequencyenergyand,ifnotinstalledandusedinaccordancewiththeinstructions,maycauseharmfulinterferencetoradiocommunications.
However,thereisnoguaranteethatinterferencewillnotoccurinaparticularinstallation.Ifthisequipmentdoescauseharmfulinterferencetoradioor
televisionreception,whichcanbedeterminedbyturningtheequipmentoandon,theuserisencouragedtotrytocorrecttheinterferencebyoneor
moreofthefollowingmeasures:
• Reorientorrelocatethereceivingantenna.
• Increasetheseparationbetweentheequipmentandreceiver.
• Connecttheequipmentintoanoutletonacircuitdierentfromthattowhichthereceiverisconnected.
• Consultthedealeroranexperiencedradio/TVtechnicianforhelp.
20453755 Williams Overture III Owner's Manual_V3.indd 220453755 Williams Overture III Owner's Manual_V3.indd 2 8/2/21 1:57 PM8/2/21 1:57 PM

OVERTURE III DIGITAL PIANO
WILLIAMSPIANOS.COM
3
ASSEMBLY INSTRUCTIONS
STEP 1
PlacethefourCylindricalNutsA(M6 Nut)intotheholesintheStand
Legs,withthescrewdriverslotfacingout.Useascrewdrivertoalignthe
threadsinthenutswiththeopeningsonthebottomofthe
StandLegs.
PIANO PARTS LIST
STEP 2
Placethedowelsinthefeetintotheappropriateholesinthebottom
oftheStandLegs.Makesurethatthefeetarefacingawayfromthe
backpanelbracketasshownbelow.ThreadtwoFootBoltsB(M6X55)
throughthefootandintothecylindricalwashers,rotatingthewasherto
alignifneeded.Firmlytighten&repeatfortheotherside.Placethefour
plasticcapsovertheholeswiththecylindricalwashers.
20453755 Williams Overture III Owner's Manual_V3.indd 320453755 Williams Overture III Owner's Manual_V3.indd 3 8/2/21 1:57 PM8/2/21 1:57 PM

OWNER'S MANUAL
4
STEP 3
Attachthepianobasetotheleft
andrightlegs,andsecureusing
fourC (M6X16)screws.
STEP 4
Screwthethreebrackets
D (ST4X12)intothepianobase
byfollowingthepre-drilledholes.
Thebracketshouldbefacingthe
frontofthepiano,withthescrews
facingthebackofthepiano.
20453755 Williams Overture III Owner's Manual_V3.indd 420453755 Williams Overture III Owner's Manual_V3.indd 4 8/2/21 1:57 PM8/2/21 1:57 PM

OVERTURE III DIGITAL PIANO
WILLIAMSPIANOS.COM
5
STEP 5
Screwthemodestlypanelintothe
bracketsandlegsusingthepre-
drilledholesandincludedscrews
withwashersE (M4X10).
Thevanityboardshouldbeon
thefrontsideofthebrackets,
andscrewsshouldenterthrough
thefrontsideofthepiano.
STEP 6
Placethemainpianosectionon
topofthelegs.
Slipthetwotabsonthebottom
ofthepianointotheU-shaped
bracketstowardtherearof
thestand.UsefourF (M6x20)
screwstosecurethebrackets.
Tightenallfourscrews.
20453755 Williams Overture III Owner's Manual_V3.indd 520453755 Williams Overture III Owner's Manual_V3.indd 5 8/2/21 1:57 PM8/2/21 1:57 PM

OWNER'S MANUAL
6
STEP 6
Attachtheheadphonehookto
theundersideofthepiano,justto
theleftoftheheadphoneoutput
jacksbyusingthefourpre-drilled
holesandincludedG (M4X12)
screws.
FINAL STEP
Plugthepedalarraycableinto
the"Pedal"jack,andthepower
cableintothe"Power"jack
onthebackofthepiano.
20453755 Williams Overture III Owner's Manual_V3.indd 620453755 Williams Overture III Owner's Manual_V3.indd 6 8/2/21 1:57 PM8/2/21 1:57 PM

OVERTURE III DIGITAL PIANO
WILLIAMSPIANOS.COM
7
PIANO BENCH ASSEMBLY
Toassemblethepianobench,
pushinsertAintotheleg.Push
woodendowelCintothetop
oftheleg.Addthenutsand
washersinBtoattachtheleg,
andusethesuppliedwrenchD
totighten.
PIANO BENCH PARTS LIST
20453755 Williams Overture III Owner's Manual_V3.indd 720453755 Williams Overture III Owner's Manual_V3.indd 7 8/2/21 1:57 PM8/2/21 1:57 PM

OWNER'S MANUAL
8
TABLE OF CONTENTS
INTRODUCTION
Congratulations!Youhavejustpurchasedastate-of-the-artdigitalpianothatprovidesremarkableacoustic
soundandfeel.Werecommendthatyoureadthroughthisowner'smanualcarefully,soyoucangetthemost
enjoymentfromyournewpiano.
Features include:
• 88graded,weighted,velocity-sensitivekeys
• 18mainpianoandkeyboarddirectaccesssoundsand171soundsselectablebyvaluedial
• Metronomefeaturewithvariabletempotofacilitatepracticeorrecording
• WirelessBluetoothMIDIandAudioforconnectingtotablets,smartphones,andapps
• USB/MIDIconnectionsandstereo/monolineoutjacks,stereolineinputjacks
• BluetoothAudioandMIDI
BEFORE YOU GET STARTED
Yourpianowascarefullypackedatthefactory,andthepackagingwasdesignedtoprotecttheunitfrom
roughhandling.
• Iftheunitisdamaged,callWilliams Product Support: (888) 241-1582
• Usetheoriginalpackingcartonwhenstoringortransporting
• Makesurechildrenaresupervisedwhennearthepianooritspackaging
INITIAL OPERATION / QUICK START
• Plugthepowercordintoa100V-240Vsupply.
• Pressthepowerbutton.TheLEDwilllight.
• PresstheVoiceSelectbuttonforthedesiredvoice.
• Adjustthevolumecontrol.
IMPORTANTSAFETYINSTRUCTIONS...........2
ASSEMBLYINSTRUCTIONS...........................3
INTRODUCTION..............................................8
TAKINGCAREOFYOURDIGITALPIANO......9
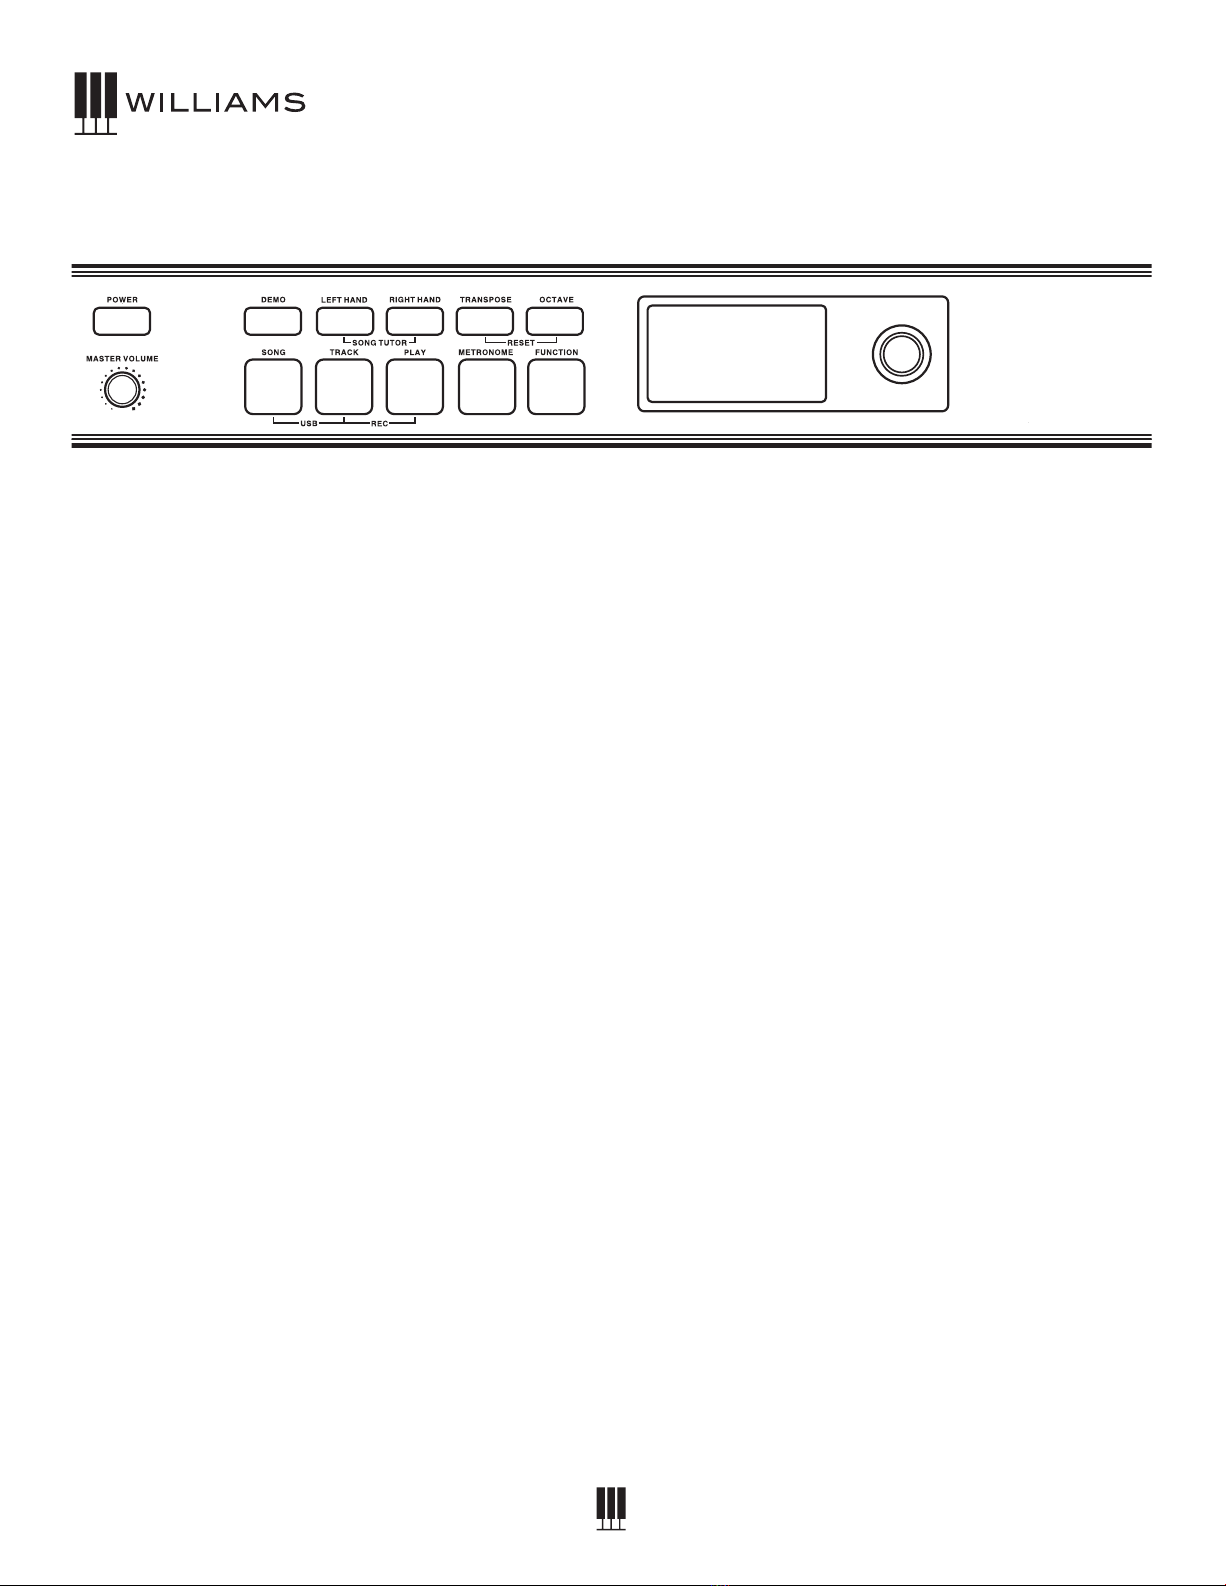
FRONTPANEL..............................................10
BACKPANEL.................................................12
TOPPANEL...................................................12
OPERATIONS................................................13
SPLITMODE.................................................16
RECORDING.................................................17
DEMOSONG.................................................17
TUNING.........................................................17
EFFECTS.......................................................18
MODFX.........................................................19
ADVANCEDFUNCTIONS..............................20
SONGTUTOR...............................................21
BLUETOOTH.................................................21
USBSONGMODE........................................22
MIDI...............................................................22
SOUNDS.......................................................24
VOICES..........................................................25
DRUMSOUNDS............................................32
DEMOSONGS..............................................43
TUTORSONGS.............................................44
SPECIFICATIONS..........................................46
MIDIIMPLEMENATIONCHART....................47
WARRANTY...................................BACKPAGE
20453755 Williams Overture III Owner's Manual_V3.indd 820453755 Williams Overture III Owner's Manual_V3.indd 8 8/2/21 1:57 PM8/2/21 1:57 PM

OVERTURE III DIGITAL PIANO
WILLIAMSPIANOS.COM
9
TAKING CARE OF YOUR DIGITAL PIANO
ThisWilliamsOvertureIIIdigitalpianowillprovideyearsofmusicalenjoymentifyoufollowthesuggestions
listedbelow.
PRODUCT SERVICING
Thisproductshouldbeservicedbyqualiedservicepersonnelwhen:
• Thepowersupplycordortheplughasbeendamaged.
• Liquidhasbeenspilledintotheunitorithasbeenexposedtorain.
• Theinstrumentdoesnotappeartooperatenormallyorexhibitsamarkedchangeinperformance.
• Theinstrumenthasbeendroppedorthecabinethasbeendamaged.
• Pleasecontact[email protected]forpartsandserviceinformation.
HANDLING AND TRANSPORT
• Neverapplyexcessiveforcetothecontrols,connectorsorotherpartsoftheinstrument.
• Alwaysunplugcablesbygrippingtheplugrmly,notbypullingonthecable.
• Disconnectallcablesbeforemovingtheinstrument.
• Physicalshockscausedbydropping,bumping,orplacingheavyobjectsontheinstrumentcan
resultinsupercialoroperationaldamage.
• Carefullycheckthevolumecontrolbeforeplaying.Excessivevolumecancausepermanenthearingloss.
CLEANING
• Cleanthecabinetandpanelwithasoft,drycloth.Donotusepaintthinnerorpetrochemicalbasedpolishes.
• Tomaintainthelusterofthekeysandbuttons,wipewithaclean,lightlydampenedcloth,andthen
polishwithasoft,drycloth.
LOCATION
• Toavoiddeformation,discoloration,ormoreseriousdamage,donotexposetheinstrumentto
thefollowingconditions:Directsunlight,hightemperatures,excessivehumidity,excessivedust,
strongvibration.
• Leaveenoughspacearoundthepianoforproperventilation.
• Thisinstrumentcontainsdigitalcircuitryandmaycauseorbesusceptibletointerferenceifplacedtoo
closetoradio,televisionreceivers,ormobilephones.Ifinterferenceoccurs,movetheinstrumentfurther
awayfromtheaectedequipment.
• Avoidplacingvinylobjectsontopoftheinstrument,vinylcansticktoanddiscolorthesurface.
POWER
• Turnthepowerowhentheinstrumentisnotinuse.
• Toavoiddamagetotheinstrumentandotherdevicestowhichitisconnected,turnthepowerofall
relateddevicesopriortoconnectionordisconnectionofMIDIcables.
• Turnthepoweroifthemaincableisdamaged,ortheinstrumenthasbeenexposedtoliquid.
• Donotswitchtheunitonandoinquicksuccession,asthisplacesanundueloadonthe
electroniccomponents.
• UnplugtheACpoweradapterduringanelectricalstorm.
• AvoidpluggingtheACpoweradapterintothesameACoutletasapplianceswithhighpower
consumption,suchaselectricheatersorovens.
20453755 Williams Overture III Owner's Manual_V3.indd 920453755 Williams Overture III Owner's Manual_V3.indd 9 8/2/21 1:57 PM8/2/21 1:57 PM

OWNER'S MANUAL
10
Power On/O
Master Volume
Controlstheoveralloutputvolumeofthepiano.
Song
PressingtheSongbuttonallowstheusertochoose
asongtoplayfromtheinternallyrecordedtracksor
anexternalUSBashdrive.
Track
PressingtheTrackbuttonallowstheusertoselect
eithertrack1ortrack2torecordover.Selectwhich
trackwillbeactivewiththeValueDial.
Play
Playsthecurrentlyselectedsong.
USB
PressingtheSongandTrackbuttonssimultaneously
opensuptheUSBmenu,allowingtheusertoselect
asongtoplayfromaUSBashdrive.
Record
PressingtheTrackandPlaybuttonssimultaneously
willstarttherecordingfunction.
Metronome
TurnsonandotheMetronome.
Function
PressingtheFunctionbuttonopensthefunction
menuontheLCDDisplay.Thisallowstheuserto
adjustseveralsettingssuchasMetronometempo,
eectsparameters,EQ,andBluetooth.
Demo
PressingtheDemobuttonwillstartplayinga
demosong.Anewdemosongcanbeselectedby
scrollingthroughtheselectionswiththeValueDial.
Song Tutor
PressingtheLeftHandandRightHandbuttons
simultaneouslywillactivatetheSongTutor,which
includes50Built-insongswithrightandlefthand
partmutes.
Left Hand
PressingtheLeftHandbuttonwhileSongTutoris
activewillmuteorunmutewhatisbeingplayedby
thelefthandontheactivetrack.
Right Hand
PressingtheRightHandbuttonwhileSongTutoris
activewillmuteorunmutewhatisbeingplayedby
therighthandontheactivetrack.
Transpose
Transposesthekeyofthepiano.
Octave
Transposestherangeofthepianokeys1octave
higherorlower.
Piano Reset
PressingtheTransposeandOctavebuttons
simultaneouslywillresetthesoundtofactory
settings.Holdingthesewhilepoweringupthepiano
willreturnallsettingstotheirdefaults.
LCD Display
Showsthecurrentnameofthesongorvoiceaswell
asvariousparameterassignmentsandmetronome
BPM.
Value Dial
Scrollsthroughvariousvoicesandvaluesonthe
LCDDisplay.
FRONT PANEL
(LEFT SIDE)
20453755 Williams Overture III Owner's Manual_V3.indd 1020453755 Williams Overture III Owner's Manual_V3.indd 10 8/2/21 1:57 PM8/2/21 1:57 PM

OVERTURE III DIGITAL PIANO
WILLIAMSPIANOS.COM
11
FRONT PANEL
(RIGHT SIDE)
Voice Select Buttons/Value Dial
(Pianos,ElectricPianos,Organs,Keys,Bassesand
Drums).Pressingthesebuttonswillswitchtothe
soundcategorythatisassociatedwiththenames
printedabovethem.UsingtheValueDialwillscroll
throughallvoices.
Variation
PressingtheVariationbuttonswitchesbetween
threedierentsoundswithinthecurrentlyselected
voicecategory.TheLEDwillremainofortherst
voice,andwilllightupwhiteforthesecondvoice
orblueforthethirdvoice.Eachvoicenumberand
namewillbeshownontheLCDDisplay.
SPLIT Button
PressingtheSplitbuttonwillseparatethekeyboard
intotwoseparatevoices.Thesplitpointdefaultsto
B1,butcanbechangedbyholdingdowntheSplit
buttonandpressinganykeytomakethisthenew
splitpoint.
Duet Button
PressingtheDuetbuttonsplitsthekeyboardinhalf
(atmiddleC)sothattwoplayersmayplaythesame
octavessimultaneously.
Chorus Button
TurnsonandotheChoruseectassignedtothe
voice.
Mod FX Button
TurnsonandotheModulationeectassignedto
thevoice.
Reverb Button
TurnsonandotheReverbeectassignedtothe
voice.
Bluetooth Indicator
IndicatesthatthepianoisconnectedtoaBluetooth
devicewhenlit.
USB Host Slot
PlugginginaUSBthumbdrivesallowstheuserto
playMIDIandaudiolesfromthedevice.
20453755 Williams Overture III Owner's Manual_V3.indd 1120453755 Williams Overture III Owner's Manual_V3.indd 11 8/2/21 1:57 PM8/2/21 1:57 PM

OWNER'S MANUAL
12
Pedal Input
Connectsthebuilt-inSustain,Soft,andSostenuto
pedalslocatedatthebottomofthepiano.
Outputs-Stereo / Mono Line Out ¼” Jacks
Theoutputjackssupplyaline-levelsignalfor
externalamplication.Usebothjacksforstereoor
justtheLeftjackformono.
AC Adapter Input
ConnectionfortheincludedACpowercord.
Headphones (x2)
Theheadphonejacksallowplayinginsilence.When
headphonesarepluggedin,thespeakersaremute.
Thisjackislocatedonthebottompanelofthe
piano.
USB Input
TheUSBconnectionsupportsClassCompliant
MIDIDriverstousewithMIDISequencer
applications.ItalsosupportsaudiooverUSBfrom
acomputer,tabletorsmartphone.
Aux In Jack
The1/8”TRSJackonthetoppanelallowstheuser
topluginanmp3oraudiodevicetoplaymusic
throughthepianospeaker.
BACK PANEL
TOP PANEL
20453755 Williams Overture III Owner's Manual_V3.indd 1220453755 Williams Overture III Owner's Manual_V3.indd 12 8/2/21 1:57 PM8/2/21 1:57 PM

OVERTURE III DIGITAL PIANO
WILLIAMSPIANOS.COM
13
OPERATIONS
TheOvertureIIIhasanLCDthatallowsyoutosee
theVoicenameaswellasitsparameters.
Mostofthefrontpanelbuttonsareverystraight
forwardandeasytoselectforgeneralfunctions.In
caseswhereyouwanttoeditsettingsinmoredepth
youwillneedtousethefrontpanelbuttonsaswell
astheFunctionbuttonandValueknobtochange
parameters.
Front Panel Sound Assignments
Variation Pianos E. Pianos Organs Keys Basses Drums
Original
Voice GrandPiano TineEPiano SmileyOrgan OrchStrings UprightBass StandardKit
Variation
Voice 1 RockPiano ReedEPiano PercOrgan ChoirAahs PickedBass PowerKit
Variation
Voice 2 HonkyTonk 80sEPiano PipeOrgan SynthBrass1 SlapBass1 ElectroKit
Powering On the Overture III
PressthePOWERbuttonintheupperleftcornerof
thefrontpanel.Thisproducthasapowerstandby
mode.Ifthepianoturnsowhileyouarenot
playingit,thisislikelyduetotheAutoPowermode.
ToadjusttheAutoPowerOtimerordeactivatethis
feature,presstheFunctionButton,thenturnthe
ValueDialto“AutoPower”andchooseyourtime
settings,orscrollallthewaytothelefttosetitto
“O.”
Voices
TheOvertureIIIpianohas171built-invoices.
Allvoicesmaybeselectedusingthevalueknob,or
themostcommonlyusedvoicesmaybeselected
usingtheVoiceSelectandVariationbuttons.Some
canbelayeredtoproducetwovoicesatonce,or
assignedtotheleftorrighthandsinthesplitmode.
WhenaVoiceSelectbuttonispressed,thebutton’s
LEDwillindicatethatitisactive,andthevoice
nameandnumberwillbeshownonthedisplay.
WhenthesameVoiceSelectbuttonispressed
again,oriftheVariationbuttonispressed,thevoice
willskiptoanothercommonlyusedsoundfrom
thesamecategory.Ifthevoiceisavariation,the
Variationbuttonwilllightupwhitetoindicatethat
therstvariationisactive,orbluetoindicatethat
thesecondvariationisactive.
20453755 Williams Overture III Owner's Manual_V3.indd 1320453755 Williams Overture III Owner's Manual_V3.indd 13 8/2/21 1:57 PM8/2/21 1:57 PM

OWNER'S MANUAL
14
Metronome Function
PresstheMetronomebuttontoturnonthe
metronome.TheLEDwilllight.Youwillhearthe
clickinheadphonesorspeakers.
PresstheMetronomebuttonagaintoexit
metronomefunction.TheLEDwillturno.
To Change Metronome Time Signature:
1. Pressthe[FUNCTION]button.
2. TurntheValueDialtoselectMetronome
signatureeditmenu.Thedisplaywillshow
“TimeSig”.
3. PresstheFunctionbuttonagaintoenterthe
relativeparametereditmenu,andtheFUNC
indicatorwillblinktoindicatetheparameter
iseditable.
4. TurntheValueDialtoselectatimesignature.
The time signature can also be changed with the
following shortcut:
1. Pressandholdthe[METRONOME]buttonfor2
seconds.TheLCDdisplaywillshowthecurrent
metronomesignaturesettingandthengobackto
currentVoicename.
2. TurntheValueKnobtodeterminetheMetronome
timesignaturewhilethedisplayshowsthe
currentsetting.
Thedefaultis4/4andthefollowingoptionsare
availabletotogglethrough:1/4,2/4,3/4,4/4,5/4,
6/4,3/8,6/8,7/8,9/8,and12/8.
To Set the Volume Level of the Metronome:
1. Pressthe[FUNCTION]button.
2. TurntheValueDialtoselecttheMetronomeVolume
editmenu.Thedisplaywillshow“MetroVol”.
3. PresstheFunctionbuttonagaintoenterthe
relativeparametereditmenu,andtheFUNC
indicatorwillblinktoindicatetheparameteris
editable.
4. TurntheValueDialtoselecttheMetronome
Volumerange(0-127).
To Set the Tempo:
1. Pressthe[FUNCTION]button.
2. TurntheValueDialtoselectTempoeditmenu.
Thedisplaywillshow“Tempo”.
3. PresstheFunctionbuttonagaintoenterthe
parametereditmenu.TheFUNCindicatorwill
blinktoindicatethevalueiseditable.
4. TurntheValueDialtoselectTempo.(20-280)
Transpose Function
Thisfunctionwilltransposethepianokeyboardby
upto+12or-12semitones.
To transpose the keyboard:
1. Pressandholdthe[TRANSPOSE]button.The
displaywillshowthecurrentTransposesettingin
thelowerright-handcornerofthedisplay.
2. WhiletheTransposeindicatorison,youcan
turntheValueDialtoselecttheTranspose
range(+12or-12semitones),orplayanykey
withintheoctavesaboveorbelowmiddleCto
automaticallyjumptothatinterval.
20453755 Williams Overture III Owner's Manual_V3.indd 1420453755 Williams Overture III Owner's Manual_V3.indd 14 8/2/21 1:57 PM8/2/21 1:57 PM

OVERTURE III DIGITAL PIANO
WILLIAMSPIANOS.COM
15
Octave
Thisfunctionwilltransposethepianokeyboardup
ordownbyuptotwooctaves.
TherearetwokindsofOctaves.Oneisforfull
keyboardoctavetheotherisforsplitmode(left
hand)octave.
To Transpose the Full Keyboard:
1. Pressandholdthe[OCTAVE]button.Thedisplay
willshowthecurrentfullkeyboardOctavesetting
inthelowerright-handcornerofthedisplay.
2. WhiletheOctavescreenisonyoucanturnthe
ValueDialtoselecttheOctave.(+2or-2)
Wheninsplitmode,theregularOctavebutton
functionwillonlyadjustthemain(righthand)
octave.
To Change the Split (left hand) Octave:
1. Pressthe[FUNCTION]button.
2. TurntheValueDialtoselectSplitOctaveedit
menu.Thedisplaywillshow“SplitOctave”.
3. PresstheFunctionbuttonagaintoenterthe
parametereditmenu.TheFUNCindicatorwill
blinktoindicatethevalueiseditable.
4. TurntheValueDialtoselectSplitOctave.
(+2or-2)
Piano Reset
Ifyouwanttoquicklyresetthekeyboardtothe
defaulttransposition,Octaverangesandeects,
youcandosobypressingtheTransposeand
Octavebuttonssimultaneously.
LAYER MODE
To Layer Two Sounds:
1. SelectyourmainvoiceusingtheVoiceSelect
buttonorValueDial.
2. PressanytwoVoiceSelectbuttons
simultaneouslytoactivatelayermode.TheLayer
indicatorinthebottomleft-handcornerofthe
screenwillashtoindicatethatyouareediting
thelayervoice.
3. ChooseyourlayeredvoiceusingtheVoiceSelect
buttonsorValueDial.
4. Wait5secondsfortheLayerindicatortostop
ashing,andtheDisplaywillswitchbackto
showingyourmainvoice.TheLayerindicator
willstayfullylittoindicatethatyourlayerisstill
active.Youmaychooseanewmainvoiceatany
timewhilelayermodeisactive.
PressanytwoVoiceSelectbuttonssimultaneously
againtodeactivatelayermode.Followsteps1-4to
chooseanewlayeredsound.
To Change the Layer Volume Level:
1. Pressthe[FUNCTION]button.
2. TurntheValueDialtoselecttheLayerVolume
Leveleditmenu,thedisplaywillshow“Layer
Volume”.
20453755 Williams Overture III Owner's Manual_V3.indd 1520453755 Williams Overture III Owner's Manual_V3.indd 15 8/2/21 1:57 PM8/2/21 1:57 PM

OWNER'S MANUAL
16
3. PresstheFunctionbuttonagaintoenter
parametereditmenu.TheFUNCIndicatorwill
blinktoindicatethevalueiseditable.
4. TurntheValueDialtoselectthelevelofthelayer
volume.(0-127)
SPLIT MODE
SplitModeallowsthekeyboardtobedividedinto
twosectionssothatdierentvoicesmaybeplayed
withtheleftandrighthands.TheSplitPoint(the
highestnoteplayedwiththelefthand),SplitVoice,
andVoiceVolumesmaybechangedasdesired.
To Enter Split Mode:
Pressthe[SPLIT]button.TheSplitindicatorand
currentsplitpointwilllightupinthelowerleft-hand
corneroftheDisplay.
TheSplitsettingswilldefaulttotheAcousticBass
andthelastSplitPointused.
To Change the Split Point:
HoldtheSplitbuttonandthenpressakeyonthe
keyboardtodeterminethenewsplitpoint.
Thesplitpointcanalsobechangedwithinthe
FunctionMode.
1. Pressthe[FUNCTION]button.
2. TurntheValueDialtoselectthesplitpointedit
menu,thedisplaywillshow“SplitPoint”.
3. PresstheFunctionbuttonagaintoenterthe
parametereditmenu.TheFUNCIndicatorwill
blinktoindicatethatthenumberiseditable.
4. TurntheValueDialtoselectthesplitpoint.(C-0
toC-7)
To Change the Main (Right Hand) Voice:
ThemainvoicecanbeselectedbyusingtheVoice
ButtonsorValueDial,inthesamewayasduring
normaloperation.
To Change the Split (Left Hand) Voice:
PressandholdtheSplitbuttonfor2seconds.The
Splitbuttonwillashtoindicatethatyouarenow
editingthesplitvoice,whichcanbeselectedusing
theVoicebuttonsorValueDial.
To Change the Split (Left Hand) Voice Volume:
1. Pressthe[FUNCTION]button.
2. TurntheValueDialtoselecttheSplitVolume
Leveleditmenu,thedisplaywillshow“Split
Volume”.
3. PresstheFunctionbuttonagaintoenterthe
parametereditmenu.TheFUNCIndicatorwill
blinktoindicatethevalueiseditable.
4. TurntheValueDialtoselectthelevelofthesplit
volume.(0-127)
To Change the Split (Left Hand) Octave:
Wheninsplitmode,theregularOctavebutton
functionwillonlyadjustthemain(righthand)
octave.
1. Pressthe[FUNCTION]button.
2. TurntheValueDialtoselectSplitOctaveedit
menu.Thedisplaywillshow“SplitOctave”.
3. Pressthe[FUNCTION]buttonagaintoenterthe
parametereditmenu.TheFUNCindicatorwill
blinktoindicatethevalueiseditable.
4. TurntheValueDialtoselectSplitOctave.
(+2or-2)
To Turn O Split Mode:
PresstheSplitbutton.TheSplitLEDwillturnoas
wellastheSplitIndicatorontheDisplay,andthe
currentlyselectedsplitvoice.
Duet Mode
InDuetMode,thekeyboardissplitintotwo
sections.TheleftsectionsbecomeA0-C3,andthe
rightsectionbecomeC#3-C7.Thevoiceofthetwo
sectionsisthesame.
20453755 Williams Overture III Owner's Manual_V3.indd 1620453755 Williams Overture III Owner's Manual_V3.indd 16 8/2/21 1:57 PM8/2/21 1:57 PM

OVERTURE III DIGITAL PIANO
WILLIAMSPIANOS.COM
17
Inthismode,therightpedalbecomesthesustain
pedalfortherightsectionofthekeyboardandtheleft
pedalbecomesthesustainpedalfortheleftsection
ofthekeyboard.Themiddlepedalisdisabled.This
modeisidealforteacher/studentpractices.
WhentheDuetButtonispressed,thebutton’s
LEDwilllightuptoshowthattheDUETmodeis
engaged.UsetheVoicebuttonsortheValueDialto
selectthevoice.
PresstheDUETbuttonagaintoexittheduet
keyboardmode.TheDuetLEDwillturno.
RECORDING
Recording Your Own Song
TheOvertureIIIallowstheusertorecordtheirown
songonuptotwotracks.Whenatrackisrecorded,
therecordingwillberetaineduntilyoueitherdelete
therecording,overwritethetrackwithanew
recording,orresettheOvertureIIIbacktofactory
settings.
1. Pressthe[TRACK]Buttonandselectwhichtrack
youwanttorecordtousingtheValueDial.
2. Pressthe[PLAY]and[TRACK]buttonstogether
tobeginrecording.Bothbuttonswillashto
indicatethatthetrackisreadytorecord,andthe
displaywillshow“InternalSongRecordTk1”
(or2).Oneyoustartplaying,thePlayandTrack
buttonLEDswillstopashingandremainonto
indicatethattherecordingisinprogress.
3. PressthePlayandTrackbuttonstogetheragain,
orjustthePlaybuttontostoptherecorder.
Then,pressPlaytohearyoursong.
4. Repeatthestepsabovetorecordtothe
othertrack.
DEMO SONGS
TheOvertureIIIcomeswith14demosongsto
demonstratesomeofthevarioussoundsthatare
includedinthepiano.Seepage43foralistofdemo
songs.
To Play A Demo Song:
Pressthe[DEMO]buttontobeginplayingademo
song,andpresstheDemobuttonagaintostopthe
demo.UsetheValueKnobtoselectanothersong.
Seelistofdemosongsbelow.
Changing the Voice Volume Level
Whileademosongisactive,thekeyboardmaybe
playedalongsidetherecording.Tochangethevoice
volumeinrelationtothedemo,followthesteps
below.
1. Pressthe[FUNCTION]button.
2. TurntheValueDialtoselectVoiceVolumeLevel
editmenu,thedisplaywillshow“MainVolume”.
3. PresstheFunctionbuttonagaintoenterthe
parametereditmenu.TheFUNCIndicatorwill
blinktoindicatethatthenumberiseditable.
4. TurntheValueDialtoselectthelevelofthevoice
volume.(0-127)
TUNING
To Change Global Tuning:
1. Pressthe[FUNCTION]button.
2. TurntheValueDialtoselecttheTuneeditmenu.
Thedisplaywillshow“MasterTune”.
3. PresstheFunctionbuttonagaintoenterthe
parametereditmenu.TheFUNCIndicatorwill
blinktoindicatethevalueiseditable.
4. TurntheValueDialtoselecttheTuning.
(415Hzto466Hz)
20453755 Williams Overture III Owner's Manual_V3.indd 1720453755 Williams Overture III Owner's Manual_V3.indd 17 8/2/21 1:57 PM8/2/21 1:57 PM

OWNER'S MANUAL
18
EFFECTS
TheReverbandChoruseectsmaybeappliedto
eachvoiceindividuallyandwillberetainedeven
whenthepoweristurnedo.
Toapplyeithereect,presseitherbutton.The
buttonwilllightandtheeectwillbeheardwhen
thepianoisplayed.Toturnotheeectpressthe
buttonofthedesiredeectagainandtheLEDlight
willgoo.
ReverbandChorussettingsaresetperInstrument
andwillberetainedevenwhenthepoweris
turnedo.
Reverb
To Change the Reverb Type:
1. Pressthe[FUNCTION]button.
2. TurntheValueDialtoselectReverbTypeedit
menu,thedisplaywillshow“ReverbType”.
3. PresstheFunctionbuttonagaintoenterthe
parametereditmenu.TheFUNCIndicatorwill
blinktoindicatethevalueiseditable.
4. TurntheValueDialtoselecttheReverbtype.
Thedierentreverbtypesareasfollows:
# Type Name # Type Name
1MedRoom 5 LongHall
2Ambience 6MedHall
3BrightHall 7 LongPlate
4 GiantHall 8PercPlate
To Change Reverb Depth:
1. Pressthe[FUNCTION]button.
2. TurntheValueDialtoselecttheReverbdepth
editmenu.Thedisplaywillshow“ReverbLevel”.
3. PresstheFunctionbuttonagaintoenterthe
parametereditmenu.TheFUNCIndicatorwill
blinktoindicatethevalueiseditable.
4. SelecttheReverbLevelrange.(0-127)
Chorus
Choruseectsaddshimmeringmovementtoa
voice.Thesettingcanbesubtletoextreme.
To Change Chorus Type:
1. Pressthe[FUNCTION]button.
2. TurntheValueDialtoselecttheChorusTypeedit
menu.Thedisplaywillshow“ChorusType”.
3. PresstheFunctionbuttonagaintoenterthe
parametereditmenu.TheFUNCIndicatorwill
blinktoindicatethevalueiseditable.
4. TurntheValueDialtoselectaChorusType.
(OFFandchoices1to8)
Chorus Type List
# Type Name
1Stereo
2SlowDeep
3SlowFlange
4 LiquidFlange
5 BigPad
6StudioFlange
7 Chorale
To Change Chorus Depth:
1. Pressthe[FUNCTION]button.
2. TurntheValueDialtoselecttheChorusdepth
editmenu.Thedisplaywillshow“ChorusLevel”.
3. PresstheFunctionbuttonagaintoenterthe
parametereditmenu.TheFUNCIndicatorwill
blinktoindicatethevalueiseditable.
4. Selectthedepthrange.(0-127)
20453755 Williams Overture III Owner's Manual_V3.indd 1820453755 Williams Overture III Owner's Manual_V3.indd 18 8/2/21 1:57 PM8/2/21 1:57 PM

OVERTURE III DIGITAL PIANO
WILLIAMSPIANOS.COM
19
MOD FX
Modulationeectsaredesignedtoaddunique
playablesoundeectstovoices.
Inadditiontothesounds,theOvertureIIIhasanew
eectssectionthatwillallowuserstohavemore
controlovertheirsoundscalledModFX.Thesenew
eectswillbeinsertedintotheaudiopathwayofthe
soundtothemixerandwillbepresetintotheVoice.
Whenyouswitchonthespecicvoice,apreset
eectwillbeassociatedwiththesound.Youcan
thenselectwhethertheeectshouldbeturnedo
ormodied.
ToturnontheModFXfunctionforaninstrument,
presstheModFxbutton.Theeectwillbecome
activeandtheModFxLEDwilllight.
ToturnotheModFx,pressthebuttonagain.The
LEDonthebuttonwillturno.
To Change ModFX Type:
1. Pressthe[FUNCTION]button.
2. TurntheValueDialtoselecttheModFXType
editmenu.Thedisplaywillshow“ModFXType”.
3. PresstheFunctionbuttonagaintoenterthe
parametereditmenu.TheFUNCIndicatorwill
blinktoindicatethevalueiseditable.
4. TurntheValueDialtoselectaModFXType.
(OFFandchoices1to11)
The ModFX Are:
# ModFX Type
1FastStereoTremolo
2SlowStereoTremolo
3SlowPhaser
4 SlowMonoTremolo
5 SlowVibrato
6VibPhase
7 AshesVibrato
8SlowChorus
# ModFX Type
9FastMonoTremolo
10 MedVibrato
11 Rotary
Rotary
TheOvertureIIIincludesarotaryeect,whichis
designedfororganvoices.Toselectthespeedof
therotary,pressthesustainpedalwithyourfoot.
Holdingdownthepedalwillspeeduptherotary
voicetoatremolo.Whenthepedalisreleased,the
speedofthetremolowillslowdowntoachoral
setting.
Rotary Speed Mode
Asadefault,theRotarySpeedmodeisassignedto
“Pedal”.ThismodeallowsyoutochangetheRotary
Speedbyusingafootpedal.Notethatthesustain
willnotholdthesoundwhenyourhandsareothe
keysinthismode.
In“Slow”mode,thespeedisassignedtobeslow.
Thesustainpedalwillworktosustainthesound.
In“Fast”mode,thespeedisassignedtobefast.
Thesustainpedalwillworktosustainthesound.
To Change The Rotary Speed Settings In
Function Mode:
1. Pressthe[FUNCTION]button.
2. WithaRotaryeectselectedastheactive
ModFXType,TurntheValueDialtoselectthe
ModFXSpeedModeeditmenu,thedisplaywill
show“ModFXSpeed”.
3. PresstheFunctionbuttonagaintoenterthe
parametereditmenu.TheFUNCIndicatorwill
blinktoindicatethevalueiseditable.
4. TurntheValueDialtoselecttheSpeed:“Pedal”,
”Slow”,or”Fast”.
Vibrato / Tremolo
TheOvertureIIIalsoincludesVibratoandTremolo
eects,whichcanbeadjustedtotheuser’sliking.
To Change the ModFX Depth:
1. Pressthe[FUNCTION]button.
20453755 Williams Overture III Owner's Manual_V3.indd 1920453755 Williams Overture III Owner's Manual_V3.indd 19 8/2/21 1:57 PM8/2/21 1:57 PM

OWNER'S MANUAL
20
2. TurntheValueDialtoselecttheModFXdepth
editmenu,thedisplaywillshow“ModFXDepth”.
3. PresstheFunctionbuttonagaintoenterthe
parametereditmenu.TheFUNCIndicatorwill
blinktoindicatethevalueiseditable.
4. TurntheValueDialtoselecttheModFXDepth.
(0-127)
To Change ModFX Speed:
1. Pressthe[FUNCTION]button.
2. WithaVibratoorTremoloeectselectedasthe
activeModFXType,turntheValueDialtoselect
theModFXSpeededitmenu,thedisplaywill
show“ModFXSpeed”.
3. PresstheFunctionbuttonagaintoenterthe
parametereditmenu.TheFUNCIndicatorwill
blinktoindicatethevalueiseditable.
4. TurntheValueDialtoselecttheModFXSpeed.
(0-127)
EQ Level Settings
1. Pressthe[FUNCTION]button.
2. TurntheValueDialtoselecteitherthetheEQ
BassorEQTrebleeditmenu.Thedisplaywill
show“EQBass”or“EQTreble”.
3. PresstheFunctionbuttonagaintoenterthe
parametereditmenu.TheFUNCIndicatorwill
blinktoindicatethevalueiseditable.
4. TurntheValueDialtoselecttheEQLevelforyour
chosenfrequencies.(-6dBto+6dB)
ADVANCED
FUNCTIONS
Auto Power O / Power Saving Mode
TheOvertureIIIhasaPowersavingfunctionthat
willshutothePianoafter20-60minutesofnon-
use.ThedefaultsettingisO,howeverifyound
youwantthisfunctiontoworkusethestepsbelow.
1. Pressthe[FUNCTION]button.
2. TurntheValueDialtoselecttheAutoPoweredit
menu.Thedisplaywillshow“AutoPower”.
3. PresstheFunctionbuttonagaintoenterthe
parametereditmenu.TheFUNCIndicatorwill
blinktoindicatethevalueiseditable.
4. TurntheValueDialtoOFFifyoudonotwantto
usethisfeature.Otherwise,selectbetween20–
60minutesusingtheValueDialtodeterminehow
manyminutesofnon-usewillcausethepianoto
automaticallyshuto.
Factory Reset
PerformingaFactoryResetwillclearallmemory
andrestoreallfunctionstofactorydefaults.
1. TurnthePowerO.
2. Pressandholdthetransposeandoctave
buttons.
3. TurnthePoweron.Ifthedisplayshows
“RESETTING!”,theactionissuccessful.
Touch Sensitivity
Youcanchangethewaythekeyboardreacts
toyourplayingbyadjustingtheVelocitycurve
settings.
1. Pressthe[FUNCTION]button.
2. TurntheValueDialtoselecttheVelocityCurve
editmenu,thedisplaywillshow“VelCurve”.
20453755 Williams Overture III Owner's Manual_V3.indd 2020453755 Williams Overture III Owner's Manual_V3.indd 20 8/2/21 1:57 PM8/2/21 1:57 PM
Table of contents
Other Williams Musical Instrument manuals

Williams
Williams SYMPHONY GRAND II User manual

Williams
Williams LEGATO User manual

Williams
Williams RHAPSODY 2 User manual

Williams
Williams ALLEGRO 2 User manual

Williams
Williams Legato III User manual

Williams
Williams Symphony User manual

Williams
Williams Sonata 88 User manual

Williams
Williams ALLEGRO III IN-HOME PACK User manual

Williams
Williams Rhapsody User manual

Williams
Williams RHAPSODY III User manual