1Contact Wilson Electronics Technical Support Team with any questions at 866-294-1660
Installation Instructions for the Following Wilson Electronics Antenna
Cellular Cradle Plus™
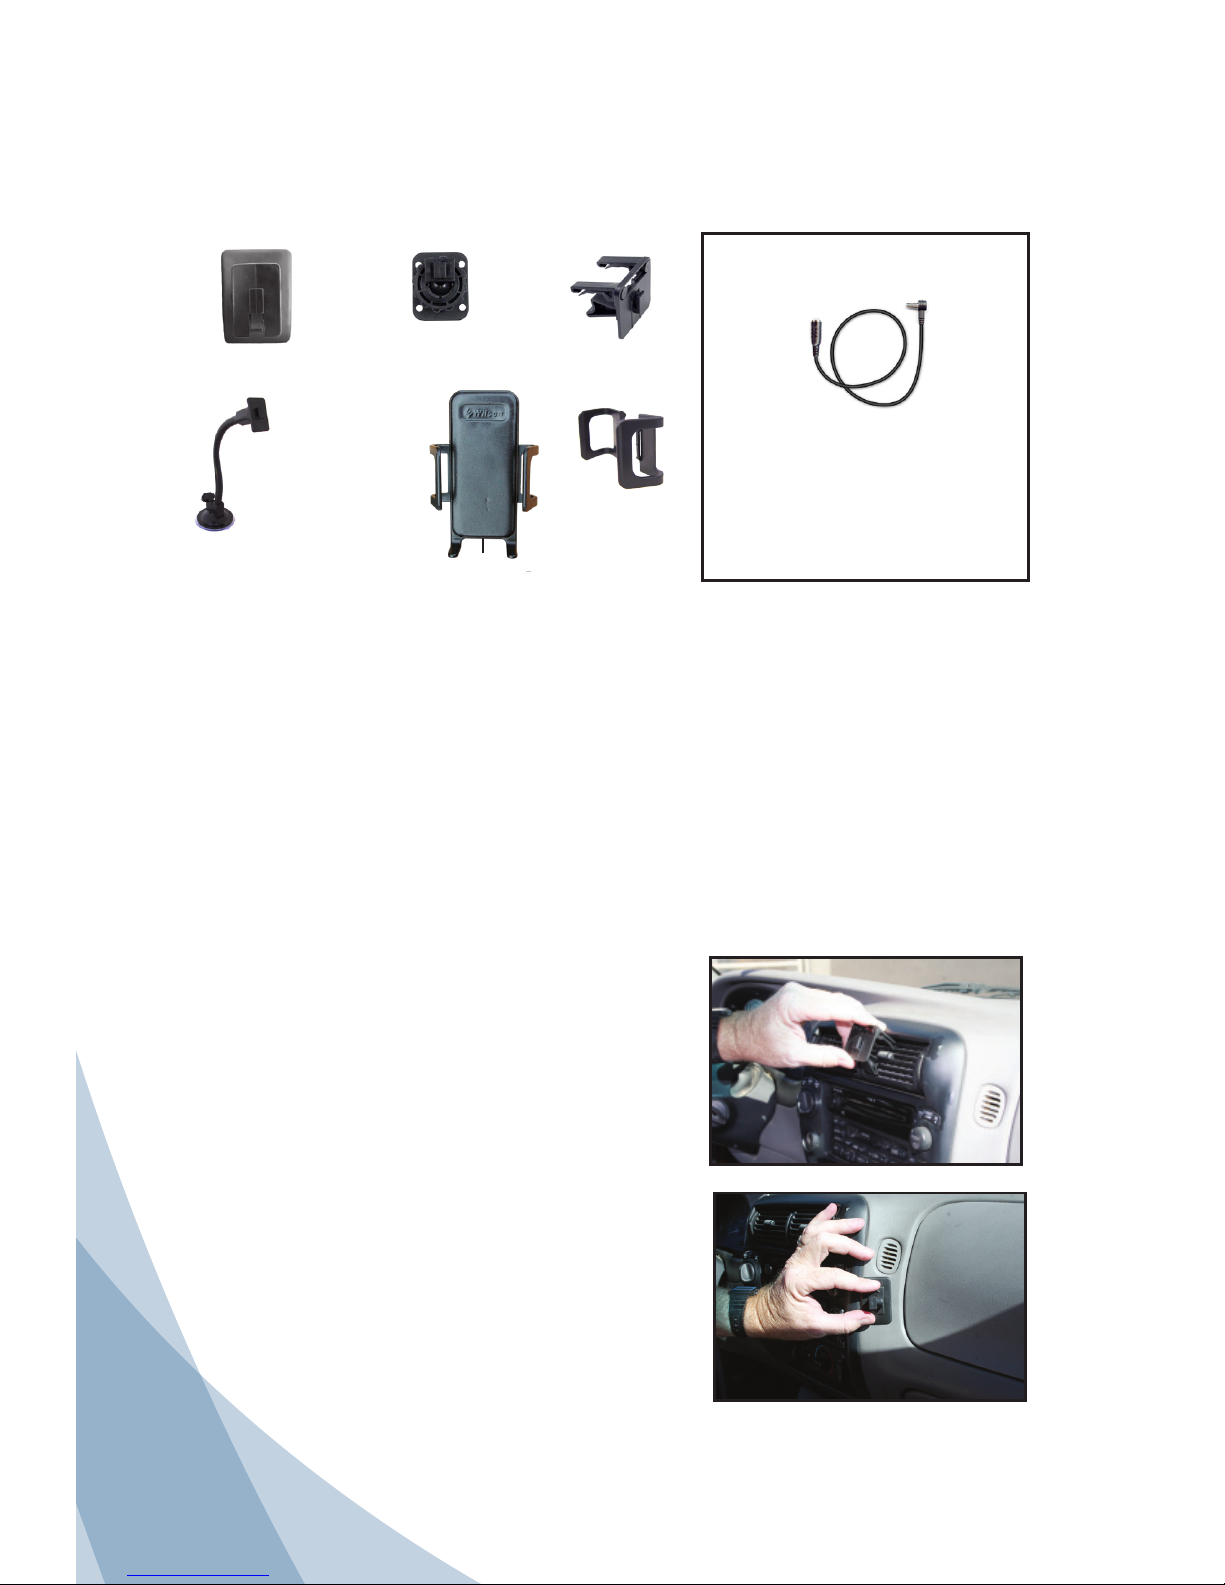
Inside this Package
Included in the 301146 Kit
Cellular Cradle Plus™
Wilson Electronics’ Cellular Cradle Plus offers a built-in cell phone signal antenna/coupler.
Used in conjunction with one of Wilson Electronics Cellular Signal Boosters, the Cradle
Plus can improve your cellular signal up to 20 times and help you stay connected in places
you never could before!
Multiple Mounting Options
Multiple mounting options allow for a custom installation in virtually any vehicle. Before
mounting, determine the desired location of the cradle in your vehicle. Hold the cradle in the
intended position and be sure it does not obstruct your view or block access to any controls
or gauges necessary for safe driving.
Adhesive Bracket
Adhesive/Screw
Swivel Bracket
Adapter
(For use with your MobilePro)
(359909)
Plug one end into the Cradle Plus
Antenna, and the other end into your
MobilePro (sold separately).
Cellular
Cradle Plus™
3 Sets of arms
(1 set small, 1
set medium, 1
set large)
Cell Phone Cradle and Cell Phone Cradle Plus
Installation Guide
Cell Phone Cradle
(Part # 859942)
Cell Phone Cradle Plus
(Part # 301146)
Wilson Electronics’ Cell Phone Cradle is a lightweight,
versatile product that enables you to place your cell phone in a
convenient location in your vehicle and use it with a hands-free
device such as an ear bud or Bluetooth®product. Doing so lets
you keep both hands on the wheel, thereby maintaining your
safety while allowing you to carry on a cell phone conversation.
With adjustable arms and feet, Wilson’s Cell Phone Cradle
holds virtually any cell phone on the market and does not
obstruct access to phone controls or connections. The push-
button release function enables you to quickly and easily
remove the phone from the cradle when you leave the vehicle.
The cradle comes with mounting brackets for installation on the
console or dashboard. Some cradle kits include a gooseneck
suction mount for application to the windshield.
Wilson Electronics’ Cell Phone Cradle Plus offers all the
convenience features of the standard cradle with the added
benefit of a built-in cell phone signal antenna/coupler. Used in
conjunction with one of Wilson’s cellular amplifiers, the Cradle
Plus can improve your cellular signal up to 10 times and help
you stay connected in places you never could before!
Here’s how the amplifier/Cradle Plus system works: A Wilson
antenna mounted on the outside of your vehicle communicates
with the cell site, and the built-in cradle antenna/coupler
communicates with your cell phone. The outside antenna
collects weak cellular signals and sends them to the amplifier.
The amplifier boosts those signals and sends transmits them
through the cradle antenna/coupler, significantly improving the
performance of your cell phone or laptop data card. The Cradle
Plus works with Wilson’s SignalBoost
amplifiers.
Multiple Mounting Options
The Cell Phone Cradle and Cradle Plus are designed for maximum ease of use and flexibility. Multiple mounting options allow for a
custom installation in virtually any vehicle. Before mounting, determine the desired location of the cradle in your vehicle. Hold the cradle
in the intended position and be sure it does not obstruct your view or block access to any controls or gauges necessary for safe driving.
With the Cradle Plus, take special care to ensure that the cable running to the amplifier does not block the movement of your arms or
legs.
Included With Some Kits:Included Contents:
Adhesive Bracket Adhesive/Screw
Swivel Bracket
Gooseneck Suction Cup Bracket
For mounting the cradle to the windshield
359909 Adapter
For use with your amplier
Slide the bracket clips into the chosen vent1.
location until they snap into place. If necessary,
use a thin-bladed screwdriver to gently pry the
clips apart as they slide into the vent.
Position the moveable arm at the base of the2.
bracket to achieve the desired angle and to
provide additional stability for the bracket.
See “Attaching the Cradle” on the back page.3.
Air Vent Bracket
Adhesive Bracket
1. Clean the area where the bracket
is to be mounted with rubbing
alcohol and a soft cloth. Allow to
dry.
2. Peel the backing to expose the
adhesive and press the bracket
onto the desired location in the
vehicle. Note: be sure the bracket
is positioned vertically, not
horizontally.
3. Allow the adhesive to cure for 24
hours before you attach the cradle.
4. See “Attaching the Cradle”. (Note:
once the cradle is attached,
you can adjust the angle of the
adhesive bracket by applying
gentle pressure to the top or
bottom of the cradle.)
For best mounting results and long-
term performance, we suggest that
you choose a flat, smooth surface
like the console area of your vehicle
between the two front seats. If this is
not available in your vehicle, you may
mount the cradle on the front of the
dashboard.
If mounting the cradle on a sloped
area of the dashboard in your vehicle,
please note that gravity may affect
the adhesive over time. Use the
screw mount for a more permanent
attachment.
1. Clean the area where the bracket
is to be mounted with rubbing
alcohol and a soft cloth. Allow to
dry.
2. For an adhesive mount, peel the
backing to expose the adhesive
and press the bracket onto the
desired location in the vehicle.
(Note: the swivel feature allows the
bracket to be positioned vertically
or horizontally.) Allow the adhesive
to cure for 24 hours before you
attach the cradle.
For a screw mount, use an ice
pick or an awl to punch through
the adhesive and expose the four
screw holes in the bracket. You
must provide the screws of an
appropriate size for your particular
application. Using the bracket as a
template, mark the locations for the
screws as shown, drill pilot holes,
attach the bracket with adhesive,
and tighten all screws
3. See “Attaching the Cradle”. (Note:
Once the cradle is attached, you
can loosen the knurled wheel and
swivel the hook to the desired
angle, then re-tighten the wheel.)
1. Clean the area of the windshield
in the location you would like to
attach the suction cup. Allow to dry.
2. Press the suction cup at the base
of the mount onto the windshield
with even pressure. Depress the
lever above the suction cup to
pump the remaining air out of
the area and to achieve a strong
suction mount.
3. Bend the gooseneck to the location
where you would like to attach
the cradle. For best performance,
adjust the gooseneck so that the
cradle is allowed to rest on the
dashboard.
4. See “Attaching the Cradle”.
NOTE: State law prohibits drivers in
some states from using suction mounts
on their windshields when operating
motor vehicles. In such cases, other
Wilson Electronics dashboard or
console mounting options should
be used. Wilson does not take any
responsibility for any fines, penalties,
or damages that may be incurred as a
result of disregarding this notice.
Attaching The Cradle
Once you have installed your selected mount in the desired location, attach the
cradle by aligning the rectangular hole on its back with the hook on the mount.
Grasping the sides of the cradle, slide it downward approximately ¼ inch into place.
Adhesive/Screw
Swivel Bracket
Gooseneck Suction
Bracket (available on some kits)
Quick Release
Button
Adjustable Arms
Adjustable Feet
Placing Your Phone in the Cradle
1. Press the quick-release button on the lower right side to open the cradle arms
wide enough to accommodate your phone.
2. With the phone resting against the back of the cradle, gently squeeze the cradle
arms together to hold the phone in place. Note that the arms move up and down
and have upper and lower sections.
3. Adjust the two feet at the bottom of the cradle to support the phone at its base.
4. Connect your hands-free device to the phone, adjusting the cradle arms or feet as
necessary. For the Cradle Plus, connect the antenna cable to the Wilson amplifier
in accordance with the instructions supplied with the amplifier.
5. To remove the phone, press the quick-release button to open the cradle arms and
release the phone.
If you have any questions regarding the installation
or operation of your Wilson Cell Phone Cradle
or Cell Phone Cradle Plus, please contact our
Technical Support Department at 866-294-1660, or
3301 East Deseret Drive, St. George, Utah 84790
800.204.4104 • 435.673.5021
www.wilsonelectronics.com
Improving Your Cellular Signal
Part # 104080 AIG Cradle -rev.02- 07.07.10
Hours 7am to 6 pm MST
1. Insert the two vent clips into the
circular hole in the bracket and
slide them to each end of the slot.
The flat surface of the clips should
face upward.
2. Slide the bracket clips into the
chosen vent location until they
snap into place. If necessary, use
a thin-bladed screwdriver to gently
pry the clips apart as they slide into
the vent.
3. Position the moveable arm at the
base of the bracket to achieve
the desired angle and to provide
additional stability for the bracket.
4. See “Attaching the Cradle”.
Air Vent Bracket
Air Vent
Bracket
Clean the area where the bracket is to be1.
mounted with an alcohol wipe (included).
Allow to dry.
Peel the backing to expose the adhesive and2.
press the bracket onto the desired location
in the vehicle. Note: Be sure the bracket is
positioned vertically, not horizontally.
Adhesive Bracket
Adhesive Bracket
1. Clean the area where the bracket
is to be mounted with rubbing
alcohol and a soft cloth. Allow to
dry.
2. Peel the backing to expose the
adhesive and press the bracket
onto the desired location in the
vehicle. Note: be sure the bracket
is positioned vertically, not
horizontally.
3. Allow the adhesive to cure for 24
hours before you attach the cradle.
4. See “Attaching the Cradle”. (Note:
once the cradle is attached,
you can adjust the angle of the
adhesive bracket by applying
gentle pressure to the top or
bottom of the cradle.)
For best mounting results and long-
term performance, we suggest that
you choose a flat, smooth surface
like the console area of your vehicle
between the two front seats. If this is
not available in your vehicle, you may
mount the cradle on the front of the
dashboard.
If mounting the cradle on a sloped
area of the dashboard in your vehicle,
please note that gravity may affect
the adhesive over time. Use the
screw mount for a more permanent
attachment.
1. Clean the area where the bracket
is to be mounted with rubbing
alcohol and a soft cloth. Allow to
dry.
2. For an adhesive mount, peel the
backing to expose the adhesive
and press the bracket onto the
desired location in the vehicle.
(Note: the swivel feature allows the
bracket to be positioned vertically
or horizontally.) Allow the adhesive
to cure for 24 hours before you
attach the cradle.
For a screw mount, use an ice
pick or an awl to punch through
the adhesive and expose the four
screw holes in the bracket. You
must provide the screws of an
appropriate size for your particular
application. Using the bracket as a
template, mark the locations for the
screws as shown, drill pilot holes,
attach the bracket with adhesive,
and tighten all screws
3. See “Attaching the Cradle”. (Note:
Once the cradle is attached, you
can loosen the knurled wheel and
swivel the hook to the desired
angle, then re-tighten the wheel.)
1. Clean the area of the windshield
in the location you would like to
attach the suction cup. Allow to dry.
2. Press the suction cup at the base
of the mount onto the windshield
with even pressure. Depress the
lever above the suction cup to
pump the remaining air out of
the area and to achieve a strong
suction mount.
3. Bend the gooseneck to the location
where you would like to attach
the cradle. For best performance,
adjust the gooseneck so that the
cradle is allowed to rest on the
dashboard.
4. See “Attaching the Cradle”.
NOTE: State law prohibits drivers in
some states from using suction mounts
on their windshields when operating
motor vehicles. In such cases, other
Wilson Electronics dashboard or
console mounting options should
be used. Wilson does not take any
responsibility for any fines, penalties,
or damages that may be incurred as a
result of disregarding this notice.
Attaching The Cradle
Once you have installed your selected mount in the desired location, attach the
cradle by aligning the rectangular hole on its back with the hook on the mount.
Grasping the sides of the cradle, slide it downward approximately ¼ inch into place.
Adhesive/Screw
Swivel Bracket
Gooseneck Suction
Bracket (available on some kits)
Quick Release
Button
Adjustable Arms
Adjustable Feet
Placing Your Phone in the Cradle
1. Press the quick-release button on the lower right side to open the cradle arms
wide enough to accommodate your phone.
2. With the phone resting against the back of the cradle, gently squeeze the cradle
arms together to hold the phone in place. Note that the arms move up and down
and have upper and lower sections.
3. Adjust the two feet at the bottom of the cradle to support the phone at its base.
4. Connect your hands-free device to the phone, adjusting the cradle arms or feet as
necessary. For the Cradle Plus, connect the antenna cable to the Wilson amplifier
in accordance with the instructions supplied with the amplifier.
5. To remove the phone, press the quick-release button to open the cradle arms and
release the phone.
If you have any questions regarding the installation
or operation of your Wilson Cell Phone Cradle
or Cell Phone Cradle Plus, please contact our
Technical Support Department at 866-294-1660, or
3301 East Deseret Drive, St. George, Utah 84790
800.204.4104 • 435.673.5021
www.wilsonelectronics.com
Improving Your Cellular Signal
Part # 104080 AIG Cradle -rev.02- 07.07.10
Hours 7am to 6 pm MST
1. Insert the two vent clips into the
circular hole in the bracket and
slide them to each end of the slot.
The flat surface of the clips should
face upward.
2. Slide the bracket clips into the
chosen vent location until they
snap into place. If necessary, use
a thin-bladed screwdriver to gently
pry the clips apart as they slide into
the vent.
3. Position the moveable arm at the
base of the bracket to achieve
the desired angle and to provide
additional stability for the bracket.
4. See “Attaching the Cradle”.
Air Vent Bracket
Gooseneck Suction
Cup Mount
(For mounting the cradle
to the windshield)
(901120)


