WilTec 51865 User manual

SOFT-1 SOFT-2
User Manual
Automatic Water Softener
Important Notices
The controlling components are driven by an electric circuit. Some
programmed parameters will be lost as a power outage over 48 hours, and
water softener system will carry out the regeneration process at the
incorrect time. We strongly recommend that after a power outage, users
should check the timer.
Notice: buy the soften salt from the dealer to protect the water softener.
Read the User Manual carefully before
using the product.

1
1
2
3
6
9
13
1
Components
Automatic Control Valve
■ Noryl plastic approved by FDA;
■ Strong corrosion resistance; stainless;
■ Innovative design; refined structure;
Media
Ў High-grade Anion Exchange Resin(Food Grade)
FRP Vessel
■ Polyethene material manufactured for the FoodBeverage industries;
■ Light; high pressure resistance; stainless;
Brine Valve
■ Reasonable structure, safe and reliable;
■ High pressure resistance;
FunctionsFeatures
Automatic Valve Control
■24 hours control and monitoring with a timer; automatically regenerate
the medial bed at the system's set time of regeneration according to the
set regeneration frequency or the water hardness and the balance
volume.
■Automatically calculate and design more scientific cycle plan according
to the quality of supply water and the user's actual water use.
■ Cycle process:
IN SERV.: Supply water with suitable pressure and flow rate flows into
2+ 2+
softener, and the cations concerns to water hardness(Ca , Mg ,etc.) in
+
the water will be replaced by Na in regenerants, then the softening
system supply softened water though its outlet.
Backwash: When the ion exchange resins are out of effect, the resin bed
needs to be regenerated. And before the regeneration of resin bed, a
backwash step is absolutely necessarily for two main purposes: remove
the residuals and resin shatters in the resin bed, and loose the impacted
resin bed for a better regeneration efficiency.
Components
FunctionsЈFeatures
Operation
Cautions
Controller Operation Instruction
Inquiring and Establishment of Each Parameter
Troubleshooting
Important Notices
CONTENTS
back cover

32
Brine: Under certain concentration and flow rate conditions, brine flow
through entire resin bed, then the saturated resins will resume their
softening capacity.
Rinse: Rinse the resin bed to remove the residual regenerant (salt) in it
after Brine step until the water from outlet contains no regenerant; rinse
could also impact the resin bed for a better softening effect.
Fill: Refill water to brine tank to dissolve salt for the next regeneration.
PE Brine Tank
■ Refill water and salt meet each other in the brine tank, and the salt will
dissolve continuously to water through natural convection until the
water is saturated by salts.
Operation
This product should be able to put in normal use right after the complete
installation and a regeneration test; any other operations are not
necessary unless power supply is cut off accidentally;
The soften unit should be installed and prepared by qualified person, any
other operations are not necessary while keeping power on all the time
and remaining enough salt in brine tank. The only requirements for
installation are three water pipe ports (inlet, outlet, drain) and power
supply.
Fill resin tank with water (Initial)
■Set the control into the backwash position, then open water supply
valve very slowly to approximately the 1/4 open position and let water
flow slowly into the resin tank ( if open too rapidly or too far, resin
may be lost). When all of the air has been purged from the tank (water
begins to flow steadily from the drain), open the main supply valve to
the full position.
■ Drain until the drain water is clear.
■ Shut off water supply and let the unit stand for about five minutes to
escape all trapped air from the tank.
Refill brine tank
■ Manually initiate a whole regeneration cycles after resin tank filling (
see Appendix) to fill appropriate water to brine tank.
ЎSalt level should be higher than water level at first time. There should be
enough solid salt at anytime.
It is recommended to install a bypass system to ensure water supply in any
special cases, such as softener failure, maintenance, etc.
Cautions
1) Without reading and truly understanding the contents of this user
manual, please DO NOT perform any operations on the control valve.
2) Strictly prohibit leaning position when shipping, installing and using
this product: Otherwise, it will be damaged inside.
3) During regenerate time, water from tap will NOT be softened. It is NOT
recommended to use water during regeneration; otherwise, a negative
effect on the regeneration result will occur;
4) Initial a regenerate cycle after being inactivated in a long period of
time, and then turn on the tap for several minutes before resuming
normal use;
DO NOT disconnect power during service time to keep the timer run
normal that controls the regeneration function;
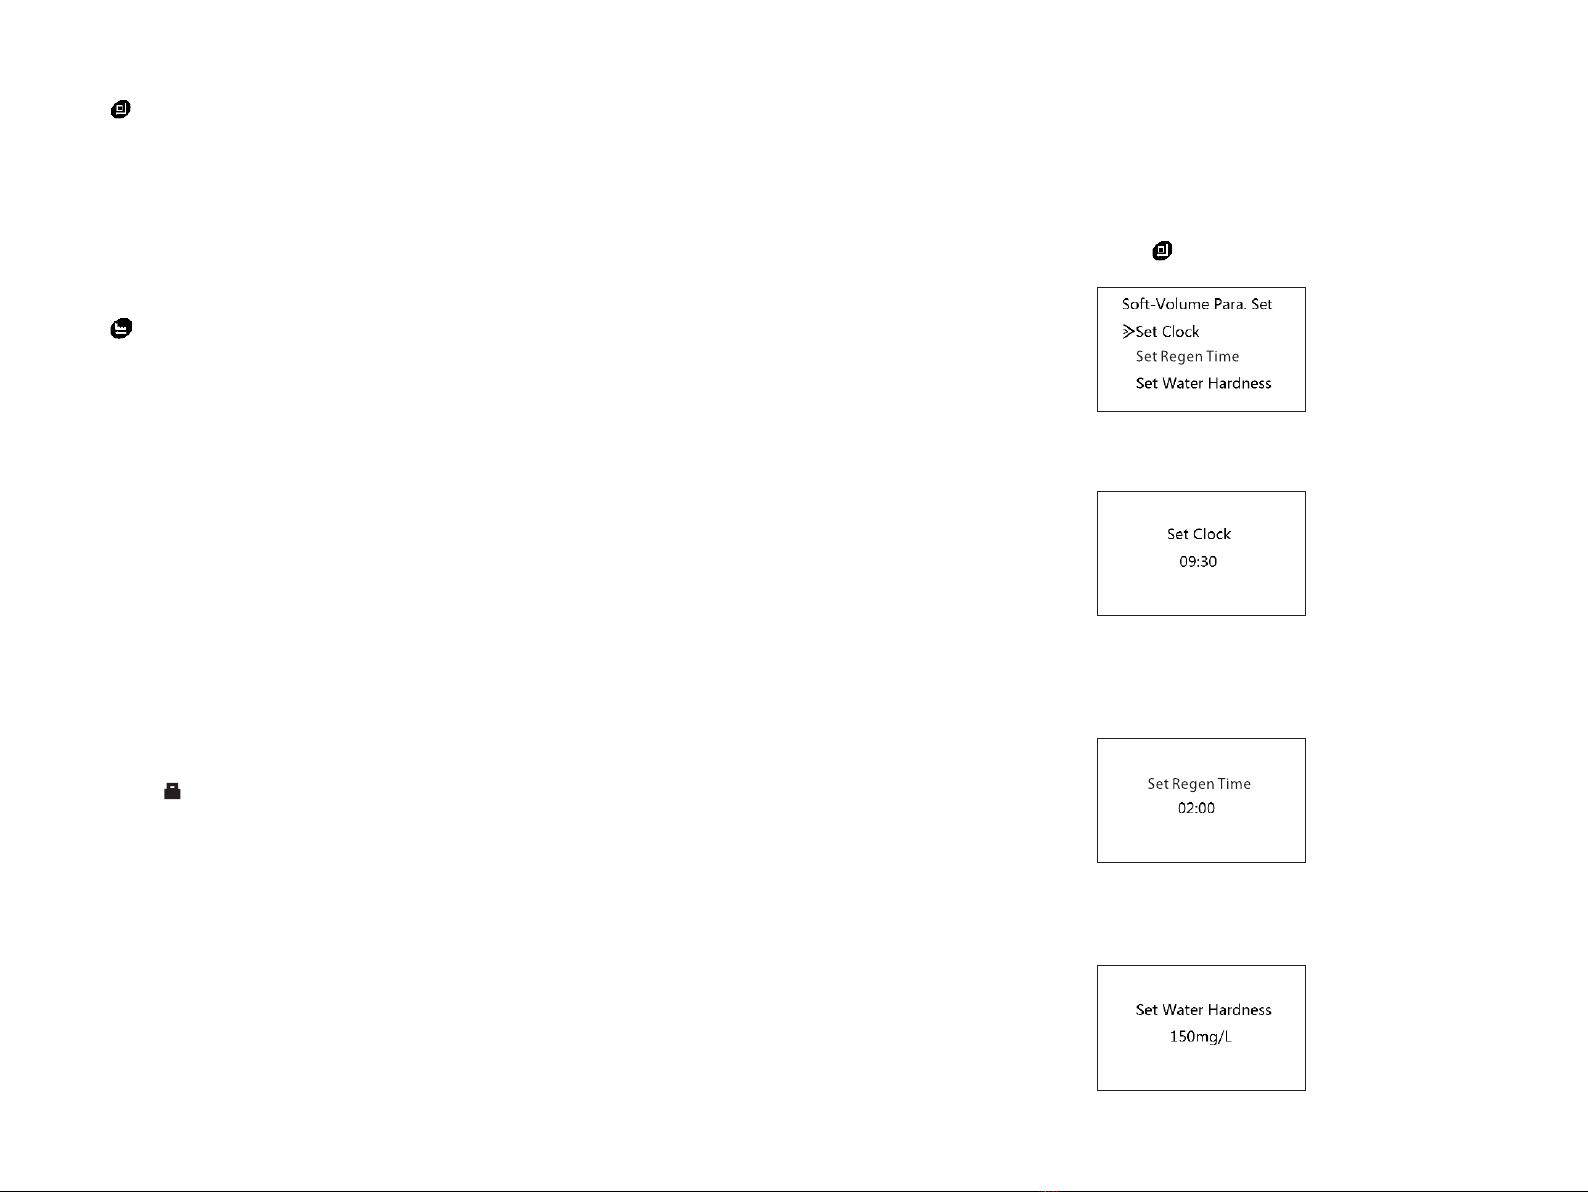
5) If the hardness of raw water dramatically changes, change the Water
Hardness in the User Setting menu.
6) Hot water could cause severe damage to the softener system; for water
boiler and water heater users, ensure the total-run of the piping between
the softener and the boiler is not less than 3 meters; it is recommended
to install a check valve between the filter and the boiler if unable to
meet the required piping length.
7) The input water pressure must be between 0.1 to 0.6 Mpa, no negative
water pressure allowed.
8) No chemical allowed at the inlet and outlet connecting sectors. No
excessive force which can damage the plastic conjunction parts should
be applied by any tools. Besides the machine, spare part connection
material doesn't include in scope of manufacture's warranty.
9) The required environmental temperature for softener is 33.8~102.2°F.
Please protect the softener from frozen.
10) Please set up a waterspout on the floor nearby the softener in case of
any leaking accidents.

Brine tube
Outlet
Over flow pipe
Drain
Flow meter
Inlet
54
11) DO NOT apply any pressure on the softener; avoid exposure to direct
sun light and radiation from other heating sources;
12) Please select regeneration salt pill as regenerant.
Floor Drain
F i x t h e d r a i n
pipe well above
the floor drain
4cm air gap
Pipes of the water softener
The bypass valve
Notice:Line Flow Controller
Adapter Coupling
Mounting Clip
Bypass Body
Inlet Knob
Big Clip
Screw Connector
Adapter Coupling
for Flow meter
Flow Meter Socket
Outlet Knob
The water enters
the valve.
Bypass position
the water doesntЈ
enter the valve.
Note:
the end of the BLFC
Button Retainer
having a small crossbeam
should be inserted to
Brine Port first.
Quick Fitting
BLFC Pressor
BLFC Button No.4
Brine Port
BLFC Button Retainer

10:30:00 current time. 2Min
represents the balance time
of this state, unit minute,
count down.
76
Controller Operation Instruction
Control Panel
ˇ
ˇ
1. Display Screen
a) At service state, the display screen shows the following images every
10 seconds cyclically:
3
Ў Balance treated water volume, such as 2.00m .
3
Ў Current flow rate, such as 1.00m /h.
Ў Trig time, such as 02:00.
b) When system is at other states, it displays the following images:
Work State Showing Content Description
Back wash
Brine&Slow
Rinse
3 0 M i n r e p r e s e n t s t h e
balance time of this state,
unit minute, count down.
Do w n-Flo w re prese nts it
recharges by down flow.
Brine Refill
5Min represents the balance
time of this states, unit
minute, count down.
Fast Rinse
3Min represents the balance
tim e o f t hi s s t at e , un i t
minute, count down.
Display Screen
Select/Menu
Down
Up
Esc/Manual
Motor Running
W o r k s t a t e i s
Key Locked
When at key locked state,
press any key, it shows this
image.
System
Maintenance
Error
E-01 represents error code.

98
2. Select key
a) Press this key to enter into menu, press Up or Down key, to show each
parameter value.
b) After entered into menu, press this key again, to show parameter
adjusting image, the parameter flickers.
c) After setting the parameter, press this key, there is a sound ЎdingЎ, to
confirm setting and return to the set up state.
3. ESC key
a) Press this key when not at the menu state, this allow you to finish the
current working state and go to the next working state immediately.
You can control valve manually by pressing this key directly.
b) Press this key when in the menu state to go back to the set up menu.
c) Press this key when at the setting state ( the setting parameter is not
saved ) to return to set up.
4. Up and Down keys
a) Enter into the menu, press Up or Down, to show each parameter value.
b) When setting the parameter, press Up or Down continuously to adjust
the parameter.
c) Press Up and Down keys together for 5 seconds to unlock.
5. Another information:
a) Current time is 24 hour.
3
b) Flow rate unit: m .
c) When lights, it represents the keys are locked.
d) The time on right top corner, it is the current time.
e) When pressing the Up or Down key to adjust parameter, a number is
changed incrementally per press. Alternatively, press the key and hold
for longer than 1.5 seconds, to scroll through numbers incrementally at
the rate of 1 every 0.2 seconds. Holding the key longer than three
seconds advances the parameter at the rate of 20 per 0.2 seconds for
rapid scrolling.
Inquiring and Establishment
of Each Parameter
1. User setting menu
When keys are not locked, press key to enter into menu.
a) Set Clock menu
b) Set Regen Time
set the regeneration time.
c) Set Water Hardness

1110
2. System setting menu (Taking ASD2 as an example to illustrate)
After you turn on the system, during it displays the valve type, if you
press ESC and key in turn, it will display the system setting
menu.
a) Set Mode
B) Set Valve Type
c) Set Type
d) Set Resin Vol
e) Set Rchg Day
Set max days between recharges.
f) Set BackWash
g) Set Brine
h) Set Refill
i) Set Fast Rinse
Caution: The parameters
are all set in the factory. So
DO NOT change them to
prevent unknown errors.
Caution: DO NOT change
the parameter, otherwise the
v a l v e c a n n o t w o r k
Caution: DO NOT change
the parameter, otherwise the
v a l v e c a n n o t w o r k
Caution: The value of 08 is
just taken as an example. DO
NOT change the parameter,
otherwise the water may not
be treated well.
+
SetRegenDay
SetFastRinse

1312
Troubleshooting
Problem Possible Cause Solution
Controller does not
work
1.Transformer is not plugged in
2.Defective power cord
3.Power off
4.Defective transformer
1 . C o n n e c t t o c o n s t a n t
power source
2.Replace cord
Incorrect Time of
Regeneration
Power outage causes inaccurate
timing
According to the User Manual
to reset the timer
Leaking
Noisy
Milk-white water
Loose connecting
Air exists in the system
Tighten joints
Re-backwash the system to
vent air
Turn on the tap to vent air
Unsatisfied water
hardness
1.Poor raw water quality
2.Time of regeneration is too
long
3.Resin disable
1.Call your dealer
2.Reset time of regeneration
3.Re-regeneration or use new
resin
Softener fails to
use salt
1.Water pressure is too low
2.Brine tube plugged
3.Injector is plugged
4.Internal control leak
1.Inlet pressure must be at
least 15 PSI
2.Clean brine tube
3.Clean or replace injector and
screen
4.C hec k pis ton, s eal s and
spacers
Bri ne c ont ain er
overflow Refill time disordered Call your dealer
Wa t e r h a r d n e s s
remains
1.Fail to regenerate
automatically
2.Brine concentration is poor
3.Injector is plugged
1.Check power of controller
2.Keep brine tank full of salt
3.Disassemble the injector
and clear it by washing with
water
Control backwashes
at excessively low
or high rate
1.Incorrect backwash controller
used
2 . F o r e i g n m a t t e r a f f e c t i n g
controller operation
1.Replace with correct size
controller
2.Remove controller and ball
Flush with water
Untreated water
l e a k a g e d u r i n g
service
1.Improper regeneration
2.Leaking of bypass valve
3.O- ring arou nd ris er tu be
damaged
4.Water Hardess in the user
setting menu is wrong
1.Repeat regeneration making
certain that the correct salt
dosage is set
2-3.Replace O-ring
4.Reset the Water Hardness
How to begin a regenerate progress manually
At service state, press the ESC key and you will hear the motor
running. The screen shows:
After several seconds, it changes:
If you want to end up this step, press ESC key again. And the valve
would go to the next working state immediately( if not, the valve can
complete the regenerate progress itself). The rest working states of a
regenerate progress are below:
At last, the valve returns to the service position.
Table of contents
Other WilTec Water Dispenser manuals
Popular Water Dispenser manuals by other brands

Water Factory Systems
Water Factory Systems CoolerMATE CMTRO-75 owner's manual

Elkay
Elkay ERPB8C 3C Series Installation, care & use manual

Bunn
Bunn 10052.0000 Installation & operating guide

Elkay
Elkay Deluxe EFA8 1L Series Installation, care & use manual

ComAp
ComAp Adoucisseur softeo manual

Franklin Water Treatment
Franklin Water Treatment SWS1C-30-HE Installation instructions and owner's manual