WinBridge H5 Plus User manual

PORTABLE PA SYSTEM
USER MANUAL
H5 Plus


M
: Press one time to switch modes among UHF, Bluetooth, FM and
USB drive play; ( If you plug USB drive )
: Previous
: Next
: Pause/Resume; Under any mode, Double click to turn on/off voice
prompt, there will be a“Di”sound.
: Long press to start to recording; Short press to play recording or
switch to play USB drive/TF card music.
Mode switching
MIC Volume
ECHO Volume
Previous
Play/pause
USB
Record
Next
: Turn on/off speaker; Control music volume;
1
MIC
DC 9V TF Card
AUX

Pair Key
……………………………
…………………………
How to disassemble the wireless mic:
2

Transmitter:
3
Noted:
The transmitter is used with lapel mic or stand mic, and only one
microphone can be used with the speaker at the same time, which means
if you have paired the headset, you can not use the transmitter, that you
can not use lapel mic or stand mic.
Volume -
Pairing key
Charing indicator
Volume +
Power ON/OFF
DC 5Vport

Press to change mode
(except Recording mode).
MODES
Noted: When connected, by long press wifi button on the mic or long
press the M button on the speaker would disconnect with speaker.
Please refer above steps to re pair mic with speaker manually again.
…………………
How to Pair Wireless Headset Microphone
Turn on U8 wireless headset
microphone with BIue light
becomes constantly lights.
Turn on speaker, short press M button to switch to UHF mode with
screen shows: , then long press M button again for 3 seconds
to enter UHF pairing mode with voice prompt: “UHF is waiting for
connection...”, meanwhile UHF indicator become flashes.
Do a press on the small silicone button wifi on the headset until
speaker prompt: “ UHF is connected”, then you could start to
enjoy it.
4

Noted:
In a small room, when you using lapel microphone, you
will experience feedback noise easily when your volume
is high because the sound will easily bounce from walls
and ceiling and feedback to the microphone. In order to
avoid feedback or howling, volume level needs to be
adjusted depending on the area you are using. Please
try again by increasing volume level slowly to a point just
below you hear feedback noise.
Noted:
If the transmitter and speaker are too close, the howling will be very
loud. Please do not face the front of the speaker at close range. You
can use the MIC volume wheel on the speaker and "-" button on the
transmitter to lower the volume to reduce the howling.
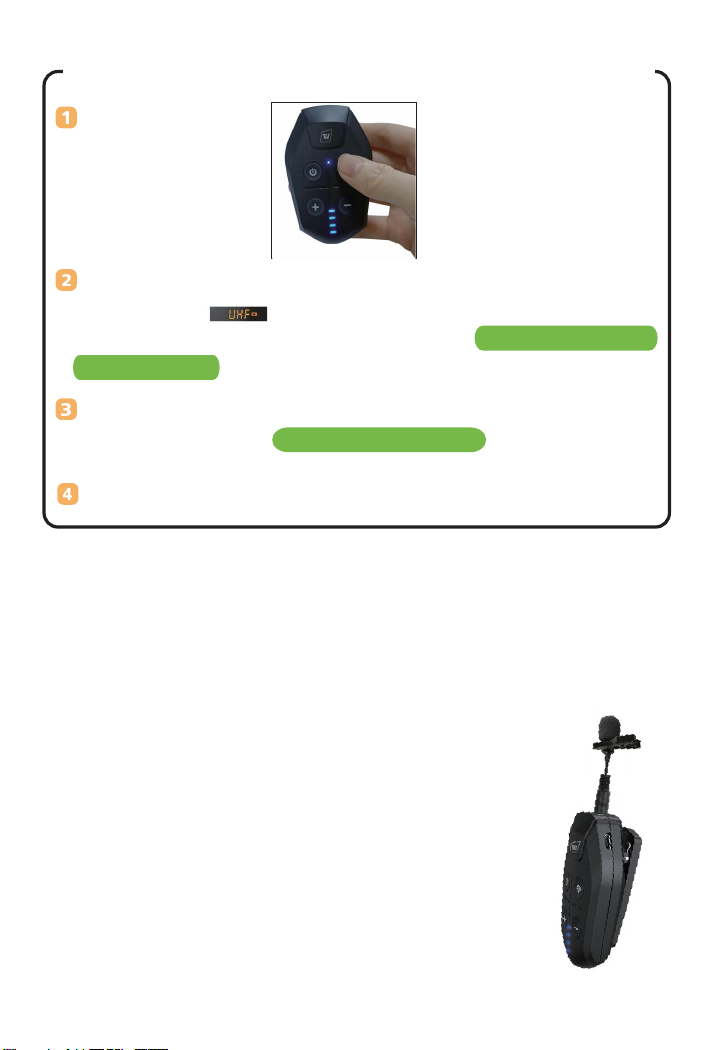
Turn on transmitter
and speaker
Turn on speaker, short press M button to switch to UHF mode with
screen shows: , then long press M button again for 3 seconds
to enter UHF pairing mode with voice prompt: “UHF is waiting for
connection...”, meanwhile UHF indicator become flashes.
Long press on the small silicone button wifi on the transmitter
until speaker prompt: “ UHF is connected”
Plug lapel mic or stand mic into transmitter to use.
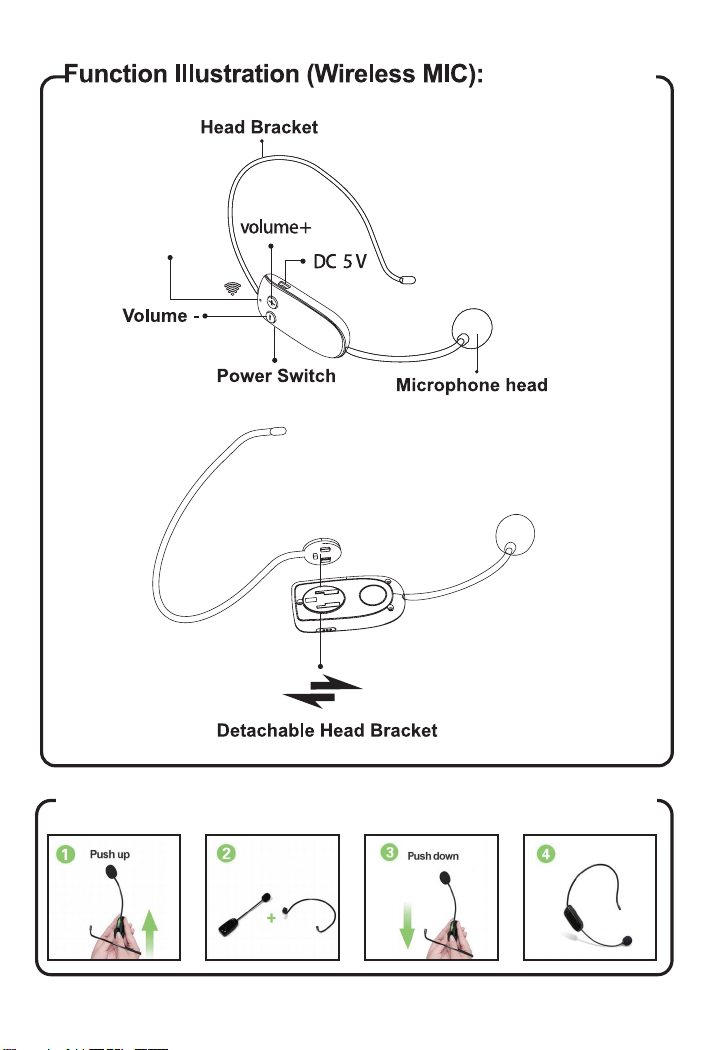
How to Use Wireless Lapel/Stand Mic System
……………
5

M
………………………………………………………
How to Play FM ?
Click to switch to FM
mode with a screen
shows like ,
and there will be voice
prompts: FM Mode
Long press for about 3s to start automatic channel search
The search will last about 1 min, just leave it before it’s done.
There will be several or dozens of channels. (The amount depends
on the area. )
Each channel is given a sequence number (in ascending order of
frequency )
For example, = Channel 3
Click to play previous/next channel;
DC 5 V
MI C
M
M
……………………………………………
How to Play Recording ?
Prerequisite: require a USB drive or TF card for storage and a
microphone for input.
Under any mode, long press ( 3s) button to start recording;
There will be a voice prompts “Start recording.”
And the screen shows like this
Connect with wireless mic or plug in an external wired mic to talk with it.
Click button to finish and save recording; At this point, it will play
recording file automatically you just made;
Please click button to pause/resume;
Click to play previous/next recording;
Click again to play USB drive/TF card music.
Click button to quit recording and switch to other modes;
USB
REC
6

Music Play
Supports: Refer to
MODES
Bluetooth USB
flash drive
micro
SD card
3.5mm
audio cable
M
Click to switch to Bluetooth
mode with a screen shows
, and there will
be voice prompts:
Bluetooth is waiting for connection;
Turn on Bluetooth device and search named“H5”to pair.
…………………………………………
How to Connect Blueooth ?
DC 5 V
MI C
M
M
Turn on two H5 speakers, click button to enter Bluetooth mode,
long press one of speaker’s M button to enter pairing status, the
other one Bluetooth indication become solid lights means these two
speakers are connected successfully.
Turn on your phone or Bluetooth device and search named“H5”
to pair.
……………………………………………………
How to Play TWS ?
7

How to Play Aux
AUX
3.5mm
audio cable
plug the 3.5mm audio cable into the AUX hole.
connect to any device with 3.5mm audio output
Audio Format supported:
MP3 WAV WMA APE FLAC
Just connect a USB drive or TF card,
then speaker will play music
automatically. Please make sure your
USB or TF card have music files.
………………………………
How to Play USB drive or TF card
USB
flash drive micro
SD card
8

……………………………………………
How to Charging Speaker?
Enough Power indication: the battery sign on the screen normally on
Low Power indication: the battery sign on the screen Blinks
In charging status: the indicator flashes while charging;
Fully charged: the indicator turn on solid lights after charged fully.
When working (but not charging)
Charging speaker with plug included
9

10
Please note:
Use the included 9V AC power adapter to charge the speaker internal
rechargeable battery.
Plug adapter into 110~240 AC outlet. Connect the cable end into the
DC 9V power input on speaker.
It will normally take 3-5 hours to fully charge the battery.
When charging is required, a voice prompt will indicate,“Low battery,
please charge.”The battery indicator will blink while charging. It will
stop blinking when battery is fully charged.
Recharge the battery within 48 hours of“low battery”voice prompt.
In order to extend the life of the internal battery, please charge it
regularly even if system is not being used.
It is suggested that you charge the internal battery an additional
1-2 hours after fully charged to extend its life.
Please DO NOT over charge the battery by leaving the system
plugged in continuously. This will reduce the life of the internal
rechargeable battery and could cause over heating.
5
6
7

Charging headset with cable included
Charging transmitter with cable included
How to Charging Transmitter?
In charging status: the indicator flashes while charging;
Fully charged: the indicator turn on solid lights after
charged fully.
11
How to Charging Headset Microphone?
In charging status: the indicator shows red while charging;
Fully charged: the red indicator goes off after charged
fully.

TROUBLESHOOTINGS
Malfunction
Powered on but no
sound
Forget to turn up U8 headset
mic or transmitter's volume
Please short press the "+" key
on the U8 headset mic or
transmitter's to turn up the volume
Why speaker sound
volume is lower than
expected even its’
volume set to
maximum?
Mic no sound
Doesn’t play music
in the USB drive or
TF card
Howling
Microphone loose
power quickly
Microphone too close to speaker;
1.Microphone isn’t charged fully;
2.Forget turn off mic volume while
charging or not work;
Keep distance between mic and
speaker,Please refer to the
description on page 5
1.Please make sure your mic
is charged fully before use;
2.Please remember turn off mic
volume while charging or not
work;
1.Format not supported;
2.Program disorder;
3.Volume set to the minimum;
1.Only support MP3 WAV WMA
APE FLAC;
2.Reboot speaker;
3.Turn up
1.Connect lost;
2.Mic volume set to the minimum;
3.Speaker volume set to the
minimum;
1.Please re connect mic with
speaker follow above steps;
2.Click“+”button on the mic to
turn up volume;
3.Turn Speaker
VOL up
1.Speaker no power;
2.No input source;
3.Volume set to the minimum;
1.Charge speaker;
2.Recheck the input;
3.Turn up
Possible Causes Solution
1 * Voice Amplifier
1 * Transmitter
1 * Headset Microphone
1 * Lapel Microphone
1 * Stand Microphone
1 * User Manual
1 * Charging Cable
1 * Aux Cable
1 * 9V Charger
1 * 5V Charger
1 * Adjustable Waistband
1 * WinBridge Booklet
Package Includes:
12


After-sale service
WinBridge provide one year warranty and lifetime
technical support.
Please be confident that Seller support is just a mail away from you in case you
find any difficulty. Kindly do not hesitate to write back to us if you need any
clarification or any kind of support. http://www.winbridgepower.com
Table of contents