manuals.online logo
Brands
  1. Home
  2. •
  3. Brands
  4. •
  5. Wine Racks
  6. •
  7. Wine Cooler
  8. •
  9. Wine Racks Magnum/Champagne Kit User manual

Wine Racks Magnum/Champagne Kit User manual

Magnum/Champagne Kit
Assembly GUIDE
Cordless Drill Finish Nailer
Hammer Nail Setter
Depending on the model you purchased, your bundle should contain the following:
*All models follow the same assembly procedure varying only in the number of middle ladders your rack will require.
Package Contents tools for assembly
Page 1
or visit
wineracksamerica.com
Questions?
888.373.6057
WOOD SCREWS
FINISH NAILS
WOOD PUTTY
+
Screwdriver
Required
Wood Glue
Suggested
Standard Connector
Screwless Connector
Standard Connector
End Ladder
Middle Ladder
Standard Connector
END LADDER ASSEMBLIES
SIDE VIEW
77 1/8"
STANDARD CONNECTORS
(Various Lengths)
SIDE VIEW
SCREWLESS CONNECTORS
(Various Lengths)
SIDE VIEW
MIDDLE LADDER ASSEMBLIES
SIDE VIEW
77 1/8"
Assembly GUIDE or visit
wineracksamerica.com
Questions?
888.373.6057
Top of rack
Page 2
1. Find an open, flat area in which to work. Carefully remove all components from the box and remove banding
with a utility knife. Check the parts list to verify package contents.
1
BEGIN WITH BACK
OF RACK
2.
Arrange the end ladders on the floor so that the bottle support pieces face one another. Align the large gaps on each
end ladder. The end with the larger gap is the top of your rack. Attach a standard column connector to the top
and bottom of your rack using the screws provided. Make sure the connectors are flush with the top and bottom
of your rack. (figure 1)
* Minimize the risk of splitting your ladders by drilling a 1/16" pilot hole before driving the wood screws.
For best results, drive the screw most of the way in with your drill, then finish tightening by hand.
3. Insert the middle ladders and finish securing the top & bottom connectors using the screws provided.
4. Attach the middle standard connectors so that the top edge of the lower connector is 26 5/8" from the bottom
of the rack, and the top edge of the upper connector is 51 3/4" from the bottom of the rack. Secure the middle
connectors using the screws provided. This is the back of your rack. (figure 2)
2
FINISH SECURING BACK
CONNECTORS
Magnum/Champagne Kit
26 5/8"
51 3/4"
Back of rack
Assembly GUIDE or visit
wineracksamerica.com
Questions?
888.373.6057
Magnum/Champagne Kit
Page 3
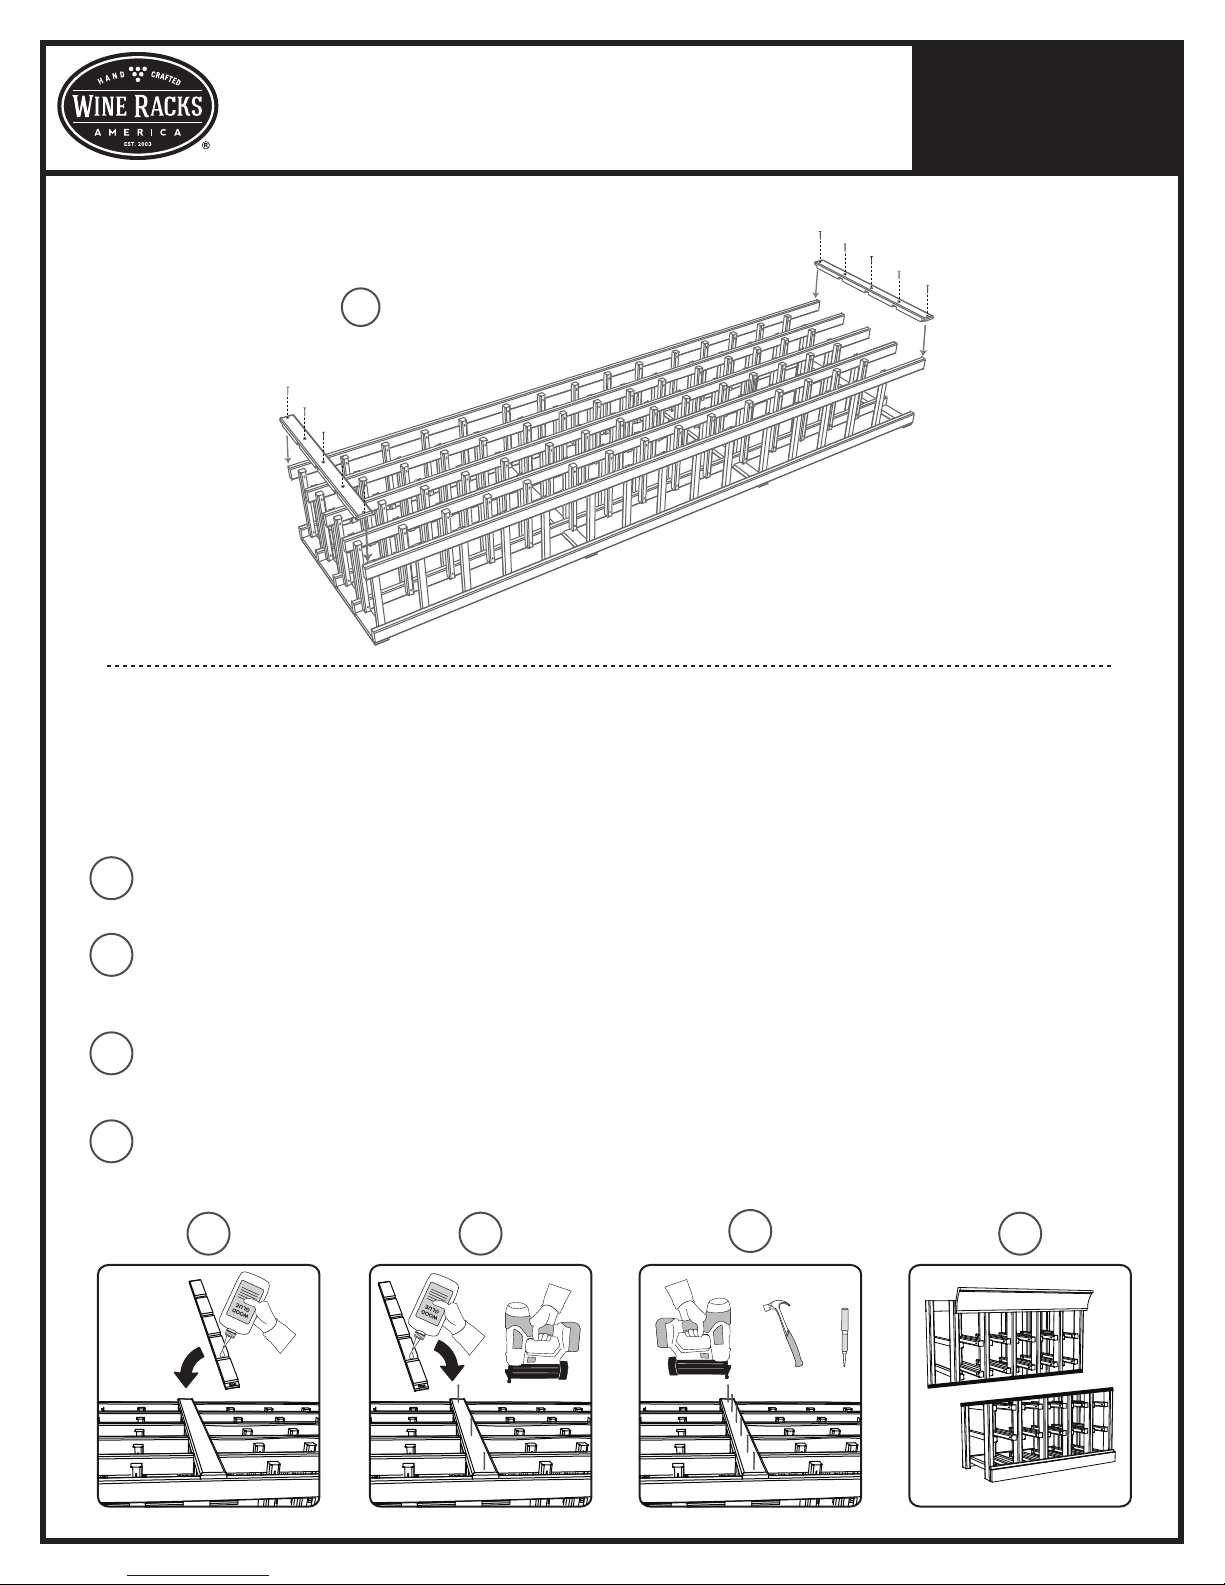
5. Flip rack over and secure a standard column connector to the top and bottom of your rack using the screws
provided. (figure 3)
3
FRONT OF RACK
6. Attach the middle screwless connectors so that the top edge of the lower connector is 26 5/8" from the bottom
of the rack, and the top edge of the upper connector is 51 3/4" from the bottom of the rack. Make sure the rack
is flat on the floor while attaching the screwless connectors. (figure 4)
Magnum/Champagne kits are designed to show no visible hardware on the front of the rack. Use of of these following
methods to install the screwless connectors:
For no visible hardware, add wood glue to the inside of each connector notch. Place the connnector on your
rack and carefully press each notch into place. Hold until glue is dry. (figure A)
For minimal visible hardware, add wood glue to the inside of each connector notch. Place the connector
on your rack and carefully press each notch into place. Hold until glue is dry. For added support, use a finish
nailer to attach the connector to the two end ladders and one middle ladder. (figure B)
For a professional installation, secure the connectors using a finish nail gun to drive a nail through the connector
into each vertical ladder. If you do not have a finish nail gun, drive one of the provided finish nails into each
vertical ladder until it is flush. Then, countersink the nail using a nail setter until the head of the nail is about
1/16" below the surface of the wood. (figure C)
(Optional) Purchase Crown and Base molding to cover the hardware of the top and bottom standard connectors
on the front of the rack. (figure D)
A B C
A
B
C
D
+
++
or
Crown Molding
Base Molding
D
Assembly GUIDE or visit
wineracksamerica.com
Questions?
888.373.6057
Page 4
8. Attaching your rack to the wall (optional). Depending on how many bottles you store, your wine cellar rack
could weigh as much as 540 lbs. To avoid tipping, attach your rack to the wall using one of the following
methods.
1. Put the rack in the desired location.
2. Shim the front of the rack so it is
parallel with the wall behind it.
3. Locate a wall stud behind the rack.
4. Drive a 2 1/2" wood screw through a
back spacer bar to attach to the stud.
1. Use "L" brackets (located at any hardware store).
2. Attach to both the rack and the wall in any out of
the way spot.
WINERACKSAMERICA.COM
360 North 700 West Suite F • North Salt Lake, UT 84054
(toll free) 888-373-6057
(fax) 801-936-0534
Once again, thank you for your business. Remember, customer
service is available to answer any questions Monday-Friday
7:00 am - 5:00 pm MST. Please feel free to contact us for any
wine storage needs.
4
ATTACH SCREWLESS
CONNECTORS
7. Fill the nail holes using the wood putty provided. Simply push the putty into each hole using your thumb and
wipe excess putty off the surface using a damp cloth.
We would love to see your wine racks in use! Please feel free to
send any photos of your racks to [email protected]
Magnum/Champagne Kit

Popular Wine Cooler manuals by other brands

Gaggenau RC 462 Installation instruction

Gaggenau

Gaggenau RC 462 Installation instruction

Moffat MWR02 Owner's manual and installation

Moffat

Moffat MWR02 Owner's manual and installation

GE Profile 3504502P327 Owner's manual and installation

GE

GE Profile 3504502P327 Owner's manual and installation

SEVERIN Temperature-controlled wine cabinet Instructions for use

SEVERIN

SEVERIN Temperature-controlled wine cabinet Instructions for use

Haier HWS84GA user guide

Haier

Haier HWS84GA user guide

THERMEx Winemex quick guide

THERMEx

THERMEx Winemex quick guide

Baumatic BW28 user manual

Baumatic

Baumatic BW28 user manual

Kalorik USK WCL 2 operating instructions

Kalorik

Kalorik USK WCL 2 operating instructions

Kadeka KA24WR instruction manual

Kadeka

Kadeka KA24WR instruction manual

Richelieu C32 Assembly and Instruction Guide

Richelieu

Richelieu C32 Assembly and Instruction Guide

Allavino VSWR30-1 instruction manual

Allavino

Allavino VSWR30-1 instruction manual

Marvel 3SWC-BN datasheet

Marvel

Marvel 3SWC-BN datasheet

Electrolux E24WC48EBS Service manual

Electrolux

Electrolux E24WC48EBS Service manual

Cliadiff CV41ZX user manual

Cliadiff

Cliadiff CV41ZX user manual

Insignia NS-WC45BK7 Quick setup guide

Insignia

Insignia NS-WC45BK7 Quick setup guide

Gaggenau RW 404 operating instructions

Gaggenau

Gaggenau RW 404 operating instructions

Vinvautz Grand Cru Classe VZ46BHK user manual

Vinvautz

Vinvautz Grand Cru Classe VZ46BHK user manual

LG Signature URETC1408N Safety instructions

LG

LG Signature URETC1408N Safety instructions

manuals.online logo
manuals.online logoBrands
  • About & Mission
  • Contact us
  • Privacy Policy
  • Terms and Conditions

Copyright 2025 Manuals.Online. All Rights Reserved.