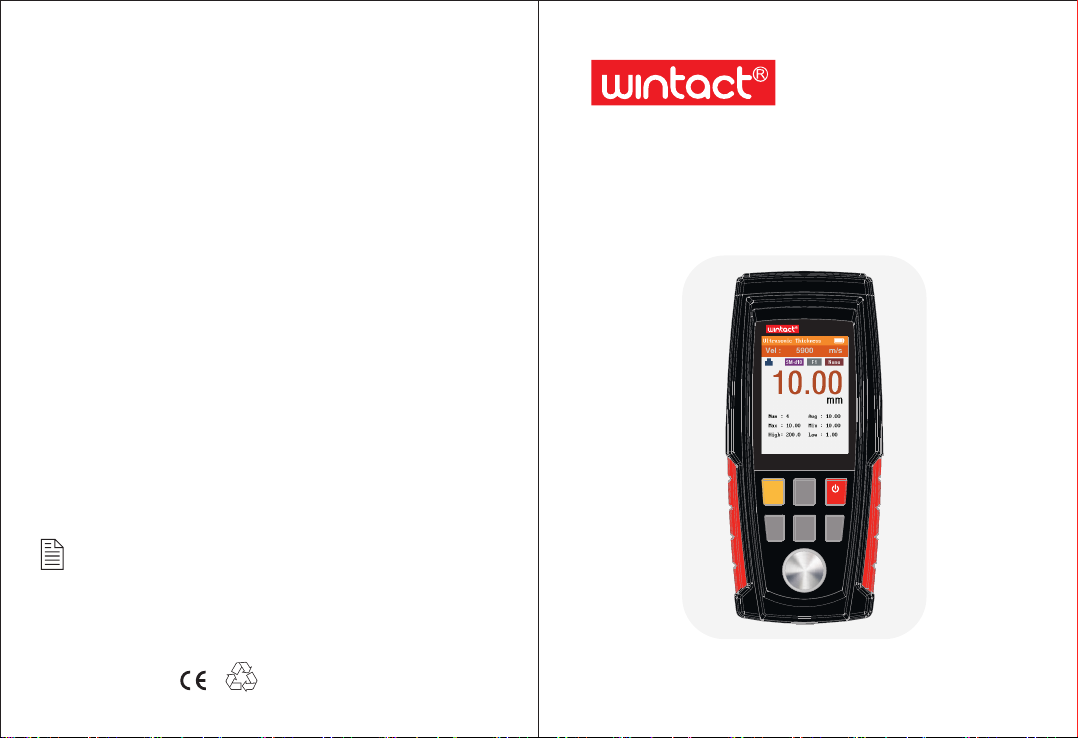
WINTACT WT100A User manual

Specific Declarations:
Our company shall hold no any responisibility resulting from using output from
this product as an direct or indirect evidence.
We reserves the right to modify product design and specification without notice.
Version:WT100A/WT130A-EN-02
MODEL:WT100A
WT130A
Ultrasonic Thickness Gauge
MENU
OK
VEL
UP
ESC
DOWN
Ultrasonic Thickness Gauge
Instruction Manual
Any queries,kindly contact us feel free.
Contact Email: [email protected]
Tel: +86 13530057923(Wechat&WhatsApp)
Skype: raymondzheng2014

目 录
1. --------------------------------------Introduction -------------------------- (01)
------------------------------ ---------- --(02)Part name ------------ -------
Button function instruction ------- ------------------ --------- (02)
Instruction of measurement interface display ---------(03)
2.--------------------------------- --------- ----(01)Attention -------------- ---------
3.--------------------------------- -- (02)Part name and display instruction -
4.--------------------- -- (04)Technical parameters -----------------------------
5.-------------------------------------------- --(05)Operation preparation ------
Battery installation -------------------- (05) ---------------------
Power on/off --------------------------------- (05) ----------------
7.-------------------(06)Main menu operation and function introduction
Introduction to main menu operation ---------- (06) ---------
Introduction to main menu functions ----------(06) ----------
Measurement options --------------------(06)------------------
Probe -----------------------------------------------(06) -----------
Limit value --------------------------------------- (06) ------------
Storage ----------------------------------------- (06) --------------
Chart -----------------------------------------------(07) ------------
Settings ----------------------------------------- (07) --------------
12.--------------------------- ---------- (10)Technology of measurement ---- -
Menu interface display instruction ------ ----------- -------- (03)
8.--------------- (07)Bottom menu operation and function introduction
Introduction to bottom menu operation ---------(07) --------
Introduction to bottom menu functions --------- (08) --------
9.-------------------------------------- --------(08)Calibration instruction ------
10.----------------------------- (08)Instruction of sound speed calibration
11.-----------------------------------------(09)Instruction of other functions
Divergence chart of menu functions --------- ------- ---- (09)
13.--------------------------------------------- (12)Avoid measurement error
14.------------------------------------------- (14)Maintenance and warranty -
15.---------------------------------- ------------------ (15)Notices for users ---- -
16.---------------------------------- ---------- (16)Table of sound velocity ---- -
6.---------------------- ----------------------- -- (05)Measurement --------- ------ -

-0 1--0 2-
button
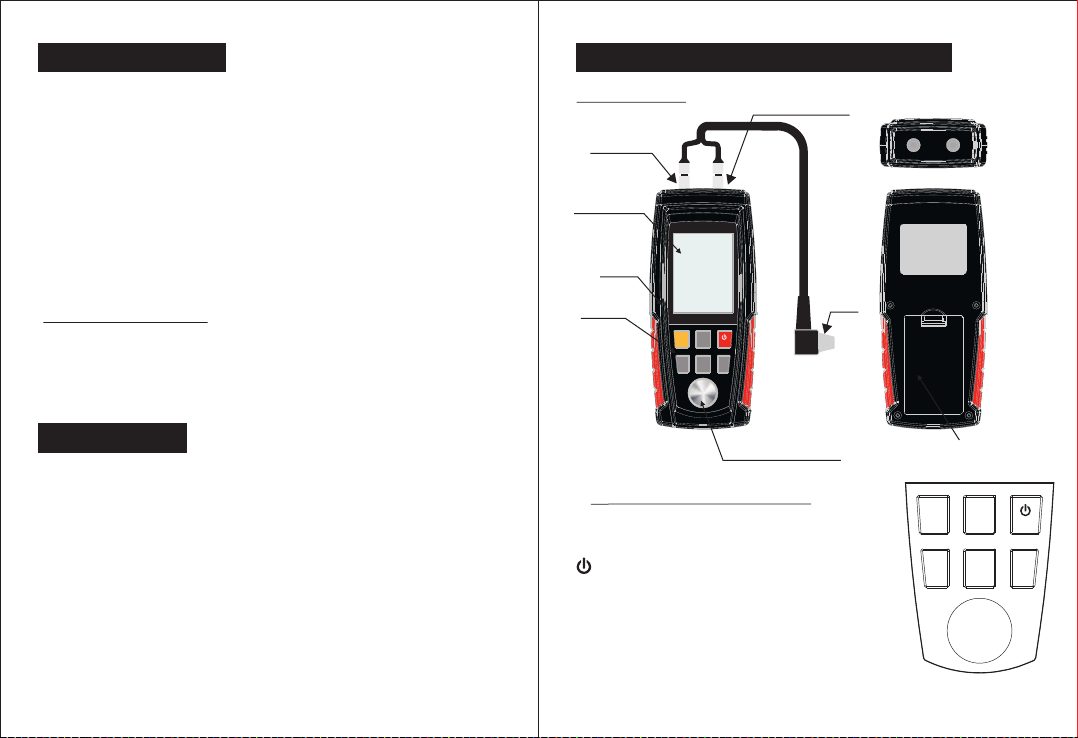
3.2. Button function instruction:
VEL:Sound speed adjustment button
UP:Switch button of selection\Adjustment
/MENU:Power On\Shutdown\Menu
ESC:Exit button
DOWN:Switch button of selection\Adjustment
OK:Confirmation button
MENU
OK
VEL UP
ESC
DOWN
3、Part name and display instruction
3.1. Part name
Transmission
socket
Battery compartment
(back of body)
Receiving socket
Probe
MENU
OK
VEL
UP
ESC
DOWN
Ultrasonic Thickness Gauge
Calibration sample
Color screen
Button
Body
1 Introduction、
2、Attention
The intelligent and hand-held ultrasonic thickness gauge is
controlled by a microprocessor, which can measure thickness
and sound speed of various materials quickly, accurately and
without damage by ultrasonic measurement. This instrument is
capable of accurate measurement for different materials or
parts in industrial production, as well as monitoring pipelines
and pressure vessels of production equipment, and corrosion
degree of various parts in use. It can also be widely used in
manufacturing, metal processing, commodity inspection and
other testing areas. Any material that allows ultrasonic to
transmit at a constant speed and that is distinguishable from
waves reflected from the back side is applicable to this
instrument.
1.1. Application scope
The thickness of any good conductor for ultrasonic waves
with top and bottom surfaces parallel to each other, like metal,
plastic, ceramic and glass, can be measured with the instrument.
For example: aluminum, copper, gold, resin, water, glycerin, etc.
The internal particles of cast iron are too big for this instrument!
2.1. This gauge is equipped with Ni-MH rechargeable batteries.
Please do not install non-rechargeable batteries.
2.2. Please keep the instrument away from flammable or
explosive environment.
2.3. Please keep the instrument away from dangerous voltage in
ase of accidents.
2.4. Please keep the instrument away from strong impact, high
temperature and water immersion.
2.5. Batteries should be taken out if not in use for a long time.
2.6. Please install batteries in correct direction. Please charge or
replace batteries when the power is low.
2.7. Please do not disassemble the instrument or try to change
internal parts.
2.8. Alcohol and diluents are corrosive to case and screen, which
can be cleaned with a little water.

-0 3--0 4-
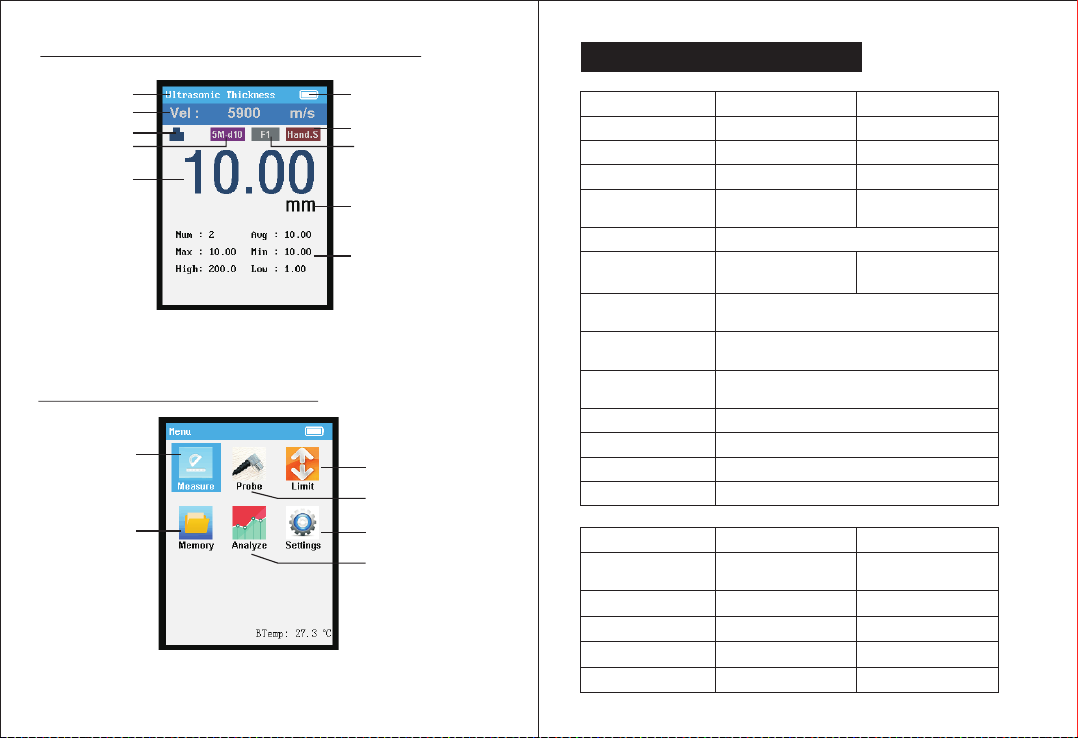
3.3. Instruction of measurement interface display
Measurement interface
Title bar
Sound speed bar
Coupling icon
Selected probe
Measured value
Battery power
Selected storage method
Selected file
Unit
Measurement information
Main menu display
3.4. Menu interface display instruction
Measurement
selection
Probe
Limit value
Storage
Chart
Setting
4、Technical parameters
5Md10
5Md6
2.5M
High temperature
Probe Measurement
parameters
×
×
×
1.0~300.0mm
1.0~50.0mm
1.2~300.0mm
1.2~300.0mm
1.0~225.0mm
WT130A
WT100A
Measurement
parameters
Measuring range
Data storage
Probe selection
WT130A
1.00~300.0mm
1500
√
WT100A
1.00~225.0mm
500
×
5MHz
Lower limit of pipe
measurement
Φ20x3mm (steel)
Measurement error
Adjustment range
of sound speed
1000~9999m/s
Temperature range
of operation
0~40℃
Battery
3 Ni-MH rechargeable batteries of 1.2V
Dimensions 65x146x30mm
Weight
130G
±(0.5%H+0.05)mm
Operation
frequency 5MHz/2.5MHz
USB charging 5V 1A
0.01mm(1.00 to 99.99mm)
0.1mm(100 to 300mm)
Resolution
0.01mm(1.00 to 99.99mm)
0.1mm(100 to 225mm)

-0 5--0 6-
5.1. Battery installation;
First insert the probe into host probe socket, and install
batteries in battery compartment, pay attention to the polar of
batteries. Check battery power after powering on; if battery
power is low, please charge them in time.
5.2. Power on/off;
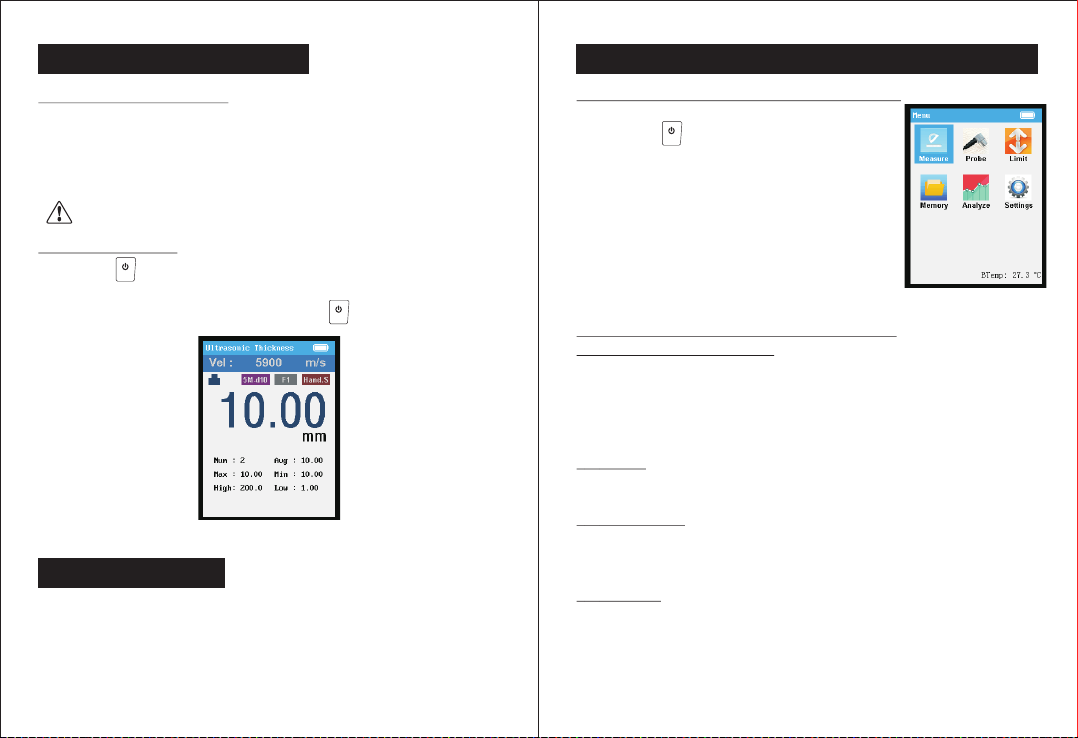
Press " " to turn on the instrument and enter into sound
speed measurement interface. At this point, the measurement
can be started. (As shown), long press " " button to manually
shut down.
Measurement interface
of sound velocity
5、Operation preparation
6.1. Apply coupling agent evenly to the measured points on the
surface of tested object.
6.2. Thickness can be measured by gently pressing the probe
on the object surface with coupling agent.
6、Measurement
MENU
MENU
Note: Please do not install non-rechargeable battery.
7.2. Introduction to main menu functions;
1)Measurement options;
Make measurement settings under this menu, including:
a. Sound speed of measurement. (sound speed bar of
measurement interface)
b. Measurement unit of
c. Measurement resolution
2)Probe
Under this menu, select the probe to use in measurement
(selected probe icon in measurement interface).
3)Limit value
Make limit value settings under this menu.
a. Set high and low limit value of measurement
b. Turn on/off sound alarm for exceeding limit values.
4)Storage
Storage related operations can be performed under this menu:
a. Select the file to save when saving data (the selected
file label of the measurement interface)
b. View saved data by file
c. Delete the data of the selected file
7.1. Introduction to main menu operation;
a.Enter into main menu
Press " " button in measurement
interface to enter into main menu.
b.Select menu item
Press UP or DOWN button under
menu interface to select menu item.
c.Enter into menu item
Press OK to enter into selected
menu item
d.Exit menu item
Press ESC to return to the previous menu
7、Main menu operation and function introduction
Main menu
MENU

-0 7--0 8-
8.1. Introduction to bottom menu operation;
a、Enter into bottom menu:
Press ESC under measurement
interface to enter into bottom
menu.
b、Select menu item:
Press UP or DOWN button to
select menu item.
c、Enter into selected menu item:
Press OK to enter into selected
menu item.
d、Exit menu item:
Press ESC button to exit bottom menu.
5)Chart
In this menu, you can view the data saved in the file inform of
trend graph.
a. View basic information such as data number, maximum
value, minimum value, and average value in this file.
b. Zoom the whole trend graph
c. Use cursor to view specific data value in the file.
6)Settings
Make other settings for the instrument under this menu, including:
a. Language
b. Automatic shutdown time
c. Button sound
d. Backlight brightness
e. Color
f. Software version number
g. Restore factory settings
Bottom menu
8、Bottom menu operation and function introduction
8.2. Introduction to bottom menu functions;
a. Storage:
Save current measured values to the selected file.
b. Delete:
Delete measured values and measurement information
(except for limit values).
c. Calibration:
Refer to calibration instruction for details.
d. Sound speed calibration:
Refer to sound speed calibration instruction for details.
9.1. Press ESC under measurement interface
to enter into bottom menu. Select
calibration item and press OK button.
9.2. The interface is displayed as shown on
the right:
9.3. The sound speed in calibration is
automatically set as 5900m/s during.
9.4. Press the probe on calibration sample to
calibrate. 5 circles on the bottom of
screen will be filled in turn.
9.5. After the calibration is completed, it will
automatically return to measurement
interface.
10.1. Enter into bottom menu and select
sound speed calibration item
10.2. The interface is displayed as shown
on the left:
10.3. As shown in the figure, press
UP/DOWN button to adjust value.
10.4. After the value adjustment is
completed, press OK to complete
calibration.
9、Calibration instruction
10、Instruction of sound speed calibration

-0 9--1 0-
12、Technology of measurement
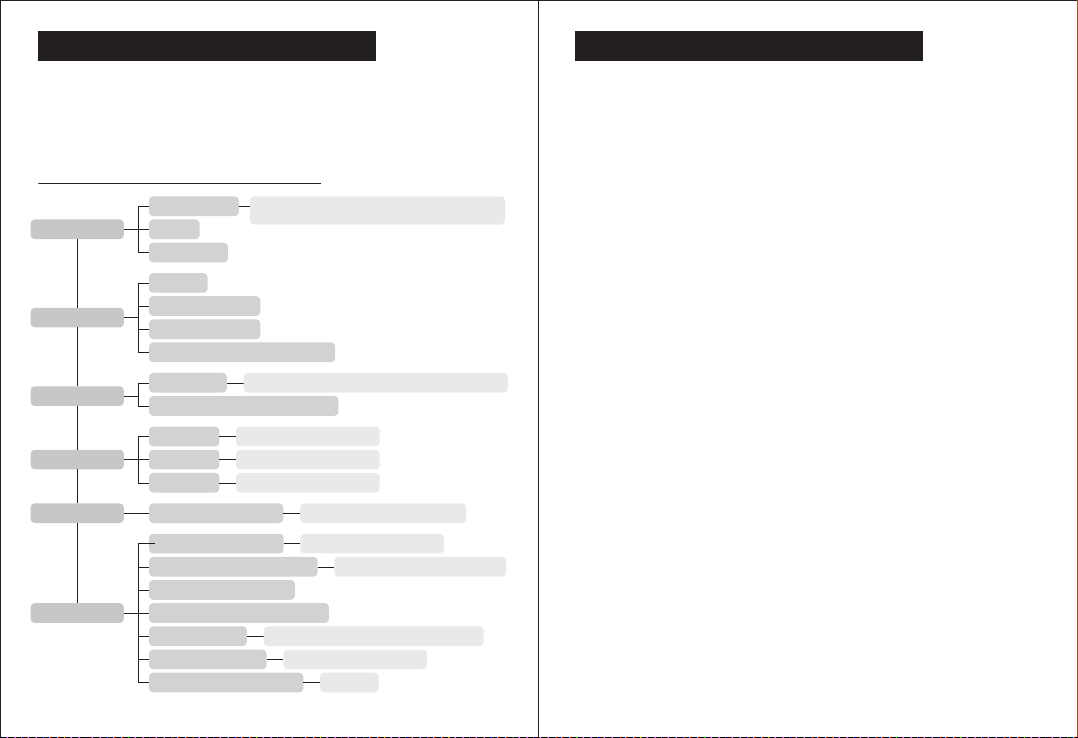
Divergence chart of menu functions:
Refer to the divergence chart of menu for other functions(as
shown below).
Probe label: 5Md10, 5Md6, 2.5M, H.T (high temperature)
File label: F1 ~ F5 (WT100A), F1 ~ F15 (WT130A)
Storage label: Hand.S (manually saved), Auto.S (automatically
saved)
Measurement
Sound speed
Unit
Resolution
Selection among various materials and
sound speed / customizable
Probe
Limit value
Limit value
Sound of Limit value (switch)
Adjustment setting of high/low limit value
Storage
Select file
View file
Delete file
Select file
Select file to view
Select file to delete
Chart Documents 1, 2, 3... View data of selected file
Setting
Language selection
On/off of button sound
Chinese/ English
2, 5, 10, 30 minutes / never
Automatic shutdown time
On/off of backlight highlight
Select color
Software version
Restore factory setting
5M-d10
5M-d6(WT130A)
2.5M (WT130A)
High temperature(WT130A)
Blue, orange, green, purple, gray
View software version
Yes/No
11、Instruction of other functions
12.1. Clean surface
Before measurement, all the dust, dirt and rust on the surface
of the object to be tested should be cleaned, and the covering
such as paint should be removed.
12.2. Reduce roughness
Excessively rough surfaces can cause measurement errors or
no readings on the instrument. Before measurement, the
material surface should be as smooth as possible through
sanding, grinding, polishing, rasping, or using high-viscosity
coupling agent.
12.3. Surface made by crude machinery:
Regular fine grooves on surfaces made by crude machinery
(such as lathe or planer) can also cause measurement errors,
and the correction way is the same as 12-2; besides, adjust the
angle between the crosstalk spacer of probe (metal folium in the
middle of the probe bottom) and the fine groove of the tested
material (orthogonal or parallel) may also achieve better results.
12.4. Measurement of cylindrical surface:
To measure cylindrical objects, such as pipes, oil drums and
so on, it is important to adjust the angle between the crosstalk
spacer of probe and the axis of the tested material. Briefly,
coupling the probe to the tested material, the crosstalk spacer of
probe is parallel or perpendicular to the axis of the tested
material. Slowly move the probe perpendicular to the axis of the
tested material, and the readings on the screen will change
regularly. Select the minimum value among readings as the
accurate thickness of the material.
The criterion for selecting the direction of the crosstalk spacer
of probe and the axis of the tested material depends on the
curvature of the material. For the pipe with larger diameter, the
crosstalk spacer of probe should be perpendicular to the axis of
the pipe; for the pipe with smaller diameter, the crosstalk spacer
of probe can be either parallel or vertical to the axis of material.
The minimum reading is selected as the measured thickness.

13、Avoid measurement error
-1 1--1 2-
12.5. Measurement of composite shape:
When measuring materials of composite shapes (such as
elbow of pipe), the method described in 12-4 can be adopted,
except that the measurement should be performed for two
times to get two readings by placing the crosstalk spacer of
probe vertical or parallel with the axis, the smaller of which is
the thickness of the measured point.
12.6. Non-parallel surfaces:
In order to obtain a satisfactory ultrasonic response, the other
surface of the material to be tested must be parallel or coaxial
with the surface to be measured, otherwise it will cause
measurement errors or no reading.
12.7. Effects of material's temperature:
The thickness of material and the transmission speed of
ultrasonic wave are affected by temperature. For high
measurement accuracy, separately measure samples of the
same material under the same temperature condition, then
calculate the measurement error caused by temperature, and
correct error with parameterS. For steel, high temperatures will
cause big error (measured values are smaller than actual data),
and this way can also be used to correct errors.
12.8. Materials of attenuation:
For some materials with fibers, pores, and coarse particles,
they cause great scattering and energy attenuation of
ultrasonic waves, resulting in abnormal readings or even no
readings (usually the abnormal reading is smaller than the
actual thickness), in which case the material is not suitable to
be tested with this thickness gauge.
12.9. Samples for reference:
A material of known thickness or sound speed helps calibrate
the instrument. At least one sample for reference is required to
calibrate the instrument. The ultrasonic thickness gauge is
equipped with a steel sample with thickness of 4.0 mm. Please
refer to calibration instruction in item 9 of this manual for
calibration method.
13.1. Ultra-thin material
With any ultrasonic thickness gauge, if the thickness of the
tested material falls below the probe's lower limit, measurement
errors will appear. If necessary, the minimum thickness limit can
be measured by sample comparison.
When measuring ultra-thin materials, sometimes an error
called "double refraction" occurs, in which the measured value is
equal to twice the actual thickness. Another error is called "pulse
envelope and loop jump", in which the measured value is bigger
than the actual thickness. To avoid such errors, repeat checking
measurement of critical thin material.
13.2. Rust spots and corrosion pits
Rust spots and corrosion pits on the other surface of the tested
material will cause readings to change irregularly or no reading
in extreme cases, and small rust spots are sometimes difficult to
detect. When pits are found or suspected, be careful with the
measurement of this area, and place the crosstalk spacer of
probe at different angles for multiple tests.
13.3. Material identification error
If you have calibrated the instrument with one material and use it
to test another material, an erroneous result will occur. You
should be careful when selecting the correct sound speed. Or, if
the sound speed in the actual test displays certain deviation from
that of calibration, errors may also occur. Please make
adjustment in use.
13.4. Probe abrasion
The surface of probe is made of acrylic resin. After the
instrument is used for a long time, the roughness of probe
surface will increase, resulting in a decrease of sensitivity. If the
user can determine errors caused by this, the probe surface can
be polished with a small amount of 500# sandpaper or whetstone
to smooth surface and ensure parallelism.
If the result is still unstable, you may need to replace the probe.
14、Maintenance and warranty
-1 3--1 4-
13.5. Laminated material, composite material
It is impossible to measure uncoupled laminate materials
because ultrasonic waves cannot penetrate the uncoupled
space. Since ultrasonic waves cannot transmit at a constant
velocity in composite materials, instruments that measure
thickness by ultrasonic reflection are not suitable for
measuring laminated materials and composite materials.
13.6. Effects of oxide layer on metal surface
Some metals can produce a dense oxide layer on the
surface, such as aluminum. This layer of oxide is tightly
bonded to the substrate with no obvious interface. However,
the transmission speed of ultrasonic waves in these two
substances is different, thus resulting in errors. Different
thickness of oxide layer causes different errors, to which the
user shall pay attention. You can carve a piece of the same
material with a micrometer or caliper as sample to calibrate the
instrument.
13.7. Use and selection of coupling agent
Coupling agent is used to transfer high-frequency ultrasonic
energy between the probe and the tested material.
Inappropriate type or improper usage may cause errors or
failed measurement with lable of coupling agent flashing. It
should be used in an appropriate amount and applied evenly.
Coupling agent is usually applied to the surface of tested
material. When the temperature is high, coupling agent is
applied to the bottom of probe.
It is important to choose the right type of coupling agent. For
materials with smooth surface, coupling agents of low viscosity
(such as randomly mixed coupling agent, light machine oil,
etc.) are suitable. For rough surface, vertical surface and top
surface or aluminum, higher-viscosity coupling agents (such
as glycerin creams, greases, etc.) can be used.
Coupling agents of various formulations are available in many
places.
14.1. Probe protection:
The surface of the probe is acryl resin, which is sensitive to
grooves on rough surface and should be handled with care in
use. When measuring rough surface, please reduce the slide
of probe on the surface; the surface temperature of the
measured object should not exceed 60 °C (high temperature
probe for high temperature surface), otherwise the probe will
fail to work; oil and dust on the surface will gradually age the
cable in probe, and cause it to break. So clean the dirt on cable
after use.
a. Cleaning of case:
Alcohol and diluents have a corrosive effect on case,
especially the window, so when cleaning case, gently wipe it
with a little water.
b.Cleaning of test samples:
When using random test sample to calibrate the instrument,
apply coupling agent to prevent it from rusting. After finishing,
please wipe coupling agent off test sample. Do not drip sweat
on test sample when the temperature is high. If it is not in use
for a long time, apply a little fat oil on the surface of random test
sample (all kinds of anti-rust oil will also do). When using it
again, please wipe anti-rust oil off test sample first and then
start to perform.
c. Note: remember to avoid collision, humidity, etc.
14.2. Maintenance
If any of the following problems occur, please contact our
company or agent:
a. The instrument device is damaged and cannot measure
with no output.
b. LCD does not work properly.
c. In normal use, the error is too large.
d. Keyboard operation is out of order or in confusion.

16、Table of sound velocity
15、Notices for users
-1 5--1 6-
14.3. This ultrasonic thickness gauge is a high-tech product,
so the maintenance work should be subject to
professional staff. Please do not disassemble and repair
the instrument on your own.
15.1. Warranty and Maintenance Regulations
After you purchase our company's products, please fill in
<warranty registration card> and stamp official seal. If our
products have quality problems within one year from the date of
purchase (excluding products of non-warranty), please send
purchase invoice and warranty card (or photocopy) to customer
service department of our company within warranty period. Our
company will not guarantee warranty for users with no warranty
card .
If warranty period (one year) expires, local agencies will be
responsible for after-sales service and maintenance for
products of quality problems,. Besides, the maintenance fee
will be charged according to our company's regulations. The
maintenance fee for "special configuration" out of our
company's regular products will be charged according to
relevant standards.
Our company does not guarantee warranty for the following
circumstances: any user's disassembling products on his/her
own, improper transportation or storage after purchase,
product damage caused by improper operation and not
following product manual, defacement of warranty card, and no
purchase certificate.
15.2. Non-warranty list
Color screen, battery, probe, test sample, case, coupling agent.
Sound velocities of common materials
SUS
Aluminum
Zinc
Silver
Gold
Tin
Iron/Stee
Brass
Copper
Acrylic resin
Water(20℃)
Glycerinl
Soluble glass
2670
3530
4430
5440
5720
6310
6020
5630
5850
5660
6070
4650
2620
Acetate resin
Phosphor bronze
Turpentine
Glass
Incoloy alloy
Magnesium
Monel alloy
Nickle
Steel 4330(mild)
Steel 330
Titanium
Zirconium
Nylon
6320
4170
3600
3240
3230
5900
4640
4700
5790
2730
1480
1920
2350
Material Velocity(m/s) Velocity(m/s)
Material
This manual suits for next models
1
Table of contents
Other WINTACT Measuring Instrument manuals