WINTACT WT63C User manual

Instruction Manual of Vibration Meter
MODEL:WT63C
Version:WT63C-EN-01
Executive Standard: Q/HTY 008-2018
WT 63 C

CONTENTS
A.Introduction ----------------------------------------------------(01)
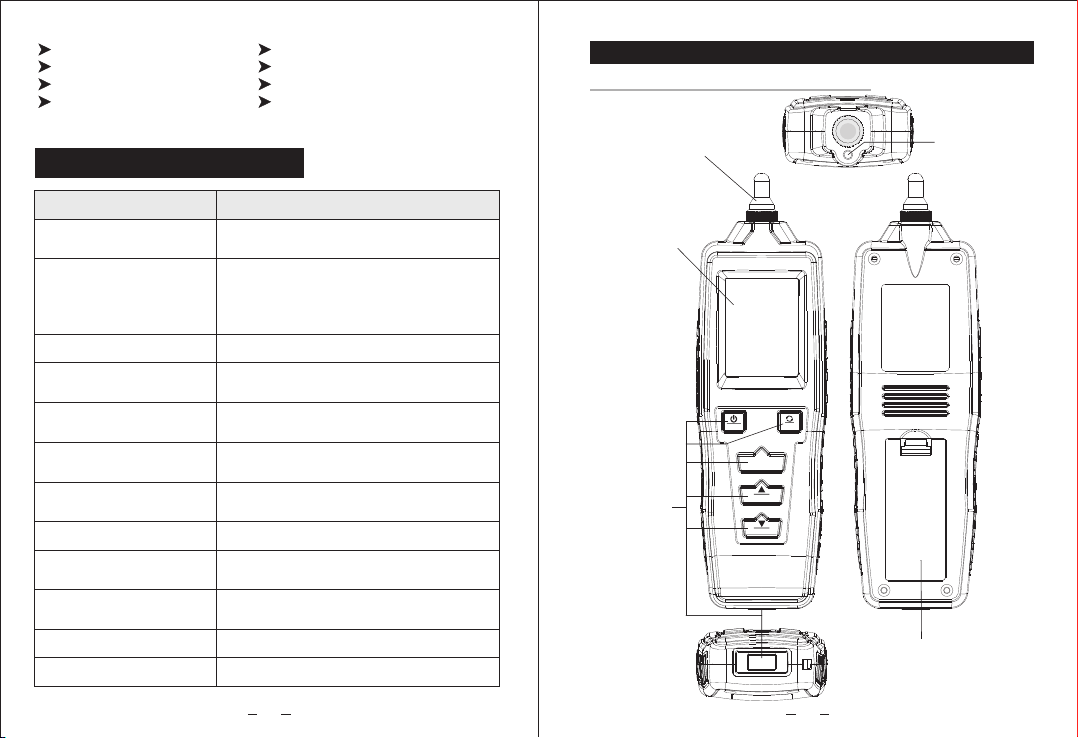
body parts (as shown in picture) ---------------------------(03)
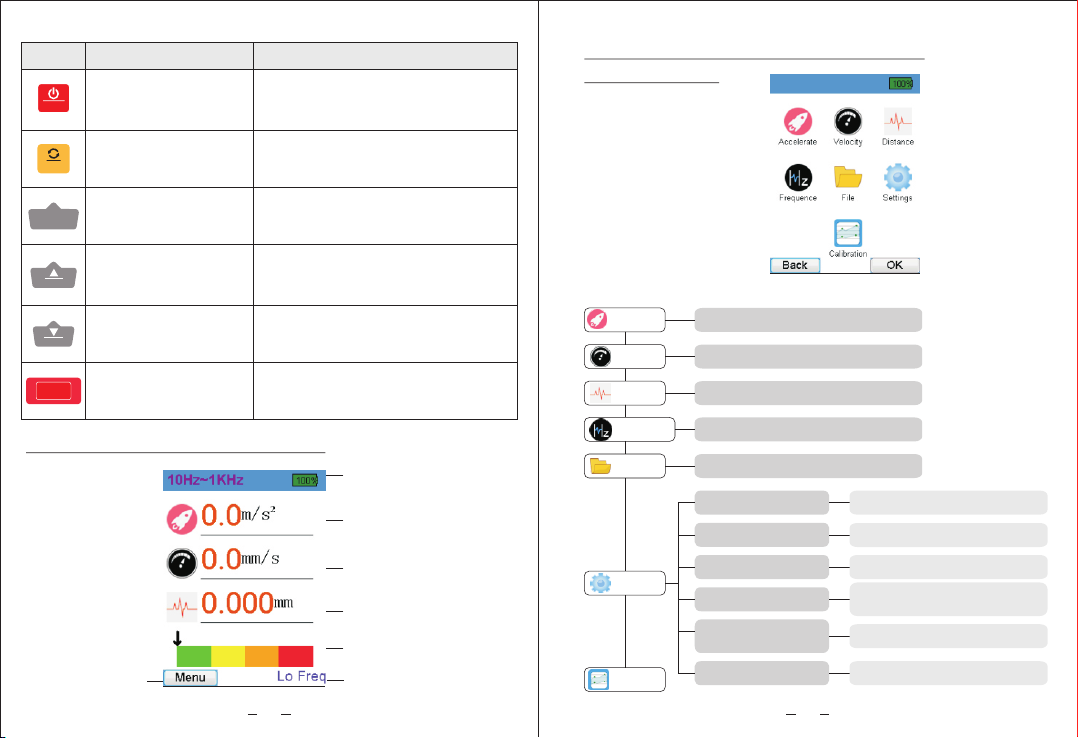
Instruction of full display interface--------------------------(04)
menu interface description / divergence
B.Notice---------------------------------------------------------------(01)
C. Functions--------------------------------------------------------(01)
D.Technical parameters --------------------------------------(02)
E. Instruction of parts and interface display-------(03)
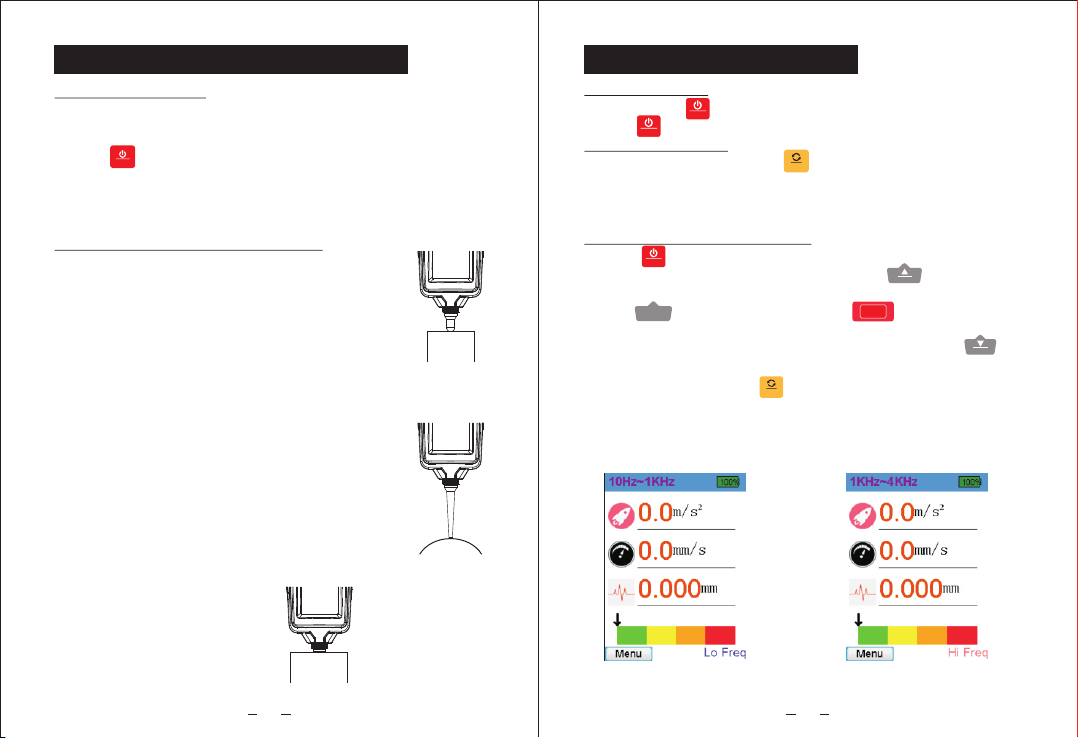
F.Preparation for measurement---------------------------(06)
Install batteries; -------------------------- ------(06)-----------------
Select probe for measurement; ----------------- ------(06)-----
G.Operation instruction---------------------------------------(07)
Power on / off-------------------------- --- ------(07)----- ------------
Screen rotation ------------------- --------(07)----------------------
Full display measurement-------------------------- ---------(07)-
Menu ------------------- --------(08)-----------------------------------
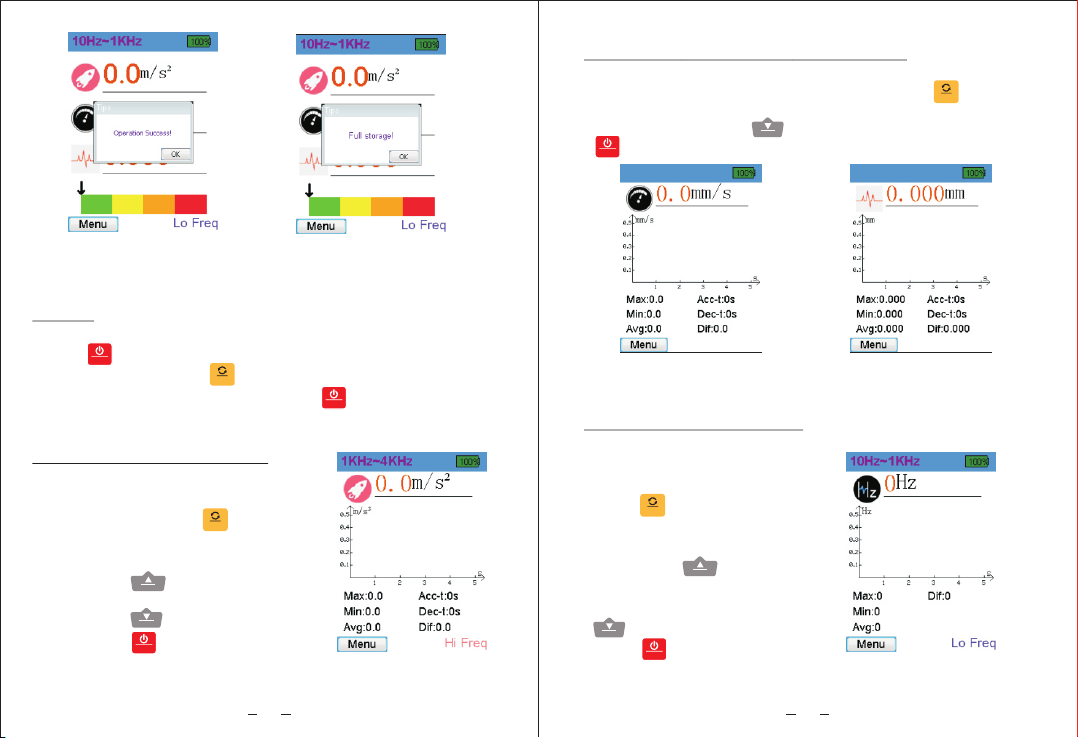
Acceleration measurement --------------------- ----------(08)---
Velocity/ measurement - ------(09)Displacement --------------
Frequency measurement ------------- --- -------(09)---- ---------
View files ------------------- - ------(10)----------------- --------------
Settings -------------------------- ------------(10)---------------------
H. Other notices-------------------------------------------------- (12)
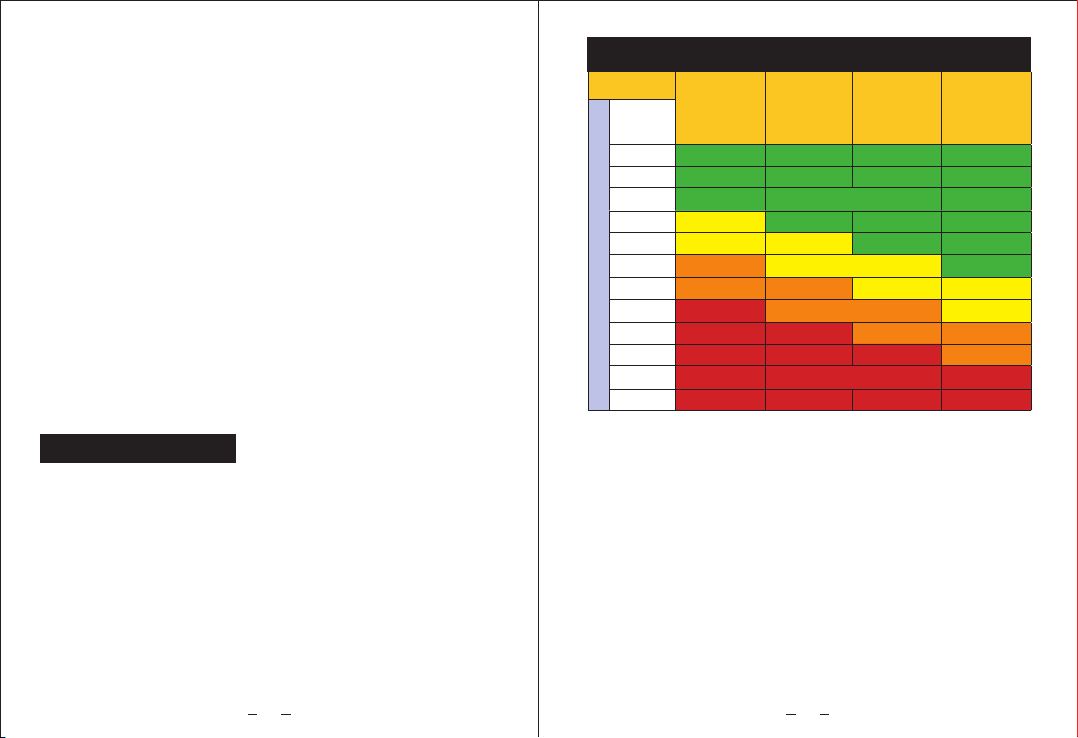
Comparison table for vibration intensity -----------------(13)
WARRANTY: ----------------- ------------(13)-----
Calibration -------------------------------------------------------(11)
diagram of menu -----------------------------------------------(05)
A.Introduction
C. Functions
B.Notice
1. Do not use the instrument in a flammable or explosive
environment.
2. Keep away from dangerous voltage in case of injury.
3. Avoid strong impact, high temperature and water immersion.
4. Take out batteries if not in use for a long time.
5. Install batteries in correct polarity; replace batteries when
the power is low.
6. Do not disassemble this meter or try to change internal parts.
7. Alcohol, diluent and so on are corrosive to the case,
especially to the screen, so use a little water to clean the case.
8. Please operate the instrument carefully near rotating
equipment. Do not leave wires and bands outside.
This product is based on piezoelectric effect of artificially
polarized ceramics. It is suitable for conventional vibration
measurement of mechanical equipment, especially for rotating
and reciprocating machinery. It can measure vibration
acceleration,velocity,displacement and frequency, and is widely
used in fields like machinery manufacturing, electric metallurgy
and general aerospace.
Acceleration/Velocity/Displacement;
Screen flipping;
Switch acceleration measurement between high and low frequency;
high frequency (1KHz~4KHz) /low frequency (10Hz~1KHz)
Curve display;
Store and view files;
1

D.Technical parameters
Power indicator;
Double measurement button;
Flashlight;
Brightness control;
2
E. Instruction of parts and interface display
1) Body parts (as shown in picture)
OK
MEAS
LO/HI
SAVE
VIBRATION METER
MENU
MEAS
Display screen
Sensor Flashlight
Battery door
Buttons
3
Select Chinese/English;
Shutdown time setting;
Selection of machine level;
Measurement of vibration frequency.
Humidity range for
operation
Size
Weight
Technical parameters
Vibration acquisition
Frequency range of
acceleration measurement
Frequency range of
speed measurement
Frequency range of
displacement measurement
Maximum groups of
data storage
Power supply
Temperature range
for operation
Measurement range
Measurement accuracy
180x54x30mm
>150g(with batteries)
Technical indicators
Piezoelectric ceramic accelerometer
(shear type)
High frequency
Low frequency
:
:1KHz~4KHz (HI)
10Hz~1KHz ( LO)
10Hz~1KHz (LO)
10Hz~1KHz (LO)
1.5V AAA battery*2
0~40℃
30~90%RH
500 pieces
(5 groups * 100 pieces/group)
2
Acceleration:0.1~199.9m/s
Velocity:0.1~199.9mm/s
Displacement:0.001~1.999mm
Frequency:0Hz~4KHz
±10%

2) Instruction of full display interface
Rotate/OK button
Power on/off/menu
button
Measurement button
Up/frequency button
Down/save button
Measurement button
on the bottom
MENU
Short press to turn on the meter,
long press to turn it off; after
powering on, short press to
switch menu or return
During measurement,
short press to rotate screen
setting and confirm selection
Long press to start measurement
Short press to start measurement
During measurement, short press
to switch between high and low
frequency settings and make
selection.
During measurement, press to
save selection settings and
make selection.
Buttons Names of parts Function Description
SAVE
LO/HI
MEAS
MENU
OK
MEAS
4
3) Menu interface description / divergence
diagram of menu
a.Divergence diagram of menu functions:
Accelerate Enter acceleration mode
Velocity
Distance
File
Settings
Calibration
Enter displacement mode
Enter and view memory data
Select language
Screen brightness
Flashlight
Chinese/English
Turn on/off
Shutdown time
Restore factory
setting
Machine level
Select automatic
shutdown time (0-9 mins)
Yes/No
Set machine level
5
Menu selection High/low frequency
mode
Battery indicator
Acceleration
measurement value
Velocity value
Displacement value
Vibration intensity
Low/high brightness
Frequency Enter frequency mode
Enter Velocity mode

MENU
F.Preparation for measurement
1. Install batteries;
Put batteries into battery compartment correctly,
paying attention to the polarity of battery.
Press “ ” button to turn on the meter, after powering on,
check battery status. If power is low, please replace
battery in time.
2. Select probe for measurement;
Based on measurement requirements,
users can select different probes. Measuring
with different probes may yield different
evaluations on measurement results.
a. Measure with short (S) probe:
This probe is installed randomly and
suitable for a wide range of vibration
measurements with better response values.
b. Measure with long (L) probe:
This probe is an accessory in the package
and is mainly used on narrow or special
objects with faster response.
c. Remove hardware probe
to measure: this way is for
measurement on flat object
surface with stable data.
6
1.Power on / off
Short press “ ”button to power on, long
press“ ”button to shut down.
2. Screen rotation
After powering on, press “ ” button to rotate screen.
Only acceleration measurement, speed measurement,
displacement measurement and full display interface support
screen rotation. Each rotation will clear cached data.
3. Full display measurement
Press “ ” to turn on the meter, full display interface
appears after powering on; short press“ ” to switch
between high frequency and low frequency mode. Long
press“ ”button or short press “ ” button to start
automatic measurement, short press again to exit
measurement. When cached data is over 0, press“ ”to
save and window prompt pops up to indicate successful
operation, then press “ ”button to OK storage.
(The cache can hold up to 20 data, and the first data will be
automatically removed if the cache is more than 20; the
maximum data storage is 7 groups, and there will be a
prompt when storage is full.)
MENU
MEAS MEAS
MENU
MENU
SAVE
OK
LO/H I
OK
G.Operation instruction
7
Short (S) probe
measurement
Long (L) probe
measurement
Remove hardware
probe measurement
Full display interface
(low frequency mode)
Full display interface
(high frequency mode)

Success prompt of
data storage
Indicator of full memory
8
Acceleration interface
5. Acceleration measurement
Enter menu interface, press
up/ down button to select acceleration
measurement, press “ ” button to
enter the interface. This interface also
has graph analysis function.
Short press “ ” to switch high/low
frequency mode measurement,
short press “ ” to save data and
short press “ ” to return to the
previous interface.
OK
LO/H I
SAVE
MENU
4. Menu
Full display interface appears after powering on,
press “ ” button to enter menu interface, press up/ down
button to select, press“ ” button to enter the
corresponding interface. Short press“ ” button again to
return to the previous screen.
MENU
OK
MENU
9
6. Velocity / measurement
Enter menu interface, press up/ down button to select
Velocity / Displacement measurement, press“ ” button
to enter the interface. This interface also has graph analysis
function. Short press“ ” to save data and short press
“ ” to return to the previous interface.
Displacement
OK
SAVE
MENU
Velocity interface Displacement interface
Frequency interface
7. Frequency measurement
Enter menu interface, press
up/ down button to select
frequency measurement,
press “ ” button to enter the
interface. This interface also
has graph analysis function.
Short press “ ” to switch
high/low frequency mode
measurement, short press
“ ” to save data and short
press “ ” to return to the
previous interface.
OK
SAVE
MENU
LO/H I

10
8. View files
Enter menu interface and select file item, the saved
data can be viewed under file interface; press up/down
button to scroll, long press for fast reading. Press OK
button, a window showing up with operations like View
accelerate chart/View velocity chart/View distance
chart/Delete current group/Delete all data.
9. Settings
Enter menu interface and select setting item. Language
setting / screen brightness / flashlight / shutdown time /
restoring factory setting / machine level are displayed under
setting interface, among which settings of language switching,
screen brightness and shutdown time can be memorized.
11
a. Language selection;
Users can choose English/Chinese interface.
b. Screen brightness;
Users can choose low /high brightness.
c. Flashlight;
Users can choose to turn flashlight on/off.
d. Shutdown time;
Users can set automatic shutdown time from 0 min to 9 mins.
0 min means that automatic shutdown is prohibited.
e. Restore factory settings;
Users can choose whether to restore factory settings.
f. Machine grade;
four levels to choose from:
Small
Medium
Large hard base
Large soft base
10. Calibration
a. Select calibration interface to enter.
b. Press up/down button to select item and press OK button
to enter.(Note: There is no order for calibration)
Ⅰ: (P<15kW)
Ⅱ: (15KW<P<=75KW)
Ⅲ: (P>75KW)
Ⅳ: (P>75KW)
(1)Zero point calibration.
(2)Calibration for the point at after the machine
reaches the steady status.
(3)Calibration for the point at & 2000Hz.
2
10m/s & 80Hz
2
10m/s

12
c. (Optional) Short press measurement button 1 to flip the page.
d. Select start item and press OK to initialize. At this time, the
first three items read "Number--Number", the right side
represents ADC value, and the left side represents the
converted vibration value.
e. Display under different calibration items:
(1) Press again to perform zero calibration with “Set Zero”
showing up, and wait until progress bar reaches 100%.
(2) Adjust the output of vibrating machine to a stable state
corresponding to the condition above. Press OK button again
to calibrate slope value with “Set Slope” showing up,and wait
until progress bar reaches 100%.
(3)After the calibration is successful, the progress bar
disappears and displays "Done".
f. After completing the required calibration, press Menu button
to return.
g. If calibration value is wrong, users can restore factory setting
in the settings.
H. Other notices
1. When the amount of data is large, it will take some time to
enter file interface and operation also needs some response
time. It is recommended to delete some unnecessary data.
2. When acceleration value is beyond measurement, try to
switch frequency.
3. The meter will automatically shut down when the battery is low.
4. Machine level is represented by green, yellow, orange,
red status bar in the full display measurement interface.
Refer to the figure below for details.
13
WARRANTY:
1. Please refer to warranty card provided for your warranty.
2. If the user disassembles our products and for damages caused
by improper transportation, improper storage after purchase,
and failure to operate according to instruction, and for anyone
who smears warranty card or does not possess purchase
certificate, our company does not guarantee warranty.
Specific Declarations:
Our company shall hold no any responisibility resulting from using
output from this product as an direct or indirect evidence.
We reserves the right to modify product design and specification
without notice.
Comparison table for vibration intensity
Machinery
Class I Class II Class III Class IV
mm/s
Good
Satisfactory
Unsatisfactory
Unacceptable
0.28
0.45
0.71
1.12
1.80
2.80
4.50
7.10
11.20
18.00
28.00
45.90
Vibration intensity (ISO 10816-1)
small
machine
medium
machine
large
hard base
large
soft base
Vibration speed Vrms
Table of contents
Other WINTACT Measuring Instrument manuals
Popular Measuring Instrument manuals by other brands

Nellcor
Nellcor OxiMax N-550 Operator's manual

Endress+Hauser
Endress+Hauser Micropilot S FMR540 Brief operating instructions

Chauvin Arnoux
Chauvin Arnoux Ulys MD45 Series quick start

Klein Tools
Klein Tools CL900 instruction manual

Ele
Ele 45-9300 operating instructions

Mitsubishi Electric
Mitsubishi Electric Super-S ME96SS Series manual