Wintal PVR2HD User manual

1
USER MANUAL

2
3
IMPORTANT SAFETY INSTRUCTIONS
Be sure to read this user manual before operang your PVR.1.
Never open the cover. It is very dangerous to touch the inside of the unit due to 2.
possible electric shock.
When not using your PVR for a long me, please pull the power cord from the outlet.3.
Ensure that there is no damage to your power cord.4.
Do not touch the unit with wet hands. If there is liquid owing into the unit, pull out the 5.
power cord immediately because it may cause re or electric shock.
Place the unit in a well venlated environment.6.
Install the unit horizontally. Unbalanced installaon may cause damage to the unit.7.
When the unit is suddenly moved to a hot area from a cold area, it may cause problems. 8.
In that case, turn o the power, and turn on aer 1-2 hours.
Install the unit in a place with: good venlaon, suitable temperature, away from direct 9.
sunlight, and low humidity.
Do not put heavy objects on the unit.10.
INSTRUCTION MARKINGS:
This symbol indicates there is a dangerous voltage within the PVR, which may have sucient
magnitude to constute a risk of electric shock if not handled correctly. To avoid the risk of
electric shock, do not open the housing at any me.
Danger Symbol
The lightning ash with arrowhead symbol within an equilateral triangle is intended to alert
the user to the presence of dangerous voltage in the unit.
Warning Symbol
The exclamaon point within an equilateral triangle is intended to alert the user to the
presence of important operaon and maintenance (servicing) instrucons in the manual
accompanying the unit.

4
5
TABLE OF CONTENTS
IMPORTANT SAFETY INSTRUCTIONS................................................................3
......................................................................................3
GENERAL INFORMATION .................................................................................6
1. PREFACE....................................................................................................6
2. MAIN FEATURES........................................................................................6
3. ACCESSORIES ............................................................................................7
4. GENERAL OPERATION ...............................................................................7
OVERVIEW.......................................................................................................8
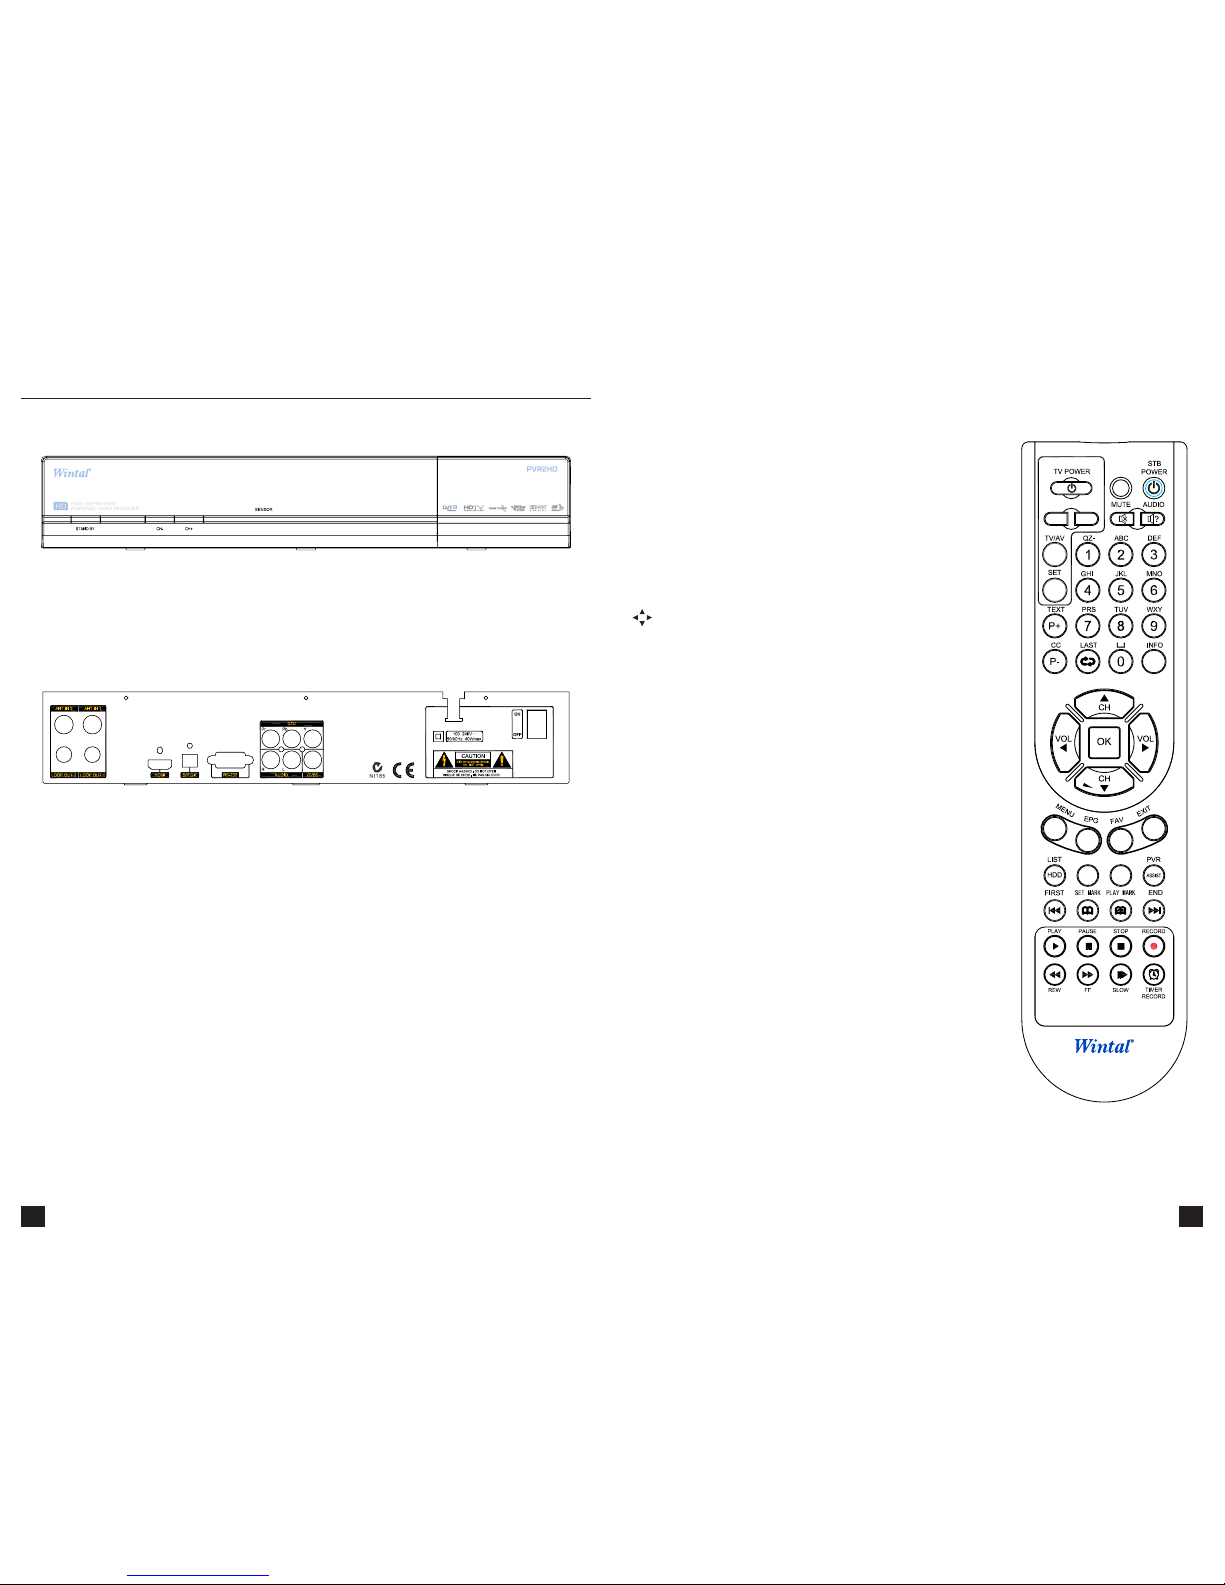
1. FRONT PANEL............................................................................................8
2. REAR PANEL ..............................................................................................8
3. REMOTE CONTROL UNIT ...........................................................................9
The Learning Key ...................................................................................................................10
Appendix: ..............................................................................................................................10
4. CONNECTION DIAGRAM..........................................................................11
A. Using HDMI Cable .............................................................................................................11
B. USING COMPONENT (RGB) LEAD ..................................................................................... 12
C. Using RCA Cable ............................................................................................................... 13
OPERATION ..................................................................................................14
1. INSTALLATION.........................................................................................14
1.1 Auto Search .....................................................................................................................14
1.2 Manual Search ............................................................................................................... 15
1.3 Channel Edit ................................................................................................................... 15
1.4 Factory Default ...............................................................................................................16
2. PROGRAM GUIDE.................................................................................... 17
3. PROGRAM MANAGE ...............................................................................17
3.1 Program Edit ...................................................................................................................17
3.2 Favourite Edit ................................................................................................................. 18
4. PROGRAM SELECT...................................................................................20
5. PVR.........................................................................................................20
5.1 Record File Edit ...............................................................................................................20
5.3 PVR Seng ..................................................................................................................... 23
5.4 Recording Info ................................................................................................................24
5.5 HDD Format ....................................................................................................................24
6. SYSTEM SETTING.....................................................................................25
6.1 Common Set .................................................................................................................. 25
6.3 Audio Set ........................................................................................................................ 25
6.4 Time Zone Adjust ............................................................................................................26
6.5 System Informaon ........................................................................................................26
7. SHORTCUT KEY EXPLANATIONS ...............................................................26
7.1 Audio ...............................................................................................................................26
7.2 MUTE ...............................................................................................................................26
7.3 TeleText ...........................................................................................................................27
7.4 Informaon .....................................................................................................................27
7.5 EPG and EPG Schedule ....................................................................................................27
7.6 [FAV] Recall favourite channel ....................................................................................... 28
7.7 [HDD] File List ................................................................................................................. 28
7.8 PVR ASSIST ..................................................................................................................... 28
7.9 Time shi ........................................................................................................................ 29
7.10 REC................................................................................................................................ 29
7.11 File playback ................................................................................................................. 30
7.12 Bookmark ......................................................................................................................31
SPECIFICATIONS.............................................................................................32
TROUBLE SHOOTING .....................................................................................34
WARRANTY INFORMATION ...........................................................................35

6
7
GENERAL INFORMATION
1. PREFACE
Congratulaons on your purchase of the Wintal PVR2HD.
Your HD PVR is equipped with the latest technology and design; it can decode high and
standard denion digital TV programs, and can also record and playback terrestrial digital
broadcasts. You can view a variety of programs provided through terrestrial transmission.
Simply pressing the power buon on your remote control will provide you with crystal clear
picture and DVD quality sound.
Throughout this manual you will noce that operang your HD PVR is easy.
In case you experience any dicules using this product, please consult the relevant secon of
the manual for assistance.
2. MAIN FEATURES
MPEG-2 HD/SD decoding (MP@HL/ML)•
Fully DVB-T & MPEG-2 compliant•
Down-mixes 5.1 AC3 to two channels encoded with Dolby Prologic Surround, also Support •
PCM digital audio output (Bitstream)
5000 Editable Channels•
Auto or Manual installaon•
Electronic Program Guide and Informaon Plate (EPG)•
RF modulator for TV standard (PAL B/G, NTSC)•
Digital Audio Output S/P DIF•
Signal level & quality indicator•
Composite video output•
Soware upgradeable via RS-232 serial port•
Auto PAL/ NTSC conversion•
Standby with low power consumpon•
Clock adjustment•
Excellent Performance•
Fast Channel Change•
Conversion between SD programs and HD programs•
YPbPr Output: supporng 1080i•
HDMI output: supporng 1080i•
Digital Recepon covers through VHF & UHF band•
Wide screen 16:9 and normal 4:3 Aspect Rao•
Bandwidth of 6MHz & 7MHz & 8MHz Supported•
TeleText / Bitmap subtle, compliant with ETSI/EN300 472•
S/P DIF (Digital Audio or Dolby AC3 Stream out)•
RTC (Real Time Clock) Timer•
65536 Colour Graphic•
8 Favourite Channel List•
Channel Eding Capability (Move, Delete, complied Lock and etc.)•
PVR Funcons and Twin Tuner Funcon•
Time shi (buering): 1 Hours •
Recording Time: 120hrs SD/ 75 hours HD•
Variable Forward Play Speed: 2, 4, 8, 16, 32, 1/2, 1/4, 1/8•
Variable Reverse Play Speed: 2, 4, 8, 16, 32, 1/2, 1/4, 1/8•
Fast Schedule: Support Once/Daily/Weekly mode•
Chase Play•
Region Selecon for Replay•
Variable Combinaon of Watching and Recording Simultaneously•
Live Watching or Recording + Live Watching or Recording or HDD Playback•
Grouping for Cascade Playing•
Assist Key to make operate more convenient•
3. ACCESSORIES
Please check the following accessories are enclosed
1 x User Manual•
1 x Remote Control Unit•
1 x AV lead•
2 x AAA Baeries•
1 x RF Male to RF Female Cross Cable•
Note:
If any of the accessories listed above are missing, please contact the dealer where this product
was inially purchased.
4. GENERAL OPERATION
Throughout this manual you will noce that the everyday operaon of your Wintal PVR2HD
is based on a series of user friendly on screen display and menus. These menus will help you
get the most from your PVR, guiding you through installaon, channel organizing, viewing and
many other funcons.
All funcons can be carried out using the buons on the RCU (Remote Control Unit), and some
of the funcons can also be carried out using the buons on the front panel.
Should you experience any dicules with the operaon of your unit, please consult the
relevant secon of this manual, including “Problem Shoong”, or alternavely call your dealer
or a customer service adviser.

8 9
OVERVIEW
1. FROnt PanEl
HDTV TERRESTRIAL RECEIVER
naME FUnCtIOn
STAND BY Switch between operaon and standby modes
CH+/ CH- Change channel
2. REaR PanEl
From le to right:
naME FUnCtIOn
ant 2 In Connect to terrestrial antenna
ant 1 In Connect to terrestrial antenna
lOOP OUt 2 RF Loop through output to 2nd receiver
lOOP OUt 1 RF Loop through output to 2nd receiver
HDMI HDMI video output [Supports high denion output]
S/PDIF Connect to amplier for digital audio output
RS232 Serial port used for soware upgrade
YPbPr Component video output [Supports high denion output]
R-aUDIO Right audio output
l-aUDIO Le audio output
CVBS Composite video output
100-240V Power supply
On/OFF Main power switch
3. REMOtE COntROl UnIt
STB POWER Press to switch between Operaon and Standby modes
MUTE Press to temporarily cut o the sound
AUDIO Press to switch the audio channel among the
Le, Right and Stereo modes
0-9 Press to enter required numbers in the input
box or select a channel to watch
TEXT Press to enter the teletext window
CC Used to turn Closed Capon subtles on or
o
LAST Returns to previous program.
INFO Press to show informaon of the current
channel
Move cursor up/down/le/right, Page up/
down, Volume +/-
OK Press to execute the selected item in the
menu, or to conrm the desired value in input
mode
MENU Press to display the Main Menu on the screen
EPG Press to display EPG (Electronic Program
Guide) menu
FAV+/- Press to display the FAV list
EXIT Press to return to the previous menu or
escape from the item
PVR funcons:
LIST Press to display the Recorded Program List.
PVR Press to display the PVR Assist window.
FIRST Change le playback posion (backward).
SET MARK Set the bookmark in playback progress bar.
PLAY MARK Press to jump to the next bookmark in
playback progress bar.
END Change le playback posion (Forward).
PLAY Return to Normal Speed Playback from FF/FR/
Slow/Paused mode.
PAUSE Pause from live video or playback, and step
when playback in Paused mode.
STOP Stop playback when playback or stop
recording when recording.
RECORD Record current service or set stop recording
me when recording.
REW Fast rewind
F.F Fast forward
SLOW Press to slow at 1/2, 1/4, speed
TIMER RECORD Shortcut to schedule recording

10
11
THE LEARNING KEY
Your PVR remote has four learning keys plus a self-coding funcon. The keys can be used for
the STB remote to funcon as any of the four keys on your TV remote.
The recommended keys to use are “TV POWER”, the two grey keys below “TV POWER” ”TV/
AV”, and “SET”. The idencaon of ”TV/AV” key varies with the TV type. For example,
idenfying AV INPUT 1 2 3, etc.
You do not need to use your TV remote when watching the digital TV program and services
once your PVR remote has been set up to turn on your TV and change to the correct AV
channel.
Press and hold the “SET” key on your remote for three seconds, indicator light will keep on;1.
Aim your TV remote to the “receiving window” on the back of your PVR remote while 2.
pressing the key you want it to learn (eg. the Power buon on your TV remote).
The indicator light of the STB RCU ashes three mes, and it indicates that the STB RCU has 3.
received the signal from your TV remote;
And press corresponding learning key on “TV key” window of your PVR remote again (such 4.
as the TV power key), the indicator light will ash three mes. This indicates that the key
has been learnt successfully and is ready to use.
When pressing keys on the “TV key” secon on your PVR remote, the indicator light will 5.
ash. This indicates that your PVR remote is sending control signals to your TV. It is the
same as the VOL+, VOL- and TV/AV keys.
APPENDIX:
When watching TV pressing the “INFO” key on your remote will bring up the informaon of 1.
the current and next program, such as name, starng me and ending me. This message
will disappear automacally aer several seconds.
The descripon informaon of the current channel will be displayed on the screen for 2.
several seconds by pressing the “INFO” buon again.
4. CONNECTION DIAGRAM
There are various ways to connect your PVR to your TV.
The recommended opons to obtain high denion picture is via HDMI, followed by
Component (YPbPr).
A. USING HDMI CABLE
HDMI is the recommended connecon for your PVR (if you have a TV with an HDMI input). An
HDMI connecon will allow you to transmit 1080i digital video and digital audio signals using a
single lead.
Connect the antenna to ANT IN of the STB•
Connect one end of your HDMI lead to the PVR and the other end to the HDMI port on •
your TV.

12
13
Connect the antenna to ANT IN of the STB.•
Connect to TV as shown.•
C. USING RCA CABLE
Connect the antenna to ANT IN of the STB•
Connect to TV by using the supplied AV lead as shown: •

14
15
OPERATION
Pressing the MENU key when there is no other dialogue window open, will display the main
menu.
The main menu consists of ve menu items as shown below.
1. Installaon•
2. Program Guide•
3. Program Manage•
4. Program Select•
5. PVR•
6. System Seng•
Use the ▲▼ keys to move up or down from one item to another. Press the OK key on your
remote to enter the selected sub-menu.
To exit the menu system at anyme, press EXIT on your remote.
Note: When in sub-menus, pressing the EXIT key will take you back one-step through the sub-
menus. To completely exit from the menu, keep pressing the EXIT key on your remote.
1. INSTALLATION
The Installaon menu allows two ways to search for programs: and Manual
.
1.1 AUTO SEARCH
For beginners the Auto Search feature is the best choice. First use the ▲▼ keys to select Auto
Search from the Installaon menu. Then press OK to enter the Auto Search sub-menu. The
System will automacally search programs under Channel Edit. Once the search is complete,
the newly found programs will be added to the TV program list and your PVR will automacally
display the rst found channel.
During the search process you may press the EXIT key to stop or press the OK key to skip. Press
the EXIT key again to exit from this window.
1.2 MANUAL SEARCH
You can set parameters in Manual Search window if you are familiar with relevant parameters
(such as specic transmission frequencies for specic channels). In this mode, only one channel,
whose necessary parameters are set in Manual Search window by hand, can be searched.
Press the ◄► keys to select proper opon among the Channel List that you can
edit in the Channel Edit window.
Frequency: The value varies with what you have selected in Channel No.
Press the ◄► keys to choose 6M, 7M or 8M.
At the boom of this window, there are two dynamic colour bars reecng the signal’s quality
and strength. You can check whether you have set your antenna well by these two bars.
Aer modifying, press the OK key to start searching. If the search is completed successfully
your PVR will turn to view the rst searched program automacally. During the whole process,
you can press EXIT key at any me to exit.
1.3 CHANNEL EDIT
Select Channel Edit item in the Installaon menu and press the OK key. The Channel Edit
window will be displayed on the screen. From here, new channels can be added and the
exisng ones can be edited or deleted.
You can use the colour keys on your remote to execute the corresponding command shown at
the boom of this window.

16
17
Aer pressing red key on your remote, the Add Channel window, where you can set necessary
parameters of the new channel, will be displayed on the screen.
Frequency: You can input values referring to above by using the number keys on your remote.
Press the ◄► keys to choice 6M, 7M or 8M.
Aer seng all the parameters, press the OK key to conrm and exit from the Add Channel
window. In Channel Edit window, you can nd that the new channel has been added to the end
of the list.
Delete
This command allows you to delete one or more unwanted channels. Select the channel you
want to delete and press the green key on your remote.
Note: Aer you choose to delete the channel (by pressing the green key), the system won’t ask
you to conrm your deleon. So please make sure before you delete the channel.
Select the channel you want to edit rst and then press the yellow key to display the “Modify
Channel” window. The operaons are the same as “Add”.
1.4 FACTORY DEFAULT
In Installaon menu, move the selecon to Factory Default and press the OK key, a warning
message box will be displayed on the screen, press OK key to conrm your selecon.
NOTE: Aer restoring default, all programs you have searched will be erased and all parameters
will return to the factory default. Please use this operaon with care.
2. PROGRAM GUIDE
NOTE: Pressing the EPG key on your remote will also enter the Program Guide window directly.
The le hand of this screen displays the available channels. You can see a preview of the
channel and the EPG informaon on the right hand side.
Press the “Recall” key to switch between several days of EPG for that channel.
Press the FAV key to change the group.
Press the Green colour key to enter into the program schedule window.
Press the EXIT key to return to main menu.
Note: EPG informaon is enrely based on what the broadcaster chooses to broadcast. And
may not necessarily be accurate.
3. PROGRAM MANAGE
3.1 PROGRAM EDIT
Through this window, you can edit programs according to your requirements. The three colour
keys on your remote have the following funcons.
Delete (Red key) | (Green key) | Rename (Blue key)
Delete
Delete allows you to delete one or more unwanted programs permanently. First select the
program you want to delete and press the red key on your remote.
You can connue to select other unnecessary programs and mark them (shown with a red

18
19
cross) and nally press OK key to delete all of them from the list.
Only one program item can be moved up or down each me. Press the ▲▼ keys to select the
program you want to move and press the green key on your remote. An Up-Down-Pointed
arrow will be displayed right of the selected program. You can press the ▲▼ keys to move this
program to where you want. Press the green key again to conrm the new locaon.
Rename
Use the ▲▼ keys to select the program you want to rename, press the blue key on your
remote, and a on screen keypad will pop up where you can rename the program name.
In this keypad window, select your required character by using direcon keys on your remote
and press OK key.
The selected character will be shown in the tle bar at the top of this keypad window. To
switch between capital and lowercase leers, please select Caps On command and press the
OK key on your remote. The Back command allows you to erase the unwanted character in the
tle bar. Move cursor to the OK command and press the OK key on your remote. The keypad
will disappear and the new name will be shown in the program name column. You can dene
several program names in the same way.
3.2 FAVOURITE EDIT
This window includes the three columns of FAV, Selected, and Programs. While there are no
prepared favourite groups in FAV column, you can dene and modify favourite groups name by
using the corresponding colour keys on your remote. Addionally, you can add programs to any
favourite group.
The ◄► keys are used to switch among the three columns, and the ▲▼ keys are used to
select items in each column. Noce that what will be shown in the Selected and Programs
column varies with the favourite group that you have selected in the FAV column.
Press the Red key on your remote, and a on screen keypad will pop up where you can dene a
favourite group name.
In this keypad window, select your required character by using the direcon keys on your
remote and press OK key.
Then the selected character will be shown in the tle bar at the top of this keypad window. To
switch between capital and lowercase leers, please select Caps On command and press the
OK key on your remote. The Back command allows you to erase the unwanted character in the
tle bar. Move cursor to the OK command and press the OK key on your remote. The keypad
will disappear and the new name will be shown in the fav column. You can dene several
favourite groups in the same way.
In the FAV column, use the ▲▼ keys to select one that you want to modify and press the
yellow key. Once the on screen keyboard pops up refer to the above instrucons to make your
modicaons.
In the FAV column, the selected favourite group will be deleted from the list aer the green
colour key on your remote is pressed.
Note: Aer you choose to delete the group (by pressing the green key), the system won’t ask
you to conrm your deleon. So please make sure before you delete the group.
Select one favourite group (for example Sports favourite group that you have just dened) in
the FAV column, and then move the cursor to the Programs column. In the Programs column,
select programs that have a relaon with Sports and press OK key, and then those programs

20
21
will be added into Sports favourite group and shown in the selected column.
If you want to deselect one program in Sport favourite group, move cursor to program that you
want to delete from selected column and press the OK key, and then this designated program
will disappear in selected column.
4. PROGRAM SELECT
In the Main Menu, use the ▲▼ keys to select the Program List item, and press the OK key to
enter into the Program List menu. From here, the default mode is “TV” mode.
In program list, the ◄► keys are used to select the desired program and pressing the OK key
allows you to view the selected program.
For example, let’s say you set up 2 favourite Groups:
1. All HD channels 2. All SD channels
To watch only the selected favourite channels (see secon: Favourite Edit), you can use the le
and right arrow buons to select how the program list is displayed. You can choose between
show ALL, or only HD or SD groups (which you created earlier).
Say you choose HD favourite group, you will see the Channels you added into this favourite
group. If you highlight one of these channels and pressed OK, the PVR2HD will go back to
normal viewing mode, but each me you change channel, you will only cycle through channels
within your HD favourite group. To get back to all channels, simply press OK buon and get the
program list back up, and use the Le and Right arrow keys to change the Program list choice
back to ALL.
5. PVR
5.1 RECORD FILE EDIT
You can edit recorded channels in this menu.
Delete: Select a recorded le you want to delete, and press the Red key.
Rename: Press the Yellow key to display the on screen keyboard. You can edit the le name
using the arrow keys on your remote
Press the Blue key on the selected le name. This feature will prevent you from
accidentally deleng the selected recording.
GroupManager: The Group Manager allows you to make groups of your recordings for easy
locaon. Press the Green key to create a new group list. You can press the OK key to add a
recorded le to the group. Red key cancels an exisng group and the Yellow Key modies its
name.

22
23
Select the Schedule menu item and enter it by pressing the OK key. The Schedule Programs list
window will be shown.
To add a new Scheduled task, press the Green key on your remote.
To delete exisng scheduled tasks: press the Red key to delete an individual task, or press the
Blue key to delete all the exisng tasks. You will have to conrm your decision once you press
OK.
Press the EXIT or MENU keys to exit.
In Add Schedule, there are parameters below to be set.
Rec or Play
You can either have the PVR2HD start recording, or automacally switch a selected channel at a
desired me.
Input wanted me by using the number keys on your remote, or press OK
to enter the sub-menu to set the date and me (The FAV key on your remote is used to switch
between date and me)
Input wanted me to stop recording, or playback using the
number keys on your remote.
Once / Daily / Weekly.
Once: The task will acvate only on the selected date and me.
Daily: The task will be acvated every day on the selected start and end mes.
The task will be acvated every week on the selected day(s)
When you choose the “Weekly” mode and press the OK key on your remote, you will see the
opon to choose the week day/s, select the days you want and press the OK key to back.
Select the desired channel you wish to record or have your PVR2HD start
playing.
5.3 PVR SETTING
Schedule record or play to start earlier or later. This is to
compensate for programs that have an earlier or later than adversed start me.
Schedule record or play to stop earlier or later.
Remind you before schedule is going to start.
Select on or o.
If set to On, recordings will be broken up to individual entries based on the program name
transmied via the EPG.
PVR Icon Time Out: Select the me that the PVR icon is displayed on the screen by using the
◄► keys.
the default duraon for manual record (when you press the REC
buon on the remote during an ongoing program).
The available opons are: Never, Always and Pause key. Changing this seng comes into eect
aer playing a new service (ie. changing channels).

24
25
Timeshi, when set to Always ensures that the PVR2HD is always recording in the
background. This will allow you to pause, and rewind live TV, as the PVR2HD buer will have a
certain amount of pre-recorded content.
If this opon is selected, Timeshi will only begin when you press the Pause key on
your remote. This is useful when you need to answer a phone call or the door while watching a
TV, so that you can resume watching from where you le.
Will disable the me shi feature.
5.4 RECORDING INFO
When there is a recording, you can see the light down le on the front panel blinking. And
you can enter the Recording info. If there are no recordings currently in place, there will be a
message warning you that there are currently no recordings.
When there is a recording happening and you press the Info buon on your remote the
recording info box will tell you the recording informaon as follows:
Index: R1 or R2
Mode: Quick or Schedule
Channel Name
File Name: you can change the name by pressing OK key.
Valid Record Time: the real recording me
Past Time:
Duraon: Showing you how long there is le ll the recording stops.
5.5 HDD FORMAT
Please be extra careful when using this feature as it will completely erase your hard drive and
you will lose any previously recorded content. For security purposes you will be asked to enter
the password to conrm your decision (Default password is: 0000).
6. SYSTEM SETTING
In the Main Menu, use the ▲▼ keys to select the System Seng menu item, and press the OK
key to enter. This menu consists of ve items. You can access the sub-menus by highlighng
your selecon and pressing the OK key.
6.1 COMMON SET
Transparency: This eects the transparency of the closed capons. The value is from 0 to 30%.
Banner Time: Determines the display me of info boxes before they disappear.
Aer making your selecons, press the OK or EXIT key to save and exit.
6.2 VIDEO SET
Screen Type: 4:3 or 16:9
Full Screen / Leerbox / Pan Scan
AUTO / 1080I / 576P / 720P
6.3 AUDIO SET
Stereo / le / right
MPEG or AC3

26
27
6.4 TIME ZONE ADJUST
This screen allows you to adjust the me zone sengs to suit your locaon. Press the ▲▼ keys
to change between states and use the ◄► keys to select between “Daylight Saving On” and
“Daylight Saving O” for daylight saving sengs.
Press OK or EXIT key to save and exit.
6.5 SYSTEM INFORMATION
The system informaon screen displays general and version informaon relang to your
hardware and soware.
7. SHORTCUT KEY EXPLANATIONS
Your PVR2HD remote comes with dedicated keys to make accessing certain features on your
PVR easily accessible. Refer to the following secon:
7.1 AUDIO
Press Audio key to display the Audio Selecon window.
Press the ◄► keys to switch among . Select the best audio channel
output for the current program.
NOTE: The available selecons in the audio language dialogue window depend on the channel
broadcast. If the service provides several audio languages, use keys to select appropriate
language and press the OK key to conrm.
7.2 MUTE
Press the MUTE key on your PVR2HD buon to cut o the sound completely; a MUTE icon will
be displayed on the up-right corner of your TV screen. Volume can be restored by pressing the
MUTE key again.
7.3 TELETEXT
You can press the CC key on your remote to enter the TeleText or Closed Capon windows. This
feature will only become acve if the channel broadcast contains Teletext or Closed Capons.
To exit TeleText, press the EXIT key. To exit Closed Capons press the CC key again on your
remote.
7.4 INFORMATION
When watching a channel, pressing the INFO key buon will display a simple EPG dialogue box
that includes current and next program informaon.
Note: The duraon of info windows on your PVR2HD can be adjusted to be longer or shorter.
Refer to 6.1 Common Set > Banner Time.
An SD or HD icon will also display at top-right corner of this window that will show you whether
you are watching a SD or HD channel.
Pressing the INFO key again on this screen will pop up a bigger window showing more details
about the current program. By pressing the INFO key again on your remote you can connue
reading the next program informaon. Press INFO key once again to return to the inial view
mode.
During the whole operaon, press the EXIT key to exit from this window at any me.
7.5 EPG AND EPG SCHEDULE
For more informaon on EPG, see
When you select a parcular program in the EPG window and press the OK key on your remote,
you can enter the EPG Schedule window. This will allow you to assign Recording or Playback
tasks based on the selected program– see for informaon on
each opon.
When you are done with seng up your opons, press the OK key on your remote to save your
changes, or press the EXIT key to exit without saving.

28
29
If you schedule a recording via this method, you will noce a mer icon next to the selected
program, indicang it is scheduled to record (or play).
Press the FAV key to recall a stored favourite channel.
Favourite channels are programmed and stored in the Program list menu.
Press the HDD key on your PVR2HD remote to view a list of all the recordings available on your
PVR.
You can see the used percentage of hard disk space on the boom le corner of this screen.
Pressing the ◄► keys to change view between group list and le list.
When File list is on focus, its program name, start me and duraon will be displayed, and you
can operate as follows:
Press INFO key to see the informaon of this le, when there is no informaon, it will display
“this le has no descripon.” Press the INFO key again to remove this window.
Press the OK key to playback this le.
7.8 PVR ASSIST
The PVR Assist feature is a convenient funcon that will display all the PVR operaon according
to the current situaon. Press OK key to start a on-screen tutorial from the available list.
7.9 TIME SHIFT
When Time shi Start Mode is Always, you can press the Red, Blue Key or Pause Key to start it.
When the mode is Pause, you can only start it by pressing Pause Key.
You can’t start me shi when the mode is never.
You can change the TimeShi mode in PVR Sengs– see 5.3 PVR Sengs.
Aer pressing the REW, FF, Slow or Pause keys to change me shi speed, a speed icon will be
displayed on the upper le corner of the screen.
Press the Red or Blue keys to display me shi process bar. You can change the me shi
playing posion.
Method 1: Press the Stop key to stop me shi and return back to watching the live broadcast.
Method 2: If you switch channels, the me shi buer for the previous channel will be replaced
by the new channel.
7.10 REC
Press the RECORD key to start recording. A record icon is displayed on the top le part of the
screen and the recording light on the front panel of your PVR2HD will start ashing to indicate a
recording is in progress.
The record icon displays recording number, duraon and recording name. Recording name is in
the form of Channel Name-Event Name.
See 5.4 Recording Info for more informaon on this feature.
If scheduled EPG or scheduled REC is reached, a new record can also be started. For more
informaon, refer to Scheduled list.
If current recording service has EPG informaon, recorded le is paroned automacally
according EPG items. Recorded le name is program name, le duraon is program duraon
and le descripon is program descripon. If current recording service has no EPG informaon,
recorded le name is channel name and it will not be paroned.
Press the STOP key to stop recording. You will be asked to conrm.

30
31
7.11 FILE PLAYBACK
Press the REW, FF, SLOW keys to change le playback speed, a speed icon is displayed in the top
le of the screen.
Press the Play, Red or Blue keys to display playback progress bar. You can press the Red or Blue
keys to change le playback posion.
Press the INFO key to pop up a bar to show informaon on the current playback.
In the playback progress bar, you can press the number keys on your remote to input a me,
then press the OK key or wait for a while, playback will skip to your selected me (if me seng
is valid).
Follow the instrucons below to cut out certain secons of your recording.
1. Start playback of a recording.
2. Press the Play, Red, or Blue buon on your remote to display the Playback progress bar; press
the OK key twice which will bring up the following prompt:
3. Specify your start posion with the GREEN key, and your end posion with the YELLOW key.
Finally, press the OK key to conrm.
4. Select the OK buon to cut or the CANCEL buon to cancel the operaon.
7.12 BOOKMARK
The bookmark funcon allows you to quickly jump to specied posions in your recording with
the press of a buon. Follow the instrucons below:
To add a bookmark, press the GREEN key at the posion you want to add it into the playback
progress bar. You can bookmark a maximum 20 posions per recording.
Press the YELLOW key to jump to the next bookmark in the playback progress bar. The le will
start playing from the bookmarked posion.
To remove a bookmark, you should jump to the bookmarked posion by pressing the YELLOW
key and then press the GREEN key to delete the bookmark.

32
33
SPECIFICATIONS
Tuner
2 Input Connector F-type, IEC 169-2
Signal Level Input -20 ~ +20 dBm
Bandwidth 6 ~ 8 MHz Auto Soware Seng
Input Impedance 75 Ohms
Carrier Mode 2K / 8K
FEC Code Rate Auto(1/2,2/3,3/4,5/6,7/8)
Compliant Fully DVB-T MPEG-2 Compliant
Constellaon Auto (QPSK,16 and 64 QAM)
Guard Interval Modes 1/32, 1/16, 1/8, 1/4
Transport Stream ISO13818-1, 2 * MPEG-2, MP@ML
Mpeg transport stream & A/V decoding
Compliant Fully DVB-T MPEG-2 Compliant
Record Stream @ 4Mbps Stream
Aspect Rao 4:3, 16:9 Leer Box
Video Resoluon 1920*1080i MAX
Audio Decoding MPEG layer I and II
Audio Mode Single / Dual Channel, Stereo, Joint Stereo
Audio sampling frequency 32, 44.1, 48KHz
Microprocessor & Memories
Main Processor STi7100
CPU Clock 200 MIPS
Flash Memory 8 Mbyte
SDRAM 32 Mbyte*4
Data Port
Connector 9 Pin D-Sub type
Protocol RS232 asynchronous
Data Rate Max. 19.2 kbps
RF Modulator
Connector IEC 169-2, Male / Female
Frequency 47 MHz to 862 MHz
TV Standard PAL/NTSC
LNB power supply 13V/18/OFF, Imax=400mA
Front Panel
4 Digits LED Display Channel Number Display
8 Keys Standby, Menu, Select, Exit, Channel , VOL
Rear Panel
IF Input F-type Connector
IF Loop Through Output F-type Connector
TV output YPbPr/CVBS, Audio L/R
HDMI output HDMI
Digital Audio Out Modulator S/P DIF or AC-3 Opcal
RS232 Serial Port 9 Pin D-sub Type
Remote Control
Type Infra-red (Carrier Freq: 38 KHZ)
Baery 2×1.5V AAA Type
HDD
HDD 320GB, Recording up to 120 hours (@4Mbps)
SD, 75hrs for HD

34
35
TROUBLE SHOOTING
The table below covers some of the more common reasons for abnormal PVR funcon.
Problem
Can’t record 2 channels The RF Cross over lead is not
connected
Connect the supplied Cross
over lead from RF Loopout 2
to ANT In 1.
Front LED’s do not light AC power cord disconnected Connect power cord properly
to the power socket
No picture or sound Connecon of Video or
Audio to input terminals is
incorrect.
Check your choice of AV or RF
is right. Check each AV lead
at each end.
Antenna cables incorrectly
connected
Check the RF path from
antenna through both tuners
to modulator and RF OUT
Antenna not delivering clear
signal
Check cable connecons, or
adjust the antenna
No signal or weak signal Call an antenna specialist
from local paper or similar.
Wrong Channel Informaon
in menu
Type values again carefully
Black and white screen or
V-Hold
Your TV or PVR picture mode
does not match broadcast
Check that screen shape best
matches your screen and PAL
B/G is selected.
Your remote Control Unit is
not working
Baery exhausted Replace remote baeries
with new ones
Fluorescent light interfering
with remote control signals
Switch light O
Remote control is incorrectly
aimed
Point front of RCU carefully
towards PVR.
Distorted Menu Screen Brightness or Contrast level
of TV set too high
Adjust Brightness and
Contrast to lower levels
Not working Processor stopped Remove the power cord or
switch AC OFF and ON
THIS WARRANTY CARD AND THE PURCHASE DOCKET
(OR SIMILAR PROOF OF PURCHASE)
SHOULD BE RETAINED BY THE CUSTOMER AT ALL TIMES
TROUBLE SHOOTING HELP LINE
1300 662 946
C
U
S
T
O
M
E
R
C
A
R
E
C
E
N
T
R
E
CUSTOMER
CARE CENTRE
Customer Care Centre
562 Spencer Street, West Melbourne
VICTORIA 3003
this product is warranted for 12 months from the date of purchase.
Subject to the conditions of this warranty, the Customer Care Centre will perform
necessary service on the product without charge for parts, or labour if, in the
opinion of the manufacturer/ manufacturer’s agent, the product is found to be
faulty within the warranty period.
The warranties hereby conferred do not extend to any costs associated with the
delivery, handling, freighting or transportation of the product or any part thereof
or replacement of and do not extend to any damage or loss occurring during, or
associated with transit.
If warranty service is required you should:
■Telephone the Customer Care Centre on 1300 662 946
■Provide a copy of your purchase receipt that shows retailers identity and
date of purchase.
■Send or bring the product to your Customer Care Centre.
Please note that freight to and/or from your Customer Care Centre
must be arranged by you.
This warranty only applies if the product has been installed and used in accordance
with the manufacturer’s recommendations (as noted in the operating instructions)
under normal use and reasonable care. The warranty covers normal domestic use
only and does not cover damage, malfunction or failure resulting from use of
incorrect voltage, accident, misuse, neglect, build-up of dirt or dust, abuse, mis-
adjustment of customer controls, mains supply problems, thunderstorm activity,
infestation by insects or vermin, tampering or repair by unauthorised persons
(including unauthorised alterations), exposure to abnormally corrosive conditions
or any foreign object or matter having entered the product.

36
HDTV TERRESTRIAL RECEIVER
Table of contents
Other Wintal DVR manuals