Wirbel M7 AUTO CE 11/1 I User guide

M7 - M7 AUTO
M7 - M7 AUTO
CE 11/1 I
CE 11/1 I
IT
Uso e Manutenzione
EN
Use and Maintenance
FR
Utilisation et Entretien
DE
Gebrauch und wartung
ES
Uso y Mantenimiento
PT
Uso e manutenção
NL
Gebruik en Onderhoud
NO
Bruk og vedlikehold
DK
Brug og vedligeholdelse
SV
Användning och underhåll
PL
Obsługa i Konserwacja
CS
Použití a Údržba
SK
Použitie a údržba
TR
Kullanım ve Bakım
HU
Használat és karbantartás
RO
Folosire şi Întreţinere
EL
Χρήση και Συντήρηση
RU
Эксплуатация и обслуживание
HR
Upotreba i održavanje
SR
Upotreba i Održavanje

0 - 2
Mod.
Art.
Cap.ty
Vac mba
Air flow l/s
Nr
3
4
56
7
8
1
2

0 - 3
1 2 3 4 5 6 7 8
IT Produttore Modello Articolo Capacità fusto Capacità aspirazione Portata d’aria N° Matricola Caratteristiche elettriche
EN Manufacturer Model Article
Container capacity
Vacuum Air flow Serial N° Electrical characteristics
FR Producteur Modèle Article
Capacité de la cuve
Capacité d’aspiration Débit d’air N° Matricule Caractéristiques électriques
DE Hersteller Modell Artikel Fassungsvermögen
des Körpers Ansaugleistung Luftdurchsatz Matrikelnr. Elektrische Eigenschaften
ES Fabricante Modelo Artículo Capacidad del bidón
Capacidad de aspiración
Caudal de aire N° Matrícola Características eléctricas
PT Produtor Modelo Artigo Capacidade do
reservatório Capacidade de
aspiração Caudal de ar Número de série Características elétricas
NL Producent Model Artikel Inhoud reservoir Zuigcapaciteit Luchtdebiet Serienummer Elektrische
eigenschappen
NO Produsent Modell Artikkel Beholderkapasitet Sugekapasitet Luftmengde Matrikkelnr. Elektriske egenskaper
DK Fabrikant Model Artikel Beholdervolumen Sugeeffekt Luftmængde Matrikelnummer El-specifikationer
SV Tillverkare Modell Artikel Korgens kapacitet Sugkapacitet Luftflöde Serienummer Elektriska egenskaper
PL Producent Model Artykuł Pojemność
zbiornika Podciśnienie (mbar) Przepływ
powietrza Nr. Fabryczny Właściwości elektryczne
CS Výrobce Model Typ Obsah nádoby Sací výkon
Množství
dopravovaného
vzduchu
Výrobní č. Elektrické údaje
SK Výrobca Model Výrobok Objem nádoby Sací výkon Prietok vzduchu Výrobné č. Elektrické vlastnosti
TR Üretici Model Ürün Gövde kapasitesi Aspirasyon kapasitesi Hava Akışı Seri No Elektriksel Özellikler
HU Gyártó Modell Cikk A szár teljesítménye Szívó teljesítmény Levegőhozam Törzskönyvi szám Elektromos sajátosságok
RO Producător Model Articol Capacitate rezervor Capacitate
aspiraţie Volum aer Nr. Matricol Caracteristici
electrice
EL
Κατασκευαστής
Μοντέλο Προϊόν Χωρητικότητα κάδου Ικανότητα
αναρρόφησης Ροή αέρα Αρ. Μητρώου Ηλεκτρικά
χαρακτηριστικά
RU
Изготовитель
Модель Артикул Емкость бака
Мощность всасывания
Расход воздуха Заводской № Электрические
характеристики
HR Proizvođač Model Proizvod Zapremnina
spremnika Usisni kapacitet Protok zraka Registracijski br. Električna svojstva
SR Proizvođač Model Proizvod Kapacitet postolja Kapacitet usisa
Nosivost vazduha
Br° Proizvoda Električne karakteristike

0 - 4
Fig. 1 Fig. 2 Fig. 3 Fig. 4
Fig. 5 Fig. 6 Fig. 7
Fig. 8 Fig. 9
Fig. 10
Fig. 12
Fig. 11
Fig. 13
13
20
21
9
7
5
17
1
4
11
8
1
10 14
19
18
2
3
6
10
9
10
11
10
11
12
11
13
15
9
816
22 23
24
25

0 - 5
Fig. 14
Fig. 20
Fig. 19
Fig. 17
Fig. 21
Fig. 15 Fig. 16
Fig. 18
30
21
31
26
34
29
27
11
33
28
37
13
10
9
28
30
32
35 36
Fig. 1 Fig. 2 Fig. 3 Fig. 4
Fig. 5 Fig. 6 Fig. 7
Fig. 8 Fig. 9
Fig. 10
Fig. 12
Fig. 11
Fig. 13
13
20
21
9
7
5
17
1
4
11
8
1
10 14
19
18
2
3
6
10
9
10
11
10
11
12
11
13
15
9
816
22 23
24
25

0 - 6
Fig. 26 Fig. 27
Fig. 22
Fig. 24
Fig. 23
Fig. 25
40
39
38
38
40
37
39
39
40
37 38
41

0 - 7
IT
EN
FR
DE
ES
PT
Italiano............................................................. I -1
(Istruzioni originali)
English......................................................... EN -6
(Translation of original instructions)
Français..................................................... FR -11
(Traduction des instructions d’origine)
Deutsch ..................................................... DE -16
(Übersetzung der Originalanleitung)
Português ...................................................PT -26
(Tradução das instruções originais)
Español...................................................... ES -21
(
Traducción de las instrucciones originales
)
DK
HU
NL
PL
SV
TR
Dansk ........................................................ DK -41
(Oversættelse af original vejledning)
Magyar.......................................................HU -71
(Eredeti utasítások fordítása)
Nederlands .................................................NL -31
(vertalinig van de originele instructies)
Polski..........................................................PL -51
(Tłumaczenie z oryginalnej instrukcji obsługi)
Türkçe........................................................ TR -66
(Orijinal talimatların çevirisi)
Svenska..................................................... SV -46
(
Översättning av originalinstruktionerna
)
CS
HR
SK
RO
EL
RU
Česky......................................................... CS -56
(Překlad originálního návodu)
Hrvatski......................................................HR -91
(Prijevod originalnih uputa)
Slovenčina................................................. SK -61
(Preklad originálnych pokynov)
Română.....................................................RO -76
(Traducerea instrucţiunilor originale)
Русский.......................................................RU -86
(Перевод оригинальной инструкции)
Ελληνικά.......................................................EL -81
(Μετάφραση των αρχικών οδηγιών)
Srpski......................................................... SR -96
(Prevod originalnih uputstava)
NO Norsk .........................................................NO -36
(Oversettelse av originalinstruksjonene)
SR


IT
I - 1
CARATTERISTICHE
TECNICHE
Tensione .........................Vedi targhetta dati
Potenza motore................................1200 W
Livello sonoro.................................60 dB(A)
Depressione..................................240 mbar
Capacità utile serbatoio.......................... 11 l
Capacità serbatoio detergente................. 7 l
Dimensioni ................530 x 380 x 485H mm
Peso................................................. 10,5 kg
Accessori....................................... Ø 36 mm
TIPO D’USO
Questo apparecchio è stato concepito per il
lavaggio a spruzzo ed estrazione di qualsiasi
tipo di tessuto, di moquette, poltrone sedili
auto, pavimenti, ecc...
É possibile l’utilizzo come aspirapolvere e
aspiratore solidi e liquidi con i dovuti acces-
sori a richiesta.
Solo per questi utilizzi è stato concepito.
PERICOLO:
Il costruttore non può essere ritenuto re-
sponsabile per eventuali danni dovuti ad
un uso improprio o scorretto.
Qualsiasi altro utilizzo solleva il costrutto-
re da responsabilità per danni a persone
e/o cose e fa decadere qualsiasi condizio-
ne di garanzia.
USO SCORRETTO
Non utilizzare l’apparecchio per:
- Aspirare sostanze infiammabili, esplosi-
ve, corrosive, tossiche.
- Aspirare sostanze calde.
- Non utilizzare l’apparecchio in versione
aspiraliquidi per aspirare polveri e vice-
versa.
Non utilizzare l’apparecchio in ambienti con
rischio di esplosione.
PREPARAZIONE
APPARECCHIO
Assemblaggio tubazioni
- Introdurre, fino a finecorsa, il manicotto
(1 Fig. 1) del tubo di aspirazione nella
bocchetta (2 Fig. 1) presente sul fusto.
- Per sganciare il manicotto (1 Fig. 2) spo-
stare la levetta (3 Fig. 2) in senso orario
quindi tirare verso l’esterno il manicotto
(1 Fig. 2).
- Collegare il tubo (4 Fig. 3) di mandata de-
tergente al raccordo rapido (5 Fig.3); per
sganciarlo spingere il raccordo rapido (5
Fig.3) verso l’interno.
- Collegare il tubo (6 Fig. 4) di aspirazione
detergente al raccordo rapido (7 Fig.4);
per sganciarlo spingere il raccordo rapido
(7 Fig.4) verso l’interno.
Assemblaggio tubazione rigida per lavag-
gio moquette o pavimenti (se presente).
Dopo aver collegato il tubo di aspirazione
alla bocchetta presente sul fusto agire come
segue:
- Controllare che la levetta (8 Fig.5) sia
in posizione verticale quindi aggancia-
re all’impugnatura ergonomica (9 Fig.5)
del tubo flessibile la prima prolunga (10
Fig.5) e bloccarla ruotando la levetta (8
Fig.5) in orizzontale.
- Agganciare alla prima prolunga (10 Fig.
6) la seconda prolunga (11 Fig.6) e bloc-
carla agendo sulla levetta (12 Fig.6) come
descritto in precedenza per la prima pro-
lunga.
- Agganciare alla seconda prolunga (11
Fig.7) la bocchetta pavimenti (13 Fig.7) e
bloccarla agendo sulla levetta (14 Fig.7)
come descritto in precedenza.
Assemblaggio tubazione per lavaggio
tessuti (se presente).
Dopo aver collegato il tubo di aspirazione
alla bocchetta presente sul fusto agire come
segue:

ITIT
I - 2
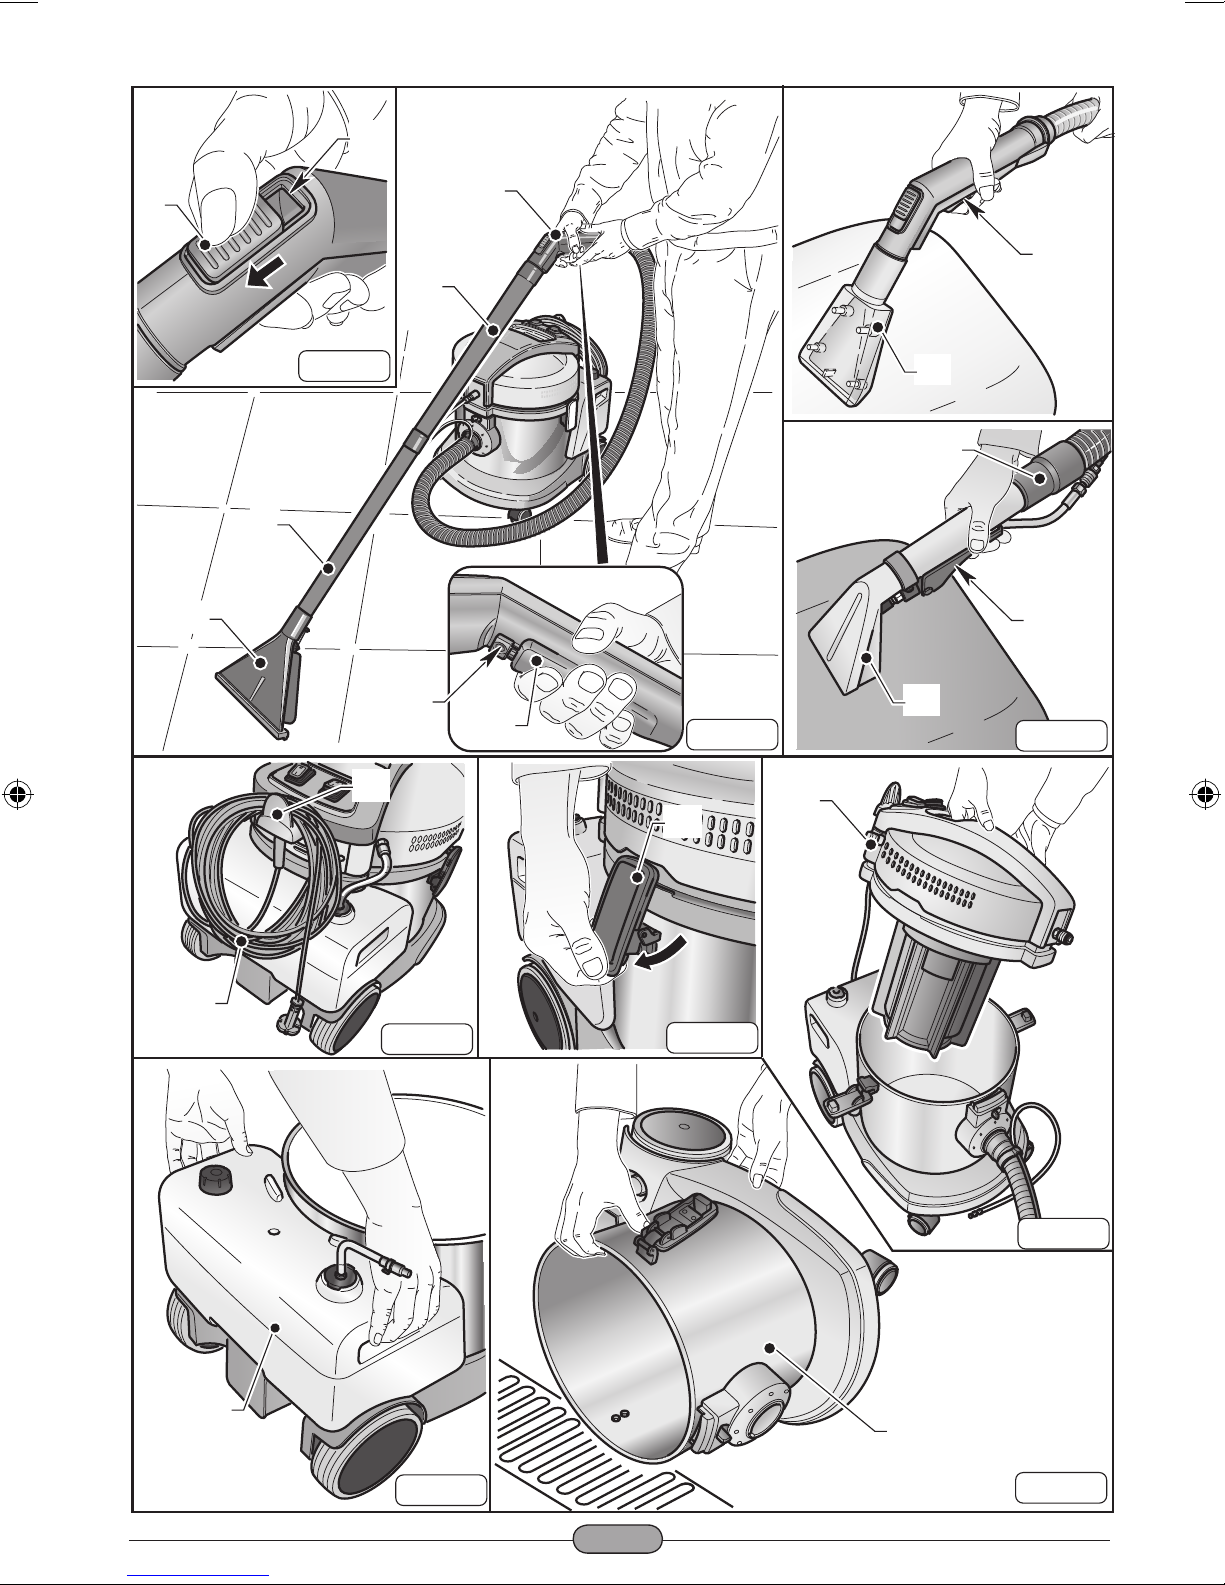
- Controllare che la levetta (8 Fig.8) sia
in posizione verticale quindi agganciare
all’impugnatura ergonomica (9 Fig.8) la
bocchetta tessuti (15 Fig.8) e bloccarla
ruotando la levetta (8 Fig.8) in orizzonta-
le.
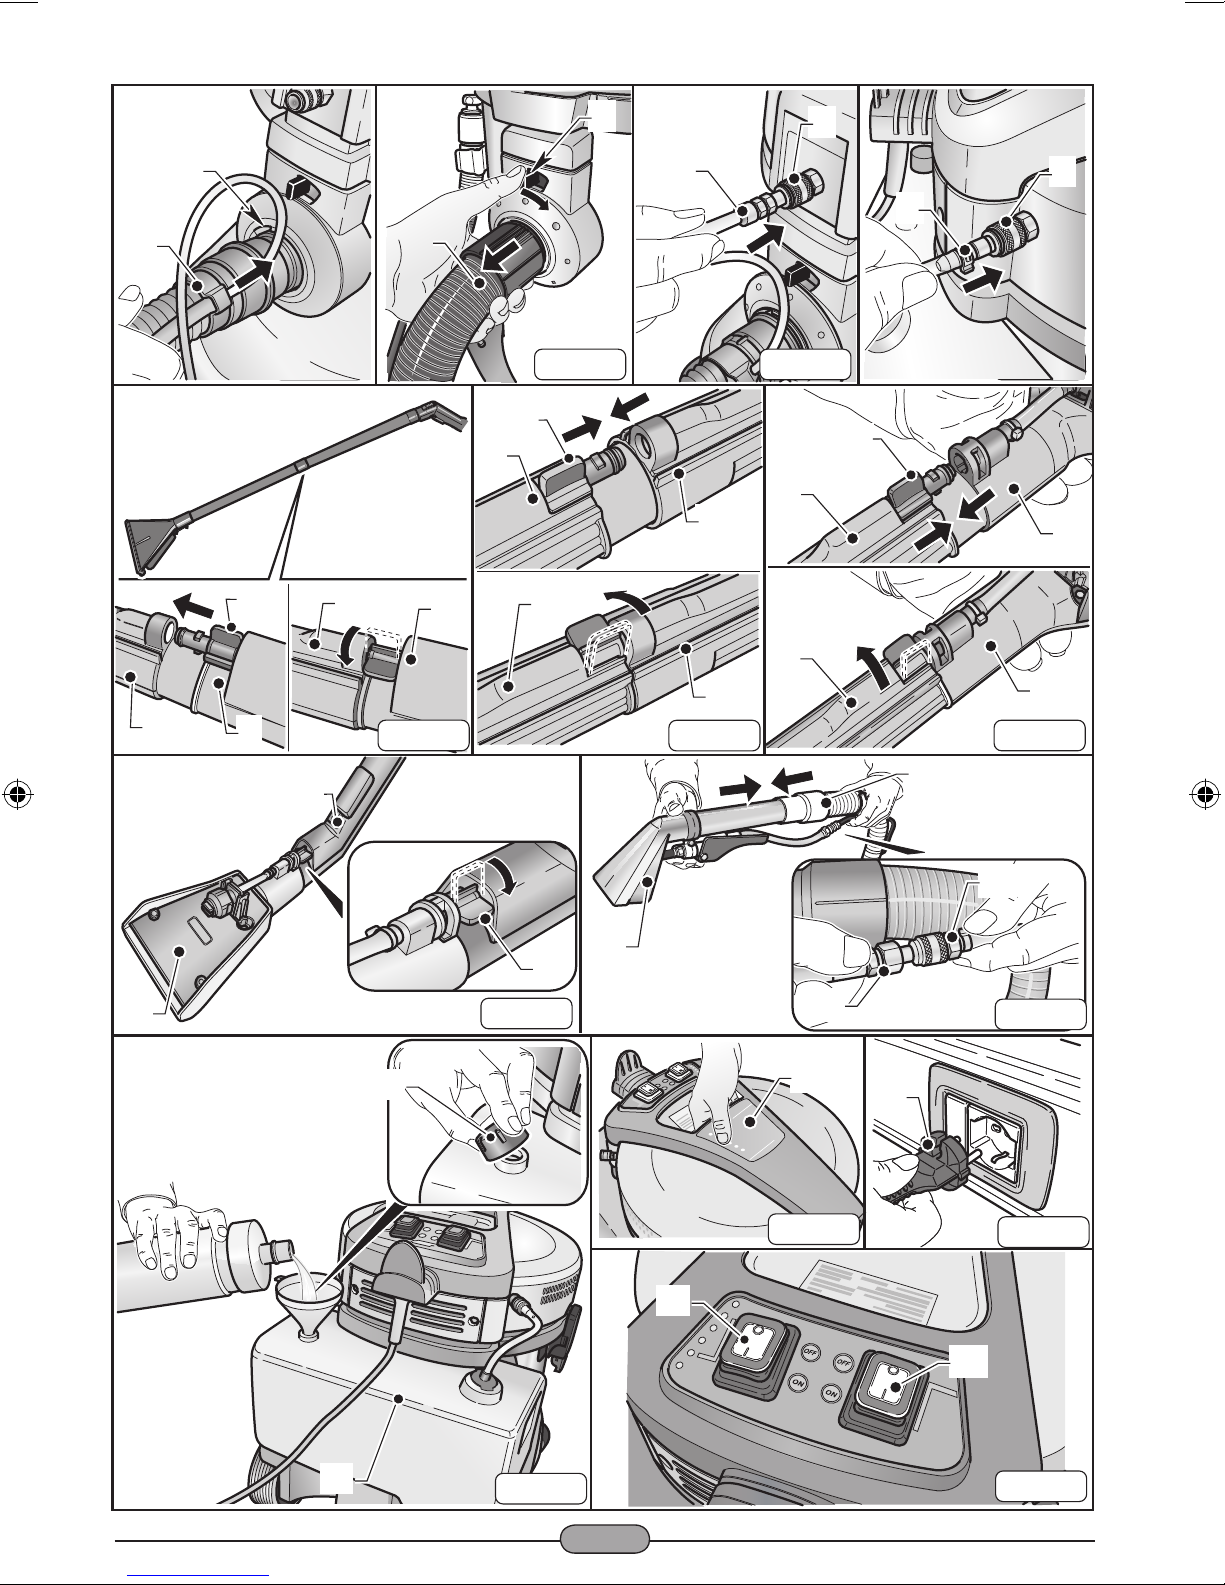
Assemblaggio tubazione professionale
per lavaggio tessuti (se presente).
Dopo aver collegato il tubo di aspirazione
alla bocchetta presente sul fusto agire come
segue:
- Introdurre la bocchetta tessuti (16 Fig.9)
nel tubo flessibile (17 Fig.9).
- Collegare il tubo del detergente (18 Fig.9)
al raccordo rapido (19 Fig.9) presente nel
tubo flessibile; per sganciarlo spingere il
raccordo rapido (19 Fig.9) verso il tubo.
Riempimento serbatoio detergente.
- Rimuovere il tappo (20 Fig.10) versare
nel serbatoio (21 Fig.10) il liquido deter-
gente adatto per la superficie da lavare.
NOTA:
Per il dosaggio del detergente fare riferimen-
to alle istruzioni del produttore.
- Rimontare il tappo (20 Fig.10)
USO DELL’APPARECCHIO
- L’apparecchio è dotato di ruote e quindi
durante l’utilizzo può essere trascinato
tramite il tubo flessibile.
- Per il suo sollevamento inserire le dita
della mano nell’apposita maniglia (22
Fig.11) ricavata sulla parte superiore del
coperchio.
Avviamento dell’apparecchio
- Inserire la spina (23 Fig.12) nella presa di
corrente.
- Premere l’interruttore (24 Fig.13) su “I”
per avviare il motore di aspirazione, l’in-
terruttore si illumina.
- Premere l’interruttore (25 Fig.13) su “I”
per avviare la pompa detergente, l’inter-
ruttore si illumina.
NOTA:
Il funzionamento del motore di aspirazione e
della pompa detergente sono indipendenti e
quindi è possibile:
- effettuare il lavaggio dei tessuti o dei pa-
vimenti / moquette avviando solo la pom-
pa detergente;
- lavare e contemporaneamente aspirare il
liquido avviando contemporaneamente la
pompa detergente e l’aspirazione;
- aspirare liquidi avviando solo il motore di
aspirazione.
NOTA:
Per l’impugnatura ergonomica (se presente)
è possibile regolare la forza di aspirazione
agendo sul selettore (26 Fig.14).
Aprendo la nestrella (27 Fig.14) si ha una
minore azione aspirante.
Lavaggio pavimenti o moquette
- Per il lavaggio dei pavimenti o moquette
è necessario montare il tubo con impu-
gnatura ergonomica (9 Fig.15), le prolun-
ghe rigide (10 e 11 Fig.15) e la bocchetta
pavimenti (13 Fig.15), se presenti.
- Avviare l’aspirazione e la pompa deter-
gente premendo sui relativi interruttori
(24 - 25 Fig.13).
- Premere il pulsante (28 Fig.15) per ero-
gare il detergente, rilasciare per fermare
l’erogazione.
É possibile bloccare il pulsante (28
Fig.15) in posizione premuta (erogazione
detergente continua) spostando il cursore
(29 Fig.15) verso il pulsante (27 Fig.15).
Riportando il cursore (29 Fig.15) in posi-
zione iniziale il pulsante si libera e si bloc-
ca l’erogazione del detergente.
- Il detergente erogato lava il pavimento /
moquette e il liquido sporco viene aspira-
to nel serbatoio dell’apparecchio.
Per sporchi intensi si consiglia di eroga-
re il detergente sulla parte sporca senza
aspirarlo lasciandolo agire per qualche
secondo quindi ripassare lavando e api-
rando.

IT
I - 3
NOTA:
Per evitare la rottura della pompa detergen-
te, si consiglia di fermare il funzionamento
della stessa, agendo sul relativo interruttore,
quando non viene effettuato il dosaggio per
alcuni minuti.
NOTA:
Quando il serbatoio di recupero è pieno si ha
un aumento di rumore e l’apparecchio non
aspira più, quindi spegnere l’apparecchio e
svuotare il serbatoio come descritto nei rela-
tivi paragrafi
Lavaggio poltrone
- Montare la bocchetta tessuti (30 Fig.16)
sul relativo tubo (31 Fig.16).
- Avviare l’aspirazione e la pompa deter-
gente premendo sui relativi interruttori
(24 - 25 Fig.13).
- Appoggiare la bocchetta sul tessuto pre-
mendo leggermente quindi premere il
pulsante (28 Fig.15) o la leva (32 Fig.15),
a seconda del tipo di bocchetta, per ero-
gare il detergente, rilasciare per fermare
l’erogazione.
Per sporchi intensi si consiglia di eroga-
re il detergente sulla parte sporca senza
aspirarlo lasciandolo agire per qualche
secondo quindi ripassare lavando e api-
rando.
NOTA:
Per evitare la rottura della pompa detergen-
te, si consiglia di fermare il funzionamento
della stessa, agendo sul relativo interruttore,
quando non viene effettuato il dosaggio per
alcuni minuti.
NOTA:
Quando il serbatoio di recupero è pieno si ha
un aumento di rumore e l’apparecchio non
aspira più, quindi spegnere l’apparecchio e
svuotare il serbatoio come descritto nei rela-
tivi paragrafi
Spegnimento dell’apparecchio
-
Premere gli interruttori (24 e 25 Fig.13) su
“0” per spegnere l’apparecchio; le lampa-
de presenti sugli interruttori si spengono.
- Staccare la spina (23 Fig.12) dalla presa
di corrente.
- Avvolgere il cavo (33 Fig.17) e aggan-
ciarlo nell’apposita sede (34 Fig.17).
PULIZIA E MANUTENZIONE
PERICOLO:
Prima di effettuare qualsiasi operazione
di manutenzione rimuovere la spina dalla
presa di corrente.
Pulizia gionaliera
Svuotamento serbatoio di recupero
- Scollegare il tubo di mandata detergente
(4 Fig.3) e il tubo flessibile (1 Fig.2).
- Scollegare il tubo di aspirazione deter-
gente (6 Fig.4).
- Sganciare le leve (35 Fig.18) e rimuove-
re la testata (36 Fig.19) completa di mo-
tore.
- Rimuovere il contenitore del detergente
(21 Fig.20) sollevandolo dalle apposite
maniglie.
- Posizionarsi su una piletta di scarico e
svuotare il liquido contenuto nel serbatoio
di recupero (37 Fig.21)
- Pulire l’interno del serbatoio con acqua
corrente quindi rimontare il tutto proce-
dendo in senso inverso allo smontaggio.
Lavaggio circuito dosaggio detergente
Alla fine della lavorazione giornaliera è ne-
cessario lavare il circuito di dosaggio deter-
gente per evitare che si intasi agendo come
segue:
- Scollegare il tubo di mandata detergente
(4 Fig.3).
- Scollegare il tubo di aspirazione deter-
gente (6 Fig.4).
- Sganciare le leve (35 Fig.18) e rimuove-
re la testata (36 Fig.19) completa di mo-
tore.

ITIT
I - 4
- Rimuovere il contenitore del detergente
(21 Fig.20) sollevandolo dalle apposite
maniglie.
- Togliere il tappo (20 Fig.10) del conteni-
tore detergente e svuotare il liquido resi-
duo in un idoneo contenitore.
- Lavare l’interno del contenitore detergen-
te con acqua corrente.
- Rimontare il tutto procedendo in senso
inverso.
- Versare nel contenitore detergente ac-
qua pulita, collegare elettricamente l’ap-
parecchio e avviare la pompa dosaggio
premendo l’interruttore (25 Fig.13).
- Pulire il circuito premendo il pulsante (28
Fig.15) o la leva (32 Fig.15), a seconda
del tipo di bocchetta.
- Erogare dalla bocchetta il liquido fino a
che dall’ugello fuoriesce acqua pulita.
- Svuotare l’acqua contenuta nel serbatoio
detergente come descritto in preceden-
za.
Pulizia corpo apparecchio
- Pulire il corpo apparecchio utilizzando un
panno umido d’acqua o detergente neu-
tro.
PERICOLO:
Non lavare l’apparecchio con getti d’ac-
qua.
Controlli periodici
Controllo filtro uscita aria
- Svitare le viti (38 Fig.22) e rimuovere il
coperchietto (39 Fig.22).
- Rimuovere la spugnetta filtro (40 Fig.23)
e pulirla con un getto d’aria (Fig.24).
È possibile lavare la spugnetta filtro in
acqua tiepida e rimontarla solo dopo una
completa asciugatura; se si presenta
troppo sporca sostituirla.
- Rimontare il tutto procedendo in senso
inverso allo smontaggio.
Pulizia ugello erogatore detergente
Se si nota che l’erogazione del detergente
non avviene in modo uniforme è necessario
pulire l’ugello come descritto di seguito:
- Rimuovere la ghiera (37 Fig.25).
- Rimuovere l’ugello (38 Fig.25) e pulirlo in
acqua corrente, se si presenta intasato
utilizzare uno spillo facendo attenzione a
non deformare la sagoma dell’ugello.
- Rimontare il tutto procedendo in senso
inverso.
Pulizia filtro aspirazione detergente
Se si nota che il detergente non viene aspi-
rato correttamente è necessario controllare e
pulire il filtro di aspirazione posizionato all’in-
terno del serbatoio detergente.
- Aiutandosi con un cacciavite sgancia-
re il tappo di aspirazione (39 Fig.26) ed
estrarlo con il relativo tubetto di aspirazio-
ne dal serbatoio.
- Rimuovere il filtro (40 Fig.26) e lavarlo in
acqua corrente se si presenta troppo in-
tasato è necessario sostituirlo.
- Rimontare il tutto procedendo in senso
inverso.
Sostituzione racla bocchetta pavi-
menti (se presente)
Se durante il lavaggio dei pavimenti si ha
difficoltà ad aspirare il liquido di lavaggio e
il pavimento o la moquette rimane bagnata
è necessario controllare lo stato della racla
(41 Fig.27).
Se la racla risulta consumata o rovinata è
necessario sostituirla sfilando il particolare
racla più setole dalla bocchetta come indica-
to in figura 27.
RICAMBI
Manichetta manuale (ves. auto)
Cod. 7180085
Estrattore M7 + strip Cod. 6010692
Manichetta piccola Cod. 6010695

IT
I - 5
PROBLEMA CAUSA RIMEDIO
Aspiratore non funziona. Interruttore non premuto.
Spina non inserita.
Mancanza corrente.
Premere l’interruttore.
Inserire la spina nella presa
di corrente.
Verificare la linea di
alimentazione.
L’aspirazione non è soddi-
sfacente.
Accessori o tubi otturati.
Racla bocchetta aspirazio-
ne usurata o rovinata.
Controllare e pulire il tubo
flessibile e la bocchetta di
aspirazione.
Controllare e sostituire la
racla
Erogazione detergente non
uniforme
Ugello otturato
Filtro otturato
Pulire ugello
Pulire il filtro di aspirazione
Erogazione detergente non
funziona
Interruttore non premuto Premere l’interruttore

ITEN
EN - 6
TECHNICAL
CHARACTERISTICS
Voltage..................................See data plate
Motor power .....................................1200 W
Sound level ....................................60 dB(A)
Depression....................................240 mbar
Useful capacity tank............................... 11 l
Detergent tank capacity ........................... 7 l
Dimensions ...............530 x 380 x 485H mm
Weight.............................................. 10.5 kg
Accessories................................... Ø 36 mm
TYPE OF USE
This appliance was designed for spray wash-
ing and extracting any type of fabric, carpet,
car seats, floors etc.
It can be used as a vacuum cleaner and or
solid and liquid suction unit with the appropri-
ate accessories upon request.
It has only been designed for these uses.
DANGER:
The manufacturer can not be held respon-
sible for any damage due to improper or
incorrect use.
Any other use releases the manufacturer
from liability for harm to persons and/or
property and invalidates any warranty
condition.
IMPROPER USE
Do not use the appliance to:
- Aspirate flammable, explosive, corrosive
and toxic substances.
- Aspirate hot substances.
- Do not use the appliance in liquid suction
mode to suction powder and vice versa
Do not use the appliance in areas at risk of
explosion.
PREPARING THE
APPLIANCE
Assembling the hoses
- Insert, as far as possible, the sleeve (1
Fig. 1) of the suction hose into the nozzle
(2 Fig. 1) on the drum.
- To release the sleeve (1 Fig. 2) move the
lever (3 Fig. 2) clockwise then pull the
sleeve outwards (1 Fig. 2).
- Connect the (4 Fig. 3) detergent delivery
hose to the quick coupling (5 Fig.3); to re-
lease it push the quick coupling (5 Fig.3)
inwards.
- Connect the detergent suction (6 Fig. 4)
hose to the quick coupling (7 Fig.4); to re-
lease it push the quick coupling (7 Fig.4)
inwards.
Rigid pipe assembly for washing carpets
or floors (if present)
After connecting the suction hose to the out-
let the drum, do as follows:
- Make sure the lever (8 Fig.5) is in ver-
tical position then attach the first exten-
sion (10 Fig.5) to the ergonomic handle
(9 Fig.5) of the flexible hose and lock it in
place by turning the lever (8 Fig.5) to the
horizontal position.
- Attach the first extension (10 Fig. 6) to
the second extension (11 Fig.6) and lock
it in place using the lever (12 Fig.6) as de-
scribed previously for the first extension.
- Attach the floor nozzle (13 Fig.7) to the
second extension (11 Fig.7) and lock it
in place using the lever (14 Fig.7) as de-
scribed above.
Hose assembly for fabric washing
(if present)
After connecting the suction hose to the out-
let the drum, do as follows:
- Make sure the lever (8 Fig.8) is in vertical
position then attach the fabric nozzle (15
Fig.8) to the ergonomic handle (9 Fig.8)
and lock it in place by turning the lever (8
Fig.8) to the horizontal position.

EN
EN - 7
Professional hose assembly for fabric
washing (if present)
After connecting the suction hose to the out-
let the drum, do as follows:
- Insert the fabric nozzle (16 Fig.9) into the
flexible hose (17 Fig.9).
- Connect the detergent hose (18 Fig.9)
to the quick coupling (19 Fig.9) on the
flexible hose; to release it push the quick
coupling (19 Fig.9) towards the hose.
Filling the detergent tank
- Remove the cap (20 Fig.10) and pour the
detergent liquid (suitable for the surfaces
to be washed) into the tank (21 Fig.10) .
NOTE:
For detergent dosing refer to the manufac-
turer’s instructions.
- Put the cap back on (20 Fig.10)
USING THE APPLICANCE
- The appliance is fitted with wheels and
can therefore be pulled along using the
flexible hose.
- To lift it up, insert your fingers under the
handle (22 Fig. 11) on the top of the cov-
er.
Starting up the appliance
- Insert the plug (23 Fig.12) into the electri-
cal socket.
- Push the switch (24 Fig.13) on “I” to start
the suction motor; the switch lights up.
- Push the switch (25 Fig.13) on “I” to start
the detergent pump; the switch lights up.
NOTE:
The suction motor and the detergent pump
operate independently; therefore, it is pos-
sible to:
- wash fabrics or floors/ carpets by starting
only the detergent pump;
- wash and suction liquid simultaneously
by starting up the detergent pump and
suction motor at the same time;
- suction liquids by only starting the suction
motor.
NOTE:
For the ergonomic handle (if present) it is
possible to adjust the suction force using the
selector (26 Fig.14).
The suction force is decreased by opening
the window (27 Fig.14).
Washing floors or carpets
- To wash floors or carpets it is necessary
to mount the hose with ergonomic handle
(9 Fig.15), the rigid extensions (10 and 11
Fig.15) and the floor nozzle (13 Fig.15), if
present.
- Start the suction motor and the detergent
pump by pressing the relative switches
(24 - 25 Fig.13).
- Press the switch (28 Fig.15) to dispense
the detergent, release the button to stop
dispensing.
The switch (28 Fig.15) can be blocked in
the pushed position (continuous deter-
gent dispensing) by moving the slide (29
Fig.15) towards the switch (28 Fig.15).
When the slide (29 Fig.15) is moved back
to its original position the switch is re-
leased and detergent dispensing stops.
- The detergent released washes the floor/
carpet / and the dirty liquid is suctioned
into the tank of the appliance.
For very dirty areas it is recommended
you apply detergent to the dirty area with-
out suctioning it; leave the detergent al-
lowing it to work for several seconds and
then wash the area and suction the dirt.

ITEN
EN - 8
NOTE:
To prevent the detergent pump from break-
ing, it is recommended that you stop its op-
eration, pushing the relative switch, when
dosing has not occurred for several minutes.
NOTE:
When the recovery tank is full, noise in-
creases and the appliance does not suction;
therefore, switch it off and empty the tank as
described in the relevant paragraphs.
Cleaning chairs
- Mount the fabric nozzle (30 Fig.16) on the
relative hose (31 Fig.16).
- Start the suction motor and the detergent
pump by pressing the relative switches
(24 - 25 Fig.13).
- Place the nozzle on the fabric pressing
slightly then press the switch (28 Fig.15)
or the lever (32 Fig.15), depending on the
nozzle type, to dispense the detergent,
release to stop dispensing.
For very dirty areas it is recommended
you apply detergent to the dirty area wi-
thout suctioning it; leave the detergent al-
lowing it to work for several seconds and
then wash the area and suction the dirt.
NOTE:
To prevent the detergent pump from break-
ing, it is recommended that you stop its op-
eration, pushing the relative switch, when
dosing has not occurred for several minutes.
NOTE:
When the recovery tank is full, noise in-
creases and the appliance does not suction;
therefore, switch it off and empty the tank as
described in the relevant paragraphs.
Switching off the appliance
- Press the switches (24 and 25 Fig.13) to
“0” to switch off the appliance; the lamps
on the switches will go out.
- Remove the plug (23 Fig.12) from the
electrical socket.
- Wind up the cable (33 Fig.17) and hook it
onto its housing (34 Fig.17).
CLEANING AND
MAINTENANCE
DANGER:
Before performing any maintenance op-
erations, unplug the appliance from the
electrical socket.
Daily cleaning
Emptying the recovery tank
- Disconnect the detergent delivery hose
(4 Fig.3) and the flexible hose (1 Fig.2).
- Disconnect the detergent suction hose (6
Fig.4).
- Lift up the levers (35 Fig.18) and remove
the cover (36 Fig. 19) complete with mo-
tor.
- Remove the detergent container (21
Fig.20) lifting it by the handles.
- Place yourself over a floor drain and
empty the liquid in the recovery tank (37
Fig.21)
- Clean the inside of the tank with running
water and then reassemble everything
proceeding in the reverse order.
Cleaning the detergent dosing circuit
At the end of each workday, clean the de-
tergent dosing circuit as follows to prevent
clogging:
- Disconnect the detergent delivery hose
(4 Fig.3).
- Disconnect the detergent suction hose (6
Fig.4).
- Lift up the levers (35 Fig.18) and remove
the cover (36 Fig. 19) complete with mo-
tor.

EN
EN - 9
- Remove the detergent container (21
Fig.20) lifting it by the handles.
- Remove the cap (20 Fig.10) of the de-
tergent container and empty the residual
liquid into a suitable container.
- Wash the inside of the detergent contain-
er with running water.
- Reassemble all of the parts performing
these operations in the reverse order.
- Pour clean water into the detergent con-
tainer, electrically connect the appliance
and start the dosing pump by pressing
the switch (25 Fig.13).
- Clean the circuit by pressing the switch
(28 Fig.15) or the lever (32 Fig.15), de-
pending on the type of nozzle.
- Dispense the liquid from the nozzle until
clean water comes out.
- Empty the water in the detergent tank as
described above.
Cleaning the appliance body
- Clean the unit body with a cloth damp-
ened with water or a mild detergent;
DANGER:
Do not wash the appliance using jets of
water.
Periodic checks
Checking the air outlet filter
- Loosen the screws (38 Fig.22) and re-
move the cover (39 Fig.22)
- Remove the filter sponge (40 Fig.23) and
clean it with a blast of air (Fig.24).
The filter sponge can be washed in warm
water and must only be replaced once it
is completely dry. If it is too dirty, replace
it with a new one.
- Reassemble all the parts by following the
dismantling process steps in the reverse
order.
Cleaning the detergent
dispensing nozzle
If you note that the detergent is not dispensed
evenly, clean the nozzle as described be-
low:
- Remove the ring nut (37 Fig.25).
- Remove the nozzle (38 Fig.25) and clean
it with running water, if it is clogged use a
pin being careful not to distort the shape
of the nozzle.
- Reassemble all of the parts performing
these operations in the reverse order.
Cleaning the detergent suction filter
If you note that the detergent is not being
suctioned properly, check and clean the suc-
tion filter located inside the detergent tank.
- Using a screw driver, loosen the suction
cap (39 Fig.26) and remove it from the
tank with the relative suction hose.
- Remove the filter (40 Fig.26) and wash it
under running water; if it is too clogged it
should be replaced.
- Reassemble all of the parts performing
these operations in the reverse order.
Replacing the floor nozzle squeegee
(if present)
If when washing the floors the washing liquid
is not suctioned properly and the floor or car-
pet remains wet, check the condition of the
squeegee (41 Fig.27).
If the squeegee is worn or damaged replace
it by slipping the squeegee and its bristles off
the nozzle as shown in figure 27.
SPARE PARTS
Manual nozzle (vers. auto)
Code 7180085
Extractor M7 + strip Code 6010692
Small nozzle Code 6010695

ITEN
EN - 10
PROBLEM CAUSE SOLUTION
The vacuum cleaner does
not work.
Switch not pressed.
Plug not inserted.
Power cut.
Press the switch.
Insert the plug into the
socket.
Check the power
line.
Suction is not satisfactory. Accessories or tubes
clogged.
Suction nozzle squeegee
worn or damaged.
Check and clean the flexible
hose and the suction nozzle.
Check and replace the
squeegee
Detergent dispensing not
even
Nozzle clogged
Filter clogged
Clean nozzle
Clean suction filter
Detergent dispensing not
working
Switch not pressed Press the switch

FR
FR - 11
CARACTÉRISTIQUES
TECHNIQUES
Tension ............ Voir la plaque des données
Puissance moteur ............................1200 W
Niveau sonore................................60 dB(A)
Dépression....................................240 mbar
Capacité utile réservoir .........................11 L
Capacité réservoir du détergent..............7 L
Dimensions ...............530 x 380 x 485H mm
Poids ................................................ 10,5 kg
Accessoires................................... Ø 36 mm
TYPE D’UTILISATION
Cet appareil a été conçu pour le lavage à
pulvérisation et extraction pour tout type de
tissus, moquettes, fauteuils, sièges auto,
sols, etc.
Il est possible de l’utiliser comme aspirateur
de poussières et aspirateur de solides et li-
quides avec les accessoires appropriés four-
nis sur demande.
Il a été conçu uniquement pour ces utilisa-
tions.
DANGER :
Le constructeur ne peut être retenu res-
ponsable des éventuels dommages dus à
une utilisation impropre et incorrecte.
Toute autre utilisation dégage le fabricant
de toute responsabilité pour endomma-
gements sur des personnes et/ou choses
et annule toute condition de garantie.
UTILISATION INCORRECTE
Ne pas utiliser l’appareil pour :
- Aspirer des substances inflammables,
explosives, corrosives, toxiques.
- Aspirer des substances chaudes.
- Ne pas utiliser l’appareil en version as-
pirateur pour liquides pour aspirer des
poussières et vice-versa.
Ne pas utiliser l’appareil dans des milieux
ayant un risque d’explosion.
PRÉPARATION
APPAREIL
Assemblage des tuyaux
- Introduire, jusqu’en fin de course, le man-
chon (1 Fig. 1) du tuyau d’aspiration dans
la bouche (2 Fig. 1) présente sur la cuve.
- Pour décrocher le manchon (1 Fig. 2) dé-
placer le levier (3 Fig. 2) dans le sens ho-
raire puis tirer le manchon vers l’extérieur
(1 Fig. 2).
- Raccorder le tuyau (4 Fig. 3) d’alimen-
tation du détergent au raccord rapide (5
Fig.3) ; pour le décrocher, pousser le rac-
cord rapide (5 Fig.3) vers l’intérieur.
- Raccorder le tuyau (6 Fig. 4) d’aspiration
du détergent au raccord rapide (7 Fig.4) ;
pour le décrocher, pousser le raccord ra-
pide (7 Fig.4) vers l’intérieur.
Assemblage des tuyaux rigides pour le la-
vage de moquettes ou sols (si présents).
Après avoir raccordé le tuyau d’aspiration à
la bouche présente sur la cuve, agir comme
suivant :
- Contrôler que le levier (8 Fig.5) soit en
position verticale puis accrocher à la
poignée ergonomique (9 Fig.5) du tuyau
flexible la première rallonge (10 Fig.5) et
la bloquer en tournant le levier (8 Fig.5)
horizontalement.
- Accrocher à la première rallonge (10
Fig. 6) la deuxième rallonge (11 Fig.6)
et la bloquer en agissant sur le levier (12
Fig.6) comme il décrit précédemment
pour la première rallonge.
- Accrocher à la seconde rallonge (11
Fig.7) la buse pour sols (13 Fig.7) et la
bloquer en agissant sur le levier (14 Fig.7)
comme il est décrit précédemment.
Assemblage des tuyaux pour le lavage
des tissus (si présents).
Après avoir raccordé le tuyau d’aspiration à
la bouche présente sur la cuve, agir comme
suivant :

ITFR
FR - 12
- Contrôler que le levier (8 Fig.8) soit en
position verticale puis accrocher à la poi-
gnée ergonomique (9 Fig.8) la buse pour
tissus (15 Fig.8) et la bloquer en tournant
le levier (8 Fig.8) horizontalement.
Assemblage des tuyaux professionnels
pour le lavage des tissus (si présents).
Après avoir raccordé le tuyau d’aspiration à
la bouche présente sur la cuve, agir comme
suivant :
- Introduire la buse des tissus (16 Fig.9)
dans le tuyau flexible (17 Fig.9).
- Raccorder le tuyau du détergent (18
Fig.9) au raccord rapide (19 Fig.9) pré-
sent sur le tuyau flexible ; pour le décro-
cher, pousser le raccord rapide (19 Fig.9)
vers le tuyau.
Remplissage réservoir du détergent
- Retirer le bouchon (20 Fig.10), verser
dans le réservoir (21 Fig.10) le liquide
détergent adapté à la surface à laver.
REMARQUE :
Pour le dosage du détergent, se référer aux
instructions du producteur.
- Remonter le bouchon (20 Fig.10)
UTILISATION DE
L’APPAREIL
- L’appareil est doté de roues et peut donc
être traîné durant l’emploi en utilisant di-
rectement le tuyau flexible.
- Pour le soulever, introduire les doigts de
la main dans la poignée prévue à cet effet
(22 Fig.11) fixée sur la partie supérieure
du couvercle.
Démarrage de l’appareil
- Insérer la fiche (23 Fig.12) dans la prise
de courant.
- Mettre l’interrupteur (24 Fig.13) sur “I”
pour démarrer le moteur d’aspiration, l’in-
terrupteur s’allume.
- Mettre l’interrupteur (25 Fig.13) sur “I”
pour démarrer la pompe du détergent,
l’interrupteur s’allume.
REMARQUE :
Le fonctionnement du moteur d’aspiration
et de la pompe du détergent sont indépen-
dants, il est donc possible de :
- effectuer le lavage des tissus ou des sols
/moquettes en démarrant uniquement la
pompe du détergent ;
- laver et aspirer en même temps le liquide
en démarrant simultanément la pompe
de détergent et l’aspiration ;
- aspirer les liquides en démarrant seule-
ment le moteur d’aspiration.
REMARQUE :
Pour la poignée ergonomique (si présente) il
est possible de régler la force d’aspiration en
agissant sur le sélecteur (26 Fig.14).
En ouvrant le petit clapet (27 Fig.14), on ob-
tient une action aspirante moins puissante.
Lavage des sols ou des moquettes
- Pour le lavage des sols ou moquettes, il
est nécessaire de monter le tuyau avec la
poignée ergonomique (9 Fig.15), les ral-
longes rigides (10 et 11 Fig.15) et la buse
pour sols (13 Fig.15), si présents.
- Démarrer l’aspiration et la pompe déter-
gent en appuyant sur les interrupteurs
relatifs (24 - 25 Fig.13).
- Appuyer sur le bouton (28 Fig.15) pour
pulvériser le détergent, relâcher pour ar-
rêter la pulvérisation.
Il est possible de bloquer le bouton (28
Fig.15) en position appuyée (pulvérisa-
tion du détergent en continu) en dépla-
çant le curseur (29 Fig.15) vers le bouton
(28 Fig.15).
En replaçant le curseur (29 Fig.15) en
position initiale, le bouton se libère et la
pulvérisation du détergent se bloque.
- Le détergent pulvérisé lave le sol / mo-
quette et le liquide sale est aspiré dans le
réservoir de l’appareil.
Pour des sols très sales, il est conseillé de
pulvériser le détergent sur la partie sale
sans l’aspirer en le laissant agir quelques
secondes puis repasser en lavant et en
aspirant.
This manual suits for next models
1
Table of contents
Languages:
Other Wirbel Vacuum Cleaner manuals