Wireless Pacific GT Series User manual

User Manual
VHF/UHF TRANSCEIVER
GT/GTR Series
Professional Portable Radios

Table of Contents
Parts Name & Functions������������������������������������������������������������1
Fitting & Removing the Battery Pack ���������������������������������������2
•To Install the battery pack �����������������������������������������������2
•To remove the battery pack ������������������������������������������2
Charging the Battery Pack�������������������������������������������������������2
Symbol Description �������������������������������������������������������������������3
Basic Operation�������������������������������������������������������������������������4
•Turning the radio On & Off�����������������������������������������������4
•Channel selection ������������������������������������������������������������4
•On-site 16 ���������������������������������������������������������������������������4
•Australian UHF CB channels��������������������������������������������4
•Private repeater operation����������������������������������������������4
•Receiving���������������������������������������������������������������������������4
•Monitor�������������������������������������������������������������������������������5
•Transmitting������������������������������������������������������������������������5
•Voice Privacy (scrambler) GT only������������������������������������5
•Handsfree VOX �����������������������������������������������������������������5
•Bluetooth (GTR option)��������������������������������������������������������5
•BT headset operation������������������������������������������������������5
•Channel Scan �������������������������������������������������������������������6
•Time Out Time (TOT)����������������������������������������������������������6
•Ch 16 Safety operation ���������������������������������������������������6
•Alternate programming /cloning �����������������������������������6
GTR Scan/Voting Operation ����������������������������������������������������7
•Dual watch scan���������������������������������������������������������������7
Transmit channel while scanning�����������������������������������7
Home channel �����������������������������������������������������������������7
Deleting a nuisance channel ����������������������������������������7
Voting ��������������������������������������������������������������������������������7

GTR Menu Selection ������������������������������������������������������������������������8
•Squelch level ���������������������������������������������������������������������������8
•VOX sensitivity Level ��������������������������������������������������������������8
•Beep ����������������������������������������������������������������������������������������8
•TX power selection������������������������������������������������������������������8
•Keypad lock/unlock ��������������������������������������������������������������8
GTR dealer programmable functions��������������������������������������������9
•Busy Lockout On/Off ��������������������������������������������������������������9
•Burst Tone ��������������������������������������������������������������������������������9
•Talk around ������������������������������������������������������������������������������9
•Auto Tx ( Remote monitor)���������������������������������������������������10
•Emergency Call ��������������������������������������������������������������������10
•Lone worker���������������������������������������������������������������������������10
•5 tone Selective Calling (Selcall) ����������������������������������������10
Individual or sub-group call (Call 2) ����������������������������������10
Receiving a selective call���������������������������������������������������10
•Remote stun - Radio kill��������������������������������������������������������10
•Power on password ��������������������������������������������������������������10
GT dealer programmable functions��������������������������������������������11
Taking care of your radios & things you should know���������������12

Part Names & Functions
BEEP sound Status Indication
Beep every 30 seconds Low battery warning
Beep while pressing Hi/Low button
(GT Radio only - when enabled)
One beep for low power
Two beeps for high power
Beep while pressing programmable
button (GT radio only)
One beep to enable the function
Two beeps to disable
FRONT
TOP
SIDE
MOST BUTTONS ARE DEALER RE-CONFIGURABLE�
GTR GT
Antenna connector
Channel selector
Volume Off/On
Battery
LED: shows radio status
Red: transmitting
Green: receiving
Amber: interference
or user with different tone squelch
Loudspeaker
Microphone
LCD display
Up/down buttons
Enter button
Menu button
Scan button
A Key: Emergency*
B Key: PTT Press To Talk
C Key: Lone Worker*
D Key: Monitor
A Key: Emergency*
B Key: PTT Press To Talk
C Key: Lone Worker*
D Key: Monitor
Release
1
GTR Vox Operation:
ON: Hold ‘C” while turning on radio�
OFF: Turn radio off and back on�
GTR Lone Worker:
ON: Press ‘C” for 3 seconds. (LED will ash RED)
OFF: Press ‘C” for 3 seconds�
Note: Safe 16 automatically ON�
GT Voice Privacy/Scrambler
ON: Hold ‘C” while turning on radio�
OFF: Turn radio off and back on�
GTR Lone Worker:
ON: Press ‘C” for 3 seconds�
OFF: Turn radio off and back on�
* Press button for 3 seconds to trigger
shown with optional stubby antenna
Ext� Spk Mic
Cover

1] Fit the bottom edge of the battery pack into the holes of
the transceiver cabinet bottom�
2] Push the battery pack down to the transceiver aluminum
chassis till the end clicks�
1] Connect the jack of AC adaptor to the DC input
socket on side of the desktop charger�
2] Plug the AC adaptor into the power outlet�
3] Insert the radio into the charger�
4] The radio will re-charge in around 2 hours�
Fitting & Removing the Battery Pack
•To Install the battery pack
•To remove the battery pack
Press the release lever of the battery pack while levering the battery pack away from
the transceiver body. Note: It is normal for this lever to be rm.
Charging the Battery Pack
A Key: Emergency*
B Key: PTT Press To Talk
C Key: Lone Worker*
D Key: Monitor
Remove the radio from the charger
when the battery is fully-charged
Make sure the radio is turned off while charging�
2

1] : selected channel is the priority channel�
2] : channel has Busy Channel Lockout feature�
3] : channel with CTCSS (Continuous Tone Coded Squelch)�
4] : channel with DCS (Digital Coded Squelch)�
5] : channel with signalling (2/5 tone) feature�
6] : channel with DTMF feature
7] : monitor feature is activated�
8] : keypad is locked�
9] : time-out timer function is activated�
10] : shows battery condition� Recharge when icon displays 1 segment �
11] : radio is transmitting�
12] : shows the strength of Tx or Rx signal�
13] : VOX is activated�
14] or : Tx output power: H means high; L means low�
15] : power saving is active�
16] : channel is home channel�
17] : channel with voice privacy/scrambler feature�
18] : Bluetooth active
19] : channel scan is activate�
20] Channel Name (Dealer programmable)
GTR LCD Display Symbols
3

Basic Operation
•Turning the radio on/off
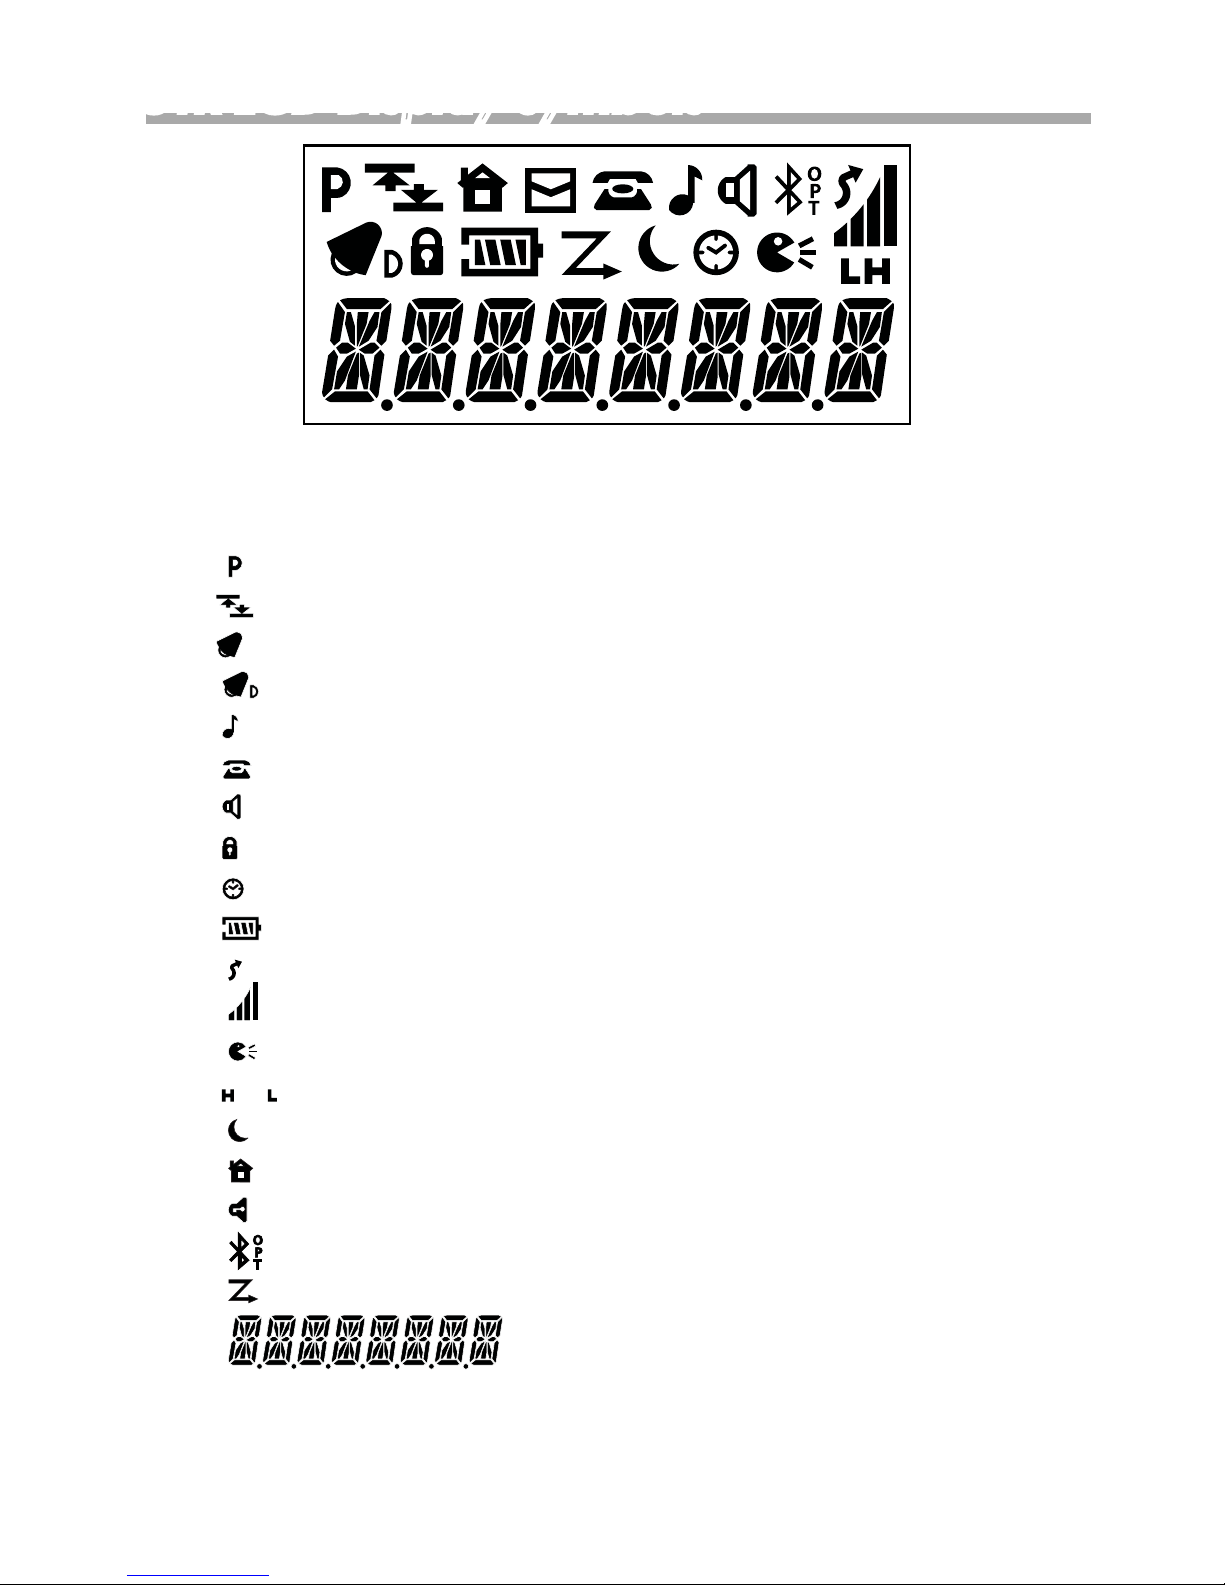
Rotate the PWR/VOL knob clockwise till the radio is turned on� The radio will initially
go through an auto test routine� (All icons on the GTR LCD will appear�) After auto test-
ing is complete, the GTR LCD will show channel name alias and whatever functions
have been activated by your dealer� Rotate the PWR/VOL knob clockwise to increase
its volume or reverse to reduce� To turn the radio off, rotate the PWR/VOL knob counter-
clockwise until it clicks�
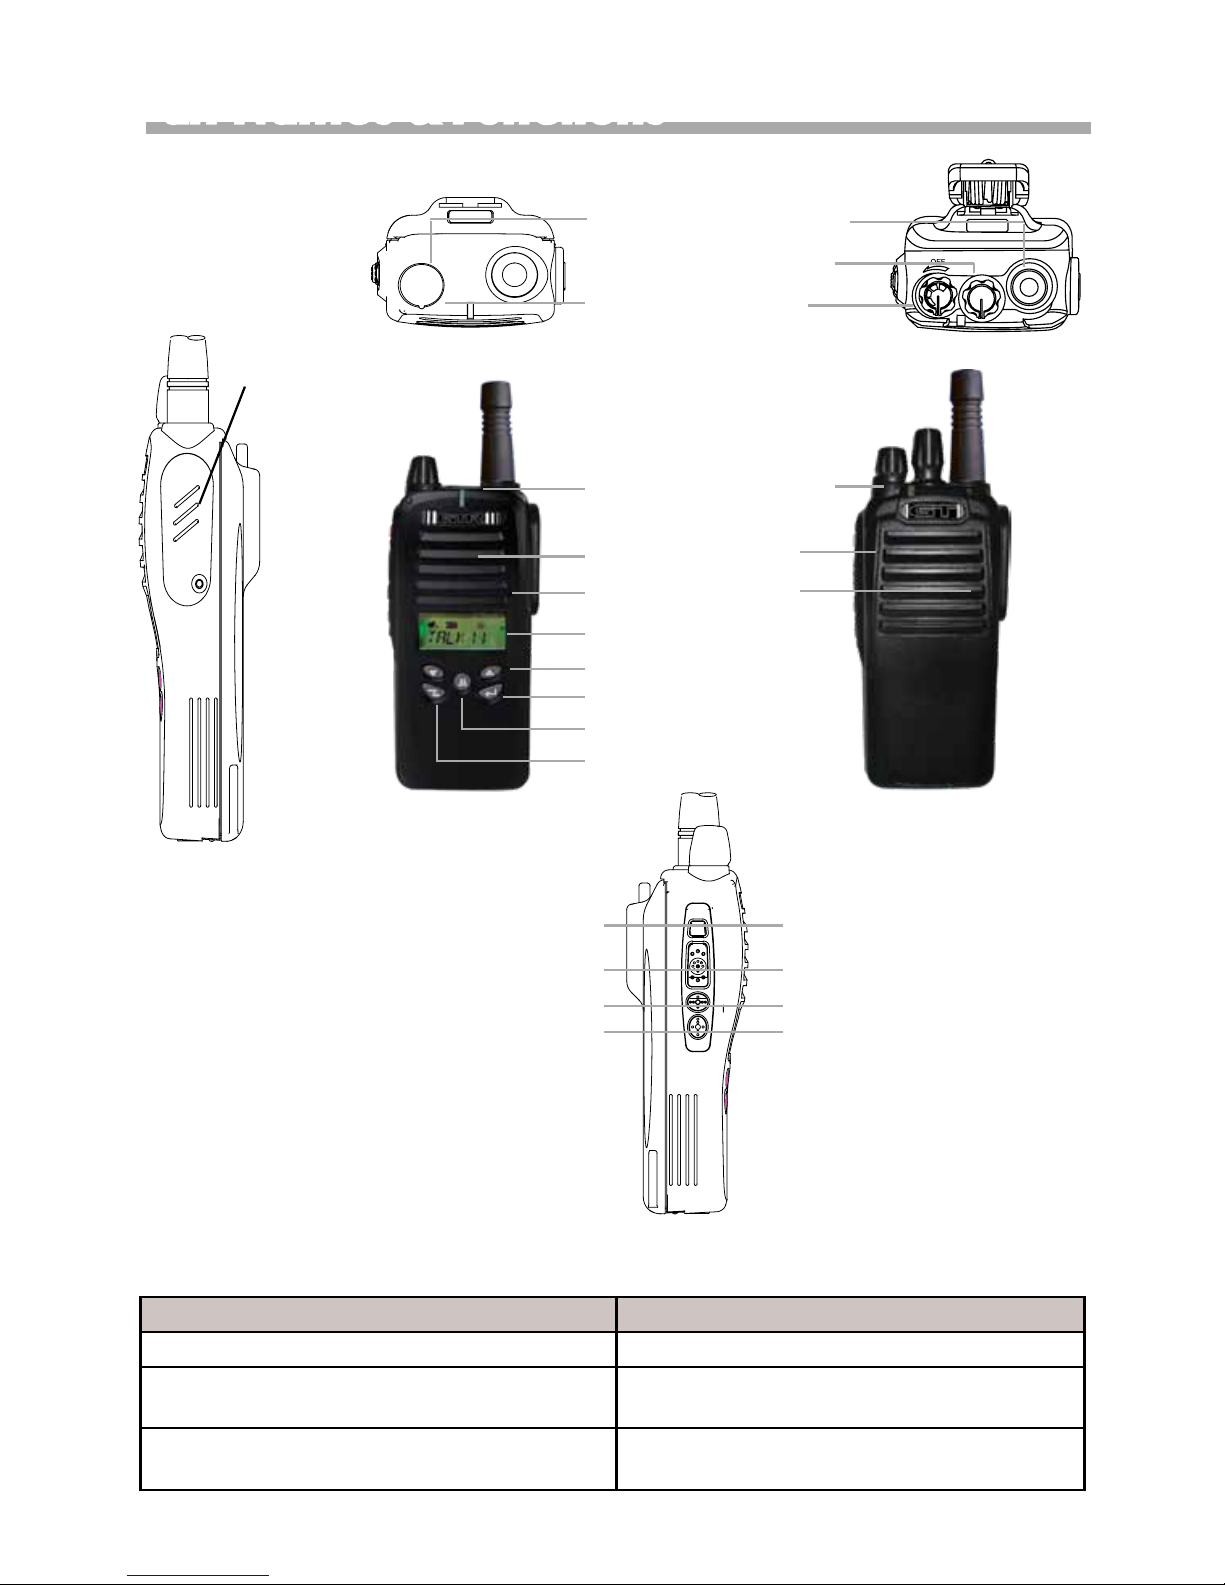
•Channel selection
The GTR portable can be programmed with up to 256 channels� The XU1 series are
factory programmed with On-Site 16 channels as well as 80 Australia UHF CB channels�
Press the or buttons to select the desired channel� The channel name alias is
re-programmable by your dealer. The GT series portable is congured with On-Site 16
channels� On-site 16 allows you select up to 15 standard plus a special safety 16th chan -
nel to choose from� Use the channel selector on the GT radio to choose the desired
channel� On the GTR radio they are labelled: Talk 1, Talk 2, etc� You may choose to have
different users on different channels� For example; in a hotel you may choose channel 1
for Security, channel 2 for Housekeeping, channel 3 for the Front desk staff, etc� On the
rare occasions that you nd someone else on one of the on-site 16 channels, simply se-
lect an alternative for your communications� Should you desire, your dealer can arrange
your own personal licensed radio channel for a small annual charge�
Australian UHF CB Channels
GTR-XU1/2 models are factory supplied in Australia, pre-congured with the national
80 narrowband (12�5kHz) simplex channels as well as citizen band UHF repeater radio
channels� Certain channels have governmental restriction on their use� For further infor-
mation regarding use of these channels refer to www�acma�gov�au or refer inside this
manual’s back cover� The On-site 16 channels are a unique selection of some of these
80 public channels which are congured with tone squelch to minimise interference.
Private Repeater Channels
GTR-XU1 models are also pre-congured for access to a number of private repeater
channels to allow you, at some future time, to purchase and operate your own repeater
base station, should you nd coverage between portable radios is insufcient. They are
labelled RTR1, RTR2, etc� Contact your dealer for further details�
•Receiving
Radios are factory set to work in “Group Mode”� Group mode uses tone squelch (CTC-
SS/DCS) which prevents other users on the same channel from being heard on your
radio� The LED indicator will glow green and the speaker will unmute when the radio re-
ceives a call� Occasionally interference, or another user may be present on your chan-
nel. In such cases your LED may ash amber but no audio will usually be heard.
•Emergency
Press the A key for 3 seconds� The radio will automatically change to channel 16 and
send an emergency alert followed by 10 seconds of transmit audio followed by 10 sec-
onds of receive� This is repeated 3 times� If you receive an Emeregency call you can reset
by pressing any button� Operation is programmable by your dealer�
4

•Monitor
Simply press the D key once to open the squelch, the GTR LCD shows” “ � Press the
D key again to close monitor� This allows you to override the tone squelch function� It
is polite to monitor the channel before you transmit to ensure there is no one using the
channel� This function can be disabled by your dealer�
•Transmit
Simply press the PTT button and start talking approximately 2-3cm from the MIC hole�
When transmitting, the LED on the top of the radio will glow red� Release the PTT button
to listen�
•Voice protection operation (GT series only)
Simply press the C button while turning on the radio to enable Voice protection
(scrambler) operation. Voice protection scrambling modies your voice rendering it very
difcult for other who may be listening to your radio trafc such as others sharing the
frequency or those with scanners, to understand what is being said� It should not be as-
sumed that it will prevent someone who really desires to listen to your transmissions from
doing so� If your communications calls for absolute privacy then contact your dealer to
discuss more sophisticated versions of voice encryption� To disable simply turn off radio
and back on again�
•Handsfree Transmit (VOX) (GTR series only)
To activate VOX simply press the C button while turning on the radio� The icon will
display� During VOX mode the PTT button is disabled� The VOX sensitivity is preset but can
be adjusted using the menu function� (See page 8)
To transmit talk with your lips approx�� 2-3cm from the MIC hole, then stop to listen�
To deactivate VOX: Turn the radio off and back on again�
•Bluetooth operation (Option for GTR series only)
Pairing your BT headset
Follow these steps to pair your Bluetooth equipped GTR radio with a Bluetooth headset�
1: Find out your BT headset pin code from its operation instruction�
(Common pin numbers are “1234” or “0000” etc���)
2: Set the GTR pairing pin code by pressing the button until the LCD shows “BLUT-
ON”, next press button to enter the BT feature� Press or button until the LCD
shows “PIN CODE” and then press button to set code number (“ ” shifts the digit, “
” selects the number� Press button to save and exit setting or enter the pin code by
PC programmer directly�
3: Pairing headset to the radio, press the or button until LCD shows “PAIR” and
then press button, The LCD will show “INQUIRY” (make sure your BT headset is ON and
in pairing mode� Press button to pair with your BT headset� “NO FOUND” means no BT
device can be found�), If “BLUT-ON” is not found while pressing the button repeatedly,
it means the Bluetooth option is not tted.
BT headset operation
There are two activation modes available� One is PTT mode: press or button until
the LCD shows “PTT” and then press button to save and exit� In this mode you need
to use the PTT button� The other mode is VOX, please refer to the Handsfree Transmit
(VOX) paragraph�
5

•Channel Scan (GTR series only)
The advanced scan functionality of the GTR allows optionally scanning for carrier or
carrier with CTCSS or DCS� Your dealer can program the channels to be scanned into
the scan list� When the dealer sets your CTCSS or DCS tone, then GTR will automatically
scan both carrier and tone, if no tone is set, then GTR will only scan for carrier�
•TOT (Time-Out Timer)
TOT is the function that prevents the radio from locking up a repeater or frequency by
prolonged keying of PTT� The time-out timer limits the amount of time you have to trans-
mit your message� When you reach the time limit which has been programmed by your
dealer, your transmission will be cut off� In order to transmit again, you must release and
push PTT button to reset the timer�
Channel 16 Safety operation
On-Site Channel 16 on your radio has been optimized for the following functions:
Lone worker - This safety feature requires the user to press any button on the radio at
least once every 15 minutes� Failure to do so will send an emergency alert tone over the
radio channel� A warning tone is sounded 15 seconds beforehand to remind the user to
momentarily press a button� On channel 16 on the GTR model it is automatically ON and
the LED will ash RED to indicate Lone worker mode. To disable Lone worker press the (C)
button for 3 seconds� Press for another 3 seconds to re-enable� The GT model requires
you to manually activate� Press for 3 seconds to enable, another 3 seconds to disable�
Emergency call - enabled when a user presses the Orange button (A) for 3 seconds�
The radio will automatically change to channel 16 and it will initiate an Emergency Call�
Three emergency calls will go out followed by Auto Tx�
Auto Tx - Automatically enabled when Emergency is triggered so that others can re-
motely monitor local user audio in the event of an emergency or a lone worker failing to
respond� The radio will automatically transmit audio for 10 seconds and then receive for
10 seconds� the cycle repeats 3 times�
For a small nominal charge, the radio can be programmed to send its individual elec-
tronic ID so that it shows on a display unit� These Safety channel function can be best
experienced by use of a GTR radio as the LCD display can show the unit’s identication
when programmed�
Alternate Programming
The GTR and GT series radios can be programmed with a vast variety of the features�
Some of which are listed in the following pages� If you feel they may allow you to make
better use of your radios, then contact your dealer to discuss� They will be happy to
discuss your specic application and then arrange the required re-programming for a
nominal charge�
•Radio Cloning
Cloning is a function that allows you to copy the original settings of one radio to an-
ot h e r� It is usually done by your dealer but they can arrange to train you, where appropri-
ate, to do it yourself�
6

GTR Scan/Voting Operation
•Scan operation
To scan all the channels your dealer has programmed into the scan list, press but-
ton� The icon will appear on the LCD and you will notice the channel numbers cy-
cling continuously� The radio will stop and stay on a busy channel and will then resume
when stay time has expired� If your radio has scanned a channel on which there is a
party that you want to talk to, you can directly communicate with the party by pressing
the PTT button� To stop scanning, press the button again� Your dealer can set both
scan and pause time�
•Dual watch scan
Dual watch is a function that allows you to scan one or two channels along with one
active channel� Choose the active channel� Keep pressing button till the trigger
time is reached, the radio will begin scanning between the active channel and the dual
watch channel� The GTR provides the following scan types:
1priority channel 4priority channel - emergency channel
2emergency channel 5 emergency channel - lone worker channel
3 lone work channel 6 priority channel - lone work channel
Example when you type 4 it will scan: PRI -> EMG -> ACH -> PRI-> EMG-> ACH->��
PRI=priority channel ; EMG=emergency channel ; ACH= active channel�
Transmit channel while scanning
Your dealer can set the transmit channel while scanning� It means that in the event of
your wishing to transmit while in any scan menu, you will transmit only on the designated
channel� The GTR have a variety of options including: priority channel, home channel,
last busy channel and current busy channel programmed by your dealer�
Home Channel
Press the button continuously until the LCD shows [HOME-On ], press or button
to select On or OFF, or press button to enter the desired home channel by pressing
the or button to select the home channel� This function can be disabled by your
dealer�
Deleting A Nuisance Channel
Allows you to remove temporarily the channels which you don’t want to hear from the
scan list� During scanning, when the radio is locked on a busy channel, press but-
ton to remove this channel from the scan list, and it won’t be scanned until the radio is
turned on again� Care should be taken using this function on mission critical communi-
cation systems� The feature can be disabled by your dealer�
Voting Operation
The GTR radio can be congured for “mobile voting” to allow wide-area multicast
operation. Operation is usually transparent to the user, but can be congured to allow
indication of voted site� Your dealer can advise on how to best utilise this advanced
systems functionality�
7

GTR Menu Selection
•The button can be locked to stop user access in the programming software�
This prevents the following settings being changed by end users� Your dealer is able to
setup the following menu items by the PC programmer�
•Squelch Level
Continue to press the button until the LCD shows [SQUL-3], and then press or
button to increase or decrease squelch level from 0 to 10; 0 means squelch open; 10
means tight squelch� Setting the radio to the tight squelch level avoids unwanted signals
or noise, but you may no longer receive a weak signal� Therefore, it will be better for
you to maintain the normal squelch level (default value: 3)� Press button to save the
setting and to get back to operating mode or press again to gain access to other
settings�
•VOX Sensitivity Level
The VOX feature can be programmed on each channel� If a channel is set with the
VOX feature, icon will ash. Press the button continuously until the LCD shows
[VXL:3]� Press the or button to adjust VOX sensitivity from 0 to 10� 0 means VOX op-
eration is cancelled; 1 means the most sensitive (for very quiet environments); 10 means
the least (for very noisy environment)� Press the button to save the setting and get
back to operating mode or press button again to gain access to other settings�
•Beep
Press the button continuously until the LCD shows [BEEP-On]� Press or button
to turn beep On or Off� Press button to save the setting and get back to operating
mode or press again to gain access to other settings�
•TX Power Selection
Press the button continuously until the LCD shows [PWR-H]� Press or to choose
the output power� H means high power; L means low power� Press button to save
the setting and get back to operating mode or press button again to gain access to
other settings� Using low power increase your battery life but will marginally reduce your
radio range�
•Keypad Lock
There are two kinds of keypad lock/unlock functions: Type 1/ with user access or Type
2/ without. Your dealer can set the front ve buttons to be locked permanently without
user access, or to be temporarily unlocked for access� Locking the keypad can be use-
ful in ensuring that the GTR works at its best for unfamiliar users� Press the button con-
tinuously until the LCD shows [KEY�L:OFF]� Press or button to choose keypad lock:
“OFF” means unlock; “On” means lock� When the keypad is locked, the LCD shows
and only keys on left side still working� Press button to save the setting and get back
to operation menu or press button again to gain access to other settings�
•Keypad Unlock (Type 1)
Press the button for 5 seconds, the button can now be unlocked for 10 seconds� It
will be automatically re-lock again after 10 seconds�
8

GTR dealer programmable functions
•Busy Lock Out :
BCLO (Busy Channel LockOut); BTLO (Busy Tone LockOut)
Lockout type LCD show icon Lockout type LCD show icon
BCLO RBCLO , (ash)
BTLO (ash), , RBTLO ,
BCLO: prevents Tx when the channel is busy with other users� (RBCLO-repeater use)
BTLO: prevents Tx when receiving a signal from your own group� (RBTLO-repeater use)
If the repeater is occupied by others when you press the PTT button, RBCLO/RBTLO will
prevent you from transmitting until the channel is free� Your radio will beep 3 times to let
you know when you are allowed to access the repeater�
Busy Lockout On/Off
Press the button continuously until the LCD shows BCL-On ( or BTL-On, RBTL-On, RBCL-
On), press or button to select On or Off, press button to save the setting and
get back to operating menu or press again to gain access to other settings�
•Burst tone
Burst tone is an alternative means of accessing a repeater, in addition to CTCSS or DCS�
A number of tone burst frequencies are programmable for your desired application�
Burst Tone On/Off
Press the button continuously until the LCD shows [BURST-01], press or button to
select burst tone, press button to save the setting� To activate burst tone, you need
to press button when PTT button is pressed�
•Talk Around
This feature is useful when you are out of the repeater range or the repeater is not ac-
tivated� You can directly communicate with other radios in your group by using the talk
around function� To set talk around, press the button continuously until LCD appear
[TALKARUN ]� Press or button to select [AR-TO-RV],[ AR-TO-TX] or [AR-TO-RX]� Press
button to save setting�
AR-TO-RV( ) means transmission frequency and receiving frequency are reversed�
AR-TO-TX( ) means talk around on transmission frequency�
AR-TO-RX( ) means talk around on receiving frequency�
Talk around operation
Press D key for 3 seconds, the radio will then transmit in accordance with talk around
setting� These functions should only be used after a full discussion with your dealer, mis-
use of these functions can disrupt your radio system or may not be permitted�
•Auto Tx - Remote Monitor
The radio will automatically transmit background audio without user needing to press
PTT when the Emergency function is triggered� The time intervals for auto Tx & Rx modes
are by default 10 secs transmit/10 secs receive� Repeated 3 times� It can be reset through
PC programmer� Turn the radio off and back on to disable auto Tx�
9

•Emergency call
There are siren, revert channel, trigger time, auto VOX on & command code param-
eters that can be set by your dealer. By default the radio is congured to be triggered
by pressing the A key for 3 seconds� Display radios within your group will show the emer-
gency code on their LCD display� When you receive an emergency code, you can
press button to view the caller’s ID if this feature was pre-congured. By default the
radio will also change to channel 16 in an emergency� When you receive an emergency
call, a siren or alerting beep will sound� Press any key to reset�
•Lone worker
Provides a function that requires a user to press any button on their radio at least once
every 15 minutes (programmable)� If the user fails to do so, the radio will send a pre-
programmed emergency call sequence� Before sending the emergency call, a DUDUDU
sound will sound 10 seconds before to remind the user to press any button to re-start the
timer� By default this automatically enabled on Safe 16 on GTR radios�
•5 tone selective calling (Selcall)
You can make a selective call to individuals, a sub-group, or the whole group� If a
channel is programmed with Selcall function, its speaker will be muted until a correct
Selcall is received� Your delaer can enable this feature for a nominal charge�
Group call (Call 1)
To make a group call on a Selcall channel, press the B (Call1) key until the trigger time
is reached, [ALLGROUP] will appear on the LCD and then all recipients of the group will
hear a beep and open their squelch� Your dealer can set these parameters��
Individual or sub-group call (Call 2)
To make a sub-group call or an individual call, on the Selcall channel, press the C
(Call2) key until the trigger time is reached, [SUB�GROUP] or [Name��],will appear on the
LCD , then press or to choose the ID you wish to talk with and then press button
to start� GTR provide 100 call list for individual call�
Receiving a selective call
When the called radio receives a Selcall, its LCD will show the ID of the calling radio�
The called radio will automatically make an acknowledgement call and the speaker
will unmute, a beep will sound and the PTT will be enabled� Both the called and the call-
ing radio can talk for the period of time, which was set-up by the dealer�
•Remote stun - Radio kill
This function allows the radio to be remotely disabled and re-enabled by a GTR con-
gured for xMCU Master Control unit operation. Your dealer can set the Stun and Revive
I�D in the programming software�
•Power on password
Your dealer can set-up a 4 digit password� Every time you turn the radio on, you must
then enter the correct password to operate the radio�
10

GT dealer programmable functions
Ask your dealer about programming your GT series with the following
functions:
The programmable buttons A/B/C/D can be tailored according to your
need�
In general, the radio will beep a “DU” sound when the programmed
function is enabled (by either long press or short press)� Repeat the same
procedure to disable this function, and the radio will beep a “DuDu” sound
as indicator�
1] Priority Call: The radio will shift from the present working channel onto a pre-dened
priority channel�
2] Emergency Siren/Call: Either a siren tone will sound at your own end or an Emergency
code will be sent to others over the radio channel� Emergency Call is enabled by de-
fault and will automatically divert the radio to Channel 16� The cycle repeats 3 times
before returning to normal�
3] Lone Worker: Provides a function that requires a user to press any button on their radio
at least once every 15 minutes (programmable)� If the user fails to do so, the radio will
send a pre-programmed emergency call sequence� Before sending the emergency
call, a DUDUDU sound will sound to remind the user to press any button to re-start the
timer� Press C key for 3 seconds to turn on or turn radio off and back on to disable�
4] Call 1/ Call 2: Transmits pre-set selcall (5 tone, 2 tone, or DTMF)
5] Lock / Unlock: Prevents users from activating some function by accidental� Once
you activate the lock function, buttons C & D will be locked and a beep will sound
sound when you press either� Channel selection knob can also be locked via the PC
programmer�
6] Tx Power Selection: A Du sound indicates low Tx power; a DuDu sound indicates high
Tx power�
7] Whisper: It will increase mic sensitivity to make weak audio at your side to be heard by
others loudly; however, background noise at your side will be increased too�
8] Auto Tx: The radio will automatically transmit background audio without user needing
to press the PTT� The time intervals for auto Tx & Rx modes can be set through PC pro-
grammer� Turn off the radio to disable auto Tx� It is activated by the Emergency func-
tion and is programmed to Transmit for 10 seconds and then receive for 10 seconds�
The cycle repeats 3 times before returning to normal�
9] Voice Privacy/Scrambler: To provide basic protection against users of radio scanners
or others who may be monitoring your channel, the GT incorporates a voice inversion
scrambler to offer more condential communications. Other radios at the same fre-
quency will receive only distorted audio noise� It can be enabled by pressing button C
while turning the radio on� To turn off scrambling turn radio off and back on�
11

Taking care of your radio & rules to know
Your radio will continue to be a valuable work tool with care and attention�
Some general rules are:
Don’t leave your radio in very hot areas like on the car dashboard in summer�
Keep the battery charged when not in use�
Don’t drop or immerse into water - resulting damage can be expensive�
Plan on replacing your battery about every two years�
(Li-Ion batteries usually can only be re-charged about 400-500 times maximum)
Don’t carry the radio by its antenna�
Don’t use as a hammer or a weapon�
Never yell when transmitting�
(Just talk about 2-3cm from microphone in a normal street level voice)�
If you share a channel, never talk over the top of someone else�
Never joke about safety on the radio, nor use words like “mayday” ippantly.
(ACMA or others may pick it up and mount an emergency response)�
Use of Australian UHF CB unlicensed channels:
Users of radios operating on Australian UHF CB channels including On-Site 16 are required by
Government regulations to adhere to a set of requirements when operating on these public
shared radio channels� You should know:
- the citizen band radio service is licensed in Australia under an ACMA Radio communications
(Citizens Band Radio Stations) Class Licence and operation is subject to conditions contained in
those licences�
- in Australia, except in an emergency, a CB transmitter shall not be operated on UHF emergen-
cy CB channels 5 & 35 (note: this is not channel 5 on a GT Radio)� Furthermore, no voice transmis-
sions are permitted on data (telemetry/telecommand) channels 22 and 23�
- always monitor a channel (or observe a channel-busy indicator) to ensure it is not already be-
ing used, before transmitting�
-To prevent interference and congestion on UHF CB repeater channels avoid operation on
channels 1 to 8, 31 to 38, 41-48 and channels 71 to 78 channels unless long-distance communica-
tion via an available UHF CB repeater facility is specically required.
NOTE: In Australia, channel 11 is the customary calling channel for establishing communication
and channel 40 is the customary road vehicle channel�
- Australia is currently changing from 40 wide band CB channels to 80 narrowband channels�
You may hear partially distorted audio if talking with users of old wideband CB 40 CH equip-
ment and they may complain that your voice sounds soft� These situations will decrease as UHF
CB equipment changes from the old 5kHz to the new 2�5kHz modulation� If you own wideband
equipment, we suggest you upgrade now to narrow band and recommend to others to do like-
wise to further expedite the changeover process for the benet of all users.
- the list of currently authorized UHF CB channel frequencies can be obtained from the ACMA
website in Australia� - www�acma�gov�au�
12

© Copyright 2012
This manual suits for next models
1
Table of contents