Wisenet SPD-260B User manual

DECODER BOARD
Installation Manual
SPD-260B

2
IMPORTANT SAFETY INSTRUCTIONS
Read these operating instructions carefully before using the unit.
Follow all the safety instructions listed below.
Keep these operating instructions handy for future reference.
1) Read these instructions.
2) Keep these instructions.
3) Heed all warnings.
4) Follow all instructions.
5) Do not use this apparatus near water.
6) Clean the contaminated area on the product surface with a soft, dry cloth or a damp cloth.
(Do not use a detergent or cosmetic products that contain alcohol, solvents or surfactants or oil
constituents as they may deform or cause damage to the product.)
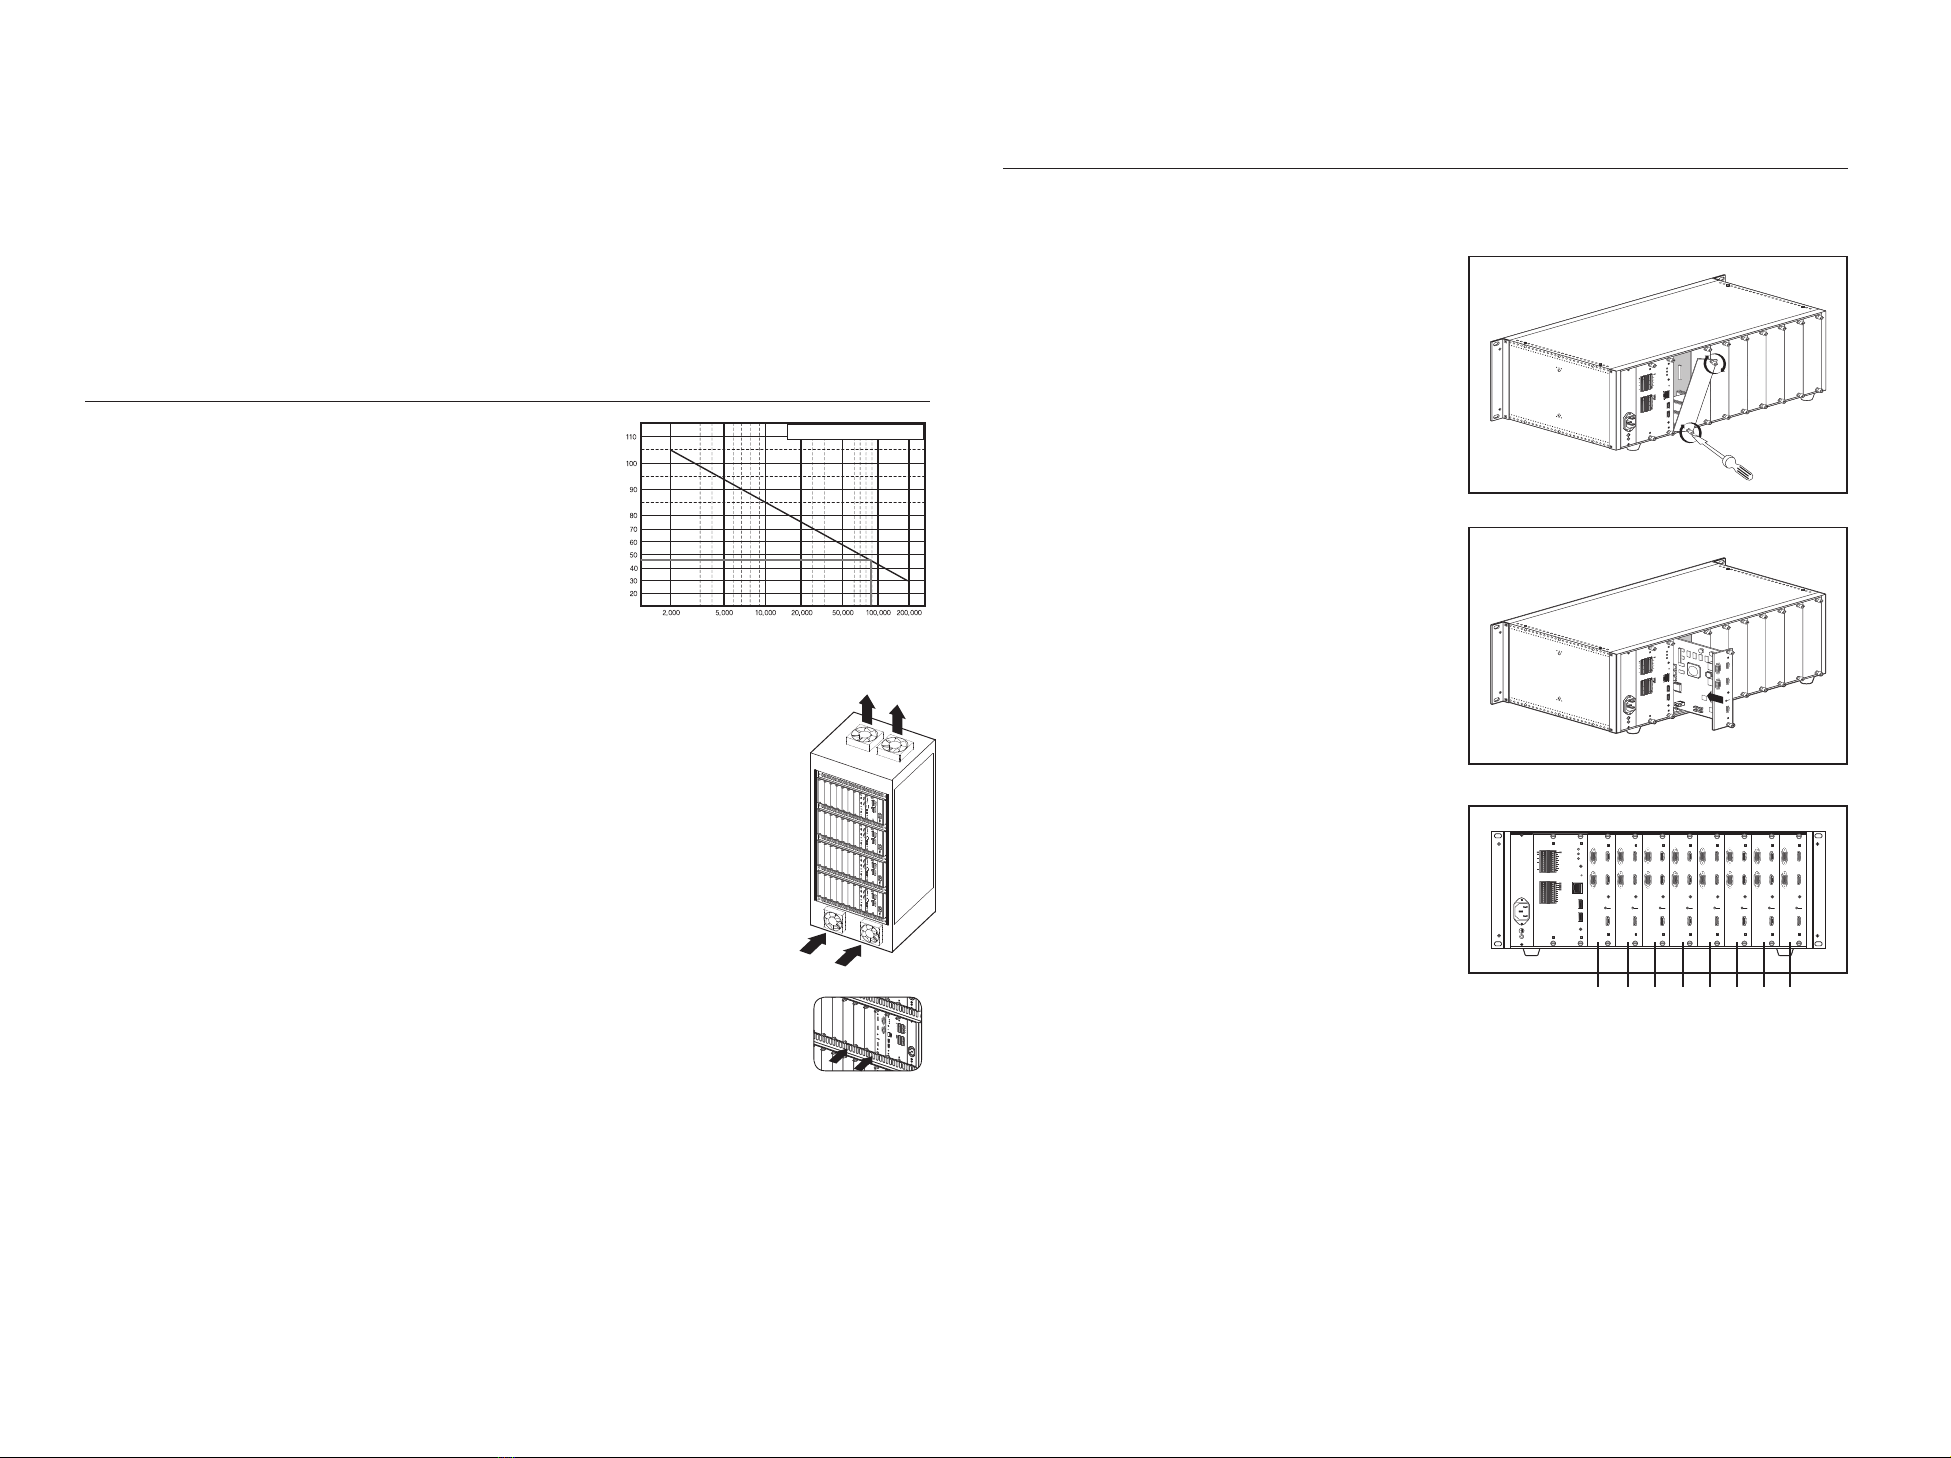
7) Do not block any ventilation openings, Install in accordance with the manufacturer's instructions.
8) Do not install near any heat sources such as radiators, heat registers, stoves, or other apparatus (including
amplifiers) that produce heat.
9) Do not defeat the safety purpose of the polarized or grounding- type plug. A polarized plug has two blades
with one wider than the other. A grounding type plug has two blades and a third grounding prong. The
wide blade or the third prong are provided for your safety. if the provided plug does not fit into your outlet,
consult an electrician for replacement of the obsolete outlet.
10) Protect the power cord from being walked on or pinched particularly at plugs, convenience receptacles,
and the point where they exit from the apparatus.
11) Only use attachments/accessories specified by the manufacturer.
12) Use only with the cart, stand, tripod, bracket, or table specified by the manufacturer,
or sold with the apparatus. When a cart is used, use caution when moving the cart/
apparatus combination to avoid injury from tip-over.
13) Unplug this apparatus during lightning storms or when unused for long periods of
time.
14) Refer all servicing to qualified service personnel. Servicing is required when the
apparatus has been damaged in any way, such as power-supply cord or plug is
damaged, liquid has been spilled or objects have fallen into the apparatus, the apparatus has been
exposed to rain or moisture, does not operate normally, or has been dropped.
Standards Approvals
J `Any changes or modifications in construction of this device which are not expressly approved by the party responsible for
compliance could void the user's authority to operate the equipment.
M
`
This device complies with part 15 of the FCC Rules. Operation is subject to the following two conditions: (1) This device may
not cause harmful interference, and (2) this device must accept any interference received, including interference that may
cause undesired operation.
`
This equipment has been tested and found to comply with the limits for a Class A digital device, pursuant to part 15 of the
FCC Rules. These limits are designed to provide reasonable protection against harmful interference when the equipment is
operated in a commercial environment.
This equipment generates, uses, and can radiate radio frequency energy and, if not installed and used in accordance with the
instruction manual, may cause harmful interference to radio communications. Operation of this equipment in a residential area
is likely to cause harmful interference in which case the user will be required to correct the interference at his own expense.
BEFORE START
This manual provides operational information necessary for using the product and contains a description about each
component part and its function as well as menu or network settings.
You have to keep in mind the following notices :
•
Hanwha Techwin retains the copyright on this manual.
•
This manual cannot be copied without Hanwha Techwin's prior written approval.
•
We are not liable for any or all losses to the product incurred by your use of non-standard product or violation of
instructions mentioned in this manual.
•
Prior to opening the case, please consult a qualified technician first. Whenever this is needed power must be
removed from the unit.
Warning
Battery
It is essential that when changing the battery in the unit, the replacement battery must be of the same type
otherwise there may be a possibility of an explosion.
The following are the specifications of the battery you are using now.
•
Normal voltage : 3V
•
Normal capacity : 210mAh
•
Continuous standard load : 0.4mA
•
Operating temperature : -20°C ~ +60°C
(-4°F ~ +140°F)
Caution
•
Connect the power cord into a grounded outlet.
•
The Mains plug is used as a disconnect device and shall stay readily operable at any time.
•
Batteries shall not be exposed to excessive heat such as sunshine, fire or the like.
•
Risk of Explosion if Battery is replaced by an Incorrect Type. Dispose of Used Batteries According to the
Instructions.
Operating Temperature
The guaranteed operating temperature range of this product is 0°C ~ 40°C (32°F ~ 104°F).
This product may not work properly if you run right after a long period of storage at a temperature below the
guaranteed one.
Prior to using a device that has been stored for a long period in low temperatures, allow the product to stand at
room temperature for a period. Please ensure product is stored under appropriate temperature conditions.
CALIFORNIA USA ONLY
This Perchlorate warning applies only to primary CR (Manganese Dioxide)
Lithium coin cells in the product sold or distributed ONLY in California USA.
"Perchlorate Material - special handling may apply,
See www.dtsc.ca.gov/hazardouswaste/perchlorate."

3
PACKAGE CONTENTS
Please unwrap the product, and place the product on a flat place or in the place to be installed.
Please check the following contents are included in addition to the main unit.
CONSOLERUN
HDMI 2HDMI IN HDMI 1
VGA 2 VGA 1
SPD-260B Installation Manual
PART NAMES AND FUNCTIONS
Part Names Functions
a
HDMI IN HDMI video input terminal.
b
RUN Shows the operation status.
c
CONSOLE This is a device for after-sales service.
d
HDMI 1/2
HDMI connector port.
`HDMI 1 (Maximum supported resolution : 2160P)
`HDMI 2 (Maximum supported resolution : 1080P)
e
VGA 1/2 VGA Video Signal Output Port.
`Maximum supported resolution 1080P
f
Jack connector This terminal connects the blade to the rack when plugged into the blade (SPD-260B) block.
CONSOLERUN
HDMI 2HDMI IN HDMI 1
VGA 2 VGA 1
a b c d
e
f
Correct Disposal of This Product (Waste Electrical & Electronic Equipment)
(Applicable in the European Union and other European countries with separate collection systems)
This marking on the product, accessories or literature indicates that the product and its electronic accessories (e.g. charger, headset, USB
cable) should not be disposed of with other household waste at the end of their working life. To prevent possible harm to the environment
or human health from uncontrolled waste disposal, please separate these items from other types of waste and recycle them responsibly
to promote the sustainable reuse of material resources.
Household users should contact either the retailer where they purchased this product, or their local government office, for details of
where and how they can take these items for environmentally safe recycling.
Business users should contact their supplier and check the terms and conditions of the purchase contract. This product and its electronic
accessories should not be mixed with other commercial wastes for disposal.
Correct disposal of batteries in this product
(Applicable in the European Union and other European countries with separate battery return systems.)
This marking on the battery, manual or packaging indicates that the batteries in this product should not be disposed of with other household waste at the end of their
working life. Where marked, the chemical symbols Hg, Cd or Pb indicate that the battery contains mercury, cadmium or lead above the reference levels in EC Directive
2006/66. If batteries are not properly disposed of, these substances can cause harm to human health or the environment.
To protect natural resources and to promote material reuse, please separate batteries from other types of waste and recycle them through your local, free battery
return system.
Hanwha Techwin cares for the environment at all product manufacturing stages, and is taking measures to provide
customers with more environmentally friendly products.
The Eco mark represents Hanwha Techwin's devotion to creating environmentally friendly products, and indicates
that the product satisfies the EU RoHS Directive.

4
Please take note of the followings before using this product.
•
Do not use the product outdoor.
•
Do not spill water or liquid in the connection part of the product.
•
Do not impose the system to excessive shock or force.
•
Do not pull out the power plug forcefully.
•
Do not disassemble the product on your own.
•
Do not exceed the rated input/output range.
•
Use a certified power cord only.
•
For the product with an input ground, use a grounded power plug.
CHECKING THE INSTALLATION ENVIRONMENT
Note that an excessive internal temperature of the product may
cause a system failure or a shortened product life (see the right
figure). Keep in mind the following instructions before installing
the product.
When mounting the product on a rack, comply with the following instructions.
1. Please ensure that the rack inside is not sealed.
2. Please ensure the air is circulated through the inlet/outlet as shown in the picture.
3. If you pile up the prudcts or other rack-mount devices as shown in figure 2, secure room for
ventilation or install a vent.
4. For natural air convection, place the inlet at the bottom of the rack and the outlet on top.
5. It is strongly recommended that a fan motor is installed at the inlet and the outlet for air
circulation. (Please fit a filter at the inlet to screen dust or foreign substances.)
6. Please maintain the temperature inside the rack or surrounding areas between 0°C ~ 40°C
(32°F ~ 104°F) as shown in the figure 1.
Rack Mount Instructions - The following or similar rack-mount instructions are included with
the installation instructions :
A) Elevated Operating Ambient - If installed in a closed or multi-unit rack assembly, the
operating ambient temperature of the rack environment may be greater than room
ambient. Therefore, consideration should be given to installing the equipment in an
environment compatible with the maximum ambient temperature (Tma) specified by the
manufacturer.
B) Reduced Air Flow - Installation of the equipment in a rack should be such that the amount of air flow required
for safe operation of the equipment is not compromised.
C) Mechanical Loading - Mounting of the equipment in the rack should be such that a hazardous condition is
not achieved due to uneven mechanical loading.
D) Circuit Overloading - Consideration should be given to the connection of the equipment to the supply circuit
and the effect that overloading of the circuits might have on overcurrent protection and supply wiring.
Appropriate consideration of equipment nameplate ratings should be used when addressing this concern.
E) Reliable Earthing - Reliable earthing of rack-mounted equipment should be maintained. Particular attention should
be given to supply connections other than direct connections to the branch circuit (e.g. use of power strips).
One Year: 24HR X 365 DAY =8,760 HR
Temperature
Unit: ºC
Life (Unit: HOURS)
[Figure 1]
CONSOLERUN
HDMI 2HDMI IN HDMI 1
VGA 2 VGA 1
G
RS485
G
1 2 3 4 5 6 7 8 910
111213 14 15 16
NO NONO NO
COM
NO
COM
NO
COM
NO
COM
NO
COM
RESET
COMCOMCOM
NC
G
G
NATWORK
NETWORK RUN POWER
USB 1 USB 2
AUDIO CONSOLE
RESET
CONSOLERUN
HDMI 2HDMI IN HDMI 1
VGA 2 VGA 1
G
RS485
G
1 2 3 4 5 6 7 8 910
111213 14 15 16
NO NONO NO
COM
NO
COM
NO
COM
NO
COM
NO
COM
RESET
COMCOMCOM
NC
G
G
NATWORK
NETWORK RUN POWER
USB 1 USB 2
AUDIO CONSOLE
RESET
CONSOLERUN
HDMI 2HDMI IN HDMI 1
VGA 2 VGA 1
G
RS485
G
1 2 3 4 5 6 7 8 910
111213 14 15 16
NO NONO NO
COM
NO
COM
NO
COM
NO
COM
NO
COM
RESET
COMCOMCOM
NC
G
G
NATWORK
NETWORK RUN POWER
USB 1 USB 2
AUDIO CONSOLE
RESET
CONSOLERUN
HDMI 2HDMI IN HDMI 1
VGA 2 VGA 1
G
RS485
G
1 2 3 4 5 6 7 8 910
111213 14 15 16
NO NONO NO
COM
NO
COM
NO
COM
NO
COM
NO
COM
RESET
COMCOMCOM
NC
G
G
NATWORK
NETWORK RUN POWER
USB 1 USB 2
AUDIO CONSOLE
RESET
[Figure 2]
CONSOLERUN
HDMI 2HDMI IN HDMI 1
VGA 2 VGA 1
G
RS485
G
12 3 4 5 6 7 8 910
1112131415 16
NO NONO NO
COM
NO
COM
NO
COM
NO
COM
NO
COM
RESET
COMCOMCOM
NC
G
G
NATWORK
NETWORKRUN POWER
USB 1 USB 2
AUDIO CONSOLE
RESET
CONSOLERUN
HDMI 2HDMI IN HDMI 1
VGA 2 VGA 1
G
RS485
G
12 3 4 5 6 7 8 910
1112131415 16
NO NONO NO
COM
NO
COM
NO
COM
NO
COM
NO
COM
RESET
COMCOMCOM
NC
G
G
NATWORK
NETWORKRUN POWER
USB 1 USB 2
AUDIO CONSOLE
RESET
CONSOLERUN
HDMI 2HDMI IN HDMI 1
VGA 2 VGA 1
G
RS485
G
12 3 4 5 6 7 8 910
1112131415 16
NO NONO NO
COM
NO
COM
NO
COM
NO
COM
NO
COM
RESET
COMCOMCOM
NC
G
G
NATWORK
NETWORKRUN POWER
USB 1 USB 2
AUDIO CONSOLE
RESET
CONSOLERUN
HDMI 2HDMI IN HDMI 1
VGA 2 VGA 1
G
RS485
G
12 3 4 5 6 7 8 910
1112131415 16
NO NONO NO
COM
NO
COM
NO
COM
NO
COM
NO
COM
RESET
COMCOMCOM
NC
G
G
NATWORK
NETWORKRUN POWER
USB 1 USB 2
AUDIO CONSOLE
RESET
HOW TO INSTALL THE SPD-260B IN THE SPD-1660R
J `Turn off the SPD-1660R and install the blade (SPD-260B).
1. Unscrew both sides of the cover on the SPD-1660R blade
(SPD-260B) mounting slot.
2. Insert the blade (SPD-260B) into the slide grooves on both
sides as shown in the figure, and push it in the direction of
the arrow.
3. Slide the blade (SPD-260B) into the rack until the ends of
the rack are aligned and tighten the screws.
M
`This is applied when all the blades (SPD-260B) are
installed.
`Mount the blade (SPD-260B) in order from left (Figure 1).
G
RS485
G
1 2 3 4 5 6 7 8 9 10
1112 13 14 15 16
NO NO NO NO
COM
NO
COM
NO
COM
NO
COM
NO
COM
RESET
COMCOM COM
NC
G
G
NETWORK
NETWORK RUN POWER
USB 1 USB 2
AUDIO CONSOLE
RESET
CONSOLERUN
HDMI 2HDMI IN HDMI 1
VGA 2 VGA 1
G
RS485
G
1 2 3 4 5 6 7 8 9 10
1112 13 14 15 16
NO NO NO NO
COM
NO
COM
NO
COM
NO
COM
NO
COM
RESET
COMCOM COM
NC
G
G
NETWORK
NETWORK RUN POWER
USB 1 USB 2
AUDIO CONSOLE
RESET
G
RS485
G
1 2 3 4 5 6 7 8 9 10
1112 13 14 15 16
NO NO NO NO
COM
NO
COM
NO
COM
NO
COM
NO
COM
RESET
COM COM COM
NC
G
G
NETWORK
NETWORK RUN POWER
USB 1 USB 2
AUDIO CONSOLE
RESET
CONSOLERUN
HDMI 2HDMI IN HDMI 1
VGA 2 VGA 1
CONSOLERUN
HDMI 2HDMI IN HDMI 1
VGA 2 VGA 1
CONSOLERUN
HDMI 2HDMI IN HDMI 1
VGA 2 VGA 1
CONSOLERUN
HDMI 2HDMI IN HDMI 1
VGA 2 VGA 1
CONSOLERUN
HDMI 2HDMI IN HDMI 1
VGA 2 VGA 1
CONSOLERUN
HDMI 2HDMI IN HDMI 1
VGA 2 VGA 1
CONSOLERUN
HDMI 2HDMI IN HDMI 1
VGA 2 VGA 1
CONSOLERUN
HDMI 2HDMI IN HDMI 1
VGA 2 VGA 1
a b c d e f g h

5
PRODUCT OVERVIEW
unit : mm (inches)
PRODUCT SPECIFICATION
Item Details
H/W
Video output
HDMI 2 (1: Up to 4K, 1: Up to 1080P)
VGA 2 (up to 1080P)
Format
HDMI1 : 3840*2160@60HZ/30HZ, 2560*1440@60HZ/30HZ,
1920*1080@60HZ
1280*1024@60H, 1280*720@60Hz
HDMI2 : 1920*1080@60HZ, 1280*1024@60H,
1280*720@60Hz
VGA1/VGA2 : 1920*1080@60HZ, 1280*1024@60H,
1280*720@60Hz
Video input
HDMI 1ea
Format 1920*1080@60Hz, 1280*720@60Hz
LED Decoding Operation
Electrical
Power 12V/5V/3.3V
Power Consumption Max. 9W
Environmental
Operating Temperature +0°C to +40°C (+32°F to +104°F)
Humidity 20% ~ 85% RH
Mechanical
Dimension (WxHxD) W173.6 X H40.4 X D158.9 (mm) (6.83" x 1.59" x 6.26")
Weight 284g
S/W
Video
Compression method H.265/H.264/MJPEG
Maximum supported
resolution
12MP(4000x3000), 8MP(4096x2160), 5M(2592x1944),
3M(2048x1536), 2M(1920x1080, 1600x1200), 1.3M and below
(1280x1024, 1280x960, 1280x720, 800x600, 720x576,
704x576, 640x480, 640x360, 352x288, 320x240, 320x180,
176x144), Hallway mode (1080x1920,720x1280)
Display performance 4CH 4K@30fps, 16CH 2M(1080P)@30fps
Decoding Rate 30fps@8MP, up-to 12MP
Split screen (HDMI) 1/4/6/8/9/13/16/2V/3V/2
※VGA is output on the same screen as HDMI
Layout Supports up to 20 per monitor. Supports sequence.
Audio Codec G.711/G.726/AAC

Head Oce
6, Pangyo-ro 319 beon-gil, Bundang-gu, Seongnam-si,
Gyeonggi-do, 463-400 Rep. of KOREA
Tel : +82.70.7147.8753 Fax : +82.31.8018.3740
www.hanwha-security.com
Hanwha Techwin America
500 Frank W. Burr Blvd. Suite 43 Teaneck, NJ 07666
Toll Free +1.877.213.1222 Direct +1.201.325.6920
Fax +1.201.373.0124
www.hanwha-security.com
Hanwha Techwin Europe
Heriot House, Heriot Road, Chertsey, Surrey, KT16 9DT, United Kingdom
Tel +44.1932.57.8100 Fax +44.1932.57.8101
www.hanwha-security.eu
Table of contents
Other Wisenet Media Converter manuals

Wisenet
Wisenet SPE-420 User manual

Wisenet
Wisenet SPE-110A User manual

Wisenet
Wisenet TMC-F Series User manual

Wisenet
Wisenet TMC-GSFP Series User manual

Wisenet
Wisenet SPE-410 User manual

Wisenet
Wisenet SPE-1630 User manual

Wisenet
Wisenet SPD-150 Installation guide

Wisenet
Wisenet SPE-420 User manual

Wisenet
Wisenet SPE-110 User manual