WMF STELIO User manual

Kaffeemühle Edition
STELIO
Gebrauchsanweisung 4
Operating Manual 8
Mode d’emploi 14
Istruzioni per l’uso 18
Instrucciones de uso 22
de
en
fr
it
es
nl
da
sv
no
Gebruiksaanwijzing 26
Brugsanvisning 30
Användarguide 34
Käyttöohje 38
Bruksanvisning 42

2
A B
2
3
6
7
8
4
5
1

3
Aufbau Kaffeemühle
1 - Bohnenbehälterdeckel
2 - Mahlwerk
3 - Bohnenbehälter
4 - Start-/Stopptaste
5 - Portionswahl-Drehknopf
6 - Mahlgrad-Drehknopf
7 - Auffangbehälterdeckel
8 - Auffangbehälter
Layout Coffee Grinder
1 - Bean hopper lid
2 - Grinding mechanism
3 - Bean hopper
4 - On/off button
5 - Portion selection switch
6 - Grinding setting control knob
7 - Collection container lid
8 - Collection container
Montage Moulin à café
1 - Couvercle du récipient à grains
2 - Moulin
3 - Récipient à grains
4 - Touche marche/arrêt
5 - Sélecteur de portions
6 - Bouton rotatif de degré de mouture
7 - Couvercle du récipient collecteur
8 - Récipient collecteur
Struttura Molinillo de Cafè
1 - Coperchio del serbatoio per chicchi
2 - Meccanismo di macinazione
3 - Serbatoio per chicchi
4 - Tasto di avvio/arresto
5 - Interruttore porzioni
6 - Manopola del grado di macinazione
7 - Coperchio del recipiente di raccolta
8 - Recipiente di raccolta
Componentes Macinacaffè
1 - Tapa del recipiente de granos
2 - Mecanismo de molido
3 - Recipiente de granos
4 - Tecla inicio/parada
5 - Conmutador selector de porciones
6 - Perilla giratoria de selección de grado de molido
7 - Tapa del recipiente colector
8 - Recipiente colector
Onderdelen Koffiemolen
1 - Deksel van het bonenreservoir
2 - Maalmechanisme
3 - Bonenreservoir
4 - Start/stop-knop
5 - Doseerkeuzeschakelaar
6 - Draaiknop voor de malingsgraad
7 - Deksel van opvangreservoir
8 - Opvangreservoir
Apparatets dele kaffemølle
1 - Bønnebeholderens låg
2 - Kværn
3 - Bønnebeholder
4 - Start-/Stopknap
5 - Portionsvælger
6 - Drejeknappen til valg af formaling
7 - Opsamlingsbeholderens låg
8 - Opsamlingsbeholder
Konstruktion Kaffekvarnen
1 - Lock till bönbehållare
2 - Kvarnverk
3 - Bönbehållare
4 - Start-och stoppknapp
5 - Portionsväljare
6 - Vredet för malningsgrad
7 - Lock till uppsamlingsbehållare
8 - Uppsamlingsbehållare
Laitteen osat kahvimylly
1 - Papusäiliön kansi
2 - Mylly
3 - Papusäiliö
4 - Käynnistys-/pysäytysnäppäin
5 - Annosmäärän valitsin
6 - Jauhatusaste kiertosäätimellä
7 - Keräysastian kansi
8 - Keräysastia
Deler kaffekvernen
1 - Bønnebeholderlokk
2 - Kvern
3 - Bønnebeholder
4 - Start- og stoppknapp
5 - Porsjonsvalgbryter
6 - Malegradeknappen
7 - Oppsamlingsbeholderlokk
8 - Oppsamlingsbeholder

4
Gebrauchsanweisung
Wichtige Sicherheitshinweise
▪ Das Gerät nur gemäß dieser Anleitung verwenden. Unsachgemäßer
Gebrauch kann Stromschlag oder andere Gefahrenmomente zur
Folge haben.
▪ Geräte können von Personen mit reduzierten physischen, senso-
rischen oder mentalen Fähigkeiten oder Mangel an Erfahrung und/
oder Wissen benutzt werden, wenn sie beaufsichtigt oder bezüglich
des sicheren Gebrauchs des Gerätes unterwiesen wurden und die
daraus resultierenden Gefahren verstanden haben.
▪ Dieses Gerät sollte nicht von Kindern benutzt werden. Das Gerät
und seine Anschlussleitung ist von Kindern fernzuhalten.
▪ Kinder sollten beaufsichtigt werden, um sicherzustellen, dass sie
nicht mit dem Gerät spielen.
▪ Das Gerät ist bei nicht vorhandener Aufsicht, bei Störung während
des Betriebs und vor dem Zusammenbau, dem Auseinandernehmen
oder Reinigen stets durch Ziehen des Netzsteckers vom Netz zu
trennen.
▪ Wenn die Netzanschlussleitung dieses Gerätes beschädigt wird,
muss sie durch den Hersteller oder seinen Kundendienst oder eine
ähnlich qualifizierte Person ersetzt werden, um Gefährdungen zu
vermeiden.
▪ Reinigen Sie nach Verwendung des Gerätes und des Zubehöres alle
Flächen/Teile, die mit Nahrungsmitteln in Berührung gekommen
sind. Bitte befolgen Sie die Hinweise im Kapitel „Reinigung und
Pflege“.
▪ Dieses Gerät ist dafür bestimmt, im Haushalt und ähnlichen Anwen-
dungen verwendet zu werden, wie beispielsweise:
⋅in Küchen für Mitarbeiter in Läden, Büros und anderen gewerb-
lichen Bereichen;
⋅in landwirtschaftlichen Anwesen;
⋅von Kunden in Hotels, Motels und anderen Wohneinrichtungen;
⋅in Frühstückspensionen.

5
dede
Vor dem Benutzen
Bitte lesen Sie die Gebrauchsanweisung aufmerksam. Sie enthält wichtige Hinweise für den Gebrauch,
die Sicherheit und die Wartung des Gerätes. Sie soll sorgfältig aufbewahrt und gegebenenfalls an
Nachbenutzer weitergegeben werden. Das Gerät darf nur für den vorgesehenen Zweck gemäß dieser
Gebrauchsanweisung verwendet werden. Bitte beachten Sie beim Gebrauch die Sicherheitshinweise.
Technische Daten
Nennspannung: 220-240 V~ 50-60 Hz
Leistungsaufnahme: 110 W
Schutzklasse: II
Sicherheitshinweise
▪ Dieses Gerät ist nur für Kaffeebohnen geeignet.
▪ Die maximale Füllmenge des Bohnenbehälters beträgt 150 g.
Achtung! Wird der Auffangbehälter überfüllt, könnte das Gerät verstopfen. Deshalb den Auffangbe-
hälter rechtzeitig leeren.
▪ Die Anschlussleitung nicht über scharfe Kanten ziehen oder einklemmen, nicht herunterhängen
lassen sowie vor Hitze und Öl schützen.
▪ Das Gerät nicht auf heiße Oberflächen wie Herdplatten o. Ä. stellen und nicht in der Nähe offener
Flammen betreiben.
▪ Den Netzstecker nicht an der Leitung oder mit nassen Händen aus der Steckdose ziehen.
▪ Das Gerät nicht in Betrieb nehmen bzw. sofort Netzstecker ziehen, wenn:
⋅Gerät oder Netzkabel beschädigt ist,
⋅der Verdacht auf einen Defekt nach einem Sturz o. Ä. besteht.
In diesen Fällen das Gerät zur Reparatur geben.
▪ Das Gerät nicht in Wasser tauchen.
▪ Bei Zweckentfremdung, falscher Bedienung oder nicht fachgerechter Reparatur wird keine Haftung
für eventuelle Schäden übernommen. Ebenso sind Garantieleistungen in solchen Fällen ausge-
schlossen.
▪ Das Gerät ist nicht für den gewerblichen Gebrauch bestimmt.
Inbetriebnahme
▪ Vor der Erstbenutzung alle Verpackungsteile entfernen und das Gerät gründlich reinigen
(siehe Kapitel „Reinigung und Pflege“).
▪ Den Auffangbehälter (8) mit Deckel (7) in das Gerät einschieben, bis dieser hörbar einrastet.
▪ Nehmen Sie den Deckel des Bohnenbehälters (1) ab und befüllen Sie diesen mit der gewünschten
Kaffeebohnensorte und -menge (max. 150 g).
Achtung! Diese Kaffeemühle ist ausschließlich zum Mahlen von Kaffeebohnen geeignet. Die
Verwendung anderen Mahlgutes, wie z.B. gefriergetrockneten oder karamellisierten Kaffeeboh-
nen, Mohn, Nüssen, Zucker usw., gilt als unsachgemäßer Gebrauch und führt zum Verlust Ihrer
Garantieansprüche.
▪ Setzen Sie den Deckel wieder auf den Bohnenbehälter.
▪ Stellen Sie den gewünschten Mahlgrad ein (siehe Kapitel „Mahlgrad“).
▪ Wählen Sie die gewünschte Tassenmenge mit dem Portionswahl-Drehknopf (5). Sie können zwi-
schen 2 bis 10 Tassen auswählen.
Hinweis: Die Tassenangaben auf dem Portionswahl-Drehknopf (5) dienen nur zur Orientierung.
Unterschiedliche Kaffeesorten, Tassengröße, Wasserhärte und auch der persönliche Geschmack
können eine andere Einstellung notwendig machen.
▪ Den Netzstecker an eine Steckdose anschließen.

6
▪ Der Mahlvorgang beginnt nach dem Drücken der Start-/Stopptaste (4).
▪ Ist die eingestellte Kaffeemenge gemahlen, schaltet die Mühle automatisch ab. Der Mahlvorgang
kann jederzeit durch nochmaliges Drücken der Start-/Stopptaste (4) abgebrochen werden.
Wichtiger Hinweis: Sollte das Mahlwerk nicht anlaufen, könnte der Motor durch eingeklemmte
Bohnen blockiert sein. In diesem Fall einen höheren Mahlgrad einstellen (siehe Kapitel „Mahlgrad“).
Nach dem Anlaufen kann bei laufendem Motor sofort auf den gewünschten Mahlgrad zurückge-
stellt werden.
▪ Achten Sie darauf, dass der Motor zum Stillstand gekommen ist, bevor Sie den Auffangbehälter (8)
entnehmen. Dafür den Behälter nach vorne herausziehen. Um die statische Aufladung zu verrin-
gern, klopfen Sie leicht gegen den Auffangbehälter (8), bevor Sie den Behälterdeckel abnehmen.
Tipp: Um Aromaverluste zu vermeiden, sollte nur für den sofortigen Verbrauch gemahlen werden. Die
frischen Kaffeebohnen, sowie überschüssiges Kaffeemehl können Sie in einem luftdicht schließenden
Behälter aufbewahren.
Achten Sie darauf, dass die Bohnenzufuhr während des Mahlens nicht unterbrochen wird. Stellen Sie
dafür sicher, dass sich genügend Kaffeebohnen im Bohnenbehälter befinden. Sollten die Kaffeebohnen
nicht gleichmäßig in das Mahlwerk geführt werden, können Sie leicht von außen gegen den Bohnen-
behälter klopfen, damit die Bohnen nachrutschen können.
Mahlgrad
Sie können zwischen 17 verschiedenen Mahlgradstufen - von fein bis grob - auswählen. Mit dem
Mahlgrad-Drehknopf (6) können Sie den gewünschten Mahlgrad einstellen: z.B. für Filterkaffeema-
schinen eine feinere, für Handaufbrühung und French Press eine gröbere Einstellung. Als Faustregel
gilt: Je kürzer die Kontaktzeit mit heißem Wasser, desto feiner sollte der Kaffee sein. Kaffeegeschmack
und -stärke sind persönliche Vorlieben. Probieren Sie daher aus, welche Art von Kaffeebohnen, Kaffee-
menge und Mahlgradeinstellung für Sie richtig ist.
Die Einstellung sollte vor dem Einfüllen der Kaffeebohnen erfolgen, da sonst im
Mahlwerk eingeklemmte Bohnen das Anlaufen des Motors verhindern könnten.
Wichtig: Stellen Sie bei Blockade des Motors einen höheren Mahlgrad ein. Nachdem die eingeklemmte
Bohne sich gelöst hat, kann bei laufendem Motor auf den gewünschten Mahlgrad zurückgestellt
werden. Während des Mahlens kann bei laufendem Motor die Einstellung jederzeit verändert werden.
Reinigung und Pflege
Achtung! Vor dem Reinigen den Netzstecker ziehen. Das Gerät keinesfalls in Wasser tauchen, sondern
außen nur mit einem feuchten Tuch abwischen. Keine scheuernden Reinigungsmittel verwenden.
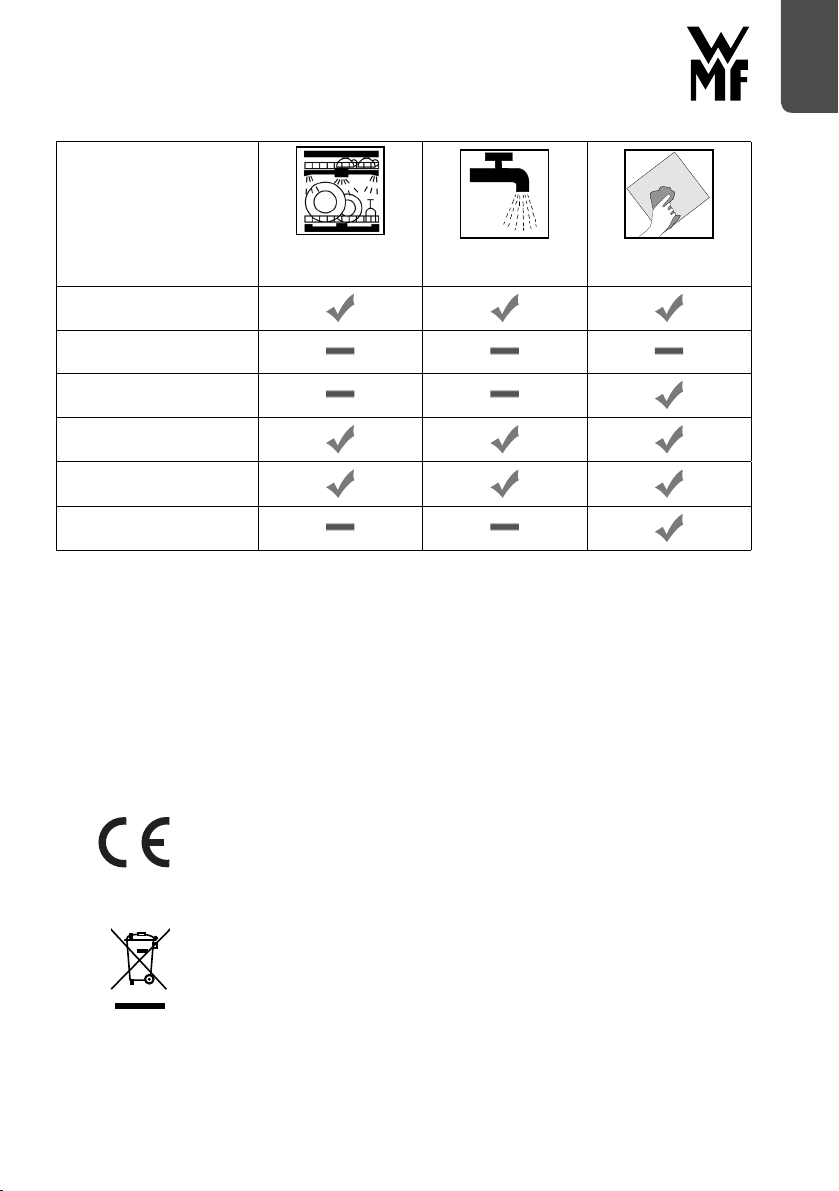
▪ Reinigen Sie den Auffangbehälter (8), dessen Deckel (7) und den Bohnenbehälterdeckel (1) mit
einem milden Spülmittel unter warmen Wasser. Vor dem Einsetzen müssen alle Teile getrocknet
sein.
Hinweis: Der Auffangbehälter (8), Auffangbehälterdeckel (7) und Bohnenbehälterdeckel (1) sind
auch spülmaschinengeeignet.
▪ Das Gehäuse mit einem leicht angefeuchteten Tuch abwischen und anschließend trockenreiben.
▪ Zur Reinigung des Bohnenbehälters (3) die restlichen Bohnen entfernen und mit einem feuchten
Tuch auswischen.
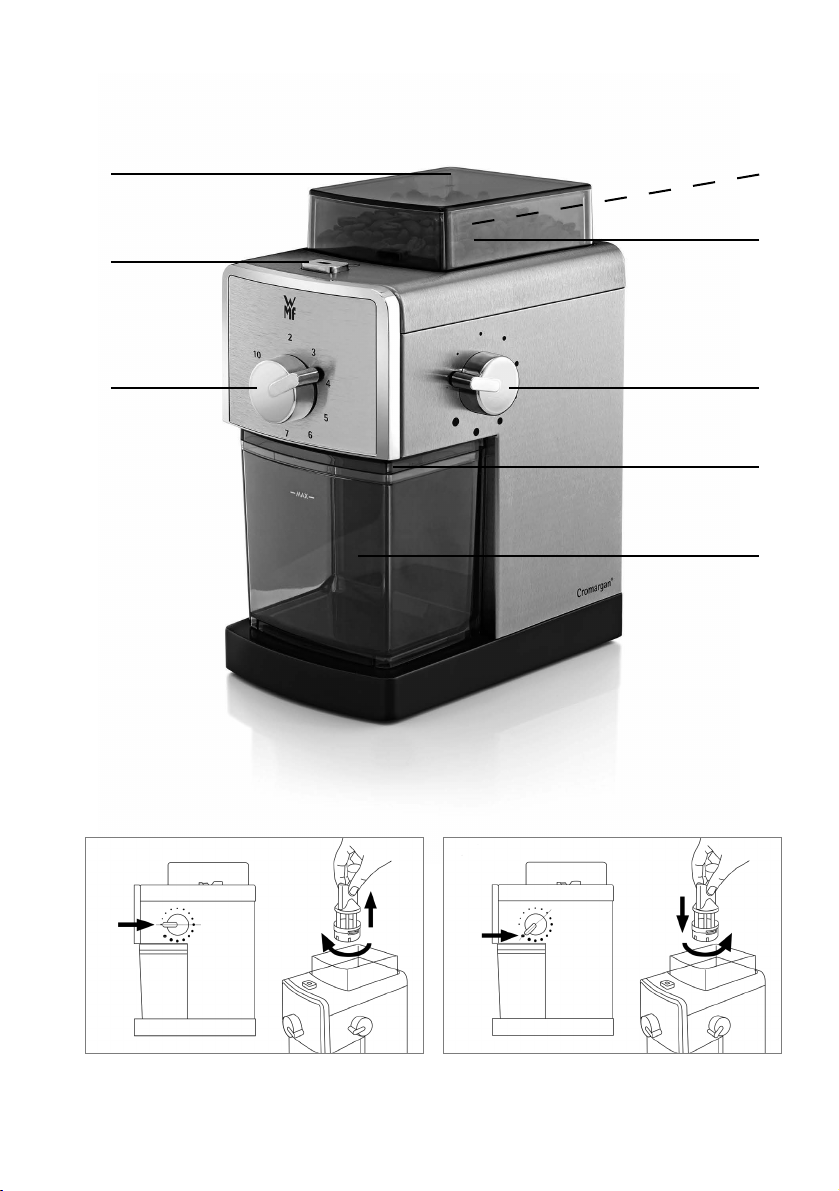
▪ Säubern Sie das Mahlwerk mit einer weichen Bürste. Hierfür entnehmen Sie die obere Mahlscheibe.
Stellen Sie den Mahlgrad-Drehknopf (6) auf die feinste Stufe . Drehen Sie die obere Mahlscheibe im
Uhrzeigersinn bis zum Anschlag und entnehmen Sie diese nach oben aus dem Behälter heraus (Abb A).
▪ Zum Einsetzen der oberen Mahlscheibe (2) stellen Sie den Mahlgrad-Drehknopf (6) auf die gröbste
Stufe . Setzen Sie die obere Mahlscheibe in den Bohnenbehälter und drehen Sie diese gegen den
Uhrzeigersinn bis zum Anschlag (Abb B).

7
de
spülmaschinen-
geeignet
unter fließendem
Wasser abspülbar
feucht abwischen
Bohnenbehälterdeckel (1)
Mahlwerk (2)
Bohnenbehälter (3)
Auffangbehälterdeckel (7)
Auffangbehälter (8)
Gerätegehäuse
Garantie-Information
Für unsere Geräte übernehmen wir gegenüber dem Endkunden eine 24-monatige
Haltbarkeitsgarantie. Sie beginnt mit dem Kauf des Gerätes durch den Endkun-
den und gilt im Gebiet der Bundesrepublik Deutschland. Ansprüche aus dieser
Garantie sind unter Vorlage des Kaufbelegs direkt gegenüber unserem zentralen
Kundendienst geltend zu machen.
Von der Garantie ausgeschlossen sind Schäden durch normalen Verschleiß,
unsachgemäßen Gebrauch sowie unterbliebene Pflege.
Der Endkunde besitzt zusätzlich zu den Ansprüchen aus dieser Garantie gesetz-
liche Ansprüche wegen Mängeln des Gerätes gegenüber seinem direkten Verkäu-
fer/Händler, die durch diese Garantie nicht eingeschränkt werden.
Das Gerät entspricht den Europäischen Richtlinien 2014/35/EG, 2014/30/EG und
2009/125/EG.
Dieses Produkt darf am Ende seiner Lebensdauer nicht über den normalen
Haushaltsabfall entsorgt werden, sondern muss an einem Sammelpunkt für das
Recycling von elektrischen und elektronischen Geräten abgegeben werden.
Die Werkstoffe sind gemäß ihrer Kennzeichnung wiederverwertbar. Mit der Wie-
derverwendung, der stofflichen Verwertung oder anderen Formen der Verwertung
von Altgeräten leisten Sie einen wichtigen Beitrag zum Schutze unserer Umwelt.
Bitte erfragen Sie bei der Gemeindeverwaltung die zuständige Entsorgungsstelle.
Änderungen vorbehalten

8
Operating Manual
Important Safety Instructions
▪ Only use the appliance in accordance with these instructions.
Improper use can result in electric shocks and other hazards.
▪ Devices may be used by persons with reduced physical, sensory or
mental capacity or little experience and/or knowledge if they are
supervised or trained in how to use the equipment safely. After this
they must have understood the resulting risks.
▪ This device shall not be used by children. The device and its cable
must be kept out of the reach of children.
▪ Children should be supervised to ensure that they do not play with
the device.
▪ The device must always be unplugged from the mains during ins-
pection, in the event of an operating malfunction and prior to
assembly, disassembly or cleaning.
▪ If the device cable is damaged, it must be replaced by the manufac-
turer, its customer service team or another similarly qualified person
to avoid hazards.
▪ After using the appliance and accessories, clean all surfaces / parts
that have come into contact with food. Please follow the instruc-
tions in the “Cleaning and care” section.
▪ This appliance is designed for use in households and similar envi-
ronments, such as:
⋅ staff kitchen areas in shops, offices and other working
environments;
⋅ farm houses;
⋅ by guests at hotels, motels and other residential facilities;
⋅ bed and breakfast establishments.

9
en
Prior to use
Please read the instruction manual carefully. It contains important information about using the
device, as well as safety and maintenance advice. Please store it carefully and if necessary pass it on to
subsequent users. The device should only be used for its designated purpose in accordance with these
usage instructions. Please pay attention to the safety instructions during use.
Technical data
Rated voltage: 220-240 V~ 50-60 Hz
Power consumption: 110 W
Protection class: II
Safety information
▪ This appliance is only suitable for coffee beans.
▪ The bean hopper’s maximum filling quantity is 150 g.
Warning! If collection container for the coffee powder is overfilled, the device could stop. Therefore
empty the collection container in good time.
▪ Do not pull or clamp the cable across sharp edges. Do not allow it to hang down and protect it
from heat and oil.
▪ Do not place the device on hot surfaces such as hotplates etc, and do not operate close to naked
flames.
▪ Do not remove the plug from the socket by the cable or with wet hands.
▪ Cease operating the device and unplug it immediately if:
⋅ the device or the mains cable is damaged;
⋅ you suspect a defect after dropping the device etc.
In these instances send the device for repair.
▪ Do not immerse the device in water.
▪ No liability is assumed for possible damage through misappropriation, incorrect operation or
negligent repair. Furthermore warranty payments are excluded in such events.
▪ The device is not suitable for commercial use.
Start-up
▪ Remove all packaging and thoroughly clean the appliance prior to first use (see “Cleaning and care”
section).
▪ Slide the collection container (8) with lid (7) into the appliance until you hear it lock into place.
▪ Remove the lid of the bean hopper (1) and fill with your desired type and quantity of coffee beans
(max. 150 g).
Attention! This coffee grinder is only intended for grinding coffee beans. The use of other grinding
material, such as freeze-dried or caramelised coffee beans, poppy seeds, nuts, sugar, etc., is impro-
per use and will void your warranty.
▪ Place the lid back on the bean hopper.
▪ Set the desired grinding setting (see “Grinding degree” section).
▪ Select the desired number of cups with the portion selection control knob (5). You can select
between two and ten cups.
Note: The cup amounts given on the portion selection switch (5) are for orientation purposes only.
Different coffee types, cup sizes, water hardness levels and personal tastes may call for different
settings.
▪ Connect the mains plug to a socket.
▪ The grinding processor begins when you press the on/off button (4).

10
▪ Once the selected amount of coffee has been ground the grinder will automatically stop. The
grinding process can be stopped at any time by re-pressing the on/off button (4).
Important note: If the grinder is not working, the motor may be blocked by a stuck bean. If this
happens, set a higher grinding degree (see “Grinding degree“ section). As soon as the motor has
started it can be immediately set back to the desired grinding degree.
▪ Ensure that the motor has stopped before you remove the collection container (8). Pull the contai-
ner out towards you to do this. To reduce the static charge, tap lightly on the collection container
(8) before removing the container lid.
Tip: To avoid aroma loss, only grind coffee for immediate use. You can store the fresh coffee beans
and any excess coffee grounds in an air-tight container.
Ensure that the bean supply is not interrupted during grinding. Ensure that there are enough coffee
beans in the bean hopper. If the coffee beans are not fed into the grinder evenly, you can tap lightly
on the outside of the bean hopper to shift the beans.
Grinding degree
You can select from 17 different grinding settings – from fine to coarse . You can use the grinding
setting control knob (6) to select the desired grinding setting, e.g. a finer setting for filter coffee
machines and a coarser setting for manual brewing or French Press coffee makers. As a rule of thumb,
the shorter the contact time with hot water, the finer the coffee should be. Both coffee taste and
strength are matters of personal preference. You should therefore experiment to find out what type of
coffee beans, coffee quantity and grinding setting are right for you. Select the grinding setting before
adding the coffee beans, as otherwise beans stuck in the grinding mechanism may prevent the motor
from working.
Important: Select a higher grinding setting if the motor becomes blocked. Once the stuck bean has
been removed, you can reset the desired grinding setting when the motor is running. During grinding,
the setting can be changed at any time when the motor is running.

11
en
Cleaning and care
Attention! Before cleaning, unplug the mains plug. The mill should never be placed in water, only
wiped down with a damp cloth. Do not use any abrasive cleaning agents.
▪ Clean the collection container (8), its lid (7) and the bean hopper lid (1) with a mild detergent
under warm water. All parts must be dry before use.
Note: The collection container (8), collection container lid (7) and bean hopper lid (1) are
also dishwasher safe.
▪ Wipe the casing with a slightly damp cloth and then rub dry.
▪ To clean the bean hopper (3), remove the remaining beans and wipe out with a damp cloth.
▪ Use a soft brush to clean the grinding mechanism. Remove the top grinding disc to do this. Set
the grinding setting control knob (6) to the finest level . Turn the top grinding disc in a clockwise
direction as far as the stop and remove it by lifting it up and out of the hopper (Fig. A).
▪ To insert the top grinding disc (2), set the grinding setting control knob (6) to the coarsest setting
. Place the top grinding disc into the bean hopper and turn it in an anti-clockwise direction as far
as the stop (Fig. B).
Dishwasher safe Can be rinsed under
running water
Wipe with a damp
cloth
Bean hopper lid (1)
Grinding mechanism (2)
Bean hopper (3)
Collection container lid (7)
Collection container (8)
Appliance casing

12
For UK use only
▪ This product is supplied with a 13 A plug conforming to BS 1363 fitted to the
mains lead. If the plug is unsuitable for your socket outlets or needs to be
replaced, please note the following. If the plug is a non-rewireable one, cut
it from the mains lead and immediately dispose of it. Never insert it into a
socket outlet as there is a very great risk of an electric shock.
▪ The replacement of the plug at the mains lead has to be done according to the
following instructions:
Warning - This appliance must be earthed
Important: The wires in this mains lead are coloured in accordance with the
following code:
green/yellow Earth
blue Neutral
brown Live
As the colours of the wires in the mains lead of this appliance may not
correspond with the coloured markings identifying the terminals in your plug,
proceed as follows:
⋅ the wire which is coloured green and yellow must be connected
to the terminal which is marked with the letter E or by the earth
symbol , or coloured green or green and yellow,
⋅ the wire which is coloured blue must be connected to the terminal
which is marked the letter N or coloured black,
⋅ the wire which is coloured brown must be connected to the terminal
which is marked with the letter L or coloured red.
▪ If a 13 A (BS 1363) plug is used it must be fitted with a 13 A fuse conforming
to BS 1362 and be ASTA approved. If any other type of plug is used, the
appliance must be protected by a 10 A fuse either in the plug or adapter or at
the distribution board.
If in doubt - consult a qualified electrician.
▪ Never use the plug without closing the fuse cover.
The appliance complies with European directives 2014/35/EC, 2014/30/EC and
2009/125/EC.
At the end of its life, this product must not be disposed of in normal household
waste but must instead be delivered to a collection point for recycling electric
and electronic appliances.
The materials are recyclable in accordance with their labelling. The reuse, recy-
cling and other ways of using old appliances make an important contribution to
protecting our environment.
Please ask your local administration for details of the appropriate disposal point.
Subject to alterations

13
en

14
Mode d’emploi
Consignes de sécurité importantes
▪ N’utilisez l’appareil que conformément aux présentes instructions.
Une utilisation non conforme peut entraîner une électrocution ou
d’autres dangers.
▪ Les personnes ayant des capacités physiques, sensorielles ou
mentales restreintes, ou ayant un manque d’expérience et/ou de
connaissance, peuvent utiliser ces appareils s’ils sont surveillés et
s’ils ont été instruits pour utiliser cet appareil en toute sécurité, et
s’ils ont compris les dangers pouvant résulter de l’usage de l’appa-
reil.
▪ Les enfants n’ont pas le droit d’utiliser cet appareil. L’appareil et son
câble de raccodement sont à tenir hors de portée des enfants.
▪ Les enfants devraient être surveillés pour s’assurer qu’ils ne jouent
pas avec l’appareil.
▪ L’appareil doit toujours être débranché en cas d’absence de surveil-
lance, de dysfonctionnement pendant l’utilisation et avant le mon-
tage, le démontage ou le nettoyage.
▪ Si le câble d’alimentation de l’appareil est endommagé, il doit être
remplacé par le SAV central du fabricant ou par une personne quali-
fiée, afin d’éviter toute mise en danger.
▪ Après avoir utilisé l’appareil et les accessoires, nettoyez toutes les
surfaces/pièces qui sont entrées en contact avec les aliments. Veuil-
lez suivre les instructions du chapitre « Nettoyage et entretien ».
▪ L’appareil est conçu pour un usage domestique ou pour des applica-
tions similaires telles que:
⋅ dans des cuisines réservées au personnel dans des boutiques, des
bureaux ou d’autres secteurs professionnels;
⋅ dans des exploitations agricoles;
⋅ par des clients dans des hôtels, des motels et autres établissements
résidentiels;
⋅ dans des chambres d’hôtes.

15
frfr
Avant l’utilisation
Lire attentivement le mode d’emploi. Il contient des consignes importantes pour l’utilisation, la
sécurité et l’entretien de l’appareil. Il doit être soigneusement conservé et éventuellement transmis
aux autres personnes qui utiliseront l’appareil. L’appareil ne doit être utilisé que pour l’usage prévu
conformément à ce mode d’emploi. Respecter les consignes de sécurité lors de l’utilisation.
Caractéristiques techniques
Tension du secteur : 220-240 V~ 50-60 Hz
Puissance : 110 W
Catégorie de protection : II
Consignes de sécurité
▪ Cet appareil est conçu uniquement pour fonctionner avec des grains de café.
▪ La capacité maximale de remplissage du récipient à grains est de 150 g.
Attention ! Si le collecteur est trop rempli, l’appareil peut s’obstruer. C’est pourquoi il faut vider le
récipient à temps.
▪ Ne pas tirer le cordon d’alimentation sur des bords tranchants, ne pas le coincer, ne pas le laisser
pendre et le protéger de la chaleur et de l’huile.
▪ Ne pas poser l’appareil sur des surfaces chaudes telles que des plaques de cuisson ou équivalent, et
ne pas l’utiliser à proximité d’une flamme.
▪ Ne pas débrancher l’appareil en tirant sur le câble ou avec de mains mouillées.
▪ Ne pas mettre l’appareil en marche ou le débrancher immédiatement si:
⋅ l’appareil ou le câble d’alimentation sont endommagés,
⋅ une défaillance est soupçonnée suite à une chute ou équivalent.
Dans ces cas-là, emmener l’appareil en réparation.
▪ Ne pas plonger l’appareil dans l’eau.
▪ Nous déclinons toute responsabilité pour des dommages éventuels en cas d’utilisation détournée,
de mauvaise utilisation, de réparation inappropriée. Dans de tels cas, toute intervention sous
garantie est exclue.
▪ L’appareil ne doit pas faire l’objet d’un usage professionnel.
Mise en service
▪ Avant la première utilisation, retirez tous les morceaux de l’emballage et nettoyez soigneusement
l’appareil (voir le chapitre « Nettoyage et entretien »).
▪ Insérez le collecteur (8) avec le couvercle (7) dans l’appareil, jusqu’à entendre un clic.
▪ Retirez le couvercle du récipient à grains (1) et remplissez-le avec le type et la quantité de grains de
café souhaités (max. 150 g).
Attention ! Ce moulin à café est conçu exclusivement pour moudre des grains de café. L’utilisation
pour d’autres aliments à moudre tels que des grains de café caramélisés ou lyophilisés, du pavot,
des noix, du sucre etc., représente une utilisation inadaptée et entraîne une perte de vos droits de
garantie.
▪ Remettez le couvercle sur le récipient à grains.
▪ Réglez le degré de mouture souhaité (voir chapitre « Degré de mouture »).
▪ Choisissez le nombre de tasses souhaité avec le bouton rotatif de choix de portion (5). Vous pouvez
choisir entre 2 et 10 tasses.
Consigne : Les portions en tasses sur le commutateur de choix de portion (5) servent juste à vous
orienter. Des sortes de café variées, différentes tailles de tasse, une dureté de l’eau variable mais
aussi votre goût personnel peuvent nécessiter un autre réglage.
▪ Branchez la fiche de contact à une prise électrique.

16
▪ Le process de mouture commence après avoir pressé sur le bouton marche/arrêt (4). Le moteur
fonctionne seulement lorsque le récipient à grains (3) est correctement placé.
▪ Lorsque la quantité de café réglée est moulue, le moulin s’éteint automatiquement. Le procédé de
mouture peut à tout moment être interrompu grâce au bouton marche/arrêt (4).
Remarque importante: Si le moulin de ne fonctionne pas, il se peut que le moteur soit bloqué par
des grains collés. Dans ce cas, régler l’appareil sur un degré de mouture plus élevé (cf. chapitre
Degré de mouture). Après le démarrage, on peut immédiatement revenir sur le degré de mouture
souhaité pendant que le moteur est en marche.
▪ Veillez à ce que le moteur soit totalement arrêté avant de retirer le récipient collecteur (8). Pour ce
faire, tirez le récipient vers l’avant. Pour réduire toute charge statique, tapotez légèrement le récipi-
ent collecteur (8) avant de retirer le couvercle du récipient.
Conseil : Pour éviter toute perte des arômes, il est recommandé de moudre uniquement la quantité
souhaitée pour une utilisation immédiate. Vous pouvez conserver les grains de café frais, ainsi que le
café moulu restant dans un récipient hermétique.
Veillez à ce que l’arrivée des grains ne soit pas interrompue pendant que le moulin est en marche.
Assurez-vous, dans ce but, que suffisamment de grains de café sont disponibles dans le récipient à grains.
Si les grains de café ne sont pas alimentés de manière uniforme dans le moulin, vous pouvez tapoter
légèrement depuis l’extérieur contre le récipient à grains, afin que les grains puissent rouler vers le bas.
Degré de mouture
Vous pouvez choisir entre 17 niveaux de mouture différents – de fin à grossier . Avec le bouton
rotatif de degré de mouture (6), vous pouvez régler le degré souhaité : par ex. pour les machines à café
à filtre, un réglage plus fin, pour les infuseurs manuels et les appareils French Press, un réglage plus
grossier. De manière générale : plus le temps de contact avec l’eau chaude est réduit, plus le café doit
être fin. L’arôme et l’intensité du café sont une question de préférence personnelle. Ainsi, testez le type
de grains de café, la quantité de café et le réglage du degré de mouture pour trouver ceux que vous
préférez. Le réglage doit avoir lieu avant de remplir le récipient de grains. Dans le cas contraire, les
grains collés dans le moulin pourraient empêcher le moteur de fonctionner correctement.
Important : En cas de blocage du moteur, réglez un degré de mouture plus élevé. Une fois que les
grains collés se sont libérés, il est possible de revenir au degré de mouture souhaité pendant que le
moteur est en marche. Pendant la mouture, le réglage peut être changé à tout moment lorsque le
moteur est en marche.
Nettoyage et entretien
Attention! Débrancher l’appareil avant le nettoyage. Ne plonger le bloc moteur en aucun cas dans
l’eau, mais l’essuyer à l’extérieur avec un chiffon humide. Ne pas utiliser de nettoyants abrasifs.
▪ Nettoyez le récipient collecteur (8), son couvercle (7) et le couvercle du récipient à grains (1)
avec du produit à vaisselle doux et de l’eau chaude. Toutes les pièces doivent être sèches avant
l’utilisation.
Remarque : Le récipient collecteur (8), le couvercle du récipient collecteur (7) et le couvercle du
récipient à grains (1) peuvent également passer au lave-vaisselle.
▪ Essuyez et séchez correctement le boîtier avec un chiffon légèrement humide.
▪ Pour nettoyer le récipient à grains (3), retirez les grains restants et essuyez avec un chiffon humide.
▪ Nettoyez le moulin avec une brosse souple. Pour ce faire, retirez le disque de mouture supérieur. Réglez
le bouton rotatif de degré de mouture (6) sur le niveau le plus fin . Faites tourner le disque de mouture
supérieur dans le sens horaire jusqu’à la butée et retirez-le vers le haut en le sortant du récipient (ill. A).
▪ Pour replacer le disque de mouture supérieur (2), réglez le bouton rotatif de degré de mouture (6)
sur le niveau le plus élevé . Placez le disque de mouture supérieur dans le récipient à grains et
faites-le tourner dans le sens anti-horaire jusqu’à la butée (ill. B).

17
fr
L’appareil est conforme aux Directives Européennes 2014/35/CE, 2014/30/CE et
2009/125/CE.
Au terme de son utilisation ce produit ne doit pas être éliminé avec les déchets
ménagers habituels, mais il doit être déposé dans un point de collecte pour le
recyclage d’appareils électriques et électroniques.
Les matériaux sont recyclables conformément à leur identification. Grâce à la
réutilisation, le recyclage de matériaux ou d’autres formes de recyclage des
vieux appareils vous contribuez de manière significative à la protection de notre
environnement.
Veuillez contacter votre municipalité pour connaître le centre de traitement
compétent.
Sous réserve de modifications
compatible avec le
lave-vaisselle
rinçable à l‘eau
courante
essuyer avec un
chiffon humide
Couvercle du récipient à
grains (1)
Moulin (2)
Récipient à grains (3)
Couvercle du récipient
collecteur (7)
Récipient collecteur (8)
Boîtier de l’appareil

18
Istruzioni per l’uso
Importanti istruzioni per la sicurezza
▪ Usare l’apparecchio solo conformemente alle presenti istruzioni.
L’uso improprio può provocare shock elettrici o altri rischi.
▪ Queste apparecchiature possono essere utilizzate da persone con
ridotte capacità fisiche, sensoriali o mentali o che mancano di espe-
rienza e/o di conoscenza, solo se sono sorvegliate o se sono state
istruite riguardo all’utilizzo sicuro dell’apparecchio e se ne hanno
compreso i pericoli risultanti.
▪ Questo elettrodomestico non deve essere utilizzato da bambini.
Tenere l’apparecchio ed i suoi cavi di collegamento fuori dalla
portata dei bambini.
▪ I bambini vanno sorvegliati per accertarsi che non giochino con
l’apparecchio.
▪ L’elettrodomestico deve essere sempre scollegato, staccando pre-
viamente la spina dalla presa di corrente nei seguenti casi: quando
rimane incustodito, in caso di guasto durante il funzionamento,
prima del montaggio e dello smontaggio o della pulizia.
▪ Se il cavo di allacciamento alla rete è guasto, bisogna farlo sosti-
tuire dal produttore, dal suo servizio clienti o da un’altra persona
competente del settore, per evitare pericoli.
▪ Dopo aver utilizzato l’apparecchio e gli accessori, pulire tutte le
superfici/parti che sono state a contatto con gli alimenti. Seguire le
indicazioni contenute nel capitolo “Pulizia e manutenzione”.
▪ Questo apparecchio può essere utilizzato solo in ambito domestico e
in applicazioni simili, come ad esempio:
⋅ in cucine per i collaboratori di negozi, uffici e altri settori
commerciali;
⋅ in tenute agricole;
⋅ in hotel, motel e altre strutture ricettive da parte del cli-
ente;
⋅ in strutture Bed & Breakfast.

19
itit
Prima dell’uso
Leggere attentamente le istruzioni per l’uso. Forniscono indicazioni importanti riguardanti l’uso, la
sicurezza e la manutenzione dell’apparecchio. Vanno conservate con cura ed eventualmente trasmesse
all’utente successivo. L’apparecchio va adoperato solo per l’uso previsto, seguendo le istruzioni per
l’uso. Durante l’uso osservare scrupolosamente le istruzioni per la sicurezza.
Dati tecnici
Tensione nominale: 220-240 V~ 50-60 Hz
Potenza assorbita: 110 W
Classe di protezione: II
Istruzioni per la sicurezza
▪ Questo apparecchio è adatto solo per chicchi di caffè.
▪ La quantità totale massima del serbatoio per chicchi è di 150 g.
Attenzione! Se il contenitore di chicchi fosse colmo, l’apparecchio potrebbe intasarsi. Perciò bisogna
svuotare tempestivamente il contenitore.
▪ Non tirare o incastrare il cavo di collegamento contro spigoli taglienti, non lasciarlo sospeso e
proteggerlo dal calore e dall’olio.
▪ Non collocare l’apparecchio su superfici calde come piastre e non metterlo in funzione in prossi-
mità di fiamme libere.
▪ Non staccare la spina dalla presa, tirandola per il cavo o con le mani bagnate.
▪ Non usare l’apparecchio e staccare subito la spina, se:
⋅ l’apparecchiatura o il cavo d’alimentazione sono guasti,
⋅ si sospetta un difetto dopo una caduta od un evento simile.
In questi casi far riparare l’apparecchio.
▪ Non immergere l’apparecchio in acqua.
▪ Non ci si assume nessuna responsabilità in caso di uso per uno scopo diverso da quello previsto, per
un utilizzo errato oppure in caso di riparazione non professionale. In questi casi sono escluse anche
le richieste di garanzia.
▪ Questo apparecchio non è destinato ad un uso commerciale.
Messa in servizio
▪ Prima del primo utilizzo rimuovere tutti gli imballaggi e pulire a fondo l‘apparecchio (si veda
capitolo „Pulizia e manutenzione“).
▪ Inserire il recipiente di raccolta (8) con il coperchio (7) nell‘apparecchio, finché non scatta in
posizione.
▪ Rimuovere il coperchio del serbatoio per chicchi (1) e riempirlo con i tipi e la quantità di chicchi di
caffè desiderati (max. 150 g).
Attenzione! Questo macinacaffè è adatto esclusivamente per macinare chicchi di caffè. Non ne
è previsto l‘uso per macinare altri tipi di sostanze come per esempio chicchi di caffè liofilizzati o
caramellati, semi di papavero, noci, zucchero, ecc. e in caso di uso inadeguato decade la garanzia.
▪ Rimettere il coperchio sul serbatoio per chicchi.
▪ Selezionare il grado di macinazione desiderato (si veda capitolo „Grado di macinazione“).
▪ Selezionare la quantità di tazze desiderate tramite l’apposita manopola (5). Si possono selezionare
tra 2 e 10 tazze.
▪ Nota: Le tacche sull’interruttore porzioni (5) sono solo indicative. Diversi tipi di caffè, dimensioni delle
tazze, durezza dell’acqua ed anche gusti personali possono rendere necessarie impostazioni diverse.

20
▪ Collegare il cavo di alimentazione a una presa.
▪ La procedura di macinazione inizia dopo aver premuto il tasto di avvio-/arresto (4).
▪ Una volta macinata la quantità impostata di caffè, il macinino si chiude automaticamente. La
procedura di macinazione può essere interrotta in qualsiasi momento, premendo più volte il tasto
di avvio-/arresto (4).
Nota importante: Se il meccanismo di macinazione non funzionasse, il motore potrebbe essersi
bloccato a causa di chicchi rimasti incastrati. In questo caso impostare un grado di macinazione
maggiore (vedere Capitolo Grado di macinatura). Dopo l’accensione, a motore acceso, può essere
subito reimpostato il grado di macinazione prescelto.
▪ Fare attenzione che il motore sia fermo prima di rimuovere il recipiente di raccolta (8). Estrarre il
contenitore verso la parte anteriore. Per ridurre l’elettricità statica, battere leggermente sul recipi-
ente di raccolta (8) prima di rimuovere il coperchio.
Consiglio: per evitare la perdita di aroma, dovrebbe essere macinata solo la quantità di caffè da usare
al momento. È possibile conservare i chicchi di caffè freschi e il caffè macinato in eccedenza in un
contenitore a chiusura ermetica.
Assicurarsi che durante la macinazione non venga interrotta l’entrata dei chicchi. Accertarsi che
nel serbatoio vi sia una quantità sufficiente di chicchi di caffè. Se i chicchi non dovessero essere
trasportati al meccanismo di macinazione in modo uniforme, dall’esterno è possibile dare un colpetto
al serbatoio affinché scivolino meglio.
Grado di macinatura
È possibile selezionare tra 17 livelli di macinazione, da macinazione fine a grossolana . Tramite la
manopola del grado di macinazione (6) si può impostare il grado di macinazione: ad es. macinazione
più fine per macchine da caffè con filtro e macinazione più grossolana in caso di versamento di acqua
bollente a mano o di French Press. La regola è semplice: quanto meno tempo di contatto con l’acqua
calda, più fine deve essere la macinazione del caffè. Il gusto e l’intensità del caffè sono preferenze
personali. Provare quindi quale tipo di chicchi di caffè, qualità di caffè e grado di macinazione si
preferisce. L’impostazione deve avvenire prima di riempire l’apposito contenitore di chicchi di caffè,
altrimenti il macinino potrebbe incepparsi con dei chicchi incastrati ed impedire l’avvio del motore.
Importante: se il motore si blocca, impostare un maggiore grado di macinazione. Dopo che il chicco
incastrato si è staccato, a motore acceso, può essere reimpostato il grado di macinazione prescelto.
Durante la macinazione mentre il motore è in funzione si può cambiare in qualsiasi momento la
regolazione.
Pulizia e manutenzione
Attenzione! La spina va staccata prima della pulizia. Non si deve assolutamente immergere l’apparec-
chio in acqua, ma se ne può pulire solo la parte esterna con un panno umido. Non usare detergenti
abrasivi.
▪ Pulire il recipiente di raccolta (8), il suo coperchio (7) e il coperchio del serbatoio per chicchi (1)
con un detersivo delicato e acqua calda. Tutte le parti devono essere asciugate prima dell‘uso.
Avvertenza: il recipiente di raccolta (8), il suo coperchio (7) e il coperchio del serbatoio per chicchi
(1) possono essere lavati anche in lavastoviglie.
▪ Strofinare l‘alloggiamento con un panno leggermente umido e successivamente asciugarlo.
▪ Per pulire il serbatoio per chicchi (3) rimuovere i chicchi residui e utilizzare un panno umido.
▪ Pulire il macinacaffè con un spazzola morbida. Per fare ciò rimuovere il disco di macinazione superiore.
Impostare la manopola del grado di macinazione (6) sul livello di macinazione più fine . Ruotare
il disco di macinazione superiore in senso orario fino alla battuta e rimuoverlo dal contenitore
estraendolo verso l‘alto (Fig. A).
▪ Per inserire il disco di macinazione superiore (2), impostare la manopola del grado di macinazione
Other manuals for STELIO
12
Table of contents
Languages:
Other WMF Coffee Grinder manuals