DeLonghi KG521.M User manual

De’Longhi Appliances via Seitz, 47 31100 Treviso Italia www.delonghi.com
5717710021/06.15

KG521
MACINACAFFÈ
COFFEE GRINDER
KAFFEEMÜHLE
MOULIN À CAFÉ
KOFFIEMALER
MOLINILLO DE CAFÉ
MOINHO DE CAFÉ
ΤΡΟΧΙΣΤΉΣ
KAFFEKVERN
KAFFEKVARN
KAFFEMØLLE
KAHVIMYLLY
КОФЕМОЛКА
КОФЕҮГІТКІШ
KÁVÉŐRLŐ
MLÝNEK NA KÁVU
MLYNČEK NA KÁVU
MŁYNEK DO KAWY
ﺔﻣﺎﻫ ﺎﻤﻴﻠﻌﺗ – ﻮﻬﻗ ﺔﻧﻮﺣﺎﻃ
ﺎﻤﻴﻠﻌﺘﻟﺎﺑ ﻆﻔﺘﺣ
KG 7989
1771016IDL/07.09

2
IT EN DE FR NL ES
pag. 6 page 11 S. 15 page 20 pág. 25 pág. 30
PT EL NO SV DA FI RU KZ
pág. 35 σελ. 40 sid. 45 sid. 49 sid. 54 siv. 59 стр. 63
68-бет
HU CS SK PL AR
old. 74 str. 79 str. 84 str.88 2
Before using this appliance ensure that the voltage indicated on the product corresponds with the main voltage in your home, if you
are in any doubt about your supply contact your local electricity company.
The exible mains lead is supplied connected to a B.S. 1363 fused plug having a fuse of 13 amp capacity.
Should this plug not t the socket outlets in your home, it should be cut o and replaced with a suitable plug, following the proce-
dure outlined below.
Note: Such a plug cannot be used for any other appliance and should therefore be properly disposed of and not left where children
might nd it and plug it into a supply socket - with the obvious consequent danger.
Please note: We recommend the use of good quality plugs and wall sockets that can be switched o when the machine is not in
use.
IMPORTANT: The wires in the mains lead tted to this appliance are coloured in accordance with the following code:
GREEN ANDYELLOW EARTH
BLUE NEUTRAL
BROWN LIVE
As the colours of the wires in the mains lead of this appliance may not correspond with the coloured markings identifying the
terminals in your plug, proceed as follows:
- The wire which is coloured green and yellow must be connected to the terminal in theplug which is marked with the letter E or
by the earth symbol or coloured green or green and yellow.
- The wire which is coloured blue must be connected to the terminal which is marked with the letter N or coloured black.
- The wire which is coloured brown must be connected to the terminal which is marked with the letter L or coloured red.
When wiring the plug, ensure that all strands of wire are securely retained in each terminal. Do not forget to tighten the mains
lead clamp on the plug. If your electricity supply point has only two pin socket outlets, or if you are in doubt, consult a qualied
electrician.
Should the mains lead ever require replacement, it is essential that this operation be carried out by a qualied electrician and should
only be replaced with a exible cord of the same size.
After replacement of a fuse in the plug, the fuse cover must be retted. If the fuse cover is lost, the plug must not be used until a
replacement cover is obtained. The colour of the correct replacement fuse cover is that of the coloured insert in the base of the fuse
recess or elsewhere on the plug. Always state this colour when ordering a replacement fuse cover.
Only 13amp replacement fuses which are asta approved to B.S. 1362 should be tted.
This appliance conforms to the Norms EN 55014 regarding the suppression of radio interference.
Warning - this appliance must be earthed
Green andYellow to Earth
ELECTRICAL REQUIREMENTS UK ONLY
13 amp Fuse
Brown to live
Cord Clamp
Blue to
neutral

3
A1
A2
A3
A4
A5
A6
A7
A8
B1
A9
A10
A12 A13
A11
B2
B3
B4
B6
B7
B5

4
6
1 2 3
45
8
9 11
7
10

5
12 13 14
15 16

6
1. AVVERTENZE FONDAMENTALI PER LA SICUREZZA
• L’apparecchio può essere utilizzato da persone con ridotte capacità siche, sensoriali
o mentali o con mancanza di esperienza e di conoscenza se sono sorvegliate oppure
se hanno ricevuto istruzioni riguardo l’utilizzo in sicurezza dell’apparecchio e se ne
hanno capito i pericoli implicati.
• Ibambinidevonoesseresorvegliatiperassicurarsichenongiochinoconl’apparecchio.
• Per la pulizia non immergere mai la macchina nell’acqua.
• Nonusarel’apparecchioseilcoperchioaprotezionedellaparterotanteè danneggiato
o rovinato.
• Questoapparecchioèdestinatoesclusivamenteall’uso domestico.Nonèprevistol’uso
in: ambienti adibiti a cucina per il personale di negozi, uci e altre aree di lavoro,
agriturismi, hotel, motel e altre strutture ricettive, atta camere.
• In caso di danni alla spina o al cavo di alimentazione, farli sostituire esclusivamente
dall’AssistenzaTecnica, in modo da prevenire ogni rischio.
SOLO PER MERCATI EUROPEI:
• Scollegare sempre l’apparecchio dall’alimentazione se lasciato incustodito e prima di
montarlo, smontarlo o pulirlo.
• Questo apparecchio non deve essere utilizzato dai bambini.Tenere l’apparecchio ed il
suo cavo fuori dalla portata dei bambini.
• I bambini non devono utilizzare l’apparecchio come gioco.
2. AVVERTENZE DI SICUREZZA
Pericolo! La mancata osservanza può essere o è causa di
lesioni da scossa elettrica con pericolo per la vita.
Poiché l’apparecchio funziona a corrente elettrica, non si può
escludere che generi scosse elettriche.
Attenersi quindi alle seguenti avvertenze di sicurezza:
• Non toccare l’apparecchio con le mani o i piedi bagnati.
• Non toccare la spina con le mani bagnate.
• Assicurarsi che la presa di corrente utilizzata sia sempre
liberamente accessibile, perché solo così si potrà staccare
la spina all’occorrenza.
• Se si vuole staccare la spina dalla presa, agire diretta-
mente sulla spina. Non tirare mai il cavo perché potrebbe
danneggiarsi.
• Per scollegare completamente l’apparecchio, staccare la
spina dalla presa di corrente.
• In caso di guasti all’apparecchio, non tentare di ripararli.
Spegnere l’apparecchio, staccare la spina dalla presa e
rivolgersi all’AssistenzaTecnica.
• Prima di qualsiasi operazione di pulizia, spegnere la mac-
china, staccare la spina dalla presa di corrente.
Attenzione: La mancata osservanza può essere o è causa
di lesioni o di danni all’apparecchio.
• Conservare il materiale dell’imballaggio (sacchetti di pla-
stica, polistirolo espanso) fuori dalla portata dei bambini.
• Non sistemare l’apparecchio sopra o in prossimità di for-
neli elettrici o a gas, o in un forno riscaldato.
• Vericare che all’interno del macinacaè non ci siano og-
getti estranei.
• Evitare il contatto con le parti in movimento.
Uso conforme alla destinazione
Questo apparecchio dovrà essere impiegato solo per l’uso per
il quale è stato concepito. Ogni altro uso è da considerarsi im-
proprio. Questo apparecchio non è adatto per uso commerciale
Il costruttore non risponde per danni derivanti da un uso im-
proprio dell’apparecchio.

7
Maicercareditritareghiaccioousarein modo diverso da quello
indicato nelle istruzioni.
2.1 Istruzioni per l’uso
Leggere attentamente queste istruzioni prima di utilizzare
l’apparecchio. Il mancato rispetto di queste istruzioni può esse
fonte di lesioni e di danni all’apparecchio.
Il costruttore non risponde per danni derivanti dal mancato
rispetto di queste istruzioni per l’uso.
Nota Bene:
Conservare accuratamente queste istruzioni. Qualora l’appa-
recchio venga ceduto ad altre persone, consegnare loro anche
queste istruzioni per l’uso.
3. DESCRIZIONE
3.1 Descrizione dell’apparecchio
(pag. 3 - A )
A1. Contenitore chicchi
A2. Coperchio contenitore chicchi
A3. Regolatore grado di macinatura
A4. Manopola selezione numero tazze (MIN=1; MAX=14)
A5. Vano porta accessori
A6. Contenitore accessorio porta-coppetta
A7. Accessorio porta-coppetta
A8. Ripiano per contenitore caè macinato
A9. Pulsante ON/OFF
A10. Coperchio contenitore caè macinato
A11. Tappo contenitore caè macinato
A12. Contenitore caè macinato
A13. Pennellino pulizia
3.2 Descrizione dei comandi
(pag. 3 - B )
B1. Pulsante avvio macinatura
B2. Pulsante selezione aroma
B3. Selezione aroma corrente (LIGHT = LEGGERA; NORMAL =
NORMALE; STRONG= FORTE)
B4. Spia contenitore caè macinato
B5. Numero di tazze selezionato
B6. Spia accessorio porta-coppetta
B7. Spia contenitore chicchi
4. CONTROLLO DELL’APPARECCHIO
Dopo aver tolto l’imballaggio, assicurarsi dell’integrità dell’ap-
parecchio e della presenza di tutti gli accessori. Non utilizzare
l’apparecchio in presenza di danni evidenti. Rivolgersi all’Assi-
stenzaTecnica De’Longhi.
5. COLLEGAMENTO DELL’APPARECCHIO
Pericolo!
Assicurarsi che la tensione della rete elettrica corrisponda a
quella indicata nella targa dati sul fondo dell’apparecchio.
Collegare l’apparecchio solo ad una presa di corrente installata
a regola d’arte avente una portata minima di 10A e dotata di
eciente messa a terra. In caso di incompatibilità tra la presa e
la spina dell’apparecchio, fare sostituire la presa con un altra di
tipo adatto, da personale qualicato.
6. OPERAZIONI PRELIMINARI
Prima di utilizzare il macinacaè, pulire il corpo macchina
con un panno inumidito. Lavare tutti gli accessori a mano,
con acqua tiepida e detersivo per piatti, quindi sciacquarli e
asciugarli.
Attenzione:
La macina non deve essere lavata e deve essere mantenuta
sempre asciutta.
Pulire la macina con una spazzola a setole dure.
7. UTILIZZO DELL’APPARECCHIO
7.1 Macinare caè nel contenitore
1. Appoggiare l’apparecchio su una supercie piana.
2. Avvitare il contenitore chicchi ruotandolo in senso orario
(g. 1);
3. Estrarre il coperchio del contenitore chicchi (g. 2);
4. Versarelaquantitàdesideratadichicchidi caè nelconte-
nitore (g. 3);
5. Richiudere il coperchio premendolo bene;
Attenzione:
Non rimuovere il contenitore chicchi se ci sono chicchi al suo
interno.
6. Inserire la spina nella presa di corrente;
7. Impostare la manopola (A4) sulla quantità di caè cor-
rispondente al numero di tazze per il quale si devono
macinare i chicchi: sul display compare il numero deside-
rato (g. 4). Comunque usare questa corrispondenza solo
come riferimento, in quanto la quantità varierà a seconda
del gusto, del tipo e della tostatura dei chicchi di caé,
nonché dal grado di macinatura selezionato;
8. Premere il pulsante selezione aroma (B2) no a visualiz-
zare sul display l’aroma desiderato (g. 5);
Attenzione:
• È normale avere quantità di caè macinato diverse a se-
conda del grado di macinatura selezionato.
• Regolare il grado di macinatura e l’aroma a seconda dei
gusti personali.

8
• FRENCH PRESS: quando si seleziona il grado di macinatura
per questo tipo di caè, è consigliabile preparare al mas-
simo 8 tazze.
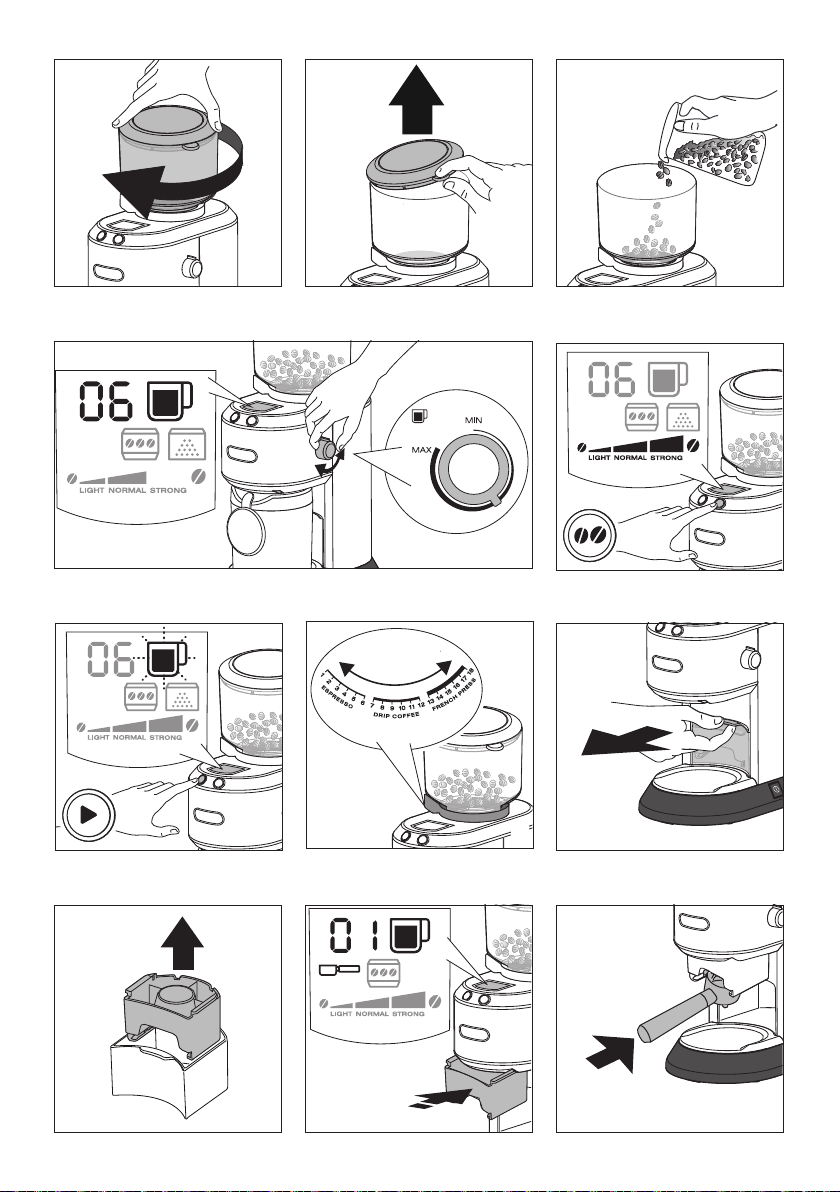
9. Premere il pulsante avvio macinatura (B1) (g. 6);
10. Impostare il grado di macinatura del caè ruotando il re-
lativo regolatore (A3) sul tipo di caè desiderato (g. 7):
modicare il grado di macinatura quando l’apparecchio è
in funzione;
11. Una volta raggiunta la quantità di caè precedentemente
selezionata, l’apparecchio si arresta automaticamente;
12. Se si desidera arrestare l’apparecchio prima che la
macinatura sia terminata, ripremere il pulsante avvio
macinatura;
Nota Bene:
Arrestare la macinatura se la polvere di caè arriva al livello
MAX.
13. Rimuovere il contenitore del caè macinato (A12), pic-
chiettare leggermente il recipiente, rimuovere il coper-
chioeversareilcaèmacinatonelltrodellamacchinada
caè. Se non si utilizza tutto il caè macinato, questo può
essere conservato all’interno del contenitore, chiudendo il
tappo (A11) per evitare che perda l’aroma.
Svuotare sempre il contenitore per il caè macinato, prima di
procedere a successivi utilizzi.
7.2 Macinare caè nel contenitore porta-
coppetta
1. Preparare il contenitore chicchi come illustrato nei punti
da 1 a 6 del paragrafo precedente;
2. Estrarre dal vano il contenitore accessorio porta-coppetta
(A6) (g. 8);
3. Prendere dal contenitore l’accessorio porta-coppetta (A7)
(g. 9);
4. Inserire l’accessorio all’apparecchio, spingendolo no in
fondo: sul display la relativa spia rimane accesa ssa (g.
10);
Nota Bene:
• Quando si utilizza l’accessorio porta-coppetta non è pos-
sibile scegliere il numero di tazze: si può infatti macinare
la dose di caè necessaria per una o due tazze di caè
espresso;
• Quando si utilizza l’accessorio porta-coppetta, ruotare il
regolatoregradodi macinatura (A3)in corrispondenza del
settore da 1 a 6“ESPRESSO”: regolare il grado di macina-
tura quando l’apparecchio è in funzione.
Nota: non macinare oltre il grado di macinatura 6 per
evitare di sovraccaricare il portaltro.
5. Agganciare la coppetta all’accessorio (g. 11). Si consiglia
di tenere in posizione la coppetta in quanto l’accessorio è
costruito in base ad alcune dimensioni standard che non
sono comuni a tutte le coppette portaltro in commercio;
6. Premere il pulsante avvio macinatura (B1) (g. 6): per
macinare la quantità per 2 tazze, premere due volte il pul-
sante di avvio entro il primo secondo della preparazione;
7. La macinatura si interrompe automaticamente: se si de-
sidera arrestare l’apparecchio prima che la macinatura sia
terminata, ripremere il pulsante avvio macinatura;
8. Estrarrelacoppettaportaltroe procedereconlaprepara-
zione del caè espresso.
8. CONSIGLI PER L’USO
• Tenere sempre il coperchio del contenitore dei chicchi
ermeticamente chiuso per conservare tutto il gusto e l’a-
roma dei chicchi di caé.
• Macinare solo la quantità di caé necessaria al momento.
• Non riempire mai troppo il contenitore dei chicchi. Come
indicazione generale, considerare un cucchiaio da tavola
di chicchi per tazza (es. 4 cucchiai di chicchi per caè per 4
tazze). Naturalmente le quantità ottimali, denite in base
al gusto personale, saranno individuate con il tempo.
• Dopo 2 utilizzi consecutivi, attendere 15 minuti prima di
riutilizzare l’apparecchio.
• Per garantire una buona qualità in termini di freschezza
del caè, pulire sempre l’apparecchio dopo ogni uso. Non
é comunque consigliabile macinare chicchi oleosi.
9. IMPOSTAZIONI PROGRAMMABILI
9.1 Programmazione tempo di macinatura con
l’utilizzo dell’accessorio porta-coppetta
(A7)
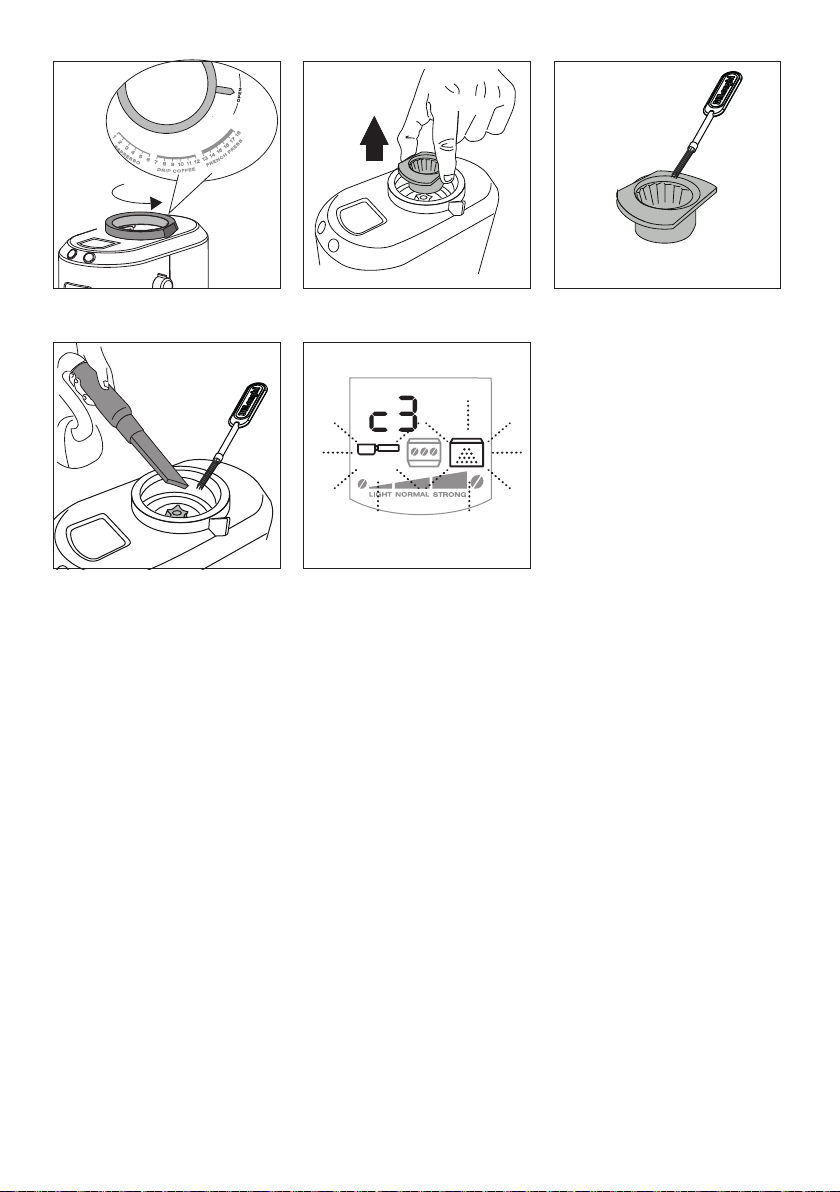
1. Inserire l’accessorio portaccopetta;
2. Inserire la coppetta della macchina da caè espresso;
3. Premere il pulsante avvio macinatura (A1) e mantenerlo
premuto: la macinatura comincia e il simbolo tazza lam-
peggia velocemente ad indicare che l’apparecchio è in
modalità programmazione;
4. Una volta macinata la quantità di caè desiderata, rila-
sciare il pulsante: l’apparecchio interrompe la macinatura
ed il tempo di macinatura per una tazza di caè espresso
è memorizzata.
Nota Bene:
• Per evitare di produrre una quantità eccessiva di caè in
polvere, l’apparecchio può memorizzare un tempo massi-
mo di macinatura pari a 7 secondi circa.
• È possibile memorizzare solo la quantità di caè macinato
per 1 tazza: quando si macina per 2 tazze, l’apparecchio

9
macinerà il doppio della quantità memorizzata per la
tazza singola.
9.2 Contrasto display
Il display può essere regolato su 5 diverse impostazioni di con-
trasto: procedere come segue:
1. Accendere l’apparecchio premendo il pulsante ON/OFF
(A9);
2. Estrarre il contenitore caè macinato (A12) o l’accessorio
porta-coppetta (A7) (se inseriti);
3. Premere uno dei due pulsanti: sul display compare il nu-
mero del livello di contrasto attualmente selezionato (g.
16);
4. Premere uno dei due pulsanti per aumentare/diminuire il
contrasto;
5. Una volta selezionato il contrasto desiderato, riposiziona-
re il contenitore caè in polvere o l’accessorio porta-cop-
petta: l’apparecchio è pronto all’uso.
9.3 Reset ai valori di fabbrica
1. Accendere l’apparecchio premendo il pulsante ON/OFF
(A9);
2. Estrarre il contenitore caè macinato (A12) o l’accessorio
porta-coppetta (A7) (se inseriti);
3. Premere contemporaneamente i due tasti: l’apparecchio
torna al valore di contrasto preimpostato e ai tempi stan-
dard di macinatura con porta-coppetta;
4. Riposizionare il contenitore caè in polvere o l’accessorio
porta-coppetta: l’apparecchio è pronto all’uso.
10. PULIZIA
Pericolo!
Prima di eseguire qualsiasi operazione di pulizia, la macchina
deveesserespentaescollegatadallareteelettrica.Nonimmer-
gere mai la macchina nell’acqua.
1. Estrarre la spina dalla presa;
2. Sganciare il contenitore chicchi (A1) ruotandolo in senso
antiorario ed estrarlo dalla macchina. Assicurarsi che sia
vuoto prima di rimuoverlo;
3. Estrarre il contenitore caè macinato (A12);
4. Estrarre il contenitore accessorio porta-coppetta (A6);
5. Sollevare il ripiano per contenitore caè macinato (A8);
6. Tutti gli accessori possono essere lavati con acqua tiepida
e detergente per piatti: non lavare i componenti in lava-
stoviglie!Asciugarebenegliaccessoriprimadiriutilizzarli.
Nota Bene:
Pulire regolarmente anche le macine, procedendo come segue:
1. Ruotare in senso antiorario il regolatore di macinatura
no a ne corsa, in posizione“OPEN”(g. 12);
2. Estrarre, sollevandola, la parte superiore della macina
(g. 13);
3. Pulire la parte estratta con una spazzola a setole dure (g.
14);
4. Pulire l’interno della macchina con un pennello e aspirare
i residui di caè con un aspirapolvere (g. 15);
6. Reinserire la parte superiore della macina e ruotare il re-
golatore selezionando il grado di macinatura desiderato.
Con il tempo le macine si usurano e la quantità di caè maci-
nato si riduce. In questo caso, rivolgersi ad un centro assistenza
autorizzato per acquistare le macine nuove e sostituirle.
11. DATI TECNICI
Tensione:.................................220-240V ˜50/60 Hz max. 10A
Potenza assorbita: ........................................................ 150W
Peso: ..............................................................................3,5Kg
Il presente apparecchio è conforme al Regolamento
europeo 1935/2004 sui materiali destinati al contatto con gli
alimenti.
12. SMALTIMENTO
Non smaltire l’apparecchio insieme ai riuti dome-
stici ma consegnatelo ad un centro di raccolta die-
renziata uciale.

10
13. SE QUALCOSA NON FUNZIONA
L’apparecchio non funziona. Accertarsi che la spina sia correttamente inserita nella presa e che la presa funzioni
correttamente.
Non è inserito nè il contenitore caè macinato (A12), nè l’accessorio portacoppetta
(A7). Inserire l’accessorio desiderato
L’accessorio non è inserito correttamente. Estrarlo e ripetere l’inserimento.
Non è inserito il contenitore portachicchi (A1). Inserire il contenitore.
Il contenitore portachicchi (A1) non è inserito correttamente. Estrarlo ed inserirlo
correttamente.
L’apparecchio si arresta durante il
funzionamento.
L’apparecchio è surriscaldato.
E’intervenuto il fusibile termico del motore.
Contattare un centro assistenza autorizzato.
La quantità di caè macinato è scarsa. Con il tempo le macine si usurano. Acquistare delle macine nuove presso uno dei
centri assistenza autorizzati e procedere alla sostituzione (vedi sezione dedicata al
capitolo“10. Pulizia”)

11
1. FUNDAMENTAL SAFETY WARNINGS
• Appliances can be used by persons with reduced physical, sensory or mental capa-
bilities or lack of experience and knowledge if they have been given supervision or
instruction concerning use of the appliance in a safe way and if they understand the
hazards involved.
• Children should be supervised to ensure that they do not play with the appliance.
• Never clean by immersing the appliance in water.
• Donotusetheapplianceifthecoverprotectingtherotatingpartisdamagedorruined.
• This is an household appliance only. It is not intended to be used in: sta kitchen
areas in shops, oces and other working environments; farm houses; by clients in
hotels, motels and other residential type environments; bed and breakfast type
environments.
• If the plug or cord is damaged, it must be replaced by Customer Services only to avoid
all risk.
FOR EUROPEAN MARKETS ONLY:
• Alwaysunplug the appliance when leftunattendedand beforeassembly, taking apart
or cleaning.
• This appliance shall not be used by children. Keep the appliance and its cord out of
reach of children.
• Children shall not play with the appliance.
2. SAFETY WARNINGS
Danger! Failure to observe the warning may result in life
threatening injury by electric shock.
This is an electrical appliance and may cause electric shock.
You should therefore follow these safety warnings:
• Never touch the appliance with damp hands or feet.
• Never touch the plug with damp hands.
• Make sure the socket used is freely accessible at all times,
enabling the appliance to be unplugged when necessary.
• Unplug directly from the plug only. Never pull the cord as
you could damage it.
• To disconnect the appliance completely you must unplug
it from the mains socket.
• If the appliance is faulty, do not attempt to repair.
Turn it o, unplug from the mains socket and contact Cus-
tomer Services.
• Before cleaning the appliance, turn it o and unplug from
the mains socket.
Important: Failure to observe the warning could result in
injury or damage to the appliance.
• Keep all packaging (plastic bags, polystyrene foam) away
from children.
• Do not locate the appliance above or near electric or gas
hobs or a hot oven.
• Make sure there are no foreign objects in the coee
grinder.
• Avoid contact with moving parts.
Designated use
This appliance must be used exclusively for the purpose for
which it was expressly conceived. All other uses are considered
improper.This appliance is not suitable for commercial use
The manufacturer is not liable for damage deriving from im-
proper use of the appliance.
Never try to chop ice or use the appliance other than as indicat-
ed in the Instruction for Use.

12
2.1 Instruction for Use
Read this Instruction for Use carefully before using the appli-
ance. Failure to follow this Instruction for Use may result in
injury or damage to the appliance.
The manufacturer is not liable for damage deriving from failure
to respect this Instruction for Use.
Please note:
Keep this operating instructions for future use. If the appliance
ispassed to otherpersons,they must alsobe provided with this
Instruction for Use.
3. DESCRIPTION
3.1 Description of the appliance
(page 3 - A )
A1. Coee beans container
A2. Coee beans container lid
A3. Grinding selection regulator
A4. Selection dial for number of cups (MIN=1; MAX=14)
A5. Accessories holder housing
A6. Box for lter holder’s accessory
A7. Filter holder’s accessory
A8. Ground coee container’s tray
A9. ON/OFF button
A10. Ground coee container’s lid
A11. Ground coee container’s cap
A12. Ground coee container
A13. Cleaning brush
3.2 Description of the control panel
(page 3 - B )
B1. Start grinding button
B2. Strength selection button
B3. Selected strength (LIGHT; NORMAL; STRONG)
B4. Ground coee container’s light
B5. Selected number of cups
B6. Filter holder’s accessory light
B7. Coee beans container light
4. CHECKING THE APPLIANCE
After removing the packaging, make sure the product is com-
plete and undamaged and that all accessories are present. Do
not use the appliance if it is visibly damaged. Contact De’Long-
hi Customer Services.
5. CONNECTING THE APPLIANCE
Danger!
Check that the mains power supply voltage corresponds to
the value indicated on the rating plate on the bottom of the
appliance.
Connect the appliance to an eciently earthed and correctly
installed socket with a minimum current rating of 10A only. If
the power socket does not match the plug on the appliance,
have the socket replaced with a suitable type by a qualied
professional.
6. BEFORE USE
Before using the coee grinder, clean the outer housing and
the container for loading coee beans with a clean damp cloth.
Wash all the accessories in hot soapy water, then rinse and dry.
Important:
The grinder should not be washed and must always be kept
dry. Clean the grinder with a sti bristle brush.
7. USING THE APPLIANCE
7.1 Using the ground coee container
1. Place the appliance on a at surface.
2. Screw the coee beans container turning it clockwise (g.
1);
3. Remove the coee beans container lid (g. 2);
4. Pour the desired coee beans quantity in the container
(g. 3);
5. Close the lid pushing it rmly;
Important:
Never remove the container if there are coee beans inside.
6. Plug the appliance into the mains socket;
7. Set the dial (A4) to the quantity of coee corresponding
to the number of cups for which you want to grind the
beans: the relative number appears on the display (g. 4).
Use this ratio as a rough guide only, since the amount will
vary according to the taste, type and roasting of coee
beans as well as the neness of grinding selected;
8. Press the strength selection button (B2) until the desired
aroma appears on the display (g. 5);
Important:
• The quantity of ground coee varies upon the dierent
coee grind.
• Adjust the coee grind and strength according the per-
sonal taste.
• FRENCH PRESS: when preparing ground coee for this
kind of coee machine, it is recommended to set max 8
cups.
9. Push the start grinding button (B1) (g. 6);
10. Select the grind of coee by adjusting the regulator (A3)
to the type of coee desired (g. 7): adjust the regulator
when the appliance is working;

13
11. Once the previously selected amount of coee is reached,
the appliance will stop automatically;
12. If you want to stop the appliance before grinding is n-
ished, press the start grinding button again;
Please note:
Stop grinding if the ground coee reaches the max level.
13. Remove the pre-ground coee container, gently tap the
container, remove the lid and pour the pre-ground coee
intothelterofthecoeemachine.Ifyoudon’tuseallthe
ground coee, it can be stored in the container, closing
the cap (A11) to avoid loosing aroma.
Always empty the ground coee container before using the
appliance again.
7.2 Grinding directly in the lter holder
1. Preparethe coee beanscontaineras illustratedin steps 1
to 6 of the previous paragraph;
2. Extract the lter holder accessory’s box (A6) from its
housing (g. 8);
3. Extract the lter holder accessory (A7) (g. 9);
4. Insert the accessoryto the appliance,pushingit as faras it
goes:the corresponding light comes steadyon the display
(g. 10);
Please note:
• When using the lter holder accessory, you can not
choose the number of the cups: you can only grind coee
for 1 or 2 cups of espresso;
• When using the lter holder accessory, turn the grinding
selection regulator (A3) to number 1 or 6 of the“ESPRES-
SO”section.
Note: do not grind beyond number 6 to avoid to overll
the lter holder.
5. Insert the lter holder to the accessory (g. 11). It is rec-
ommended to hold in place the lter holder, as the acces-
sory is suitable for standard dimensions and do not cover
all the models;
6. Push the start button (B1) (g. 6): to grind the 2-cups
quantity, push two times the start button within 1 second
after the grinding starts;
7. Grinding automatically stops: if you want to stop it earlier,
press the start button once again;
8. Extract the lter holder and proceed preparing espresso
coee.
8. TIPS
• Always close the beans coee container to maintain the
taste and aroma of the coee beans.
• Only grind the coee quantity for the single preparation.
• Never overll the coee beans container. As a rough
guide, use a tablespoon of beans per cup (e.g. 4 table-
spoonsofbeans for 4 cupsofcoee).As youusethe grind-
er, you will of course discover the optimum quantities for
your own personal taste.
• After 2 preparations consequently, wait 15 minutes be-
fore next use.
• To ensure good quality in terms of coee freshness, al-
ways clean the appliance after each use. It is not advis-
able to grind oil beans.
9. PROGRAMMABLE SETTINGS
9.1 Programming grinding time with the lter
holder accessory (A7)
1. Insert the lter holder accessory;
2. Insert the lter holder of your coee machine;
3. Push the start grinding button (A1) and keep it pushed:
the grinding starts and the cup symbol ashes fast to in-
dicate that the appliance is in programming mode;
4. Once reached the coee quantity, release the button: the
appliance stops grinding and the time for 1 espresso cup
is programmed.
Please note:
• To avoid excessive quantities, the max programmable
grinding time is about 7 seconds.
• Itispossible to programthe1-cupquantity:when prepar-
ing the quantity for 2 cups, the appliance grinds a double
quantity.
9.2 Display contrast
The display can be set on 5 dierent levels of contrast:
1. Switch the appliance on by pressing the ON/OFF button
(A9);
2. Extract the ground coee container (A12) or the lter
holder accessory (A7) (if inserted);
3. Pressone button:onthedisplayappearsthe currentnum-
ber of the contrast level (g. 16);
4. Press the buttons to increase or decrease the contrast;
5. Once selected the desired contrast, insert the ground cof-
fee container of the lter holder accessory: the appliance
is ready to use.

14
9.3 Reset to default values
1. Switch the appliance on by pushing the ON/OFF button
(A9);
2. Extract the ground coee container (A12) or the lter
holder accessory (A7) (if inserted);
3. Press both buttons simultaneously: the appliance reset to
the default values of display contrast and grinding time
when using the lter holder accessory;
4. Insert the ground coee container or the lter holder ac-
cessory: the appliance is ready to use.
10. CLEANING
Danger!
Before performing any cleaning operations, the machine must
be turned o and disconnected from the mains power supply.
Never immerse the coee machine in water.
1. Unplug from the mains.
2. Unhook the coee beans container (A1) rotating it coun-
terclockwise and extract it. Ensure it is empty when
removing;
3. Extract the ground coee container (A12);
4. Extract the lter holder accessory’s box (A6);
5. Lift the ground coee container’s tray (A8);
6. Wash all the accessories with soapy mild water: do not
wash in dishwasher! Dry thoroughly the accessories be-
fore use.
Please note:
Regularly clean the grinders, proceeding as follows:
1. Turn counterclockwise the regulator, to “OPEN” position
(g. 12);
2. Extract by lifting the upper grinder (g. 13);
3. Clean the extracted grinder with the sti bristle brush
(g. 14);
4. Clean the inner grinder with a brush and vacuum up the
residues of coee with a vacuum cleaner (g. 15);
6. Re-insert the upper grinder and turn the regulator by
choosing the desired grinding level.
11. TECHNICAL DATA
Voltage: ..................................220-240V ˜50/60 Hz max. 10A
Absorbed power: .......................................................... 150W
Weight:..........................................................................3.5kg
This appliance complies with European regulation no.
1935/2004 on food contact materials.
12. DISPOSING OF THE APPLIANCE
The appliance must not be disposed of with house-
hold waste, but taken to an authorised waste sepa-
ration and recycling centre.
13. TROUBLESHOOTING
The appliance does not work. Make sure the plug is correctly plugged into the mains socket and is functioning
correctly.
Neither the ground coee container (A12) nor the lter-holder accessory (A7) is in-
serted. Insert the required accessory
The accessory is not inserted correctly. Extract, then insert again.
The beans container is not inserted (A1). Insert the container.
The beans container (A1) is not inserted correctly. Extract, then insert again.
The appliance stops during grinding. The appliance has overheated.
The thermal cutout on the motor has tripped.
Contact an authorised Customer Services.
There is not enough ground coee. Over time the burrs wear down. Replace them with new burrs purchased from an
authorised Customer Services centre (see section“10. cleaning”)

15
1. GRUNDLEGENDE SICHERHEITSHINWEISE
• Geräte könnenvonPersonenmit reduzierten physischen,sensorischen oder mentalen
Fähigkeiten oder Mangel an Erfahrung und/oder Wissen benutzt werden, wenn sie
beaufsichtigtoderbezüglichdessicherenGebrauchsdesGerätesunterwiesen wurden
und die daraus resultierenden Gefahren verstanden haben.
• Kinder müssen überwacht werden, damit sie nicht mit dem Gerät spielen.
• Während der Reinigung das Gerät nie insWasser tauchen.
• Verwenden Sie das Gerät nicht, wenn die Schutzabdeckung des rotierendenTeils be-
schädigt oder brüchig ist.
• Dieses Gerät ist ausschließlich für den Hausgebrauch bestimmt. Der Gebrauch
ist nicht vorgesehen in Räumen, die als Küchen für das Personal von Geschäften,
Büros und anderen Arbeitsbereichen eingerichtet sind, in landwirtschaftlichen tou-
ristischen Einrichtungen, Hotels, Motels und sonstigen Übernachtungsbetrieben,
Zimmervermietungen.
• Wenn die Netzanschlussleitung dieses Gerätes beschädigt wird, muss sie durch den
Hersteller oder seinen Kundendienst oder eine ähnlich qualizierte Person ersetzt
werden, um Gefährdungen zu vermeiden.
NUR FÜR EUROPÄISCHE MÄRKTE:
• DasGerätimmervonderStromversorgungtrennen,wennesunbeaufsichtigtist sowie
bevor es montiert, demontiert oder gereinigt wird.
• Dieses Gerät darf nicht von Kindern benutzt werden. Das Gerät und sein Kabel außer-
halb der Reichweite von Kindern halten.
• Kinder dürfen nicht mit dem Gerät spielen.
2. SICHERHEITSHINWEISE
Gefahr! Die Nichteinhaltung kann zu Verletzungen durch
Stromschlag mit Lebensgefahr führen.
Da das Gerät mit Strom betrieben wird, können Stromschläge
nicht ausgeschlossen werden.
HaltenSiesichdaherbitteandiefolgendenSicherheitshinweise:
• Das Gerät niemals mit nassen Händen bzw. Füßen
berühren.
• Den Netzstecker nicht mit nassen Händen berühren.
• Sicherstellen, dass die verwendete Steckdose stets ein-
wandfrei zugänglich ist, da Sie nur so im Bedarfsfall den
Netzstecker trennen können.
• Zum Trennen des Netzsteckers aus der Steckdose direkt
am Stecker selbst ziehen. Nicht am Kabel ziehen, weil es
sonst beschädigt werden könnte.
• Um das Gerät vollständig vom Strom zu trennen, den
Netzstecker aus der Steckdose ziehen.
• Bei Defekten des Gerätes versuchen Sie bitte nicht, diese
selbst zu reparieren.
Schalten Sie das Gerät aus, ziehen Sie den Netzstecker aus
der Steckdose und wenden Sie sich an den technischen
Kundendienst.
• Vor jeder Reinigung die Kaeemühle ausschalten, den
Netzstecker aus der Steckdose ziehen.
Achtung! Die Nichteinhaltung kann zu Verletzungen oder
Beschädigungen am Gerät führen.
• Das Verpackungsmaterial (Plastikbeutel, Styropor) ist
außer Reichweite von Kindern aufzubewahren.
• Das Gerät nicht auf oder in der Nähe von Elektro- oder
Gasherden bzw. in einem beheizten Backofen aufstellen.
• Das Innere der Kaeemühle auf Fremdkörper prüfen.
• Den Kontakt mit bewegtenTeilen vermeiden.
Bestimmungsgemäßer Gebrauch
Dieses Gerät darf nur für den Zweck, für den es bestimmt
wurde, eingesetzt werden. Jeder sonstige Gebrauch gilt als

16
unsachgemäß. Dieses Gerät ist nicht für den gewerblichen
Gebrauch geeignet.
Der Hersteller haftet nichtfür Schäden, die durchunsachgemä-
ßen Gebrauch des Gerätes verursacht werden.
Versuchen Sie nie, Eis zu zerkleinern oder das Gerät entgegen
den Angaben in der Bedienungsanleitung zu verwenden.
2.1 Bedienungsanleitung
Bitte lesen Sie diese Bedienungsanleitung vor dem Gebrauch
des Gerätes aufmerksam durch. Die Nichtbeachtung dieser
Anleitungenkann zuVerletzungenoder Geräteschädenführen.
Der Hersteller haftet nicht für Schäden, die durch die Nichtbe-
achtung dieser Bedienungsanleitung verursacht werden.
Hinweis:
Bewahren Sie diese Bedienungsanleitung sorgfältig auf. Falls
Sie dieses Gerät an andere Personen abtreten sollten, muss
ihnen auch diese Bedienungsanleitung übergeben werden.
3. BESCHREIBUNG
3.1 Beschreibung des Gerätes
(S. 3- A)
A1. Kaeebohnenbehälter
A2. Deckel des Kaeebohnenbehälters
A3. Mahlgradregler
A4. Drehknopf zur Auswahl der Tassenanzahl (MIN=1;
MAX=14)
A5. Zubehörfach
A6. Behälter mit Zubehör für den Siebträger
A7. Zubehör für den Siebträger
A8. Ablage für Kaeepulverbehälter
A9. Taste ON/OFF
A10. Deckel Kaeepulverbehälter
A11. Verschluss Kaeepulverbehälter
A12. Kaeepulverbehälter
A13. Reinigungspinsel
3.2 Beschreibung der Bedienelemente
(Seite 3 - B )
B1. Taste zum Start des Mahlvorgangs
B2. Taste zur Auswahl des Kaeearomas
B3. Aktuell eingestelltes Aroma (LIGHT = MILD; NORMAL =
NORMAL; STRONG= KRÄFTIG)
B4. Kontrolllampe Kaeepulverbehälter
B5. EingestellteTassenanzahl
B6. Kontrolllampe Zubehör für den Siebträger
B7. Kontrolllampe Kaeebohnenbehälter
4. KONTROLLE DES GERÄTES
Überzeugen Sie sich nach dem Auspacken, dass das Gerät
unversehrt ist und keine Zubehörteile fehlen. Bei sichtbaren
Schäden das Gerät auf keinen Fall verwenden. Wenden Sie sich
an den technischen Kundendienst De’Longhi.
5. ANSCHLUSS DES GERÄTES
Gefahr!
Vergewissern Sie sich, dass die Netzspannung mit der auf dem
Typenschild angegebenen Spannung übereinstimmt. Das Ty-
penschild bendet sich am Geräteboden.
Schließen Sie das Gerät nur an eine vorschriftsmäßig installier-
te und geerdete Steckdose mit einer Mindestleistung von 10A
an. Falls die Steckdose nicht für den Netzstecker Ihres Gerätes
geeignet ist, lassen Sie diese bitte von einem Fachmann gegen
eine geeignete Steckdose austauschen.
6. ERSTE SCHRITTE
Reinigen Sie vor dem Gebrauch der Kaeemühle das Gehäuse
mit einem feuchten Tuch. Waschen Sie alle Zubehörteile von
Hand mit lauwarmem Wasser und Geschirrspülmittel, spülen
Sie sie ab und trocknen Sie sie ab.
Achtung!
Das Mahlwerk darf nicht gewaschen werden und muss immer
trocken bleiben.
ReinigenSiedasMahlwerkmiteinerBürstemithartenBorsten.
7. GEBRAUCH DES GERÄTES
7.1 Kaee in den Behälter mahlen
1. Stellen Sie das Gerät auf einer ebenen Fläche auf.
2. Schrauben Sie den Kaeebohnenbehälter fest, indem Sie
ihn nach rechts drehen (Abb. 1);
3. Ziehen Sie den Kaeebohnenbehälters heraus (Abb. 2);
4. Füllen Sie die gewünschte Menge Kaeebohnen in den
Behälter (Abb. 3);
5. Schließen Sie den Deckel wieder, indem Sie ihn gut
andrücken;
Achtung!
Entfernen Sie den Kaeebohnenbehälter nicht, wenn sich Kaf-
feebohnen darin benden.
6. Stecken Sie den Netzstecker in die Steckdose;
7. Stellen Sie den Drehknopf (A4) auf die benötigte Kaee-
menge für die gewünschteTassenanzahl: auf dem Display
erscheint die gewünschte Anzahl (Abb. 4). Diese Einstel-
lung ist nur eine Empfehlung, da die jeweilige Menge
vom Geschmack, von der Röstung der Kaeebohnen und
vom eingestellten Mahlgrad abhängt;

17
8. Drücken Sie dieTaste zur Auswahl des Kaeearomas (B2),
bis auf dem Display das gewünschte Aroma angezeigt
wird (Abb. 5);
Achtung!
• Es ist normal, dass die Kaeepulvermenge je nach einge-
stelltem Mahlgrad abweicht.
• Stellen Sie den Mahlgrad und das Aroma nach Ihrem per-
sönlichen Geschmack ein.
• FRENCH PRESS: wenn der Mahlgrad für diese Kaeeart
eingestellt wird, sollten höchstens 8 Tassen zubereitet
werden.
9. Drücken Sie die Taste zum Start des Mahlvorgangs (B1)
(Abb. 6);
10. Regeln Sie den Mahlgrad des Kaees, indem Sie den ent-
sprechenden Regler (A3) auf die gewünschte Kaeeart
stellen (Abb. 7): stellen Sie den Mahlgrad nur bei laufen-
dem Gerät ein;
11. Sobald die zuvor eingestellte Kaeemenge erreicht ist,
schaltet sich das Gerät automatisch ab;
12. Wenn Sie das Gerät ausschalten möchten, bevor der
Mahlvorgang beendet ist, dann drücken Sie bitte dieTaste
zum Start des Mahlvorgangs erneut;
Hinweis:
Beenden Sie den Mahlvorgang, wenn das Kaeepulver den
Füllstand MAX.
13. Entnehmen Sie den Kaeepulverbehälter (A12), klopfen
Sie leicht gegen den Behälter, nehmen Sie den Deckel ab
und füllen Sie das Kaeepulver in das Sieb der Kaee-
maschine. Wenn das Kaeepulver nicht ganz verwendet
wird, kann es im Behälter aufbewahrt werden, der mit
dem Verschluss (A11) verschlossen werden muss, um das
Aroma zu bewahren.
Leeren Sie den Kaeepulverbehälter immer, bevor Sie ihn er-
neut verwenden.
7.2 Mahlen von Kaee in den Behälter mit
Siebträgerhalter
1. Bereiten Sie den Kaeebohnenbehälter vor, wie in
den Punkten 1 bis 7 des vorhergehenden Abschnitts
beschrieben;
2. Nehmen Sie den Behälter mit dem Zubehör für den Sieb-
träger (A6) aus seinem Fach (Abb. 8);
3. Nehmen Sie das Zubehör für den Siebträger (A7) aus dem
Behälter (Abb. 9);
4. Setzen Sie das Zubehör in das Gerät ein und drücken Sie
es fest an: auf dem Display bleibt die entsprechende Kon-
trolllampe permanent eingeschaltet (Abb. 10);
Hinweis:
• Wenn das Zubehör für den Siebträger verwendet wird,
kann die Tassenanzahl nicht gewählt werden: es kann
die notwendige Kaeemenge für eine oder zwei Tassen
Espresso gemahlen werden;
• Wenn das Zubehör für den Siebträger verwendet wird,
muss der Mahlgradregler (A3) zwischen 1 und 6 im
Bereich “ESPRESSO” gestellt werden: stellen Sie den
Mahlgrad nur bei laufendem Gerät ein.
Hinweis: mahlen Sie mit einem höheren Mahlgrad als 6,
damit der Siebträger nicht zu voll wird.
5. Rasten Sie den Siebträger am Zubehör ein (Abb. 11). Es
wird empfohlen, den Siebträger in Position zu halten, da
das Zubehör anhand von Standardabmessungen kons-
truiert ist, die nicht allen handelsüblichen Siebträgern
entsprechen;
6. Drücken Sie die Taste zum Start des Mahlvorgangs (B1)
(Abb. 7): um die Menge für 2 Tassen zu mahlen, drücken
Sie die Starttaste innerhalb der ersten Sekunde der Zube-
reitung bitte zweimal;
7. Der Mahlvorgang endet automatisch: wenn Sie das
Gerät ausschalten möchten, bevor der Mahlvorgang be-
endet ist, dann drücken Sie bitte die Taste zum Start des
Mahlvorgangs;
8. Entnehmen Sie den Siebträger und fahren Sie mit der Es-
pressozubereitung fort.
8. EMPFEHLUNGEN ZUM GEBRAUCH
• Halten Sie den Deckel des Kaeebohnenbehälters immer
luftdichtverschlossen,umdenGeschmack und dasAroma
der Kaeebohnen lange zu bewahren.
• Mahlen Sie nur die jeweils benötigte Kaeemenge.
• Machen Sie den Kaeebohnenbehälter nicht zu voll. Ge-
nerell gilt, ein Esslöel Bohnen pro Tasse (z.B. 4 Esslöel
Kaeebohnen für 4 Tassen Kaee). Die optimale Menge
nden Sie mit der Zeit anhand Ihres persönlichen Ge-
schmacks heraus.
• Wenn das Gerät zweimal hintereinander verwendet
wurde, warten Sie bitte 15 Minuten bevor Sie es erneut
verwenden.
• Um die Frische des Kaees zu garantieren, muss das Gerät
nach jedem Gebrauch gereinigt werden, vor allem, wenn
vor dem Kaee andere Lebensmittel gemahlen wurden
(z.B. Zucker). Ölhaltige Samen (z.B. Erdnüsse) oder zu
harte Körner (z.B. Reis) sollten nicht gemahlen werden.

18
9. PROGRAMMIERBARE EINSTELLUNGEN
9.1 Programmierung der Mahlzeit bei
Verwendung des Zubehörs für den
Siebträger (A7)
1. Setzen Sie das Zubehör für den Siebträger ein;
2. Setzen Sie den Siebträger der Espressomaschinen ein;
3. Drücken Sie die Taste zum Start des Mahlvorgangs (A1)
und halten Sie sie gedrückt: der Mahlvorgang beginnt
und das Symbol der Taste blinkt schnell, wodurch ange-
zeigt wird, dass sich das Gerät im Programmiermodus
bendet;
4. Wenn die gewünschte Kaeemenge gemahlen ist, die
Taste wieder loslassen: das Gerät bricht den Mahlvor-
gang ab und die Mahlzeit für eine Tasse Espresso ist
gespeichert.
Hinweis:
• Damit keine zu große Kaeepulvermenge erzeugt wird,
kann das Gerät eine maximale Mahlzeit von etwa 7 Se-
kunden speichern.
• Es kann nur die Kaeepulvermenge für eineTasse gespei-
chert werden: wenn Kaee für 2 Tassen gemahlen wird,
mahlt das Gerät das Doppelte der Menge, die für eine
Tasse gespeichert ist.
9.2 Displaykontrast
Für das Display sind 5 verschiedene Kontrasteinstellungen
wählbar: dazu wie folgt vorgehen:
1. Das Gerät durch Drücken der Taste EIN/AUS (A9)
einschalten.
2. Den Kaeepulverbehälter (A12) oder das Zubehör für den
Siebträger (A7) (falls eingesetzt) entnehmen;
3. Eine der beiden Tasten drücken: auf Display erscheint die
aktuell eingestellte Kontraststufe und blinken die 3 mitt-
leren Kontrolllampen (Abb. 16);
4. Drücken Sie eine beiden Tasten, um den Kontrast zu
erhöhen/verringern;
5. Sobald der gewünschte Kontrast eingestellt ist, den Kaf-
feepulverbehälter oder das Zubehör für den Siebträger
wieder einsetzen: das Gerät ist betriebsbereit.
9.3 Rücksetzung auf die Werkseinstellungen
1. Das Gerät durch Drücken der Taste EIN/AUS (A9)
einschalten.
2. Den Kaeepulverbehälter (A12) oder das Zubehör für den
Siebträger (A7) (falls eingesetzt) entnehmen;
3. Beide Tasten gleichzeitig drücken: das Gerät kehrt zu
dem voreingestellten Kontrastwert und zu den Stan-
dard-Mahlzeiten mit Siebträger zurück;
4. Den Kaeepulverbehälter (A12) oder das Zubehör für den
Siebträger wieder einsetzen: das Gerät ist betriebsbereit.
10. REINIGUNG
Gefahr!
Vor jedem Reinigungseingri muss die Kaeemühle ausge-
schaltet und vom Stromnetz getrennt sein. Das Gerät niemals
insWasser tauchen.
1. Den Stecker aus der Steckdose ziehen;
2. Den Kaeebohnenbehälter (A1) ausrasten, indem er nach
links gedreht und aus dem Gerät entnommen wird;
3. Den Kaeepulverbehälter entnehmen (A12);
4. Entnehmen Sie den Behälter mit dem Zubehör für den
Siebträger (A6);
5. Heben Sie die Ablage für den Kaeepulverbehälter (A8)
an;
6. Alle Zubehörteile können mit lauwarmem Wasser und
Geschirrspülmittel gewaschen werden: sei dürfen nicht
im Geschirrspüler gereinigt werden! Trocknen Sie die Zu-
behörteile gut ab, bevor Sie sie erneut verwenden.
Hinweis:
Reinigen Sie auch die Mahlwerke regelmäßig, indem Sie wie
folgt vorgehen:
1. Drehen Sie den Mahlgradregler nach links bis zum An-
schlag auf“OPEN”(Abb. 12);
2. Heben Sie den oberen Teil des Mahlwerks an und ziehen
Sie ihn heraus (Abb. 13);
3. Reinigen Sie den herausgezogenen Teil mit einer Bürste
mit harten Borsten (Abb. 14);
4. Reinigen Sie das Innere des Gerätes mit einem Pinsel und
saugen Sie Kaeerückstände mit einem Staubsauger auf
(Abb. 15);
6. Setzen Sie den oberenTeil des Mahlwerks wieder ein und
drehen Sie den Regler auf den gewünschten Mahlgrad.
Mit der Zeit nutzen sich die Mahlwerke ab und die Kaeepul-
vermenge wird weniger. In diesem Fall wenden Sie sich bitte
an ein autorisiertes Kundendienstzentrum, um neue Mahlwer-
ke zu kaufen und die alten zu ersetzen.
11. TECHNISCHE DATEN
Spannung: ..............................220-240V ˜50/60 Hz max. 10A
Leistungsaufnahme: ..................................................... 150W
Gewicht:.........................................................................3,5kg
Dieses Gerät erfüllt die Anforderungen derVerordnung
(EG) Nr. 1935/2004 über Materialien, die dazu bestimmt sind,
mit Lebensmitteln in Berührung zu kommen.

19
12. ENTSORGUNG
Das Gerät darf nicht über den Hausmüll entsorgt
werden, sondern muss an einer oziellen Sammel-
stelle abgegeben werden.
13. BETRIEBSSTÖRUNGEN
Das Gerät funktioniert nicht. Sicherstellen, dass der Gerätestecker richtig in die Steckdose gesteckt wurde und
dass die Steckdose einwandfrei funktioniert.
Es ist weder der Kaeepulverbehälter (A12), noch das Zubehör für den Siebträger
(A7) eingesetzt. Setzen Sie das gewünschte Zubehör ein
Das Zubehör ist nicht korrekt eingesetzt. Entnehmen Sie es und setzen Sie es erneut
ein.
Der Kaeebohnenbehälter (A1) ist nicht eingesetzt. Den Behälter einsetzen.
Der Kaeebohnenbehälter (A1) ist nicht korrekt eingesetzt. Entnehmen Sie ihn und
setzen Sie es korrekt ein.
Das Gerät unterbricht seinen Betrieb. Das Gerät ist überhitzt.
Der Motorschutzschalter hat ausgelöst.
Wenden Sie sich bitte an ein autorisiertes Kundendienstzentrum.
Zu wenig Kaeepulver. Mit der Zeit nutzen sich die Mahlwerke ab . Kaufen Sie in einem der autorisierten
Kundendienstzentren neue Mahlwerke und tauschen Sie sie aus (siehe entsprechen-
den Abschnitt in Kapitel„10. Reinigung“)
This manual suits for next models
1
Table of contents
Languages:
Other DeLonghi Coffee Grinder manuals

DeLonghi
DeLonghi DCG30 Series User manual

DeLonghi
DeLonghi DCG59 Series User manual

DeLonghi
DeLonghi DCG30 Series User manual

DeLonghi
DeLonghi KG40 User manual

DeLonghi
DeLonghi KG521 User manual

DeLonghi
DeLonghi KG2 Series User manual

DeLonghi
DeLonghi DCG49 Series User manual

DeLonghi
DeLonghi KG40 Installation instructions manual

DeLonghi
DeLonghi KG 79 User manual

DeLonghi
DeLonghi KG89 Installation instructions manual