WNC MRF500A User manual

Operating Instructions
DriverMonitoringSystem(DMS)
Face Login RecognizerMRF500A
Please read this manual thoroughly before operating the device,
and keep it for future reference.
V1.0

Contents
1. Precautions...............................................................................................................2
2. Product Features.....................................................................................................4
3. Technical Specifications.........................................................................................5
4. Components and Accessories...............................................................................6
5. Parts Identification & System connection............................................................7
5.1 Parts Identification of the driver fatigue monitoring system.......................7
5.2 System connection and Cable definition.......................................................7
6. Installation & Calibration.........................................................................................9
7. DMM and FRS functions......................................................................................13
7.1 Driver Monitoring Module (DMM).................................................................13
7.2 Face Recognition System (FRS) With Imobilzer Function...........................16
8. Functions of theAPP............................................................................................20
8.1 Calibration........................................................................................................ 20
8.2 Face Recognition............................................................................................20
8.3 Alarm record.....................................................................................................21
8.4 System setting.................................................................................................22
9.Troubleshooting......................................................................................................24

2
1. Precautions
●Storage and Keeping
1. Do not expose the device to excessive heat or cold. The storage temperature of this device is
-40~+85℃, and the operating temperature is -20~+70 ℃. The humidity is RH90%.
2. Never use this device near a bathtub, wash basin, kitchen, damp basement, swimming pool or
similar places.
3. Never use this device in environmentswith excessive moisture, dust or smoke.
4. Avoid dropping or striking this device.
5. Avoid using this device in enclosed spaces, areas with excessive vibration or subject to severe
impacts.
6. Never puncture, scratch or use abrasive cleaning materials on this device.
7. Do not place cables where they may be pinched or stepped on.
8. Leave at least a 2" space between the device and walls, cabinets or other objects to allow
adequate air circulation around the device.
9. The device is not designed to be waterproof.
●Operating Precautions
1. The device may be powered by a 12 / 24 volt automotive battery or vehicle electrical system.
Power supply of improper voltage may cause the device damaged permanently.
2. Make sure all cables are connected properly. Observe polarity. Improper cable connections may
damage the device. Remove the power cable connections when you don’t intend to use the unit.
3. This product is a safe driving auxiliary equipment, not a substitution for driver’s any operating
actions in the process of vehicle driving. Also, it cannot guarantee 100% recognition of any
abnormal driving
4. No obstacles are allowed within the scope of lens, GPS signal may not be received normally
which has an impact on the product use.
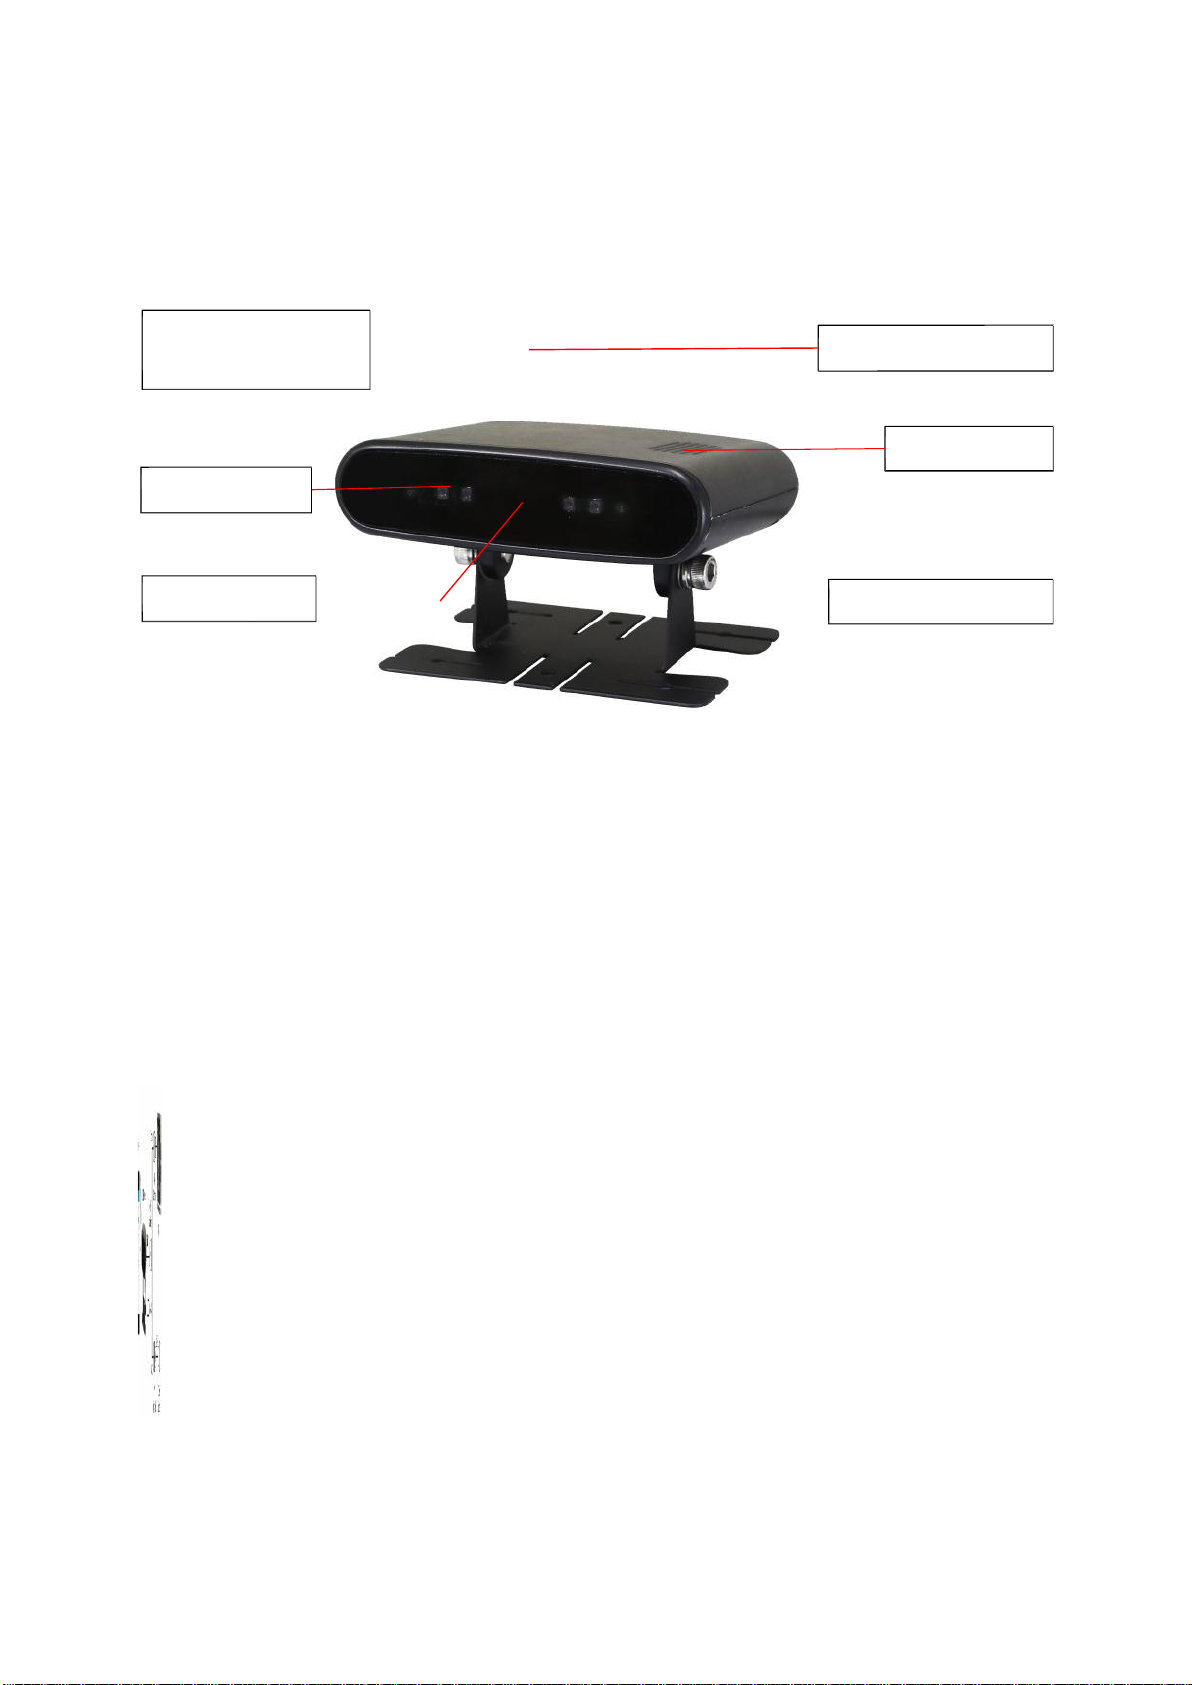
5. After disassembling the equipment or adjusting viewing angle of the camera, the equipment
need to be re-calibrated, or else its warning accuracy would be affected.

3
Warning!
1. High voltage is present within the device. The opening of the case should be by
professionals.
2. Do not watch the video while driving unless you are monitoring the rear view camera
display.
Special Notice
Never try to repair this device by yourself. In case of any problems, please turn off the device at
once and notify our company or authorized dealer.The device is a complex device.Any
disassembly or modification may lead to damage and void the warrantee.
●Maintenance
1. Remove all the cable connections from the device before cleaning the device.
2. Use a mild household detergent and clean the unit with a slightly damp, soft cloth.
3. Never use strong solvents such as thinner, as they might damage the finish of the device.
Caution
Risk of electric
shock
Do not
open
Caution: to reduce the risk of electric
shock,
Do not remove cover (or
back).
No user-serviceableparts
inside.
Refer servicing to qualified service
personnel.
This symbol is intended to alert the user to the presence of uninsulated "dangerous
voltage" within the product's enclosure that may be of sufficient magnitude to
constitute risk of electric shock to persons.
.
This symbol is intended to alert the user to the presence of important operating and
maintenance (servicing) instructions in the literature accompanying the appliance.
This symbol is intended to alert the user not to dispose of electrical and electronic equipment
CAUTION
You are cautioned that any changes or modifications not expressly approved in this manual
could void your warrantee and neccessitateexpensive repairs.

4
2. Product Features
1. DMM (Driver Monitor Module)
The DMM function includes five sub functions: Fatigued Driving Warming, Distracted Driving
Warming, Driver Calling Warning, Driver Smoking Warning and No Driver Warning;
All of the five sub functions will trigger a 20-sencondswarning record, including 10S before the
warming and 10s after the warming.
2. FRM (Face Recognition Module)
At most ten driver can be registered to the system;
Recognize the driver in 5 second, return the result by voice;
Record real-time video about the driver who cannot be recognized successfully.
3. DVR
1280×720/25f or 30f H.264 (HD) video;
Maximum support 128G Micro SD card with recording time up to 120hr. Circular overwriting
recording is available;
Camera is with WDR function.
4. Wireless communication with mobile phone
The mobile phone can access the device through Wi-Fi;
Setting the device and play back the warming video.
5. 940 IR LED
Ensure the detection accuracy in any light condition;
Ensure the detection when drivers wear polarized sunglasses.

5
3. Technical Specifications
Item
Parameter
Description
Camera
Resolution / Frame
HD 1280x720/25for 1280x720/30f
WDR
120dB
Video
Video Output
1CH, CVBS,720x480
Coding
H.264
Record Resolution
HD 1280x720/25for 1280x720/30f
Audio
Speaker Capacity
Max. 2W
Coding
ADPCM
Storage
Type / Capacity
Micro SD card / Max. 256G
Format
AVI
Sensor
G-sensor
Built-in
GPS
Built-in
Wireless
Wi-Fi
802.11b/g/n 150Mbps
Power
Input
DC 10~36V
Consumption
Max. 4W
Temperature
Operation
-20~70°C
Storage
-40~85°C
Appearance
Size
110x86.5x64mm
Weight
200g
Output
2 Digital output
Can use for Face Login Imobilizer,
strobe light, Vibration Chusion, etc
Diagram
1
Special Notice
All specificationsare subject to change without notice.

6
4. Components and Accessories
Components
or
Accessories
Quantity (piece)
Description
1
driver fatigue monitoring system
1
Extra power wire
(4 Pin aviation male connector
to DC female connector)
1
Relay Kit for Imobilizer
1 (Optional)
Monitor
(Supports analog video input)
Diagram
2
Special Notice
Accessory supply may be different for different application.

7
F gu e
1
5. Parts Identification & System connection
5.1 Parts Identification of the driver fatigue monitoring system
Micro SD card socket
(For video recording) IR transmission panel
4xIR(940) LED
Inside speaker
Inside camera Power indicator light
i
r
5.2 System connection and Cable definition
The system connection based on driver fatigue monitoring system is as follows. The device Wi-Fi hot
spot is point to point, just for calibrating and setting the device parameters,and it can’t connect to the
Internet. There are two ways to power the device, connecting to the monitor or connecting to external
power source directly. So the monitor is optional, but if device is tested or calibrated, connecting the
monitor is recommended.
Figure
2

8
Black
GND
Pink
CANL
Green
CANH
White
RS232_TX
Orange
RS232_RX
Definition of the Cable 1:
Connect to inside linker of the
driver fatigue monitoring system
CAN & UART
4PIN Aviation female
Figure
3
4PIN aviation female connector Definition of the color wire
Figure 4 Diagram 3
Definition of the Cable 2:
4PINAviation male DC Female Connector
Figure
5
Definition of the 4-PIN aviation male connector Definition of the DC female connector
Figure
6
The left end of Cable 1 is connecting to inside linkers of the driver fatigue monitoring system. To
the right end, aviation connector is connecting to the monitor or Cable 2 for external power source,
for another color wires, they are used to connect the CAN and UART (232) interface, transferring
warming information to the peripheral unit.

9
6. Installation & Calibration
The driver fatigue monitoring system should be place in the position that within angle to the front
view of the driver range about +/- 10 degrees and distance to the driver is about 0.8~1.2 meter.As
the following figure shows, to choose a proper position for fixing the device on the dashboard,
installation and calibrationshould be operated synchronously.So an assistant is recommended to
finish the calibration and registering (details operation on chapter 6, 7), who is to adjust the device,
guide the driver, and configure the device setting, etc.
Figure
7
1. Building the Wi-Fi connection
Before calibrating the driver fatigue monitoring system or setting the parameters of the device,
make sure the device is powered on. Then refer to following steps to finish the Wi-Fi connection
between mobile phone and driver fatigue monitoring system:
1) Install the APP, all of the operations and the parameters setting can only be done according to
the APP.
Note: the App is only available in Android version yet, and it can download in Google play, named
“DSMA”. The IOS version is coming soon.
2) Search the driver fatigue monitoring system Wi-Fi hot spot named “DDWS-xxxxxxxx” according
to the mobile phone, and connect this Wi-Fi hot spot with the default password “12345678”.
Refer to the below figures.

10
Figure
8
3) If it is first time to connect the Wi-Fi hot spot. It may prompt the massage as follows, choose the
“connect” button to remain the valid connection.
Figure
9

11
4) Run the specified APP “DSMA”, it will enter the main menu as follows, and touch the “Wi-Fi”
Button to establish the communicationrelationship between the phone and driver fatigue
monitoring system. And the effective communicationdistance of Wi-Fi is about 7m, please keep
in this range.
Figure
10
After finishing Wi-Fi connection, we can calibrate the driver fatigue monitoring system or operate
some other settings about the device according to the APP.
2. Operations of installing and calibrating
1) After making sure the driver’s driving posture and view straight as in normal driving, the assistant
can touch the “Calibration”button in the main menu to enter a real-time mode, as the below
figure.
Figure
11

12
There will be a color square in the middle of the screen, the square is with three color
modes:
a) Green, it means the relative angle and distance between the driver and driver fatigue
monitoring system is appropriate.
b) Red, it means the device is too closer to the driver or the angle of the device is not suitable.
The assistant should try to adjust the relative distance or angle of device, make sure that the
driver’s face is fully presented in the middle of the screen, being inside the color square. After
finishing above steps, the color of the square may turn green.
By the way, the assistant can adjust the pitch angle when the fixing hex nut is loose, as the
below figure. After adjusting to appropriate angle of the device, tighten the fixing hex nut.
Fixing hex nut
Figure
12
c) Yellow, it means the relative distance and the pitch angle of the device is appropriate, but the
included angle between the device and the front view of the driver is greater than +/- 10 degrees,
the assistant should rotate the device on the dashboard slightly until the square turn and stay
green.
2) After making sure the color square stay green, the assistant should press the "start" button and
follow the voice to guide to begin calibrating, the driver must keep the view straight as in normal
driving during the calibrating process which lasts about 10S. After calibrating, the device will
feedback by voice:
a)"Calibration is successful" indicates a successful calibrating. Then the APP will exit the
real-time mode automatically.
b)"To left" or "To right" indicates calibration is unsuccessful because the driver’s head is inclined
left or right. Slightly adjust the device angle again, and then repeat the calibrating process.
By touching the "cancel" button, you can exit the calibrating process at any time.
3) After finishing calibrating, the assistant should mark the current device position on the dashboard
by pencil carefully, then fixing the device on the marking position by 3M glue. According to above
steps, the calibration and installation is done.

13
7. DMM and FRS functions
After the device power up or reboot, the FRS function will first run automatically. Then, the device
will enter and keep in DMM mode. To make sure these two functions preform properly, please install
and calibrate the driver fatigue monitoring system carefully according to the guide of Charter 6
“Installation & Calibration”.
7.1 Driver Monitoring Module (DMM)
The DMM function includes five sub functions: Fatigued Driving Warming, Distracted Driving
Warming, Driver Calling Warning, Driver Smoking Warning, No Driver Warning. DMM just runs when
the speed is above the starting speed set by the APP, please refer to chapter 8.4 for the operation
guidance.
When a warning is triggered, the device will send out a voice to alarm the driver, record the video of
this warning event, and the warming information can transfer to other devices by CAN or
UART(232).
After the DMM function is running normally, there will be some elements overlaying in the real-time
video of the monitor, just as the below figure, these elements can be turn on or turn off by the APP,
please refer to the chapter 8.4.
Eyes closure
degree GPS status flag
Speed of the
vehicle
Head offset
degree Facial feature points
Figure
20
1. Fatigued Driving Warning
Fatigueddriving detection is based on PERCLOS (the percentageof eyelid closure over the pupil,
over time). The device triggers a fatigued driving warning, when the driver’s eyes close more than
4 seconds or the eyelids droop over time.

14
Figure
21
2. Distracted Driving Warning
Distracted driving warning is triggered when the device detects that the driver turns his (her) head
to one side (left or right) more than about 30 degrees for a long time (about 5 seconds).
Figure
22
3. Driver Calling Warning
Driver calling warning is triggered when the device detects that the driver holds the mobile phone
for a time more than about 3 seconds.
Figure
23

15
4. Driver smoking Warning
Driver smoking warning is triggered when the device detects that the driver keep smoking for a
time more than about 3 seconds.
Figure
24
5. No driver warning
No driver warning is triggered when the device cannot detect a driver for a long time (about 7
seconds).
Figure
25

16
7.2 Face Recognition System (FRS) With Imobilzer Function.
Face Recognition function detects whether a driver is registered (or qualified to drive the car) and
feedback the recognition result by voice. If the unregistered driver is detected, the video of
recognition process is recorded. Thus, before performing FRS, please register the drivers at first.
Once Face recognize match and got success, it can be configured for immobilizer to triger an output
to activate a relay immobilizer.
1. Register new drivers
a).Touch the “Face Recognition” button to enter the face recognition management menu.
“Face login” item is to turn on (or off) the FRS function after the device powers up or reboots.
Figure
13
b). Touch “Newface” to registera new qualifieddriver, and the drivers should be without the glasses
during registering their facial information. After entering the driver’s name (or ID, etc.) and
confirming, it comes to a live video screen with an assisting square. Make sure that the driver’s face
is fully in this square. For better face recognition, it’s strongly recommendedthat the driver shakes
his head slightly during this registering process.
The assisting square will show different colors to hint the registering state:
Green indicates that the system is recording the face information rightly.
Yellow indicates that the system can’t detect the driver’s facial characteristic.A face
outside the square often leads to this problem. Make sure that the device is properly installed
and calibrated. It rarely happens after proper calibration.Adjusting the device and guiding the
driver to make his face fully in the square will also do the trick.
White indicates that the system detects a static face.A slight head shaking often solved
this problem.The slight movement of the face is required to prohibit a fake identity by the
picture.
Note: if the system can’t detect a face rightly overtime, it will exit to the face recognition
managementmenu and gives a failure notice.

17
Figure
14
c) After recording the new face rightly, the system will pop up a notice to select whether to register
another new driver (“new face”) or to finish the registration.
It may take some time from a few second to 2 minutes to finish the registration, according to the total
number of registering and preregistered drivers.
Figure
15

18
Note: If the device powers down or restart due to some external factors during the registration
process, all the registering drivers' face information is already saved. The system will prompt
a message when the APP is reconnected. To choose the “CANCEL” button to abandon the
last registration, or to choose the “REGISTRATION”button to finish last registration.
Figure
16
2. Manage the drivers' information
To manage a registered driver's information, press the driver's name (or ID, etc.) in the menu to
enter the management interface and perform deleting or renaming.
Figure
17

19
Long pressing of a name will come to the batch mode, and then batch deletion is available.
Figure
18
3. Driver Recognition
There two ways to run the FRS, firstly, press the “TEST LOGIN” option in FRS setting page, refer to
the above figure. Secondly, after the system powers up or reboot, the FRS function will
automatically run. It will guide the driver to shake his (her) head and blink for recognition process by
voice. The recognition results are feedback both by voice and notice in the video of monitor as
follows. Once Face recognize match and got success, it can be configured for immobilizer to triger
an output to activate a relay immobilizer.
When an unregistered driver is detected, the system will record the recognition process video into
the micro Micro SD card for playback. About how to play back the video, please refer to chapter 8.3.
Note: The start-up of the driver fatigue monitoring system may take about 10S, please keep a
normal driving posture for better face recognition after hearing the voice guide.
Figure
19
Table of contents