manuals.online logo
Brands
  1. Home
  2. •
  3. Brands
  4. •
  5. Wolf
  6. •
  7. Ventilation Hood
  8. •
  9. Wolf Cooktop Low-Profile Hood User manual

Wolf Cooktop Low-Profile Hood User manual

This manual suits for next models

1

Other Wolf Ventilation Hood manuals

Wolf L342212 User manual

Wolf

Wolf L342212 User manual

Wolf PW362718R Instructions for use

Wolf

Wolf PW362718R Instructions for use

Wolf W542418 Instructions for use

Wolf

Wolf W542418 Instructions for use

Wolf VW36B User manual

Wolf

Wolf VW36B User manual

Wolf PW302418 User manual

Wolf

Wolf PW302418 User manual

Wolf ICBPW482418 Owner's manual

Wolf

Wolf ICBPW482418 Owner's manual

Wolf PW542418 User manual

Wolf

Wolf PW542418 User manual

Wolf CTEIH42I User manual

Wolf

Wolf CTEIH42I User manual

Wolf PI663418 Instructions for use

Wolf

Wolf PI663418 Instructions for use

Wolf W542718 Instructions for use

Wolf

Wolf W542718 Instructions for use

Wolf W662418 Instructions for use

Wolf

Wolf W662418 Instructions for use

Wolf L282212I Instructions for use

Wolf

Wolf L282212I Instructions for use

Wolf W482210 Instructions for use

Wolf

Wolf W482210 Instructions for use

Wolf CTWH30 User manual

Wolf

Wolf CTWH30 User manual

Wolf DD45I User manual

Wolf

Wolf DD45I User manual

Wolf PW542718R Instructions for use

Wolf

Wolf PW542718R Instructions for use

Wolf ICBDD30 User manual

Wolf

Wolf ICBDD30 User manual

Wolf PW482718 User manual

Wolf

Wolf PW482718 User manual

Wolf I423418 Instructions for use

Wolf

Wolf I423418 Instructions for use

Wolf PL462212 Instructions for use

Wolf

Wolf PL462212 Instructions for use

Wolf PL342212 User manual

Wolf

Wolf PL342212 User manual

Wolf L282212I User manual

Wolf

Wolf L282212I User manual

Wolf W482418 Instructions for use

Wolf

Wolf W482418 Instructions for use

Wolf VW30S User manual

Wolf

Wolf VW30S User manual

Popular Ventilation Hood manuals by other brands

Gorenje S3 IHGC963S4X manual

Gorenje

Gorenje S3 IHGC963S4X manual

KOBE ISX2136SQB-1 Installation instructions and operation manual

KOBE

KOBE ISX2136SQB-1 Installation instructions and operation manual

U.S. Products ADVANTAGE-100H Information & operating instructions

U.S. Products

U.S. Products ADVANTAGE-100H Information & operating instructions

Kuppersberg DUDL 4 LX Technical Passport

Kuppersberg

Kuppersberg DUDL 4 LX Technical Passport

Framtid HW280 manual

Framtid

Framtid HW280 manual

Thermador HGEW 36 FS installation manual

Thermador

Thermador HGEW 36 FS installation manual

Electrolux LFT769X user manual

Electrolux

Electrolux LFT769X user manual

AEG X69453MVO UK user manual

AEG

AEG X69453MVO UK user manual

Broan B5836SS manual

Broan

Broan B5836SS manual

Heinner HDCH-6060RGBK quick start guide

Heinner

Heinner HDCH-6060RGBK quick start guide

Baumatic AS35SS instruction manual

Baumatic

Baumatic AS35SS instruction manual

Franke FTF 604 XS V2 Instructions for use and installation

Franke

Franke FTF 604 XS V2 Instructions for use and installation

Best UCB3I30SBW installation instructions

Best

Best UCB3I30SBW installation instructions

Gram EFU 503-90 X instruction manual

Gram

Gram EFU 503-90 X instruction manual

CIARRA CBCS6803 Installation and user manual

CIARRA

CIARRA CBCS6803 Installation and user manual

sauter SHG501 Instructions for installation and use

sauter

sauter SHG501 Instructions for installation and use

Franke 392-17 User instructions

Franke

Franke 392-17 User instructions

FALMEC Polar Black 35 Instruction booklet

FALMEC

FALMEC Polar Black 35 Instruction booklet

manuals.online logo
manuals.online logoBrands
  • About & Mission
  • Contact us
  • Privacy Policy
  • Terms and Conditions

Copyright 2025 Manuals.Online. All Rights Reserved.

Cooktop ow-Profile Ventilation Hoods
INSTALLATION GUIDE
Important Note
To ensure the safe and efficient use of Wolf equipment,
please take note of the following types of highlighted
information throughout this guide:
IMPO TANT NOTE highlights information that is especially
important.
CAUTION signals a situation where minor injury or product
damage may occur if instructions are not followed.
WA NING states a hazard that may cause serious injury or
death if precautions are not followed.
Contents
Wolf Cooktop Low-Profile Ventilation Hoods . . . . . . . . 3
Cooktop Low-Profile Hood Specifications . . . . . . . . . . 4
Cooktop Low-Profile Hood Installation . . . . . . . . . . . . 8
ServiceInformation...........................18
Features and specifications are subject to change at any time
without notice. Visit wolfappliance.com/specs for the most
up-to-date information.
IMPO TANT NOTE: Throughout this guide, dimensions in
parentheses are millimeters unless otherwise specified.
IMPO TANT NOTE: Wolf cooktop low-profile hoods are
recommended for use with Wolf induction, electric and
gas cooktops and integrated modules. For ranges and
rangetops, a Wolf pro ventilation hood is recommended.
Wolf Cooktop ow-Profile Ventilation Hoods 3
wolfappliance.com/specs
Cooktop ow-Profile Hood Installation
IMPO TANT NOTE: This installation must be completed
by a qualified installer or Wolf factory certified service.
Read this entire installation guide prior to installation and
save for the local inspector’s reference. The homeowner
should keep this installation guide for future reference.
This appliance must be installed in accordance with
National Electrical Codes, as well as all state, municipal
and local codes. The correct voltage, frequency and
amperage must be supplied to the appliance from a dedi-
cated, grounded circuit which is protected by a properly
sized circuit breaker or time delay fuse. The proper
voltage, frequency and amperage ratings are listed on the
product rating plate.
Record the model and serial numbers before installing the
ventilation hood. Both numbers are listed on the product
rating plate, located on the underside of the hood, above
the grease filter. The filter must be removed to access the
rating plate. Refer to the illustration below.
Wolf Cooktop Low-Profile Hood
Model Number
Serial Number
Location of rating plate.
RATING P ATE
Cooktop ow-Profile Hood Specifications 4
Overall Dimensions
LOW-P OFILE WALL HOODS
227/8"(581)
31/8"(79)
23/8"(60)
TO
14" (356)
97/8"
(251)
113/4"
(298)
283/8"(721)
TO
40" (1016)
42" (1067) 215/8"(549)
303/4"(781)
TO
40" (1016) 227/8"(581)
31/8"(79)
43/4"(121)
TO
14" (356)
97/8"
(251)
215/8"(549)
LOW-P OFILE ISLAND HOOD
201/8"(511)
31/8"(79)
57/8"(149)
TO
183/8"(467)
107/8"
(276)
97/8"
(251)
291/8"(740)
TO
411/2"(1054)
30" (762), 36" (914) AND
45" (1143) WIDTHS
173/4"
(451)
31" (788)
TO
483/4"(1238) 201/8"(511)
31/8"(79)
77/8"(200)
TO
251/2"(648)
107/8"
(276)
173/4"
(451)
RECIRCU ATING APP ICATION
Cooktop ow-Profile Hood Specifications 5
wolfappliance.com/specs
Installation Considerations
Wolf cooktop low-profile hoods are recommended for
use with Wolf induction, electric and gas cooktops and
integrated modules. These hoods have a telescopic flue
that allows you to reach a ceiling height of 8' (2.4 m) to
9' (2.7 m) with a finished look.
IMPO TANT NOTE: Wolf recommends that the bottom
of the ventilation hood be installed 24" (610) to 30" (762)
above the countertop.
ow-profile wall and island hoods are available with an
internal blower. Wall hood models CTEWH36 and
CTEWH45 will require an in-line or remote blower
assembly, available through your authorized Wolf dealer.
For local dealer information, visit the find a showroom
section of our website, wolfappliance.com.
The blower will vary in size and is dictated by the cooking
unit, the volume of air that needs to be moved and the
length of the duct run. Refer to ventilation recommenda-
tions in the Wolf design guide. These hoods have an 6"
(152) round duct with vertical discharge.
IMPO TANT NOTE: Use only a Wolf blower with the
cooktop low-profile hood.
BACKSPLASH
Optional stainless steel backsplashes are available in
widths to match all cooktop low-profile hoods through
your authorized Wolf dealer. For local dealer information,
visit the find a showroom section of our website,
wolfappliance.com.
Electrical Requirements
Wolf cooktop low-profile ventilation hoods require a
separate, grounded 120 V AC, 60 Hz power supply. The
service should have its own 15 amp circuit breaker.
ocate the electrical supply within the shaded area shown
in the installation illustration for your specific model on the
following pages.
IMPO TANT NOTE: You must follow all National Electrical
Code regulations. In addition, be aware of local codes and
ordinances when installing your service.
Cooktop ow-Profile Hood Specifications 6
8' (2.4 m) TO 9' (2.7 m)
FLOOR TO
CEILING HEIGHT
173/4"
(451)
DEPTH OF HOOD
30" (762), 36" (914) OR
45" (1143)
WIDTH OF HOOD
291/8"(740)
TO
411/2"(1054)
HEIGHT OF HOOD
LOCATION OF
ELECTRICAL
24" (610) TO 30" (762)
TO COUNTERTOP
E
15"
(381)
5"
(127)
FRONT VIEWSIDE VIEW
Installation
LOW-P OFILE WALL HOODS
Cooktop ow-Profile Hood Specifications 7
wolfappliance.com/specs
8' (2.4 m) TO9' (2.7 m)
FLOOR TO
CEILING HEIGHT
215/8"(549)
DEPTH OF HOOD
42" (1067)
WIDTH OF HOOD
281/4"(718)
TO
411/2"(1054)
HEIGHT
OF HOOD
24" (610) TO 30" (762)
TO COUNTERTOP
LOCATION OF ELECTRICAL
THROUGH TOP OF HOOD
FRONT VIEWSIDE VIEW
Installation
LOW-P OFILE ISLAND HOODS
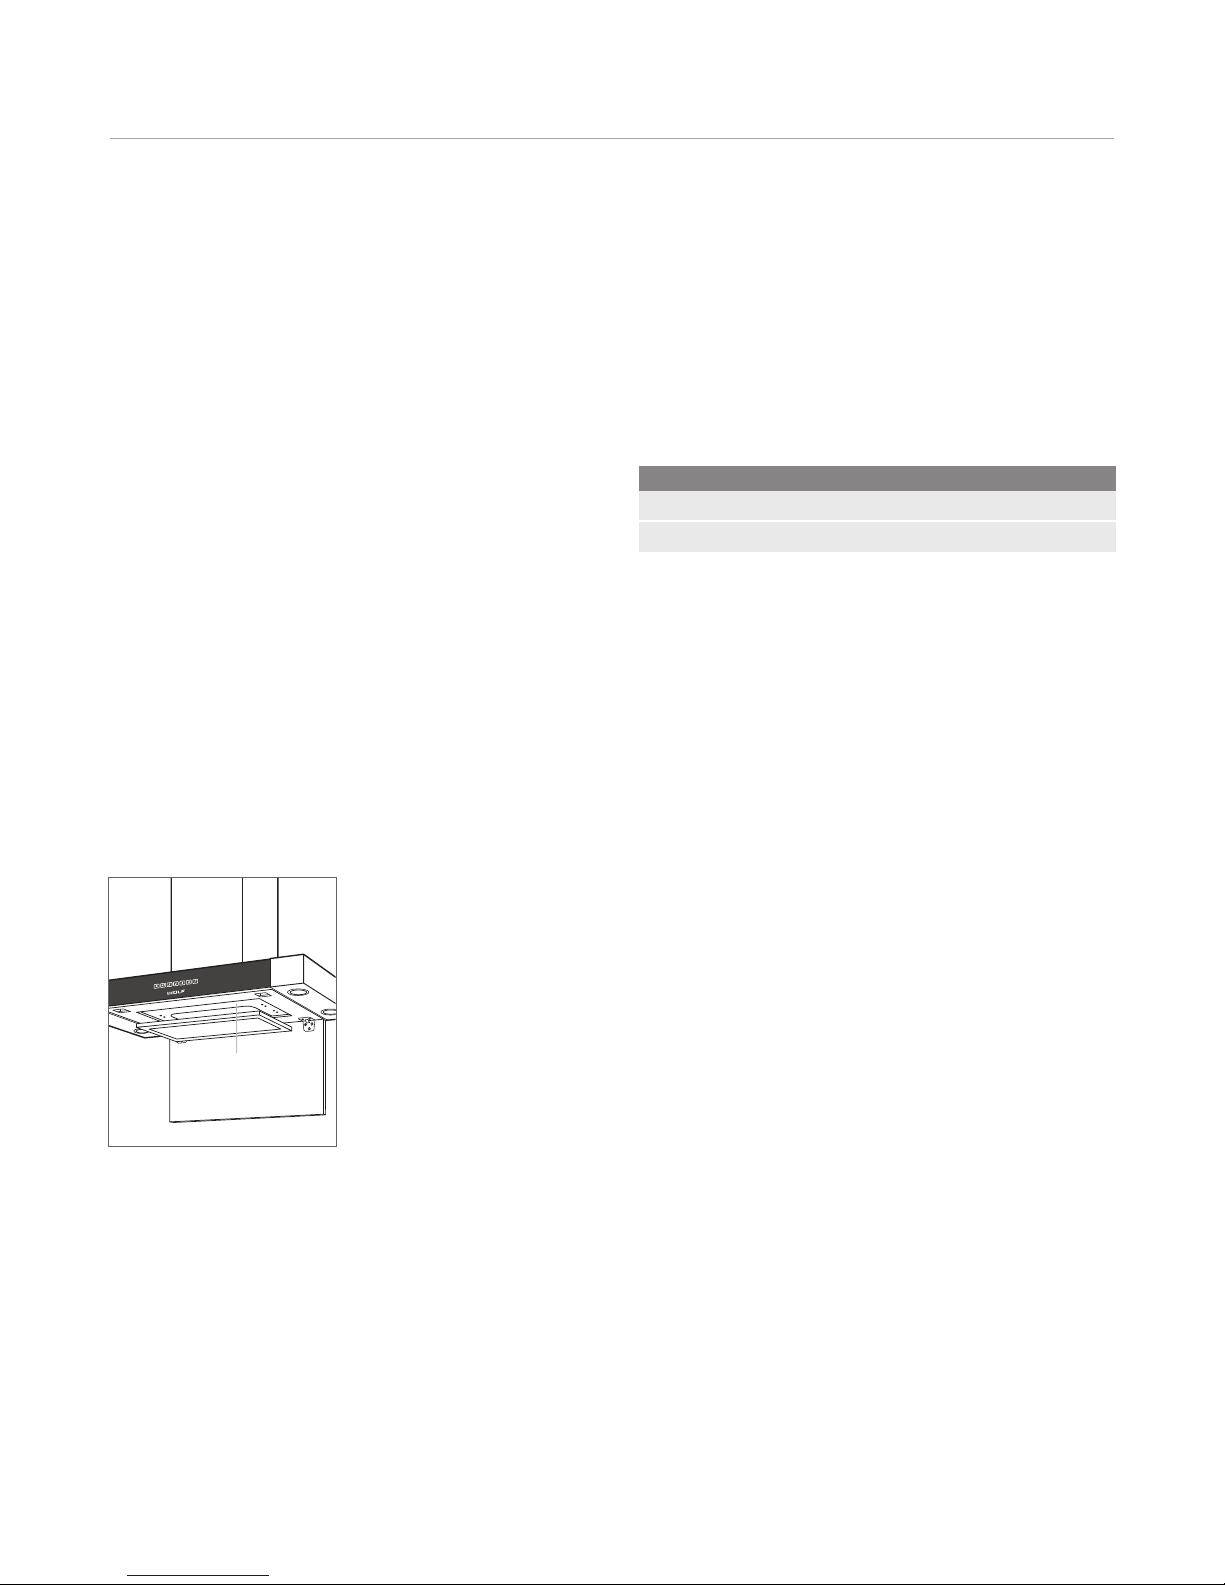
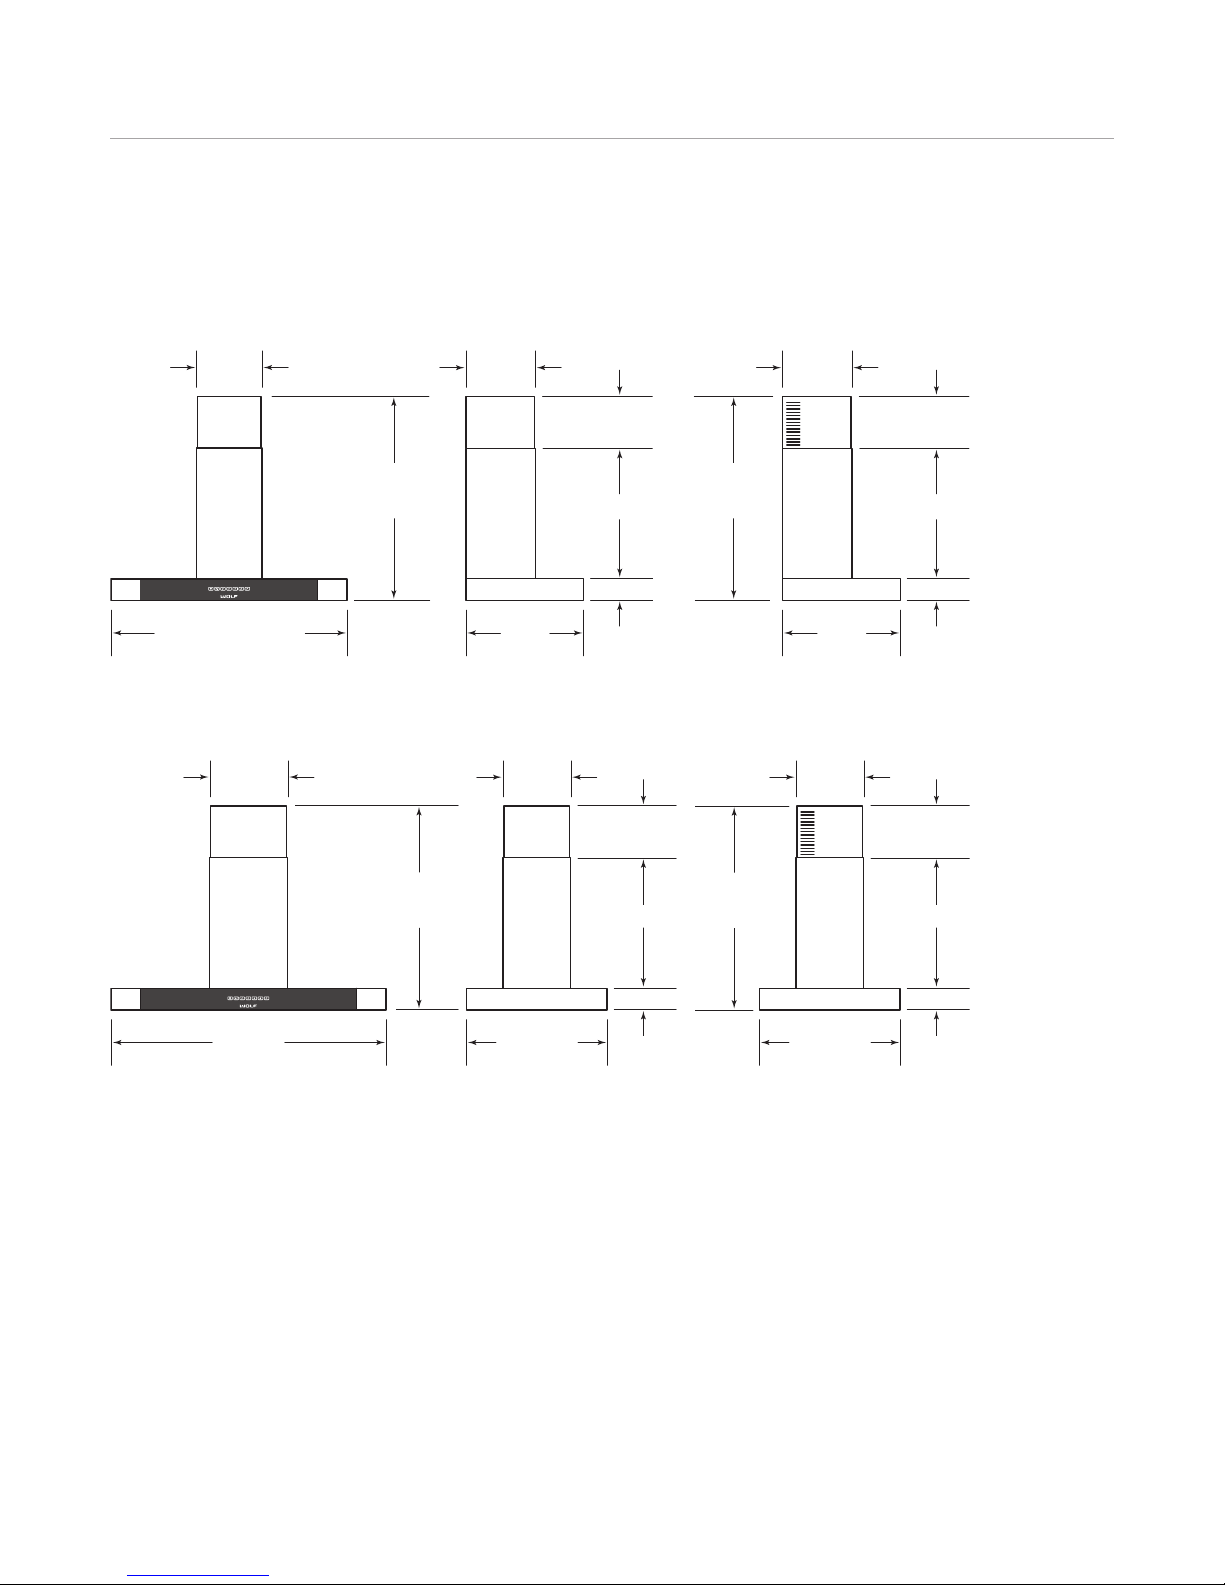
Cooktop ow-Profile Hood Installation 8
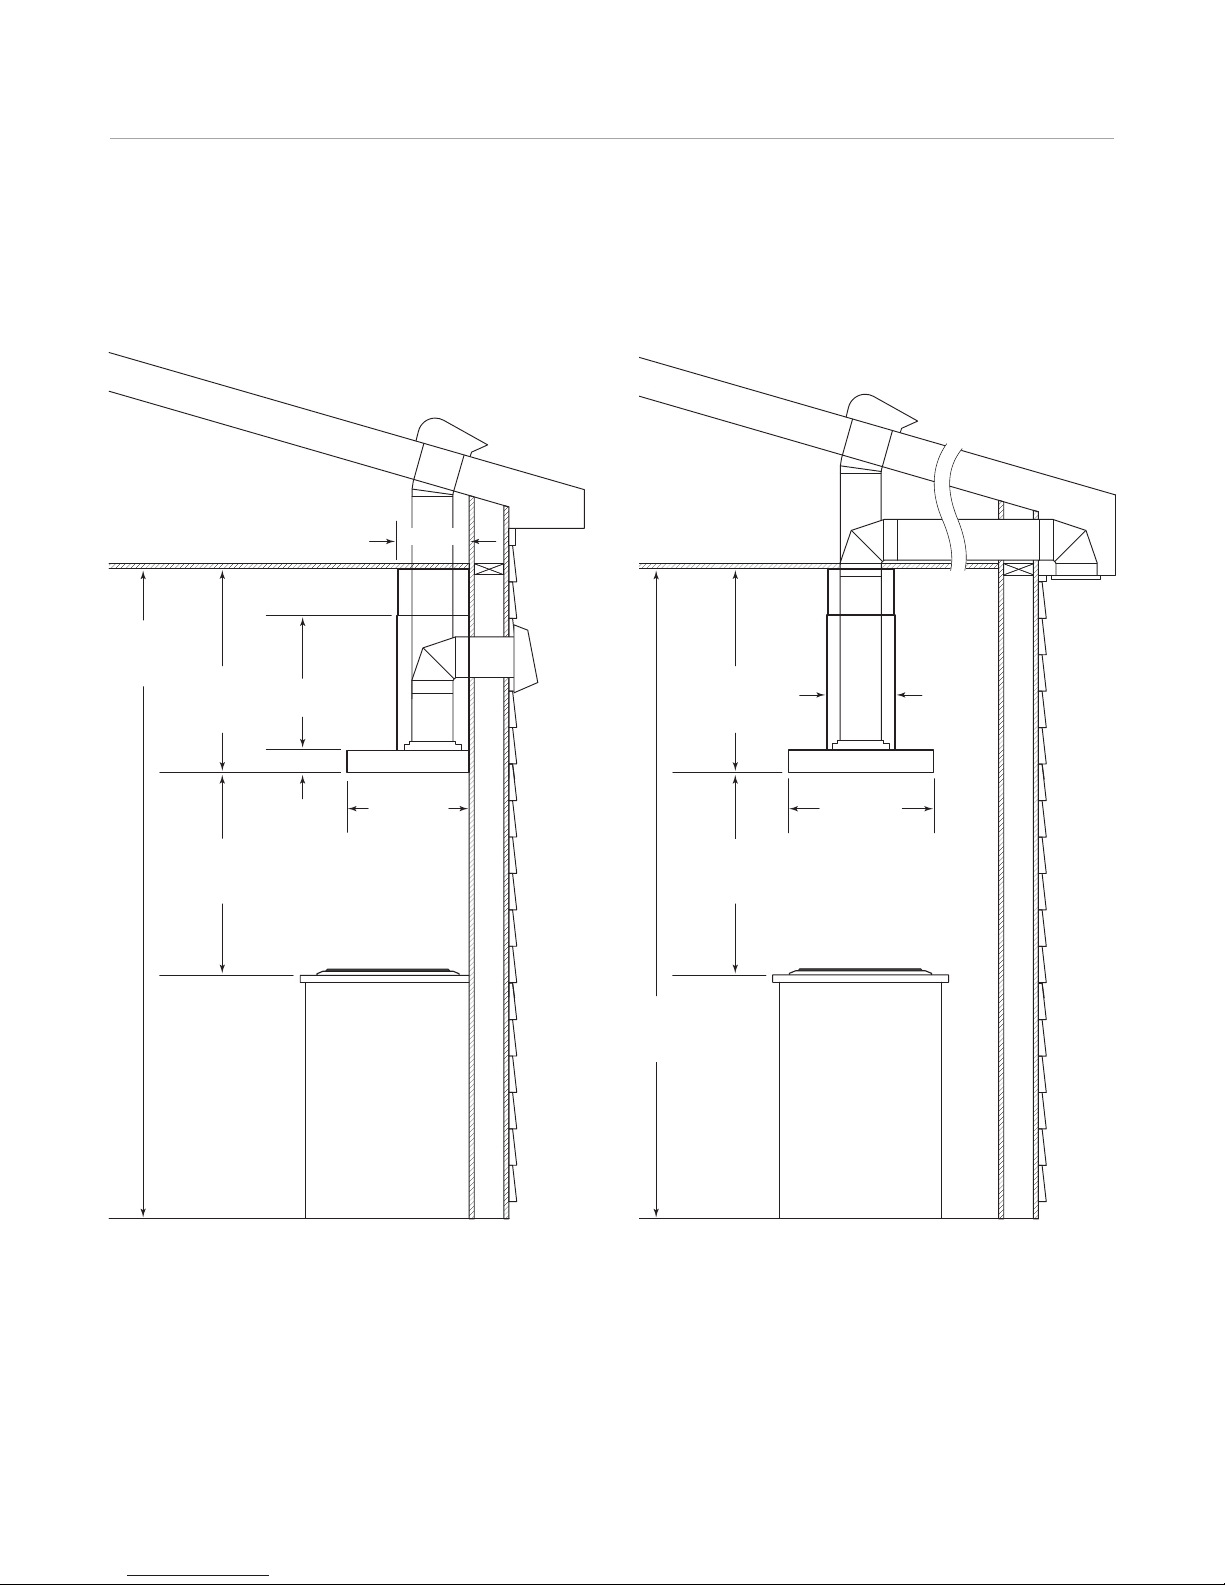
Install Ductwork
IMPO TANT NOTE: Unless used in a recirculating installa-
tion, ventilation hoods must exhaust to the outdoors.
A 6" (152) round duct is recommended for cooktop low-
profile hoods. Use only rigid metal ductwork, do not use
flex ducting. Consult a qualified HVAC engineer for
specific ducting applications.
Decide where the ductwork will run between the wall hood
and the outside. A straight, short duct run will allow the
hood to perform most efficiently. imit the number of
elbows and transitions. The duct run should be no longer
than 50' (15 m). There is a possibility of noise issues, if a
remote blower is used with a short duct run.
Wolf recommends installing a backdraft damper in all
installations. A backdraft damper is included with the
hood. It is built into the transition from the hood to the
duct run.
Unless you are using a remote blower, a roof or wall cap
must be installed. Connect ductwork to the cap and work
back towards the hood. Use duct sealing tape to seal
joints between ductwork sections.
ocal building codes may require the use of make-up air.
Consult your local HVAC professional for specific require-
ments in your area.
To reduce the risk of fire, use only metal ductwork.
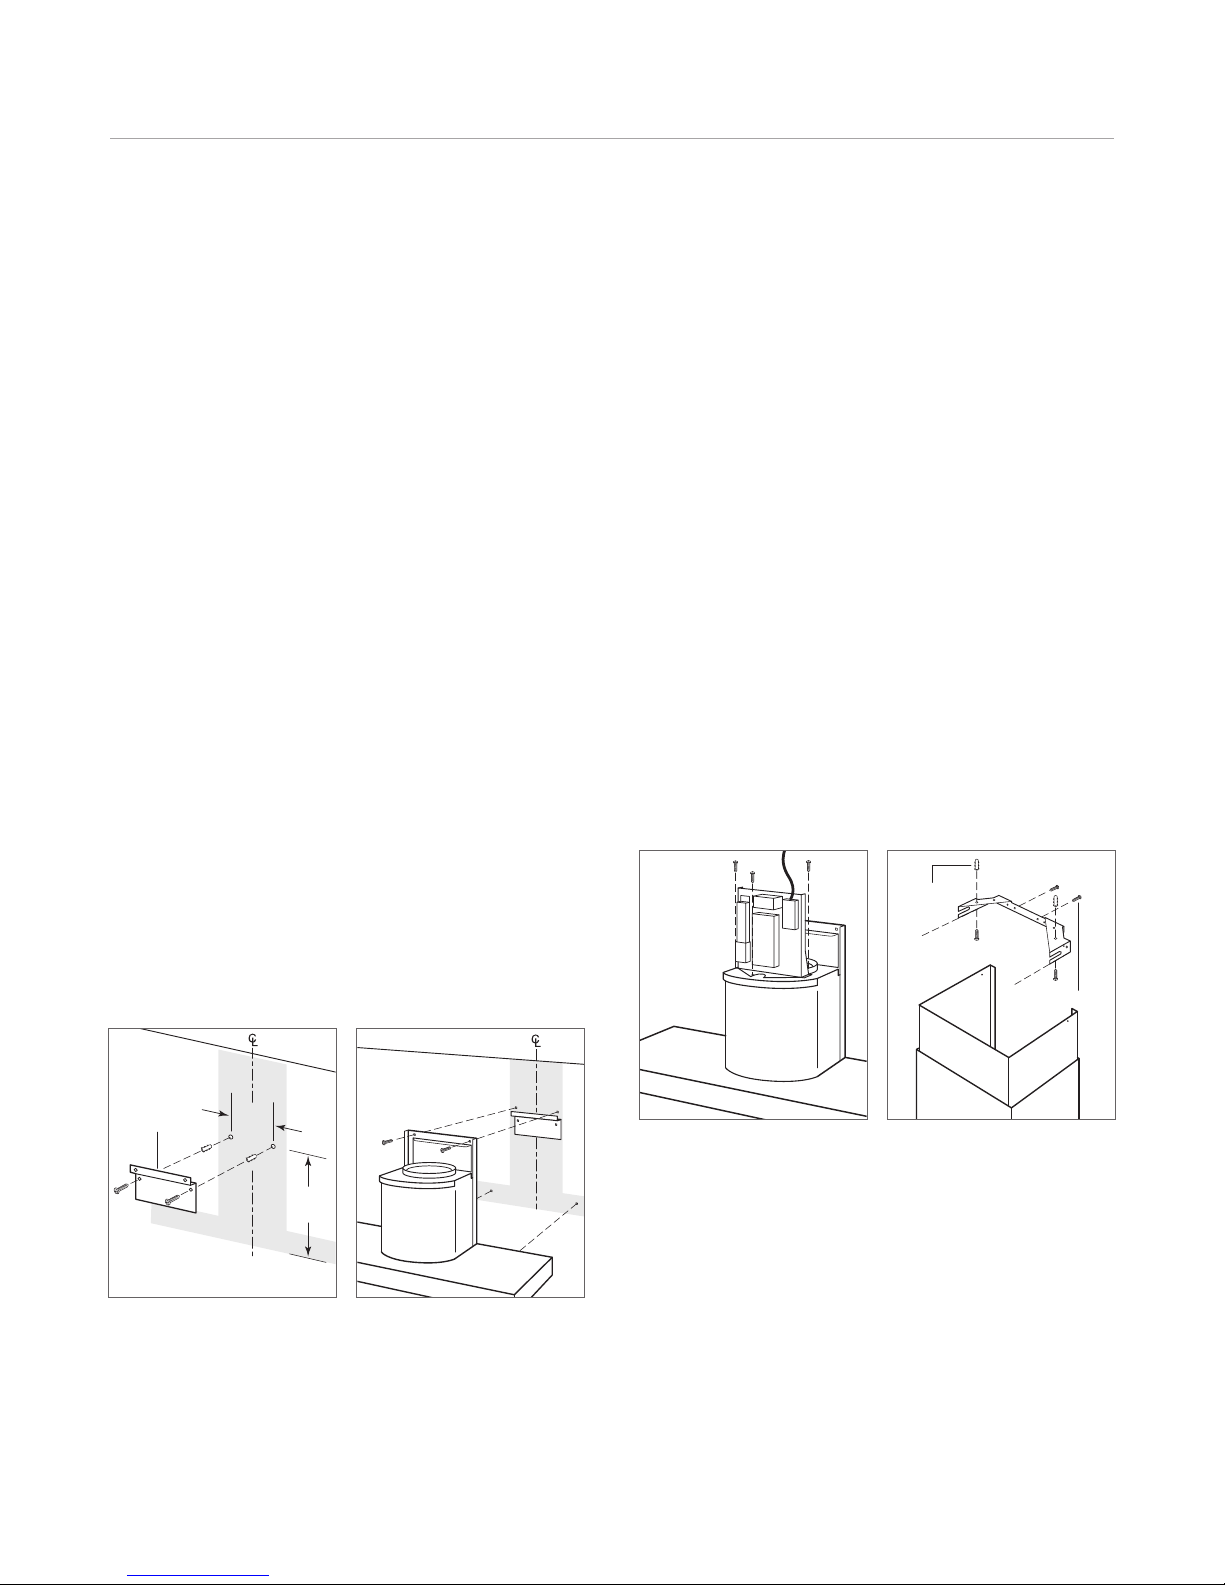
Ducting Options
Wolf cooktop low-profile hoods may be used in a ducted
or recirculating installation. For greatest efficiency, the
ducted installation is recommended.
DUCTED INSTALLATION
In a ducted installation, the hood aspirates the kitchen air
saturated with fumes and odors, passes it through the
grease filter and expels it to the outside through ductwork.
For this installation, a ventilation hood with an internal,
in-line or remote blower can be used. The in-line blower is
located in ductwork between the hood and the outside.
The remote blower can be mounted on the roof or, for wall
hoods, an exterior wall. Wolf in-line and remote blowers
are available through your authorized Wolf dealer.
ECI CULATING INSTALLATION
IMPO TANT NOTE: Only low-profile hoods with an internal
blower can be used in a recirculating installation.
In a recirculating installation, the hood aspirates the
kitchen air saturated with fumes and odors, purifies it
through the grease filter and charcoal filter and returns
clean air into the room. A recirculation kit is available
through your authorized Wolf dealer. For local dealer infor-
mation, visit the find a showroom section of our website,
wolfappliance.com.
Cooktop ow-Profile Hood Installation 9
wolfappliance.com/specs
Install Ductwork
LOW-P OFILE WALL HOODS LOW-P OFILE ISLAND HOOD
DUCTWORK
INSTALLATION
THROUGH
WALL
173/4"(451)
HOOD DEPTH
DUCTWORK INSTALLATION
THROUGH ROOF
24" (610) TO 30" (762)
BOTTOM OF
HOOD TO
COUNTERTOP
291/8"(740)
TO 411/2"(1054)
TELESCOPING
HOOD HEIGHT
31/8"(79)
8' (2.4 m)
TO 9' (2.7 m)
CEILING
HEIGHT
201/8"
(511)
107/8"
(276)
DUCTWORK INSTALLATION
THROUGH ROOF
215/8"(549)
HOOD DEPTH
24" (610) TO 30" (762)
BOTTOM OF
HOOD TO
COUNTERTOP
283/8"(721)
TO 40" (1016)
TELESCOPING
HOOD HEIGHT
DUCTWORK
INSTALLATION
THROUGH
EAVE—
INTERNAL
BLOWER
97/8"
(251)
8' (2.4 m)
9' (2.7 m)
CEILING
HEIGHT
Cooktop ow-Profile Hood Installation 10
Wall Hoods—Ducted Installation
ocate the electrical supply through the wall within the
shaded area shown in the illustration on page 6. Install
ductwork as outlined on pages 8–9.
Mount the bottom panel to the hood. Attach with the four
screws provided on the hinge side of the panel.
IMPO TANT NOTE: If a backsplash is to be used, it should
be installed prior to mounting the wall hood. Secure the
hood mounting brackets to the wall studs prior to
installing the backsplash. Refer to installation instructions
provided with the backsplash.
MOUNT HOOD TO WALL
IMPO TANT NOTE: Wolf recommends that the bottom
of the ventilation hood be installed 24" (610) to 30" (762)
above the countertop.
Draw a vertical line on the wall indicating the centerline of
the hood. Mark the first two holes to be drilled in the wall.
Position according to dimensions shown in illus 1 below.
Drill two 5/16" diameter holes and fit the screw anchors
provided. Attach the metal bracket to the wall using the
screws provided. Use the two cut-out triangles on the
bracket to position it exactly along the vertical axis of the
hood.
Hang the hood on the bracket as shown in illus 2. Adjust
the horizontal position moving the hood to the right or left
so that it is properly aligned. When adjustment has been
completed, without removing the hood, mark the four
additional holes to be drilled in the wall. Remove the hood
and drill four 5/16" diameter holes and fit the screw
anchors provided. Mount the hood to the wall using the
screws provided.
Mount the plate of the electrical system fixing it with three
screws as shown in illus 3 below.
ATTACH TELESCOPIC FLUE
Assemble the three support brackets for the telescopic
flue as shown in illus 4. The width of the bracket assembly
can be adjusted. With screws and anchors provided,
attach the bracket assembly to the ceiling so that it is
positioned along the axis with the hood.
Illus 3. Illus 4.
SCREWS
ANCHORS
BRACKET
CENTER
OF HOOD
51/16"
(129)
133/8"
(340)
Illus 1. Illus 2.