manuals.online logo
Brands
  1. Home
  2. •
  3. Brands
  4. •
  5. Wolfgang Puck
  6. •
  7. Waffle Maker
  8. •
  9. Wolfgang Puck BWB00060 Owner's manual

Wolfgang Puck BWB00060 Owner's manual

Other Wolfgang Puck Waffle Maker manuals

Wolfgang Puck SWIVELBAKER WPWB0010 Installation instructions

Wolfgang Puck

Wolfgang Puck SWIVELBAKER WPWB0010 Installation instructions

Wolfgang Puck BRWB0010 User manual

Wolfgang Puck

Wolfgang Puck BRWB0010 User manual

Popular Waffle Maker manuals by other brands

Exido 243-018 Specifications

Exido

Exido 243-018 Specifications

Exido 243-050 Product specifications

Exido

Exido 243-050 Product specifications

Lagrange Gaufres Premium manual

Lagrange

Lagrange Gaufres Premium manual

Exido 243-049 Specifications

Exido

Exido 243-049 Specifications

Kenwood PG-2000 Instructions for use and safety

Kenwood

Kenwood PG-2000 Instructions for use and safety

BRAYER BR2300 instruction manual

BRAYER

BRAYER BR2300 instruction manual

Nostalgia MyMini MWF5AQ Instructions and recipes

Nostalgia

Nostalgia MyMini MWF5AQ Instructions and recipes

Ricardo Mini Waffle Maker USER CARE AND INSTRUCTION MANUAL

Ricardo

Ricardo Mini Waffle Maker USER CARE AND INSTRUCTION MANUAL

SEVERIN WA 2101 - Dimensions

SEVERIN

SEVERIN WA 2101 - Dimensions

KYOWA KW-2616 instruction manual

KYOWA

KYOWA KW-2616 instruction manual

Herenthal EWM-1200 instruction manual

Herenthal

Herenthal EWM-1200 instruction manual

MPM MGO-30M user manual

MPM

MPM MGO-30M user manual

Wilfa WM-623BELL instruction manual

Wilfa

Wilfa WM-623BELL instruction manual

Villaware UNO 2000 Directions & Recipes

Villaware

Villaware UNO 2000 Directions & Recipes

Unold 48266 Instructions for use

Unold

Unold 48266 Instructions for use

Royal Catering RCWM-1400-B user manual

Royal Catering

Royal Catering RCWM-1400-B user manual

Cuisinart WMR-CA Instruction booklet

Cuisinart

Cuisinart WMR-CA Instruction booklet

Black & Decker WMB505C user guide

Black & Decker

Black & Decker WMB505C user guide

manuals.online logo
manuals.online logoBrands
  • About & Mission
  • Contact us
  • Privacy Policy
  • Terms and Conditions

Copyright 2025 Manuals.Online. All Rights Reserved.

USE & CARE
Self-Rotating Waffle Baker
LIFE IS ABOUT BALANCE
AND EATING WELL
IMPORTANT NOTICE
PLEASE DO NOT RETURN TO STORE.
If you have any problems with this unit, contact Consumer
Relations for service PHONE: 1-800-275-8273 or visit our
website at wphousewares.com
Please read operating instructions before using this
product. Please keep original box and packing materials
in the event that service is required.
W.P. APPLIANCES, INC. Toll Free (800) 275-8273
Models BWB00060 Printed in China REV 1.0
All trademarks, service marks and trade names (collectively the “Marks”) are proprietary
to Wolfgang Puck World Wide.
HSN_WaffleBakerManual:HSN_WaffleBakerManual 4/21/11 2:05 PM Page 1
1 2
IMPORTANT SAFEGUARDS
When using electrical appliances, basic safety precautions should always
be followed, including the following:
1Read all instructions carefully.
2Do not touch hot surfaces. Use handles or knobs.
3To protect against risk of fire, electric shock and injury to persons,
DO NOT IMMERSE CORD, PLUG OR APPLIANCE in water or
other liquid.
4Close supervision is necessary when any appliance is used by or
near children.
5Unplug from outlet when not in use and before cleaning.
Allow to cool before putting on or taking off parts, and before
cleaning the appliance.
6Do not operate any appliance with a damaged cord or plug
or after the appliance malfunctions or is dropped or damaged in any
manner. Return the appliance to an authorized service facility for
examination, repair, or electrical or mechanical adjustment.
7The use of accessory attachments not recommended or sold by the
appliance manufacturer may cause fire, electric shock, or injury.
8Do not use outdoors.
9Do not let cord hang over edge of table or counter or touch hot
surfaces, including the stove.
10 Do not place on or near a hot gas or electric burner or in a
heated oven.
11 Extreme caution must be used when moving an appliance
containing hot oil or other hot liquids.
12 Extreme care must be used when operating this appliance as surface
temperature gets extremely hot.
13 To disconnect appliance, turn any control to "OFF" and remove
plug from wall outlet. Always hold the plug, never pull the cord.
14 Do not use this appliance for other than intended use.
15 To ensure protection against risk of electric shock, only connect
appliance to properly grounded outlets.
SAVE THESE INSTRUCTIONS
HOUSEHOLD USE ONLY
GROUNDING INSTRUCTIONS: This appliance must be grounded. It is
equipped with a 3-wire cord having a grounded plug. The plug must be
plugged into an outlet which is properly installed and grounded.
WARNING: Improper use of the grounded wire can result in the
risk of electric shock. Consult a qualified electrician if necessary. Do not
attempt to defeat this safety feature by modifying the plug.
A short power-supply cord is provided to reduce the hazards resulting
from entanglement or tripping over a longer cord. If it is necessary to
use an extension cord, it should be positioned such that it does not
drape over the counter or tabletop where it can be pulled on by
children or tripped over and:
AUse only 3-wire extension cord with 3-blade grounding plug;
BThe marked rating of the extension cord must be equal to or greater
than the rating of this appliance. The electrical rating is listed on the
bottom of this unit.
Before Your First Use
Before using for the first time, remove all packaging materials. Wash the
plates according to the “Care & Cleaning” section of this manual. During
first use you may notice slight smoking or odor. This is normal with any
heating appliance and will not reoccur after multiple uses. It is recom-
mended that you complete a trial run of your Waffle Baker prior to first
use. Plug your Waffle Baker in and switch Toggle to ON position and let it
run for 15 minutes until all smoke and/or odor has dissipated.
ADDITIONAL SAFETY
INFORMATION
HSN_WaffleBakerManual:HSN_WaffleBakerManual 4/21/11 2:05 PM Page 1
3 4
Table of Contents
Important Safeguards 1
Before Your First Use 2
About Wolfgang Puck 3
Know Your Waffle Baker 5
Introduction 7
Using Your Waffle Baker 8
Care and Cleaning 9
Waffle Baker Cooking Chart 10
Troubleshooting 1 1
Recipes 15
Limited Warranty 42
Contact Information back
Wolfgang Puck,
owner of the famous
Spago restaurants and
one of the most influential
chef-restauranteurs in
America, is credited with
reviving California’s rich
culinary heritage. His
cooking innovations, a
result of blending fresh
California ingredients with his classical French techniques, are
enjoyed by world leaders, stars and fellow chefs alike. He established
other trend-setting restaurants like Postrio in San Francisco, Chinois
on Main in Santa Monica, Trattoria del Lupo, Cut, and his latest
creation, Jai, an Asian fusion restaurant in San Diego. Home chefs can
also share Mr. Puck’s talents through his cookbooks, cutlery,
cookware and, of course, through his appliances!
HSN_WaffleBakerManual:HSN_WaffleBakerManual 4/21/11 2:05 PM Page 3
5 6
Know Your Waffle Baker
Red Power Light
Blue Ready Light
On/Off
Toggle Switch
Start Button
Base
Liquid Crystal Display
Stainless Steel
Top Housing
Stainless Steel
Bottom Housing
Cool-Touch Handle
Removable Drip Tray
Crisp Button
Photo above may differ slightly from actual product
Color Button
Reset Button
HSN_WaffleBakerManual:HSN_WaffleBakerManual 4/21/11 2:05 PM Page 5
8
Using Your Waffle Baker
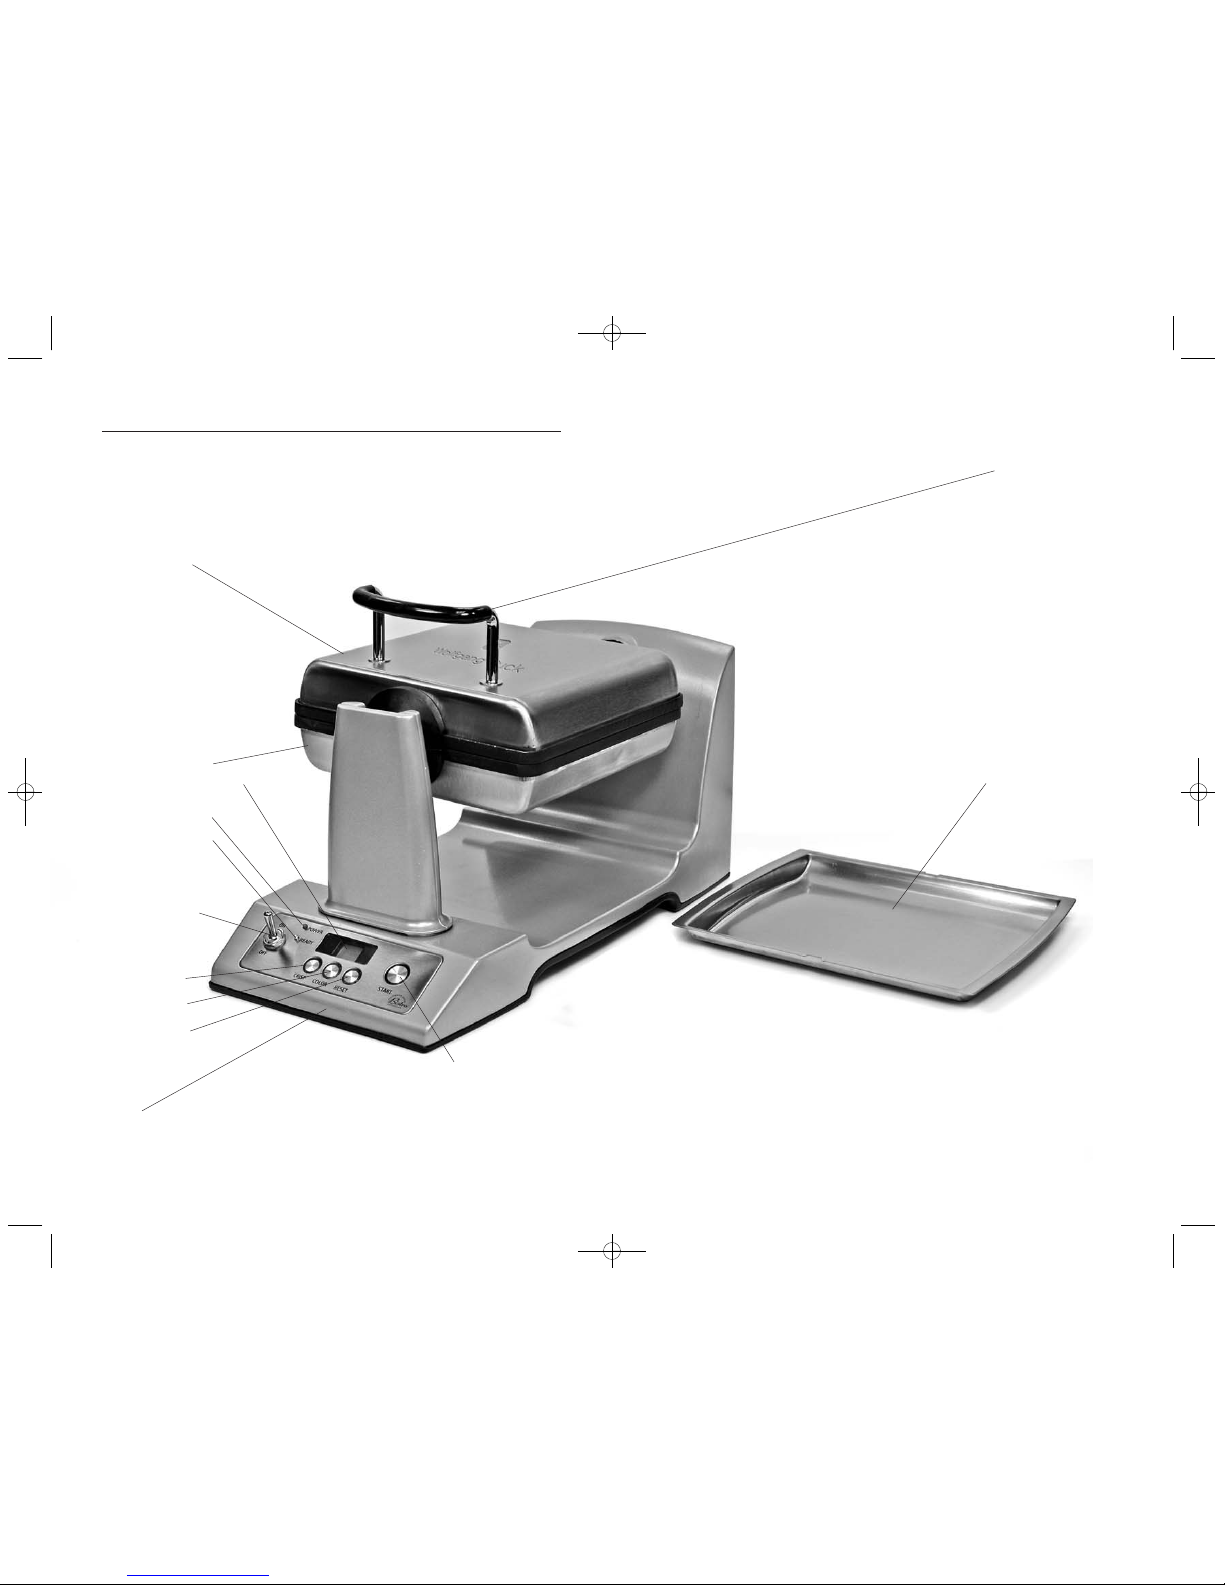
1Plug into to a 120 volt outlet. Turn the Toggle Switch to the ON
position. The Red Power Light will illuminate and 2:00 will appear in
the display indicating that the Waffle Baker has power and is starting
the preheating cycle. The red power light and heating elements will
remain on until you unplug the unit or turn the Toggle Switch to the
OFF position.
2Always preheat the waffle bake in the closed position. When the
waffle baker has finished preheating the blue READY light will
illuminate and you will hear 4 short beeps. It will take approximately
5 minutes for the plates to preheat.
3Before the first waffle of the day, use a pastry brush to lightly coat
the top and bottom waffle grids with vegetable oil or shortening.
Cooking spray will also work well for this purpose.
4Press the COLOR button to cycle through the time settings of 1:00,
1:30, 2:00, 2:30, 3:00, and 4:00 minutes for desired browning..
5If a darker waffle is desired press the CRISP button and the blue LED
light surrounding the CRISP button will illuminate.
NOTE: Pressing the CRISP button will toggle the CRISP feature on or off
for each set time. For instance, if you desire 3 minutes, press the COLOR
button until 3:00 is displayed, then press the CRISP button.
6Ladle just enough batter to fill the lower waffle plate so that the
peak areas of the plate are covered (about 1 cup). If necessary, use
a spatula to spread the batter into the corners of grid.
7Close the baker and press the START button. The countdown timer
will begin to countdown. The waffle baker will automatically rotate
180’ after a 8-10 second delay to allow the batter to rise on the
bottom plate. The READY light will cycle on and off during the
baking process.
NOTE: At anytime during the baking process you can cancel the timer
and have the Waffle Baker rotate back to the original position by
pressing the RESET button.
8When the selected time is up, you will hear 4 beeps and the Blue
Ready Light will illuminate. The waffle baker will rotate back 180’ to
the starting position.
9Lift the top housing by the black cool-touch handle. Do not touch
any metal surfaces of the waffle baker housing.
7
Introduction
Walking into a home filled with the warm smells of coffee brewing,
sausage patties sizzling in the pan, and waffles baking makes one feel
instantly comfortable. For many people, breakfast is the most important
meal of the day, and often the only hot one eaten. It would be difficult to
dash out of the house with nothing more than a doughnut under the
belt if there was a tempting bowl of granola or a stack of hot waffles
waiting on the table.
For me, brunch is a pleasurable way to entertain on any given Saturday,
Sunday or holiday. Served late morning into early afternoon, it combines
breakfast and lunch and is a leisurely experience, casual and easy. Since
my kitchen at home is warm and inviting, I find my friends like to
congregate in the kitchen.
Usually, I prepare a few dishes, set them out on the buffet, and allow
people to help themselves. If I’m making waffles, I have the batter ready,
the Waffle Baker preheated, and spoon the batter out on demand.
Sometimes I fold berries into the batter, other times I fill my nicest bowl
with an assortment of warm poached fruit.
And to make the brunch even more festive, I like to serve chilled
champagne poured over fresh orange juice or peach juice.
HSN_WaffleBakerManual:HSN_WaffleBakerManual 4/21/11 2:05 PM Page 7
109
Care & Cleaning
1Always unplug the Waffle Baker and allow to completely cool
before cleaning.
2After cooling, any excess crumbs or oils can be wiped away with a
paper towel, damp sponge or with a nylon cleaning brush. Do not
attempt to disassemble appliance for cleaning.
3Wipe the top and bottom housings with a soft cloth. A little metal
polish suitable for stainless steel may be used on the stainless steel
housing. Do not use any abrasive scouring pad or steel wool, as this
will damage the housing finish.
4Never immerse the housing in water or any liquid.
5Do not use metal utensils, which can damage the nonstick
surface, use only wood, plastic, or nylon utensils to avoid damaging
the nonstick surface.
Waffle Baker Cooking Chart
TIME COLOR
1:00 Extra Light
1:30 Light
2:00 Medium - Light
2:30 Medium
3:00 Dark
4:00 Extra Dark
Using Your Waffle Baker cont.
10. Using a fork or other utensil remove the waffle from the plate
by pulling up on the waffle itself. Use caution as the plate is
extremely hot.
11 If you wish to make additional waffles wait 2 minutes and proceed
from Step 2 of this section.
12 When you are finished baking, simply switch the toggle switch to the
OFF position and unplug from the wall outlet.
13 After your Waffle Baker has completely cooled, clean the plates
according to the section “Care & Cleaning” of this manual.
HSN_WaffleBakerManual:HSN_WaffleBakerManual 4/21/11 2:05 PM Page 9
1211
Troubleshooting
Problem Possible Cause Solution
I see smoke and detect an odor
during my first use.
My waffles are too light.
My waffles are too dark.
Cannot adjust the COLOR
Cannot see the CRISP light.
Waffle batter is running out of
the plates
The countdown timer is not
running.
I do not see a Blue Ready Light The Waffle Baker is still preheating. It will take approximately 5 minutes for the plates to preheat.
Once the Waffle Baker is preheated and you pressed the START button,
the Blue Ready Light will turn off. The light will come back on once the
set time expires.
The Waffle Baker has already
preheated and is now in cooking
mode.
You have not pressed the START
button once the Blue Ready Light
has illuminated indicating that the
plates are preheated.
Once preheated and you added your batter, press START to begin the
timer, and plates will rotate automatically after about 10 seconds.
You have used too much batter As a general rule, 1 cup of batter is sufficient to cover the bottom plate.
In addition, different batters provide different results, some are thicker
than others and may require more or less than 1 cup.
Waffle batter is not evenly spread
across the plates.
Ensure that your batter is evenly distributed throughout the bottom
plate before closing,.
The blue CRISP light is located
under the CRISP button.
Press the CRISP button and remove your finger to see the Blue
Indicator light.
The Timer is in Preheat mode. The Color cannot be adjusted until the plates are fully preheated and the
Blue Ready Light is on.
You have already pressed the
START button
You cannot adjust the COLOR when the countdown timer has already
started. To adjust the COLOR once the timer has already started press
the RESET button to stop the timer and press the COLOR button to
adjust. Once the new time is selected press START to begin the
cooking process.
Too much time is set on the Timer Decrease the amount of time to bake your waffles.
Turn off the CRISP feature if it is on by pressing the CRISP button until
the blue light under the button is no longer illuminated.
The CRISP button is on
Not enough time added to Timer.
The CRISP button is off.
Smoke and odor is expected during
the initial use of your Waffle Baker's
protective coatings used during
shipment burn off.
We recommend a trial run of your oven as outlined in the section
BEFORE YOUR FIRST USE of this manual.
Increase the amount of time to bake your waffles.
Turn on the CRISP feature if it is off by pressing the CRISP button until
he blue light under the button is illuminated.
HSN_WaffleBakerManual:HSN_WaffleBakerManual 4/21/11 2:05 PM Page 11
1413
Troubleshooting
Problem Possible Cause Solution
My food sticks to the plates.
I cannot open the Top Housing The Waffle Baker has not been
rotated back to its original position.
Wait for the Waffle Baker to rotate back to the original position and lift
the top housing straight up.
Plates have not been prepped prior
to use.
Before the first use of the day, lightly coat the plates with vegetable oil
or cooking spray.
My Waffle Baker does not rotate Waffle Mixture is too thick or not
spread out evenly between top and
bottom plates
Adjust mixture amount and / or spread mixture out quickly and evenly
HSN_WaffleBakerManual:HSN_WaffleBakerManual 4/21/11 2:05 PM Page 13
16
Plain Waffles
Makes about 6 waffles
INGREDIENTS
2 egg yolks
1 cup milk
1 1/2 cups cake flour (sifted)
2 teaspoons sugar
1 teaspoon salt
1/4 cup butter
2 egg whites (beaten stiff)
2 teaspoons baking powder
METHOD
1Combine egg yolks, milk, cake flour, sugar, salt, and butter in a bowl and
mix until smooth. Fold in beaten egg whites and baking powder – stir
lightly. After Blue Ready Light comes on, put about 1 cup of mixture in
Waffle Baker, close top housing, select baking time by pressing COLOR
button to desired doneness, and press start button for Waffle Baker to
rotate.
Recipes courtesy of Marian Getz and Debra Murray
15
Recipes
HSN_WaffleBakerManual:HSN_WaffleBakerManual 4/21/11 2:05 PM Page 15
18
Sourdough Waffles
Makes 5 8-inch waffles
INGREDIENTS
1 1/2 cups Sourdough Starter
1/2 cup nonfat milk
8 tablespoons unsalted butter, melted
1 egg
1 cup all-purpose flour
2 tablespoons sugar
1 1/2 teaspoons baking powder
1/4 teaspoon kosher salt
METHOD
1In a large bowl, combine the starter, milk, melted butter, and egg.
2In a small bowl, sift together the flour, sugar, baking powder and
salt. Add to the starter mixture and stir until well combined. Let
proof, covered, in a warm spot until bubbles begin to form, about
30 minutes.
3Spray preheated Waffle Baker with nonstick baking spray. Use 1
slightly rounded 8 ounce metal measuring cup full of batter and
pour into Waffle Baker. Bake for 3:00 to 4:00 minutes until golden
brown or to the desired doneness. Repeat with the remaining batter.
Serve immediately.
PRESENTATION
Place one 8-inch waffle on each of 5 heated plates. Serve warm with
warm maple syrup or fruit syrup. Garnish with fresh fruit, such as sliced
oranges, peaches, or berries. Serve immediately.
To prepare ahead
Through step 2 the batter can be made the night before, refrigerated,
covered, then brought to room temperature and proofed when needed.
Recipe courtesy The Wolfgang Puck Cookbook: Recipes from Spago,
Chinois, and Points East and West, Random House, 1996
17
Sourdough Starter for Waffles
Makes about 4 cups
INGREDIENTS
3 cups all-purpose flour
2 cups nonfat milk
1 cup plain yogurt
1 small potato, peeled and finely grated
METHOD
1In a medium bowl, combine all ingredients until smooth. Cover with
clean towel and set in a warm place until the batter begins to bubble
and has a somewhat pleasant sour smell, about 24 hours.
2Place in a covered container and refrigerate for at least 3 days
before using.
TIP
Sourdough starter can be kept going indefinitely if “fed” properly. When
you take out 1 1/2 cups of the starter, replace with 1 1/2 cups of flour and
1 1/2 or 2 cups milk. This should be done at least every two weeks and
the starter kept refrigerated in a covered container. However, if not
“fed” properly, the starter may acquire a pinkish color and should be
discarded and a new starter developed.
Recipe courtesy The Wolfgang Puck Cookbook: Recipes from
Spago, Chinois, and Points East and West, Random House, 1996
HSN_WaffleBakerManual:HSN_WaffleBakerManual 4/21/11 2:05 PM Page 17