B & Q plc, Chandlers Ford, Hampshire, SO53 3YX.
Visit us at www.diy.com
GIN68XX rev 0
Assembly Instructions
Soft Close Toilet Seat
AB
A B
X
A
12
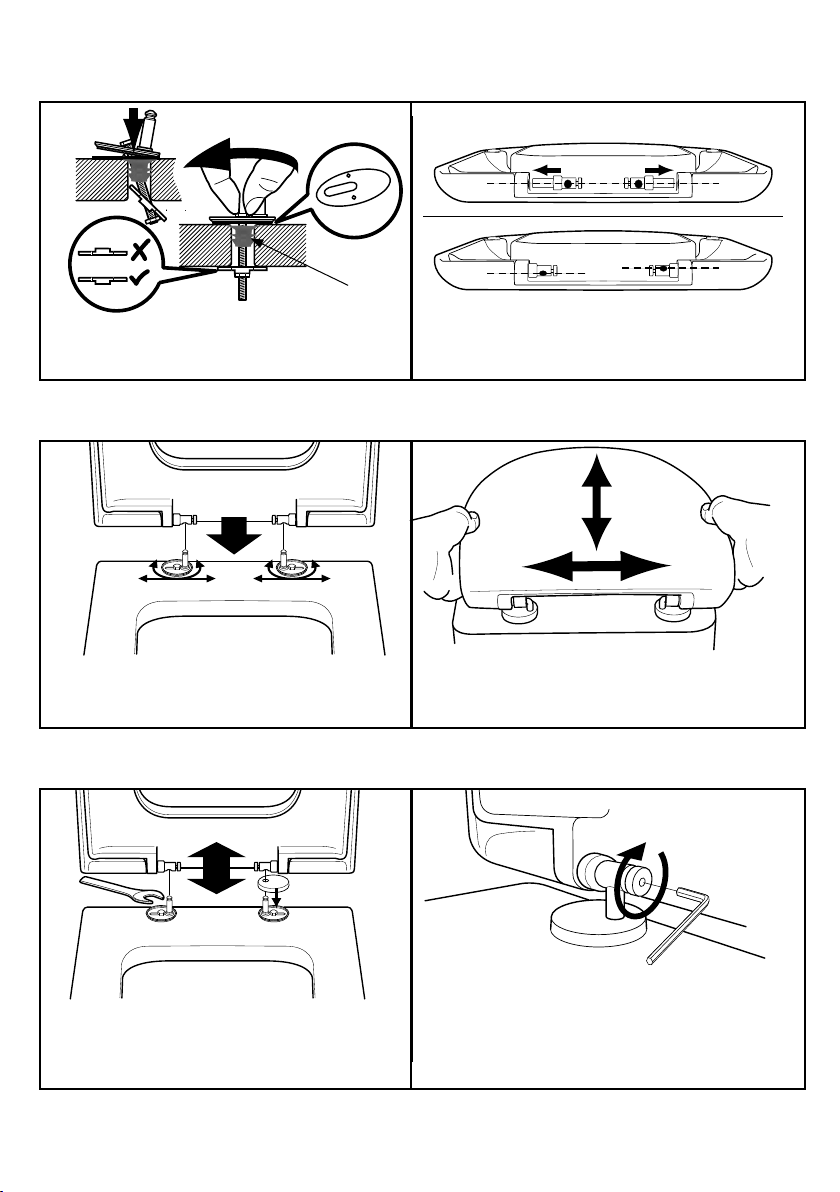
1. Assemble the hinge and gasket and slide the tab and
bolt through the pan until it engages on the underside.
Finger tighten only. Ensure the tab is the correct way up.
2. Push the hinge pins into the seat/cover lugs. Please
ensure that the pins marked A&B are in the correct side.
The holes in the pins should line up correctly.
3. Lower the seat/cover onto the pan, engaging the
hinge pins with the hinge bases. The position of the
hinge bases may need to be adjusted to allow this.
4. Adjust the hinges to centralise the seat on the pan and
to allow the correct degree of seat/cover overhang at the
front.
5. Once adjusted, remove the seat/cover and tighten the
bases with a spanner or screwdriver. Clip the hinge covers
in place before replacing the seat/cover. Care should be
taken not to overtighten the fixings.
6. Use the hexagon key to tighten the hinge pins. Check
that the seat and cover are secure before use.
Parts List & Adjustment Instructions
Soft Close Toilet Seat
For further information, please contact Customer Services on 0161 703 3360 (UK only)
DescriptionRef. Ref.Qty
Toilet Seat
Ring and
Cover
Hexagon
Key
1
1
2
Description Qty
Hinge Cover
Hinge Base
Gasket
Cavity
Fixing (tab,
bolt & nut)
2
2
2
2
A
B
Hinge Pin
C
D
E
F
G
Before You Start
● Check the pack and ensure all parts are present. If not, contact your vendor who will be able to help
● Ensure you have the correct tools to hand, plenty of space to work and a clean, dry area for assembly
● Protect the toilet seat/cover whilst fitting and do not place tools on seat/cover during installation
Please Note: Although these instructions are comprehensive, it is always recommended that a
technically competent installer should undertake installation
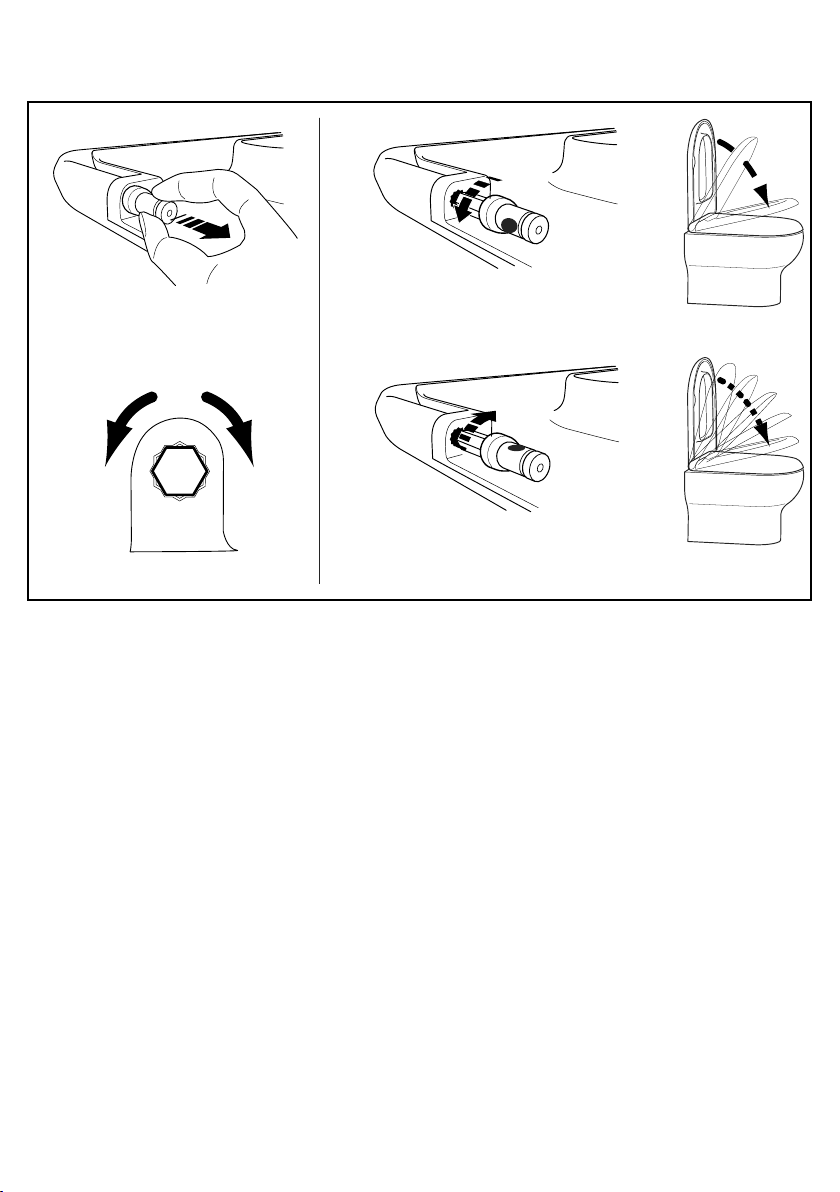
To adjust the speed that the seat and
cover fall, remove the hinge pins,
rotate them and replace them as in
the illustrations to the right.
Rotating so that the hole in the hinge pin is
further from the front of the seat will
make the seat and cover close more
slowly.
Rotating so that the hole in the hinge pin is
closer to the front of the seat will make
the seat and cover close more quickly.
Care & Use
Clean with warm, soapy water only. Do not use scourers, abrasive or chemical cleaners
B & Q plc, Chandlers Ford, Hampshire, SO53 3YX.
Visit us at www.diy.com
GIN68XX rev 0
Assembly Instructions
Soft Close Toilet Seat
AB
A B
X
A
12
12
1. Assemble the hinge and gasket and slide the tab and
bolt through the pan until it engages on the underside.
Finger tighten only. Ensure the tab is the correct way up.
2. Push the hinge pins into the seat/cover lugs. Please
ensure that the pins marked A&B are in the correct side.
The holes in the pins should line up correctly.
3. Lower the seat/cover onto the pan, engaging the
hinge pins with the hinge bases. The position of the
hinge bases may need to be adjusted to allow this.
4. Adjust the hinges to centralise the seat on the pan and
to allow the correct degree of seat/cover overhang at the
front.
5. Once adjusted, remove the seat/cover and tighten the
bases with a spanner or screwdriver. Clip the hinge covers
in place before replacing the seat/cover. Care should be
taken not to overtighten the fixings.
6. Use the hexagon key to tighten the hinge pins. Check
that the seat and cover are secure before use.
With optional LOCK+