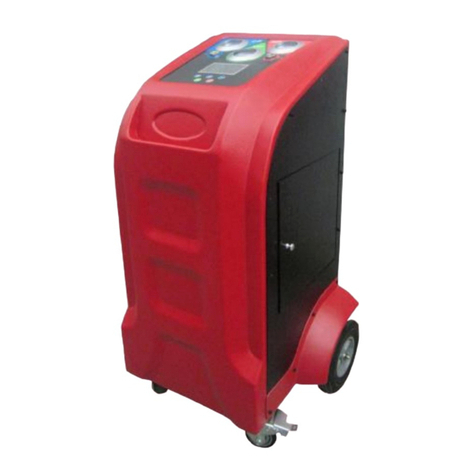
Wonderfu X530 User manual

X530
AUTOMOTIVE AIR CONDITIONER
REFRIGERANT HANDLING SYSTEM
OPERATION MANUAL

1
1
Index
1 Caution………..…………………………………………. ….……2
2 Main Function……………………………………. ………………3
3 Technical parameter……...………………………………….…….3
4 Structure …………..………………….……………. …….………4
4.1 Appearance…………………………..………………………… 4
4.2 Control panel ……………………..………………….…………4
4.3 Inner structure .…………………………………………..……..6
5 Basic operation…………………….………………. …………..…7
5.1 Connection to the car A/C system………………………………7
5.2 How to connect the adaptors/hoses………………………. ….…7
5.3 Refill……………………….…..…………...........................……8
5.4 Recovery………………….…..…………………………………12
5.5 Vacuum ………………….…..…………………………….…….15
5.6 Charge………………………………………………………..….18
5.7 Automatic Operation……………………………………….…....20
6 Maintenance…………………………….……. ………….……....24
6.1 Empty the internal tank…………………………………….…...24
6.2 Reset data of filter……………………..………………………. 26
6.3 Reset date of pump oil………………………………………….28
6.4 Calibrate the electronic scale ………………………………..…31

2
2
1Caution:
Wear the glove and eye protection glass to protect the skin and eyes. Don’t use this device
near the fire and spark. Don’t expose this device into sunshine or rain. Avoid to contact
with corrosive liquid or gas. Keep good ventilation.
△Read the manual carefully before using this device.
△Only for R134a. Check the refrigerant type before operation.
△Don’t refill R134a to the storage cylinder for more than 8KG, in order to avoid the accident caused
by over high pressure.
△Don’t put the hose close to rotation or heating automobile parts such as electronic fan or radiator.
△Check the vacuum pump oil level before use.
△Don’t recover for more than 10 times in an hour, otherwise it will do harm to the compressor.
△Keep away from children when running.
△Only for professional expert.
△Don’t disassemble device without permission of manufacture.
△Don’t lie down the device.
△The charge process would not work if the refrigerant in cylinder being less than 1Kg.

3
3
2. Main Functions:
Refill :Add fresh refrigerant R134a into the storage cylinder inside the machine.
Recovery: To recover refrigerant R134a from the car A/C system, and store it in the machine after
purification.
Vacuum: To get rid of the air in the A/C system
Charge:To charge refrigerant (gas) into the automotive A/C system accurately.
Automatic: Recovery + vacuum + charge
Maintenance: include all the necessary maintenance
3. Technical Parameter
Power Supply: AC 220V, 50~60HZ
Power:750W
Working Temperature:-10-50℃
Scale Accuracy: +/- 10g
Recovery speed: 300g/min.
Vacuum Pump: 5 Pa
Cylinder capacity: 10Kg
Charge Speed: 800g/min.
Net Weight: 82KG
Machine Size: 73cm*65cm*124cm (L*W*H)
Carton Size: 76*70*140CM (L*W*H)

4
4
4. Structure
4.1 Appearance
Picture 1: Front View
Picture 2 Back View
Handrail
Low-side adaptor
High-side adaptor
Power Plug (fuse inside)

5
5
Picture 3 Side View
4.2 Control Panel:
Low-side Gauge
High-side Gauge
Cylinder Gauge
LCD
Power Switch
Control Keys
Fresh oil Bottle
Drain oil Bottle

6
6
Picture 4: Control Keys
4.3 Inner Structure:
1
Numbering Keys (0~9)
2
Cancel
3
Select
4
Start/Stop
5
Exit
Main Board
Relay for pump
Relay for compressor
LP Switch
Compressor
Oil Separator
HP Switch
Pump
Filter Drier
Condensor
Oil Drain Valve

7
7
5. Basic Operation
5.1 Connection to the car A/C system (see below picture)
(Low-side hose connects to low-side end of A/C; High-Side hose connects to High-side end of A/C)
5.2 How to connect the adaptors/hoses
During operation, LCD will prompt out message close of open quick adaptors frequently. Please refer to below
picture for operation.
“CLOSE quick adaptors”. ”:
See below picture. Close the high-side and low-side quick adaptors anti-clockwise.

8
8
“OPEN high-side and low-side quick adaptors” at clockwise
5.3 Refill
There is no any refrigerant inside the new machine. So before running a new machine, please refill
2~6KGS fresh R134A refrigerant into storage cylinder which locates inside the machine.
Please follow the instructions to refill:
1. Connect the blue hose to the LP Connector at the back of machine.
2. Connect the blue quick adaptor on blue hose to the external tank connector
3. Close the red quick adaptor on the red hose, in order to seal the high-side end
4. Switch on the machine, and select “Maintenance” and then “Enter”

9
9
5. When display following message, press to confirm.
6. You will see below message, please press to continue.
7.Please vacuum the hoses. It will prevent the air going into the external source tank.
8. Vacuum in process:

10
10
9. Vacuum can be suspended if any gas (R134a) inside the hose. Follow instructions to handle.
10.When vacuum completed, it warns and please press OK. to next step.
10. Please set the amount below, and press to start refilling.
11. Refill in progress

11
11
12. If the tank being in high pressure or nearly full, “Refill” will be stopped and please follow instructions
to exit. But this case will not happen in new machine, since the inside storage tank being empty.
Another case is that there is no gas inside the external tank, and refilling process can be suspended.
13. Refill process completed, press to exit and come back to main menu.

12
12
5.4 Recovery
1. Turn on the machine, choose “Recovery”, press to enter:
2. Press to continue.
3. When you see the message, please follow and press to vacuum first.

13
13
4. Doing vacuum.
5. Vacuum ends and please press to next step.
6. Set the amount and press to recover.
7. If the tank is full or temperature too high, please follow message to exit or continue.

14
14
8. When there is little gas inside the car A/C system, or you forget to open the R134a quick adaptors, it
warns as below. Please open the quick adaptors and try to “Resume” recovery, or press to exit.
9. Oil will be drained after recovery.
10. After that, it is completed. Press and come back to main menu.

15
15
5.5 Vacuum
1. Choose “Vacuum” and “Enter”.
2. Press to next after reading the message
3. When you see this message, please follow the instruction. You can find the operation instructions in this
manual. After connecting the hoses, and open the valves, please press to go ahead.

16
16
4. Set the time, press
5. In progress
6. When it reaches the time that you have set, it will perform the leak test. If the users being sure that there
is no any leak, please press to skip this process.

17
17
7. After leak test, it will ask to add fresh oil. Please keep pressing for a while to inject the oil. Pay
attention: The oil amount you need to inject should be according to the amount that it has been drained.
The oil you input into the “fresh oil bottle” should be the same as what you want to input into the A/C
system.
Shall it find leaks during the process of “leak test”, please exit and check where it leaks.
8. When vacuum failed, it will prompt out message. Please Exit.
9. When vacuum completed, please press

18
18
5.6 Charge
1. Choose “Charge”.
2. Press to next step
3. Follow instructions and then press to next step
4. Set amount and go ahead

19
19
5. In progress
6. After charging, it reads as below. Please check accordingly and then go ahead
7. When you see the warning, please follow
8. After removing the hoses from the car, system will recover the residue gas from hoses automatically.
Table of contents
Other Wonderfu Air Conditioner manuals
Popular Air Conditioner manuals by other brands

MrCool
MrCool Signature Series Owners & installation manual

Amana
Amana PHB**C Service instructions

Ravanson
Ravanson KR-8000 user manual

Roller
Roller DHN 401 N EC Mounting instructions

Technibel
Technibel KPAFP165R5IA Series installation manual

Mitsubishi Electric
Mitsubishi Electric Mr.Slim PEA-M200 installation manual