Woo Audio WTP-1 User manual

©2012WOOAUDIOtmInc.Allrightsreserved.www.wooaudio.comRev1.1.Feb20,20141
WOO AUDIO WTP-1AND WDS-1
Top-Loading CD Transport
&
24-Bit/192kHz Digital to Analog Convertor
Owner’s Manual
Please review this manual before operating your WOO AUDIO™ product.

©2012WOOAUDIOtmInc.Allrightsreserved.www.wooaudio.comRev1.1.Feb20,20142
Important Safety Information
CAUTION: These amplifiers are shipped without the vacuum
tubes installed. It is necessary to install the tubes first. It
is essential that the tubes are installed correctly or serious damage
that is not covered by the warranty will result.
Turn off immediately in the event of malfunction
Should you notice smoke or an unusual smell coming from the
equipments, turn it off immediately. Continued operation could
result in injury.
Do not disassemble
High voltage circuit. Touching the product’s internal parts could
result in injury. In the event of malfunction, the product should be
repaired only by a qualified technician.
Keep out of children
Failure to observe this precaution could result in injury
WARNING: Failure to follow these instructions could result in
fire, electric shock, or other injury or damage.

©2012WOOAUDIOtmInc.Allrightsreserved.www.wooaudio.comRev1.1.Feb20,20143
Table of Contents
IMPORTANT SAFETY INFORMATION 2
TABLE OF CONTENTS 3
OVERVIEW 4
GETTING STARTED 6
QUICK INSTALLATION 10
OPERATIONS 14
FAQ - FREQUENTLY ASKED QUESTIONS 16
WARRANTY AND SERVICE 17
PRODUCT SPECIFICATION WDS-1 18
PRODUCT SPECIFICATION WTP-1 19

©2012WOOAUDIOtmInc.Allrightsreserved.www.wooaudio.comRev1.1.Feb20,20144
WTP-1 Overview
Thank you for choosing a Woo Audio product. The WTP-1 is finely hand-crafted Top-
Loading CD Transport that delivers uncompromised performance and superior listening
experience.
Vibration resistant CD tray construction
Customized high damping suspension springs for CD tray
½” (13mm) thick solid aluminum CD tray, CNC milled
High precision magnetic disc clamp with short circuit ring and low
mechanical inertia
High traction CD cover arm
VFD monitor
Customized ultra-low temperature coefficient Crystal clock
Customized toroidal power transformer
Individual power supplies for both digital and mechanical circuits
Multi-layer military grade PCBs
Ultra-low noise, high precision resistors and selected components
All-aluminum layered chassis with no screws visible from any viewing
angles
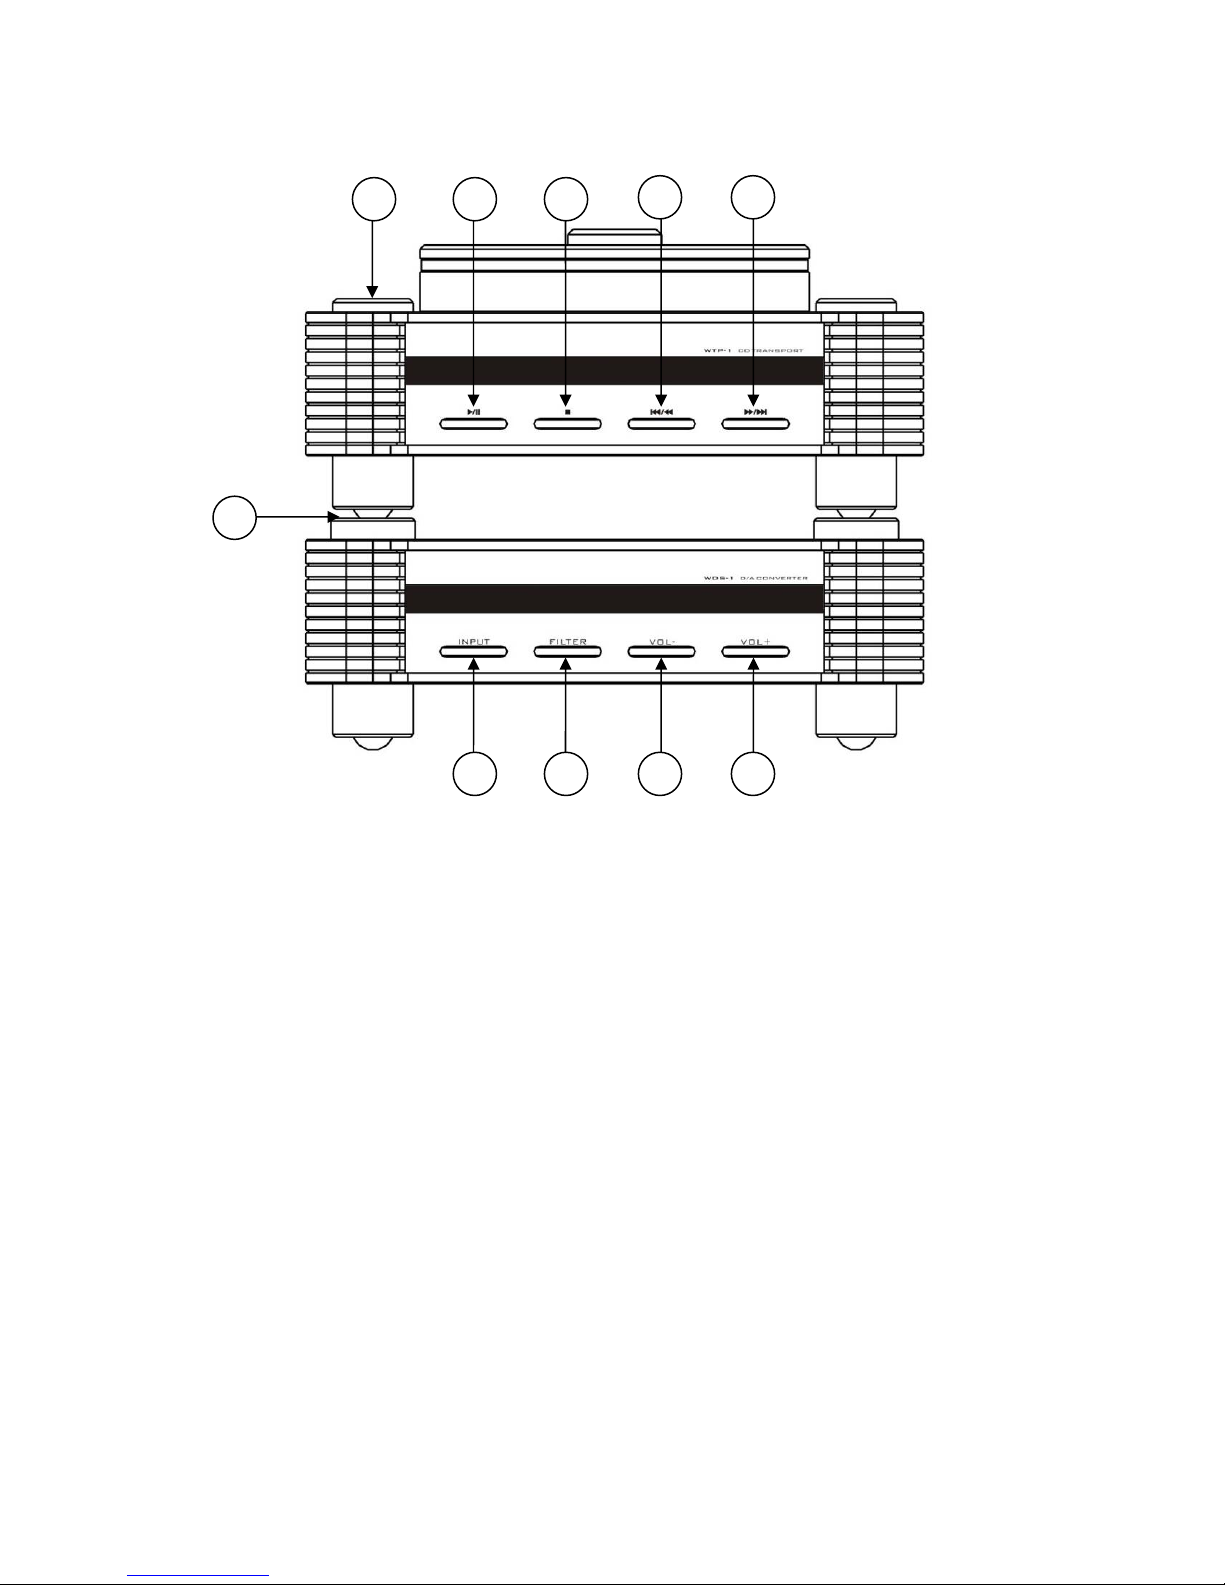
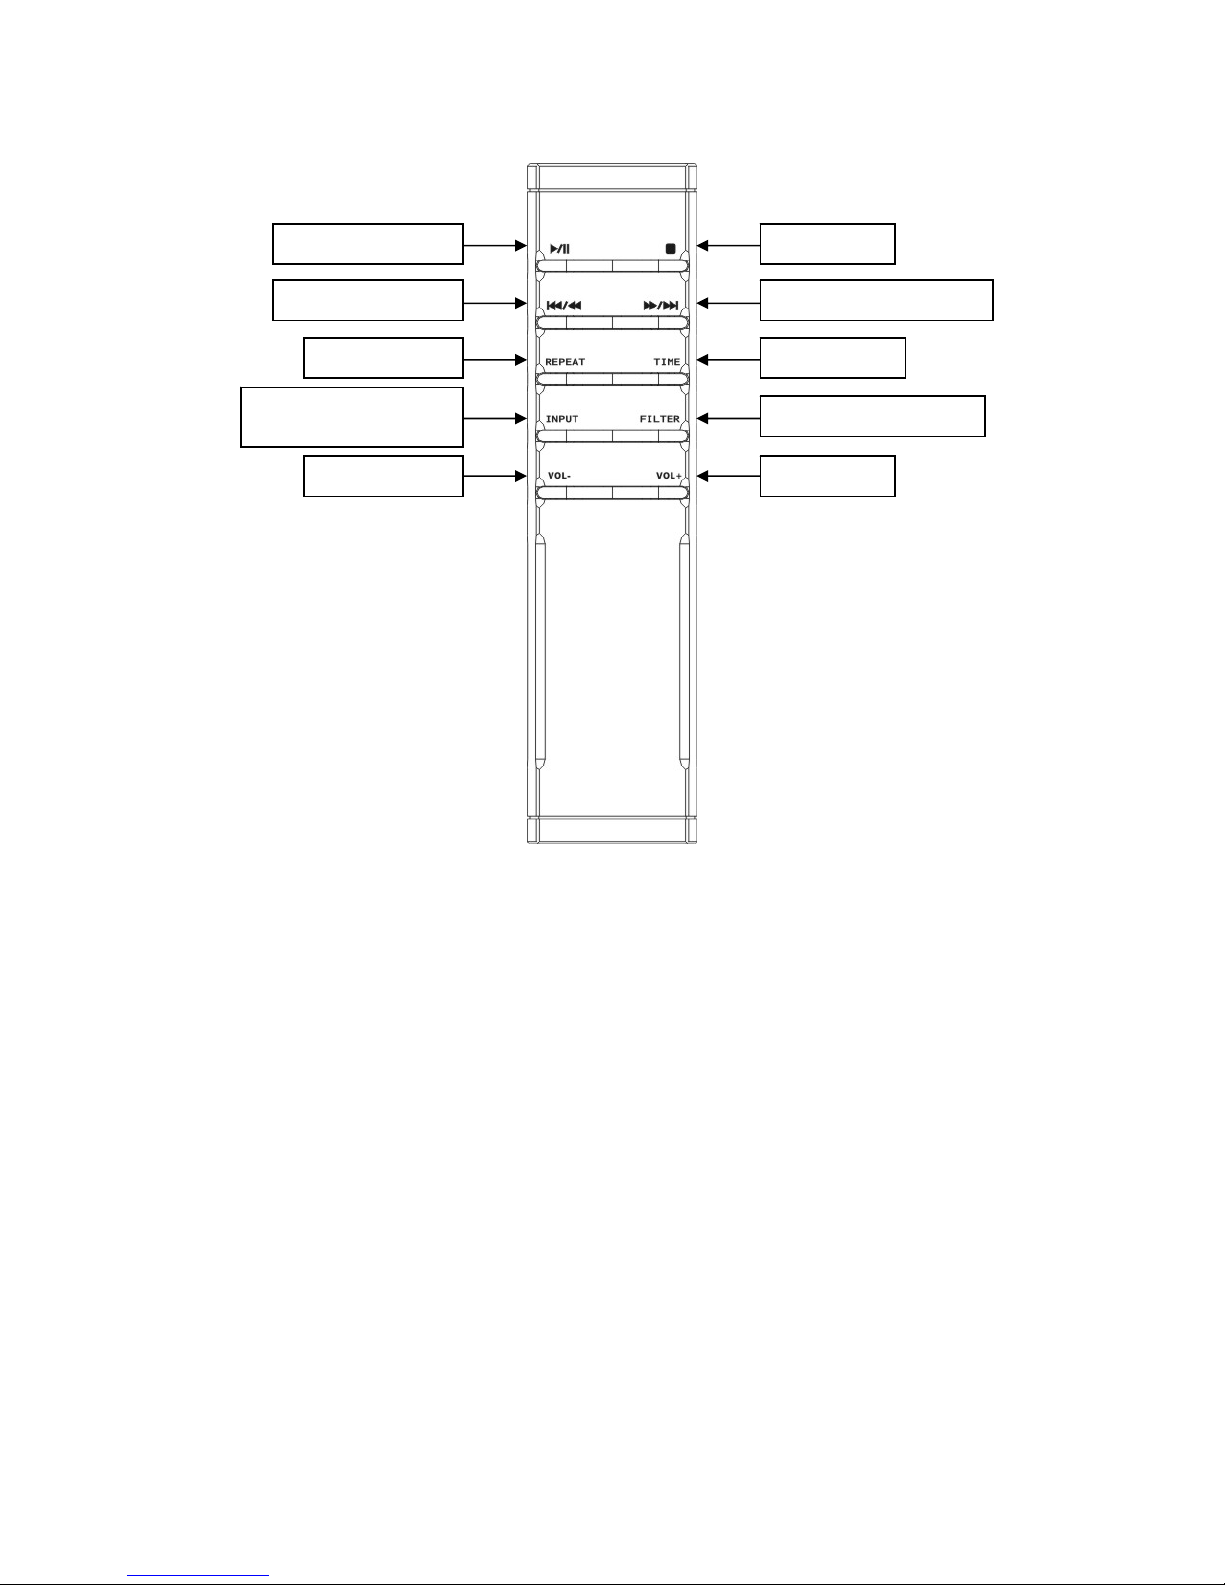
Allows for track forward/backward, play/pause, stop, fast-
forward/backward, track repeat, and play-time in different modes

©2012WOOAUDIOtmInc.Allrightsreserved.www.wooaudio.comRev1.1.Feb20,20145
WDS-1 Overview
Thank you for choosing a Woo Audio product. The WDS-1 is finely hand-crafted Digital
to Analog Converter that delivers uncompromised performance and superior listening
experience.
24-Bit, 192kHz high resolution playback
Ultra-low jitter USB 2.0 runs on Asynchronous mode
S/PDIF interfaces through Optical, Coaxial, and AES/EBU through XLR
connector
Digital volume control allows for direct connection to any power amplifier
VFD monitor display
Input switching button for all digital inputs
Selectable digital filter in Sharp and Slow modes
All-aluminum chassis with no screws visible from any viewing angles
Individual power supplies for both digital and analog circuitries
Multi-layer military grade PCBs
Customized driver for Windows XP/Vista/7/8
USB Audio Class 2.0 is natively supported by Apple OS X version 10.6.4
and above

©2012WOOAUDIOtmInc.Allrightsreserved.www.wooaudio.comRev1.1.Feb20,20146
Getting Started
What’s in the box?
WTP-1
①WTP-1 Top-Loading CD
Transport
②PremiumRemote Control
③Magnetic Disc Clamp
④Rubber Transport Plate
WTP-1
①WDS-1 Digital to Analog Converter
Power cord and AC Umbilical cord are not included and can be purchased separately.
Foot Stands may also be purchased separately to allow for stacking of the 2 units.
The Premium Remote Control may be purchased separately to accompany the WDS-1
1
3
4
2
1

©2012WOOAUDIOtmInc.Allrightsreserved.www.wooaudio.comRev1.1.Feb20,20147
Back Panel Diagram
①AC Inlet
②AC Umbilical Cord Female Outlet
③AC Umbilical Cord Male Inlet
④Fuse Port
⑤Optical Output(Top) and Input(Bottom)
⑥AES/EBU Output(Top) and Input(Bottom)
⑦Coaxial BNC Output(Top) and BNC Input(Bottom)
⑧USB 2.0 Input
⑨XLR Balanced Outputs
⑩RCA Unbalanced Outputs
12
4
5
6
3
8
9
7
10
WDS-1
WTP-1

©2012WOOAUDIOtmInc.Allrightsreserved.www.wooaudio.comRev1.1.Feb20,20148
Front Panel Diagram
⑪WTP-1 Power Button/Simultaneous Power button when units are stacked
⑫WDS-1 Power Button
⑬Play/Pause Button
⑭Stop Button
⑮Rev/Rewind(Hold down) Button
⑯Next/Fast Forward(Hold Down) Button
⑰Input Button
⑱Filter Button
⑲Volume Down
⑳Volume Up
11
12
20191817
1615
1413
WDS-1
WTP-1

©2012WOOAUDIOtmInc.Allrightsreserved.www.wooaudio.comRev1.1.Feb20,20149
Premium Remote Control
The Premium Remote Control is included standard with the WTP-1 and can be
purchased separately for the WDS-1
Premium Remote Control has a range of 10 feet working at angles up to 30 degrees
Stop ButtonPlay/Pause Button
Next Track/Fast ForwardLast Track/Rewind
Time SelectorRepeat 1/all/off
Input selector USB/
Coaxial/Optical/AES/EBU Filter Selector Slow/Sharp
Volume UpVolume Down

©2012WOOAUDIOtmInc.Allrightsreserved.www.wooaudio.comRev1.1.Feb20,201410
Quick Installation
Installing the power cord:
Plug the power cord into the AC inlet; see ①in the above diagram. The AC inlet socket is a
standard IEC type. You will need to obtain the correct type for your region.
Take the AC umbilical cord and plug it into AC Female Outlet ②of the WTP-1 and AC
Male Inlet of WDS-1 ③. Refer to the above diagram.
* If you are intending to use the AC umbilical cord to stack the two units, attach and
power up the two units first side by side before stacking the units together. This is to
make sure that both the WTP-1 and WDS-1 are powered up.
Stacking:
The WTP-1 and WDS-1 are capable of stacking together when the optional foot
stands are purchased.
U.S.
European
U.K.

©2012WOOAUDIOtmInc.Allrightsreserved.www.wooaudio.comRev1.1.Feb20,201411
Powering Up
To power up on the WTP-1 press the power button⑪until pressure is felt and
the VFD screen should turn on.
To power up on the WDS-1 press the power button⑫until pressure is felt and
the VFD screen should turn on.
If you buy both WTP-1 and WDS-1 and decide to stack them. The power button
on the WTP-1 ⑪becomes a simultaneous power button and will be able to
power up both WTP-1 and WDS-1 at the same time. Refer to Installing the
Power Cord on how to do this.
Connecting the WTP-1 with the WDS-1:
Here at Woo Audio we believe flexibility is extremely important, which is why
we offer three ways to pair the WTP-1 and WDS-1 together; Optical ⑤,
AES/EBU ⑥, Coaxial ⑦refer to the above diagram.*
*These three connections allow for 16-Bit/44.1kHz CD quality of music for your
listening pleasure.

©2012WOOAUDIOtmInc.Allrightsreserved.www.wooaudio.comRev1.1.Feb20,201412
Usin
g
the As
y
nchronous USB 2.0
p
ort:
The WDS-1 offers a fourth source of music input, a USB 2.0 port ⑧refer to the
above diagram, which allows for usage of the WDS-1 DAC with Windows or
Mac OS computer.
Installing the USB driver
*These steps only apply for Windows XP/Vista/7/8.
1. Plug in the USB 2.0 cable to the WA7 Fireflies and your computer.
2. Install the WA7 Fireflies Driver from the downloaded file from
https://www.dropbox.com/s/2c8n0d01c2b1c10/wds1-driver-1.01.zip
3. Unzip the downloaded file. Locate setup.exe file and run it.
4. Follow on-screen instruction to complete the installation. Windows restart may be
required.
5. Set USB Speakers as your default audio output.
Go to My Computer -> Control Panel -> Hardware and Sounds -> Sounds
-> Click SPDIF Speakers -> Click Set Default
6. Now you're ready to enjoy music from your computer.

©2012WOOAUDIOtmInc.Allrightsreserved.www.wooaudio.comRev1.1.Feb20,201413
Configuring media player
TIPS: It is strongly recommended to use a media player that supports ASIO output
mode for the highest playback quality.
Changing Output mode
Example is given for JRiver Media Center.
IMPORTANT: In JRiver Media Center, disable “Use large hardware buffers” option
by unchecking the box. Buffering error will occur if this option is enable.
Connecting the Amp to the WDS-1:
The WDS-1 offers two sources of output, XLR ⑨and RCA ⑩refer to the above
diagram to connect the amp of your choice. We highly recommend one of our
Woo Audio Amplifiers.
Tools -> Options -> Audio Output -> Output mode -> select ASIO
Tools -> Options -> Audio Output -> Output mode settings -> uncheck the box
below

©2012WOOAUDIOtmInc.Allrightsreserved.www.wooaudio.comRev1.1.Feb20,201414
Operations
Using the WTP-1 CD Transport:
Before you begin using your WTP-1 make sure you remove
the rubber transport plate from the CD tray.
Opening of the CD tray on the WTP-1 is done by
sliding the cover horizontally until it rotates to the left and the CD
tray is revealed. Refer to the picture.
*Remember to replace the magnetic disc clamp onto the CD tray
after putting in the CD.
Buttons
/II: Plays music or Pauses the track if already on playback
: Stops music, resets back to the beginning of the track
I/: Goes back one track or if held will rewind the track
I/: Goes forward one track or if held will fast forward the track

©2012WOOAUDIOtmInc.Allrightsreserved.www.wooaudio.comRev1.1.Feb20,201415
Using the WDS-1 Digital to Analog Converter:
Now that we have everything properly connected and setup we can begin to enjoy the
music.
Buttons
Input: Allow for the selection of input device.
Coaxial -> Optical -> AES/EBU -> USB
Filter: Choose one of two of our filter settings
Slow -> Sharp
Vol -: Lowers Volume
Maximum->Minimum (100->0)
Vol +: Increases Volume
Minimum->Maximum (0->100)
Remember to choose the proper input of music source and set the volume to your
preference.

©2012WOOAUDIOtmInc.Allrightsreserved.www.wooaudio.comRev1.1.Feb20,201416
FAQ - Frequently Asked Questions
When the Simultaneous power button is pressed, only the WTP-1 turned on
but not the WDS-1.
oTo protect the circuitry of the WDS-1 there is a 10 second delay in between power
ups.
oMake sure the WDS-1 power button is in the on position before connecting the
AC umbilical cord and using the simultaneous power button.
No sound is coming out of the WDS.
oCheck you have selected the correct input.
Pressed the play button on the CD transport but nothing plays.
oMake sure the rubber transport plate is removed from the CD tray before putting
on the CD.
oMake sure the magnetic disc clamp is placed on the CD.
I want to change my unit from 110v to 220v but I can’t seem to find the
switch.
oThe WTP-1 and WDS-1 units are not customer switchable but instead can be
factory configured before you order or you can send it in and we can change it for
you.
The VFD screen does not light.
First check if the AC cord is installed. Then, check if the fuse is burnt. See the following
instruction on how to replace a fuse. The fuse type is 2-3A, slo-blow.
Insert a small flat
screwdriver into
the fuse door
which located on
the AC inlet.
Release the fuse
door by pulling it
out.
The fuse holder is
released from the
AC inlet.
The fuse is held by
a clip.

©2012WOOAUDIOtmInc.Allrightsreserved.www.wooaudio.comRev1.1.Feb20,201417
Warranty and Service
Woo Audio warrants this product free from defects in materials and workmanship for 1
year from the original date of purchase. The tubes are warranted for 30 days unless
otherwise stated. In the event that your Woo Audio product requires servicing, please
contact us directly to get a return instruction. If the equipment needs to be shipped back,
please use the original packaging and include a copy of the sales purchase along with
detail explanation of the problem(s).
Any modification not authorized by WOO AUDIO will void this warranty.

©2012WOOAUDIOtmInc.Allrightsreserved.www.wooaudio.comRev1.1.Feb20,201418
Product Specification
Model: WDS-1
Chipset: PCM1795 D/A
USB receiving chipset: C-Media 6631A
Sampling Rate: Up to 24-Bit, 192kHz for all inputs
Inputs: Asynchronous USB 2.0, Optical, AES/EBU,
Coaxial BNC
Outputs: 1 RCA unbalanced, 1 XLR balanced
Max Output: 2.2vRMS@RCA, 4.4vRMS@XLR
Frequency response: 10Hz to 20kHz, +/- 0.5dB
Distortion: <0.002%
S/N: 120dB
Remote Control: Optional
Mains Supply: 100-120v, 220-240v, 50/60Hz, factory
configurable
Finish : Anodized Aluminum
Dimension: 84mm (H) x 230mm (W) x 320mm (D)
Weight: 9 lbs / 4 kg

©2012WOOAUDIOtmInc.Allrightsreserved.www.wooaudio.comRev1.1.Feb20,201419
Product Specification
Model: WTP-1
Optical pick up Philips
Outputs: 1 Coaxial BNC, 1 Optical, 1 AES/EBU
Output Voltage: 500mV p-p
Crystal Oscillator Stability: 0.3ppm/°C TCXO
Clock Jitter: <90pS
Remote Control: All-aluminum premium remote control
Power Consumption: <10VA
Voltage: AC 110-120v/220 - 240V, 50/60 Hz,
factory configurable
Finish Anodized Aluminum
External Dimension, end to end
measurement, same for both units:
84mm (H) x 230mm (W) x 320mm (D)
Weight (AMP & PSU): 10 lbs / 4.5 kg
Woo Audio is committed to continuously improve its products. We reserve
the right to improve the design without notice.
This manual suits for next models
1
Table of contents