Woodward RP-3000XT User manual

Technical Manual
Remote Panel - RP-3000XT
Remote Panel
Release 2.0
Remote Panel - RP-3000XT
Document ID: 37928, Revision A - Build 50960
Released

Manual (original)
This is no translation but the original Technical Manual in English.
Designed in Germany.
Woodward GmbH
Handwerkstr. 29
70565 Stuttgart
Germany
Telephone: +49 (0) 711 789 54‑510
Fax: +49 (0) 711 789 54‑101
E-mail: [email protected]
Internet: http://www.woodward.com
© 2021 Woodward GmbH. All rights reserved.
2 Remote Panel - RP-3000XT 37928
Released

Brief Overview
Woodward’s RP-3000XT is a touch screen remote control and annunciation panel for use
with the easYgen-3000XT or LS-6XT series controls. It is particularly useful with the back
panel mounted easYgen-3100XT/3400XT or LS-6XT, providing control from the front panel
with greatly reduced wiring to the access door, while keeping high voltage connections
located safely on the back panel.
The RP-3000XT allows remote control and visualization. It oers all the HMI resources that
the display variants easYgen-3200XT/3500XT oer, but with the state of the art touch
screen technology. Irrespective of the easYgen-3000XT variants, this compact HMI
solution connects to multiple XT controls (select and access one easYgen-3000XT or
LS-6XT at a time).
The RP-3000XT oers switchgear builders, genset packagers and system integrators an
o-the-shelf HMI option for any application where a secure remote control, monitoring,
and visualization is desired, such as hospitals, data centers, oshore rigs, landll and
wastewater gas-to-power applications to name a few.
A RP-3000XT remote panel communicates with easYgen-3000XT Series genset controls or
LS-6XT via Ethernet communication.
3Remote Panel - RP-3000XT37928
Brief Overview
Released

Supported devices
All easYgen-3000XT genset controls and LS-6XT are supported by the RP-3000XT remote
panel.
Scope of delivery
The following parts are included in the scope of delivery. Please check prior to the
installation that all parts are present.
Fig. 1: Scope of delivery - schematic
A RP-3000XT remote panel
B Clamp fastener installation material - 6x
C This manual is available on the web. For this there is a QR code printed on the
backside of the device which gives access to this documentation.
Additional Two additional stickers like described in C are placed inside the box that can
be pasted anywhere at your convenience.
4 Remote Panel - RP-3000XT 37928
Brief Overview
Released

Table of Contents
1 General Information . . . . . . . . . . . . . . . . . . . . . . . . . . . . . . . . . . . . . . . . . . . . . . . . . . . . . . . . . . . . . . . . . . . . . . . . . . . . . . . . . . . . . . . . . . . . 7█
1.1 Revision History . . . . . . . . . . . . . . . . . . . . . . . . . . . . . . . . . . . . . . . . . . . . . . . . . . . . . . . . . . . . . . . . . . . . . . . . . . . . . . . . . . . . . . . . . . . . 7█
1.2 Depiction Of Notes And Instructions . . . . . . . . . . . . . . . . . . . . . . . . . . . . . . . . . . . . . . . . . . . . . . . . . . . . . . . . . . . . . . . . . . . . . . . . . . . . . . . . . . . . . . . . . . . . 8█
1.2.1 Copyright And Disclaimer . . . . . . . . . . . . . . . . . . . . . . . . . . . . . . . . . . . . . . . . . . . . . . . . . . . . . . . . . . . . . . . . . . . . . . . . . . . . . . . . . . . . . . . . . . . . 9█
1.2.2 Service And Warranty . . . . . . . . . . . . . . . . . . . . . . . . . . . . . . . . . . . . . . . . . . . . . . . . . . . . . . . . . . . . . . . . . . . . . . . . . . . . . . . . . . . . . . . . . . . . 10█
1.3 Safety . . . . . . . . . . . . . . . . . . . . . . . . . . . . . . . . . . . . . . . . . . . . . . . . . . . . . . . . . . . . . . . . . . . . . . . . . . . . . . . . . . . . . . . . . . . . 10█
1.3.1 Personnel . . . . . . . . . . . . . . . . . . . . . . . . . . . . . . . . . . . . . . . . . . . . . . . . . . . . . . . . . . . . . . . . . . . . . . . . . . . . . . . . . . . . . . . . . . . . 10█
1.3.2 General Safety Notes . . . . . . . . . . . . . . . . . . . . . . . . . . . . . . . . . . . . . . . . . . . . . . . . . . . . . . . . . . . . . . . . . . . . . . . . . . . . . . . . . . . . . . . . . . . . 11█
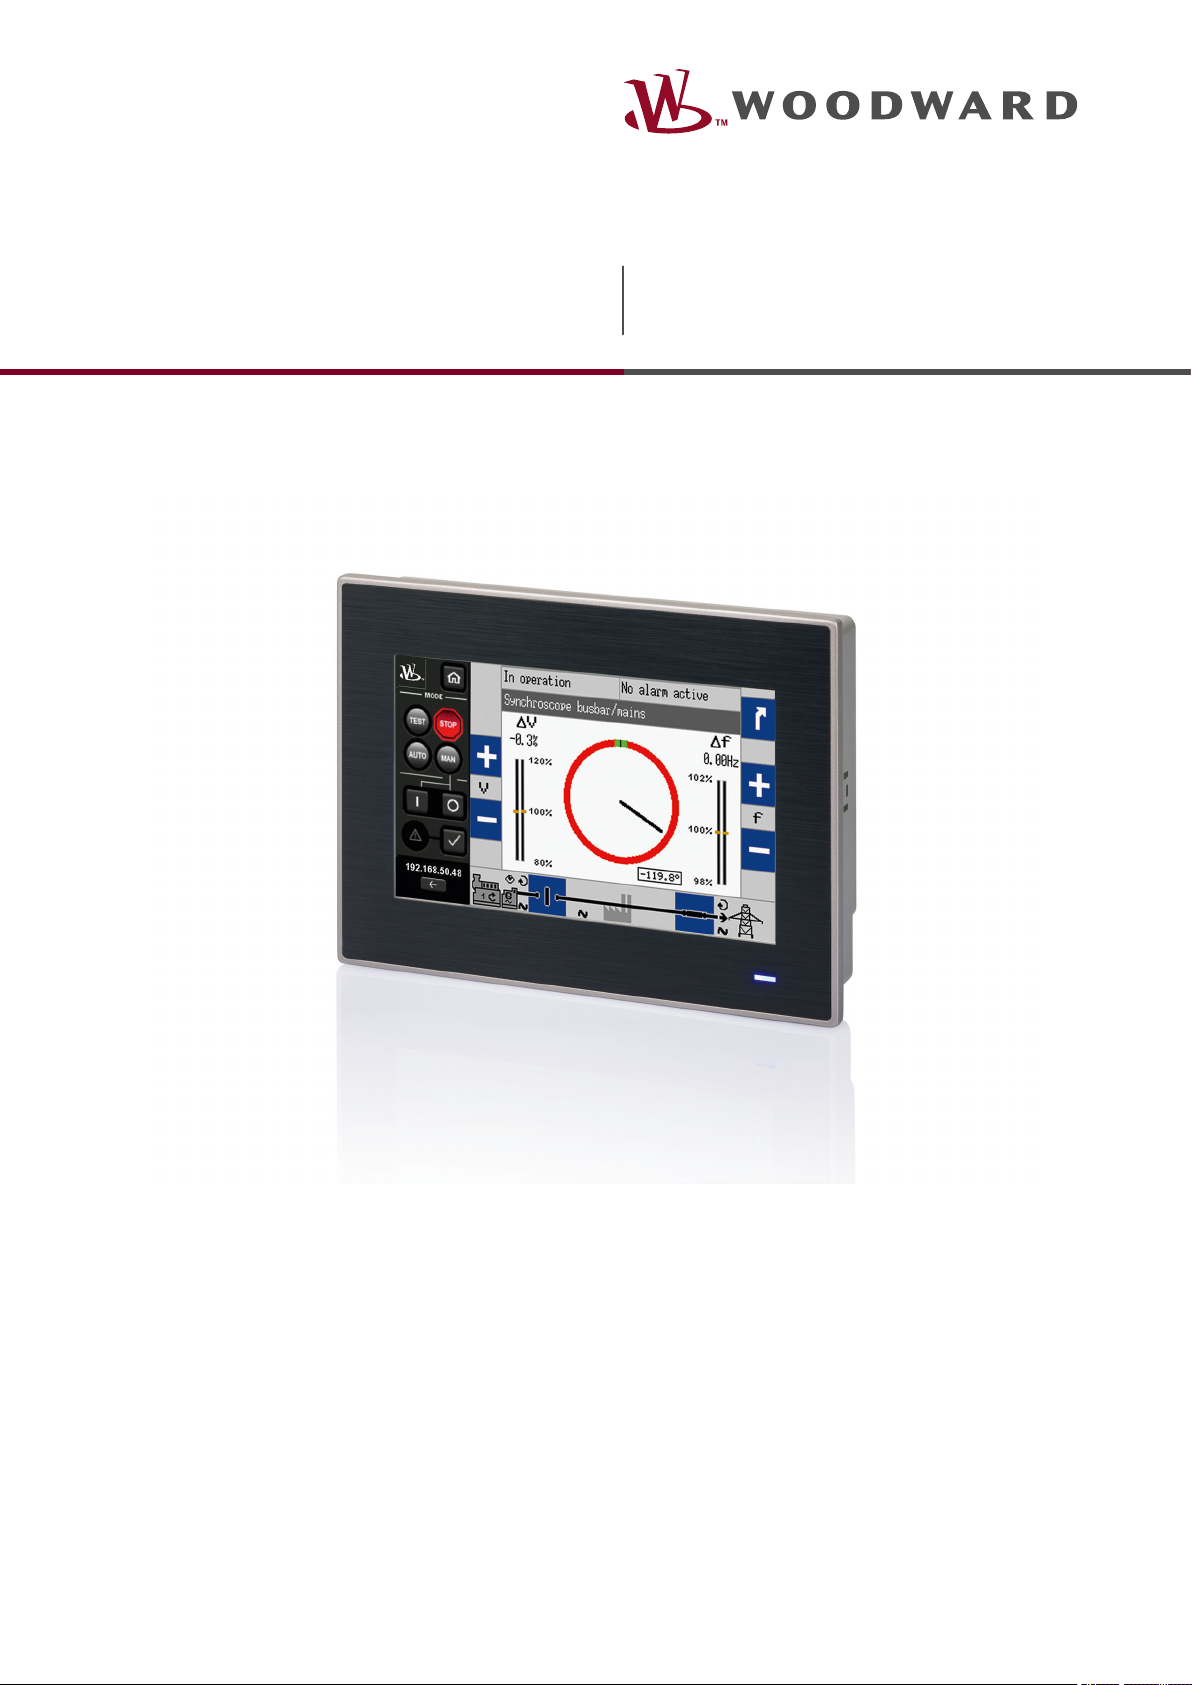
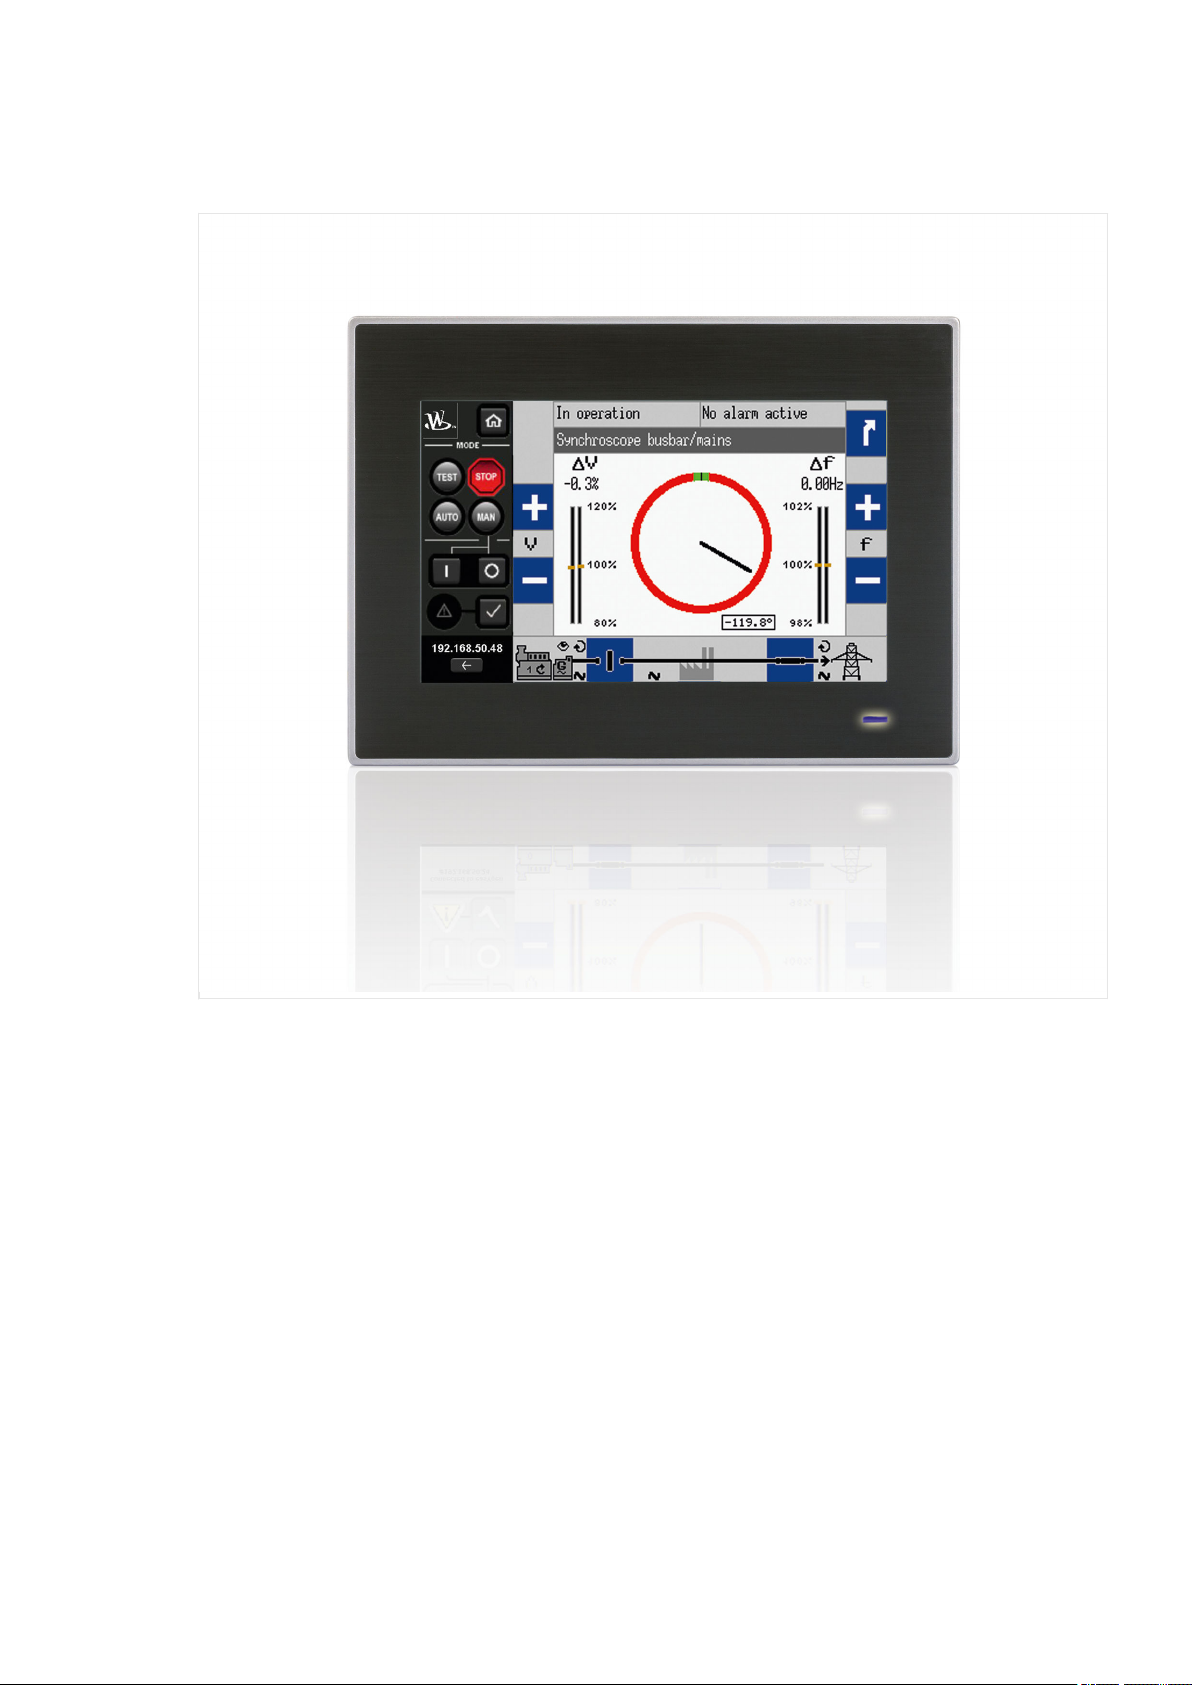
2 System Overview . . . . . . . . . . . . . . . . . . . . . . . . . . . . . . . . . . . . . . . . . . . . . . . . . . . . . . . . . . . . . . . . . . . . . . . . . . . . . . . . . . . . . . . . . . . . 13█
2.1 Display And Status Indicators . . . . . . . . . . . . . . . . . . . . . . . . . . . . . . . . . . . . . . . . . . . . . . . . . . . . . . . . . . . . . . . . . . . . . . . . . . . . . . . . . . . . . . . . . . . . 14█
2.2 Hardware Interfaces (Terminals) . . . . . . . . . . . . . . . . . . . . . . . . . . . . . . . . . . . . . . . . . . . . . . . . . . . . . . . . . . . . . . . . . . . . . . . . . . . . . . . . . . . . . . . . . . . . 15█
3 Installation . . . . . . . . . . . . . . . . . . . . . . . . . . . . . . . . . . . . . . . . . . . . . . . . . . . . . . . . . . . . . . . . . . . . . . . . . . . . . . . . . . . . . . . . . . . . 17█
3.1 Mount Unit . . . . . . . . . . . . . . . . . . . . . . . . . . . . . . . . . . . . . . . . . . . . . . . . . . . . . . . . . . . . . . . . . . . . . . . . . . . . . . . . . . . . . . . . . . . . 17█
3.1.1 Clamp Fastener Installation . . . . . . . . . . . . . . . . . . . . . . . . . . . . . . . . . . . . . . . . . . . . . . . . . . . . . . . . . . . . . . . . . . . . . . . . . . . . . . . . . . . . . . . . . . . . 19█
3.2 Setup Connections . . . . . . . . . . . . . . . . . . . . . . . . . . . . . . . . . . . . . . . . . . . . . . . . . . . . . . . . . . . . . . . . . . . . . . . . . . . . . . . . . . . . . . . . . . . . 20█
3.2.1 Terminal Allocation . . . . . . . . . . . . . . . . . . . . . . . . . . . . . . . . . . . . . . . . . . . . . . . . . . . . . . . . . . . . . . . . . . . . . . . . . . . . . . . . . . . . . . . . . . . . 20█
3.2.2 Power Supply . . . . . . . . . . . . . . . . . . . . . . . . . . . . . . . . . . . . . . . . . . . . . . . . . . . . . . . . . . . . . . . . . . . . . . . . . . . . . . . . . . . . . . . . . . . . 21█
3.2.3 ETHERNET Interface . . . . . . . . . . . . . . . . . . . . . . . . . . . . . . . . . . . . . . . . . . . . . . . . . . . . . . . . . . . . . . . . . . . . . . . . . . . . . . . . . . . . . . . . . . . . 22█
4 Setup (1st Time Operation) . . . . . . . . . . . . . . . . . . . . . . . . . . . . . . . . . . . . . . . . . . . . . . . . . . . . . . . . . . . . . . . . . . . . . . . . . . . . . . . . . . . . . . . . . . . . 27█
4.1 Find IP Address To Connect To . . . . . . . . . . . . . . . . . . . . . . . . . . . . . . . . . . . . . . . . . . . . . . . . . . . . . . . . . . . . . . . . . . . . . . . . . . . . . . . . . . . . . . . . . . . . 27█
4.2 Setup Ethernet Network Connection . . . . . . . . . . . . . . . . . . . . . . . . . . . . . . . . . . . . . . . . . . . . . . . . . . . . . . . . . . . . . . . . . . . . . . . . . . . . . . . . . . . . . . . . . . . . 29█
4.2.1 The MULTICAST Screen . . . . . . . . . . . . . . . . . . . . . . . . . . . . . . . . . . . . . . . . . . . . . . . . . . . . . . . . . . . . . . . . . . . . . . . . . . . . . . . . . . . . . . . . . . . . 30█
4.2.2 The SETTINGS Screen . . . . . . . . . . . . . . . . . . . . . . . . . . . . . . . . . . . . . . . . . . . . . . . . . . . . . . . . . . . . . . . . . . . . . . . . . . . . . . . . . . . . . . . . . . . . 31█
5 Operation . . . . . . . . . . . . . . . . . . . . . . . . . . . . . . . . . . . . . . . . . . . . . . . . . . . . . . . . . . . . . . . . . . . . . . . . . . . . . . . . . . . . . . . . . . . . 35█
5.1 Access and Level of Control . . . . . . . . . . . . . . . . . . . . . . . . . . . . . . . . . . . . . . . . . . . . . . . . . . . . . . . . . . . . . . . . . . . . . . . . . . . . . . . . . . . . . . . . . . . . 35█
5.2 The BASE Screen - The Remote Control Panel . . . . . . . . . . . . . . . . . . . . . . . . . . . . . . . . . . . . . . . . . . . . . . . . . . . . . . . . . . . . . . . . . . . . . . . . . . . . . . . . . . . . . . . . . . . . 35█
5.3 Use Cases . . . . . . . . . . . . . . . . . . . . . . . . . . . . . . . . . . . . . . . . . . . . . . . . . . . . . . . . . . . . . . . . . . . . . . . . . . . . . . . . . . . . . . . . . . . . 37█
5.4 Personalization . . . . . . . . . . . . . . . . . . . . . . . . . . . . . . . . . . . . . . . . . . . . . . . . . . . . . . . . . . . . . . . . . . . . . . . . . . . . . . . . . . . . . . . . . . . . 40█
5Remote Panel - RP-3000XT37928
Table of Contents
Released

6 Trouble Shooting . . . . . . . . . . . . . . . . . . . . . . . . . . . . . . . . . . . . . . . . . . . . . . . . . . . . . . . . . . . . . . . . . . . . . . . . . . . . . . . . . . . . . . . . . . . . 41█
7 Technical Specications . . . . . . . . . . . . . . . . . . . . . . . . . . . . . . . . . . . . . . . . . . . . . . . . . . . . . . . . . . . . . . . . . . . . . . . . . . . . . . . . . . . . . . . . . . . . 42█
7.1 Technical Data . . . . . . . . . . . . . . . . . . . . . . . . . . . . . . . . . . . . . . . . . . . . . . . . . . . . . . . . . . . . . . . . . . . . . . . . . . . . . . . . . . . . . . . . . . . . 42█
7.1.1 Ambient Variables . . . . . . . . . . . . . . . . . . . . . . . . . . . . . . . . . . . . . . . . . . . . . . . . . . . . . . . . . . . . . . . . . . . . . . . . . . . . . . . . . . . . . . . . . . . . 42█
7.1.2 System Hardware . . . . . . . . . . . . . . . . . . . . . . . . . . . . . . . . . . . . . . . . . . . . . . . . . . . . . . . . . . . . . . . . . . . . . . . . . . . . . . . . . . . . . . . . . . . . 43█
7.1.3 Display . . . . . . . . . . . . . . . . . . . . . . . . . . . . . . . . . . . . . . . . . . . . . . . . . . . . . . . . . . . . . . . . . . . . . . . . . . . . . . . . . . . . . . . . . . . . 43█
7.1.4 Touch Screen . . . . . . . . . . . . . . . . . . . . . . . . . . . . . . . . . . . . . . . . . . . . . . . . . . . . . . . . . . . . . . . . . . . . . . . . . . . . . . . . . . . . . . . . . . . . 43█
7.1.5 Interface . . . . . . . . . . . . . . . . . . . . . . . . . . . . . . . . . . . . . . . . . . . . . . . . . . . . . . . . . . . . . . . . . . . . . . . . . . . . . . . . . . . . . . . . . . . . 43█
7.1.6 Software . . . . . . . . . . . . . . . . . . . . . . . . . . . . . . . . . . . . . . . . . . . . . . . . . . . . . . . . . . . . . . . . . . . . . . . . . . . . . . . . . . . . . . . . . . . . 44█
7.1.7 Housing . . . . . . . . . . . . . . . . . . . . . . . . . . . . . . . . . . . . . . . . . . . . . . . . . . . . . . . . . . . . . . . . . . . . . . . . . . . . . . . . . . . . . . . . . . . . 44█
7.1.8 Approvals . . . . . . . . . . . . . . . . . . . . . . . . . . . . . . . . . . . . . . . . . . . . . . . . . . . . . . . . . . . . . . . . . . . . . . . . . . . . . . . . . . . . . . . . . . . . 44█
7.1.9 Generic Note . . . . . . . . . . . . . . . . . . . . . . . . . . . . . . . . . . . . . . . . . . . . . . . . . . . . . . . . . . . . . . . . . . . . . . . . . . . . . . . . . . . . . . . . . . . . 45█
8 Glossary And List Of Abbreviations . . . . . . . . . . . . . . . . . . . . . . . . . . . . . . . . . . . . . . . . . . . . . . . . . . . . . . . . . . . . . . . . . . . . . . . . . . . . . . . . . . . . . . . . . . . . 46█
9 Index . . . . . . . . . . . . . . . . . . . . . . . . . . . . . . . . . . . . . . . . . . . . . . . . . . . . . . . . . . . . . . . . . . . . . . . . . . . . . . . . . . . . . . . . . . . . 47█
6 Remote Panel - RP-3000XT 37928
Table of Contents
Released

1 General Information
1.1 Revision History
Rev. Date Editor Changes
A 2021-02-09 VK Describes device implemented software release 2.0. This
software and hardware is a rework of the remotepanel
release 1.2.
Hardware changes
• changed to new Hardware•
• set up on Linux base•
Software changes
• reworked application for changed hardware/operating system•
• reworked settings screen•
◦ IP address entering with a numeric keypad◦
◦ removed beeper settings◦
◦ expanded handling of startup delay◦
• reworked multicast screen•
◦ design changes◦
◦ handle large # of devices using a scrollbar instead of page◦
buttons
◦ Info popup with release information◦
Technical Manual
• reworked manual according to HW and SW changes•
7Remote Panel - RP-3000XT37928
1 General Information
1.1 Revision History
Released

1.2 Depiction Of Notes And Instructions
Safety instructions
Safety instructions are marked with symbols in these instructions. The safety instructions
are always introduced by signal words that express the extent of the danger.
DANGER!
This combination of symbol and signal word indicates an immediately-dangerous
situation that could cause death or severe injuries if not avoided.
WARNING!
This combination of symbol and signal word indicates a possibly-dangerous situation that
could cause death or severe injuries if it is not avoided.
CAUTION!
This combination of symbol and signal word indicates a possibly-dangerous situation that
could cause slight injuries if it is not avoided.
NOTICE!
This combination of symbol and signal word indicates a possibly-dangerous situation that
could cause property and environmental damage if it is not avoided.
Tips and recommendations
This symbol indicates useful tips and recommendations as well as information for
ecient and trouble-free operation.
Additional markings
To emphasize instructions, results, lists, references, and other elements, the following
markings are used in these instructions:
Marking Explanation
⚙Start of a procedure list
>Prerequisite for a procedure list
▷Step-by-step instructions
▶Results of action steps
╚═▷ References to sections of these instructions and to other relevant
documents
8 Remote Panel - RP-3000XT 37928
1 General Information
1.2 Depiction Of Notes And Instructions
Released

Marking Explanation
• Listing without xed sequence
☼ Example
»Buttons« Operating elements (e.g. buttons, switches), display elements (e.g.
signal lamps)
»Display« Screen elements (e.g. buttons, programming of function keys)
[Screen xx / Screen xy / Screen
xz] ...
Menu path.
The following information and setting refer to a page on HMI screen or
ToolKit located as described here.
Some parameters/settings/screens are available only either in ToolKit or
in HMI/display.
Dimensions in Figures
All dimensions shown with no units specied are in mm.
1.2.1 Copyright And Disclaimer
Disclaimer
All information and instructions in this manual have been provided under due
consideration of applicable guidelines and regulations, the current and known state of the
art, as well as our many years of in-house experience. Woodward assumes no liability for
any damages due to:
•Failure to comply with the instructions in this manual
•
• Improper use / misuse•
• Willful operation by non-authorized persons•
• Unauthorized conversions or non-approved technical modications•
• Use of non-approved spare parts•
The originator is solely liable for the full extent for damages caused by such conduct. The
obligations agreed-upon in the delivery contract, the general terms and conditions, the
manufacturer’s delivery conditions, and the statutory regulations valid at the time the
contract was concluded, apply.
Copyright
This manual is protected by copyright. No part of this manual may be reproduced in any
form or incorporated into any information retrieval system without written permission of
Woodward GmbH.
Delivery of this manual to third parties, duplication in any form - including excerpts - as
well as exploitation and/or communication of the content, are not permitted without a
written declaration of release by Woodward GmbH.
Actions to the contrary will entitle us to claim compensation for damages. We expressly
reserve the right to raise any further accessory claims.
9Remote Panel - RP-3000XT37928
1 General Information
1.2.1 Copyright And Disclaimer
Released

1.2.2 Service And Warranty
Our Customer Service is available for technical information.
For regional support, please refer to: ══▷ http://www.woodward.com/Support_pgd.aspx.
In addition, our employees are constantly interested in new information and experiences
that arise from usage and could be valuable for the improvement of our products.
Warranty terms
Please enquire about the terms of warranty from your nearest Woodward representative.
For our contact search webpage please go to: ══▷ http://www.woodward.com/
Directory.aspx
1.3 Safety
NOTICE!
Damage due to improper use!
Improper use of the device may cause damage to the device as well as connected
components.
Improper use includes, but is not limited to:
•Storage, transport, and operation outside the specied conditions.
•
1.3.1 Personnel
WARNING!
Hazards due to insuciently qualied personnel!
If unqualied personnel perform work on or with the control unit hazards may arise which
can cause serious injury and substantial damage to property.
• Therefore, all work must only be carried out by appropriately qualied personnel.•
This manual species the personnel qualications required for the dierent areas of work,
listed below:
Personnel:
•Qualied electrician•
The qualied electrician is able to execute tasks on electrical equipment and
independently detect and avoid any possible dangers due to his training, expertise
and experience, as well as knowledge of all applicable regulations.
10 Remote Panel - RP-3000XT 37928
1 General Information
1.2.2 Service And Warranty
Released

The qualied electrician has been specially trained for the work environment in
which he is active and is familiar with all relevant standards and regulations.
•User•
The user operates the device within the limits of its intended use, without additional
previous knowledge but according to the instructions and safety notes in this
manual.
The workforce must only consist of persons who can be expected to carry out their work
reliably. Persons with impaired reactions due to, for example, the consumption of drugs,
alcohol, or medication are prohibited.
When selecting personnel, the age-related and occupation-related regulations governing
the usage location must be observed.
1.3.2 General Safety Notes
Electrical hazards
DANGER!
Life-threatening hazard from electric shock!
There is an imminent life-threatening hazard from electric shocks from live parts.
Damage to insulation or to specic components can pose a life-threatening hazard.
• Only a qualied electrician should perform work on the electrical equipment.•
• Immediately switch o the power supply and have it repaired if there is damage to•
the insulation.
• Before beginning work at live parts of electrical systems and resources, cut the•
electricity and ensure it remains o for the duration of the work. Comply with the
ve safety rules in the process:
◦ cut electricity;◦
◦ safeguard against restart;◦
◦ ensure electricity is not owing;◦
◦ earth and short-circuit; and◦
◦ cover or shield neighboring live parts.◦
• Never bypass a fuse or render it inoperable. Always use the correct amperage when•
changing a fuse.
• Keep moisture away from live parts. Moisture can cause short circuits.•
11Remote Panel - RP-3000XT37928
1 General Information
1.3.2 General Safety Notes
Released

Prime mover safety
WARNING!
Hazards due to insucient prime mover protection
The engine, turbine, or other type of prime mover should be equipped with an overspeed
(over-temperature, or over-pressure, where applicable) shutdown device(s), that
operates totally independently of the prime mover control device(s) to protect against
runaway or damage to the engine, turbine, or other type of prime mover with possible
personal injury or loss of life should the mechanical-hydraulic governor(s) or electric
control(s), the actuator(s), fuel control(s), the driving mechanism(s), the linkage(s), or
the controlled device(s) fail.
Modications
WARNING!
Hazards due to unauthorized modications
Any unauthorized modications to or use of this equipment outside its specied
mechanical, electrical, or other operating limits may cause personal injury and/or
property damage, including damage to the equipment.
Any unauthorized modications:
•constitute "misuse" and/or "negligence" within the meaning of the product warranty
•
thereby excluding warranty coverage for any resulting damage
•invalidate product certications or listings.
•
Use of batteries/alternators
NOTICE!
Damage to the control system due to improper handling
Disconnecting a battery from a control system that uses an alternator or battery-
charging device whilst the charging device is still connected causes damage to the
control system.
• Make sure the charging device is turned o before disconnecting the battery from•
the system.
12 Remote Panel - RP-3000XT 37928
1 General Information
1.3.2 General Safety Notes
Released

2 System Overview
This chapter provides an overview of the remote panel unit and its use in remote control
applications.
Sample application setup
Fig. 2: Sample application setup
The RP-3000XT scans and shows multiple easYgen-3000XT or LS-6XT controls in the
network, so a user can select the desired device, but it connects to only one device at a
time.
A typical application for the remote panel is to control back-panel mounted easYgen-XT or
LS-6XT devices.
• In this case, the RP-3000XT provides control from the front panel with considerably•
reduced wiring eort.
• The high-voltage connections are located safely on the back panel at the•
easYgen-3000XT or LS-6XT.
13Remote Panel - RP-3000XT37928
2 System Overview
Released

Supported devices
All easYgen-3000XT genset controls and all LS-6XT are supported by the RP-3000XT
remote panel.
2.1 Display And Status Indicators
RP-3000XT display
Fig. 3: Display
The display (╚═▷ Fig. 3) as part of the RP-3000XT is used for direct access to status
information and conguration.
The touch screen of the Remote Panel XT allows to push the blue buttons directly at the
display while easYgen-XT devices work with soft keys (display beside the button).
Status Indicator
At the lower right corner of the Remote Panel XT there is a LED bar with two states:
• Illuminated (blue): Power ON, device is working•
14 Remote Panel - RP-3000XT 37928
2 System Overview
2.1 Display And Status Indicators
Released

• NOT illuminated: Power OFF or fatal device error•
2.2 Hardware Interfaces (Terminals)
The RP-3000XT provides the following terminals -- only two of them, marked green, are
used for remote panel. They are allocated as follows:
Fig. 4: Interfaces overview (side view)
15Remote Panel - RP-3000XT37928
2 System Overview
2.2 Hardware Interfaces (Terminals)
Released

Fig. 5: Interface overview (rear view)
Restricted use of interfaces
For use with easYgen-3000XT or LS-6XT devices only two terminals are used:
• Power supply•
• ETHERNET port•
16 Remote Panel - RP-3000XT 37928
2 System Overview
2.2 Hardware Interfaces (Terminals)
Released

3 Installation
3.1 Mount Unit
Mount the unit using the clamp fasteners (╚═▷ “3.1.1 Clamp Fastener Installation”).
• Don't drill holes if you want to use the clamp fasteners. If the holes are drilled into•
the panel, the clamp fasteners cannot be used anymore.
• In order to ensure the protection of IP 66, fasten the unit with adequate care.•
Fig. 6: Dimensions
17Remote Panel - RP-3000XT37928
3 Installation
3.1 Mount Unit
Released

Panel cutout
Fig. 7: Cutout schematic
Fig. 8: Dimension and cut out
Measure Description
B Height Total height 146.9 mm
HPanel cutout
height
138.5 mm
A Width Total width 205 mm
LPanel cutout
width
192 mm
C Depth Total depth 46 mm
The maximum permissible corner radius is 5 mm.
18 Remote Panel - RP-3000XT 37928
3 Installation
3.1 Mount Unit
Released

3.1.1 Clamp Fastener Installation
⚙
ᐳ
For installation into a door panel with the fastening clamps, proceed as follows:
1. ▷
Cut out the panel according to the dimensions in ╚═▷ Fig. 7.
Don't drill holes if you want to use the clamp fasteners. If holes are drilled
into the panel, the clamp fasteners cannot be used anymore!
2. ▷
Loosen the wire connection terminal screws on the back of the unit and remove the wire
connection terminal strip if required.
3. ▷
Insert the six clamping screws into the clamp inserts until they are almost ush. Do not
completely insert the screws into the clamp inserts.
4. ▷
Insert the unit into the panel cutout. Verify that the unit ts correctly in the cutout. If the
panel cutout is not big enough, enlarge it accordingly.
5. ▷
Fig. 9: mount
Insert the noses of the insert into the slots of the housing. Do it for all six clamp
fasteners on all sides of the device.
19Remote Panel - RP-3000XT37928
3 Installation
3.1.1 Clamp Fastener Installation
Released

6. ▷
Tighten the clamping screws until the control unit is secured to the control panel. Over
tightening of these screws may result in the clamp inserts or the housing breaking.
7. ▷
Re-attach the wire connection terminal strip and secure them.
3.2 Setup Connections
3.2.1 Terminal Allocation
Fig. 10: Side View: Used Interfaces
20 Remote Panel - RP-3000XT 37928
3 Installation
3.2 Setup Connections
Released
Other manuals for RP-3000XT
1
Table of contents
Other Woodward Remote Control manuals
Popular Remote Control manuals by other brands

COCALL
COCALL RC100M user manual

Carson
Carson reflex stick multi pro instruction manual

Litex Industries
Litex Industries RCI-108L Installation and operating instructions

Superrollo
Superrollo GW60 Translation of the Original Operating and Assembly Manual

Satel
Satel RE-1K manual

Topwing
Topwing SkyEasy Smart FPV quick start