WPI FLASHCUT CNC User manual

Control Pendant
Midwest Office
444 Lake Cook Road, Suite 22
Deerfield, IL 60015
Phone (847) 940-9305 Fax (847) 940-9315
www.flashcutcnc.com
Revised 11/02/2010
© 1998-2010 WPI, Inc.


Table of Contents
1. INTRODUCTION......................................................................................................................................................5
2. TO PREPARE YOUR DEVICE: .............................................................................................................................6
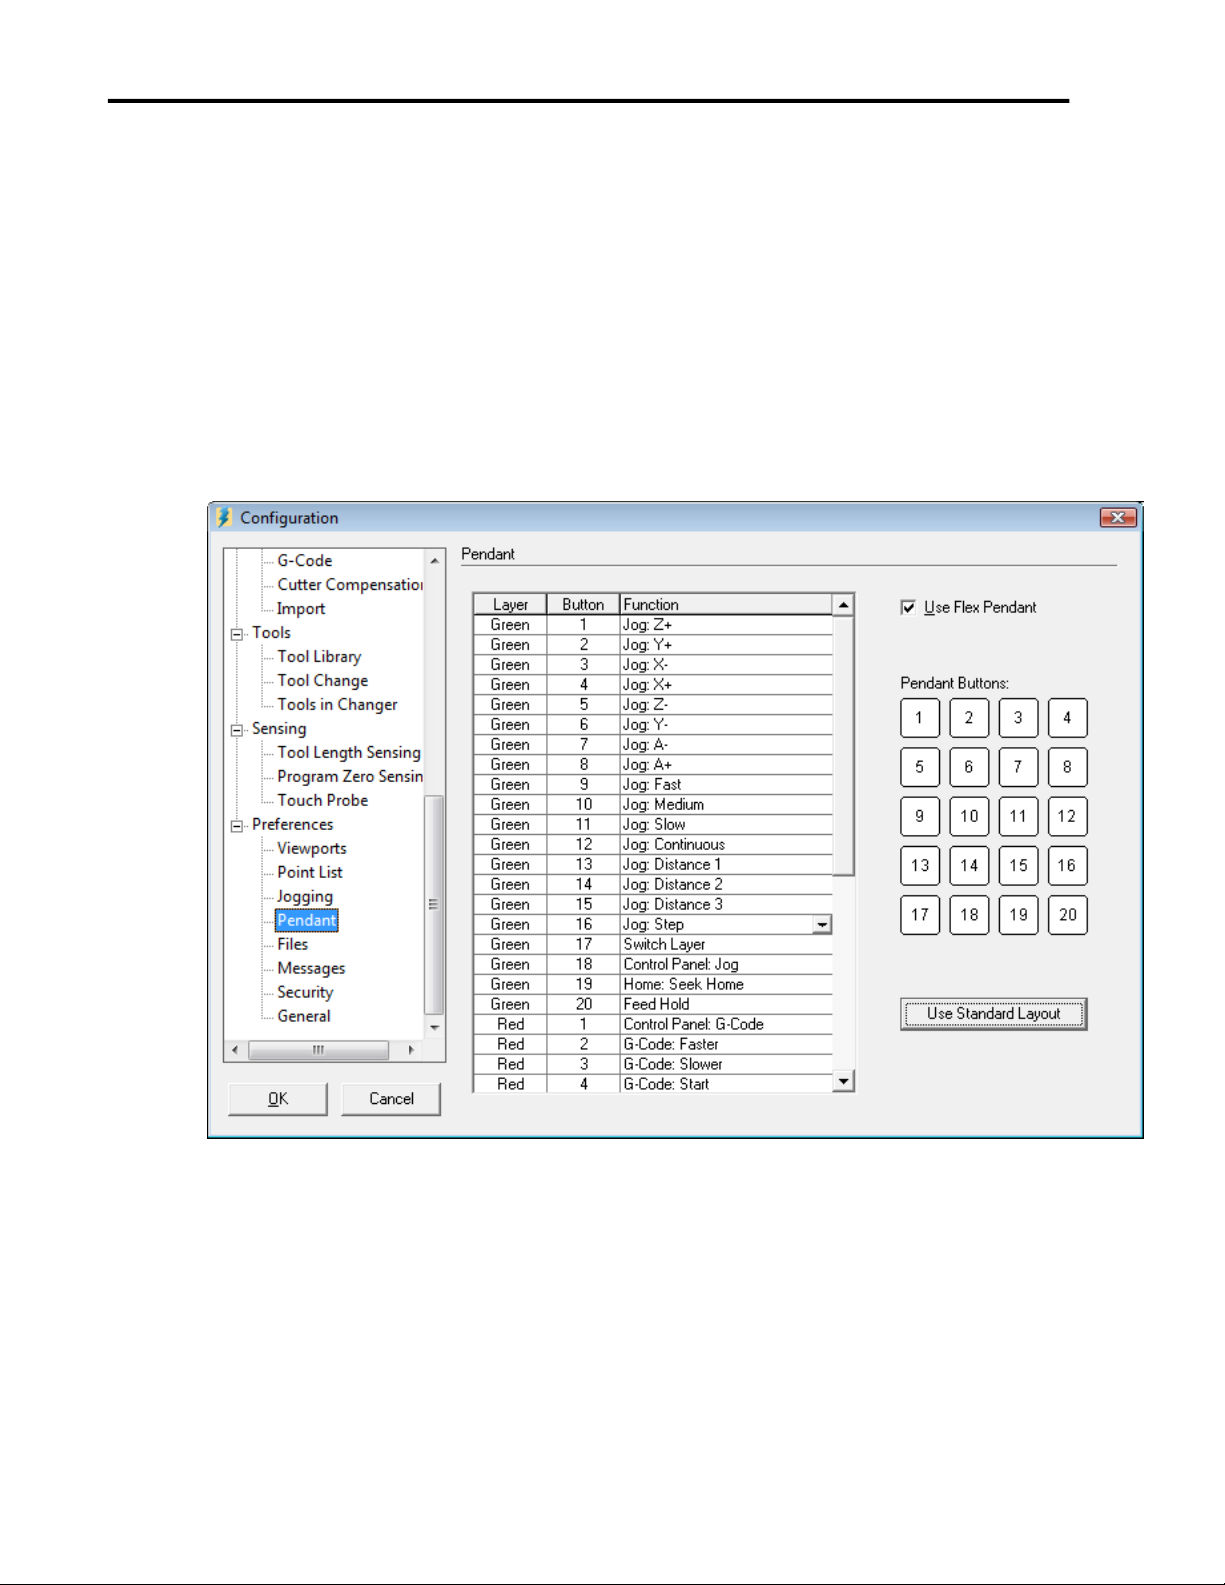
3. TO INSTALL ON YOUR SYSTEM:.......................................................................................................................7
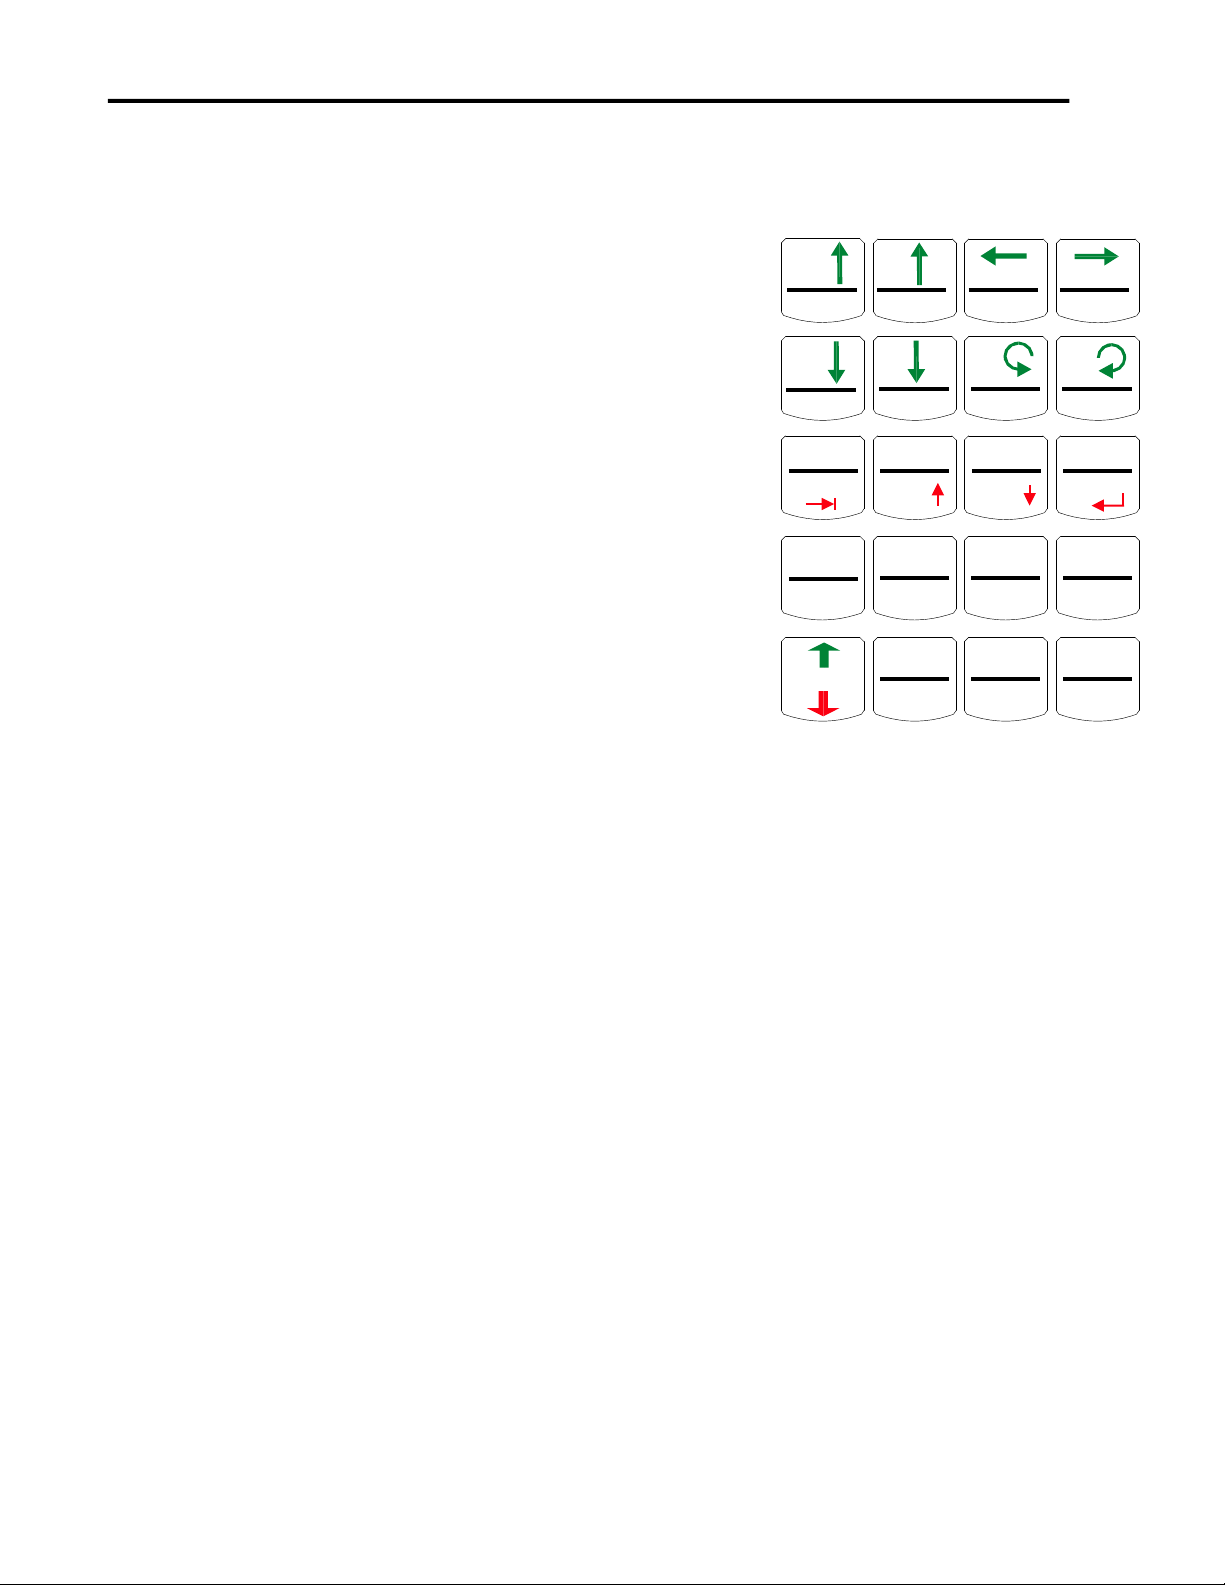
4. THE KEYS:................................................................................................................................................................8
GREEN LAYER...............................................................................................................................................................8
Z+, Z-, Y+, Y-, X+, X-, A+, A-......................................................................................................................................8
FAST, MED., SLOW .....................................................................................................................................................8
CONT., 0.1IN/1MM, 0.01IN/0.1MM, 0.001IN/0.001MM, STEP..................................................................................8
LAYER ..........................................................................................................................................................................8
JOG...............................................................................................................................................................................8
SEEK HOME ................................................................................................................................................................8
HOLD ...........................................................................................................................................................................8
RED LAYER....................................................................................................................................................................8
G-CODE.......................................................................................................................................................................8
FASTER, SLOWER.......................................................................................................................................................8
G-CD START ................................................................................................................................................................8
STEP/CONT..................................................................................................................................................................9
RESET...........................................................................................................................................................................9
PT. PROG0...................................................................................................................................................................9
TAB, SCROLL UP, SCROLL DOWN............................................................................................................................9
ENTER..........................................................................................................................................................................9
ZERO X, ZERO Y, ZERO Z, ZERO ALL.......................................................................................................................9
LAYER ..........................................................................................................................................................................9
AUX1 0/1, AUX2 0/1.....................................................................................................................................................9
HOLD ...........................................................................................................................................................................9


FlashCut CNC Section 1 Introduction
5
1. Introduction
Thank you for purchasing the FlashCut CNC Control Pendant. In your package you should have:
(1) Control Pendant
(1) USB Extension Cable
(1) Protective Cover
(1) Sheet of Button Labels

FlashCut CNC Section 2 To Prepare Your Device
6
2. To prepare your device:
1. Remove Clear Plastic Button Covers
2. Place Button Labels on white part of button. Make sure that you keep the same order as is on
the label sheet.
3. Replace Button Covers
4. Place Protective Cover over pendant. The protective cover can be permanently installed by
removing the paper strips on the edges to expose the adhesive. This protects your pendant
from chips and oil, etc, but does not provide a complete seal to protect against immersion or
heavy spraying.
5. If needed, install the extension cable on the end of the black cable on the unit.

FlashCut CNC Section 3 To Install On Your System
7
3. To install on your system:
1. Open up FlashCut CNC (Must be version 3.0.14 or greater) If you have an earlier
version, then you must install version 3.0.14 or greater before proceeding.
2. Plug the end of the USB cable into an empty USB port on your computer.
3. Select Configuration on the Main Screen’s Pull-Down menu, followed by Preferences
and Pendant
4. In the Pendant Configuration Menu, select the check box next to “Use Flex Pendant.”
5. Then press the “Use Standard Layout” button and select OK to set the pendant
buttons to their default functions.
6. The pendant is then configured to work with the FlashCut CNC software.
7. Press the buttons to perform each of the functions. Note that there are two layers that
you can choose using the Layer Key on the bottom left. This key chooses between
the Green and the Red layers. Note that all of the Jog and Home functions are in the
Green layer. All other functions are on the Red layer.
8. There is a dial on the upper right edge of the pendant that is taped in one position for
normal operation. Please do not remove the tape or try to reposition the dial.

FlashCut CNC Section 4 The Keys
8
4. The Keys:
Green Layer
Z+, Z-, Y+, Y-, X+, X-, A+, A- These keys will
jog the machine in the specified axis and direction.
Holding the key down will move the axis
continuously if in continuous mode. If you are not
in continuous mode, i.e. 0.1, 0.001, 0.001 or step
mode, tap the key for each incremental movement
you want to make.
Fast, Med., Slow –These keys choose between
the Fast, Medium and Slow Jog Feedrates as
defined in the Configuration…Feedrate Ramping
Dialog Box.
Cont., 0.1in/1mm, 0.01in/0.1mm,
0.001in/0.001mm, Step –These keys choose
between Continuous Jog movement and
incremental movement for the specified key. Note
that if you are in metric mode, the increments are
different than in inch mode. Step mode will move
one motor step (Stepper Systems) or encoder pulse
(Servo Systems)
Layer –This key will toggle between the Green Layer and the Red Layer of the
keyboard.
Jog –This key puts the unit in Jog Mode. Note that the above keys will
automatically place the unit in Jog mode.
Seek Home –This key will automatically command the machine to Seek the Home
Switches as defined in the Configuration…Homing Dialog box.
Hold –This button will stop the movement of the machine in any layer in any
function.
Red Layer
G-Code –Puts the unit in G-Code mode so that you can run your G-Code Program.
Faster, Slower –These buttons are used for federate override. In version 2.1.0 and
lower, they can only be used when the machine is idle.
G-Cd Start –This Starts the G-Code program at the current point in the program.
Z+
Y+
X- X+
G-Code
Z-
Faster
Y-
Slower
A-
GCd Start
A+
Step/Cont
Reset
Pt. Prog0
Pt. Move
Fast
Tab
0.1in
1mm
Jump
LAYER
Med.
Scroll
Up
0.01in
0.1mm
Zero Y
Jog
Aux1 0/1
Slow
Scroll
Down
0.001in
0.01mm
Zero Z
Seek
Home
Aux2 0/1
Cont.
Enter
Step
Zero-All
Hold
Hold

FlashCut CNC Section 4 The Keys
9
Step/Cont. –This toggles between the step and continuous modes of running a G-
Code file. (Step mode automatically stops at the end of each G-Code Line)
Reset –This resets the G-Code Program.
Pt. Prog0 –This places the unit in Point Mode and Chooses the Program Zero Point.
It does not move to that point automatically. To choose a different point from the list,
use the Scroll Up and Scroll Down Keys. You can use the Tab Key to choose a
different coordinate system.
Tab, Scroll Up, Scroll Down –This is for general purpose cursor movement in and
around the different text boxes and menus.
Enter –This is for choosing the enter key for messages that come up.
Zero X, Zero Y, Zero Z, Zero All –These keys will zero out the Program
Coordinates. It is especially useful when jogging your machine to find your program
zero position.
Layer –This key will toggle between the Green Layer and the Red Layer of the
keyboard.
Aux1 0/1, Aux2 0/1 –This button turns the device connected to the Auxiliary 1 and 2
outputs on and off.
Hold –This button will stop the movement of the machine in any layer in any
function.
Table of contents