Wynn's Power Steering Serve User manual

Power
Steering
Serve™
Is your steering safe?
MANUAL

NL
RU
ES
DE
FR
EN
NL
RU
ES
DE
FR
EN
Start the engine and let it run for 10
minutes.
Démarrer le moteur et le laisser
chauffer pendant 10 minutes.
Motor starten und etwa 10 Minuten
warmlaufen lassen.
Arranque el motor y hágalo funcionar
durante 10 minutos.
Заведите и прогрейте двигатель в
течение 10 минут.
Motor starten en 10 minuten laten
opwarmen.
Turn the front wheels to centre
position.
Tourner les roues avant en position
centrale.
Die Vorderräder in Mittelstellung
drehen.
Gire las ruedas delanteras a la
posición central.
Поставьте передние колеса в
центральное положение.
Plaats de voorwielen in centrale
stand.
Attach the cap with the shorter hose
onto an empty bottle.
Fixer le couvercle à tuyau court sur le
flacon vide.
Verschlusskappe mit kurzem Schlauch
auf leerer Flasche befestigen.
Fije la tapa con el tubo corto a una
botella vacía.
Подсоедините короткий шланг к
пустой емкости.
Het deksel met de korte slang op een
lege fles bevestigen.
54
32
Connect clamps.
Connecter les colliers.
Batterieklemmen
anschließen.
Conecte las pinzas.
Подсоедините кабели
питания.
Batterijklemmen
bevestigen.
6
Put both switches OFF (0).
Mettre les deux interrupteurs en
position ARRET (0).
Beide Schalter AUS (0).
Ponga los dos interruptores en
posición de desconexión (0).
Переведите оба переключателя в
положение“OFF”(0).
Beide schakelaars UIT (0).
1
Attach the cap with the longer hose onto
Wynn’s Power Steering Flush.
Fixer le couvercle à tuyau long sur le Wynn’s
Power Steering Flush.
Verschlusskappe mit langem Schlauch auf
Wynn’s Power Steering Flush Flasche befestigen.
Fije la tapa con el tubo largo al envase de
Wynn’s Power Steering Flush.
Подсоедините длинный шланг к емкости с
жидкостью Wynn’s Power Steering Flush.
Het deksel met de lange slang op de fles Wynn’s
Power Steering Flush bevestigen.

NL
RU
ES
DE
FR
EN
NL
RU
ES
DE
FR
EN
NL
RU
ES
DE
FR
EN
NL
RU
ES
DE
FR
EN
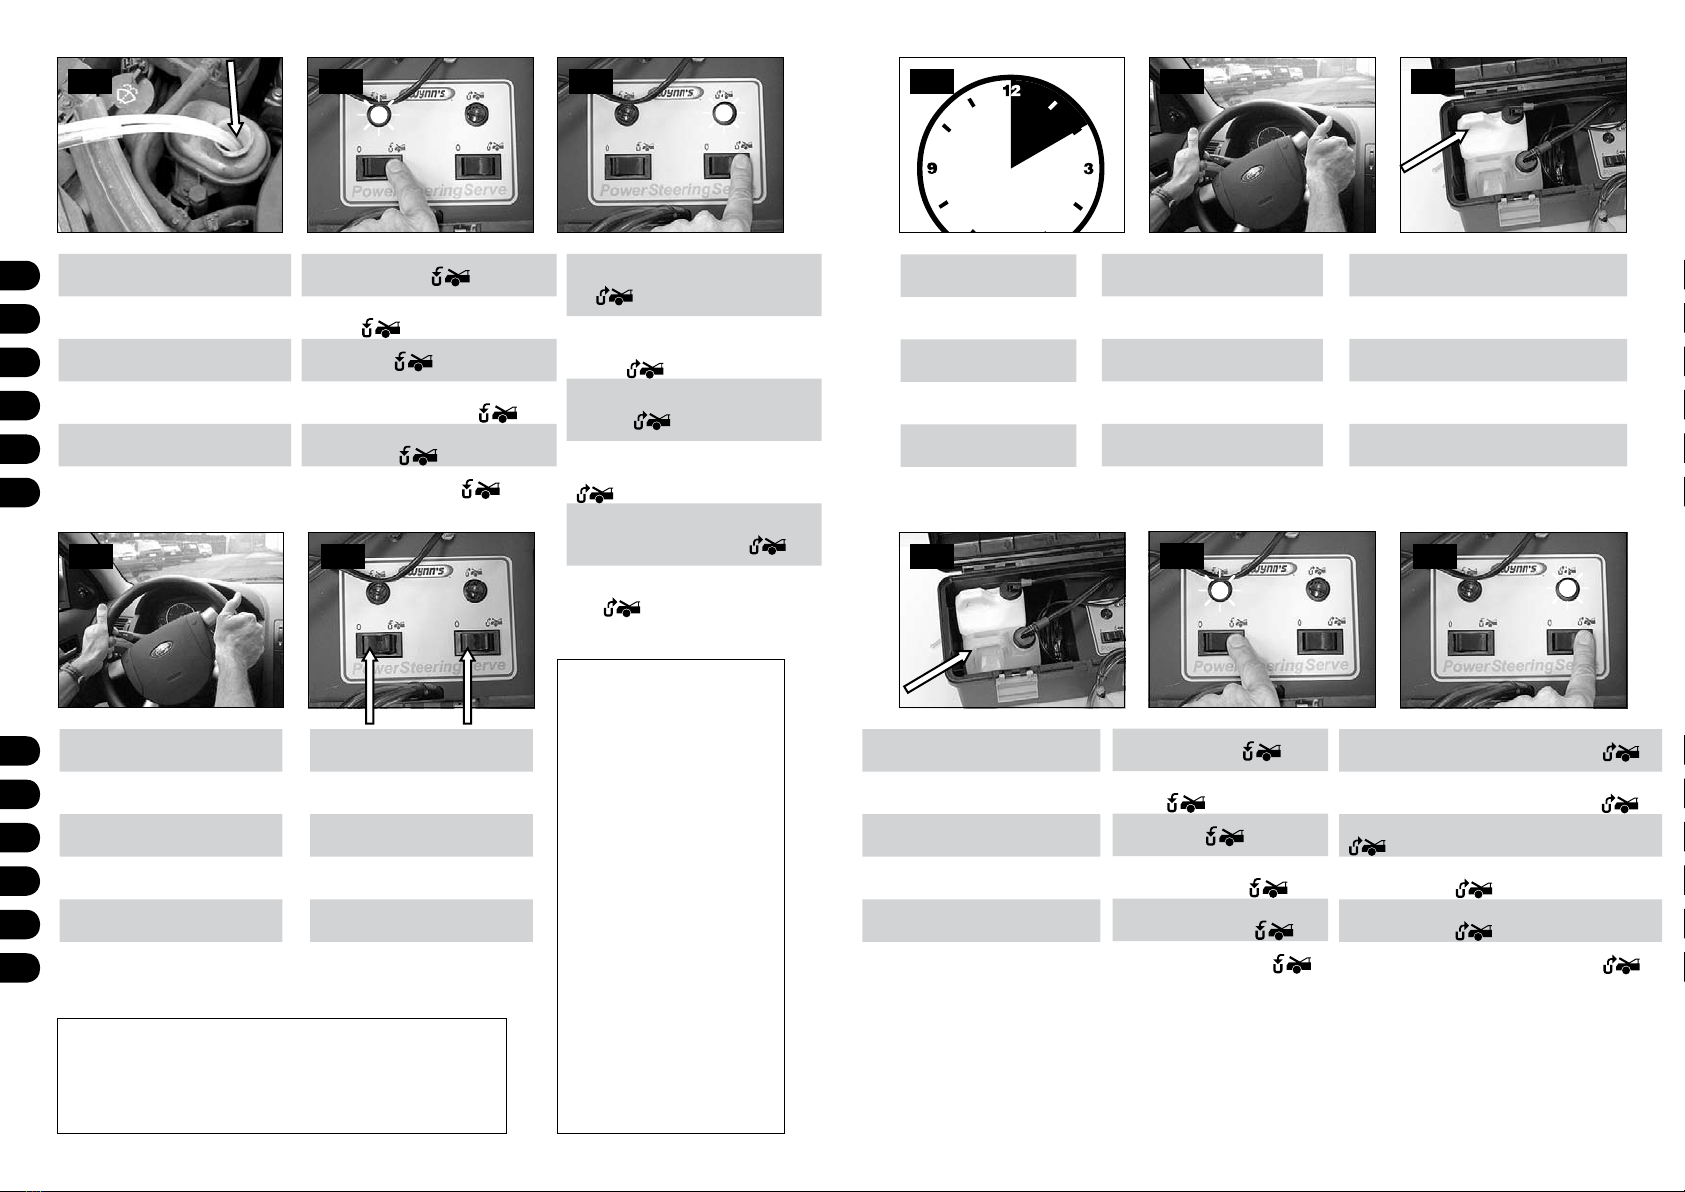
Put both hoses into expansion tank.1
Mettre les deux tuyaux dans le réservoir
de liquide de direction assistée.1
Beide Schläuche in den Ausdehnungs-
behälter einführen.1
Introduzca ambos tubos en el depósito
de expansión.1
Поместите оба шланга в
расширительный бачок 1
Beide slangen in het expansievat
steken.1
Switch“Old Fluid” ON ( ).
L’interrupteur“Old Fluid”sur position
MARCHE ( ).
“Old Fluid”EIN ( ) schalten.
Ponga el interruptor de“Old Fluid”(= aceite
usado) en posición de marcha ( ).
Переведите переключатель “Old Fluid”в
положение ON ( ).
Schakelaar“Old Fluid”AAN ( ).
Expansion tank empty, switch "New Fluid"
ON ( ).2
Réservoir de liquide de direction assistée
vide, interrupteur "New Fluid" en position
MARCHE ( ) .2
Ausdehnungsbehälter leer, Schalter "New
Fluid" EIN ( ).2
Depósito de expansión vacío, interruptor
"New Fluid" en posición de marcha
() .2
Расширительный бачок пуст: переведите
"New Fluid"в положение“ON”( ) .2
Expansievat leeg, schakelaar "New Fluid"
AAN ( ) .2
Turn steering wheel during exchange
of fluid.
Tourner le volant pendant l’échange
des liquides.
Das Lenkrad einige Male drehen
während des Wechsels der Flüssigkeit.
Gire el volante durante el cambio de
fluido.
Вращайте рулевое колесо во время
процесса замены жидкости.
Draai aan het stuur gedurende het
wisselen van de vloeistof.
Bottle empty, both switches OFF (0).
Flacon vide, les deux interrupteurs en
position ARRET (0).
Flasche leer, beide Schalter AUS (0).
Botella vacía, ambos interruptores en
posición de desconexión (0).
Емкость пуста: оба переключателя
в положение “OFF”(0).
Fles leeg, beide schakelaars UIT (0).
Run vehicle for 5 to 10
minutes.
Laisser fonctionner le moteur
pendant 5 à 10 minutes.
Das Fahrzeug 5 bis 10
Minuten laufen lassen.
Haga funcionar el motor
durante 5 a 10 minutos.
Заведите двигатель на 5 -
10 минут.
Motor 5 tot 10 minuten laten
draaien.
712
1110
98
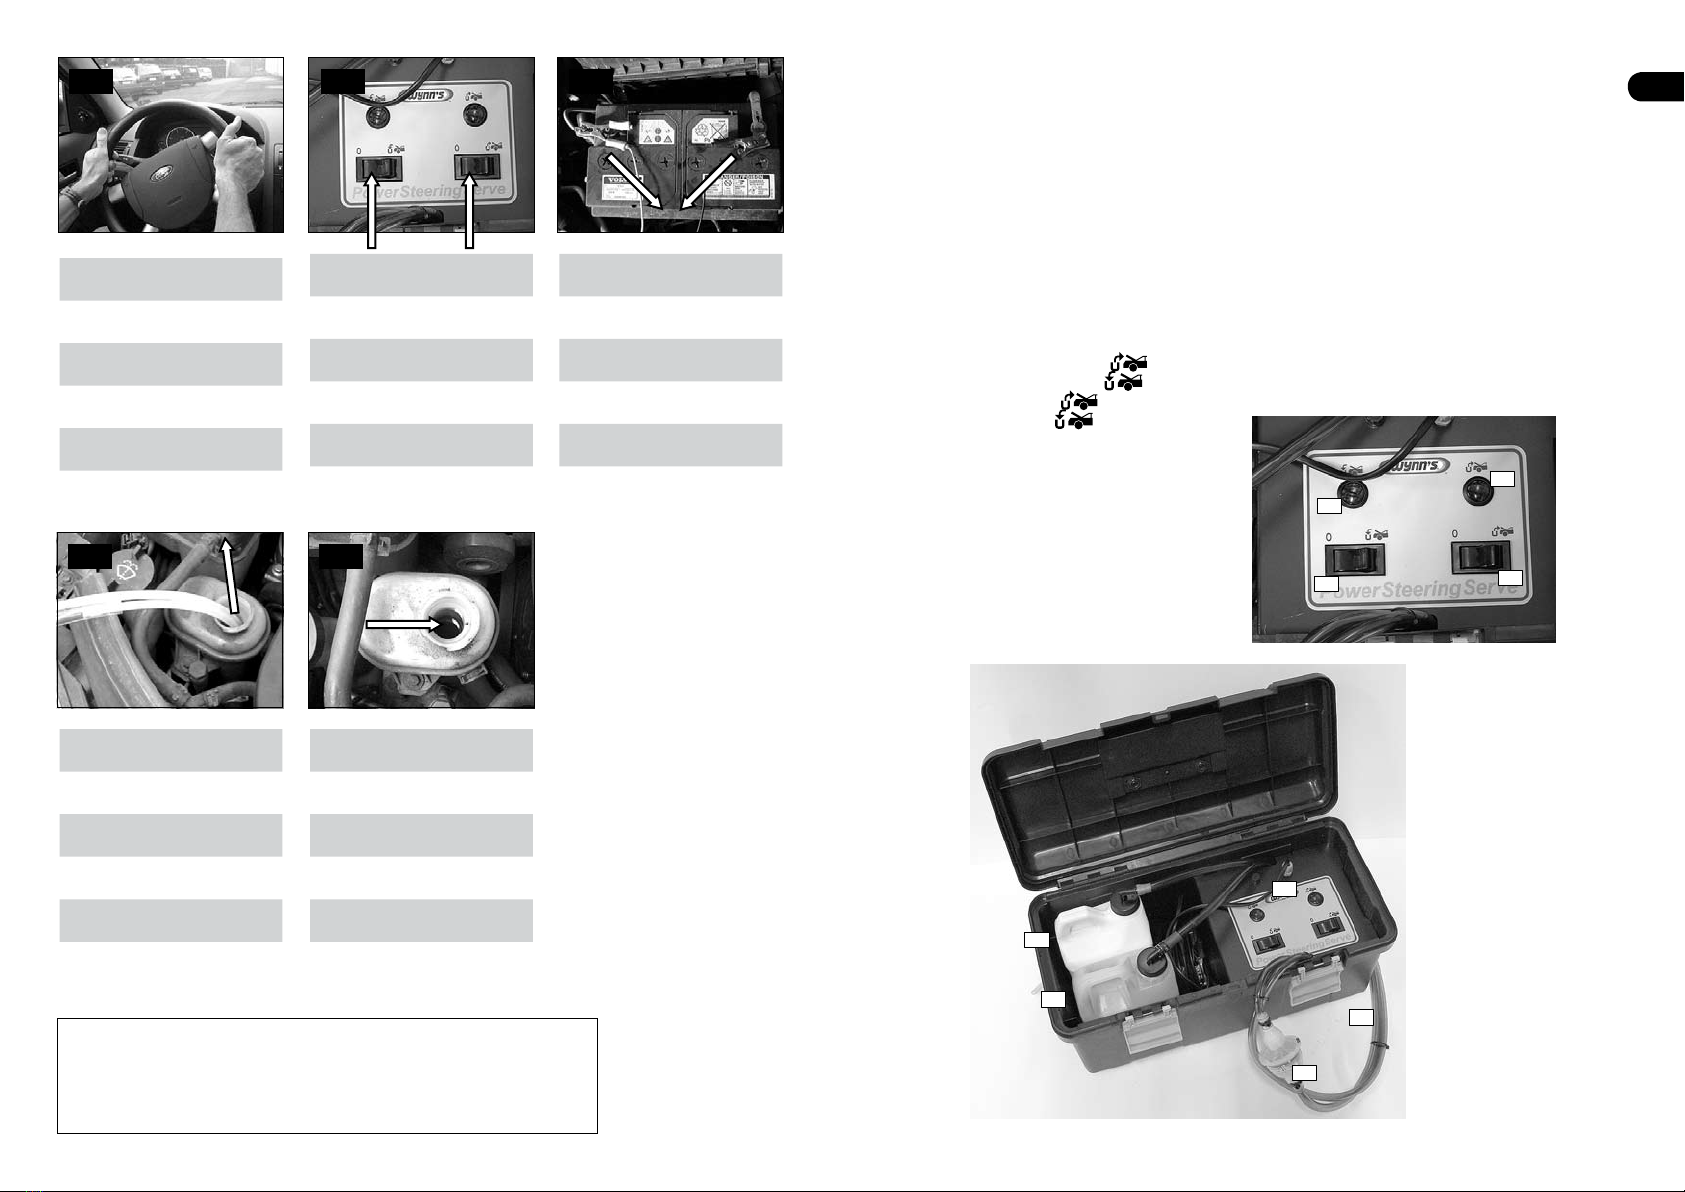
Replace bottle of contaminated used Flush with
empty bottle
Remplacer le flacon avec le produit Flush usagé
contaminé par un flacon vide.
Die Flasche mit verunreinigtem, verbrauchten
Flush-Produkt durch eine leere Flasche ersetzen.
Sustituya la botella con el producto“Flush”
usado y contaminado por una botella vacía.
Замените емкость с использованной
промывочной жидкостью на пустую.
De fles met verontreinigde gebruikte Flush
vervangen door een lege fles.
Replace empty bottle with Wynn's
Power Steering Fluid and Conditioner.
Remplacer le flacon vide par Wynn's
Power Steering Fluid and Conditioner.
Die leere Flasche durch Wynn's Power
Steering Fluid and Conditioner ersetzen.
Sustituya el envase vacío por Wynn's
Power Steering Fluid and Conditioner.
Заменить пустую бутылку с Wynn's
Power Steering Fluid and Conditioner.
De lege fles door Wynn's Power Steering
Fluid and Conditioner vervangen.
Switch“Old Fluid”ON ( ).
L’interrupteur“Old Fluid”sur position
marche ( ).
“Old Fluid”EIN ( )schalten.
Ponga el interruptor de aceite usado
en posición de marcha ( ).
Переведите переключатель“Old
Fluid”в положение ON ( ).
Schakelaar“Old Fluid”AAN ( ).
14
16
15
Expansion tank empty, switch "New Fluid" ON( ).2
Réservoir de liquide de direction assistée vide,
interrupteur "New Fluid" en position MARCHE( ).2
Ausdehnungsbehälter leer, Schalter "New Fluid" EIN
().2
Depósito de expansión vacío, interruptor "New Fluid" en
posición de marcha( ).2
Расширительный бачок пуст: переведите "New Fluid"
в положение“ON”( ).2
Expansievat leeg, schakelaar "New Fluid" AAN( ).2
17
- Note 2: If the fluid level in the expansion
tank is too high, switch “New Fluid” OFF (0)
until normal level has been reached.
- Note 2 : Si le niveau dans le réservoir de
liquide de direction assistée est trop haut,
interrupteur “New Fluid” sur position arrêt
(0) jusqu’à ce que le niveau normal soit
atteint.
- Anmerkung 2: Wenn das Niveau im
Ausdehnungsbehälter zu hoch ist, “New
Fluid” AUS (0) schalten bis Normalniveau
erreicht ist.
- Nota 2: Si el nivel de fluido en el depósito
de expansión es demasiado alto, ponga el
interruptor de “New Fluid" (= aceite nuevo)
en posición de desconexión (0) hasta que se
llegue al nivel normal.
- Примечание 2: Если уровень жидкости
в расширительном бачке слишком высок,
переведите переключатель “New Fluid”
в положение OFF (0) до достижения
нормального уровня.
- Nota 2: als het niveau in het expansievat
te hoog is, schakelaar “New Fluid” op UIT (0)
tot het normale niveau bereikt is.
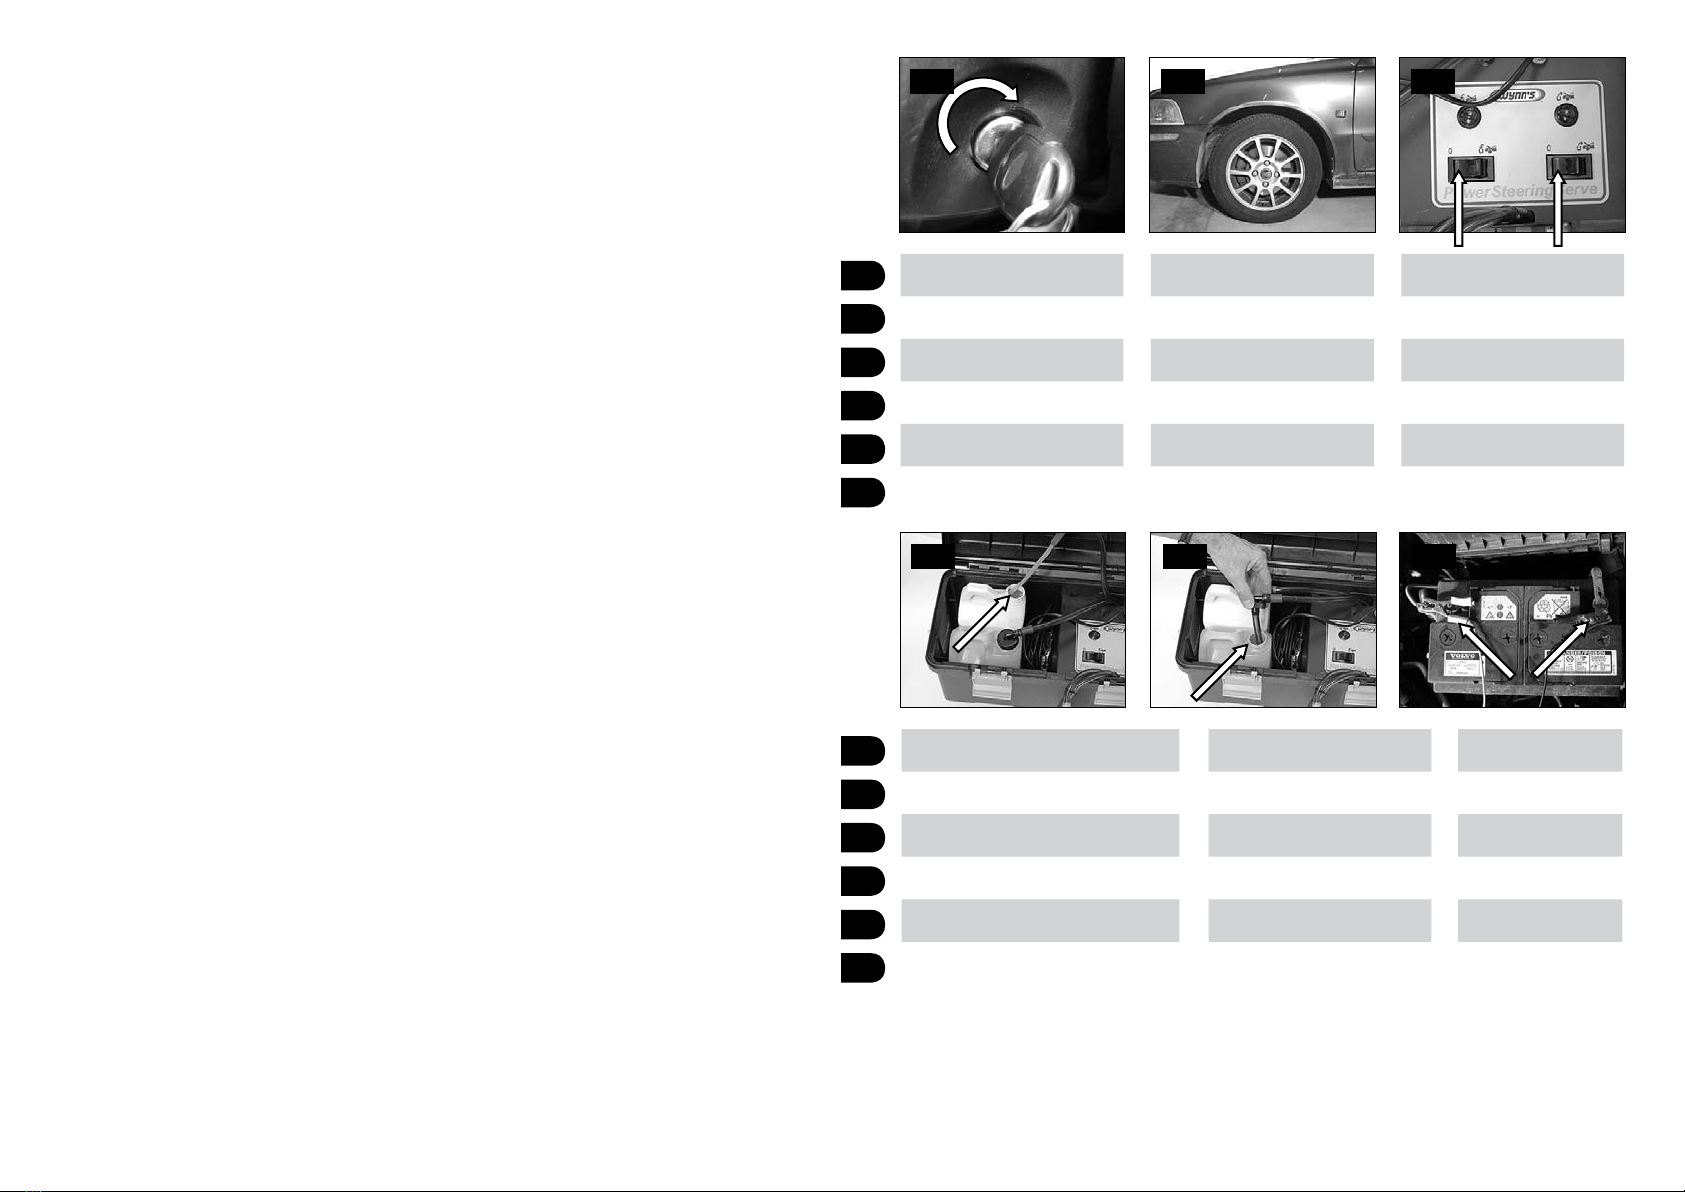
- Note 1 : if filter is present in filling orifice, please remove beforehand
- Note 1 : s’il y a un filtre dans l’orifice de remplissage, penser à l’enlever.
- Anmerkung 1: vorhandene Siebe oder Filtereinsätze entfernen.
- Nota 1: si hay un filtro en la boca de carga, retírelo de antemano.
- Примечание 1: если в горловине бачка установлен фильтр, заранее снимите его.
- Nota 1: indien er zich een filter in de vulopening bevindt, deze vooraf verwijderen.
NL
RU
ES
DE
FR
EN
NL
RU
ES
DE
FR
EN
Turn steering wheel during exchange
of fluid.
Tourner le volant pendant l’échange
des liquides.
Das Lenkrad einige Male drehen
während desWechsels der Flüssigkeit.
Gire el volante durante el cambio de
fluido.
Вращайте рулевое колесо во время
процесса замены жидкости.
Draai aan het stuur gedurende het
wisselen van de vloeistof.
13

8
4
1
9
7
6
5
2
3
Principle of Wynn’s Power Steering Serve™
With the Wynn’s Power Steering Serve™ the old fluid is removed and replaced by new fluid. In this way the
formation of air bubbles in the system is prevented. The exchange is done via the expansion tank, so special
adapters are not needed nor is there any requirement for dismantling. All cars can be treated without
problems. During the procedure the entire hydraulic power steering system is cleaned. The whole procedure
takes only 15 minutes.
As the power steering system is working during the fluid exchange, up to 95% of the used fluid is
exchanged. By way of comparison, a conventional drain and fill only replaces 50% of the power steering
fluid. The apparatus operates from a 12 volt DC source, e.g. the vehicle’s battery.
Description of Wynn’s Power Steering Serve™
Indicator light new liquid1. mode
Indicator light old liquid2. mode
Switch new liquid3. mode
Switch old liquid4. mode
Hose old liquid with filter5.
Hose new liquid6.
Wire with battery clamps7.
Place for bottle new liquid8.
Bottle for old liquid9.
7
Disconnect clamps.
Déconnecter les colliers.
Batterieklemmen lösen.
Desconecte las pinzas.
Отсоедините питающие кабели.
Batterijklemmen verwijderen.
Remove hoses.
Enlever les tuyaux.
Die Schläuche entfernen.
Retire los tubos.
Отсоедините шланги.
Slangen verwijderen.
Check level in expansion tank.4
Vérifier le niveau dans le réservoir de
liquide de direction assistée.4
Das Niveau im Ausdehnungsbehälter
prüfen.4
Verifique el nivel en el depósito de
expansión.4
Проверьте уровень жидкости в
бачке.4
Controleer het niveau in het
expansievat.4
20
2221
- Note 4: if filter was present in filling orifice, please put again (see 7).
- Note 4: s’il se trouvait un filtre dans l’orifice de remplissage, installer le de nouveau (voir 7).
- Anmerkung 4: eventuelle Filter/ Siebe in der Einfüllöffnung wieder einsetzen (siehe 7).
- Nota 4: Si había retirado un filtro de la boca de carga, vuelva a colocarlo (véase 7)
- Примечание 4: установите обратно фильтр в горловину бачка, если ранее он был снят (см. пункт 7).
- Nota 4: indien er een filter in de vulopening zat, deze terug plaatsen (zie 7)
Bottle empty, both switches OFF (0).
Flacon vide, les deux interrupteurs en
position ARRET (0).
Flasche leer, beide Schalter AUS (0).
Botella vacía, ambos interruptores en
posición de desconexión (0).
Емкость пуста: оба переключателя
в положение “OFF”(0).
Fles leeg, beide schakelaars UIT (0).
19
Turn steering wheel during exchange
of fluid.
Tourner le volant pendant l’échange
des liquides.
Das Lenkrad einige Male drehen
während des Wechsels der Flüssigkeit.
Gire el volante durante el cambio de
fluido.
Вращайте рулевое колесо во время
процесса замены жидкости.
Draai aan het stuur gedurende het
wisselen van de vloeistof.
18 EN

8
4
1
9
7
6
5
2
3
Safety requirements
1. Wear safety goggles.
2. Avoid spilling product onto painted surfaces. If spillage does occur, immediately wipe and flush the
affected surface with water.
3. Do not leave the vehicle unattended during the fluid exchange.
4. Use fender covers or other protection to prevent accidental damage to vehicle surfaces.
5. Connect the Wynn’s Power Steering Serve™ to a 12V DC power source only.
6. Read the entire Manual before performing any service.
Guarantee
The Power Steering Serve™ has been thoroughly tested before shipping. This guarantee covers all
manufacturing and material defects for 1 year from the delivery date and only covers all parts and labour
costs. Shipping costs will be extra to the customer. This guarantee is not valid if the Power Steering Serve™
has been tampered with prior to returning it to Wynn’s for inspection or when the Instructions for Use
have not been followed. Damages due to overloading, improper use, application of unauthorised products,
shocks, accidents, use of the machine for other purposes than cleaning and treating are all excluded from the
guarantee. The Power Steering Serve™ can be locally repaired following written consent by Wynn’s Belgium.
This consent will be given after examination of the specific case by Wynn’s Belgium. In case of complaint
please also send a copy of the purchase invoice. It is also important to indicate the serial number of the
apparatus on the invoice.
Possible failures
When both switches are ON ( / ) and Power Steering Serve™ doesn’t work, please check:
• If the fuse is defective
• If the electrical contacts at pump are connected
• If the clamps are connected
If the above options are OK, check further :
• If the switch is defective
• If the pump is defective
If one of these is defective, please contact Wynn’s for replacement.
Principe du système Wynn’s Power Steering Serve™
Avec le système Wynn’s Power Steering Serve™ on élimine l’huile usagée et on ajoute simultanément la
nouvelle huile à la direction assistée. De cette manière on évite la formation de bulles d’air dans le système.
L’échange se passe par le réservoir de liquide de direction assistée de sorte que ni des adaptateurs spéciaux
ni le démontage du système ne soient nécessaires. Toutes les voitures peuvent être traitées sans problème.
Pendant la procédure, l’intégralité de la direction à assistance hydraulique est nettoyée. La procédure
complète s’effectue en seulement 15 minutes.
Puisque la direction assistée fonctionne pendant l’échange de l’huile, on peut remplacer jusqu’à 95 % de
l’huile usagée. A titre de comparaison, en cas de vidange traditionnelle seulement 50 % de l’huile sera
échangée. L’appareil fonctionne sur 12 Volt courant continu (par exemple batterie de la voiture).
Description de la machine Wynn’s Power Steering Serve™
Indicateur lumineux "huile neuve"1.
Indicateur lumineux "huile usagée"2.
Interrupteur "huile neuve"3.
Interrupteur "huile usagée"4.
Tuyau "huile usagée" avec filtre5.
Tuyau "huile neuve"6.
Câble électrique avec colliers pour batterie7.
Espace pour le bidon "huile neuve"8.
Bidon pour "huile usagée"9.
9
8
EN
9
FR
Table of contents
Other Wynn's Service Equipment manuals
Popular Service Equipment manuals by other brands

Magneti Marelli
Magneti Marelli ATF EXTRA PRO user manual

Hyundai
Hyundai Midtronics GRX-5100 instruction manual

Tronair
Tronair 01-1229-0011 Operation & service manual

ULTIMATE SPEED
ULTIMATE SPEED HG02236 Assembly and Safety Advice

CEMB
CEMB DWA1000CWAS manual

Invacare
Invacare TDX SP Assembly, installation and operating instructions