9
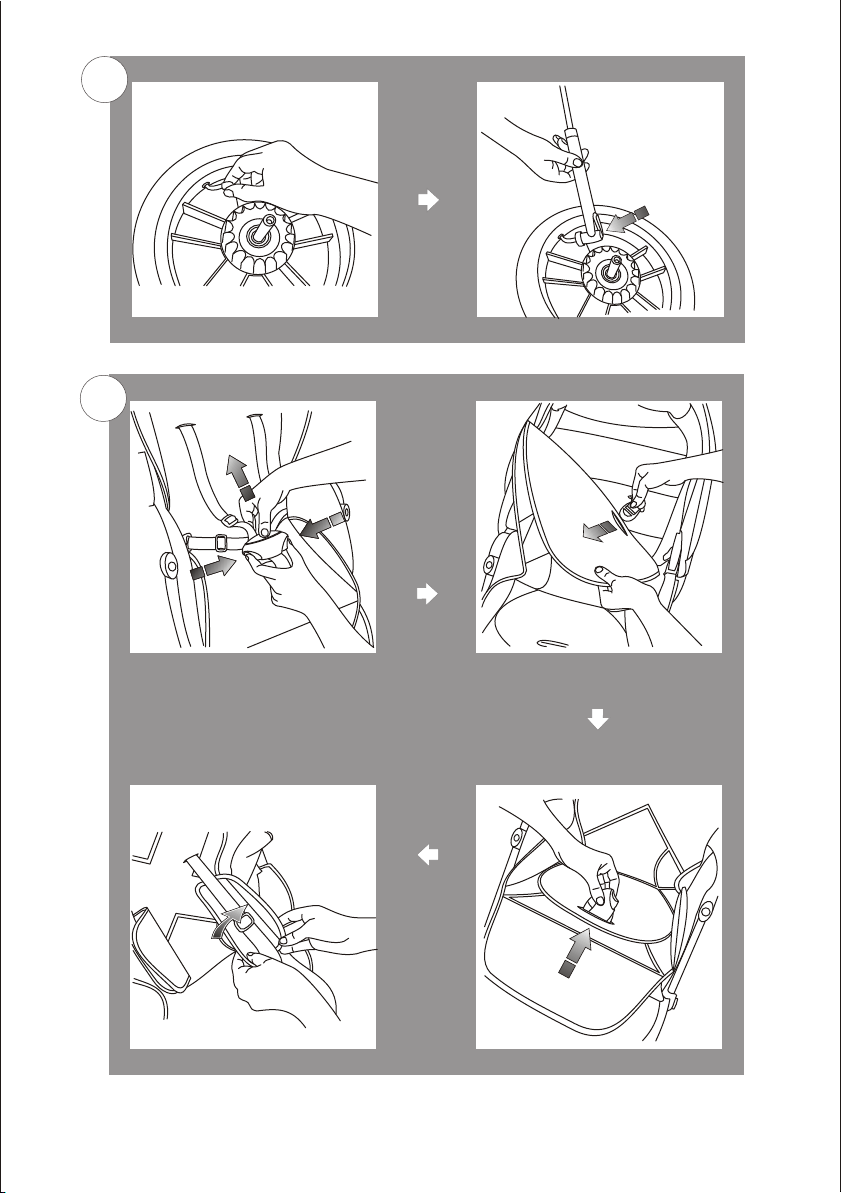
14. MONTA¯ I DEMONTA¯ KÓ£ TYLNYCH
Aby zdj¹æ lub za³o¿yæ ko³o nale¿y nacisn¹æ przycisk na œrodku ko³a.
15. MONTA¯ KO£A PRZEDNIEGO
Aby zamontowaæ ko³o wsuñ je na oœ a¿ do zatrzaœniêcia blokady.
16. DEMONTA¯ KO£A PRZEDNIEGO
Aby zdj¹æ ko³o naciœnij pokazany na rysunku przycisk (a) i œci¹gnij je z osi (b).
17. REGULACJA OPARCIA SPACERÓWKI
Poci¹gnij ciêgno do góry i ustaw oparcie w ¿¹danej pozycji.
18. REGULACJA WYSOKOŒCI R¥CZKI
Wciœnij oba przyciski znajduj¹ce siê na przegubach r¹czki i zmieñ jej po³o¿enie.
19. REGULACJA D£UGOŒCI R¥CZKI
Poci¹gnij ciêgna blokad (a) i zmieñ d³ugoœær¹czki wysuwaj¹cj¹ lub wsuwaj¹c (b).
20. MONTA¯ GONDOLI
Aby zamocowaæ gondolê na stela¿ wsuñ jej zaczepy w gniazda monta¿owe
a¿ do zatrzaœniêcia blokad.
21. DEMONTA¯ GONDOLI
Aby zdj¹æ gondolê wciœnij przyciski odblokowuj¹ce zaczepy (a) i wyci¹gnij j¹
z gniazd monta¿owych (b).
22. MONTA¯ FOTELIKA
Aby zamontowaæ fotelik u¿yj specjalnych adapterów. Umieœæ adaptery w
gniazdach monta¿owych stela¿a i za³ó¿ fotelik zatrzaskuj¹c go na adapterach.
Uwaga: Przed u¿yciem sprawdŸ poprawnoœæ zamocowania fotelika.
23. DEMONTA¯ FOTELIKA
Aby zdj¹æ fotelik wciœnij przyciski odblokowuj¹ce po obu jego stronach równo-
czeœnie wyci¹gaj¹c go z gniazd monta¿owych. Zdejmij adaptery wciskaj¹c
przycisk odblokowuj¹cy.
OSTRZE¯ENIA I UWAGI
Na podstawie przeprowadzonych testów firma Deltim deklaruje, ¿e dostar-
czony wózek dzieciêcy jest produktem bezpiecznym spe³niaj¹cym wszystkie
wymagania normy PN-EN1888/2003 + A1/A2/A3:2005.
Przeczytaj tê instrukcjê uwa¿nie przed u¿yciem i zatrzymaj j¹ na przysz³oœæ
24. POMPOWANIE KÓ£
Aby napompowaæ ko³o odkrêæ zawleczkê wentyla. Przy³ó¿ pompkê do
koñcówki wentyla i napompuj ko³o. Maksymalne ciœnienie w oponie nie mo¿e
przekroczyæ 1,5 atm.
25. ZAK£ADANIE DODATKOWEJ WK£ADKI
Rozpi¹æ klamrê szelek (a). Po³o¿yæ wk³adkê na siedzisku spacerówki i
prze³o¿yæ pasy przez otwory w sposób pokazany na rysunku (b, c).
Zapiaæ na pasach naramiennych ochraniacze na szelki (d).
POLSKI
8
1. ROZK£ADANIE WÓZKA
Roz³ó¿ r¹czkê odblokowuj¹c jej przeguby (a). Naciskaj¹c w dó³ na ramkê
kosza roz³ó¿ wózek a¿ do momentu zatrzaœniêcia blokad (b).
2. SK£ADANIE WÓZKA
Odblokuj zamki po obu stronach wózka (a,b) i poci¹gnij ramkê kosza do sie-
bie (c).Zatrzaœnij ramkê na blokadzie.Z³ó¿ r¹czkê odblokowuj¹c jej przeguby (d).
3. ZAK£ADANIE SPACERÓWKI NA STELA¯
Wsuñ zaczepy spacerówki w gniazda monta¿owe w stela¿u a¿ do zatrzaœniê-
cia blokad.
4. ZDEJMOWANIE SPACERÓWKI ZE STELA¯A
Wciœnij przyciski odblokowuj¹ce zaczepy spacerówki i wyci¹gnij j¹ z gniazd
monta¿owych.
5. ZAK£ADANIE BUDKI
Wsuñ zaczepy budki w otwory monta¿owe (a) i przypnij napy znajduj¹ce siê
na tyle budki (b).
6. ZDEJMOWANIE BUDKI
Odepnij napy. Wysuñ budkê z otworów monta¿owych.
7. REGULACJA PODNÓ¯KA
Naciœnij przyciski po obu stronach podnó¿ka i zmieñ jego po³o¿enie.
8. ZAK£ADANIE BARIERKI
Wciœnij koñce barierki w otwory monta¿owe a¿ do zatrzaœniêcia blokad.
9. ZDEJMOWANIE BARIERKI
Wciœnij przyciski blokad barierki i wysuñ jej koñce z otworów monta¿owych.
Barierkê mo¿na odchyliæ odpinaj¹c j¹ tylko z jednej strony.
10. KLAMRA
Aby rozpi¹æ klamrê naciœnij przyciski i wysuñ czêœæ spinaj¹c¹ z obudowy (a). Aby
spi¹æ klamrê wciœnij czêœæ spinaj¹c¹ w obudowê do momentu zatrzaœniêcia (b).
11. REGULACJA SZELEK
Przesuwaj¹c regulator w jedn¹ lub drug¹ stronê zmieñ d³ugoœæ pasków w
szelkach dopasowuj¹c do tu³owia dziecka.
12. HAMULEC
Aby zahamowaæ ko³a naciœnij peda³ hamulca. Aby zwolniæ hamulec, unieœ pe-
da³ koñcem stopy.
13. BLOKADA KO£A PRZEDNIEGO
Wózek posiada obrotowe ko³a przednie. Do blokady obrotu s³u¿y przycisk. Na-
ciœniêcie go powoduje zablokowanie ko³a do jazdy na wprost. Aby odblokowaæ
ko³o naciœnij przycisk ponownie.
POLSKI