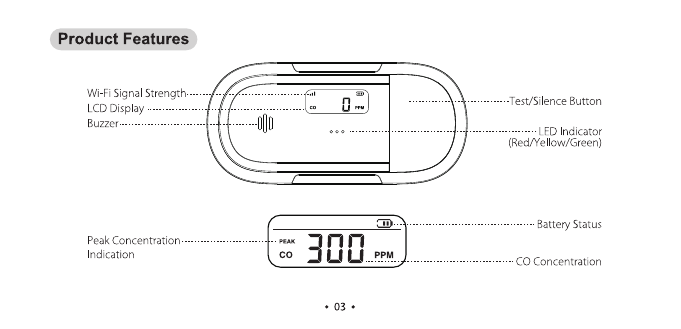
x-sense XC04-WX User manual

OM
Y
UL
2034
Email:
Www.x-:
sense.com
X-SENSE
User
Manual
Wi-Fi
Carbon
Monoxide
Alarm
®

This
user
manual
contains
important
information
regarding
the
installation
and
operation
of
your
carbon
monoxide
alarm.
Please
take
a
few
minutes
to
thoroughly
read
this
manual
which
should
be
saved
for
future
reference.
If
you
are
installing
the
carbon
monoxide
alarm
for
use
by
others,
you
must
leave
this
manual—or
a
copy
of
it—with
the
end
user.
Introduction
This
device
is
a
battery-powered
Wi-Fi
carbon
monoxide
(CO)
alarm.
It
is
designed
with
an
advanced
electrochemical
sensor
and
is
for
domestic
use
only.
After
the
device
is
connected
to
the
app,
you
can
remotely
use
your
smartphone
to
control
the
device,
receive
app
push
notifications,
and
make
daily
use
more
convenient.
Please
note
that
this
device
does
not
detect
smoke,
heat,
flames
or
any
hazardous
gas
other
than
carbon
monoxide
even
though
carbon
monoxide
can
be
generated
by
fire.
For
this
reason
you
must
install
smoke
alarms
to
provide
early
warning
of
fire
and
to
protect you and
your
family
from
fire
and
its
related
hazards.
<01e

AWARNING
-
THE
INSTALLATION
OF
THE
APPARATUS
SHOULD
NOT
BE
USED
AS
A
SUBSTITUTE
FOR
PROPER
INSTALLATION,
USE
AND
MAINTENANCE
OF
FUEL-BURNING
APPLIANCES
INCLUDING
APPROPRIATE
VENTILATION
AND
EXHAUST
SYSTEMS.
-
THIS
APPARATUS
IS
TO
BE
INSTALLED
BY
A
COMPETENT
PERSON.
-
ITS
NOT
TESTED
FOR
USE
IN
A
CARAVAN
OR
BOAT.
Package
Contents
1
x
CO
Alarm
(Pre-installed
Battery)
2
x
Screws
2
x
Anchor
Plugs
1
x
User
Manual
1
x
Carbon
Monoxide
Safety
Sticker
02°
Product
Features
Wi-Fi
Signal
LCD
Display
Buzzer
Test/Silence
Button
LED
Indicator
(Red/Yellow/Green)
Peak
Concentration
--------------------------F~
PEAK
Indication
co
J
oosvscsceresesosesececsenesscecscecces
Battery
Status
wee
ores
CO
Concentration
e003

Test/Silence
Button
The
test/silence
button
is
used
to
test
the
unit's
electronics
and
to
silence
the
unit
during
an
alarm.
Short
press
the
test
button
and you
will
hear
a
short
beep,
indicating
that
the
alarm
has
entered
the
test
mode.
A
test
push
notification
will
be
sent
to
your
smartphone
by
the
app.
Please
refer
to
the
“Alarm
Testing”
section
for
further
information.
The
alarm
goes
back
to
the
standby
mode
after
testing.
NOTE:
After
a
test
has
begun,
the
alarm
will
sound
and
the
LED
indicator
will
flash
red.
This
does
not
indicate
that
CO
is
present.
If
you
press
the
test
button
during
an
alarm
state,
the
unit
will
enter
the
silence
mode.
CO
Alarm
Levels
This
X-Sense
carbon
monoxide
alarm
is
programmed
to
sound
an
alarm
at
the
following
CO
concentrations
within
the
time
periods
listed:
70
ppm
for
60-240
minutes,
150
ppm
for
10-50
minutes,
and
400
ppm
for
4-15
minutes.
When
CO
is
detected
and
the
alarm
sounds,
the
CO
concentration
will
be
displayed
on the
LCD
and
a
blue
backlight
will
be
lit.
The
LED
indicator
will
flash
red
and
the
alarm
will
issue
4
short
beeps,
repeating
the cycle
every
5.8
seconds.
An
alarm
push
notification
will
be
sent
to
your
smartphone
by
the
app.
©
046
CO
Concentration
and
Symptoms
The
table
below
shows
the effects
of
different
levels
of
CO
poisoning
on
the
body:
lace
aCe
Gay)
Effects
on
Adults
100
Slight
headache,
nausea,
fatigue
(flu-like
symptoms).
200
Dizziness
and
headache
within
2-3
hours.
400
Nausea,
frontal
headache,
drowsiness,
confusion
and
rapid
heart
rate.
Risk
to
life
after
over
3
hours
of
exposure.
800
Severe
headaches,
convulsions,
vital
organ
failures.
Death
possible
within
2-3
hours.
A
WARNING
THIS
DEVICE
IS
DESIGNED
TO
PROTECT
INDIVIDUALS
FROM
ACUTE
EFFECTS
OF
CARBON
MONOXIDE
EXPOSURE.
IT
MAY
NOT
FULLY
SAFEGUARD
INDIVIDUALS
WITH
SPECIFIC
MEDICAL
CONDITIONS.
IF
IN
DOUBT,
CONSULT
A
MEDICAL
PRACTITIONER.
°©05e¢

Low-Battery
Warning
If
the
battery
is
low,
the
unit
will
chirp
once,
and
the
LED
indicator
will
flash
yellow
every
60
seconds
to
indicate
that
the
battery
needs
replacement.
A
low battery
notification
will
be
sent
to
your
smartphone
by
the
app.
If
you
press the
test
button
when
there
is
a
low
battery,
the
low battery
signal
will
temporarily
stop
for
10
hours;
if
you
press the
test
button
again,
the
unit
will
enter
test
mode,
and
then
standby
mode.
End-of-Life
Indication
and
Hush
Control
Once
the
maximum
lifetime
of
the
alarm
(10
years)
is
reached,
the
alarm
will
beep
3
times
and
the
LED
indicator
will
flash
yellow
3
times every
60
seconds.
This
end-of-life
signal
can
be
temporarily
silenced
for
22
hours
by
pressing
the
test
button.
An
end-of-life
push
notification
will
be
sent
to
your
smartphone
by
the
app.
This
end-of-life
silence
feature
can
only
be
used
for
a
total
of
30
days.
After
30
days,
the
end-of-life
signal
cannot
be
silenced.
During
this
end-of-life
silence period,
your
alarm
will
continue
to
monitor
for
CO
and
provide
protection
as
usual.
To
help
identify the
date
to
replace
the
alarm,
write
down
the
date
of
first
operation
on
the
dedicated
label,
located
on
the
side
of
the
alarm.
©
06¢
Device
Setup
Within
the
App
To
download
the
app,
search
for
X-Sense
Home
Security
in
the
Apple
App
Store
or
Google
Play
Store,
or
simply
scan
the
QR
code.
Create
an
account
using
a
valid
email
address.
If
you already
have
an
account,
make
sure
it
is
updated
to
the
latest
version.
Note:
Make
sure
your
phone
runs on iOS
11
and
above,
or
Android
8.0
and
above.
@
PRS
aCt
keels
ENG
Before
connecting
alarms,
make
sure
that:
1.
Know
your
Wi-Fi
network
name
and
password.
2,
Make
sure
you
are
connecting
alarms
to
a
2.4
GHz
Wi-Fi
network
(incompatible
with
5
GHz
Wi-Fi
network).
3.
Make
sure
the
Bluetooth
on
your
phone
is
turned
on.
°07¢

Before
use,
pull
out
the
battery
insulating
film
from
the
battery
compartment
to
power
on the
device.
After
the
device
is
turned
Activate
the
Device
on,
the
buzzer
will
beep
once,
the
LCD
backlight
will
light
up,
and
the
LED
indicator
will
flash
through
8
cycles
This
device
is
equipped
with
a
battery
insulating
film
to
ensure
it
will
not
be
powered
on
during
transportation
before
it
has
(yellow/green/red),
The device
will
then
enter
standby
mode
shipped
from
the
factory.
When
installing
this
product,
you
will
need
to
pull
out
the
film
before
powering
on
and
activating
the
y
9
.
y
.
device.
Follow
the
process
below
to
open
the
battery
compartment
cover:
Hold
the
alarm
with
both
hands
and
put
your
thumbs
on
both
ends
of
the
battery
compartment
cover.
Then,
push
the
cover
upwards
with
some
force
to
remove
it.
Insulating
Film
©
09
e
©
08
e

Add
a
Carbon
Monoxide
Alarm
1.
Tap
"®"
in
the
right
top
corner
of
the
app
homepage,
select
"Carbon
Monoxide
Alarms",
then
select
"Wi-Fi
CO
Alarms"
and
tap
"Next"
to
add
a
device.
2.
Remove
the
insulating
film
to
power
up
the
alarm.
3.
Enter
a
name
for
the
alarm.
Select
the
home
you created
or
create
a
new
home
for
the
alarm,
then
select
the
room
in
which
it
is
installed.
If
you
create
a
new
home,
you
will
need
to
enter
a
name
and
select
the
country
or
region
in
which
you
live.
4.
Press
and
hold
the
test/silence
button
on
the
alarm
for
3
seconds
until
it
flashes
blue.
Immediately
tap
“Operation
Confirmed”
before
the
light
goes
off;
or
else
you
need
to
repeat
the
step
to
make
the
LED
indicator
flash
blue.
NOTE:
if
your
mobile
phone
finds
two
or
more
devices
waiting
to
connect
to
the
network,
you
need
to
tap
to
select
the
corresponding
device
you
want
to
add.
5.
Connect
to
a
2.4
GHz
Wi-Fi
network
and
make
sure
you
enter
the
correct
password.
Then,
the
alarm
will
enter
the
pairing
process.
Make
sure
the
test/silence
button
(the
LED
indicator)
is
still
flashing
blue;
or
else
you
need
to
press
it
to
make
it
flash
blue
again.
6.
When
finished,
you
will
see the
Wi-Fi
CO
alarm
on the
app’s
device
list.
°10¢
Press
and
hold
for
3
seconds
The LED
indicator
will
flash
blue
NOTE:
-
/f
your
router
supports
a
dual
band
network
with
both
2.4
GHz
and
5
GHz,
please
create
separate
SSiDs
for
the
2.4
GHz
and
5
GHz
channels.
This
device
is
only
compatible
with
a
2.4
GHz
Wi-Fi
network.
-
To
promote
successful
Wi-Fi
connection,
make
sure
you
place
the
alarm
within
the
router range,
and
that
you
enter
the
correct
password.
elle

Set
the
Preferences
for
Your
Mobile
App
Push
Notifications
You
can
choose
to
receive
app
push
notifications
when
any
change
is
made
to
your
system.
It
is
highly
recommended
that
you
limit
push
notifications,
as
too
many
notifications
can
become
redundant
and
load
your
phone,
which
can
quickly
become
a
nuisance.
Furthermore,
the
more
push
notifications
you
allow, the
more
power
your
CO
alarm
will
consume,
which
will
reduce
battery
life.
Record
History
To
access
data
or
check
device
status,
tap
the
History
button
on the
bottom.
Offline
Notifications
Offline
notifications
are
used
to
notify
you
if
the
alarm
disconnects
from
the
Wi-Fi.
Note
that
this
notification
may
not
be
sent
instantly,
as
the
alarm
reports
to
the
cloud
service
center
at
set
intervals.
CO
Alarm
Precaution
Dangerous
CO
concentration
is
detected,
but
has
not
reached
the
alarm
status.
The
app
will
show
a
"CO
Alarm
Precaution"
message,
and
an
app
push
notification
will
be
sent
to
your
smartphone.
Potential
dangerous
CO
conditions
exist.
e12¢
Where
to
Install
Ideally,
a
carbon
monoxide
alarm
should
be
installed
in
every
room
containing
a
fuel-burning
appliance,
and
one
in
every
bedroom.
However,
if
the
number
of
carbon
monoxide
alarms
available
is
limited,
the
following
guidelines
should
be
considered
when
choosing
the
best
places
to
install
an
alarm(s):
+
If
there
is
an
appliance
in
a
bedroom,
a
CO
monitor
should
be
installed.
+
Install
an
alarm
in
rooms
containing
a
flueless
or
open-flued
appliance.
+
Install
an
alarm
where
residents
spend
most
of
their
time.
+
In
a
studio
apartment,
a
CO
alarm
should
be
placed
as
far
away
from
the
cooking
appliances
as
possible,
but
close
to
where
the
person
sleeps.
+
If
the
appliance
is
in
a
room
not
normally
used
(such
as
a
boiler
room),
the
CO
alarm
should
be
placed
just
outside
of
this
room
so
that
the
alarm
can
be
heard
more
easily.
1.
Installing
a
CO
alarm
in
a
room
with
a
fuel-burning
appliance
(see
Figure
1):
+
If
it is
mounted
on
a
wall,
it
should
be
installed
at
a
height
greater
than
the
height
of
any
door
or
window,
but
should
still
be
at
least
150
mm
(5.9
inches)
below
the
ceiling.
e136

+
The
CO
alarm
should
have
a
horizontal
distance
between
1
m
(3.3
feet)
and
3
m
(10
feet)
from
any
potential
CO
source.
2.
Installing
the
CO
alarm
in
a
bedroom
or
room
without
a
fuel-burning
appliance
(see
Figure
2):
+
If
there
i
rtition
in
the
room,
th
larm
shoul
installed
on
the
same
side
of
the
partition
as
the
potential
CO
. .
voles
Sa
partition
in
the
room,
the
CO
alarm
should
be
installed
on
the
sa
P
P
+
Mount
the
CO
alarm
relatively
close
to
the
breathing
zone
of
the
occupant.
.
300
mm
(11.8
in)
+
Install
the
alarm
such
that
the LED
indicator
is
viewable
when
the
occupant
is
near
the
alarm.
|
f—
CO
Alarm
150
mm
(5.9
in)
RP
7
\
&
1-3m
[]
(33-10
ft)
CO Alarm
(J
LH]
DEAD
AIR
SPACE
DON'T
INSTALL
HERE
Figure
1:
Installation
in
a
room
with
a
fuel-burning
appliance
Figure
2:
Installation
in
a
bedroom
or
other
room
without
a
fuel-burning
appliance
(installed
at
head
level)
o146
*156

+
The
CO
alarm
should
have
a
horizontal
distance
between
1
m
(3.3
feet)
and
3
m
(10
feet)
from
any
potential
CO
source.
2.
Installing
the
CO
alarm
in
a
bedroom
or
room
without
a
fuel-burning
appliance
(see
Figure
2):
+
If
there
i
rtition
in
the
room,
th
larm
shoul
installed
on
the
same
side
of
the
partition
as
the
potential
CO
. .
voles
Sa
partition
in
the
room,
the
CO
alarm
should
be
installed
on
the
sa
P
P
+
Mount
the
CO
alarm
relatively
close
to
the
breathing
zone
of
the
occupant.
.
300
mm
(11.8
in)
+
Install
the
alarm
such
that
the LED
indicator
is
viewable
when
the
occupant
is
near
the
alarm.
|
f—
CO
Alarm
150
mm
(5.9
in)
RP
7
\
&
1-3m
[]
(33-10
ft)
CO Alarm
(J
LH]
DEAD
AIR
SPACE
DON'T
INSTALL
HERE
Figure
1:
Installation
in
a
room
with
a
fuel-burning
appliance
Figure
2:
Installation
in
a
bedroom
or
other
room
without
a
fuel-burning
appliance
(installed
at
head
level)
o146
*156

NOTE:
Due
to
the
product's
unique
design
and
unfixed
installation,
it
is
not
recommended
to
install
it
on
a
ceiling,
as
it
is
prone
to
falling
off
and
causing
injuries
to
people.
Locations
to
Avoid
Important
Note
Improper
location
can
affect
the
sensitive
electronic
components
in
this
alarm.
To
avoid
causing
damage
to
the
unit,
to
provide
optimum
performance
and
to
prevent
unnecessary
nuisance
alarms,
do
not
locate
CO
alarms
in
the
following
areas:
1.
In
garages
or
in
any
extremely
dusty,
dirty
or
greasy
areas.
2.
Where
there
is
the
possibility
of
smoke
or
fumes
under
normal
operating
circumstances.
3. In
poorly
ventilated
kitchens,
garages
and
furnace
rooms.
Keep
the
CO
alarms
at
least
1.5
m
(5
feet)
from
potential
smoke
or
fume
sources
(e.g.
stoves,
furnaces,
water
heaters,
space
heaters)
if
possible.
4.
|n
areas
where
a
1.5
m
(5-foot)
distance
from
a
potential
smoke
or
fume
source
is
not
possible.
In
modular,
mobile
or
smaller
houses,
it
is
recommended
the
CO
alarm
be
placed
as
far
from
any
potential
smoke
or
fume
sources.
5.
Within
1.5
m
(5
feet)
of
any
cooking
appliance.
6. In
extremely
humid
areas.
This
alarm
should
be
at
least
3
m
(10
feet)
from
a
bath
or
shower,
sauna,
humidifier,
vaporizer,
dishwasher,
laundry
room,
utility
room
or
other
source
of
high
humidity.
°16¢
7.|n
areas
where
the
temperature
is
colder
than
4.4°C
(40°F)
or
hotter
than
37.8°C
(100°F).
For
example,
non-air-conditioned
crawl
spaces,
unfinished
attics,
uninsulated
or
poorly
insulated
ceilings,
porches
and
garages.
8.
Where
the
air
is
turbulent,
such
as
near
ceiling
fans,
heat
vents,
air
conditioner
vents,
fresh
air
return
vents,
or
open
windows.
Excessive
air
flow
may
prevent
any
CO
from
reaching
the
sensors.
9.
In
direct
sunlight.
Installation
Method
NOTE:
Before
installation,
we
recommend
you
test
the
Wi-Fi
alarms
in
the
rooms
you
wish
to
instai/
them
in
to
ensure
they
are
within
range
of
the
Wi-Fi
router
that
nothing
is
interfering
with
their
communication.
A
WARNING
CONSTANT
EXPOSURE
TO
HIGH
OR
LOW
TEMPERATURES
AND
HIGH
HUMIDITY
MAY
REDUCE
BATTERY
LIFE.
e176

NOTE:
Due
to
the
product's
unique
design
and
unfixed
installation,
it
is
not
recommended
to
install
it
on
a
ceiling,
as
it
is
prone
to
falling
off
and
causing
injuries
to
people.
Locations
to
Avoid
Important
Note
Improper
location
can
affect
the
sensitive
electronic
components
in
this
alarm.
To
avoid
causing
damage
to
the
unit,
to
provide
optimum
performance
and
to
prevent
unnecessary
nuisance
alarms,
do
not
locate
CO
alarms
in
the
following
areas:
1.
In
garages
or
in
any
extremely
dusty,
dirty
or
greasy
areas.
2.
Where
there
is
the
possibility
of
smoke
or
fumes
under
normal
operating
circumstances.
3. In
poorly
ventilated
kitchens,
garages
and
furnace
rooms.
Keep
the
CO
alarms
at
least
1.5
m
(5
feet)
from
potential
smoke
or
fume
sources
(e.g.
stoves,
furnaces,
water
heaters,
space
heaters)
if
possible.
4.
|n
areas
where
a
1.5
m
(5-foot)
distance
from
a
potential
smoke
or
fume
source
is
not
possible.
In
modular,
mobile
or
smaller
houses,
it
is
recommended
the
CO
alarm
be
placed
as
far
from
any
potential
smoke
or
fume
sources.
5.
Within
1.5
m
(5
feet)
of
any
cooking
appliance.
6. In
extremely
humid
areas.
This
alarm
should
be
at
least
3
m
(10
feet)
from
a
bath
or
shower,
sauna,
humidifier,
vaporizer,
dishwasher,
laundry
room,
utility
room
or
other
source
of
high
humidity.
°16¢
7.|n
areas
where
the
temperature
is
colder
than
4.4°C
(40°F)
or
hotter
than
37.8°C
(100°F).
For
example,
non-air-conditioned
crawl
spaces,
unfinished
attics,
uninsulated
or
poorly
insulated
ceilings,
porches
and
garages.
8.
Where
the
air
is
turbulent,
such
as
near
ceiling
fans,
heat
vents,
air
conditioner
vents,
fresh
air
return
vents,
or
open
windows.
Excessive
air
flow
may
prevent
any
CO
from
reaching
the
sensors.
9.
In
direct
sunlight.
Installation
Method
NOTE:
Before
installation,
we
recommend
you
test
the
Wi-Fi
alarms
in
the
rooms
you
wish
to
instai/
them
in
to
ensure
they
are
within
range
of
the
Wi-Fi
router
that
nothing
is
interfering
with
their
communication.
A
WARNING
CONSTANT
EXPOSURE
TO
HIGH
OR
LOW
TEMPERATURES
AND
HIGH
HUMIDITY
MAY
REDUCE
BATTERY
LIFE.
e176

Wall
Mounting
1.
Choose
a
suitable
installation
location
by
referring
to
the
“Where
to
Install”
section.
2.
Remove
the
indication
sticker
from
the
packaging
and
refer
to
the
hole
locations
on
the
sticker.
Draw
two
screw
holes
according
to
the
size
and
layout
of
the
mounting
holes
on
the
back
of
the
product.
Drill
the
screw
holes
30
mm
(1.18
inches)
deep
using
a
@
6.0
mm
(1/4-inch)
drill
bit.
Note
that
the
distance
between
the
center
of
the
two
holes
is
74
mm
(2.9
inches).
Drill
hole
spacing
2.9
in/74
Mounting
Slots
3.
Insert
the
anchor
plug
into
the
screw
hole
and
hammer
it
in
until
the
head
of
the
anchor
plug
is
flush
with
the
wall.
4,
Use
the
two
provided
screws
or
3.5
x
25
mm
countersunk
screws
to
screw
into
the
two
anchor
plugs.
Be
sure
to
leave
a5
mm
(1/5-inch)
gap
between
the
head
of
the
anchor
plugs
and
the
screws,
which
will
allow
for
easy
device
mounting.
°18
6
5.
Mount
and
lock
the
device
onto
the
wall
by
aligning
the
two
mounting
slots
on
the
back
of
the
device
with
the
screws
on
the
wall.
6.
Test
the
device
by
pushing
the
test
button
to
make
sure that
the
device
is
functioning
properly.
Installation
on
a
Table
The
base
of
the
detector
has
two
feet
built
into
the
design
that
allow
it
to
stand
freely
on a
flat
surface.
Feet
NOTE:
When
placing
on
a
shelf,
please
adhere
to
the
recommended
placement
as
described
in
“Where
to
install.”
2196
Table of contents
Other x-sense Carbon Monoxide Alarm manuals