XAG RTK User manual


To Users
Contact Us
Dear user, thank you for choosing XAG products.
For safety reasons and the best experience possible, XAG recommends that you read through the
User Manual and Disclaimer in this document before attempting to use the RTK4 Rover/Portable
Base.
If you have any questions about this document, please contact our Technical Support via email: info@
xa.com
www.xa.com/en 1
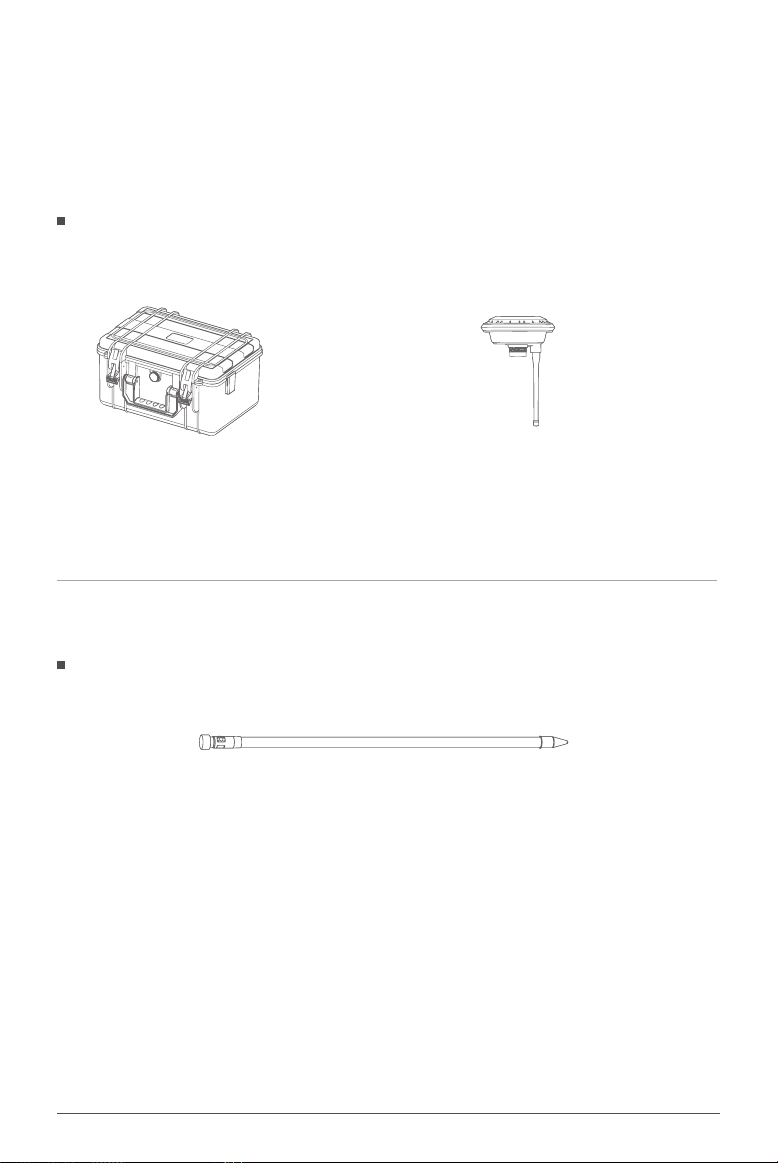
List of Items (Rover)
Before unpacking and using the product, please carefully check if it contains all the items listed below.
Please contact XAG™ or your dealer if there are any missing items.
The components of the rover are packed in 2 boxes. Please refer to the following for details:
RTK Smart Battery (Pole)
× 1
GNSS RTK Module for Agriculture Use ( Mushroom Head)
× 1
Toolkit
× 1
GNSS RTK
Module for Agriculture Use
GNSS RTK
Smart Battery
“■” indicates the component is packed in box/case separately
www.xa.com/en
2
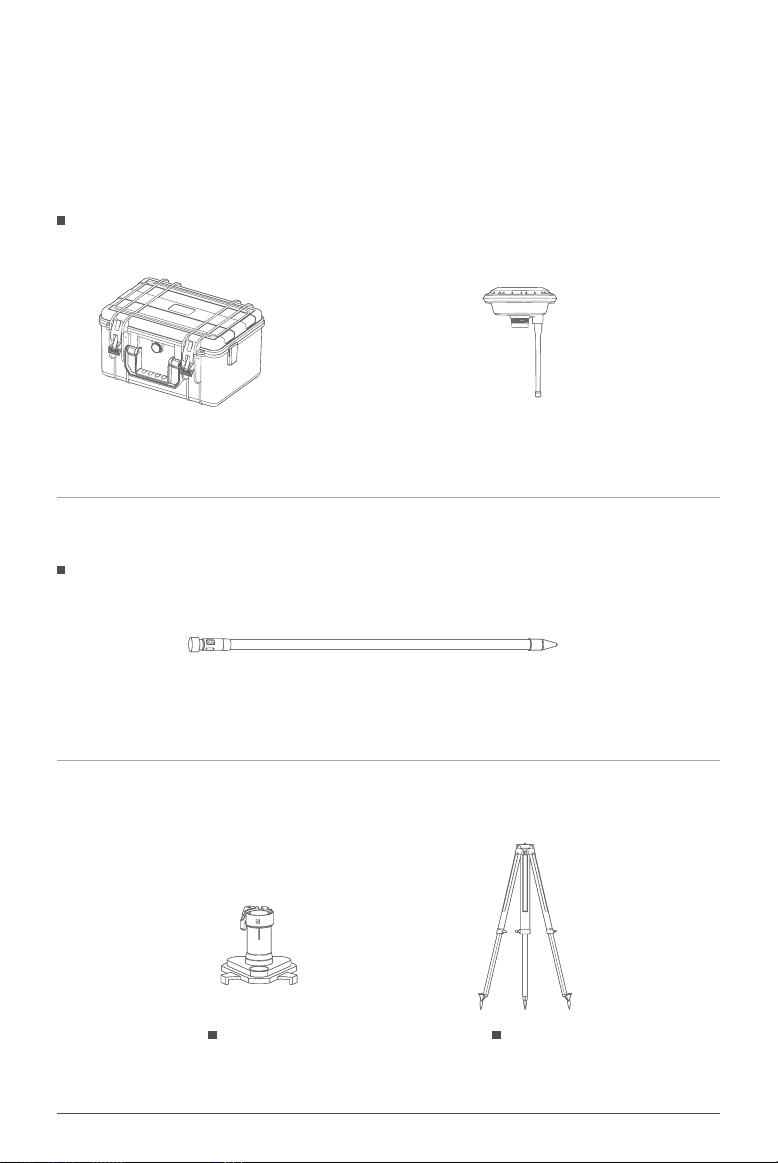
List of Items (Portable Base)
Before unpacking and using the product, please carefully check if it contains all the items listed below.
Please contact XAG™ or your dealer if there are any missing items.
The components of the portable base are packed in 4 boxes. Please refer to the following for details:
Triangle Stand
× 1
Tripod
× 1
RTK Smart Battery (Pole)
× 1
GNSS RTK
Module for Agriculture Use
GNSS RTK
Smart Battery
GNSS RTK
Extension Package
“■” indicates the component is packed in box/case separately
GNSS RTK Module for Agriculture Use ( Mushroom Head)
× 1
Toolkit
× 1

www.xa.com/en 3
Note
Getting to Know the Rover
The RTK4 Rover is comprised of the RTK Positioning Module for Agricultural Use ( Mushroom Head)
and RTK Smart Battery. In specic:
1 RTK Positioning Module for Agricultural Use ( Mushroom Head)
1
4 Antenna
2 RTK Smart Battery
3 RTK Smart Battery Console
including Battery Level Indicators, Power Button, Type-C Charge Port
The RTK4 Rover and RTK4 Portable Base are the same in terms of functional denition,
despite some dierences in structural components.
2
3
4

www.xa.com/en
4
Assembling the Rover
Connect the Mushroom Head with the pole
from top.
Rotate the tightening ring to lock the
smart battery with the Mushroom Head to
complete the assembly.
1
2
1
2
www.xa.com/en 5
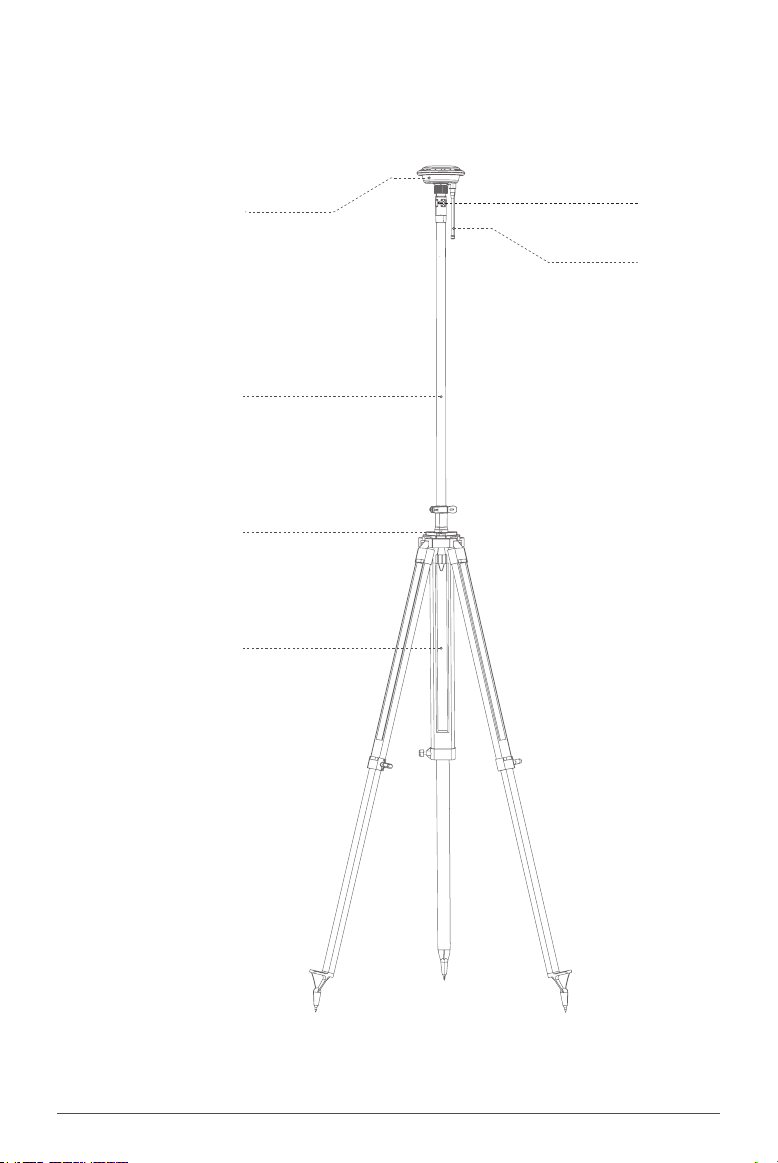
1 RTK Positioning Module for Agricultural Use
(Mushroom Head)
2 RTK Smart Battery (Pole)
3 Triangle Stand
4 Tripod
5 RTK Smart Battery Console: including Battery
Level Indicators, Power Button, Type-C Charge
6 Antenna
Getting to Know the Portable Base
The RTK4 Portable Base is comprised of the RTK Positioning Module for Agricultural Use ( Mushroom
Head), RTK Smart Battery, Triangle Stand, and Tripod.
1
2
3
4
5
6

www.xa.com/en
6
5
4
3
2
1
Assembling the Portable Base
Connect the Mushroom Head with the pole from
top.
Rotate the tightening ring to lock the smart battery
with the Mushroom Head.
Place the Triangle Stand on top of the Tripod as
shown.
Tighten the fixing bolts on the Triangle Stand to
secure the Triangle Stand with the Tripod.
Insert the Rover assembled in Step 2 from top into
the spacing hole and close the buckle to complete
the assembly.
1
2
3
4
5
www.xa.com/en 7
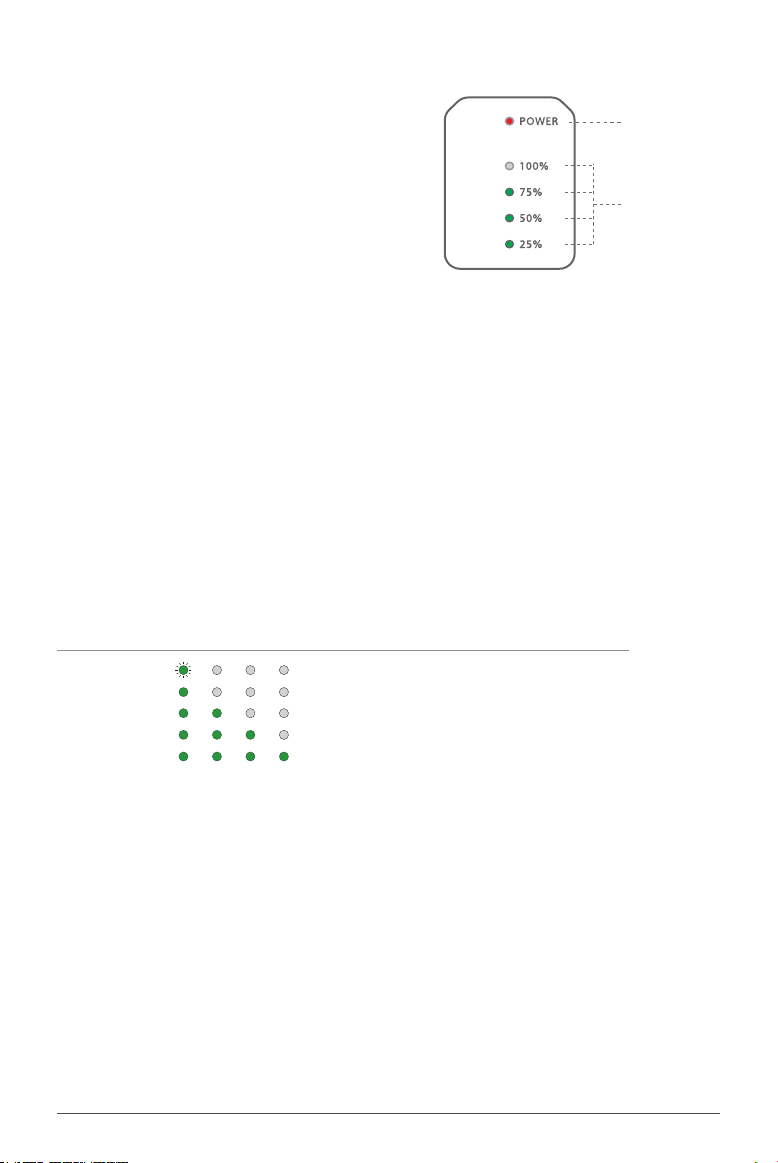
RTK Smart Battery Console
The RTK Smart Battery has a built-in 6600mAh/14.8V
lithium battery. The pole is integrated with a battery
level/status display panel (see right figure), a power
button, and a Type-C charge port.
The functions of the button/indicator lights are dened
as follows:
(Battery)
Status Indicator
(Battery)
Battery Level Indicators
When the battery is ON, see the battery level indicators for the battery level.
When the battery is OFF, press the power button once to display the battery level. Battery levels are
dened as follows:
•Checking Battery Level (Green)
ON: The battery will be powered on after 2 long presses. When the battery is OFF, press and hold the
power button for at least 1 second, and release the button after all battery level indicator lights ash
at the same time, then press and hold the button for at least 1 second again until the status indicator
is on. This indicates that the battery has been powered on successfully.
OFF: The battery will be powered o after 2 long presses. When the battery is ON, press and hold the
power button for at least 1 second, and release the button after all battery level indicator lights ash
at the same time, then press and hold the button for at least 1 second again until the status indicator
is o. This indicates that the battery has been powered o successfully.
• Battery ON/OFF
Battery Level LED
1 LIGHT FLASH 0%-9%
1 GREEN LIGHT ON 10% -25%
2 GREEN LIGHT ON 26% -50%
3 GREEN LIGHT ON 51% -75%
4 GREEN LIGHT ON 76%-100%
Battery Level
www.xa.com/en
8
Charge via the Type-C port.Warning
The battery can be charged when it is either ON* or OFF. During the battery charging, the battery level
indicators corresponding to the current battery level will be on, while the rest lights will ash in series,
indicating that the battery is being charged. After charging is completed, all battery level indicators
will be on.
•Charging Battery
The battery must be charged with the charging devices designated by XAG. The user
shall bear the responsibility for all the consequences caused by the use of the charging
devices not designated by XAG.
*Charging while the RTK is turned on may result in slow charging or power loss. It is recommended to charge when the
RTK is powered o.
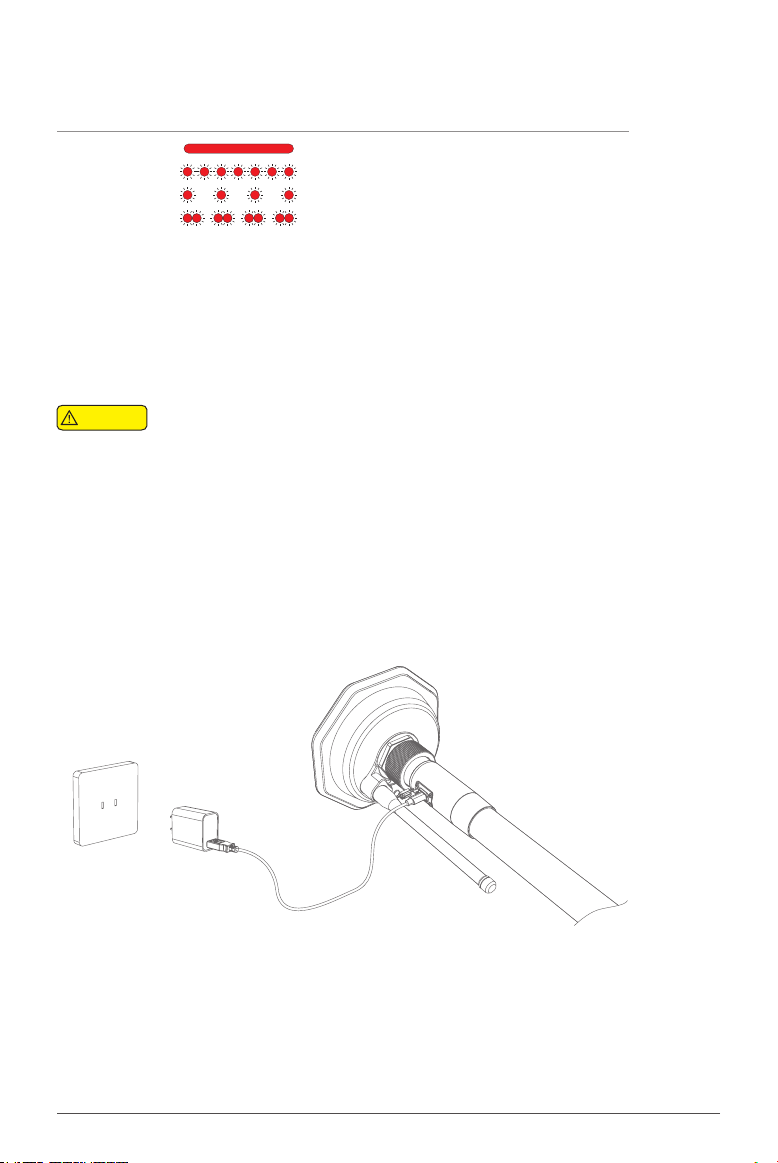
•Checking Battery Status (Red Power Indicator)
Once the battery is ON, its status will be displayed on the console. Battery statuses are dened as follows:
RED LIGHT ON Normal
RED QUICK FLASH
PCB Overheated
RED SLOW FLASH PCB Low Temperature
RED DOUBLE FLASH Battery Malfunction. Please contact
customer/technical support.
Battery Level LED Status
Table of contents
Other XAG Camera Accessories manuals


Popular Camera Accessories manuals by other brands

Viltrox
Viltrox EF-NEX Mount instructions

Calumet
Calumet 7100 Series CK7114 operating instructions

Ropox
Ropox 4Single Series User manual and installation instructions

Cambo
Cambo Wide DS Digital Series Main operating instructions

Samsung
Samsung SHG-120 Specification sheet

Ryobi
Ryobi BPL-1820 Owner's operating manual


