XD XCLUSIVE Aria User manual

1
Copyright© XD P308.69X
Aria 5W Wireless Charging
Digital Clock

2
Content
English p. 3
Deutsch p. 11
Español p. 23
Français p. 15
Italiano p. 19
Svenska p. 27
Nederlands p. 7
Polski p. 31

3
ENGLISH
Please read this manual before using the device to ensure safe
and proper use.
We recommended to use a power supply with sucient output
mentioned in the specifications to ensure an optimal function
of the product.
The USB output of laptops and computers can be unsuitable
for optimal use.
1. Time display
2. Clock setting
3. Clock +
4. Clock -
5. Micro USB input
6. USB input
7. Wireless charging module
DEVICE LAY-OUT
1.
7.
2.
3.
4.
5.6.

4
USING THE WIRELESS CHARGER:
• Make sure your phone is compatible for wireless charging.
• First plug the wireless charger using the included micro USB
cable into the USB port of your wall adapter. Please note
charging speeds depends on the input power into the wireless
charger.
• Place your mobile phone on the charging pad. You can check
the charging status on the screen of your phone.
NOTE: Wireless charging option is only possible if the micro USB
cable is connected.
HOW TO SET THE TIME:
1. 2x press Clock (2) to set the time.
2. Set the hour by pressing + or –
3. Press Clock (2) again to set the minutes
4. Wait 6 seconds, if the clock stop flashing red light, the
setting is completed.
5. Switch mode 12hour/24 hour, please short press SET(2) button.
HOW TO USE THE WIRELESS
CHARGING MODULE:
1. Please put the phone centered
onto the device in order to ensure
that your phone will charge
correctly
2. It will take the same time as
a regular charger to fully charge
your phone

5
SPECIFICATIONS:
Input: 5V/2A
Output: 5V/2A
Wireless charger output: 5V/1A 5W
Micro-USB cable: 150cm

6
NOTES:
• Some phone cases may block the wireless charging
• Do not place other materials, like metal objects, magnets,
and magnetic stripe cards, between the mobile device and
the wireless charger pad
• Check your mobile device’s battery percentage using the
charging icon displayed on the screen of your phone
• When the mobile device is not placed on the charging surface
accurately, your mobile device may not charge properly
• If you use the wireless charger in areas with weak network
coverage, you may lose your network reception
• Please do not expose this device to moisture or heat sources
• This is not a toy, not suitable for children under the age of 7
• Keep speaker away from any heat source.

7
NEDERLANDS
Lees voor gebruik van het apparaat deze handleiding door voor
veilig en correct gebruik.
Om een optimale werking van het product te garanderen
raden we aan een stroombron te gebruiken met voldoende
uitgangsspanning zoals vermeld in de specificaties .
De USB-uitgang van laptops en computers kunnen ongeschikt
zijn voor optimaal gebruik.
OVERZICHT APPARAAT:
1. Tijdweergave
2. Klok instellen
3. Klok +
4. Klok -
5. Micro-USB-ingang
6. USB-ingang
7. Module voor draadloos opladen
1.
7.
2.
3.
4.
5.6.

8
DE DRAADLOZE OPLADER GEBRUIKEN:
• Controleer of je telefoon geschikt is voor draadloos opladen.
• Steek eerst de meegeleverde micro-USB-kabel van de
draadloze oplader in de USB-poort van je computer of in de
stopcontactadapter. Let op: de duur van het opladen hangt af
van de ingangsspanning van de draadloze oplader.
• Plaats je mobiele telefoon op het laadstation. Je kunt de
oplaadstatus op uw telefoon bekijken.
NOTE: Wireless charging option is only possible if the micro USB
cable is connected.
DE TIJD INSTELLEN:
1. Druk 2 keer op de knop Klok (2) om de tijd in te stellen.
2. Stel het uur in door op + of - te drukken.
3. Druk nogmaals op de knop Klok (2) om de minuten in te
stellen.
4. Wacht 6 seconden, als de klok stopt met knipperen
dan is de instelling voltooid.
5. Wisselmodus 12 uur/24 uur, druk kort op de SET-knop.
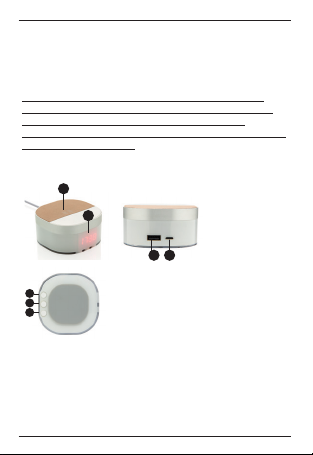
DE DRAADLOZE OPLAADMODULE
GEBRUIKEN:
1. Leg uw telefoon in het midden
van het apparaat om te zorgen dat
uw telefoon correct oplaadt.
2. Het volledig opladen van uw
telefoon duurt even lang als op de
reguliere oplaadmanier.

9
SPECIFICATIONS:
Ingangsspanning: 5V/2A
Uitgangsspanning: 5V/2A
Uitvoer draadloze oplader: 5V/1A 5W
Micro-USB-kabel: 150 cm

10
OPMERKINGEN:
• Sommige telefoonhoesjes kunnen draadloos opladen
blokkeren.
• Plaats geen andere materialen, zoals metalen objecten,
magneten en passen met magnetische strip, tussen het
mobiele apparaat en het laadstation
• Controleer het batterijniveau van uw telefoon via het oplaadi”
coon op het beeldscherm van uw telefoon
• Als het mobiele apparaat niet correct op het oppervlak voor
draadloos opladen is gelegd, kan uw telefoon niet goed
opladen.
• Als u de draadloze lader gebruikt in omgevingen met weinig
netwerkdekking, dan kunt u uw netwerkontvangst verliezen
• Houd dit apparaat uit de buurt van vocht en warmtebronnen
• Dit is geen speelgoed, niet geschikt voor kinderen jonger
dan 7 jaar

11
DEUTSCH
Bitte lesen Sie für eine sichere und korrekte Verwendung die
vorliegende Gebrauchsanleitung durch, ehe Sie das Gerät
benutzen.
Wir empfehlen die Verwendung einer Stromversorgung mit
ausreichender Ausgangsleistung (siehe Angaben in den
Spezifikationen), um eine optimale Funktion des Produkts zu
gewährleisten.
Der USB-Ausgang von Laptops und Computern kann für einen
optimale Verwendung ungeeignet sein.
LAYOUT DES GERÄTS
1. Uhrzeitanzeige
2. Uhr/Einstellung
3. Einstellung +
4. Einstellung -
5. Micro-USB-Eingang
6. USB-Eingang
7. Modul für kabelloses Laden
1.
7.
2.
3.
4.
5.6.

12
VERWENDUNG DES KABELLOSEN LADEGERÄTS:
• Stellen Sie sicher, dass Ihr Telefon für kabelloses Laden
vorgesehen ist.
• Stecken Sie zuerst das kabellose Ladegerät mit dem mitgeliefer
ten Micro USB-Kabel am USB-Port des Netzadapters an.
Beachten Sie bitte, dass die Ladegeschwindigkeit von der
Eingangsleistung des kabellosen Ladegeräts abhängt.
• Legen Sie Ihr Mobiltelefon auf das Ladegerät. Der Ladestatus
wird auf dem Display Ihres Telefons angezeigt.
HINWEIS: Kabelloses Laden ist nur möglich, wenn das Micro
USB-Kabel angeschlossen ist.
DIE ZEIT EINSTELLEN:
1. Drücken Sie 2x auf „Clock“ (2), um die Zeit einzustellen.
2. Drücken Sie auf + oder –, um die Zeit einzustellen.
3. Drücken Sie erneut auf „Clock“ (2), um die Minuten einzustellen.
4. Warten Sie 6 Sekunden. Wenn die Uhr nicht mehr blinkt, ist die
Einstellung abgeschlossen.
5. 12-Stunden- / 24-Stunden-Änderungsmodus, drücken Sie kurz
die SET-Taste.
ANWENDEN DES MODULS FÜR
KABELLOSES LADEN:
1. Zentrieren Sie Ihr Mobiltelefon
auf dem Gerät, damit es korrekt
geladen werden kann.
2. Die Ladezeit ist die gleiche,
wie bei einem handelsüblichen
Ladegerät.

13
SPEZIFIKATIONEN:
Eingang: 5V/2A
Ausgang: 5V/2A
Ausgang des kabellosen Ladegeräts: 5V/1A 5W
Micro USB-Kabel: 150 cm

14
ANMERKUNGEN:
• Bestimmte Telefonetuis können kabelloses Laden verhindern.
• Legen Sie keine Fremdkörper wie Metallobjekte, Magnete
oder Magnetstreifenkarten zwischen das Mobilgerät und das
kabellose Ladepad.
• Überprüfen Sie anhand des Ladesymbols auf dem Bildschirm
Ihres Telefons den Ladezustand Ihres Telefonakkus.
• Wenn das Mobilgerät nicht korrekt auf der Ladefläche
platziert wird, wird es möglicherweise nicht korrekt
aufgeladen.
• Wenn Sie das kabellose Ladegerät in Bereichen mit
schwachem Netz verwenden, verlieren Sie unter Umständen
den Netzempfang.
• Bitte schützen Sie das Gerät vor Feuchtigkeit und
Wärmequellen.
• Das Gerät ist kein Spielzeug und nicht für Kinder unter 7
Jahren geeignet.

15
FRANÇAIS
Veuillez lire cette notice attentivement avant d’utiliser l’appareil
pour garantir une utilisation sûre et correcte.
Nous vous recommandons d’utiliser une alimentation électrique
susamment puissante, conformément à ce qui est indiqué
dans les spécifications, pour un fonctionnement optimal du
produit.
Une alimentation au moyen d’une connexion USB avec un
ordinateur portable ou un ordinateur de bureau peut être
inadéquate pour un résultat optimal.
PRÉSENTATION DE L’APPAREIL
1. Achage de l’heure
2. Réglage de l’horloge
3. Réglage de l’horloge +
4. Réglage de l’horloge -
5. Entrée micro-USB
6. Entrée micro-USB
7. Module de chargement sans fil
1.
7.
2.
3.
4.
5.6.

16
UTILISATION DU CHARGEUR SANS FIL :
• Assurez-vous que votre téléphone est compatible pour le
chargement sans fil.
• Raccordez d’abord le chargeur sans fil dans le port USB
de votre adaptateur mural à l’aide du câble micro-USB fourni.
Veuillez noter que la vitesse de chargement dépend de la puis
sance d’entrée du câble raccordé au chargeur sans fil.
• Placez votre téléphone portable sur la station de chargement.
Vous pouvez vérifier le statut de chargement sur l’écran de votre
téléphone.
REMARQUE : L’option de chargement sans fil n’est possible que si le
câble micro-USB est branché.
RÉGLAGE DE L’HEURE :
1. Appuyez deux fois sur le bouton Horloge (5) pour régler l’heure.
2. Réglez l’heure en appuyant sur + ou –.
3. Appuyez à nouveau sur le bouton Horloge (5) pour régler les
minutes.
4. Attendez 6 secondes. Si l’horloge arrête de clignoter, c’est
Réglage terminé.
5. Mode de changement 12 heures / 24 heures, appuyez
brièvementle bouton SET.
UTILISATION DU MODULE DE CHARGE-
MENT SANS FIL :
1. Placez le téléphone au centre de l’appar-
eil afin d’assurer un chargement correct.
2. Le chargement complet de votre
téléphone prendra le même temps qu’avec
le chargeur classique.

17
SPÉCIFICATIONS :
Entrée : 5V/2A
Sortie : 5V/2A
Sortie chargeur sans fil : 5V/1A, 5W
Câble micro-USB : 150cm

18
REMARQUES :
• Certains boîtiers de téléphone peuvent bloquer la fonction de
chargement sans fil.
• Ne placez pas d’autres matériaux, comme des objets métal
liques, des aimants et des cartes à bande magnétique, entre
l’appareil mobile et la station de charge sans fil.
• Contrôlez la charge de batterie de votre téléphone grâce à
l’icône de charge qui s’ache sur l’écran de votre appareil.
• Si l’appareil mobile n’est pas placé exactement sur la surface
de charge, il peut ne pas charger correctement.
• Si vous utilisez le chargeur sans fil dans des zones avec une
couverture réseau faible, il est possible que vous perdiez la
connexion au réseau.
• N’exposez pas ce dispositif à l’humidité ou à des sources
de chaleur.
• Ce n’est pas un jouet, il est déconseillé aux enfants de moins
de 7 ans.

19
ITALIANO
Leggere il presente manuale prima di utilizzare il dispositivo per
garantire un utilizzo sicuro e corretto.
Si consiglia di utilizzare un alimentatore con potenza
suciente, come indicato nelle specifiche, per garantire un
funzionamento ottimale del prodotto.
L’uscita USB di portatili e computer potrebbe non essere adatta
per un uso ottimale.
LAY-OUT DISPOSITIVO
1. Display tempo
2. Impostazione orologio
3. Impostazione orologio +
4. Impostazione orologio -
5. Ingresso micro USB
6. Ingresso USB
7. Modulo di ricarica wireless
1.
7.
2.
3.
4.
5.6.

20
UTILIZZO DEL CARICATORE WIRELESS:
• Assicurarsi che il telefono sia compatibile per la ricarica wireless.
• Collegare prima il caricabatterie wireless utilizzando il cavo
micro USB in dotazione, alla porta USB o ad un adattatore a
parete. Notare che la velocità di carica dipende dall’ingresso
inserita nel caricabatterie wireless.
• Posizionare il telefono cellulare sul pad di caricamento. È possibile
controllare lo stato di carica sullo schermo del telefono.
NOTA: L’opzione di ricarica wireless è possibile solo se il cavo micro
USB è collegato.
COME IMPOSTARE L’ORA:
1. Premere 2 volte Clock (5) per impostare l’ora.
2. Impostare l’ora premendo + o -
3. Premere di nuovo Clock (5) per impostare i minuti.
4. Attendere 6 secondi quando l’orologio smette di lampeggiare
allora l’impostazione è completa.
5. Modalità di cambio 12 ore / 24 ore, premere brevemente il
tasto SET.
COME UTILIZZARE IL MODULO DI
RICARICA WIRELESS:
1. Centrare il telefono sul dispositivo
al fine di garantire che il telefono si
caricherà correttamente.
2. Servirà lo stesso tempo di un
normale caricabatterie per caricare
completamente il telefono
This manual suits for next models
2
Table of contents
Languages:
Popular Clock manuals by other brands

CyberData
CyberData 11106 Operation guide

TFA
TFA 98.1099 operating instructions

La Crosse Technology
La Crosse Technology WT-8002U quick start guide

VITRA
VITRA Diamond Clock Instructions for use

Oregon Scientific
Oregon Scientific BAR623PA user manual

La Crosse Technology
La Crosse Technology WT-3181PLx1 quick start guide