Xdesk NextDesk L-Series User manual

Assembly Instructions
L-Series

We are delighted that you have chosen NextDesk. Congratulations,
you have selected the most advanced and sophisticated power-adjust-
able workstation available today. Our bodies weren’t meant to sit or
stand for hours at a time. Now you have the choice to sit or stand with
the press of a button.
This user manual gives basic instructions for NextDesk Terra Pro and
Air Pro models. We are sure that your NextDesk will provide you with
many years of enjoyment. Should you ever experience a problem with
any our products, please contact us.
Thank you for choosing Nextdesk. We hope you enjoy your NextDesk
for many years!
~NextDesk Team
Preface
Preface

Safety Instructions.....................................................................
Unpacking & Preparation...........................................................
System Components List & Parts List.........................................
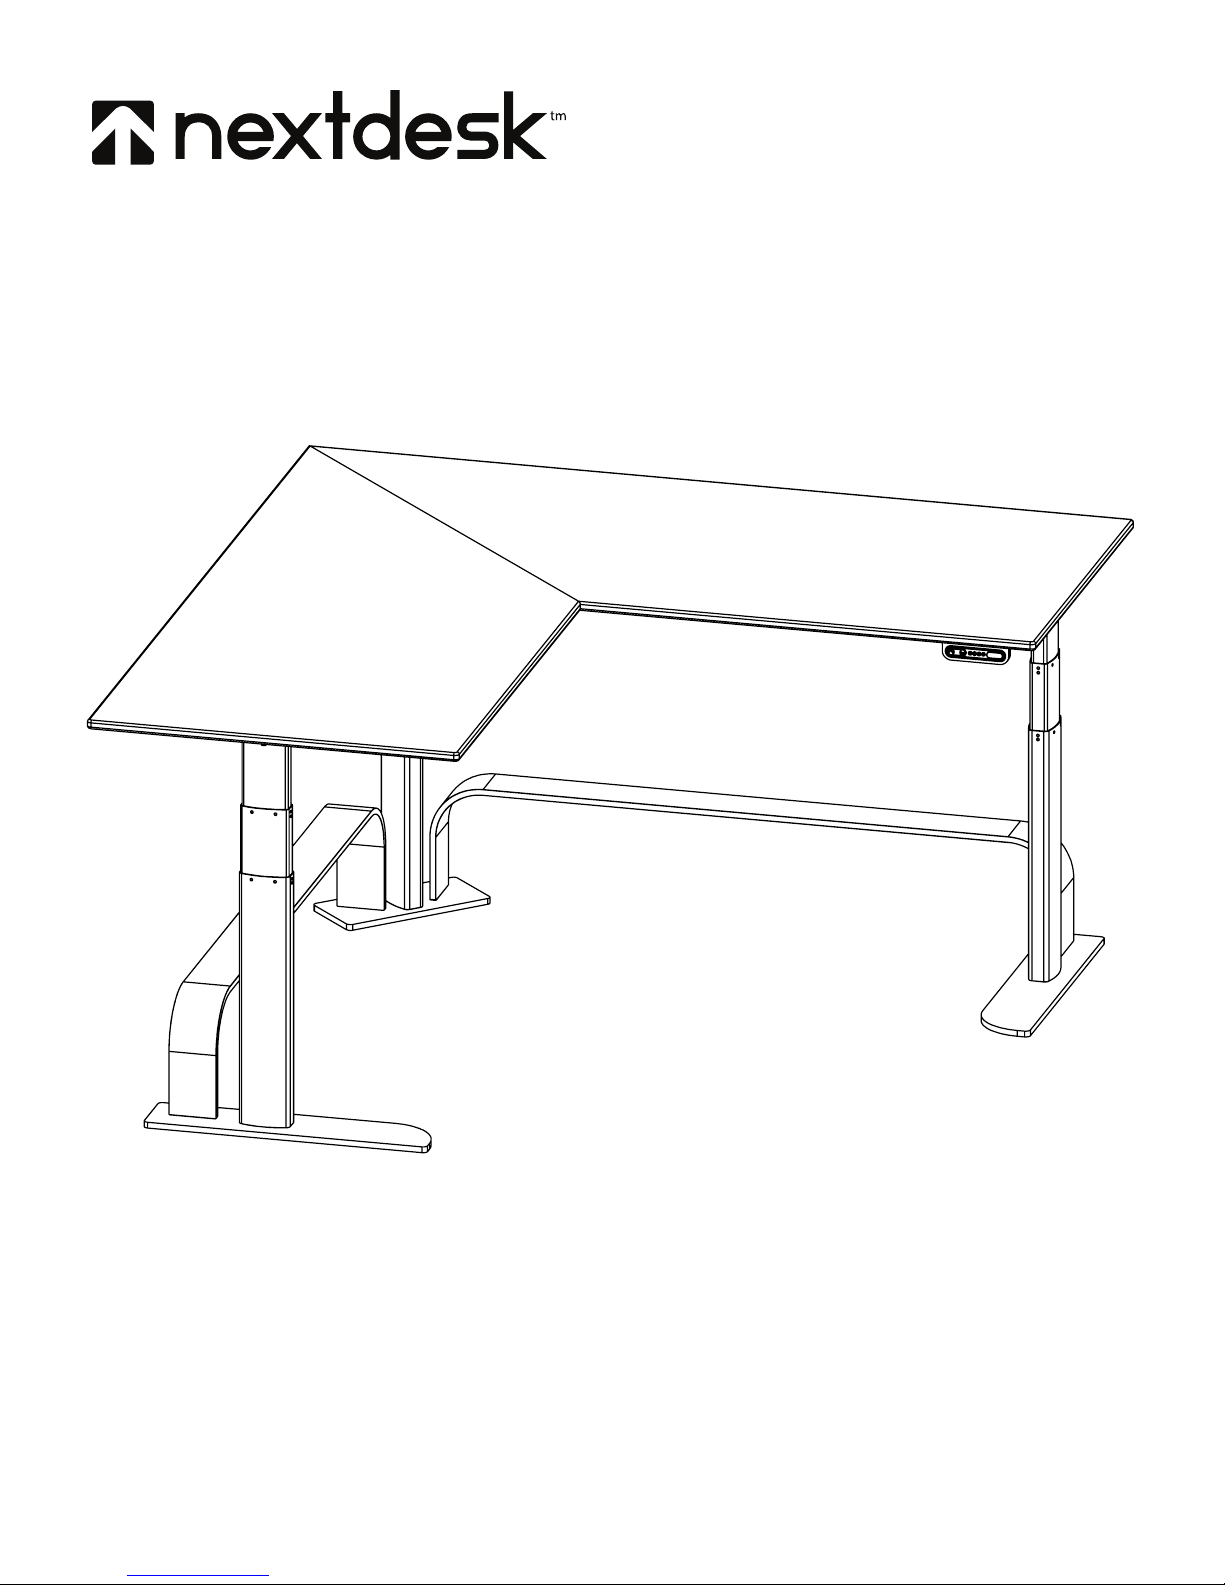
Components Diagram................................................................
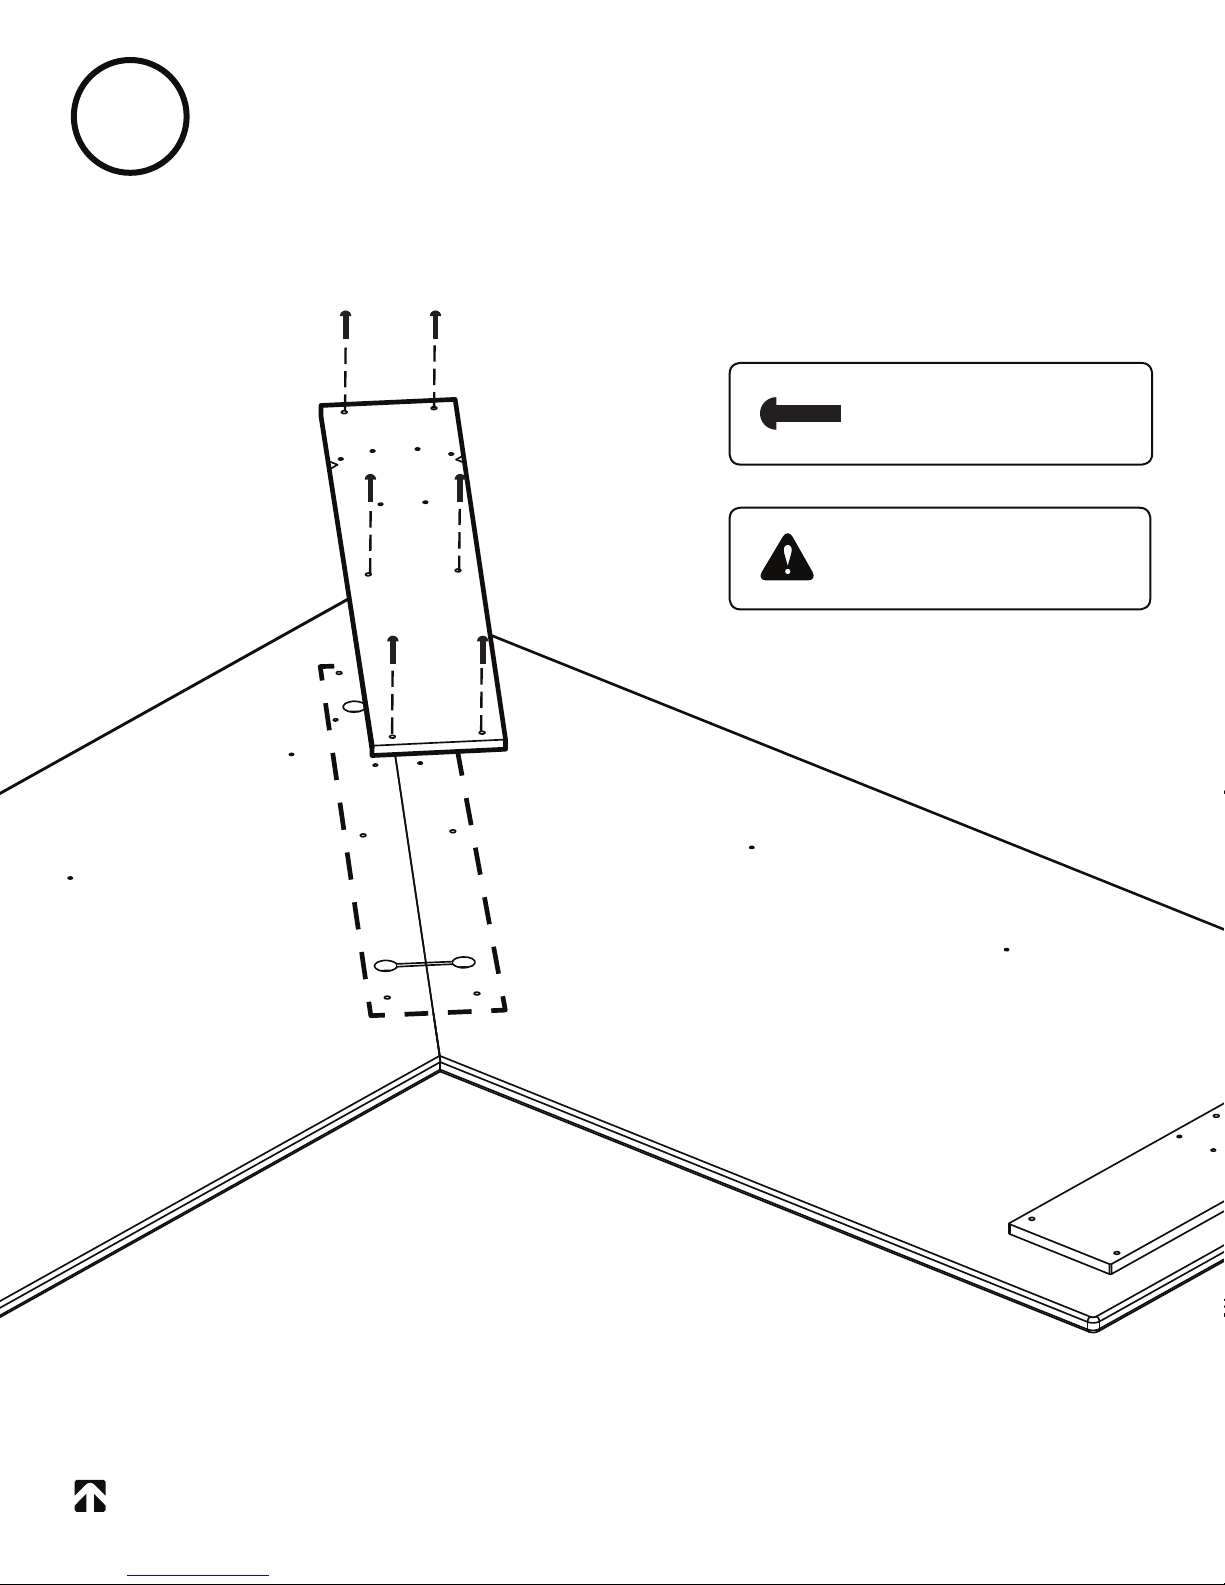
Step 1: Combine Desktop Sides.................................................
Step 2: Install Center Column Support......................................
Step 3: Secure Upper Crossbeams...........................................
Step 4: Connect Lifting Columns to Desktop.............................
Step 5: Connect Floor Supports to Columns.............................
Step 6: Attach Artisan Crossbards............................................
Step 7: Connect Cables...........................................................
Step 8: Turn Over Desk............................................................
Initialize Desk...........................................................................
Cable Management..................................................................
Operating Controller.................................................................
Anti-Collision Feature...............................................................
Maintenance & Description of the NextDesk..............................
Troubleshooting & Repairs .......................................................
Limited Warranty......................................................................
Table of Contents
Page 4
Page 6
Page 7
Page 8
Page 9
Page 10
Page 11
Page 12
Page 13
Page 14
Page 15
Page 16
Page 17
Page 18
Page 19
Page 20
Page 21
Page 22
Page 23
Table of Contents

4 - Safety Instructions
Safety Instructions
WARNING! FAILURE TO COMPLY WITH OR OBSERVE ALL ASSEMBLY
SAFETY AND OPERATING INSTRUCTIONS AND WARNINGS REGARDING THE
USE OF THIS PRODUCT MAY RESULT IN SERIOUS BODILY INJURY.
The safety of NextDesk clients and users is our primary concern.
To ensure safe operation:
Read and understand this manual before attempting to install
or operate the NextDesk.
Verify that everyone who uses the NextDesk is informed of the contents of
this manual. This is the responsibility of the purchaser.
Leave this manual near the NextDesk and if possible, permanently affixed
to the desk.
Safe use of the system is possible only when the operating instructions are read
completely and the instructions contained are strictly observed.
Failure to comply with instructions below “QUICK TIP” may result in serious damage
to the system or one of its components. Persons who do not have the necessary
experience or knowledge of the NextDesk must not use the product. Persons with
reduced physical or mental abilities must not use the NextDesk, unless they are un-
der supervision or they have been thoroughly instructed
in the use of the apparatus by a person who is responsible for the safety
of these persons.

- 5Safety Instructions (cont.)
Safety Instructions (cont.)
Children must remain under close supervision to ensure that they do not play with
the product.
It is important for everyone who is installing or using the NextDesk to have
the necessary information and access to this User Manual.
If there is visible damage on the product it must not be installed.
The NextDesk is not intended for use by young children or for those
persons who require supervision.
Children should be supervised to ensure that they do not tamper or play
with the NextDesk.
Before Installation, Reinstallation, or Troubleshooting:
Stop the NextDesk.
Turn the power supply off by pressing the switch. Unplug the desk from
the wall outlet.
Remove all objects from the desktop to reduce weight.
Before Start Up:
Make sure the NextDesk has been installed as specified in this manual.
System Connection - the individual parts must be connected before the
control box is connected to the main power supply.
If the control box makes unusual noises or has an odor, switch off the main
power supply immediately.
Make sure the cables are not damaged.
Refer to assembly video at nextdesks.com/assembly-video

6 -
Unpacking Your Nextdesk
Carefully remove the packaging from the
NextDesk and then inspect all components
for any shipping damage. Report any
damage to the shipping company and fill out
a concealed damage report.
Assembly Preparation
It is recommended to build your Nextdesk on a non-abrasive surface to
avoid damaging the desktop.
Remove all parts and components from the box.
Ensure all parts and components listed on Page 7 have been included.
QUICK TIP: DO NOT over-tighten screws during installation.
Nextdesk Assembly Preparation

- 7
System Components List
2- Outer Upper Support (pre-mounted)
1- Middle Upper Support
1- Microprocessor Control Box (pre-mounted)
1- Push Button Controller with Memory Presets (pre-mounted)
3- Power Lifting Columns
2- Outer Support Bases
1- Center Support Base
1- Upper Center Support
1- Main Power Cable (pre-installed for desks with power management)
3- Motor Cables
2- Artisan Crossbars
System Components & Parts List
System Components List
M6-35mm Socket Cap Machine Screw
M6-25mm Socket Cap Screw
M6-25mm Countersunk Machine Screw
M6-25mm Buttonhead Machine Screw
M6-14mm Countersunk Machine Screw
Zipbolts
Allen Wrench / Hex Key (5/32)
Allen Wrench / Hex Key (1/8)
Power Cord
Adhesive Zip Ties
Desk Grommets
6-10*
4
20
6
12
2
1
1
1
10
*
*- Will vary based on your desk configuration

8 -
Components Diagram
Nextdesk Components Diagram
Microprocessor Control Box
Controller Cable
Lifting Column Connector(s)
Power Cable
Center Column Support Control Box
Column Support (x2)
Upper Crossbeam (x2)
Artisan Crossbar (x2)
Support Base (x2)
Lifting Column (x3)
Center Support Base Programmable Controller
Desktop

- 9Step 1: Assembling the L-Series Desktop
Step
1a Combine Desktop Sides
Assemble the desktop by aligning the inserts into the opposing side.
IMPORTANT
Desktops should easily combine,
DO NOT forcefully press sides together
Step
1b Insert and Tighten Zipbolts
Insert a zipbolt into the interlocking channels (A and B in the diagram
above) and tighten using the included 5/32 allen wrench
HARDWARE REQUIRED
2 - Ziplock Bolts
A
B

10 -
Step
2Install Center Column Support
Using the six M6-25mm Buttonhead screws, secure the Center Column
Support to the desktop.
HARDWARE REQUIRED
6 - M6-25mm Buttonhead
IMPORTANT
DO NOT over-tighten screws
Step 2: Install the Center Column Support

- 11Step 3: Install the Upper Crossbar
Step
3a Secure Upper Crossbeams to the
Column Supports
HARDWARE REQUIRED
4 - M6-25mm Socket Cap
Using the 4 M6-25mm Socketcap screws, secure Upper Crossbeams to
the Column supports (outermost holes)
Step
3b Secure Upper Crossbeams to Desktop
Using the 6-10* M6-35mm Socketcap screws, secure Upper Crossbeams
to the desktop (inside remaining holes)
*- Will vary based on your desk configuration
HARDWARE REQUIRED
6-10* - M6-35mm Socket Cap

12 -
CABLE TO INSIDE
Step
4Connect Lifting Columns to
the Desktop x3
HARDWARE REQUIRED
12 - M6-14mm Countersunk
Step 4: Connect Lifting Columns to Desktop x3

- 13
Step
5Connect Floor Supports to Columns x3
HARDWARE REQUIRED
12 - M6-25mm Countersunk
Note: Outer Support Bases are reversible, but we find most customers
prefer the rounded facing to the inside of the desk.
Step 5 Connect Floor Suports to Columns x3

14 -
Step
6Attach Artisan Crossbars
Using two people, align and attach the Artisan Crossbar using the included
eight M6-25mm Countersunk screws
HARDWARE REQUIRED
8 - M6-25mm Countersunk
IMPORTANT
Avoid Injury: Use two people
Step 6: Attach Artisan Crossbars

- 15
Step
7Connect Cables
Most Motor cables are pre-mounted to desktop and pre-wired to the
control box. Plug each motor cable into the cable leading to the
control box. Depending on the desk configuration, some cables may need
to be installed.
Step 7 : Connect Cables

16 -
Step
8Turn Over Desk
Using two people, carefully turn desk onto its longest side (shortest side
in the air)
IMPORTANT
Avoid Injury: Use at least
two persons. Three is
recommended for larger
desks. NextDesk weighs over
100 lbs. Get an assistant
to help turn and move the
desk. Use proper lifting
techniques when lifting.
Failure to do so could result
in serious back injury.
IMPORTANT
After the desk is upright; Desk is NOT complete.
DO NOT put weight or load on desktop at this time.
Step 8: Turn Over the Desk

- 17
Step
9Initialize Desk
A. Connect power cord to standard wall outlet. For desks with
Power Management, the power cord is factory attached. For
desks without Power Management, plug power cord into the
control box prior to connecting to wall outlet.
B. Press and hold the ( ) button until the lifting columns have
completely retracted and continue to hold for 5 seconds after all
movement stops.
C. Once the columns are completely retracted, they will
automatically run approximately 5 mm out again and then slowly
run in again. Do not release the ( ) button until 5 seconds
after all movement has completely stopped.
Note: It is sometimes necessary to press the ( ) button
twice to start initialization. There may be a short delay before
movement begins.
Note: If the ( ) button is released before the sequence is
complete then initialization is interrupted and the process must
be started again from the beginning.
Step 9: Initialize the Desk

18 -
Step
10 Cable Management
Maintain the sleek lines of NextDesk. Spend a few minutes to tidy up all
visible cords and cables and then cover with NextFlex.
• Straighten and untangle cables.
• Group the main cables running to your desk into a bundle
(main power cable/network cable/printer cable)
• Group the cables between your PC and desktop into a bundle
(monitor/speakers)
• Cover bundles with NextFlex expandable cable cover
• Attach the self-adhesive zip ties underneath NextDesk and secure
cables and bundles
• Consider the optional NextDesk Vanity Cover/Cable Raceway for
even easier cable management (available in matching aluminum)
Step 10: Cable Management

- 19Operating the Controller
Operating the Controller
Up and Down ( )
Press either the up or down button for parallel drive and the system will drive until
the button is released again or the system reaches end position.
Programmable Memory
The four small buttons are used for memory drive/storing memory.
Store Memory Presets
a. Raise or lower the desk to the height you wish to store as a preset.
b. Press and release the ( ) button.
c. Within these two seconds, press a memory button ( or or ).
The panel will acknowledge by showing “1”, “2”, or “3 “ in the display
depending on chosen position.
Using Memory Presets
Press one of the memory buttons and the system will start moving to the
preprogrammed memory position. Keep the button pressed until the position is
reached. As a safety precaution, NextDesk requires the user to continuously press
the memory preset button. NextDesk will stop automatically upon reaching the
preset height.
Display Function
Shows the actual height.
s
Adjust U p Ad just Down Sto re Memo ryMemor y 1 / 2 / 3
Display
s

20 -
Anti-Collision™ Feature
Method of operation
The control box monitors the electric consumption on each lifting column. If the
electric consumption on one channel is increased more than a predefined slope,
a collision is assumed. All channels are stopped immediately and all desk legs
will start to run in the opposite direction (approximately 50 mm). The anti-collision
sensitivity is different in upward and downward direction. Upwards the force is
approximately 20 kg. Downwards the load will be approximately 40 kg + the load on
the desk lifting column (the desk + what is on top of the desk).
Situations where the anti-collision does not work
• If the collision happens during the initialization phase.
• If the collision happens within the first 1000 milliseconds or after the control
button has been released.
• If the collision happens between the floor and the table, and the load on the
desk, plus the weight of the legs are lower than 40 kg.
• If the collision happens over too long of a time, e.g. if the collision is with
a soft object.
Anti-Collision™ Feature
Table of contents
Popular Indoor Furnishing manuals by other brands

SouthShore
SouthShore 7279 Assembly instructions

Winners Only
Winners Only GFC272R Assembly instructions

LS Bedding Group
LS Bedding Group Comfort Lift Assembly instructions

Vivo
Vivo DESK-V026KW instruction manual

Child Craft
Child Craft FOREVER Eclectic F09201 manual

Xxxlutz
Xxxlutz Regale/30-3er Assembly instructions

Links
Links LIVIO 20 90 08 10 Assembling Instruction

Project Source
Project Source W3030B Assembly instruction

LPA Medical
LPA Medical Thera-Glide W Series instruction manual

ofichairs
ofichairs Baltimore manual

GIB MEBLE
GIB MEBLE QUERTY K2D3SZ Assembly instruction

OfficeSource
OfficeSource PL9997 Assembly instructions