Ximo NEXUS User manual

http://xim.tech
XIM NEXUS
USER GUIDE

http://xim.tech
XIM NEXUS
Welcome!
This guide is designed to give you an in depth understanding of all
the features of XIM NEXUS. If you need any assistance along the
way, please visit Support. We are here to help!
We encourage you to check out and join our very large and active
community of gamers at our Community Forum.
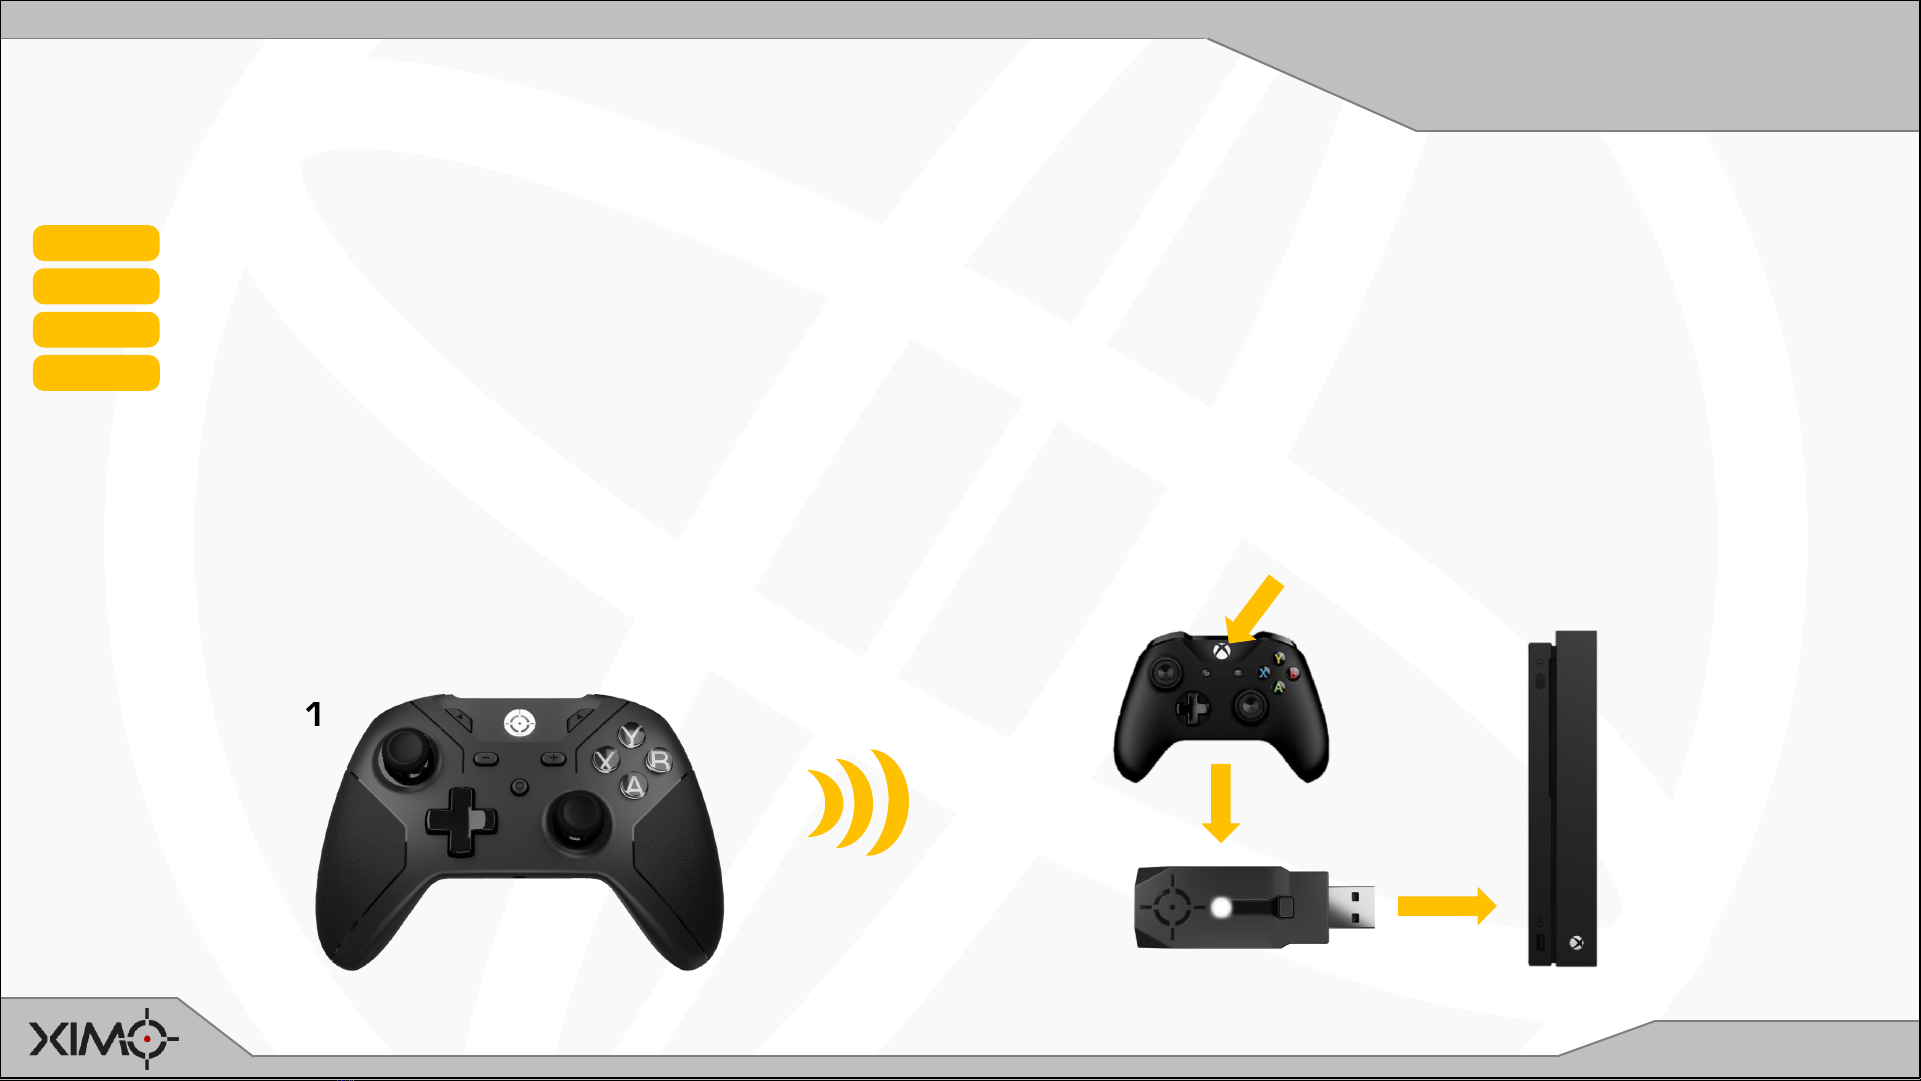
Add a new dimension to your aim with XIM NEXUS high precision motion
aim game controller for Xbox Series X |S, Xbox One, PlayStation 4, and PC!
Thank you for your purchase of XIM NEXUS! Through proprietary aim translation technology, XIM NEXUS is
able to provide a level of motion aim precision unachievable by any other gaming controller available. Gamers
can increase their overall aiming accuracy and speed by enhancing their aim with XIM motion control.
Featuring full wireless configuration through smart phones, tablets, and PCs, it is simple to configure and
easy to use. It’s the perfect companion to even the most demanding gamer.
Welcome to the XIM community!
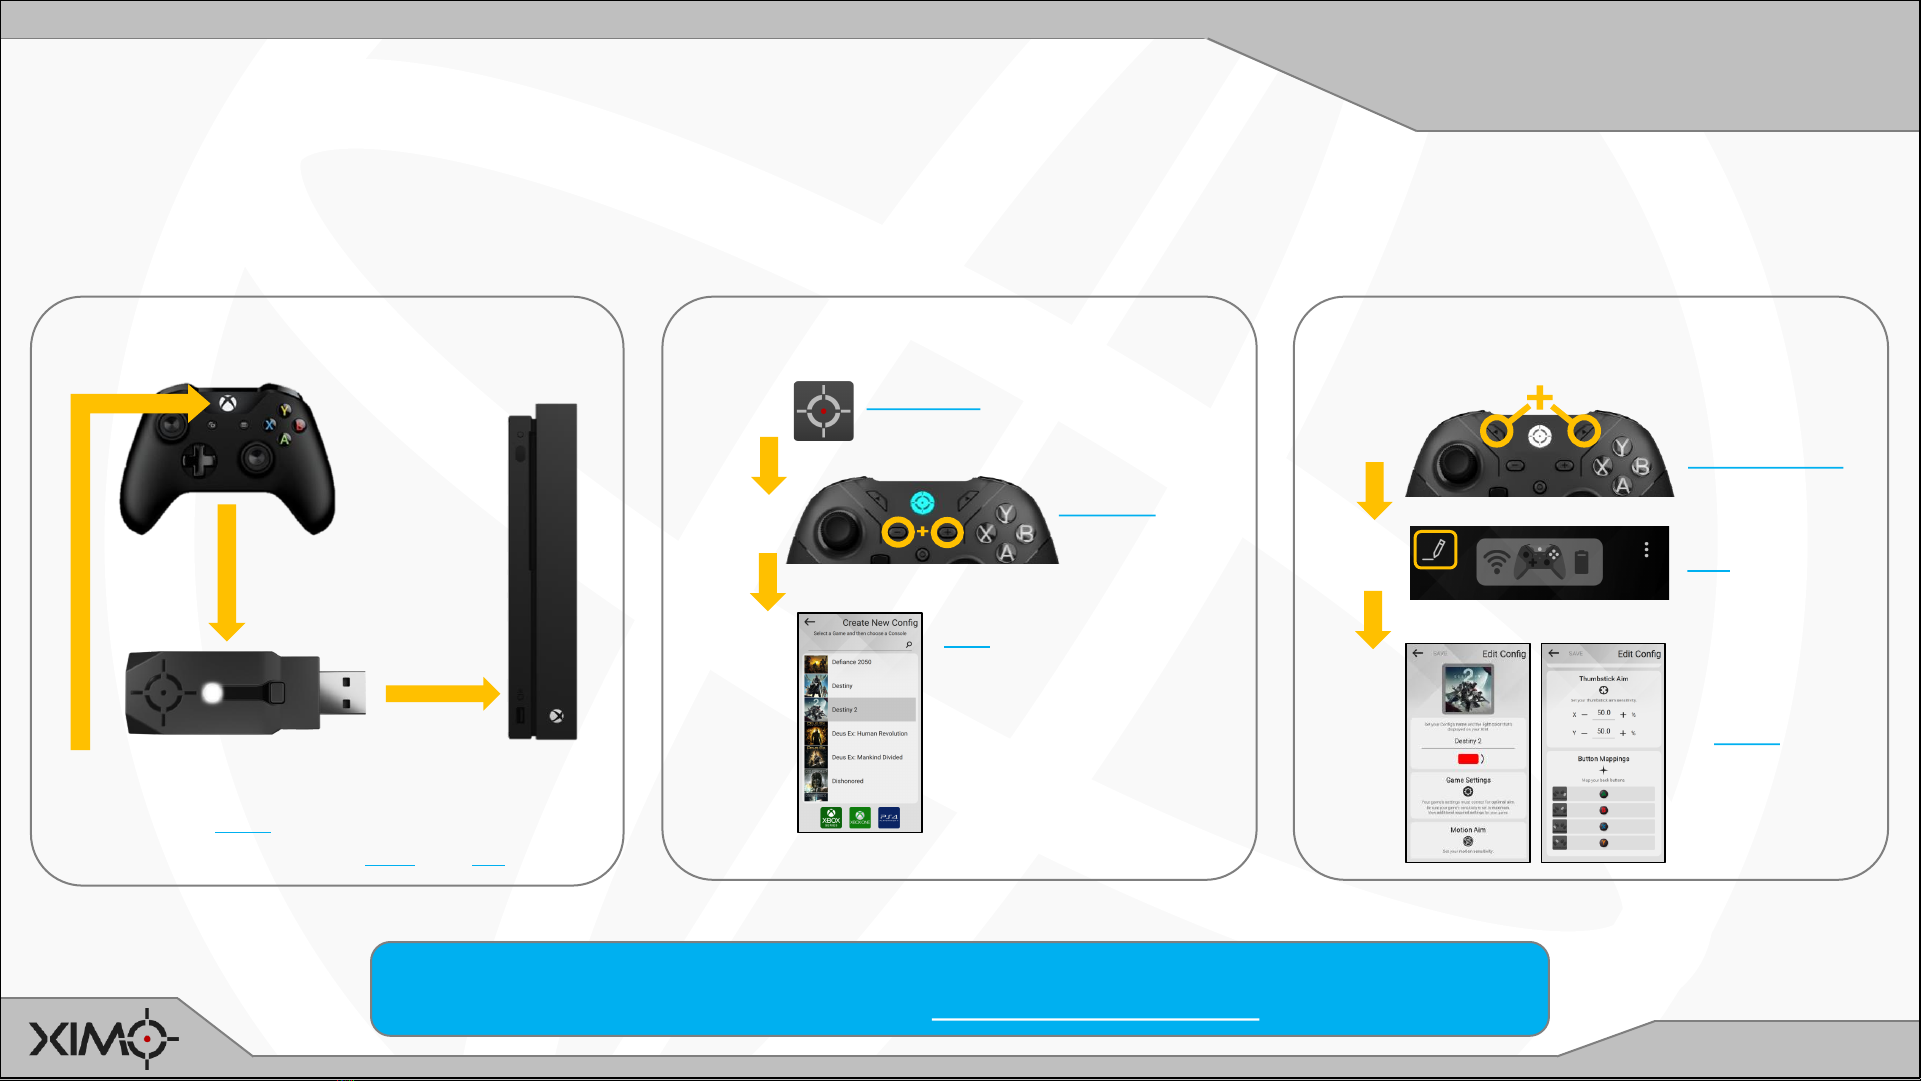
To jump into gaming as quickly as possible please check out our
Getting Started Guide. For the absolute minimum set of
instructions, look at our Minimum Start Steps.

http://xim.tech
XIM NEXUS
Minimum Start
Jump into gaming with your XIM NEXUS
XIM NEXUS has a wide range of features ready for you to explore.
To get gaming as quickly as possible, follow these steps. For more detail, check out our Getting Started Guide.
CONNECT ADAPTER TO CONSOLE
2
1Console controller
(included cable)
Xbox steps shown.
Additional steps for PS4 and PC.
ADD CONFIG TO CONTROLLER
1Download XIM
NEXUS Manager App
2Connect to
Manager
3
DIAL IN SETTINGS
Add Game Config
and follow app
instructions for in-
game settings
1Disable
Classic Mode
2Edit Config
3Follow app
instructions
to dial in
preferred
settings
For more in-depth information about everything related to XIM NEXUS, please refer to this User
Guide and also visit our Community Support Forum.
3Press Guide
Plug in

http://xim.tech
XIM NEXUS
Topics
Unboxing
Inputs and Ports
Charging your Controller
Turning On and Off
Upgrading Firmware
Connecting to Xbox
Connecting to PS4
Connecting to PC
Classic Mode
Connecting to Manager
Adding a Config
Heads Up Display (HUD)
Editing your Config
Editing Experience
Hip vs. Aim Down Sight
Editing Pages Overview
Stick Aim Sensitivity
Motion Aim Sensitivity
Motion Aim Smoothing
Custom Motion Smoothing
Motion Aim Activation
Changing Button Mappings
Setting Trigger Mappings
Advanced Triggers: Quick Pull
Advanced Triggers: ADS Sync
True Stick Curves
ADS Activation Delay
Additional Options Menu
Auto Calibration
Manual Calibration
Customizing Classic Mode
Controller Pairing to Adapter
Spectator Broadcast Overlay
Wireless Performance
Quick Links to Topics

http://xim.tech
XIM NEXUS
Unboxing
Your XIM NEXUS comes with several parts
XIM NEXUS Wireless Adapter
Referred to as Adapter throughout
this manual. The Adapter is required to
use the Controller on an Xbox or
PlayStation console.
(Not needed for PCs that have
Bluetooth connectivity.)
XIM NEXUS Controller
Referred to as Controller throughout
this manual.
Cables
Four (4) cables are included:
1) USB A to USB C: To charge and
firmware upgrade your Controller
2) USB C to USB C: To connect Adapter
to an Xbox Series X | S controller.
3) USB C to USB Micro A: To connect
Adapter to other console controllers.
4) USB A extension: For additional
flexibility when connecting Adapter to
upright consoles.

http://xim.tech
XIM NEXUS
Inputs and Ports
Your XIM NEXUS buttons, sticks, triggers, and ports
Get to know all the inputs and ports of your Controller.
ABXY
NEXTPREVIOUS GUIDE
DPAD
LEFT
TRIGGER
RIGHT
STICK
HEADPHONE
JACK
ENGAGE
MINUS PLUS
USB C
LEFT
STICK
RIGHT
TRIGGER
LEFT
BUMPER
RIGHT
BUMPER
LP LQ
P
RESET
RP
RQ

http://xim.tech
XIM NEXUS
Charging
Charging your Controller
Using the included cable, connect your XIM NEXUS to a 5V wall adapter or computer.
While charging, light will slowly
pulse YELLOW.
When charged, light will slowly
blink GREEN.
The battery will take around 3 hours to fully charge.
Under normal use, the battery will last about 12 hours.

http://xim.tech
XIM NEXUS
Turning On/Off
Turning your Controller On and Off
Press and hold GUIDE until the Controller turns ON (around 2
seconds). It will pulse WHITE when on.
Press and hold GUIDE until the Controller turns OFF (around 5
seconds). The light will turn off or display charging status if
plugged in.

http://xim.tech
XIM NEXUS
Upgrade Firmware
Upgrading your Controller’s Firmware
Like all XIM products, XIM NEXUS will be upgraded frequently with new features and fixes based on community feedback.
This means that the firmware that came preloaded on your Controller may be out of date (even if it’s brand new).
You will need a PC or Mac computer in order to upgrade the firmware on your Controller.
Download the latest firmware upgrade tool from xim.tech and follow these steps:
ENTER FLASH MODE
STEP 1 Turn Controller OFF
STEP 2 Press and hold P(back of Controller)
STEP 3 Press GUIDE
STEP 4 Release P
Controller will display BLUE when in FLASH MODE.
RUN FLASH TOOL
STEP 5 Plug Controller into USB on computer
STEP 6 Run Flash Tool
STEP 7 Choose UPGRADE FIRMWARE
STEP 8 Wait for tool to complete
Occasionally your XIM NEXUS Adapter may have also have a firmware upgrade available. The process to upgrade is very similar to
Controller except to enter FLASH mode, PRESS and HOLD Adapter’s button while plugging into your computer’s USB port.

http://xim.tech
XIM NEXUS
Xbox Connection
Connecting to your Xbox Series X | S or Xbox One
Use on an Xbox REQUIRES a genuine Microsoft Xbox Series X | S or One controller be connected to Adapter at all times.
STEP 1 Ensure Controller and Console are powered ON
STEP 2 Connect your Xbox controller to Adapter using the supplied USB cable
STEP 3 Connect your Adapter to your Xbox
STEP 4 Press the GUIDE button on the Xbox controller
Adapter will:
•Notify you that it successfully connected to your Xbox by flashing GREEN quickly 4 times
•Flash RED while is not connected Controller and is waiting to connect
•Flash WHITE while it’s wirelessly connected to Controller
1
2
3
4

http://xim.tech
XIM NEXUS
PS4 Connection
Use on a PlayStation 4 REQUIRES a genuine Sony PlayStation 4 controller be connected to Adapter at all times.
STEP 1 Ensure Controller and Console are powered ON
STEP 2 Connect your PlayStation 4 controller to Adapter using the supplied USB cable
STEP 3 Connect your Adapter to your PlayStation 4
STEP 4 Press the PS button on the PlayStation controller
1
2
3
Connecting to your PlayStation 4
Adapter will:
•Notify you that it successfully connected to your PS4 by flashing GREEN quickly 4 times
•Flash RED while is not connected Controller and is waiting to connect
•Flash WHITE while it’s wirelessly connected to Controller
IMPORTANT: If you are using a DualShock 4 Gen2 console controller, you must enable Wired Communication in your PS4’s Device Settings.

http://xim.tech
XIM NEXUS
PC Connection
Controller can connect directly to a PC either wireless or wired without the use of Adapter. For wireless connections, your
PC requires Bluetooth connectivity.
NOTE: Pairing to a device removes Controller’s prior pairing (such as to Adapter). Learn how to later re-pair to Adapter.
STEP 1 Ensure Controller and PC are powered ON
STEP 2 Press and Hold P on the back of Controller until it starts blinking CYAN (about 3s)
STEP 3 Scan for Bluetooth devices on your PC
STEP 4 Select XIM NEXUS when it shows on the list
1
2
Connecting to your PC
If your PC doesn’t have Bluetooth, or, if your PC’s has poor Bluetooth performance,
you can use Adapter on your PC. Adapter doesn’t require a console controller be
connected to it. It will flash PURPLE when ready.
3
4

http://xim.tech
XIM NEXUS
Classic Mode
Controller Classic Mode
When Controller is turned on (or if it has no Configs on it), it will automatically be in Classic Mode. You will know you are in
this mode if your Controller is pulsing WHITE.
Classic Mode makes the Controller act like a regular console controller:
•No motion control
•No thumbstick curves
•Limited button/trigger mappings
To EXIT Classic Mode, press NEXT+PREVIOUS. Press again to RE-ENTER any time.
Classic Mode is used to make it easier to navigate menus and your console’s dashboard when not in game.
This mode can also be used in games as well. For more information, please see Customizing Classic Mode.

http://xim.tech
XIM NEXUS
Connect To Manager
Connecting to Manager
XIM NEXUS Manager is used to fully configure the Controller.
Download “XIM NEXUS Manager” for Android or iOS from their app stores. For the PC version, download from xim.tech.
Make sure your device’s Bluetooth radio is ON. Do NOT pair using your device’s system pairing interface.
Android users must have LOCATION services ON to pair (this is a requirement of Google, your location information is never used).
Run MANAGER App
ENTER MANAGER SEARCH MODE ON CONTROLLER
•Ensure Controller is ON
•PRESS and HOLD PLUS+MINUS, you will see CYAN blinking
•Continue to HOLD until you see rapid CYAN blinking (about 5s)
•RELEASE PLUS+MINUS and wait until Manager connects
NOTE: After the first connection, when re-connecting it is no
longer required to hold PLUS+MINUS.

http://xim.tech
XIM NEXUS
Adding Configs
Add a Config
Every game you play must have a Config -- which is added through Manager.
A Config holds all your settings for a game such as motion behavior, thumbstick curves and button mappings.
Choose the supported game you are playing and the console. Your Config will be added to your Controller (around 20s).
Blinks WHITE while
communicating with
Manager
XIM NEXUS’ input translation technology requires that your game’s sensitivity is set to MAXIMUM,HIGH,“INSANE”, etc.
Your game may also need additional settings. If not set, you aim will not be optimal.

http://xim.tech
XIM NEXUS
HUD
Heads Up Display
The Heads Up Display (HUD) shows the current status of your Controller. Use it to edit, add, and delete your Configs.
EDIT
CURRENT
CONFIG
ADDITIONAL
OPTIONS
(NEW,
DELETE, etc.)
WIRELESS
PERFORMANCE
BATTERY
LEVEL
CONNECTION
STATUS
REALTIME
CONTROLLER
VISUALIZATION
VIEW
REQUIRED
GAME
SETTINGS
CURRENT
CONFIG

http://xim.tech
XIM NEXUS
Edit Config
Editing your Config
All Configs start with default values, but everyone’s preferences are different. You will want to edit your Config.
STEP 1 Load the game you want to play. Make sure game’s: aim sensitivity is MAXIMUM, and settings are applied
STEP 2 Find a spot that you can spend time in without disruption (such as a private session or training area)
STEP 3 Use Manager to make sure the correct Config is loaded for your game
STEP 4 Pick up your Controller and disable Classic Mode (if needed)
Try moving around the map and aiming with the thumbstick only -- it
may feel too fast (or too slow).
Try engaging motion by holding down the LEFT TRIGGER (default
binding) –it may also feel too slow.
Get an initial feel for things:
It’s time to start tuning your Config to your preferences:

http://xim.tech
XIM NEXUS
Editing Experience
Standard vs. Expert Editing Experience
XIM NEXUS Manager offers two different types of Config editing modes: Standard and Expert
Standard Editing: The default editing experience. Only the most common
settings are available. This mode is intended to be used by beginners.
Expert Editing: When activated, this mode presents all settings
available to the user.
This User Guide covers the complete set of settings and features available to you. When you edit
your Config for the first time, you will need to switch to the Expert editing experience to access all
settings. To do so, scroll down and select the link:
All your settings changes are preserved if you switch between Standard and Expert editing modes.

http://xim.tech
XIM NEXUS
Hip VS. ADS
Hip vs. Aim Down Sight (ADS)
Most shooters have the ability to Aim Down Sight (ADS)(also called “Zoom” or “Scoped”).
When not in ADS, it’s called Hip Aim. Typically, ADS is activated using the LEFT TRIGGER on most games.
For games that have an ADS mode, some change aiming behavior between Hip and ADS (aiming feels different between the modes). For
these you will have the ability to customize Hip Aim and Aim Down Sight independently when you edit your Config:
Aim Down Sight
Hip Aim
For games that don’t have an ADS mode, or they do but share the same aiming behavior between Hip and ADS, you only customize Aim.
If you still prefer to customize ADS separately, you have the choice to enable it:

http://xim.tech
XIM NEXUS
Edit Overview
Edit Config Page Overview
Config editing is divided into sections. Changes to settings occur on Controller in real-time.
These sections include Hip and Aim Down Sight (ADS) settings and button mappings (bindings).
You will only see an ADS section if your game has an ADS mode that has different aiming behavior than Hip.
Config name and color.
Motion activation settings.
Motion and Stick settings
for Hip aim.
Motion and Stick aim
settings for ADS (if game
has unique ADS aim).
Button mapping
customization.
Table of contents
Popular Controllers manuals by other brands

Linak
Linak ACTUATOR LA36 Connection diagram

Siemens
Siemens SKD32 Series Mounting instructions

Briggs & Stratton
Briggs & Stratton Home Generator System manual

Emerson
Emerson AVENTICS NL1 operating instructions

Cleco
Cleco CellCore 200 Series Hardware description

Aventics
Aventics ED05 Series operating instructions

LuXout Shades
LuXout Shades Multi-Channel Controller instruction manual

Micropelt
Micropelt MVA003 EnOcean user manual

Reer
Reer MOSAIC Master M1 Quick installation guide

White Rodgers
White Rodgers 50T35-743 installation instructions

Consort
Consort MRX1 Installation and user guide

Vega
Vega VEGAMET 841 operating instructions