Xpelair everdri 10 E User manual

08/80070/0 ISSUE: 5 Series: A
For domestic household use only.
INSTRUCTION MANUAL
Models: 10/14 E and EL
These products fully comply with all current European Safety Standard requirements
for Dehumidifiers and are fully compliant with the Low Voltage Directive 2014/35/EU,
the EMC Directive 2014/30/EU and the RoHS Directive 2015/863/EU.

NB These symbols on your device mean:
• This appliance is filled with Propane gas R290. Follow strictly the manufacturer’s
instruction concerning use and repairs!
• Before using this appliance, you must carefully read the entire instruction manual.
• Do not install, operate or store the device in a room with a floor area smaller than
4m
2
for 10L models, and 7m
2
for 14L models.
• Repairs must be performed based on the recommendations from the manufacturing
company.
SPECIFIC SAFETY NOTES RELATING TO REFRIGERANT R290:
• ENVIRONMENTAL INFORMATION: This unit contains fluorinated greenhouse gas
covered by the Kyoto Protocol.
• This appliance contains the refrigerant R290.
• R290 is a refrigerant that complies with European ecological standards; nevertheless,
it is recommended not to pierce the cooling circuit of the machine. At the end of
its useful life, deliver the appliance to a special waste collection centre for disposal.
• GWP (Global Warming Potential) R290 = 3.
• If the appliance is installed, operated or stored in a non-ventilated area, the room
must be designed to prevent the accumulation of refrigerant leaks resulting in a
risk of fire or explosion due to ignition of the refrigerant caused by electric heaters,
stoves, or other sources of ignition.
• When defrosting and cleaning the appliance, do not use any tools other than those
recommended by the manufacturing company.
• The appliance must be placed in an area without any continuous sources of ignition
(for example: open flames, gas or electrical appliances in operation).
• Do not pierce or burn any of the components of the cooling circuit of the unit.
Do not set light to the unit.
• The appliance must be stored in such a way as to prevent mechanical failure or
damage.
• Appliance must be installed, operated and stored in a room with a floor area larger
than 4m
2
for 10L models, approximate room size 2m x 2m, and 7m
2
for 14L models,
approximate room size 2.6m x 2.6m.
• Be aware that the refrigerant gases may be odourless, which means you cannot
smell leaks.
• Compliance with national gas regulations must be observed.
• Individuals who operate or work on the refrigerant circuit must have the appropriate
certification issued by an accredited organisation that ensures competence in
handling refrigerants according to a specific evaluation recognised by national
associations in the industry.
• Maintenance and repairs that require the assistance of other qualified personnel
must be performed under the supervision of an individual specifically qualified in
the use of flammable refrigerants. Keep ventilation openings clear of obstruction.
2

IMPORTANT
THESE INSTRUCTIONS SHOULD BE READ CAREFULLY AND RETAINED FOR
FUTURE REFERENCE. Note also the information presented on the appliance
CAUTION: FAILURE TO FOLLOW THESE INSTRUCTIONS MAY CAUSE INJURY
AND/OR DAMAGE AND MAY INVALIDATE YOUR GUARANTEE
Please read the operating instructions carefully before using your dehumidifier for the
first time and keep them in a safe place.
WARNING – This appliance must not be used in a bathroom.
WARNING – Do not use this appliance in the immediate surroundings of a bath,
a shower or a swimming pool.
•
Never immerse the appliance in water or other liquids.
•
Operate this unit only on a firm, flat surface to avoid the risk of water leakage or
damage. Ensure that the unit is kept upright at all times (including during transport
and storage). If it is overturned at any stage it should be left standing upright for 24
hours before use.
•
Do not place on soft, unstable or non-horizontal/angled surfaces.
•
Leave the unit to stand for 12 hours before connecting to the mains supply after
transport or when it has been tilted (e.g. During cleaning).
•
When the unit stops, you have to wait for 3 minutes before you can restart the unit to
protect the compressor from damage.
•
Never operate the appliance if a cable or connector has been damaged, after appliance
malfunction or if the appliance was dropped or is otherwise damaged.
•
If the mains lead is damaged it must only be replaced by the manufacturers service
agent or a similarly qualified person in order to avoid a hazard.
•
Please ask a professional service agent to repair the product. Improper repair may
cause danger to users.
•
Always switch off the unit and take the plug out of the socket
- If you are not using the unit,
- Before you clean or carry out maintenance on the unit,
- If a fault occurs,
- In the event of an electrical storm.
•
Operate the appliance only at the voltage specified on the rating label.
•
Only connect the unit to a properly installed and easily accessible socket so that you
can quickly disconnect the plug if necessary.
•
Do not connect this product to the mains using an extension lead.
•
Do not connect the dehumidifier to a multiple socket outlet, which is also being used
for other electrical appliances.
•
This dehumidifier is only intended for INDOOR RESIDENTIAL applications. This
dehumidifier should not be used for commercial or industrial or leisure applications or
in small enclosed spaces.
•
Never use the mains lead as a carrying strap or to pull the product when moving.
•
To avoid a fire or electrocution hazard, NEVER put the cord near heat registers,
radiator, stoves or heaters.
3

•
DO NOT cover cord with carpeting, throw rugs, runners, or similar coverings.
•
DO NOT route cord under furniture or appliances. Take care to position the cord away
from traffic areas and where it will not be a tripping hazard.
•
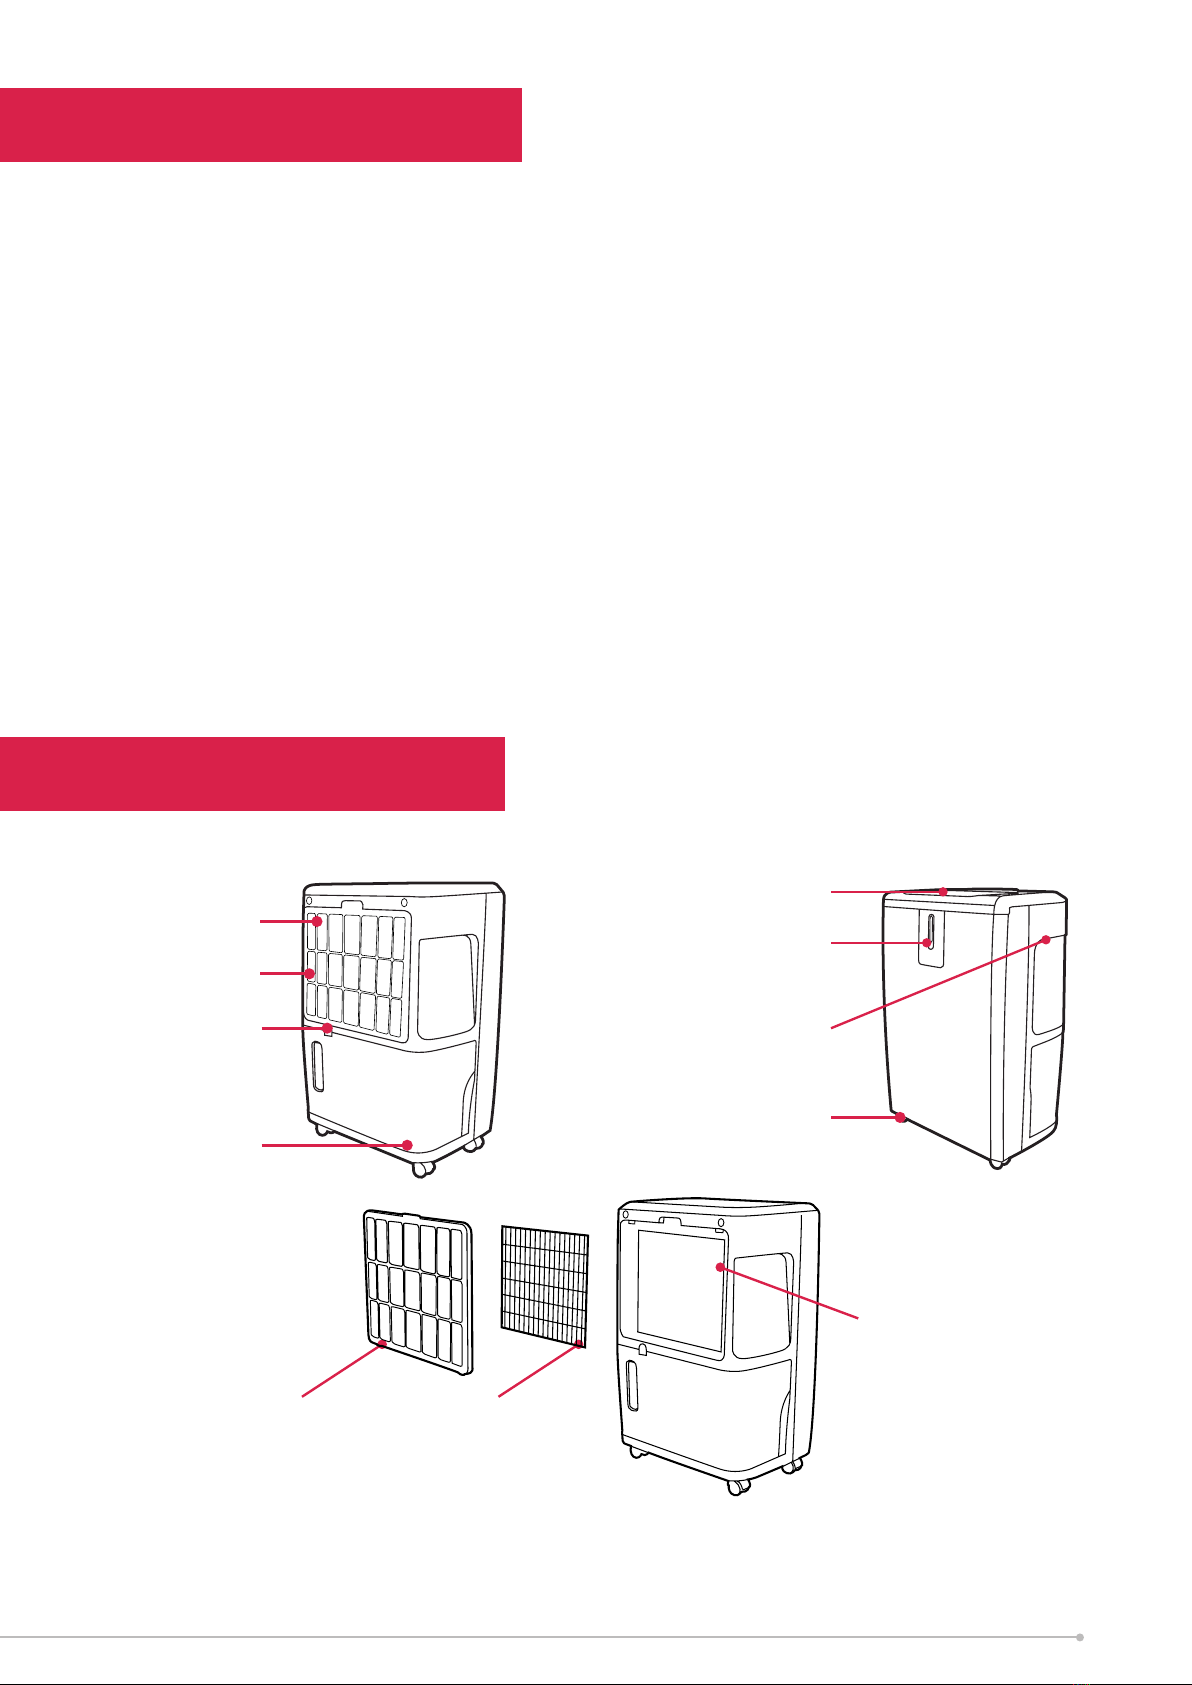
DO NOT COVER. Never cover or obstruct in any way the outlet at the top of the
dehumidifier or the air inlet slots at the rear of the dehumidifier.
•
Only operate this appliance with a minimum of 50cm clearance all around i.e. away
from walls, furniture and overhanging objects such as curtains or a shelf.
•
IMPORTANT: Do not use this unit where the ambient temperature is lower than 5
o
C,
otherwise the evaporating coil will ice up heavily and this will affect the performance
of the product and potentially cause a malfunction.
•
Children aged from 3 years and less than 8 years shall only switch on/off the appliance
provided that it has been placed or installed in its intended normal operating position
and they have been given supervision or instruction concerning use of the appliance
in a safe way and understand the hazards involved. Children aged from 3 years and
less than 8 years shall not plug in, regulate and clean the appliance or perform user
maintenance.
•
Children of less than 3 years should be kept away unless continuously supervised.
•
To prevent spillage, empty the water tank before lifting or relocating the appliance.
•
Do not tip the appliance to any side as escaping water could damage the appliance.
•
Do not use in cabinet, closet, boats, caravans or similar locations.
•
Do not use the unit in a potentially explosive environment containing combustible
liquids, gases or dusts. Do not use the appliance in the vicinity of flammable or
explosive substances or fuels. Never use any paint, cleaning sprays, anti-insect sprays
or similar near the unit; this could damage or deform the plastic, cause electrical
damage or be a fire or explosion risk.
•
Never leave this product running unsupervised.
•
WARNING: Never leave water in the reservoir when the appliance is not in use,
microorganisms can grow in stagnant water, the water tank should be emptied and
cleaned regularly and properly. Empty the tank, clean and dry it when not in use and
before putting into storage.
•
CAUTION: Clean and empty the water tank at least every third day. Empty the water
tank and clean it with fresh tap water or mild detergent. Remove any scale, deposits,
or film that has formed on the sides of the water tank or on interior surfaces using
soft non-abrasive cleaning agents (such as washing up liquid), wipe all surfaces dry
on completion.
•
WARNING – The water collected in the tank must never be used for drinking, it is not
suitable for human, bird or animal consumption.
•
Be aware that high humidity levels may encourage the growth of biological organisms
in the environment.
•
Monitor the area around the dehumidifier to ensure there is no damp or wet. Do not
allow absorbent materials, such as carpeting, drapes, or tablecloths to become damp.
•
Air inlet filter must be cleaned regularly to ensure correct operation and to avoid
damage to the appliance.
•
Never operate the product without the filter.
•
WARNING: To avoid danger of suffocation please remove all packaging materials
particularly plastic and EPS and keep these away from vulnerable people, children
and babies.
•
WARNING: To avoid the risk of accidental strangulation from the supply cord all
children and vulnerable people must be supervised when in the vicinity of the product
whether it is working or not.
•
NEVER drop or insert any object into any openings.
4

Exposed to the
weather outdoors
Near water If the power cable
wires are frayed or cut
Where small children
may be left unattended
If an extension
lead may become
overload
Where there is risk
of fire or close to
a naked flame
Where the power
cable may be
damaged
On a slope or
uneven surface
Where it may be
damaged by
chemicals
If there is a risk
of water falling on
the unit
Where there is a risk
of interference by
foreign objects
This product is not
made for DIY repair
5

Model no. 10L 14L
Max Dehumidification capacity at 30°C, 80%
10L/day
14L/day
Max Dehumidification capacity at 21°C, 59%
3.3L/day 4.7L/day
Max Dehumidification capacity at 10°C, 59%
1.5L/day 1.5L/day
Working range 5 ~ 32
°
C
Water tank 2.5 L
Size (WxDxH) 300 x 204 x 459 mm
N.W. 10.5 kg 11.5 kg
Power supply 220-240V~, 50Hz
Standard Ampere consumption 1.5A 1.4A
Power Consumption (P) (W)
290W 280W
Standby Power Consumption (PSB) (W)
0.35W 0.35W
Sound Power Level (LWA) (dBA)
41.5dB(A) 41.5dB(A)
Maximum Air Velocity (c) (m/s)
19.1 m/s 19.1 m/s
Air volume (max.)
130M3/h
Compressor Reciprocating
Maximum Suction Pressure (MPa)
0.85MPa 0.85MPa
Maximum Discharge Pressure (MPa)
2.2MPa 2.2MPa
Maximum Pressure of Coil (MPa)
9.6MPa 9.6MPa
Refrigerant
R290
GWP
3
Refrigerant Charge (kg)
0.035kg 0.065kg
CO2Equivalent (tonnes)
0.000105 tonnes 0.000195 tonnes
Contains fluorinated greenhouse gases. Hermetically sealed system.
Contact details: UK: Glen Dimplex Heating & Ventilation, Grange Drive, Hedge End, Southampton
SO30 2DF
ROI: Glen Dimplex Europe Limited, Airport Road, Cloghran, County Dublin, K67 VE08
• The data marked with * may vary for technical reasons. For greater precision, please refer to the rating label placed on the product.
• Test condition for data in our rating label is as per safety regulation: EN 60335-2-40
• Note that when the dehumidifier is in operation, the running compressor will produce heat, this is normal and may potentially
raise the room temperature.
Specification
6

How It Works
This product is a dehumidifier. It controls relative humidity by passing the air through
the unit, forcing the excess moisture to condensate over the cooling elements.
Contact with this cold surface causes the moisture in the air to condense. This condensed
water then drains safely into the water tank. The dried air then passes through the condenser
where it is slightly warmed and re-enters the room at a slightly elevated temperature.
N.B. As with all compressor type dehumidifiers their effectiveness is reduced the colder
the ambient temperature is. Do not use where the ambient temperature is 5°C or lower.
Water tank
Fan
Compressor
Motor Evaporator
Condenser
Air Outlet
Air Inlet
1. Before switching on for first time please ensure unit has settled for 12 hours.
2. Please remove ‘carbon filter’ from its bag and locate between the anti- dust filter
and air inlet on the body of the product (make sure carbon filter is lined up properly
with guide locators on the air inlet).
3. Ensure pre filter and carbon filter is fitted securely to the product before switching on.
4. Plug product in.
5. Press on/off button.
6. Select the humidity control button and keep pressing until ‘cont’ lights up- this will
set product to run continuously- leave to 3 minutes then adjust humidity control to
your desired setting.
The lower the setting e.g 40% the product will try and target 40% relative humidity
(ambient humidity) which is for drier conditions. Nearer 70% setting, the product
will try and target 70% relative humidity e.g. more humid/ moist conditions. Unless
this setting is changed, the product will now start controlling the ambient
humidity in the room.
Quick start/ First time operation
7

Excess moisture will travel throughout your home, in the same way that cooking smells waft
to every room in the house. For this reason, the dehumidifier should be positioned, so that
it can draw this moist air towards it from all over the home.
Alternatively, if you have a serious problem in one area you can begin by positioning the
dehumidifier close to this area and later moving it to a more central point.
When positioning the dehumidifier, ensure that it is placed on a level surface and that there
is a minimum of 50 cm (20”) of space on either side of the unit to allow for efficient airflow.
This dehumidifier is fitted with castors for extra mobility, if you move the unit, it should first be
switched off and the water tank emptied. We do not recommend the use of an extension lead,
so please try to ensure that the unit is sufficiently close to a fixed mains socket.
When the dehumidifier is in operation, outside doors and windows should be closed for most
effective and efficient operation.
The Active Carbon Filter is used for capturing the smaller particles of dust suspended in
the air and for tackling odours, absorbing formaldehyde, benzene and other noxious gases.
Parts
Anti dust filter
Air inlet
Water tank
Humidity light
(EverDri 14EL only)
Air outlet
Carry handles
Castors
Continuous
drainage outlet
Anti-Dust
Filter
Active Carbon
Filter
Air Inlet
Where To Position
8

Comfort Humidity Light (EverDri14EL)
EverDri14EL features a Comfort Humidity light on the front panel of the product. This
is an extremely useful feature to provide a visual indicator as to the optimum 'comfort
level' of humidity. It is designed to be a guide only, if you wish to keep the unit running
when the light is red to tackle severe damp conditions then do so.
Blue light - room humidity > 70% (too moist)
Green light - room humidity 50~70% (Just right)
Red light - room humidity < 50% (Too dry)
Red light ashing - water tank full / tank not
inserted correctly
9

Steps:
1. Plug the unit into a correct mains socket. (Please refer to the rating label at the rear
of the unit for correct voltage/frequency.)
2. Press ON/OFF button to turn on the unit. The power indicator will turn on and the
compressor will start to work.
3. Press the humidity setting button to set the working mode you need: continuous working,
humidity 40%, 50%, 60% or 70%. The relative indicator will light on.
If you prefer dryer conditions (reduced humidity) set towards 40%. For more humid
conditions set towards 70%. 'CONT' means the unit will be set to Continuous and will
continue to run regardless of humidity level.
4. Press the TIMER button to set the operating time you need. There are 4 hour
indicators above the TIMER button: 1, 2, 4, 8H. The time can be accumulated, so it’s
not just 4 different hours you could set. For example, choose 1 and 2 hours at the
same time, the unit will work 3 hours continuously, choose 1, 2 and 4 hours at the
same, it will work 7 hours. Thus, the timer could be set up to 15 hours. In this case all
the hour indicator lights are illuminated. When the set time is reached, the dehumidifier
will stop working automatically.
5. To turn off the unit, press ON/OFF button again.
6. Pre-setting function: By pressing the TIMER button without turning on the other
functions (including ON/OFF button), you can PRE-SET the time for the product
to switch on later. For example, if you press the timer to ‘2’, the unit will switch on
automatically after 2 hours.
7. When the water tank is full, the “Full Water” indicator will light up. Remove the water
tank carefully, empty the water and replace securely ensuring snug fit.
1. Power indicator
2. ON/OFF (power) button
3. Water tank “Full” indicator
4. Humidity setting button
5. Working mode indicator
(continuous working, humidity
40%, 50%, 60%, 70%)
6. Timer operation indicator
7. Timer button
4
65
123
7
Control Panel and Operation (EverDri10E & EverDri14EL)
10

Drainage
While the water tank is full, the compressor will stop for self-protection and the water
tank full indicator light will turn red.
To move the water tank, pull it out squarely from the unit.
After empting the water tank, place the water tank carefully back into its location into
space. The tank must be properly located in order for the ‘water full’ light to go out
and for your dehumidifier to start operating again.
Please note, if the water tank has not been positioned/located correctly, the water full
indicator will stay red and the product will not operate.
CONTINUOUS DRAINAGE
When the dehumidifier is operated at very high humidity levels, the water tank will
require more frequent emptying. In this situation, it may be more convenient to set the
unit up for continuous drainage, this can be done as follows:
1. Pull out the water tank.
2. Connect a water drain tube of inner
diameter 11 mm to the drain spout
connection outlet at the top of the
tank location area.
* Please note, the water tube is not supplied
with the unit.
3. Ensure the drain tube is fixed properly
and that water will always drain away
freely through the tube (the drain
point/open end of the tube must be
at a lower height than the drain outlet
from the product).
Note! In very cold weather conditions,
precautions should be taken to prevent the
water tube from freezing.
4. Put the water tank back to its position.
Spout connection
for continuous
drainage
Water drain tube
with 11mm internal
diameter
11

Always unplug the unit from the mains before carrying out any maintenance or cleaning
of the unit.
CLEANING THE BODY
Use a soft damp cloth to wipe the unit clean.
Don’t ever use volatile chemicals, gasoline, detergents, chemically treated clothes,
or other cleansing solutions. These all could possibly damage the enclosure.
CLEANING THE FILTERS
This dehumidifier is equipped with 2 filters.
The plastic dust filter is washable and should be cleaned approximately every 2 weeks
when in use (see instruction below).
The active carbon filter is not washable. The active carbon filter should be removed
regularly and cleaned with a dry cloth. It should be placed in sunlight (on window sill)
for a few hours every 3- 6 months to help re-charge the active carbon properties.
WASHING THE PLASTIC DUST FILTER
•
Remove the anti-dust filter and separate the active carbon filter (not washable)
and set it aside carefully.
•
Use a vacuum cleaner or tap the plastic air filter lightly for easy cleaning. If the
filter is particularly dirty, use warm water with a small amount of medium strength
detergent to rinse the filter.
• Allow it to dry naturally and make sure the filter is completely dry before replacing.
• Do not expose the filter to sunlight.
STORAGE
If not using the unit for an extended period of time. Please:
• Turn the unit off, unplug and take care of the mains lead & plug.
• Completely empty the water tank and clean it thoroughly and wipe it dry.
•
Cover the unit and store it upright in a location where it will not receive direct sunlight.
NB- Prolonged exposure to direct sunlight will discolour the enclosure.
Maintenance
Anti-Dust
Filter
Active Carbon
Filter
Air Inlet
12

Troubleshooting
THE UNIT DOES NOT OPERATE:
• Is the unit plugged in?
• Is the house electricity on?
•
Is the room temperature below 5°C or above 32°C? If so, then it is out of the working
range of the unit.
• Ensure the ON/OFF switch is turned on.
• Check the water tank is located properly in the unit and it is not full.
• Make sure the air inlet and outlet are not obstructed.
THE UNIT SEEMS TO DO NOTHING:
• Is the filter dusty, contaminated?
• Is the air intake or outlet blocked?
• Is the room humidity already quite low?
THE UNIT SEEMS TO DO LITTLE:
• Are too many windows or doors open?
• Is there something in the room producing lots of humidity?
THE UNIT IS TOO NOISY:
• Check whether the unit is sitting on a level surface.
THE UNIT IS LEAKING:
• Make sure the unit is on a level surface and the water tank is fitted correctly
• Check that the water tank is not damaged.
ERROR/ FAULT CODE MESSAGES ON DISPLAY:
• 1H or 2H Flashing – Sensor malfunction – Please stop using the product & Contact
Customer Service.
• 4H Flashing – Connection malfunction – Please stop using the product & Contact
Customer Service.
• 8H Flashing – Temperature elevated – Please disconnect from the mains for a few
minutes and then reconnect, if the message reappears please stop using the product
and contact Customer Service.
POWER LIGHT INDICATOR FLASHING:
Note: If the dehumidifier is continuously operating for long periods in an application
where humidity levels are very high, or, the ambient temperature is very low, the
evaporator coils (inside the back air inlet) may freeze up, when this happens a sensor
will switch the product into defrost mode (turning off the compressor & leaving the
fan running) and the power indicator light will flash on and off indicating the product
is defrosting, once it has defrosted sufficiently the sensor will switch the compressor
back on and the power indicator light will stop flashing.
13

Recycling: For electrical products sold within the European
Community. At the end of the electrical products useful life it
should not be disposed of with household waste. Please recycle
where facilities exist. Check with your Local Authority or retailer
for recycling advice in your country.
If you don't intend to keep the packaging of this product for
later use or storage, please dispose of it in an eco-friendly way,
please dispose of it in your recycling bin or nearest recycling
facility, thank you.
Spare parts
Selected replacement parts are available on www.dimplex.co.uk
Recycling
14

What does a Dimplex Guarantee cover?
Dimplex products deliver reliable service for normal, household use in domestic settings.
All Dimplex products are individually tested before leaving the factory.
If you are a consumer and you experience a problem with your Dimplex product, which
is found to be defective due to faulty materials or workmanship within the guarantee
period, this Dimplex guarantee will cover repair or - at the discretion of Dimplex –
replacement with a functionally equivalent Dimplex product.
Your product is under guarantee for 1 year from the date of purchase or the date of
delivery of the product, if later. The 1 year guarantee is extended for an additional 2
years when you register the product with Dimplex, within 28 days of purchase. If you
do not register the product with Dimplex within 28 days, your product will remain
guaranteed for 1 year only. To validate your extended guarantee register with us online
at: http://register.dimplex.co.uk. N.B. Each qualifying product needs to be registered
with Dimplex individually. Please note that the extended guarantee is only available in
the UK and Ireland.
The Dimplex guarantee is conditional upon you providing the original purchase receipt
as proof of purchase. Please therefore retain your receipt as proof of purchase.
If you do experience a problem with your Dimplex product please call the Helpline on
+44 [0]344 879 3588 or visit https://www.dimplex.co.uk/support. For ROI please email
serviceireland@glendimplex.com or call +353(0)1 842 4833. We will need details of your
Dimplex product and a description of the fault which has occurred. Once we receive
your information and proof of purchase we will contact you to make the necessary
arrangements.
If your Dimplex product is not covered by this Dimplex guarantee there may be a charge
to repair your product. However, we will contact you for agreement to any charges
before any chargeable service is carried out.
What is not covered by a Dimplex Guarantee?
The Dimplex guarantee does not cover any of the following:
Any fault or damage to your Dimplex product due to faulty materials or workmanship
occurring outside the guarantee period.
Normal wear and tear including parts that might wear out over time or consumables,
such as filters. Any fault or damage occurring to any pre-owned Dimplex product or
to any other equipment or property. Accidental damage to your Dimplex product or
damage to your Dimplex product from external sources (for example, transit, weather,
electrical outages or power surges). Fault or damage to your Dimplex product which is:
Not due to faulty materials or workmanship or which is due to circumstances outside
Dimplex’s control. Caused by use of your Dimplex product for anything other than
normal domestic household purposes in the country where it was purchased.
Caused by any misuse, abuse or negligent use of the Dimplex product, including but not
limited to any failure to use it in accordance with the Operating Instructions supplied
with the product. Caused by any failure to assemble, install clean and maintain your
Dimplex product in accordance with the Operating Instructions supplied with the
product unless this was carried out by Dimplex or its authorised dealers.
Caused by repairs or alterations to your Dimplex product not carried out by Dimplex
service personnel or its authorised dealer(s). Caused by use of any consumables or
spare parts for your Dimplex product which are not Dimplex specified.
Guarantee
15

The Dimplex guarantee is valid for 1 calendar year, plus 2 if registered, from the date of
purchase of your Dimplex product from a recognised retailer in the country of purchase
and use, or the date of delivery of the product if later, always provided the original
receipt has been retained and is produced as proof of purchase.
You must provide to Dimplex or its authorised agents on request the original receipt
as proof of purchase and - if required by Dimplex - proof of delivery. If you are unable
to provide this documentation, you will be required to pay for any repair work required.
Any repair work under the Dimplex guarantee will be carried out by Dimplex or its
authorised dealer(s) and any parts that are replaced will become the property of
Dimplex. Any repairs performed under the Dimplex guarantee will not extend the
guarantee period.
The Dimplex guarantee does not entitle you to recovery of any indirect or consequential
loss or damage including but not limited to loss or damage to any other property.
The Dimplex guarantee is in addition to your statutory rights as a consumer and your
statutory rights are not affected by this Dimplex guarantee.
Contact Dimplex A brand of the Glen Dimplex UK Limited, trading as Glen Dimplex
Heating & Ventilation.
If you have any questions about what the Dimplex guarantee covers and does not cover
or how to claim under the Dimplex guarantee, please contact us.
Terms and Conditions
Customer Helpline: 0344 879 3588
www.dimplex.co.uk
UK: Glen Dimplex UK Ltd., Millbrook House, Grange Drive, Hedge End,
Southampton SO30 2DF
ROI: Glen Dimplex Europe Limited, Airport Road, Cloghran, County
Dublin, K67 VE08
© Glen Dimplex. All rights reserved. Material contained in this publication may not be reproduced in whole or in part, without prior
permission in writing of Glen Dimplex
This manual suits for next models
3
Table of contents
Other Xpelair Dehumidifier manuals
Popular Dehumidifier manuals by other brands

Trane
Trane EDHUM070H Installation & operation instructions

Philips
Philips HU4706 user manual

Dantherm
Dantherm AD 290 B manual

Olimpia splendid
Olimpia splendid AQUARIA 18 Instructions for installation, use and maintenance

TSI Instruments
TSI Instruments DustTrak 854041 installation guide

turbionaire
turbionaire Practical 12 instruction manual