Xplornet Hub 5 User manual

2021
Xplornet Hub 5
User Guide

.

CONTENTS
Getting Started ....................................................................1
Safety Precautions ................................................................2
In the Box.............................................................................3
Indicators .............................................................................4
Ports and Buttons .................................................................5
Connecting Your Xplornet Hub .............................................6
Connect Directly to a Computer .................................................. 7
Connect additional Wi-Fi Units for Whole Home Wi-Fi....... 8-9
Change Your SSID Name and Password .............................. 10
What is an “SSID”? .................................................................... 10
Connect a Wireless Device to the Internet ................................. 10
Connection Troubleshooting...................................................... 11
Xplornet Hub Wi-FI FAQ’s.......................................................... 12
Router Features ......................................................................... 13
Xplornet Home Phone ........................................................ 14
Home Phone Features ............................................................... 14
Troubleshooting for Home Phone......................................... 15-16
Important 9-1-1 Emergency Services ................................... 17
About Xplornet .................................................................. 18

.

Getting Started
Thank you for signing up with Xplornet. Your Xplornet Hub 5 provides
Home Phone, Whole Home Wi-Fi, and Wi-Fi Router service.
This guide will help you set up your device. Just follow the easy step-by-step
instructions and start connecting to what matters to you.
XPLORNET HUB USER GUIDE 1

XPLORNET HUB USER GUIDE
Safety Precautions
Before connecting your Xplornet Hub, please read the following safety
precautions:
• Always use the power adapter that came with the device.
• Do not put anything on top of the unit.
• Keep the Xplornet Hub dry, clean and well-ventilated.
• Use a soft, dry cloth to clean the device – do not use liquid or spray to
clean it.
• Keep the air vent clean and clear of debris and keep all liquid away from
the device’s surface. Should anything fall into the Xplornet Hub through
the air vent, it could result in fire or damage to the device.
• To avoid injury, do not open the Xplornet Hub. Tampering with the
device could void your warranty.
• To prevent unauthorized access into your Wi-Fi network, we recommend
you setup a secure SSID connection with a unique password. Please
review page 9 for a step-by-step guide.
2

XPLORNET HUB USER GUIDE
3
In the Box
You will find the following items included:
If any parts are missing, please contact Xplornet Support:
By Phone: 1-866-841-6001
In the Box
You will find the following items included:
Xplornet WiFi Unit
AC Power Adapter
RJ-45 LAN Network Cable
RJ-45 WAN Network
Cable
Ifany parts are missing,pleasecontactXplornet Support:
By Email: support@xplornet.com
By Phone: 1-866-841-6001
Xplornet Hub
AC Power Adapter
RJ-45 LAN Network Cable
RJ-45 WAN Network Cable
RJ-11 Telephone Cable

XPLORNET HUB USER GUIDE4
Indicators
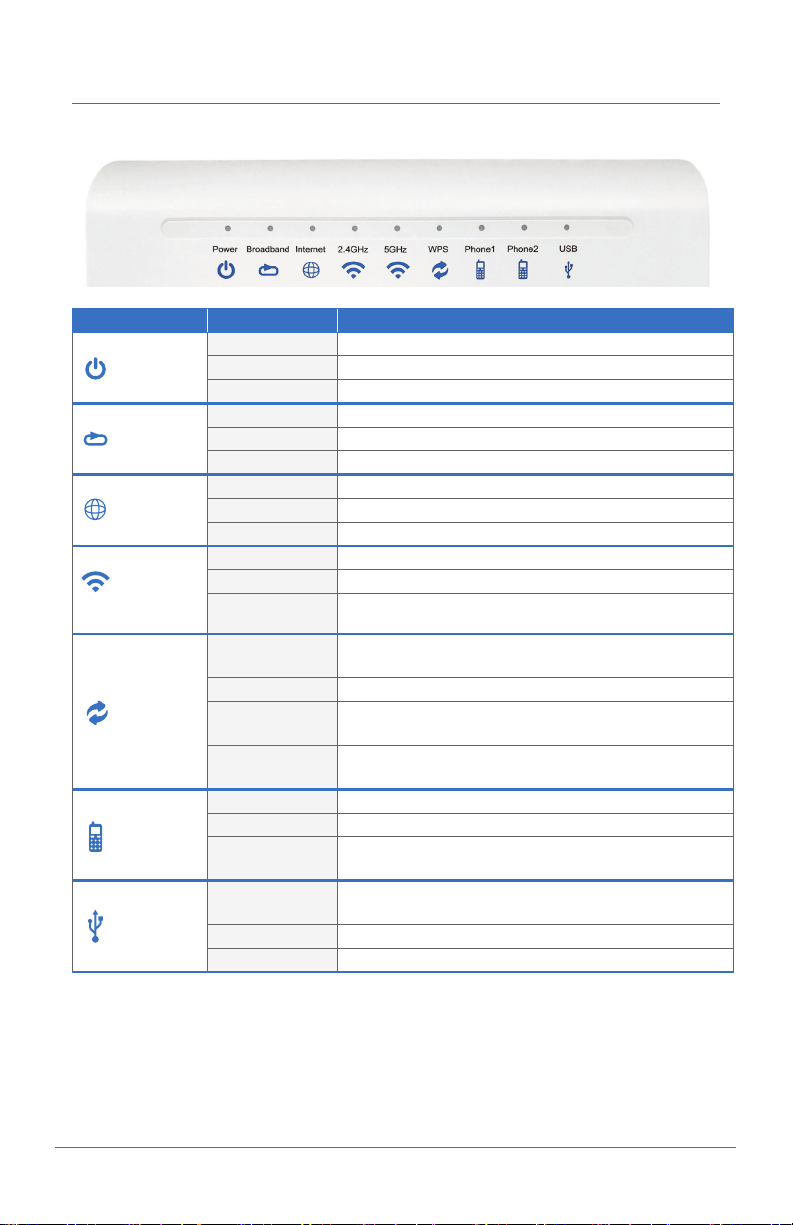
The following indicators are arranged across the top of the Xplornet Hub.
WLAN refers to the wireless local area network, also known as Wi-Fi. The Wi-Fi
function is available only when the Wi-Fi Router service is activated.
WPS refers to the Wi-Fi Protected Setup™, a feature that lets you easily
connect WPS-supported client devices (such as Whole Home Wi-Fi Units or
wireless printers) to your router wirelessly.
LED Indicator Status Description
Power
Solid Green Hub is powered on
Solid Red Hub is not working
Off Hub is powered off
Broadband
(The WAN link
is established)
Solid Green The link is activated
Flashing Green Data is being transmitted
Off The equipment is not powered on or the WAN port is disabled
Internet
Solid Green The connection is established and a correct IP address obtained
Solid Red Internet connection failed
Flashing Green Data is being transmitted
WLAN
(Applies to
both 2.4Ghz
and 5Ghz LED
indicators)
Solid Green The WLAN RF switch is on
Flashing Green Data is being transmitted
Off Hub is not powered on or the WLAN RF switch is off
WPS
Solid Green WPS access is successful. This solid-on light will be automatically
off after 5 minutes
Fast Flashing Green The WPS has an error
Slowly Flashing
Green WLAN is being accessed
Off No WPS access or the WPS access to the terminal exceeds
5 minutes
Phone
Solid Green Hub has registered on the VoIP network
Flashing Green Indicates when the associated telephone is off-hook
Off Hub is not powered on or not been registered on the VoIP
network
USB
Solid Green The USB interface is connected and operating in host mode,
but no data is being transmitted
Flashing Green Data is being transmitted on the interface
Off Hub is not powered on or the USB interface is not connected

XPLORNET HUB USER GUIDE
5
Ports and Buttons
Power plug, on/off switch and ports are located on the back and side of the
Xplornet Hub.
Side
Buttons Description
USB USB2.0 host port in right panel: Used for the
USB storage device, or printer
Back
Ports Description
Phone1~Phone2 RJ-11 port is used to connect to the phone through the telephone line
LAN1~LAN4
RJ-45 port is used to connect the modem to computer or other network
devices
WAN
RJ-45 port is used to connect to your Xplornet modem
WPS
WLAN Protected Setup
Reset
Reset button should not be used unless advised by an Xplornet
representative. This button is used to restore the factory default settings
when pressed for more than 5 seconds.
WLAN Turn the WLAN on or turn off
Power Power supply port is connected to the power adapter
On/Off Power switch. Power on or power off the Hub

XPLORNET HUB USER GUIDE
6
Connecting Your Xplornet Hub
The Xplornet Hub is your main connection point for your Xplornet Internet
service. These steps will guide you in the setup of the Xplornet Hub.
The Xplornet Hub should be the only device directly attached to the
Xplornet service modem.
COMPLETE SETUP:
1USB interface
2On/Off button
3Power port
4WPS button
5WLAN button
6Phone interface
7LAN interface
8WAN interface
53 4 62
1
7 8
Computer Modem
AC
Power
Adapter
Phone

Connect the Hub 5 to your Personal Wireless Router
Before you start:
Disconnect your computer from the Xplornet Modem.
1Disconnect your computer or any existing router from the Xplornet
Modem. Plug one end of the red cable into the LAN port on the
Modem and the other to the red WAN port on the Hub 5 router.
2If using a computer, take the yellow cable and connect one end to the
Hub 5 router in either one of the four yellow LAN ports and the other
end to your Computer’s Ethernet port. If not using a computer, skip
this step.
3If using Xplornet Home Phone, connect your telephone by attaching
one end of the green RJ-11 cable to the Phone1 port of the Xplornet
Hub 5 router and the other end to your telephone base unit.
Connect the small black power adaptor cord into the Power port on
the Hub 5 router and then plug the other end of the adaptor into a
120-volt household outlet.
5Power on your Xplornet Hub by pressing the On/Off button on the
back of the device.
Activate your Home Phone service:
6Go to www.myxplornet.com and enter your User Name and
Password to to activate or login to your account.
7Now you are ready to connect to Wi-Fi Internet and use your Xplornet
Home Phone.
XPLORNET HUB USER GUIDE 7
Modem
Xplornet
Hub 5
Modems may vary
in appearance
43
2
1
5
For more help on setting up your Hub 5 router, activating your Xplornet
Home Phone Service, or setting up your Whole Home Wi-Fi service, go to
www.xplornet.com and navigate to the the Support | Getting Started section.

XPLORNET HUB USER GUIDEXPLORNET HUB USER GUIDE
Connect additional Wi-Fi Units for Whole Home Wi-Fi
This Hub 5 connected to your Xplornet modem will be the “Controller”.
All additional units installed on the network will be referred to as “Agents”.
There are two ways to set up your Whole Home Wi-Fi.
1WPS
a. Power on your Xplornet Hub (this will become the controller), and
connect it to the Xplornet modem via the WAN port on the back.
b. Connect to the unit via Ethernet, or using the SSID and password
on the bottom of the unit.
c. Confirm browsing
i. If still unable to browse, perform a factory reset using the
button on the back (Hold for 10 seconds), wait 3 minutes for it
to power on fully, and try again.
d. Once online, plug one of the “Agent” units into a power outlet
where you would like it installed. Wait 3 minutes for it to start up.
e. Press the WPS button on the back of the Controller, and then on
the Agent. The light on both units will flash green while they are
pairing. The light on the Agent will turn blue, once it has synced.
i. If it does not turn blue after 3 minutes, then the Agent may
need to be placed closer to the Controller.
f. Repeat for the second Agent unit if applicable.
2Using the Zlife app
You can download a companion app for your Whole Home Wi-Fi
system. You can find this in the Apple App store or the Google Play
store as “Zlife Lite” (Published by ZTE).
To get started:
a. Power on the Xplornet Hub, and connect it to the Xplornet modem.
b. Connect using the SSID and password on the bottom of the
controller.
c. Open the app, The serial number of the Hub should populate
starting with ZTEEXXXXXX
d. Click on it.
e. It will ask for the username and password to log into the router.
i. The username will be admin.
ii.The password with be adminXXXX where X is the last 4 digits
of the serial number.
8

XPLORNET HUB USER GUIDE
Connect additional Wi-Fi Units for Whole Home Wi-Fi (Cont’d)
f. There might be a popup to add a new “Satellite”, click yes.
i. Otherwise there will be an “Add Satellite” button at the bottom.
g. Follow the prompts > This includes entering the SSID of the
AGENT unit.
h. Wait 5 minutes for the sync to complete.
Note: The Controller indicator light is green during normal operation, the Agent
indicator light is blue during normal operation.
9

XPLORNET HUB USER GUIDE10
Change Your SSID Name and Password
What is an “SSID”?
To connect to the Internet, your wireless device looks for your Hub’s unique
“SSID” user name. Xplornet provides you with a default SSID username and
password, found on the white sticker on the back of your Xplornet Hub.
We recommend you change the user name and password.
Disconnect your personal wireless router from the Xplornet Modem.
(if you have one).
1Ensure the yellow ethernet cord is securely connected from the
Xplornet Hub’s LAN port to your computer.
2Enter the IP address (192.168.219.1) into your Internet browser using
your GUI user name and password. The GUI userID is admin, and the
password is adminXXXX, where XXXX are the last four digits of the
serial number which can be found on the back of your actual Hub.
Go to User Name and Password section of the menu, and change
your SSID user name and password to your choosing. Be sure to write
down your password and store it securely.
Connect a Wireless Device to the Internet
1Ensure that your devices are within range of the Wi-Fi connection
(and inside the home). Also, ensure that the Ethernet cord is securely
connected from the Xplornet Hub’s LAN port to your computer.
2On the back of your Hub, locate your Wi-Fi SSID name on
the white sticker. If you have already changed the SSID name,
locate that.
On the wireless device you wish to connect, locate “Wi-Fi Settings”
then look for the SSID name of your Xplornet Hub and click “Connect”.
You will be prompted to enter your password, which is also located on
the same sticker at the back of your Xplornet Hub unless you have
changed it already.
4You should now be connected to Wi-Fi Internet. Remember to
store your password somewhere secure for your convenience.

XPLORNET HUB USER GUIDE
Connection Troubleshooting
To maximize your Wi-Fi connection:
• As much as possible, minimize the number of hard walls/ ceilings
between your Hub and other network devices. In addition, wherever the
reach of the signal from your Xplornet Wi-Fi Router is not enough, you
can always add/connect more Whole Home Wi-Fi units to implement
a Whole Home Wi-Fi mesh network, which will allow you to get the
strongest signal and best speed available among your connected devices.
• Place Hub upright with lights facing towards the centre of the home
• Keep at least 6 feet away from electrical devices or components that
generate interference like a microwave oven, home security system or
blue tooth devices
• Ensure that the Broadband, Internet and WLAN lights are green
• Ensure that you have inserted the power adapter of the Hub into a
working power socket
• Ensure the Hub has been powered “On” (the switch on the back is
pressed down)
• Check that all cables are inserted into the correct port (See page 7 for
instructions)
• If your internet service seems slow, consider rebooting your modem and
Hub.
If you are watching streaming services or gaming, use the 5Ghz wireless
channel or make a direct connection with an Ethernet cable to the Hub,
whenever possible.
11

XPLORNET HUB USER GUIDE
Xplornet Hub Wi-Fi FAQ’s
How many devices can be connected wirelessly to the Xplornet Hub at the
same time?
The maximum number of devices connecting simultaneously is 32 wireless device per
the same SSID. However, Wi-Fi performance could degrade if there are large number
of heavy-user devices connected at the same time.
What should I do if I can’t find my SSID name?
If the original or updated SSID name is not visible within your network settings,
check that the SSID has not been hidden. To unhide it, login to the Router while your
Router is connected by clicking “Local Network”, “WLAN”, “WLAN Basic”, “WLAN
SSID Configuration” and then turning “Hide” off. If you are still unable to find your
SSID name, restart your computer.
One of my devices won’t connect to Wi-Fi – what should I do?
Check to see if the “WLAN” light is on and green. If not, unplug the modem and Hub
from power for 30 seconds, and plug them back in.
My devices are connected, but I can’t access the Internet – what should I do?
Ensure the “Broadband” light is on (green) on the Hub. If the light is not on, you will
need to test your Internet connection through a hard-wired connection. Using the
yellow Ethernet cable, connect one of the “LAN” ports on the Hub to your computer.
This will confirm if you have a connection to the Internet. If you are still unable to
access the internet, the next step is to bypass the Hub by connecting directly to the
Xplornet modem. If you do not have an Internet connection, check that your modem
and Internet equipment are properly plugged in and connected.
Which SSID should I connect to?
The 2.4 GHz SSID is best suited for customers using Wi-Fi around the home.
The 5 GHz SSID is ideal when wireless devices are in close proximity to the Router
(within 5 feet). Both radios share the same SSID by default.
12

XPLORNET HUB USER GUIDE
Router Features
• Gigabit Wi-Fi: Wi-Fi 802.11ac upgraded network protocol that delivers
improved speeds, Wi-Fi performance, and better range
• Dual Band Wi-Fi – Provides both 2.4 and 5 GHz
• GB Ethernet Port – 1GB LAN Ethernet port for home networking
• WLAN On or Off (2.4 and 5 GHz) – Individually turn “on” and “off” the
2.4 or 5 GHz channels
• Companion Phone App – Provides complete access to manage your
wireless network on the fly.
Advanced features:
• Customer Configurable Channels, Bandwidth and Power Settings
– Allows homeowner to select level of power and optimal uncongested
channel
• Guest SSID’s – Provides the ability to setup and additional 2.4 and 5 GHz
band that is open to visitors
• Quality Metric – Score between 0-100% that indicates quality of Wi-Fi
signal
• Wi-Fi Optimization – Allows the network of units to reselect the best
operating channel
• Parental Controls – Allows home owner to limit network access by
connected wireless device, time of day or bandwidth allotment
• Site Survey – Allows homeowner to view other Wi-Fi connections within
their immediate proximity.
• Firewall – Protection of harmful files and data into the home
• DMZ, ALG, DDNS, DHCP, port forwarding, port triggering, port
mapping – Advanced networking features
13

XPLORNET HUB USER GUIDE
Xplornet Home Phone Features
Voicemail Access
(Default Voicemail PIN: 1234)
Call Forwarding
Enable or disable
Forward to voicemail when
busy / no answer
Last call return
*98
*72
*90
*69
Call ID Block
Single Call
Enable indefinitely
Call waiting
Enable
Disable
Call Trace
*67
*81
*57
*56
*55
Features with Star (*) Codes
• Voicemail
• Call Display
• Call Waiting
• Caller ID Block
• Do Not Disturb
• Call Forwarding
• Call Return
• Call Screening
• 3-way Calling
• Voicemail to E-mail
• Online Self-Service
• E911 Support
• Find Me / Follow Me
Home Phone N11 Services
211 – Provincial Government Information Services
Provincial government information services for health and social services such as
housing, language training and employment
311 – Local Municipal Government Information Services
Non emergency information from your local municipal government
411 – Information / Directory Assistance
Helps you find phone numbers and other contact information about businesses
and people in your area
511 – Road Conditions / Traffic Advisory
Information on transportation and infrastructure to guide your travel plans
611 – Xplornet Direct Support
Helps you contact Xplornet directly and (like 911) will work even if Xplornet
Home Phone is suspended
711 – TDD / TTY Services
Telecommunications Relay Service that helps those who are hearing impaired to
converse with others over the phone through an operator by translating from
TDD to speech and vice versa
911 – E911 Emergency Services
Enhanced 911 service is routed through a call centre which validates your address
prior to dispatching emergency services
14

XPLORNET HUB USER GUIDE 15
Troubleshooting for Home Phone
• Follow the Home Phone “Easy Setup Guide” steps if installing at home by
yourself. Alternatively, your Xplornet certified installer will complete the
process using the same instructions
• Use a standard power outlet to connect the power adaptor, but do not
use the pre-wired land line jacks in your home as these will not work
with the Xplornet Voice Over IP (VOIP) phone
• Ensure that you have plugged the correct cables into the ports of the
Hub
• The Xplornet Hub should be the only device directly connected to your
modem
• Be sure to go through the Xplornet Activation Portal to activate your
Home Phone service
• In order to login to the Xplornet Activation portal, you need your
password. In most cases, your username will be the email address you
provided to Xplornet when you signed up. If you require help resetting,
please call Xplornet at 1-866-876-3993.
Find Me (simultaneous ring)
Direct your calls so that they ring your home phone, cell phone or other phones at the same time
Follow Me (sequential ring)
Direct your calls so that they ring your home phone, cell phone, or other phones one after the other
All at the same time
Office
Phone
Mobile
Phone
Home
Phone Goes to Voicemail,
then email
If no answer
Rings to:
Incoming Call
Goes to Voicemail,
then email
If no answer
Rings to:
Incoming Call Office
Phone
Mobile
Phone
Home
Phone
You’ll never miss a call with Find Me / Follow Me feature
Xplornet Home Phone Features (Cont’d)

XPLORNET HUB USER GUIDE
16
Troubleshooting for Home Phone (Cont’d)
• Ensure you have accepted the 911 emergency terms and conditions and
completed all required information
• Once your Home Phone has been activated, please restart the Hub by
turning it “off” and “on” which is found on the side near the USB port
• To update your phone features online, visit myxplornet.com which
will allow you to view your phone usage, change your preferences and
customize your account based on your needs
• If you plan to port your existing phone number, please complete the
Local Number Portability form which is included in your welcome email.
Once complete, sign the completed Letter of Authorization and then
fax to 1-866-485-4156 or email a picture or scanned copy to
days or under.
Table of contents