Xsential QUAD-RO Manual

Q
QU
UA
AD
D-
-R
RO
O
V
V2
2
Q
QU
UI
IC
CK
K
C
CH
HA
AN
NG
GE
E
R
RE
EV
VE
ER
RS
SE
E
O
OS
SM
MO
OS
SI
IS
S
S
SY
YS
ST
TE
EM
M
W
WI
IT
TH
H
H
HO
OR
RI
IZ
ZO
ON
NT
TA
AL
L
T
TA
AN
NK
K
I
IN
NS
ST
TA
AL
LL
LA
AT
TI
IO
ON
N
A
AN
ND
D
M
MA
AI
IN
NT
TE
EN
NA
AN
NC
CE
E
M
MA
AN
NU
UA
AL
L

CONTENTS
1.0 SCOPE AND GENERAL
1.1 DISCLAIMER
2.0 QUADRO V2 QUICK CHANGE REVERSE OSMOSIS (R.O.) SYSTEM
3.0 SYSTEM COMPONENTS
4.0 PREPARATION TO INSTALLATION
5.0 INSTALLATION INSTRUCTIONS FOR QUICK CONNECTOR
6.0 INSTALLATION OF COLD WATER SUPPLY CONNECTOR
7.0 MOUNTING QUADRO V2 REVERSE OSMOSIS SYSTEM
8.0 INSTALLATION OF WASTEWATER DRAIN AND PRESSURE RELEASE VALVE
9.0 INSTALLATION OF AX12-WS WATER STABILISER SYSTEM
10.0 INSTALLATION OF STORAGE TANK AND QPB300 PUMP
11.0 CONNECTING UP FEEDING WATER
12.0 CONNECTING UP THE APPLIANCE
13.0 START UP PROCEDURE
14.0 TOTAL DISSOLVED SOLID (TDS) CHECK
15.0 SYSTEM MAINTENANCE AND FILTER CHANGE PROCEDURE
16.0 XSENTIAL TROUBLE SHOOTING GUIDE
17.0 AUTOMATIC SERVICE REMINDER (ASR)
18.0 OTHER WATER APPLIANCE PROTECTION RANGE OF XSENTIAL WATER FILTRATION
19.0 IMPORTANT NOTICE

1.0 SCOPE AND GENERAL
The condition of water in each geographical location and water requirements of any feed water appliance are different, hence
attention is required before setting up Xsential’s QuadRO V2 system. All RO systems should be installed by a qualified
plumber or technician. It is important that all installers read this manual and the appliance manual carefully before commencing
installation of Xsential’s QuadRO V2 system. Any wrong installation and set up may result in serious damage to the appliance.
Xsential will not be held responsible for the incorrect installation and set up of the system.
1.1 Disclaimer
Xsential warrants that its reverse osmosis systems will reject up to 96% of salt. Specification of the requirements by individual
appliances may vary. It has been proven that all Xsential's reverse osmosis systems help prevent scale build up. However, it is up
to the individual to check for compatibility of Xsential's reverse osmosis system for the intended application. Xsential will not be
responsible for any wrong installation or water configuration.
2.0 QUADRO V2 QUICK CHANGE REVERSE OSMOSIS (R.O.) SYSTEM
Read through the following instructions carefully before proceeding with the installation. Be sure to follow any special plumbing
codes in your area. Contact your local dealer if you are having problems installing it. Diagram 1 illustrates the plumbing
connections that are needed to install the system.
CAUTION: DO NOT USE WITH WATER THAT IS MICROBIOLOGICALLY UNSAFE OR WITH WATER OF UNKNOWN
QUALITY WITHOUT ADEQUATE DISINFECTION BEFORE OR AFTER THE SYSTEM.

Diagram 1
3.0 SYSTEM COMPONENTS
The QuadRO V2 R.O. system comes with the following components:
1. QuadRO V2 system (D)
2. An AX12-WS (K) water stabiliser system
3. QPB300 water pressure booster pump (C)
4. A pressure reduction valve (A)
5. A ¼” male to 3/8” tube connector (B)

6. A ¾” female to 3/8” tube reducers
7. A 40L storage tank (R)
8. 3/8”OD x 3/8” OD ball valve
9. 3 x 3/8” OD x 3/8” and 1 x ¼” OD stem elbow
10. 2 meters of red 1/4” tube
11. 5 meters of 3/8” blue tube
12. QuadRO front manifold mount plate (E)
13. QuadRO manifold rear mounting support (frame)
4.0 PREPARATION TO INSTALLATION
Make sure there is a 10amp power socket next to the
oven. Assemble the oven stand as per instruction. Do
not screw the top cover the stand. Look for QuadRO
manifold front mounting plate (E) and rear mounting
frame (F).
5.0 INSTALLATION INSTRUCTIONS FOR QUICK
CONNECTOR
Remove all dust plugs from the quick connectors. To
connect the poly tubing;
Diagram 2
CAUTION: To ensure proper assembly, tubing MUST
be fully inserted into the fitting body until the tube
stops.
1. Cut the tubing end squarely (with tube cutter)
2. Insert the tubing through the back of the connector
all the way through the assembly until the tube stops in
the fitting body (see diagram 2).
6.0 INSTALLATION OF COLD WATER SUPPLY
CONNECTOR
The water supply connector that comes with the unit is
made up of two parts; a dual check pressure valve and
a straight 3/8” OD to ¼” male connector. A cold-water
supply ball valve should be installed next to the
appliance. Install the pressure reduction valve and the
3/8” OD to ¼” male connector as shown in diagram 3.
Diagram 3
WARNING: INADVERTENTLY CONNECTING THE
UNIT TO HOT WATER WILL DESTROY THE
MODULE AND VOID THE WARRANTY. THE
FEEDING WATER TEMPERATURE CANNOT
EXCEED 40OC.
7.0 MOUNTING QUADRO REVERSE OSMOSIS
SYSTEM
It is important to read the instruction carefully.
1. Screws the QuadRO mounting screws on the
rear mounting supports. Leave about 3mm
gap between the screw head and the frame.
2. Remove the AX12-WS cap from the AX12-
WS filter. Screw AX12-WS mounting bracket
on the rear mounting support and tighten the

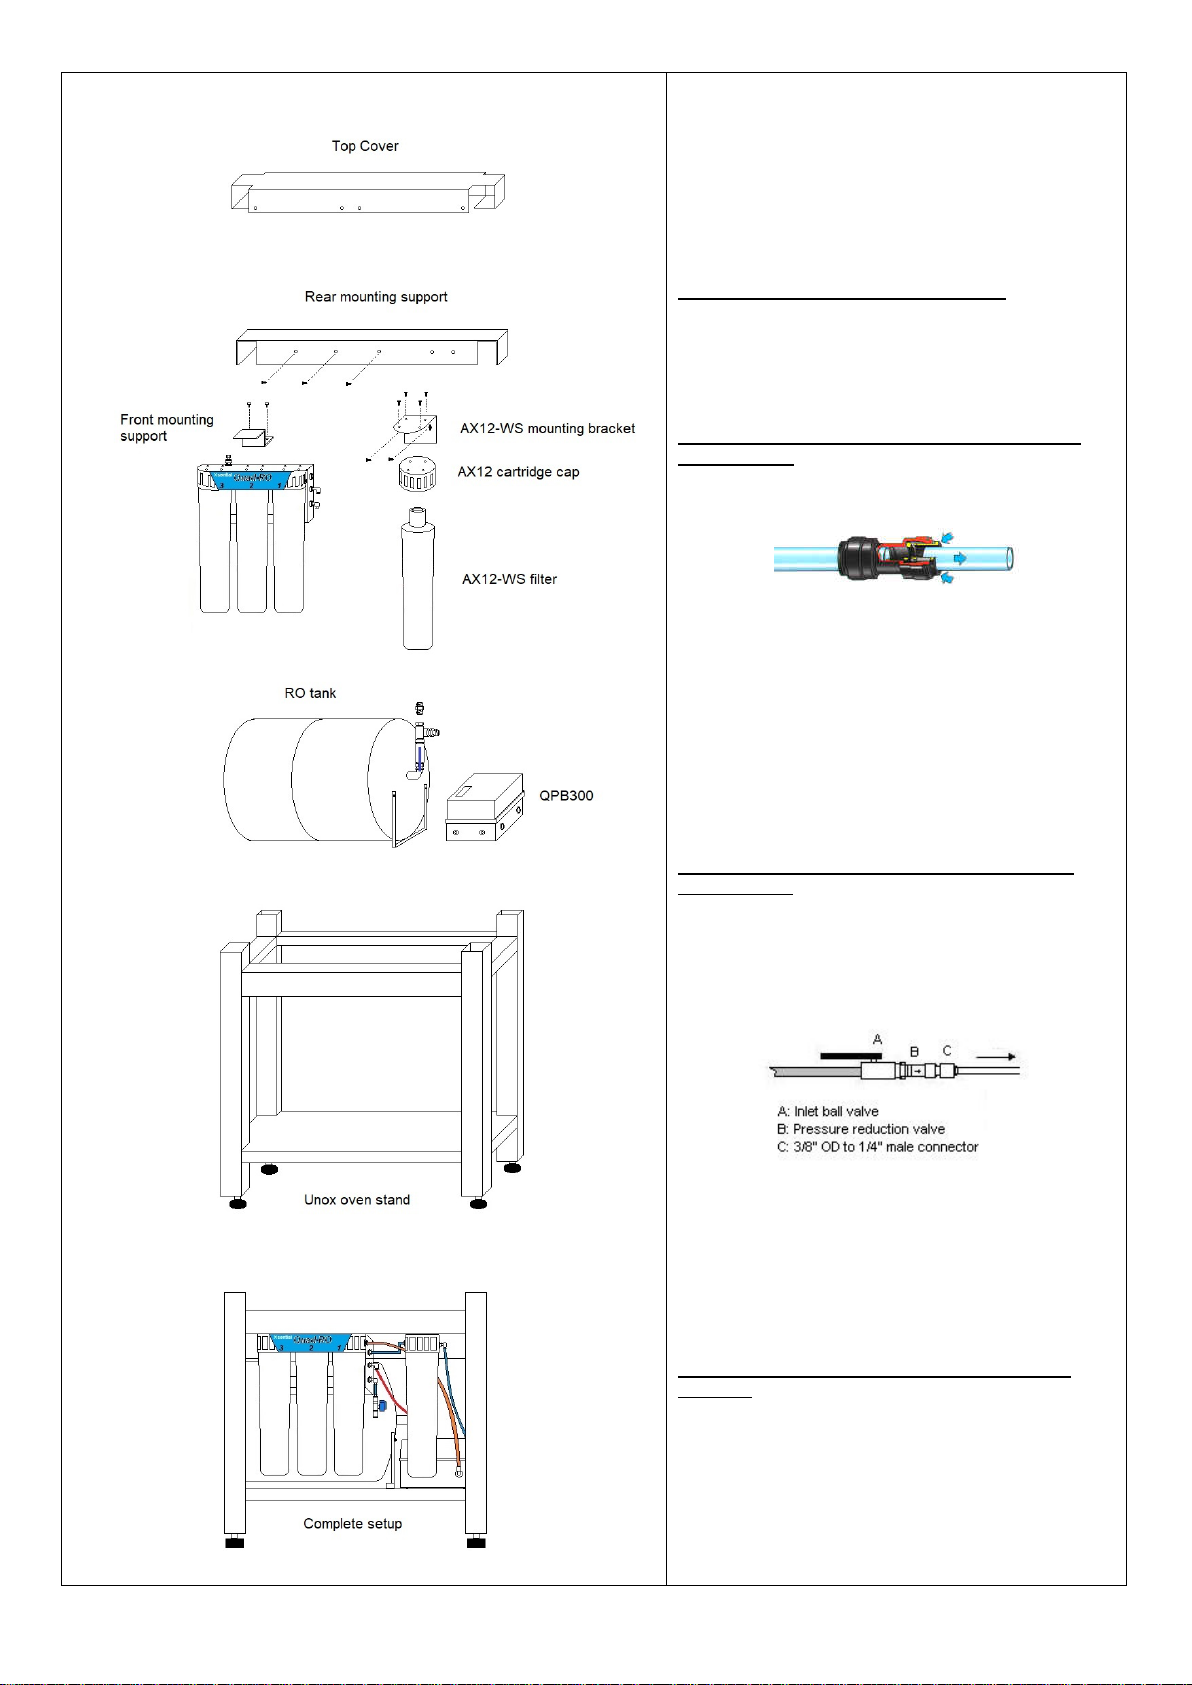
screws. Look for the “IN” marking on the cap and screw cap on the bracket with IN inlet facing the left handside of the
bracket.
3. Remove the two front screws from the cartridge 2 (yellow colour sticker). Screw the QuadRO front mounting support on
the two screw holes.
4. Place the rear mounting support on the Unox oven stand
5. Hang the QuadRO R.O. system onto three screws with 3mm gap. You can move the mounting support forward. Make
sure the front support is seated on to the front oven horizontal frame evenly.
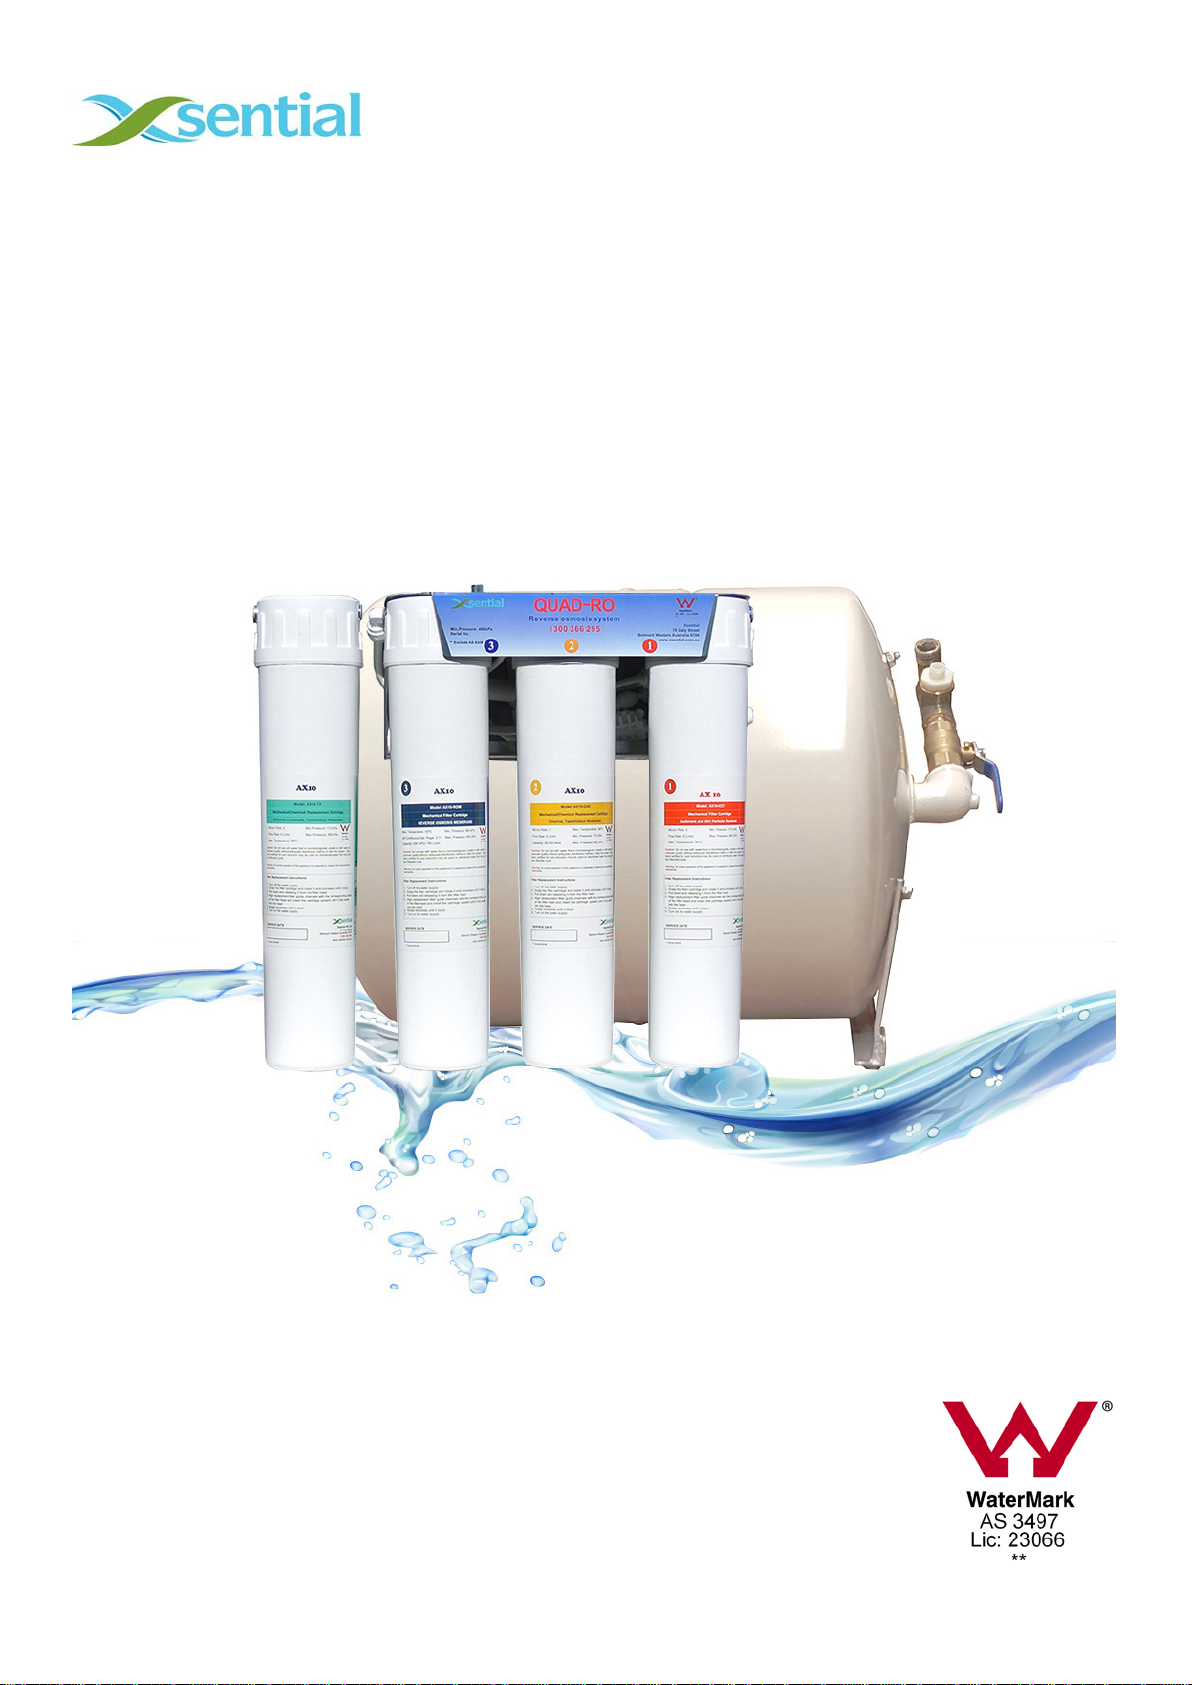
8.0 INSTALLATION OF WASTE WATER DRAIN AND PRESSURE RELEASE VALVE
The wastewater from the QuadRO system must be removed by allowing the wastewater to be drained away. This flow of the
waste water will assist in keeping the membrane free from mineral deposits and fouling. Cut the ¼” red tube to the length that is
required to connect the flow restrictor and the drainage cup. Insert the tube into a ¼” OD x ¼” stem elbow connector and insert it
into the drain connector of the QuadRO (location I in diagram 1) and secure the tube to the drainage cup.
Cut 80mm of the 3/8” tube. Insert the 3/8” tube into a 3/8” OD x 3/8” stem elbow connector. Insert the other end of the tube to the
3/8” OD x 3/8” OD ball valve. Insert the stem elbow into the TANK inlet of the QuadRO (J in diagram 1).
9.0 INSTALLATION OF AX12-WS WATER STABALISER SYSTEM
1. Measure the distance between the APP outlet and the AX12-WS filter head and cut the 3/8” tube according to the
measurement.
2. Insert the tube into the APP of the QuadRO and “IN” inlet of the AX12-WS filter
10.0 INSTALLATION OF STORAGE TANK AND QPB300 PUMP
NOTE: PRESSURE ADJUSTMENT IS NOT REQUIRED as the storage tank is shipped with pressurised air. The tank comes with
the stainless steel horizontal bracket. Put the RO tank on the shelf right behind the QuadRO system and the QPB300 pump right
next to the outlet of the tank. Do not plug in the power plug of the QPB300 at this stage.
1. Measure the distance between the QPB300 “From Tank” outlet and “OUT” of the AX12-WS filter and cut the 3/8” tube
accordingly.
2. Insert one end of the 3/8” tube to a 3/8” OD x 3/8” stem elbow connector and insert the connector into the “OUT” outlet of
the AX12-WS filter. Insert the other end of the tube to “From Tank” of the QPB300 pump.
3. Measure the distance between the QPB300 and the tank inlet Q in diagram 1. Insert one end of the tube to “To Tank”
connection of the QPB300 pump and the other end of the 3/8” tube to MIP hole plastic nut (Q in diagram 1) and screw on
the fitting.
11.0 CONNECTING UP FEEDING WATER
1. Screw the pressure limiting valve with dual check to the isolation valve.
2. Tape and screw the 3/8” OD x ¼” NPT male connector to the pressure limiting valve.
3. Measure the distance between the water feed valve and the “Water In” of the QPB300 pump.
4. Cut a 3/8” poly tubing with the length measured. Insert the one of the tube to the connector B as shown in
diagram 1 and the other end to a 3/8” OD x 3/8” stem elbow connector. Insert the stem elbow connector to the
“Water In” of QPB300 pump.
5. Measure the distance between the QPB300 “OUT TO RO” and the red sticker water filter 1 of QuadRO. Cut the
tube and insert one end of the tube to the QPB300 pump (Out to RO) and the other end to the first filter (red
sticker) of the QuadRO system. You may need to use 3/8” OD x 3/8” stem connector to ensure that the tubes
are not under any stress.
12.0 CONNECTING UP THE APPLIANCE
Please note that the ¾” hose for connecting the RO tank to the oven is not supplied. The oven comes with the hose. Connect the
connection “P” of the tank to the oven hose.
13.0 START UP PROCEDURE
1. Double check the connection of installation. Make sure the pressure release ball valve (J in diagram 1) is in ON position and
RO tank is in OFF position (M in diagram 1).
2. Plug in the power for the QPB300 pump
3. Turn on water supply slowly.
4. Turn on the power for the QPB300. The pump should start pumping within 2 second.
5. Within a few minutes the water will start to flow from the water pressure release valve J.
6. Check for leaks. (If anything is leaking shut off water, repair, then start with step 1 again.
7. Let the water run for 15 minutes. This flushes out the preservative in the membrane.
8. Turn ON the RO tank valve (M in diagram 1) and Turn OFF the pressure release valve.
9. The installation is done.
14.0 TOTAL DISSOLVED SOLID (TDS) CHECK
To check if the QuadRO system is working or not. Simply press the red button of the TDS meter. The system will show the TDS
reading “Before” and “After”. You should see there is a significant reduction in the TDS reading on the after end of the meter.

15.0 SYSTEM MAINTENANCE AND FILTER CHANGE PROCEDURE
CAUTION FOR YOUR SAFETY: Change the sediment and carbon filters regularly every 4-6 months and have the R.O.
membrane checked annually. Refer to the following table for the recommended filter change interval.
1. Turn off the power supply of the QPB300 pump.
2. Shut off the water supply isolation valve A from diagram 1 and storage tank isolation valve (M).
3. Grab the cartridge that is to be changed with both hands and turn the cartridge anti-clockwise until it stops.
4. Pull the cartridge down to remove the cartridge.
5. Repeat steps 2-3 on the remaining cartridges.
6. All cartridges are labelled with a number on the top right hand corner. Use the correct numbered cartridge for the
replacement.
7. Insert and turn clockwise until the cartridge stops.
8. Once all cartridges have been replaced turn on the isolation valves and follow by the power for the QPB300.
16.0 XSENTIAL TROUBLE SHOOTING GUIDE
This trouble-shooting guide will give you a basic idea of the problems that can occur with an R.O. system. If in doubt, contact the
local dealer.
Problem
Cause
Solution
Small amount of
water in storage tank
1. System just starting up
2. Air pressure in the storage tank is
low
1. Normally it takes 1-2 hours to fill tank. Low-pressure and/or
temperature can reduce production rate.
2. Add pressure in the storage tank. Refer to the storage tank
label for pressure detail.
Slow production
1. Low water pressure
2. Crimps in tubing
3. Clogged pre-filters
4. Fouled membrane
1. The system requires a minimum of 380kPa of incoming
water pressure. A booster pump may be needed in a low
water pressure area.
2. Check tubing is straightened or repair as necessary
3. Replace pre-filters
4. Replace membrane
No drain water
Clogged flow restrictor
Replace flow restrictor
Leaks
1. Fitting not tightened
2. Missing O-ring
3. Misalignment of hole in the drain
saddle
1. Tighten fitting as necessary
2. Contact local dealer
3. Realign drain saddle
17.0 AUTOMATIC SERVICE REMINDER (ASR)
It is very important that the filter cartridges are replaced regularly to keep up with the performance of the system. Failure to replace
the cartridges regularly will result in no or lack of water production and premature fouling of the membrane.
The table below serves only as a guide to the recommended service interval. It is very important that the owner checks the water
quality regularly to ensure that the reverse osmosis system works properly.
Parts number
Description
Recommended service interval (depending on the usage & water
quality)
AX12-CCF
Sediment filter cartridge
3-6 months
AX12-GAC
Carbon filter cartridge
3-6 months
AX12-ROM
Reverse osmosis membrane
12-24 months
AX12-TX
Triple action cartridge
3-6 months
Xsential has service reminder programme to help our customers to keep track of their water filter service schedule. We will
automatic contact your guys when your water filter is due for service. So please fill in the following detail an email it to us and we
will register it for you.
Product and contact
Company
Contact person
Address
Phone
Water filter model
Email
Service interval require
Date installed
Xsential Pty Ltd
78 Daly Street
Ascot Western Australia 6104
Ph: 1300 366 295
email: support@xsential.com.au www.xsential.com.au

18.0 OTHER WATER APPLIANCE PROTECTION RANGE OF XSENTIAL WATER FILTRATION
Most of our water feed appliances require good quality water in order for them to work efficiently. They are include coffee
machines, ice makers, hot water urns, post mixers, dishwashers, etc. A good quality water filtration system will help prolong the
life of your investment.
Xsential water filter range can help reduce/ remove;
•Reduce sediment, rust and sand particles
•Reduce unpleasant taste and odour
•Reduce chlorine
•Remove chloride
•Reduce scale build up
19.0 IMPORTANT NOTICE
Issues which can affect the water quality of RO systems
Xsential warrants that its reverse osmosis systems will reject up to 92-96% of salts in water. The reverse osmosis
(RO) technology has been around for many years and has shown that the technology provides the best solution when
it comes to the protection from scale build up in water appliances. Such appliances include combi-steamer ovens and
coffee machines.
The use of RO systems have also been known to contribute to the extension of life of water feed appliances.
However, RO systems cannot prevent corrosion from occurring. RO systems will invariably remove the elements in
water that could contribute to corrosion thereby prolonging the life of appliances but corrosion can commence in any
number of ways. All corrosion issues should be investigated by a corrosion expert.
Below are some factors which can affect the warranty of our RO systems.
1. Water source: Australia’s water can come from dams, underground wells, desalination plants, or a mixture
of various sources. This results in an inconsistent quality of water whereby some water sources could have
more dissolved salts than others. For example underground sources of water have more dissolved salts than
water from a dam. Hence RO systems might not be suitable for use in some areas. Highly saline water can
affect the performance of Xsential’s RO systems. Please check the water quality with your local water
authorities.
2. Seasonality: The concentration of salts in water increases in some seasons due to lack of rainfall while in
other seasons, the water may be less saline.
3. Chemical treatment: The amount of chemicals used to treat the water e.g. chlorine, fluoride, etc can lead
to inconsistencies in the water quality. Water is treated periodically by the local water authority leading to
times when the water may contain high doses of elements that can cause corrosion.
4. Manufacturer’s water requirements: The requirements by individual water feed appliances such as combi
steamer ovens may vary from the specification produced by Xsential’s RO systems. The end user should be
made aware of this.
5. Wrong installation.
6. Wrong TDS/water hardness output adjustment.
7. Service interval: it is very important that all of Xsential’s RO systems are serviced regularly. Failure to
service (replace filter cartridges) regularly can cause the RO system to not function properly. See the
installation manual for details.
Although all care has been taken by Xsential to ensure that its RO systems perform according to its manufacturer’s
specification, Xsential cannot guarantee the performance of its water treatment systems due to factors which are
beyond its control. Some of these factors have been listed above. End users should be made aware of the factors
that could affect the life of water feed appliances.
Copyright 2017
Unless otherwise stated, this installation manual is Xsential Pty Ltd copyright. No part of this manual may be reproduced, in whole or in part,
without the specific written permission of Xsential Pty Ltd.
Table of contents
Popular Laboratory Equipment manuals by other brands

Buchi
Buchi Rotavapor R-100 Operation manual

Ken A Vision
Ken A Vision Video Flex 5400 installation manual

Johnson & Johnson
Johnson & Johnson Sterrad 100NX user guide

CoolLED
CoolLED pE-100 Series quick start guide

IKA
IKA lab dancer 3365000 operating instructions

Endress+Hauser
Endress+Hauser Analytik Jena Biometra TSC ThermoShaker manual