XSHIFTER ELink User manual

Rev1 Page 1 of 14
Before You Begin
Please read instructions completely before you start.
XShifter Box Contents
Instructions
1) XShifter Mounting Instructions
a) Smart Phone APP (iPhone is released. Android APP not released, Beta review only)
b) ELink Hardware Mounting
c) Cable Connect ELink to Derailleur
d) Button Pod Mounting
2) ELink Set Up and Calibration
a) Auto Mode
b) Manual Mode
3) Button Pod Re-Pairing
4) XShifter App misc. functions and screen pics
5) FAQ / Installation Tips
6) Handcycle Button Pod installation (handcycle option only)
Box Contents
1) Button Pod mounting kit and Instructions for Handcycle Top End Hand Grips
a) Note this is handcycle option only
2) Foam Layer 1 XShifter ELink Paired Kit
3) Foam Layer 2 XShifter ELink Paired Kit
4) Layer 3 White Box: Bagged Hardware Installation Kits
a) Kits are in the white box under the 2nd foam E-Link Kit
An IPod Smart phone is required for the XShifter App. The XShifter App for Android smart phones is currently not released.
For proper derailleur setting and celebration, the wheel and chain MUST be moving at all times during
the setup/celebration. The ELink may be damaged if there is not chain movement and or the cable may
be stretched.Chain and wheel movement can be done while on the SportCrafter trainer for the Bike or Handcycle. There is an
optional handcycle adjustment fixture and direction on how to make this stand.
TRY TO NOT MIX UP ELink LAYER 1 PARTS AND LAYER 2 PARTS.
NOTE
Each Pod is already paired to the ELink packed on the same layer in the 2X COMBO KIT. If for any reason these get mixed up, you
can do a simple test to determine which Button Pod corresponds to the ELink or simply re-pair the desired Pod to the desired ELink
using the instructions below.
XShifter ELink Box Contents

Rev1 Page 2 of 14
Hand Cycle Hand Grip Kit Foam Layer 1 XShifter ELink Paired Kit
Optional KIT FOR HANDCYCLES ONLY
Foam Layer 2 XShifter ELink Paired Kit Layer 3 White Box: Bagged Hardware Installation Kits
White box under second foam layer
Hardware Kits (White box Contents)

Rev1 Page 3 of 14
XShifter Hardware Mounting Instructions
NOTE: DO NOT OPERATE THE ELINK EXCESSIVELY WITHOUT CONNECTING TO A DERAILLEUR. THIS MAY
DAMAGE THE MOTOR!
NOTE
Each Pod is already paired to the ELink packed on the same layer in the 2X COMBO KIT. If for any reason these get
mixed up, you can do a simple test to determine which Button Pod corresponds to the ELink or simply re-pair the
desired Pod to the desired ELink using the instructions below.
Install the XShifter APP
You will need to install the XShifter app on your mobile device. Simply find it in your APP store and install. Your mobile device will automatically
pair to the ELink that has a battery installed. If you have two ELinks both with batteries installed, your mobile device will randomly choose one of
them. To have your device select the other ELink, remove the battery from the one you don’t want your device to talk to.
Mount ELinks
1. Remove existing shift cable and shifters.
2. Choose best mounting location for ELink, assuring plenty of clearance to moving parts (including legs and feet of the rider). Keep ELink as
close as possible to derailleur, but out of the way of impact from road and trail debris.
3. Avoid installing ELink on tapered tubes as the ELink may migrate over time.
4. There are four mounting brackets supplied to determine your best fit. You will only need one of them. Dry fit the ELink with the mounting
brackets bolted together on the bike to determine the best mounting bracket to be used.
5. Insert shift cable into ELink through the oval port.
6. If the carriage is covering the port, install the battery, open the XShifter APP and shift the ELink so the port is uncovered and the motor is
fully extended. Remove the battery.
7. Once the cable is installed and pulled down snugly into the carriage, install the rubber cap over the port.
8. Take the best mounting bracket for the installation, with the best curvature to conform to the tube you will use, or use bottle cage bracket.
9. Install the ELink to the mounting bracket using the longer M4x12mm screws so that the bracket is mostly underneath the ELink and protects
the cap from falling off. Do not overtighten! Max torque ½ N-m (0.5 N-m). You can use non-permanent lock tight on the threads.
10. Mount ELink to frame using cable ties or bottle cage screws.
Connect ELink to Derailleur
1. IT IS IMPERATIVE THAT YOU BACK OUT ALL OF THE LIMIT SCREWS OF YOUR DERAILLEURS AT LEAST ONE FULL TURN.
THE ELINK CANNOT FIGHT WITH THE LIMIT SCREWS OR IT MAY BE DAMAGED AND/OR BATTERY LIFE WILL BE
SIGNIFICANTLY REDUCED.
2. Ensure derailleur is on the smallest cog (front or back)
3. Adjust small cog setting out 1-2 turns, using the adjustment screw on the shifter. You can adjust it back later after calibration, but this will
allow you to adjust for the “Cable Slack” feature of the XShifter.
4. Cut new shift outer housing to length. Try to keep original cable routing allowing for gentle radiuses.
5. Slide cable housing over the cable. DO NOT use a ferrule on the ELink side of the housing. Place waterproof cable end over the
derailleur side of the housing.
6. Route the metal cable and housing from the ELink to the derailleur. Mount the cable housing to the bike using zip ties or as mounted on
the bike originally.
7. Attach cable to derailleur with slight tension on the cable, following recommendations for attaching cable according to the derailleur
manufacturer’s instructions
8. You can cut the cable at this point to facilitate calibration of the XShifter, but leave some extra in case you need to need to use it later.
9. AFTER the ELink is calibrated and functioning properly, trim the cable to length leaving a little extra for adjustments and cap the cable end
to prevent unraveling.
Mount Button Pods
1. For first time setup, it may be easier to install the Button Pods to the bike AFTER the initial final calibration. Having the Button Pods free to
move with you, will allow you to spin the cranks moving the chain and adjust the ELink through the smart phone APP very easily.
2. Find the best mounting position for the shift pods.
3. Mark the best fit location for final attachment to the bike.
4. Permanently install the Button Pods using the screws supplied. Lock-Tight may be used on the machine screws.
HANDCYCLE OPTION:
1. For first time setup, it may be easier to install the Button Pods to the bike AFTER the initial final calibration. Having the Button Pods free to
move with you, will allow you to spin the cranks moving the chain and adjust the ELink through the smart phone APP very easily.
2. Handcycle Pod location, use 90 degrees as a starting point. You may want to have a smaller angle; the Pods are turned. A slight turn may
feel better for your thumb or finger movement. Locate the Pod so they feel natural and easy to shift. Custom fit to each individual user.
3. Find the best mounting position for the shift pods.
4. Mark the best fit location for final attachment to the bike.
5. Permanently install the Button Pods using the Handcycle pod mounting kit and the handcycle instructions. Lock-Tight may be used on the
machine screws.
6. If you are mounting to handcycle grips, SportCrafters (www.sportcrafters.com) can provide some assistance with the installation kit.

Rev1 Page 4 of 14
ELink Setup and Calibration Instructions
Setup your ELink
Install the battery on the ELink you want to setup. Your mobile device will pair to the ELink with the battery installed. If both batteries are
installed, you may need to remove the battery from the ELink you are not setting up.
I have a suggestion for your instructions.
Setup your ELink
Install the battery on the ELink you want to setup. Your mobile device will pair to the ELink with the battery installed. If both batteries are
installed, you may need to remove the battery from the ELink you are not setting up.
This is where I had a problem with the setup. My phone (mobile device) did not initially pair to the ELink). Once they paired it was smooth sailing.
I would suggest adding something like this to the above statement.
It is imperative that the ELink and your mobile device are paired before proceeding. If they are paired you will see the battery condition
indicators. (Maybe even show a picture of a phone paired). If they are not paired you may have to reboot your mobile device.
There are 2 setup modes. Auto and Manual. Auto mode has some of the more common derailleurs pre-programmed. Manual allows you to
custom configure the XShifter for any derailleur
ATTENTION: Each derailleur has to be programed and calibrated. You will perform these instructions twice, once for the front derailleur and
once for the rear derailleur.
Auto Mode:
1. Open the APP and select ELINK SETUP
2. Select Auto
3. Select the correct derailleur. (If your derailleur is not in the list, then you need to use manual setup mode)
4. Press Finish
5. You will need to wait a few seconds for the data to be uploaded and saved to the ELink. You should hear the ELink recalibrate.
6. The Auto mode only sets the correct gear spacing. It does not know how much cable slack exists. Therefore, after Auto setup, you will need
to go to the Cable pull screen to tighten the cable to the correct position. This is similar to the cable adjuster on a manual shifter.
7. You may, however, need to manually adjust each cog later in the TUNE mode if shifting is not perfectly satisfactory. There are always
variables in every application where a slight tweak here and there makes for a cleaner shift.
8. See APP screen shots in the Manual Mode setup below for detailed instructions and comments.
Setting page / calibrate button. This locks in the settings and the system resets.
Manual Mode:
Detailed steps and APP screen shots below
1. ELink setup basic gear settings and number of rings on the derailleur
a. Initial setup can be done using the job functionality or
b. Initial setup can be done by entering cable pull numbers and the slack number
2. Tune page to adjust and fine tune the cable pull setting for EACH gear.
3. Setting page / calibrate button. This locks in the settings and the system resets.
Note:
Currently it is not possible to set less than 3 gears. So, if you are using XShifter on a front 2X system, the best way is to set 4 gears. This allows
you to set 2 positions for each chain ring, thus having a trim function. This is great for eliminating chain rub when moving from between largest
and smallest rear cogs.
If you have a 3x ring gear set on the front you may want to set up that XShifter to 6 positions. Each ring would have two positions or “Pod”
clicks. The extra position would be used for chain rub or small adjustments after the rear derailleur moves.

Rev1 Page 5 of 14
Re-Pairing Pod to ELink
If for any reason you want to change which Pod talks to which ELink, or if you purchase a new Pod, it is simple to re-pair the Pod to the ELink.
1. Remove the battery on the ELink that is NOT being Re-Paired,
2. Press the red RESET button on the ELink,
3. then press and hold the center button on the Pod for 2 seconds and release.
If re-pairing is not successful you may need to try again. It is best to do this away from other Bluetooth or wireless devices as this sometimes
affects the pairing signal.

Rev1 Page 6 of 14
APP
Main Page
ELink Setup
Starting point to set up the
XShifter in Auto Setup or
Manual Setup
POD Setup
Customization of the push
button Pods (not activated as
of 10/01/2018)
Cable Length
Adjusts the pull length of the
cable overall. This function
allows the cable to be tighted.
Tune
Customizes the exact
movement of the derailleur
through numeric adjustments
to the cable.
Voice
Voice control of the XShifter
functions
Settings
Final calibration of the units
Link to software updates
Step 1. choose mode
1.ELink Setup page
2.Click Auto or Manual Setup
3.Cancel to back out
Step 2 Manual Mode
Using the jog functions
1.Select the number of gears on
your cassette.
2.You need to find the position of
the smallest and largest gear.
You can either input this data
directly with the keypad (If you
know the correct number), or
you can manually jog the
derailleur to find.
3.Using the jog buttons, move the
derailleur until it is precisely
centered on the smallest gear.
You must turn the pedals while
jogging derailleur!
4.Press “Load from current” to
load that position into the small
cog box. (If you already know
this number, then simply input
with the keypad).
5.Now jog the derailleur to the
largest gear until it is perfectly
centered on the cog.
6.Press “Load from current to load
that position into the large cog
box.
7.Note: There is 2 radio buttons
on the bottom, natural and
linear. Linear will divide the
spacing exactly even. Natural
will attempt to simulate typical
gear spacing, the larger cogs
will have slightly larger spacing
than the smaller cogs.
Generally, Natural is better.
8.Press Finish and wait a few
seconds for the data to be
loaded and saved on the ELink.
You should hear the ELink re-
calibrate.
Step 2a
This is what the app looks like
after you are done Step 2.
In most cases, the gear shifting
should be nearly perfect. But
you may need to go to the
TUNE screen to fine tune the
gear positions.
After the initial setup and tuning,
you should not need to re-tune.
But occasionally you may need
to compensate for cable stretch
and wear, so you should use
cable length to adjust the gears.
See below steps in the Tune
section for fine adjustments to
the shifting.
The next section shows how the
system looks for a 10 gear
cassette.
NOTE: Once you set the ELink
with the Auto or Manual setup
process. You will have to make
future adjustment to the ELinks
using the Manual setup and or the
tune calibration pages.

Rev1 Page 7 of 14
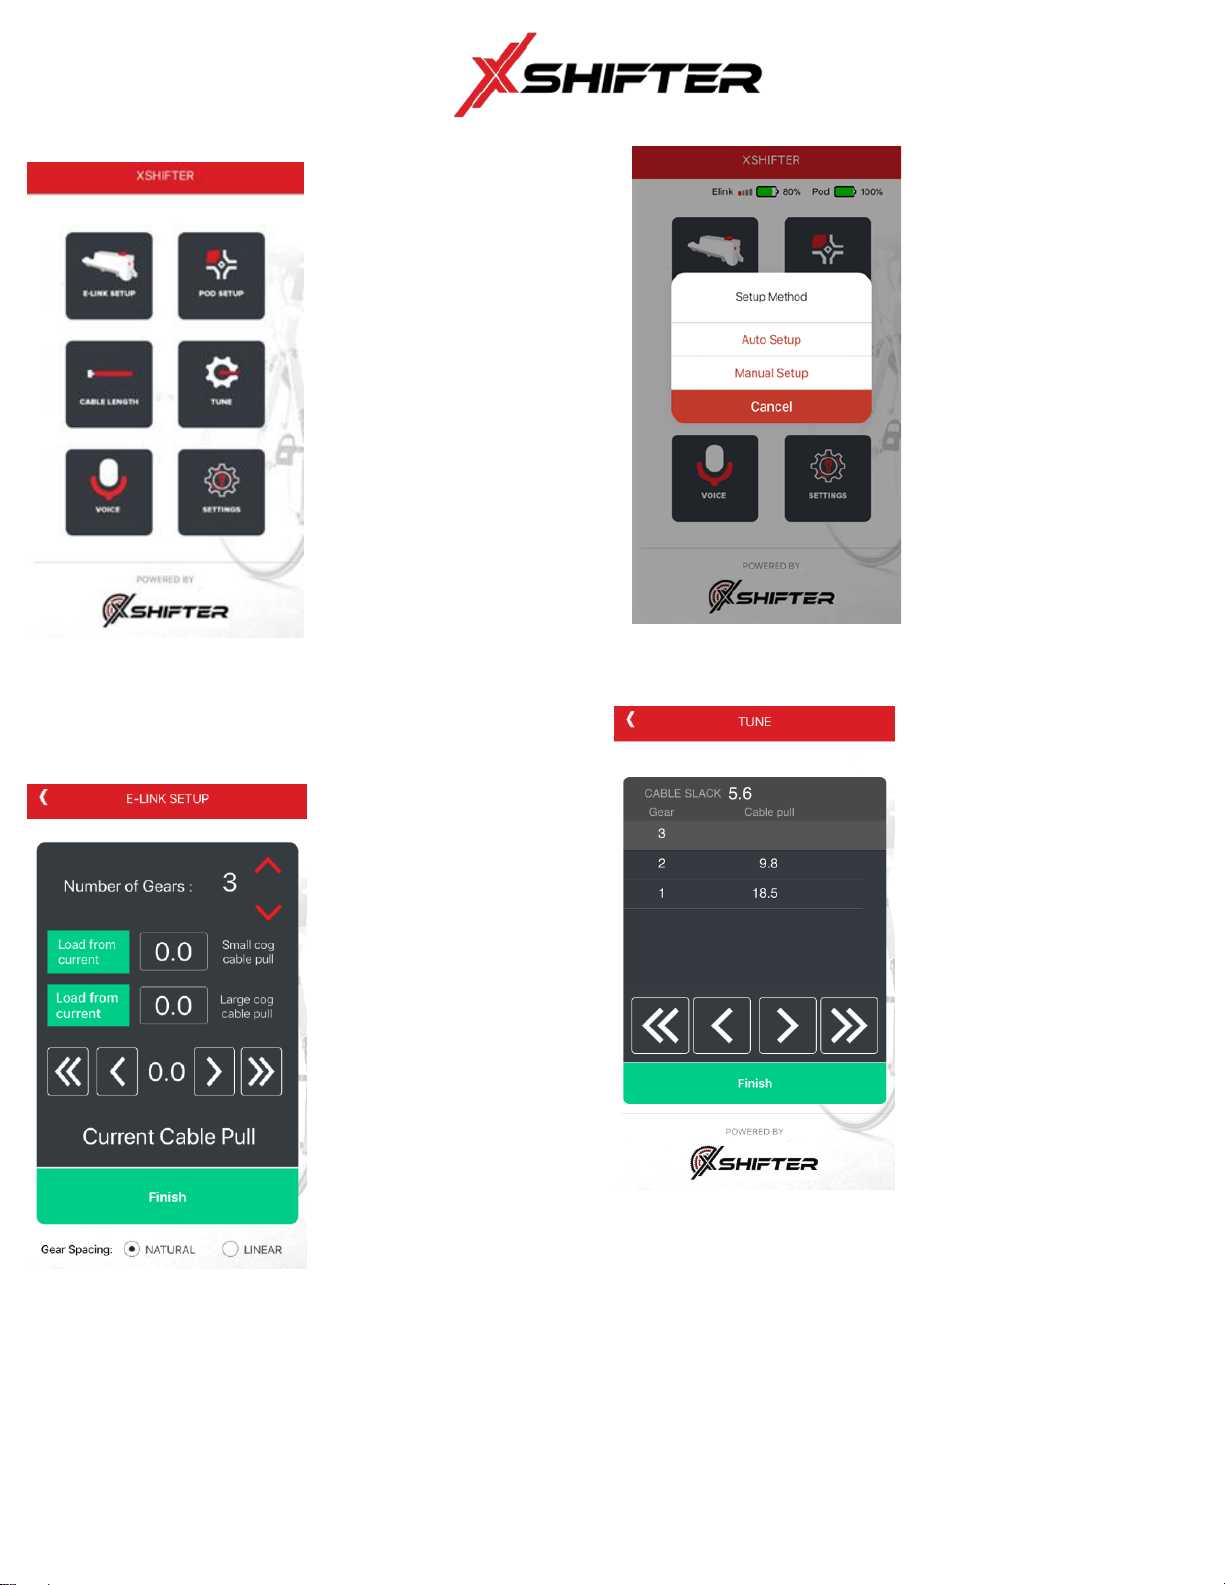
Step 2b Manual configuration
Manually entering values
You can set the ELink manually in
the main page and then easily
adjust the ELink in the Tune page.
1.Choose the number of gears
2.You must load a value, choose 1
for the load setting for the
smallest ring. Ring 10 (smallest)
gear will transfer and re-set to a
zero setting as it is the first
location.
3.Enter a high number,42 is the
maximum, for the largest ring.
This value can be changed in
the Tune page. By starting at
the max you will not have to
adjust the middle settings while
fine tuning the ELink. The large
value must be greater than 5
4.Cable pull will become the
“Cable Slack” setting. A general
rule is to set cable slack at 2 to
allow for fine adjustments in the
future.
AFTER YOU CLICK FINISH THE
APP GOES BACK TO THE MAIN
PAGE
BE SURE TO BE SPINNING THE
CRANKS WHILE THE ELINK IS
RESETTING AND MOVING TO
THE SMALLEST RING.
NOTE: The cable pull limit is 42
including the slack amount.
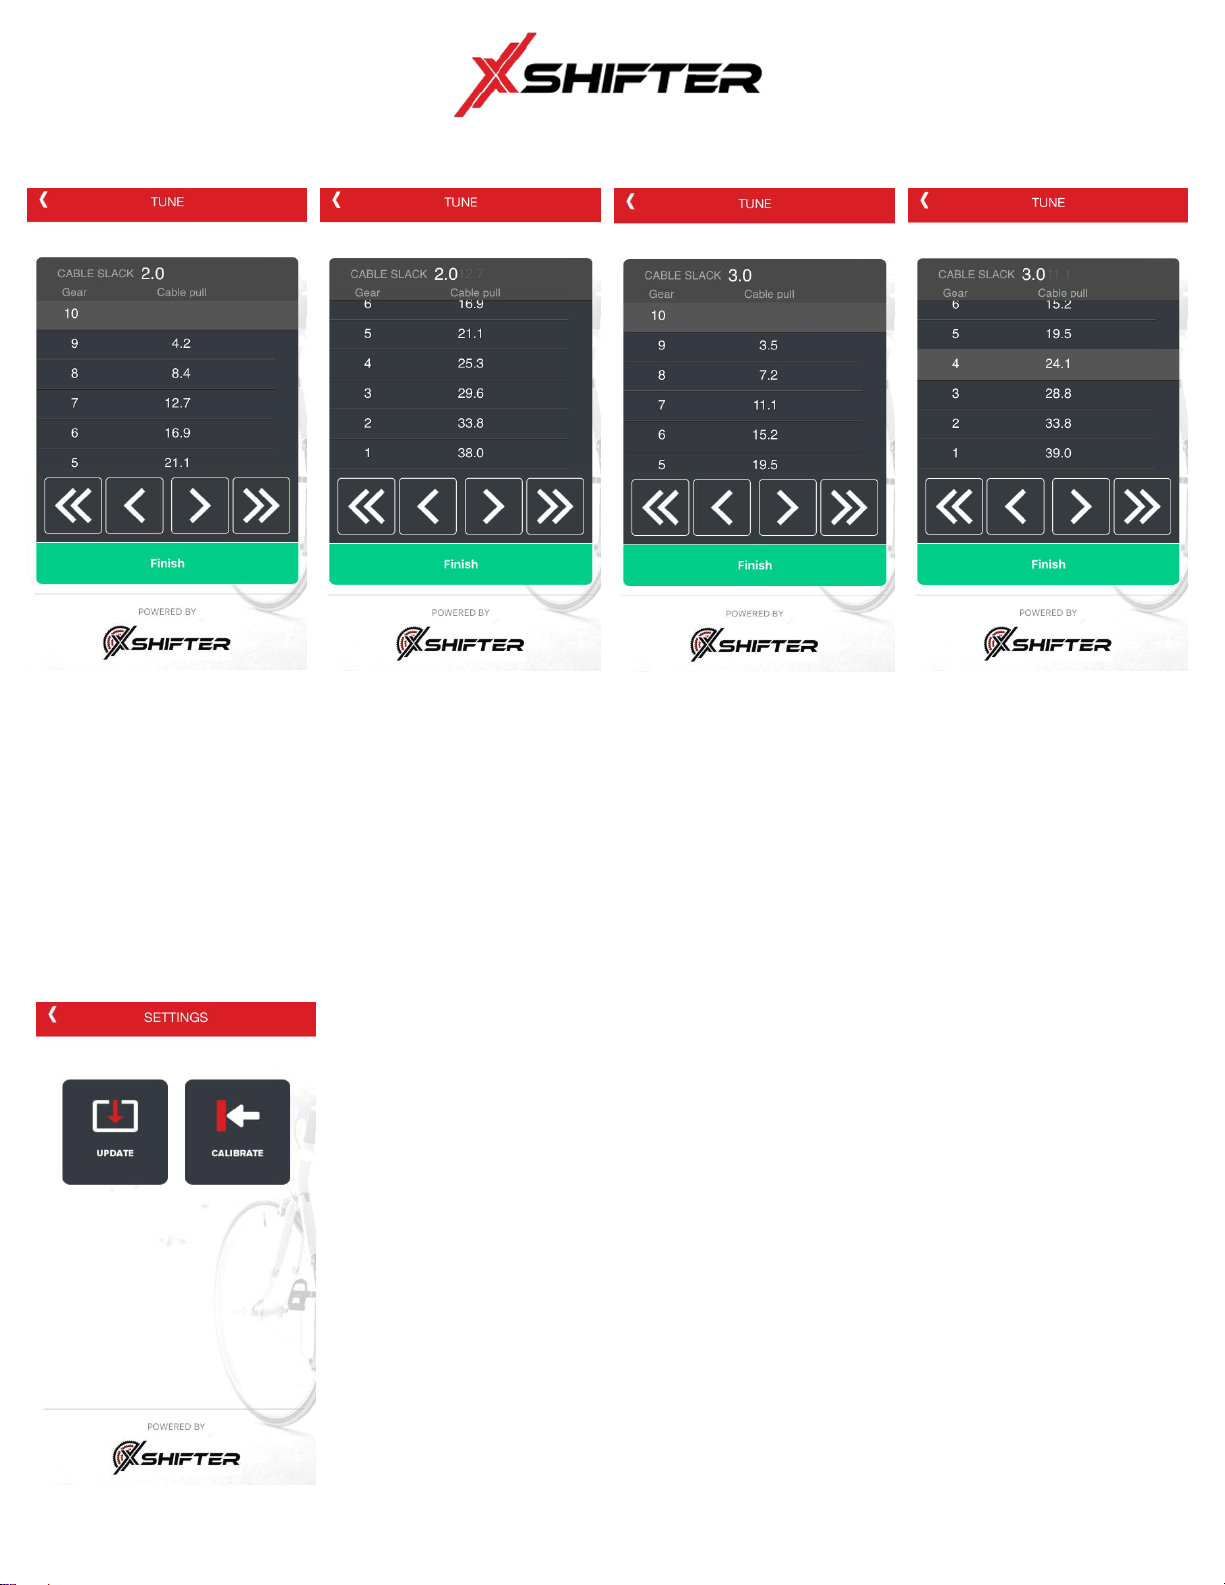
Step 3 ELink gear adjustments
CLICK TUNE on Main Page
When you touch the Tune button
on the main page you are taken
directly to the gear cable pull page.
The detailed cable settings based
on your choice of natural or Linear
will be filled in.
You may need to scroll through the
screen top to bottom to adjust
each gear
The derailleur should have been in
the smallest gear setting when you
tightened up the cable after the
hardware installation.
You are now ready to fine tune
the ELink for easy shifting.
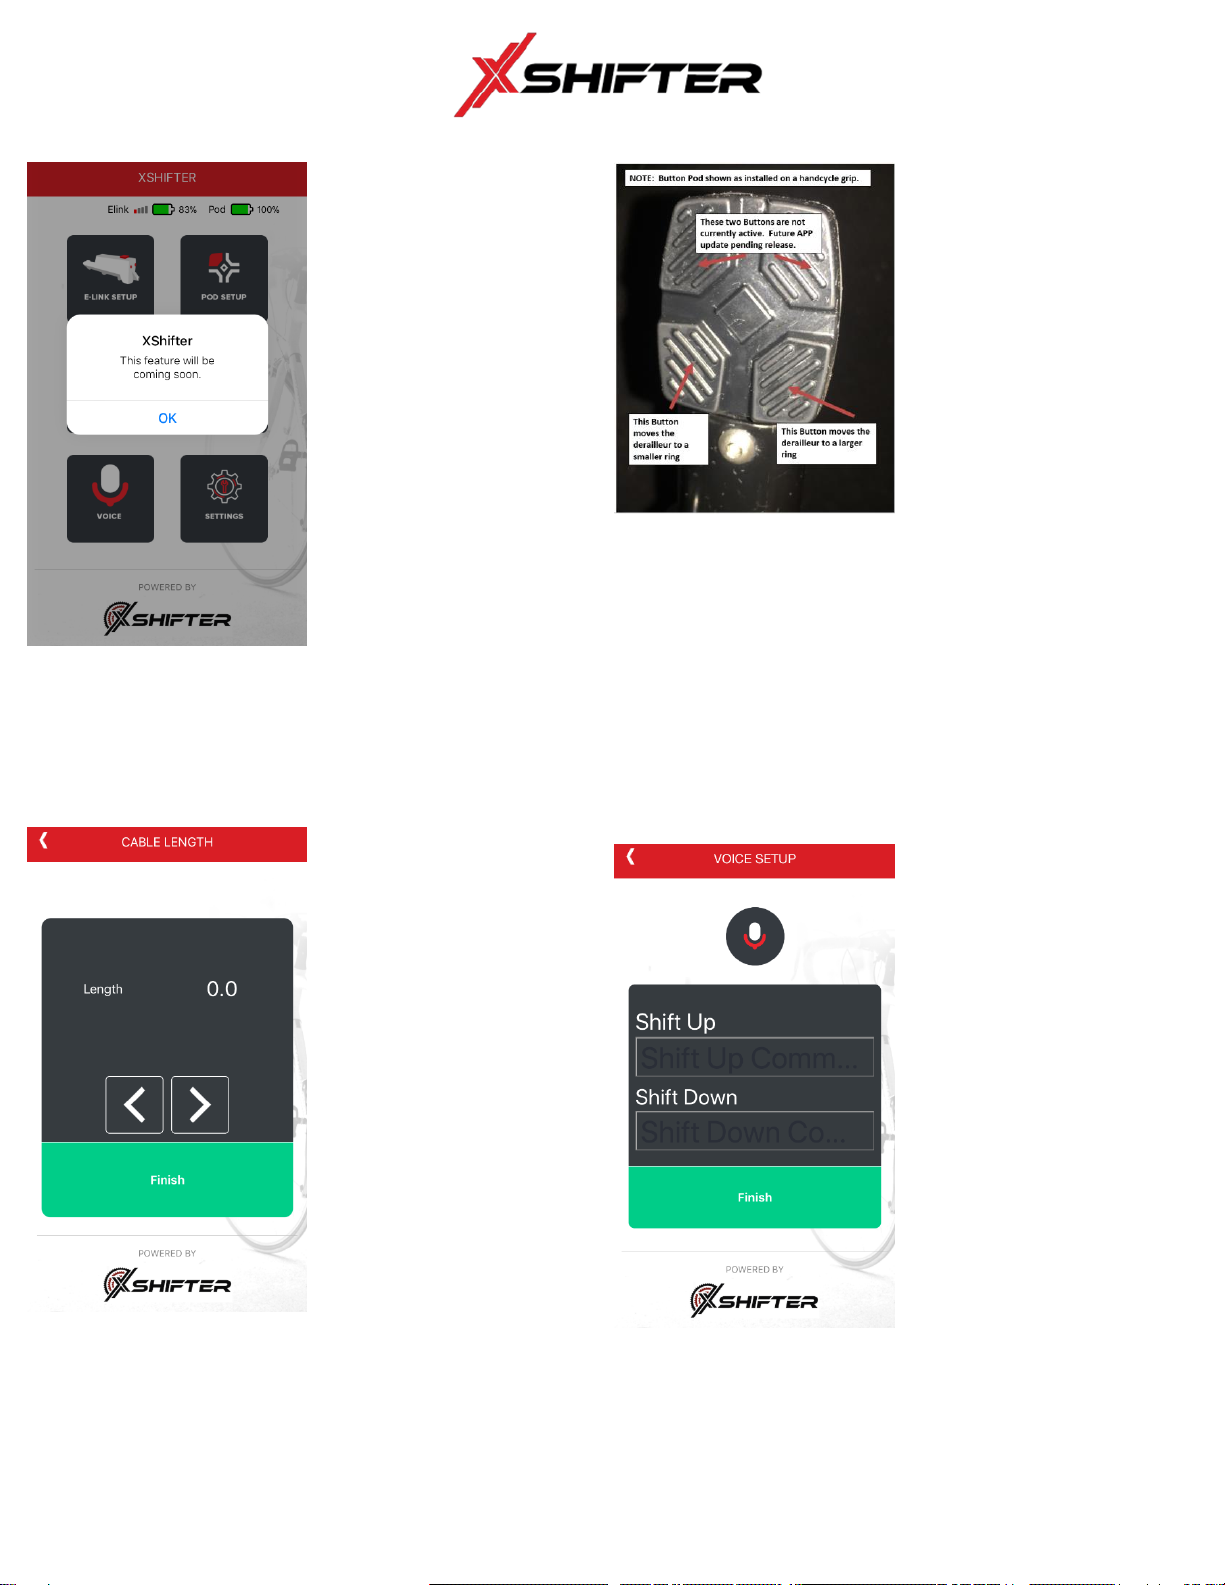
There are 2 methods to move the
ELink push the Pod button or click
on the gear number on the app.
While spinning the cranks tap the
app to gear 9 the shifter should
move to the next larger gear. If
the derailleur did not move tap the
>> or > arrows to move the cable
up or down
>> > arrows move the derailleur
towards the largest gear direction
<< < arrows move the derailleur
toward the smallest gear direction
Adjust the cable pull number until
the derailleur is properly positioned
on that ring. Repeat this process
for ALL gear rings
Step 3 Continued
Bottom half of the Tune page
shown
To verify that the settings are
correct you should be spinning the
cranks and be able to hit the
button Pod easily shifting the
gears back and forth.
NOTE:
<< & >> arrows move the cable
pull in Large increments of 1.0
< & > arrows move the cable pull
in very fine small increments of
0.1.
This fine adjustment is great for
eliminating chain rub and centering
the derailleur.
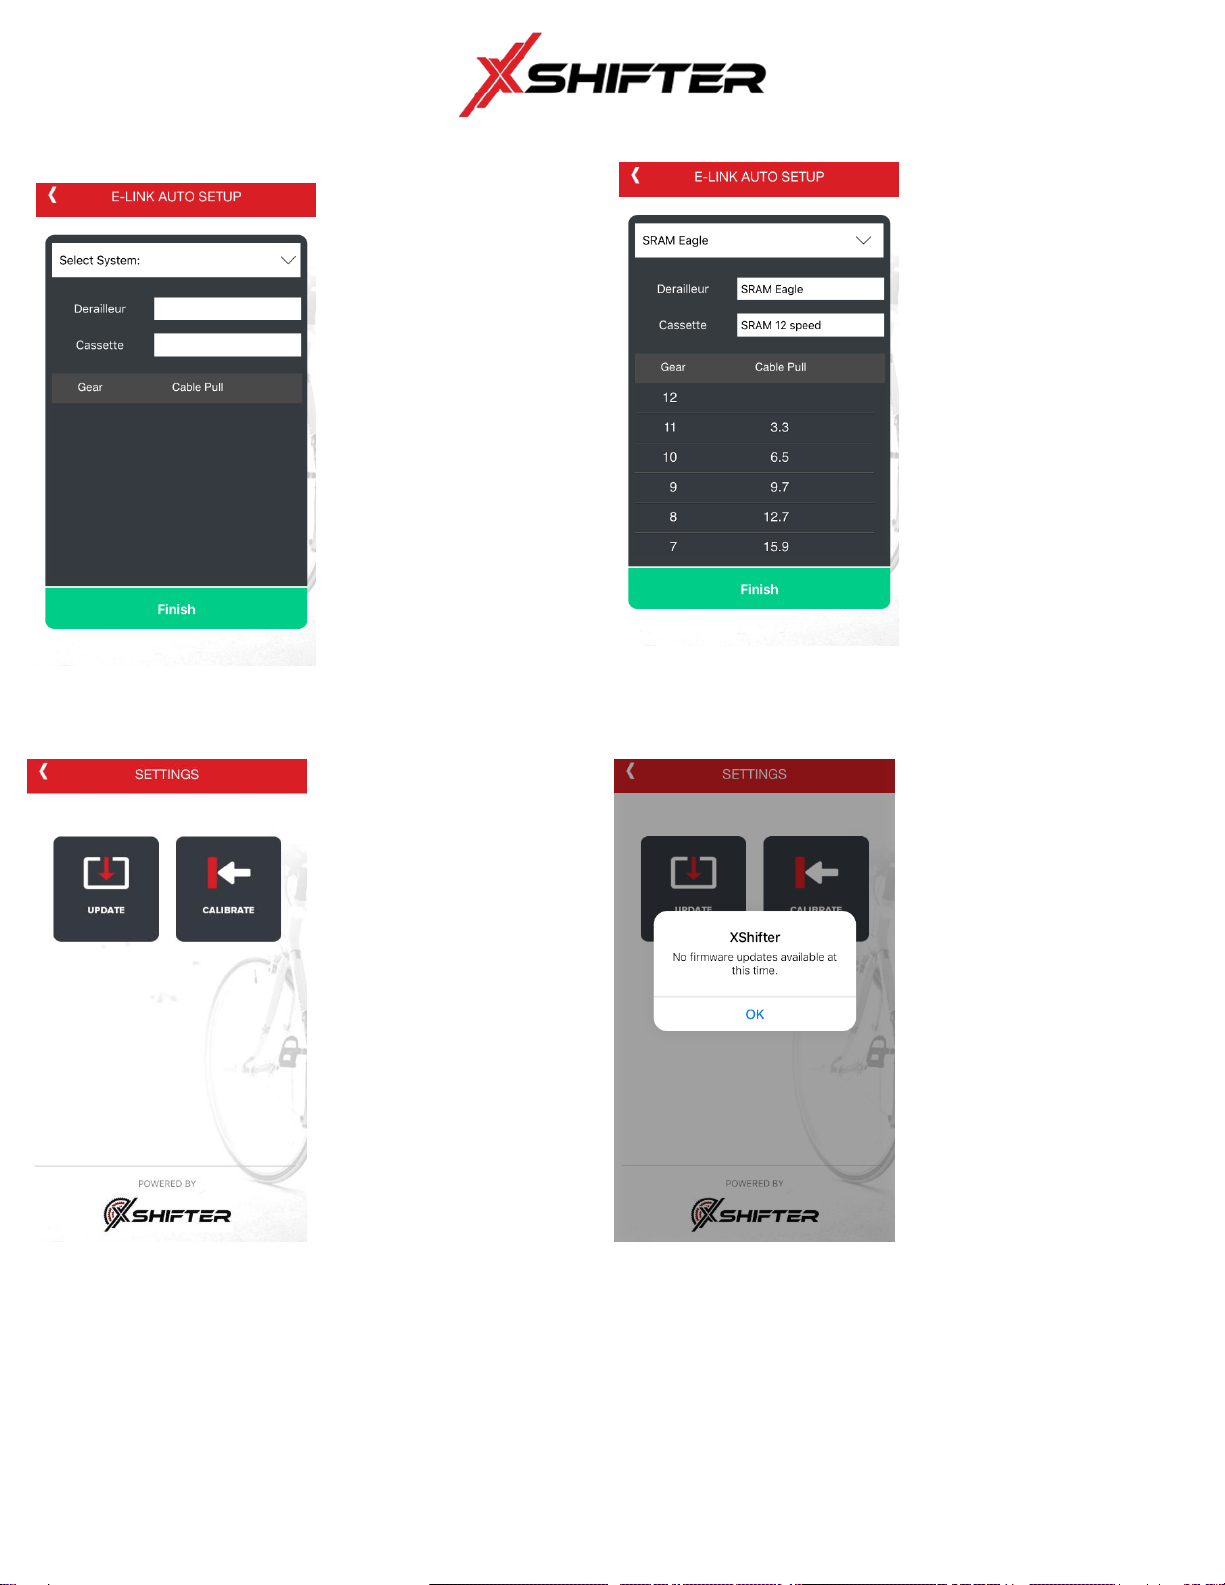
Gray screen after click finish
This gray screen will show after
the finish button is clicked. When
the screen returns to the normal
colors the App is ready.
This The ELink will click and reset
itself. Shifter will go to ring
position 10 smallest.
It is suggested to be spinning
the cranks while the ELink is re-
setting the gear positions.

Rev1 Page 8 of 14
Screen capture of the Initial set up
using the Linear method
2nd half of the Linear method
The spacing is even between the
cable pull settings. The range is
based on the number of gears and
the limits that were entered in step
2.
Screen capture of the initial set up
using the Natural method
2nd half of the Natural method
The cable spacing is based on the
outer diameter sizes of the gears.
This setting tries to accommodate
for the increasing sizes of the
rings.
The range is based on the number
of gears and the limits that were
entered in step 2.
Step 4 Calibration
After you have set each ring and
you are able to crank and shift the
gears in step 3 you need to
calibrate the ELink.
Simply click on the calibrate button
to lock in the settings.
Be sure to be spinning the crank
while doing this function as the
derailleur will move to the smallest
ring.
The App will gray out and go back
to a ready state after the function
is finished.

Rev1 Page 9 of 14
Example of the settings when Auto
method in Step 1 is chosen
This is the initial blank screen
before you choose an option that
is pre-loaded.
Screen of the cable pulls filled in
after the selection.
After the initial Auto settings, you
may need to fine tune the ELink
using the steps 2, 3 and 4 in the
manual section.
SETTINGS
Main page
Click Update button to get the
latest firmware and software
downloads
Note this screen shows that no
updates are available.

Rev1 Page 10 of 14
Pod Set up
Customizing the Button Pods is
Not Released.
Pod Configuration
This configuration is valid for both
the front and rear derailleurs.
Cable Length main page
Use this to adjust the cable
tension.
Note that this will adjust the
individual gear settings
automatically.
Voice Main Page
Use your smart phone voice
recognition to adjust the ELink

Rev1 Page 11 of 14
App is open while you are biking
and shifting. The App shows what
position the shifter is in. As You
move the derailleurs the “gear
number” will change.
Battery life is shown at the top of
the app main page. This is one
ELink battery installed.
Battery life is shown at the top of
the app main page. This shows
both ELink batteries installed.

Rev1 Page 12 of 14
FAQ / Setup and Instruction Tips
Tire and chain must be moving during all of the calibration and tuning of the ELinks.
The Sportcrafter trainers can be used for this setup.
If there is no SportCrafter training rollers you can build a simple fixture out of one wood 2x4x8' long. See the attached blue print.
Fully charged battery has a green light. A red light appears while charging
If the LED does not illuminate, try a different USB outlet and a different cable. The miniature USB port is a standard configuration common
with most rechargeable lights.
How to get from one ELink to another if both batteries are in the XShifter
Click on the finish button and the system will reset itself. Remember to be spinning the cranks. Now hit the tune or appropriate button and
the second ELink and gear settings should come up on the smartphone App. If not, you may need to remove the battery from the ELink you
DO NOT want the app to talk to.
Arrows: single arrows are for fine small .1 increments. double arrows are large 1.0 increments
ELink has to modes Active and sleep:
Active is fully communicating between Button Pod and ELink and a smart phone.
Sleep mode has minor communications between the Button Pod and ELink but NO shifting. It will fall asleep in about 5 minutes
To Wake each ELink press one of the active buttons on the Pod. This will wake up the ELink to shift. This takes around 2-4 seconds.
The next time you press a button to shift gears the ELink will move the derailleur.
if shifting gears is not working or smooth after you ride the bike the ELink settings may need to be slightly adjusted for "actual riding" cable
tension.
To avoid communication errors between a 2 ELink system, simply take out the battery of the shifter that does not need adjusting.
Open the tune section on the app and adjust the settings as needed. Complete the steps per the manual setup
Be sure to save and install the red plastic battery caps. These caps should be installed on the battery while the batteries are on the bike. The
caps will keep rain, dust and road grime from getting int the charging port and damaging the battery.
Replacement parts can be ordered directly from Sportcrafters.
Battery life: if the smart phone App is turned while in range of the ELinks, the battery charge will show up at the top of the screen one icon for
each battery.
Battery life is very long and they can be left on the bike for several days at a time.
IT IS HIGHLY SUGGESTED TO FULLY CHARGE THE BATTERIES SHORTLY BEFORE EACH RACE.
When the battery is installed the system resets itself and moves the shifters to the smallest gear.
You will need to manually push the buttons on the Pod to move the shifter back to the last position that the bike gears were in
A future enhancement should eliminate this issue
Going from Sleep to Active mode does NOT move the shifters.
ELinks go to "Sleep" mode around 5 minutes of non-activity
To make it work with a "trim shift" (like so many Road Triples were made when they still made Road Triples) you can tell the XShifter that your
3-speed is a 4-speed. If, for example, the derailleur tends to rub on the big ring (most cases) Shift# 1 and 2 (if they settle well enough on the
small and middle rings), you leave alone. Gear #3 you set up to position the derailleur directly over the middle of the big ring. Gear #4, then,
is the "over shift". So, on the big ring shift, you push the buttons thru the 4th gear to get it to shift up, then the "3rd" gear is a "trim shift" back
toward the middle ring just enough to clear the chain. If you need more "trim shifts", just add a few more gears and set up your trim shifts
accordingly.
There is no system reset for the ELink. Changes or starting over will have to be done in the manual mode per the set-up instructions

Rev1 Page 13 of 14
Handcycle Options for chain movement to ensure quality ELink setup and no damage to the ELink or cable stretching. Reminder
to keep the cranks moving to allow the chain and derailleurs to freely move.
If you do not have a Handcycle Trainer from SportCrafters you can make an easy fixture for the handcycle. This fixture can be
used for setting up the ELink and other bike maintenance and cleaning needs. Pics of the units are below. Blue prints for the
wood fixture follow.
Pic of the handcycle on the SportCrafters Trainer
Pic of the handcycle on the wood footrest fixture
Footrest wood fixture pic

Rev1 Page 14 of 14