Xtech UNIXON XTS-690 User manual

XTS-690
Wireless handheld UHF microphone
with a rechargeable receiver
UNIXON

English
Quick user's guide
I. Introduction
Thank you for purchasing the Xtech XTS-690 Handheld wireless microphone
with rechargeable receiver. We encourage you to read this quick user´s guide
thoroughly to get the most of this innovative wireless device.
Package contents:
• Handheld wireless microphone
• Receiver with rechargeable battery
• ¼in female to 3.5mm plug adapter
• USB charging cable
II. Main features
• Wireless handheld bidirectional microphone to enjoy freedom of
movement in activities like karaoke, group events, religious ceremonies,
classroom, or performances where you need a professional setup
• 10 UHF automatic channel detection to avoid unwanted noise or
interference and providing high quality sound transmission
• Rechargeable receiver with a 1200mAH lithium-ion battery provides up to
7 hours of usage and fully recharges in about 2-3 hours
• Wireless signal transmission range of up to 82ft with stable and reliable
sound reproduction
• Features a ¼in to 3.5mm jack adapter to connect it to a 3.5mm
microphone input on speakers, karaoke machines, audio amplifiers, PA
systems or other compatible devices

III. Product overview
7
5
6
8
910
11
12
1
2
3
4
MICROPHONE RECEIVER
ADAPTOR
Description Function
• When the microphone is ON the display lights up.
• When the microphone is entering into the pairing
process the display starts flashing.
• When the battery level is low and needs recharging
the display starts flashing and will turn off
automatically.
Slide it up or down to turn the microphone On or Off.
1. Microphone display
2. On/Off switch
Use it to reset the microphone.
3. Reset button
Place 2 AA batteries in this compartment to start using
the microphone.
4. Battery compartment
Charges the rechargeable battery of the receiver.
5. DC 5V Micro USB
charging port
Turns the receiver On or Off.
6. Receiver On/Off
switch
Use it to plug the rechargeable receiver to a ¼in input
port on your audio equipment.
7. ¼in microphone
output jack

IV. How to use the microphone
• Place 2 AA batteries in the microphone´s battery compartment, making
sure the positive and negative ends are pointing in the right direction.
• Turn on the microphone by sliding the switch to the ON position.
• The display will light up indicating the microphone is on.
• Turn on the receiver by sliding the switch to the ON position. The LED
light turns solid blue and the red, indicating the pairing process is
successful.
Note: Always connect the ¼in output jack or the ¼in to 3.5mm jack
adapter to a microphone input port, otherwise the microphone will not
work.
Description Function
• When the receiver is turned ON the LED lights up in
blue (red light flashes slowly)
• When the microphone is entering into the pairing
mode the LED light starts blinking quickly in red
• When the pairing process is successful the light
blinks slowly in red.
• When the battery is charging the light turns red.
• When the battery is fully charged the light turns solid
green.
9. LED status indicator
in the receiver
10. Charging LED
indicator
Connect the 1/4in output jack to this port to be able to
plug the receiver in a 3.5mm microphone input port.
Refer to Fig. A
11. Adapter's ¼in input
port
Use this adapter to plug the rechargeable receiver to
the 3.5mm microphone input port of your selected
audio equipment. Refer to Fig. A
12. ¼in to 3.5mm input
jack adapter
¼in OUTPUT
FIGURE A
3.5mm auxiliary
input
¼in microphone
input
It is advisable to remove the battery from the battery
compartment when not using the microphone to avoid
damaging the unit. Replace the rechargeable battery
with one of the same specifications and quality from a
source or store you can trust.
8. 3.7V rechargeable
lithium battery

• Plug the rechargeable receiver ¼in output jack in the microphone´s input
port of your selected audio source, or use the ¼in to 3.5mm jack adaptor
to plug it in the 3.5mm microphone input port of your selected audio
equipment.
• Start enjoying the XTS-690 handheld wireless microphone right away.
Note: The microphone and the receiver will pair automatically. In case they
don´t, follow these steps.
• Press and hold the Reset button; the display will flash quickly.
• Turn the receiver on, the LED light will turn solid blue, the red LED will
flash quickly and then it will turn off, indicating that the microphone and
the receiver are already connected to each other.
• Press the Reset button briefly again, the display will stop flashing.
• The receiver LED light will turn solid red, indicating that the pairing
process is successful.
• Turn on the microphone. At this time it should start working.
Troubleshooting
Problem Solution
- Check if the microphone´s display, the receiver´s
signal blue light or red light are giving the correct
indication.
- Check if the microphone volume is set to its lowest
level in the devices.
Check if the batteries have been correctly placed or if
they need to be replaced.
There is no sound coming out
from the microphone
The display is not lighting up
Check if the batteries need to be replaced or haven´t
been correctly placed.
The receiver´s signal indicator
light is not lighted up
Check if the battery voltage is too low.Microphone is not pairing
Lower the volume of the microphone
Maintain a longer distance between the microphone
and the sound source.
There is a whistling noise
coming out from the
microphone

Technical specifications
Microphone
Polar pattern
Frequency band
Frequency response
Distortion
Sensitivity (1KHz)
Maximum Sound Pressure level
Output power
Switch
Number of channels
Microphone power
Housing material
Receiver
Connection type
Battery type
Input voltage
Battery capacity
Working hours
Charging time
Wireless RF frequency
Wireless range
Sensitivity
Switch
Bidirectional
U band
50Hz-18KHz
≤0.3%
-52.5±1dB/mW
120db
0.45W
On/Off
10 automatic channel detection
2 AA battery (not included)
ABS
U band wireless transmission
18650, 1200mAh lithium-ion battery
5VDC, 1A
3.7VDC, 1200mAh
Up to 7 hours
2-3 hours
A: 750-759MHZ(750)
Frequency interval: 1MHZ
Up to 82ft**
20mV
On/Off
Specifications
Applications
Dimensions
Weight
Cable length
Warranty
All devices compatible with a ¼in or a 3.5mm
microphone input connector, like karaoke
machines, party speakers, audio amplifiers,
PA systems, etc.*
9x2x2in
0.7lb
Micro USB charging cable: 47in
1 Year
*Always connect the ¼in output jack or the ¼in to 3.5mm jack adapter to a
microphone input port, otherwise the microphone will not work.
**Wireless range estimate is based on an area free and clear of obstacles and
interference, and within the line-of-sight-between the receiver and the
microphone.

Español
Guía rápida del usuario
I. Introducción
Felicitaciones por la compra de su Micrófono inalámbrico de mano con
receptor recargable XTS-690 de Xtech. Le recomendamos leer
detenidamente esta guía rápida del usuario, con el objeto de aprovechar al
máximo todas las ventajas de este innovador dispositivo inalámbrico.
Contenido del empaque:
• Micrófono inalámbrico de mano
• Receptor con batería recargable
• Adaptador con conector hembra de ¼in a 3,5mm
• Cable USB para carga
II. Características principales
• Micrófono inalámbrico de mano bidireccional para disfrutar de máxima
libertad de movimiento en actividades de karaoke, eventos grupales,
ceremonias religiosas, en el salón de clase, o representaciones donde
necesitas contar con un montaje profesional
• Detección automática de 10 canales UHF para evitar los ruidos no
deseados o las interferencias y proporcionar una transmisión de sonido
de alta calidad
• Receptor recargable con una batería de iones de litio de 1200mAH que
ofrece hasta 7 horas de uso y se recarga completamente en aproximada-
mente 2-3 horas
• Alcance de transmisión inalámbrica de hasta 25m con una reproducción
de sonido estable y confiable
• El adaptador con conjuntor de ¼ de pulgada a 3,5mm permite la conexión
a un puerto de entrada para micrófono de 3,5mm en parlantes, máquinas
de karaoke, amplificadores de audio, sistemas PA o cualquier otro
dispositivo compatible

III. Diagrama del producto
7
5
6
8
910
11
12
1
2
3
4
MICRÓFONO RECEPTOR
ADAPTADOR
Descripción Función
• Cuando el micrófono está encendido la pantalla se
ilumina.
• Cuando el micrófono entra en proceso de
emparejamiento la pantalla comienza a titilar.
• Cuando el nivel de la batería está bajo y necesita ser
recargada, la pantalla comienza a titular y se apagará
automáticamente.
Deslícelo hacia arriba o hacia abajo para encender o
apagar el micrófono.
1. Pantalla del
micrófono
2. Interruptor de
Encendido/Apagado
Use este botón para reconfigurar el micrófono.
3. Botón de
reconfiguración
Coloque 2 baterías AA en este compartimiento para
comenzar a usar el micrófono.
4. Compartimiento de la
batería
Úselo para cargar la batería recargable del receptor.
5. Puerto micro USB para
carga de CC de 5V
Enciende o apaga el receptor.
6. Interruptor de
Encendido/Apagado
del receptor
Úselo para conectar el receptor recargable al puerto
de entrada de ¼in de su equipo de audio.
7. Conjuntor de salida
de ¼in para
micrófono

IV. Cómo usar el micrófono
• Coloque 2 baterías AA en el compartimiento para batería del micrófono,
asegurándose de que los polos positivo y negativo están apuntando en la
dirección correcta.
• Encienda el micrófono deslizando el interruptor en la posición de
Encendido.
• La pantalla se iluminará indicando que el micrófono está encendido.
Nota: Siempre conecte el conjuntor de salida de ¼in o el adaptador con
conjuntor de ¼in a 3,5mm a un puerto de entrada para micrófono, de lo
contrario el micrófono no funcionará.
Descripción Función
• Cuando el receptor está encendido la luz LED se
ilumina de color azul (la luz roja titila despacio).
• Cuando el micrófono entra en el modo de
emparejamiento la luz LED comienza a titilar
rápidamente en rojo.
• Cuando el proceso de emparejamiento finaliza en
forma exitosa la luz titila despacio de color rojo.
• Cuando la batería está siendo cargada la luz se
enciende de color rojo.
• Cuando la batería está con nivel de carga plena la luz
se enciende de color verde.
9. Indicador LED de
estado en el receptor
10. Indicador LED de
carga
Conecte el conjuntor de salida de ¼in en este puerto
para poder conectar el receptor en un puerto de
entrada para micrófono de 3.5mm. Consulte la Fig. A
11. Puerto de entrada de
¼in del adaptador
Use este adaptador para conectar el receptor
recargable al puerto de entrada para micrófono de
3.5mm de su fuente de audio seleccionada. Consulte
la Fig. A
12. Adaptador con
conjuntor de entrada
de ¼in a 3.5mm
Conjuntor de salida de ¼in
FIGURA A
Entrada auxiliar
de 3,5mm
Entrada para
micrófono de ¼in
Se recomienda quitar la batería del compartimiento
cuando no usa el micrófono para evitar dañar la
unidad. Reemplace la batería recargable con una de
calidad y especificaciones similares, proveniente de
una fuente o tienda confiable.
8. Batería de litio
recargable de 3,7V

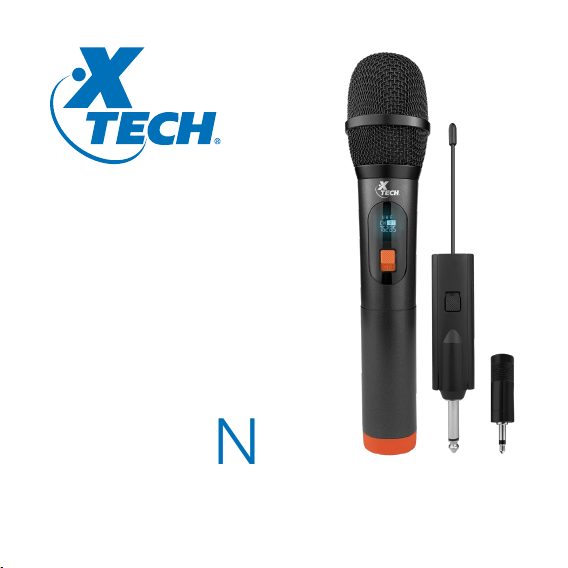
• Encienda el receptor deslizando el interruptor en la posición de
Encendido. La luz LED se ilumina de color azul y y rojo para indicar que
el proceso de emparejamiento se ha realizado exitosamente.
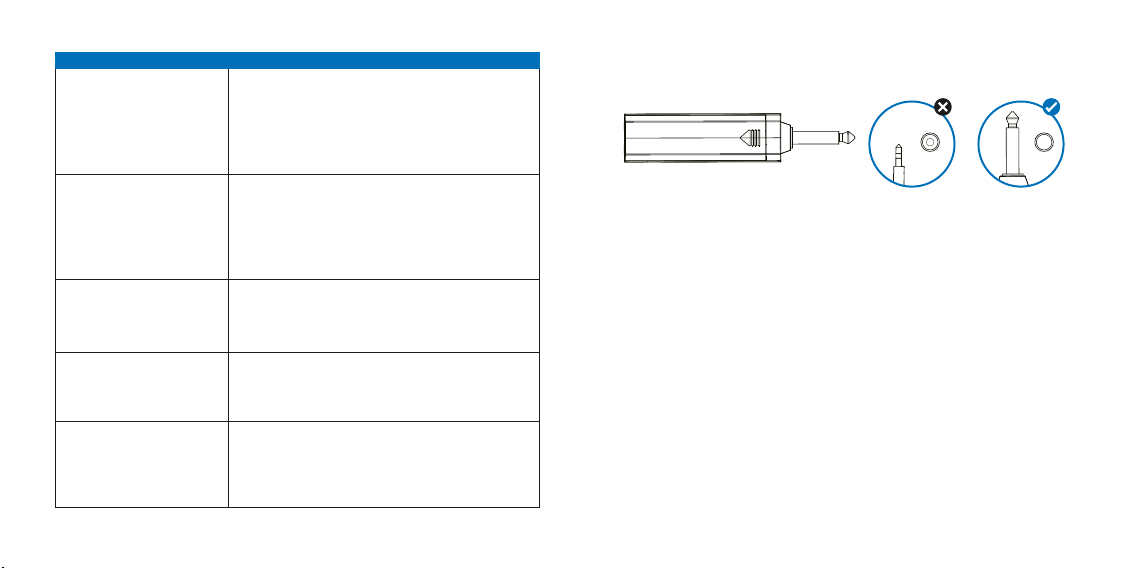
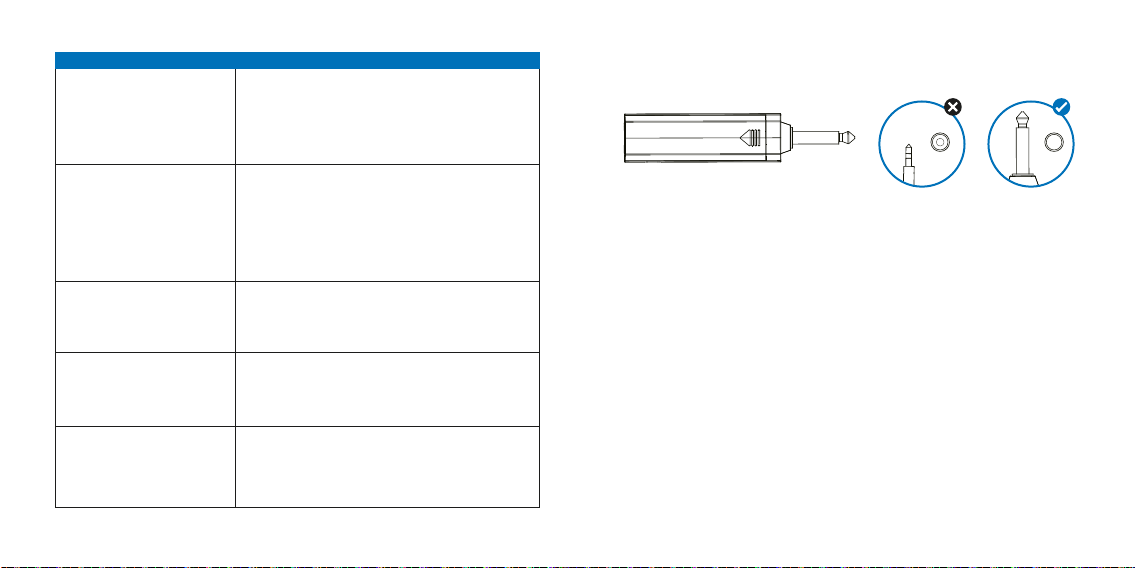
• Conecte el conjuntor de salida de ¼in del receptor recargable en el puerto
de entrada para micrófono de su fuente de audio seleccionada, o use el
adaptador con conjuntor de ¼in a 3,5mm para conectarlo en el puerto de
entrada para micrófono de 3,5mm de su equipo de audio seleccionado.
• Ahora puede comenzar a disfrutar del micrófono inalámbrico de mano
XTS-690.
Nota: El micrófono y el receptor se emparejarán automáticamente. Si no lo
hicieran, siga estos pasos.
• Mantenga presionado el botón de Reconfiguración; la pantalla se
iluminará rápidamente.
. Encienda el receptor, la luz LED se iluminará de color azul y la luz LED roja
titilará rápidamente y luego se apagará, indicando que el micrófono y el
receptor ya han establecido conexión.
. Vuelva a presionar brevemente el botón de Reconfiguración, la pantalla
dejará de titilar.
. La luz LED del receptor se iluminará de color rojo, indicando que el
proceso de emparejamiento se ha realizado exitosamente.
• Encienda el micrófono. Ahora debería comenzar a funcionar
normalmente.
Solución de problemas
Problema Solución
- Revise si la pantalla del micrófono, la luz azul de la
señal del receptor o la luz roja están emitiendo la
indicación correcta.
- Revise si el volumen del micrófono está configurado
en su nivel más bajo en los dispositivos.
Revise si las baterías están bien colocadas o si es es
necesario reemplazarlas.
El micrófono no emite sonido
La pantalla no se ilumina
Revise si las baterías están bien colocadas o si es es
necesario reemplazarlas.
La luz indicadora de señal del
receptor no se ilumina.
Revise si el voltaje de la batería es muy bajo.El micrófono no se empareja
Baje el nivel del volumen del micrófono.
Mantenga una mayor distancia entre el micrófono y el
receptor.
El micrófono emite un silbido

Especificaciones técnicas
Micrófono
Patrón polar
Banda de frecuencia
Respuesta de frecuencia
Distorsión
Sensibilidad (1KHz)
Nivel máximo de presión sonora
Potencia de salida
Interruptor
Número de canales
Potencia del micrófono
Material de la cubierta
Receptor
Tipo de conexión
Tipo de batería
Voltaje de entrada
Capacidad de la batería
Horas de funcionamiento
Tiempo de carga
Frecuencia inalámbrica RF
Alcance inalámbrico
Sensibilidad
Interruptor
Bidireccional
Banda U
50Hz-18KHz
≤0,3%
-52,5±1dB/mW
120db
0,45W
Encendido/Apagado
Detección automática de 10 canales
2 baterías AA (no están incluidas)
ABS
Transmisión inalámbrica de banda U
Batería de iones de litio de
1200mAh.18650
5VDC, 1A
3.7VDC, 1200mAh
Hasta 7 horas
2-3 horas
A: 750-759MHZ(750)
Intervalo de frecuencia: 1MHZ
Hasta 25m**
20mV
Encendido/Apagado
Especificaciones
Aplicaciones
Dimensiones
Peso
Longitud del cable
Garantía
Admite todos los dispositivos compatibles
con puerto de entrada para micrófono de
¼in o uno de 3,5mm, como máquinas de
karaoke parlantes para fiestas,
amplificadores de audio, sistemas PA, etc.*
23x4,9x4,9cm
0,33kg
Cable micro USB para carga: 1,2m
1 año
*Siempre conecte el conjuntor de salida de ¼in o el adaptador con conjuntor
de ¼in a 3,5mm a un puerto de entrada para micrófono, de lo contrario el
micrófono no funcionará.
**El cálculo de la distancia se basa en un área libre de obstáculos e
interferencias, y en línea recta entre el receptor y el micrófono.

NOTASNOTES

www.xtechamericas.com
Xtech® is a registered trademark. All rights reserved. Other trademarks and trade names are those of
their respective owners. Any mention of such is only intended for identification purposes, and is not to
be construed as a claim to any rights pertaining to, sponsorship by, or affiliation with, those brands.
Made in China. Xtech®es marca registrada. Todos los derechos reservados. Todas las demás marcas
y nombres comerciales son propiedad de sus respectivos dueños. Cualquier mención de los mismos
es por motivo de identificación solamente y por ende, no constituye reclamo alguno a ningún derecho
perteneciente a, patrocinado por, ni afiliación con cualquiera de estas marcas. Fabricado en China.
Table of contents
Languages: