Xtech XTA311 User manual

Quick installation guide
Introduction:
1. HARDWARE KIT:
Thank you for purchasing the Xtech TV soundbar mount. This product is shipped
with all proper installation hardware and components. Upon opening the box and
before beginning the installation, verify that all the parts are included in the
hardware kit and that none are damaged.
Item Quantity Image
Label
XTA311
Brackets
Extensions
M6x10 screws
M6 nuts
M4x14 screws
M5x14 screws
M6x14 screws
A
B
C
D
E
F
G
2
2
4
4
2
2
6

XTA311 TV soundbar
mount
Item Quantity Image
Label
D5 metal washers
M6x14 screws
M6 nuts
M6x20 screws
M8x20 screws
M6x30 screws
M8x30 screws
Plastic Washers
Plastic spacers
Metal Washers
H
I
J
L
M
N
O
P
Q
R
2
2
2
4
4
4
4
8
4
2
IMPORTANT:
Read this instruction guide thoroughly before you assemble and install this product.
If you have any questions regarding any of the instructions or warnings, please
contact your local distributor for assistance.
CAUTION!
• Do not use with items heavier than the maximum weight indicated here to
avoid instability.
• This product must be securely attached to the TV. If it is not properly
installed, it may fall resulting in possible injury and/or damage.
• Use the mounting screws provided and DO NOT OVER TIGHTEN them.
• This product contains small parts that could represent a choking hazard if
swallowed. Keep all these parts away from children.
• This product is intended for indoor use only. Using this product outdoors
may result in personal injuries and/or damage.
• Use protective gear as needed to assemble and install this product.
1a-1. Using a screwdriver select among the M4x14 (E), the M5x14 (F), or the
M6x14 (G) screws, and the two D5 metal washers (H) to attach them to the
brackets. If the screws are not suitable for your soundbar, use a wrench to
attach the two M6 nuts (J) and the two M6x14 screws to the soundbar. (The
screw type will depend on the soundbar).
2. Assembly instructions
A. Regular installation
Narrow mode
G
E/F
H
J
I

- If you choose the M6x30 or M8x30 screws, you will also need to use the
spacers (Q) and the washers (R) to attach the soundbar mount to the TV wall
mount.
- Depending on the size of the TV wall mount, you might have to use the
spacers (Q), the washers (P), and the other washers (R) to attach the M6x30 or
M8x30 screws as shown or just the spacers and the washers (P).
2. Your assembly is complete. Check if the brackets are secure and safe to
use at regular intervals (at least every three months).
Note: The sound bar mount can be installed in a wide, straight, or narrow
position depending on the mounting holes of the soundbar being used.
XTA311 TV soundbar
mount
1a-2. Select among the M6x14 (G), M6x20 (L), M8x20 (M), M6x30 (N) or
M8x30 (O) screws and using a screwdriver, attach the soundbar mount to the
TV wall mount. (The screw type will depend on the TV wall mount and/or
soundbar).
Note: Depending on the holes of the brackets you will or won’t need some
components as shown in the images below. TV wall mount not included.
- If you select the M6x14 screws to attach the soundbar mount to the TV wall
mount, you might need to use the two washers (R) as shown in the image.
- If you choose the M6x20 or the M8x20 screws, you will also need to use the
washers (P) and the other washers (R) to attach the soundbar mount to the TV
wall mount.
G
1
R
G
2
P
R
L/M
1
L/M
P
2
P
L/M
R
1L/M
P
2
N/O
Q
R
1N/O
Q
2
N/O
P
Q
2
R
N/O
P
Q
1

XTA311 TV soundbar
mount
1b-1. Use an open-end wrench to attach the brackets to the extensions with
the M6x10 screws (C) and the M6 nuts (D). Do not fasten too tightly as the
extensions will need some room to move inside or outside according to your
TV and soundbar setup.
1b-2. Select among the M4x14 (E) or the M5x14 (F) screws and the D5 metal
washers (H) to attach them to the brackets using a screwdriver. If you use the
M6x14 (G) screws you will not need to use the D5 metal washers for the
assembly.
Depending on the soundbar, you might need to use instead the M6x14
screws (I) to attach the brackets to the soundbar. Then, use an open-end
wrench to place and fasten the M6 nuts (J) to the bracket and the soundbar.
Note: Depending on the holes of the brackets you will or won’t need some
components as shown in the images below.
1b-3. If you select the M6x14 screws to attach the soundbar mount to the TV
wall mount, you will also need to use the two washers (R) as shown in the
image.
B. Installation with the extensions
Wide mode
C
D
E/F
H
G
J
I
G
R
1
G
2

XTA311 TV soundbar
mount
- If you choose the M6x20 or the M8x20 screws, you will also need to use the
washers (P) and the other washers (R) to attach the soundbar mount to the TV
wall mount.
- If you choose the M6x30 or M8x30 screws, you will also need to use the
spacers (Q) and the washers (R) to attach the soundbar mount to the TV wall
mount.
Depending on the size of the TV wall mount, you might have to use the
spacers (Q), the washers (P), and the other washers (R) to attach the M6x30 or
M8x30 screws as shown or just the spacers and the washers (P).
2. Once the soundbar mount is attached to the TV wall mount, move the TV to
the wall in order to place it on the wall.
P
R
L/M
1
L/M
P
2
P
L/M
R
1L/M
P
2
N/O
Q
R
1
Q
N/O
2
N/O
P
R
Q
1N/O
P
Q
2
Extensions

3. Your assembly is complete. Check if the brackets are secure and safe to
use at regular intervals (at least every three months).
Note: The brackets' angle can be adjusted to different settings in order to
accommodate users' preference.
Xtech® is a registered trademark. All rights reserved. All other brand names and trademarks are the property of
their respective owners. Made in China.
3. La instalación está completa. Verifica que los brackets están bien ajustados
y que es seguro usar el soporte de barra de sonido en intervalos regulares
(Por lo menos cada tres meses).
Nota: El ángulo de los brackets se puede ajustar en diferentes configuracio-
nes con el fin de acomodarlos a la preferencia de los usuarios.
Xtech®es marca registrada. Todos los derechos reservados. Todas las demás marcas y nombres comerciales
son propiedad de sus respectivos dueños. Fabricado en China.

XTA311 Soporte de barra
de sonido para TV
- Si eliges los tornillos M6x20 o M8x20 también necesitarás usar los
espaciadores redondos (P) y las arandelas planas (R) para ajustar el soporte
de barra de sonido al soporte del televisor.
- Si escoges los tornillos M6x30 o M8x30 también necesitarás usar los
espaciadores (Q) y las arandelas planas (R) para ajustar el soporte de barra de
sonido al soporte del televisor.
- Dependiendo del tamaño del soporte del televisor, puede que necesites
usar los espaciadores (Q), los espaciadores redondos (P) y las arandelas
planas (R) para ajustar los tornillos M6x30 o M8x30 tal como se muestra o
solamente los espaciadores (Q) y los espaciadores redondos (P).
2. Una vez que el soporte de barra de sonido quede ajustado al soporte del
televisor, mueve el televisor hacia la pared con el fin de colocarlo en la misma.
P
R
L/M
1
L/M
P
2
P
L/M
R
1L/M
P
2
N/O
Q
R
1
Q
N/O
2
N/O
P
R
Q
1N/O
P
Q
2
Extensiones

XTA311 Soporte de barra
de sonido para TV
1b-1. Utiliza una llave de boca para ajustar los brackets a las extensiones con
los tornillos M6x10 (C) y las tuercas M6 (D). No los ajustes demasiado pues
las extensiones necesitarán espacio para moverlas hacia afuera o hacia
adentro según la configuración de la barra de sonido y del televisor.
1b-2. Selecciona entre los tornillos M4x14 (E) o M5x14 (F) y las arandelas
planas de metal D5 (H) para ajustarlos a los brackets con un destornillador. Si
usas los tornillos M6x14 (G) no necesitarás utilizar las arandelas planas de
metal D5.
- Dependiendo de la barra de sonido puede que necesites usar específica-
mente los tornillos M6x14 (I) para ajustar los brackets a la barra de sonido.
Luego, utiliza una llave de boca para colocar y ajustar las tuercas M6 (J) al
bracket y a la barra de sonido.
Nota: Dependiendo de los agujeros de los brackets puede o no que necesites
algunos componentes como se muestra en las imágenes abajo.
1b-3. Si seleccionas los tornillos M6x14 para ajustar el soporte de la barra de
sonido al soporte del televisor también necesitarás las arandelas planas (R)
como se muestra en la imagen.
B. Instalación con las extensiones
Modo ancho
C
D
E/F
H
G
J
I
G
R
1
G
2

XTA311 Soporte de barra
de sonido para TV
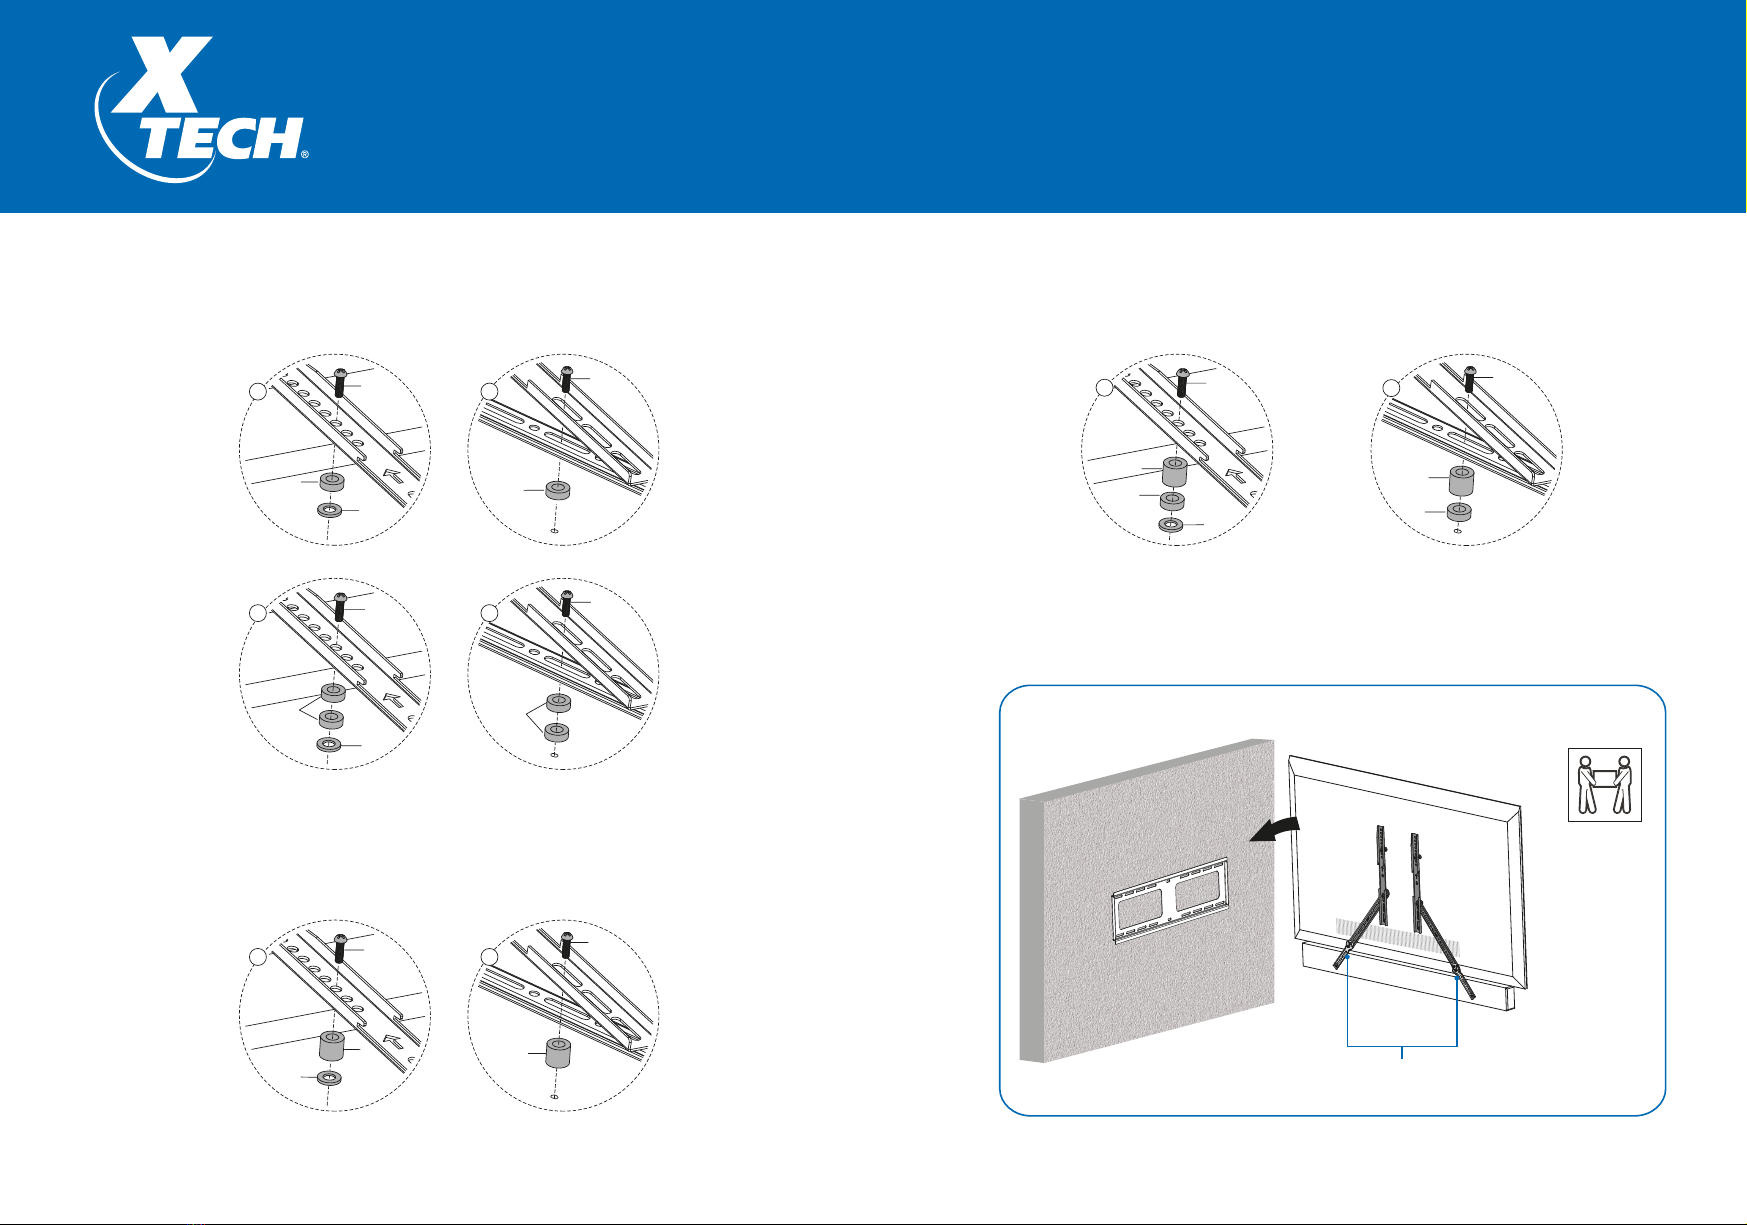
- Si eliges los tornillos M6x30 o M8x30 también necesitarás usar los
espaciadores (Q) y las arandelas planas (R) para ajustar el soporte de barra de
sonido al soporte del televisor.
- Dependiendo del tamaño del soporte del televisor, puede que tengas que
usar los espaciadores (Q), los espaciadores redondos (P) y las arandelas planas
(R) para ajustar los tornillos M6x30 o M8x30 como se muestra abajo o solo los
espaciadores (Q) y los espaciadores redondos (P).
2. La instalación está completa. Verifica que los brackets estén bien
asegurados y que el soporte esté seguro para utilizar en intervalos regulares
(Por lo menos cada tres meses).
Nota: La barra de sonido se puede instalar en una posición ancha, derecha o
estrecha dependiendo de los hoyos de montaje en la barra de sonido.
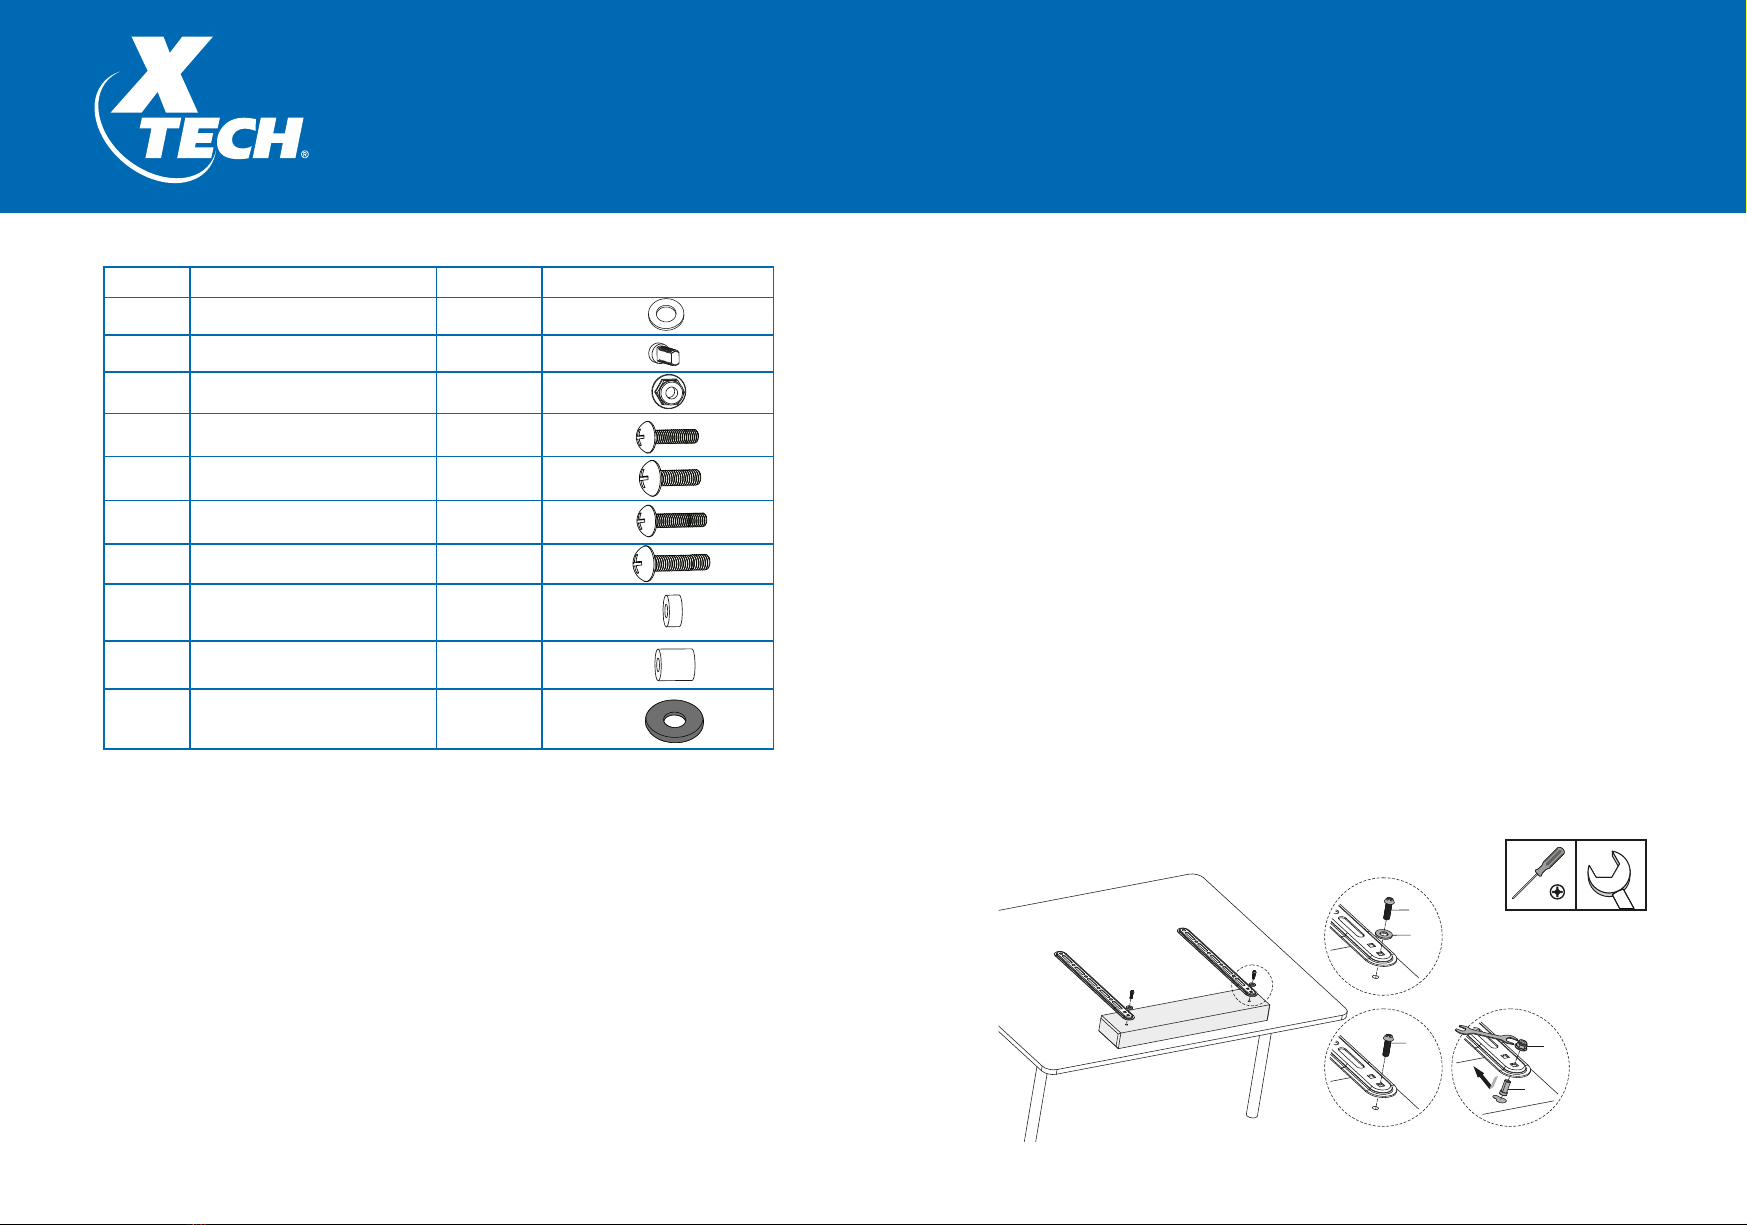
1a-2. Escoge entre los tornillos M6x14 (G), M6x20 (L), M8x20 (M), M6x30 (N) o
M8x30 (O) y con un destornillador ajusta el soporte de barra de sonido al
soporte del televisor. (El tipo de tornillo dependerá del soporte del televisor
y/o de la barra de sonido).
Nota: Dependiendo de los agujeros de los brackets puede o no que necesites
algunos componentes como se muestra en las imágenes abajo. El soporte
para televisor no está incluido.
- Si eliges los tornillos M6x14 para ajustar el soporte de barra de sonido al
soporte para televisor puede que necesites utilizar dos arandelas planas (R)
como se muestra en la imagen.
- Si escoges los tornillos M6x20 o M8x20 también necesitarás usar los
espaciadores redondos (P) y las arandelas planas (R) para ajustar el soporte
de barra de sonido al soporte del televisor.
G
1
R
G
2
P
R
L/M
1
L/M
P
2
P
L/M
R
1L/M
P
2
N/O
Q
R
1N/O
Q
2
N/O
P
Q
2
R
N/O
P
Q
1

XTA311 Soporte de barra
de sonido para TV
Descripción Cantidad Imagen
Etiqueta
Arandelas planas de metal D5
Tornillos M6x14
Tuercas M6
Tornillos M6x20
Tornillos M8x20
Tornillos M6x30
Tornillos M8x30
Espaciadores redondos de
plástico
Espaciadores de plástico
Arandelas planas de metal
H
I
J
L
M
N
O
P
Q
R
2
2
2
4
4
4
4
8
4
2
IMPORTANTE:
Lee cuidadosamente esta guía de instrucciones antes de ensamblar e instalar el
producto. Si tienes dudas acerca de las instrucciones o avisos, por favor contacta a
tu distribuidor local para solicitar ayuda.
ADVERTENCIA
• No utilices este producto con objetos más pesados que el peso máximo
indicado aquí para evitar inestabilidad.
• Este producto debe estar atornillado al televisor. Si no se instala apropiada-
mente se puede caer y resultar en lesiones o daños.
• Usa los tornillos de montaje proporcionados y NO LOS ATORNILLES
DEMASIADO.
• Este producto contiene partes pequeñas que pueden ser un riesgo de
asfixia si se ingieren. Mantén todas las piezas lejos de los niños.
• Este producto está diseñado para uso en interiores solamente. Usar este
producto en exteriores puede resultar en lesiones personales y/o daños.
• Utiliza equipo protector de ser necesario para ensamblar e instalar este
producto.
1a-1. Utiliza un destornillador y selecciona entre los tornillos M4x14 (E),
M5x14 (F) o M6x14 (G) y las dos arandelas planas de metal D5 (H) para
ajustarlos a los brackets. Si los tornillos no son adecuados para tu barra de
sonido, usa una llave para asegurar las dos tuercas M6 (J) y los dos tornillos
M6x14 a la barra de sonido. (El tipo de tornillo dependerá de la barra de
sonido).
2. Instrucciones de ensamblaje
A. Instalación regular
Modo estrecho
G
E/F
H
J
I

Guía rápida de instalación
Introducción:
1. Kit de herrajes:
Gracias por preferir el soporte de barra de sonido para TV XTA-311. Este producto
viene con todos los herrajes y componentes necesarios para su instalación.
Cuando abras el empaque, verifica que todas las piezas del kit de herrajes estén
incluidas y que ninguna se encuentre dañada.
Descripción Cantidad Imagen
Etiqueta
XTA311
Brackets
Extensiones
Tornillos M6x10
Tuercas M6
Tornillos M4x14
Tornillos M5x14
Tornillos M6x14
A
B
C
D
E
F
G
2
2
4
4
2
2
6
Table of contents
Languages: