XTREM HEIMSPIEL 60193 User manual

Art.-Nr. / Item no. 60193
ANLEITUNGEN
INSTRUCTIONS
MODE D'EMPLOI
ISTRUZIONI
DE
EN
FR
IT
INSTRUCTIES
INSTRUCCIONES
NAVODILA
UPUTE
NL
ES
SL
HR
ÚTMUATÓK
NÁVODY
INSTRUKTIONER
VEJLEDNINGER
HU
CZ
SE
DK
GJØR SLIK
INSTRUKCJE
NO
PL
BASKETBALL
INDOOR ARCADE
BASKETBALL
INDOOR ARCADE

2
Aufbauanleitung
DE
• Bitte lesen Sie diese Informationen vor dem Aufbau und der Benutzung des Produktes sorgfältig und komplett durch!
• Bringen Sie die Sicherheitshinweise allen Nutzern zur Kenntnis, heben Sie diese Anleitung zur späteren Verwendung auf
und geben Sie sie bitte gegebenenfalls an spätere Nutzer weiter.
• Einige Abbildungen oder Zeichnungen sehen möglicherweise nicht genau wie Ihr Produkt aus. Bitte lesen und verstehen Sie
den Text, bevor Sie mit einem Montageschritt beginnen.
• ACHTUNG: Nicht geeignet für Kinder unter 3 Jahren, da Kleinteile verschluckt werden können. Erstickungsgefahr!
• Entfernen Sie alle Verpackungsmaterialien, bevor Sie den Artikel Ihrem Kind geben.
• Überprüfen Sie den Inhalt auf Vollständigkeit, bevor Sie mit dem Aufbau beginnen.
• Achtung: Der Aufbau darf nur von einem Erwachsenen vorgenommen werden!
• Prüfen Sie vor jeder Verwendung, ob sich der Artikel in einwandfreiem Zustand befindet.
• Wenn das Produkt beschädigt ist, beenden Sie bitte die Montage oder Demontage.
Verbinden Sie die Rohre mit den Verbindungsstücken, wie gezeigt.
1 2 3 4 5
6 7 8 9 10
56.5 cm
x 6 42.5 cm
x 4 57.5 cm
x 2 60.5 cm
x 2 42 cm
x 4
11 12 13 14 15
x 1 x 1 x 1 x 4x 1
x 8 x 6 x 8x 2
16 17 18 19
32.5 cm
x 2 20.5 cm
x 2 9 cm
x 2 69 cm
x 2 56.5 cm
x 1
17
16
18
2
2
1
12
2
5
5
15
3
3
8
16
17
10
1
2
3
4

3
Befestigen Sie die Rückwand (#11) mit
den 4 Klettverschlüssen an den Rohren,
wie gezeigt. (Abb. 7)
Befestigen Sie das Netz (#12) mit den Klettverschlüssen
am Rahmen, wie gezeigt. (Abb. 8 + 8A)
Stecken Sie Rohr 1 in das Loch der Hülse vor dem
Netz, wie in Abb. 9 gezeigt, und verbinden Sie das
Rohr 1 mit Rohr 16, wie in Abb. 9A gezeigt.
17
1
1
1
6
7
7
6
16
4
15
9
5
7
8
9
9A
6
12
16
1
1
19
19
19
11
19
19

4
Wenn sich das Spiel im "Schlafmodus" befindet und ein Ball in den Korb geworfen wird, schaltet sich das Spiel ein und die
Anzeigetafel beginnt mit einem Countdown von 5 Sekunden. Schalten Sie nach dem Ende des Spiels das Zählwerk mit dem
Ein-/Aus-Schalter (ON/OFF) aus.
Hinweis: Die Anzeigetafel schaltet sich nach 5 Minuten aus, wenn keine Körbe geworfen werden. Wir empfehlen jedoch,
den Ein-/Ausschalter auf "OFF" zu stellen, wenn das Spiel über einen längeren Zeitraum nicht benutzt wird.
Spielanleitung
• Nicht auf das Gerät klettern oder sich an das Netz hängen!
• Ändern oder entfernen Sie keine Originalkomponenten des Basketballspiels.
• Befolgen Sie die nachstehenden Anweisungen und Empfehlungen, um diesen Artikel zu bedienen.
• Der Artikel muß von einem Erwachsenen aufgebaut werden.
Vorsicht:
• Stellen Sie sicher, daß kein Teil des Artikels beschädigt ist.
• Installation / Vorgehensweise
• Überprüfen Sie die korrekte Montage des Basketballspiels.
• Überprüfen Sie den Zustand des Basketballspiels.
• Überprüfen Sie die korrekte Anbringung von Netz und Ring.
• Überprüfen Sie den Halt und die Stabilität des Basketballspiels.
• Während des Gebrauchs: Überprüfen Sie den Artikel regelmäßig.
• Wartung: Reinigen und trocknen Sie das Objekt vor der Lagerung um Feuchtigkeitsschäden zu vermeiden.
Vor Gebrauch:
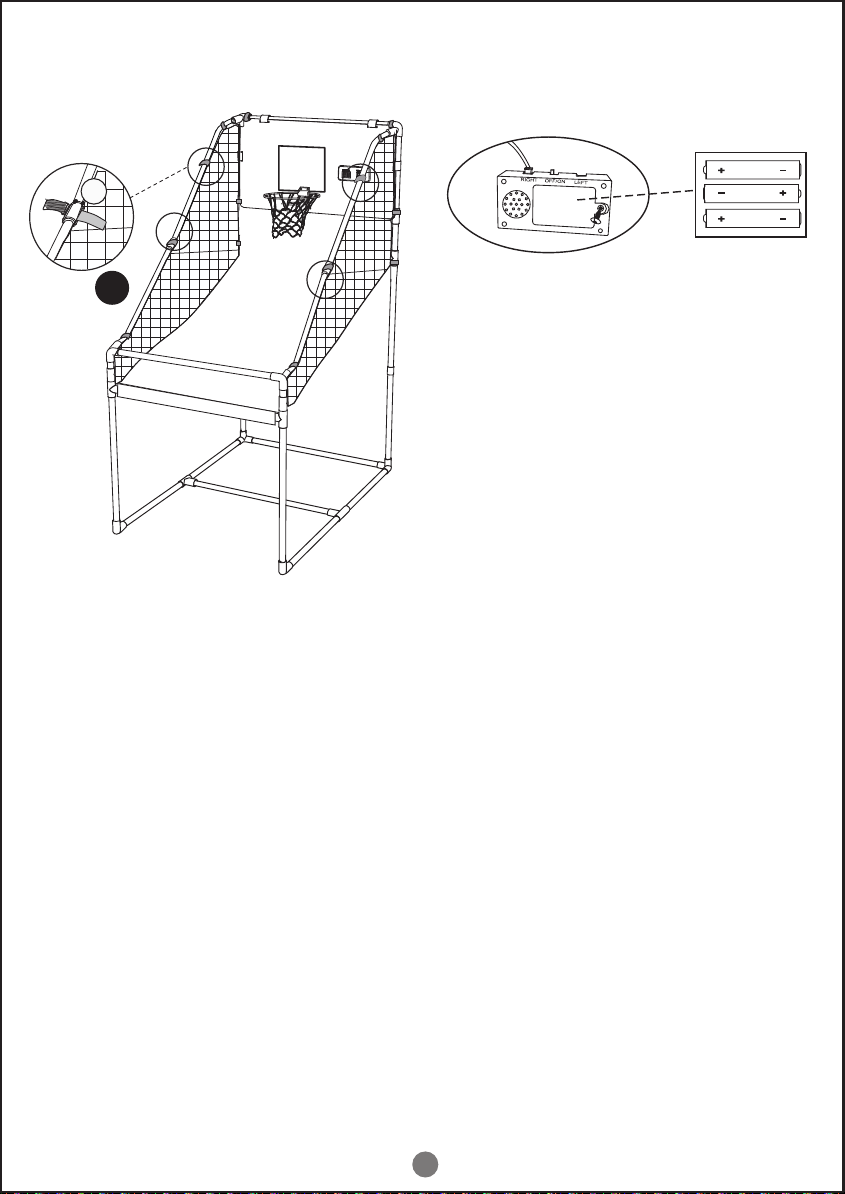
Befestigen Sie das Ballfangnetz (#12) mit den vier
Klettverschlüssen (#19), wie in Abb. 10 gezeigt.
Zum Öffnen des Batteriefachs wird ein Schraubendreher benötigt.
• Setzen Sie 3 x 1,5V LR03-Batterien ein.
• Setzen Sie den Deckel des Batteriefachs wieder auf und schrauben
Sie das Fach zu.
• Es werden 3 x 1,5V LR03-Batterien benötigt (nicht in der Packung enthalten).
• Der Batteriewechsel sollte nur von Erwachsenen vorgenommen werden.
• Ausschließlich den angegebenen Batterie-Typ verwenden.
• Alte Batterien sind nicht mit den neuen oder solchen anderen Typs zu mischen.
• Auf die richtige Polung (+ / -) achten.
• Batteriepole und Anschlußklemmen dürfen nicht kurzgeschlossen werden.
• Die Batterien regelmäßig auf Auslaufen überprüfen.
• Verbrauchte Batterien sind aus dem Spielzeug zu entfernen.
• Bei längerer Nichtbenutzung Batterien aus dem Gerät nehmen.
• Alkalische Batterien empfohlen.
• Nicht-wiederaufladbare Batterien dürfen nicht wieder aufgeladen werden.
• Wiederaufladbare Batterien dürfen nur von Erwachsenen wieder
aufgeladen werden.
• Wiederaufladbare Batterien müssen vor dem Aufladen aus dem Spielzeug
entfernt werden.
• Batterien gehören nicht in den Hausmüll, sondern sind einer Sondermüll-Deponie
zuzuführen.
Es kann losgehen!
10
19

1 2 3 4 5
6 7 8 9 10
56.5 cm
x 6 42.5 cm
x 4 57.5 cm
x 2 60.5 cm
x 2 42 cm
x 4
11 12 13 14 15
x 1 x 1 x 1 x 4x 1
x 8 x 6 x 8x 2
16 17 18 19
32.5 cm
x 2 20.5 cm
x 2 9 cm
x 2 69 cm
x 2 56.5 cm
x 1
5
Assembly instructions
EN
• Please read this information carefully and completely before assembling and using the product.
• Please make sure every user knows these safety instructions, keep them well and pass them on to possible later users.
• Some illustrations or drawings may not look exactly like your product. Please read and understand the text before beginning
each assembly step.
• WARNING: Not suitable for children under 3 years of age because of small parts which can be swallowed. Choking hazard!
• Remove all packing materials before giving this item to your child.
• Check all contents are included before assembly.
• Important: The item must be assembled by an adult only.
• Before each use, check that the item is in perfect condition.
• Please do not assemble or disassemble the product if any damage is found.
Assemble the tubes with the connectors as shown.
17
16
18
2
2
1
12
2
5
5
15
3
3
8
16
17
10
1
2
3
4

6
Fix the backboard (#11) to the tubes with 4 hook &
loop fastenings as shown. (Fig. 7)
Attach the net (#12) on the frame with the hook & loop
fastenings as shown. (Fig. 8 + 8A)
Insert tube 1 into the hole of the sleeve in front of the
net as shown in Fig. 9 and connect tube 1 to tube 16 as
shown on Fig. 9A.
17
1
1
1
6
7
7
6
16
4
15
9
12
16
1
1
19
19
19
11
19
19
5
7
8
9
9A
6

7
While game is in Sleep Mode, if a basketball is scored, the game will turn back on and the score board will begin the 5 sec
countown. After finishing the game, turn OFF the scorer by using the ON/OFF switch.
Note: The scoreboard will turn off after 5 minutes, if not in use, however, we recommend turining the ON/OFF switch to OFF
when the game will not be used for an extended period.
Playing instructions
• Do not climb on the basketball frame or net system.
• Do not modify or remove the original components of the basketball game.
• To help you operate your basketball game, follow the instructions and recommendations below.
• This toy must be assembled by an adult.
Caution:
• Check that no part of the basketball game is broken.
• Installation Steps
• Check the mounting of the basketball game.
• Check the condition of the basketball game.
• Check the correct position of the net and of the ring.
• Check the hold and stability of the basketball game.
• During usage: Regularly check the equipment.
• Maintenance: Clean and dry the object before storage to avoid damage by moisture.
Before use:
Attach the ball return net (#12) to the tubes using four
hook & loop fastenings (#19) as shown in Fig. 10.
A screwdriver is required to open the battery compartment.
• Insert 3 x 1,5V LR03/AAA batteries.
• Put the cover of the battery compartment back on and screw the
compartment shut.
• Use 3 x 1.5V LR03/AAA size batteries (not included/included).
• Batteries should be changed by adults only.
• Use only batteries specified for this product.
• Do not mix old and new batteries or batteries of different types.
• Place batteries in their correct positions as specified (+ / -).
• The supply terminals/connection clamps are not to be short-circuited.
• Check batteries regularly for signs of leakage.
• Exhausted batteries are to be removed from the toy.
• Remove batteries when not in use.
• Alkaline batteries recommended.
• Non-rechargeable batteries are not to be recharged.
• Rechargeable batteries are only to be charged under adult supervision.
• Rechargeable batteries are to be removed from the toy before being charged.
• Place used batteries in designated collecting points.
You are now ready to play!
19
10

1 2 3 4 5
6 7 8 9 10
56.5 cm
x 6 42.5 cm
x 4 57.5 cm
x 2 60.5 cm
x 2 42 cm
x 4
11 12 13 14 15
x 1 x 1 x 1 x 4x 1
x 8 x 6 x 8x 2
16 17 18 19
32.5 cm
x 2 20.5 cm
x 2 9 cm
x 2 69 cm
x 2 56.5 cm
x 1
8
Notice de montage
FR
• Veuillez lire attentivement et complètement ces informations avant d'assembler et d'utiliser le produit!
• Veillez à noter les consignes de sécurité à tous les utilisateurs, conservez-les pour référence ultérieure et, si nécessaire,
transmettez-les à d'autres utilisateurs.
• Certaines images ou dessins peuvent ne pas ressembler exactement à votre produit. Veuillez lire et comprendre le texte
avant de commencer toute étape d'assemblage.
• ATTENTION: Ne convient pas à des enfants de moins de 3 ans puisque les petites pièces peuvent être avalées. Risque d’étouffement.
• Au besoin, enlever tous les éléments de emballage avant de remettre ce produit à l'enfant.
• Vérifiez que l’ensemble est bien complet avant de démarrer le montage.
• Attention : Le montage doit être effectué uniquement par un adulte.
• Avant chaque utilisation, vérifiez que l'article est en parfait état.
• Si le produit est endommagé, veuillez interrompre le montage ou le démontage.
Reliez les tubes aux raccords, comme indiqué.
17
16
18
2
2
1
12
2
5
5
15
3
3
8
16
17
10
1
2
3
4

9
Fixez la paroi arrière (#11) aux tubes avec les 4
fermetures auto-agrippantes, comme indiqué. (Fig. 7)
Fixez le filet (#12) au cadre avec les fermetures
auto-agrippantes, comme indiqué. (Fig. 8 + 8A)
Insérez le tube 1 dans le trou de la douille devant le filet,
comme indiqué en fig. 9, et reliez le tube 1 au tube 16
comme indiqué en fig. 9.
17
1
1
1
6
7
7
6
16
4
15
9
5
7
8
9
9A
6
12
16
1
1
19
19
19
11
19
19

10
Si le jeu se trouve en mode veille et qu’une balle est lancée dans le panier, le jeu s’allume et le tableau affiche un compte
à rebours de 5 secondes. Après la fin de la partie, éteignez le compteur avec l’interrupteur marche/arrêt.
Remarque : Le compteur s’éteint au bout de 5 minutes si aucun panier n’est tenté. Nous vous recommandons cependant
de mettre l’interrupteur sur «OFF» si le jeu n’est pas utilisé pendant une période prolongée.
Instructions de jeu
• Ne pas grimper sur le dispositif ou se pendre au filet !
• Ne changez ou n’enlevez aucun composant original du jeu de basket-ball.
• Suivez les instructions et recommandations suivantes pour utiliser cet article.
• L’article doit être monté par un adulte.
Précaution:
• Assurez-vous qu’aucune partie de l’article n’est endommagée.
• Installation / Procédure
• Vérifiez le bon montage du jeu de basket-ball.
• Vérifiez l’état du jeu de basket-ball.
• Vérifiez le bon assemblage du filet et de l’anneau.
• Vérifiez la tenue et la stabilité du jeu de basket-ball.
• Pendant l’utilisation : Vérifiez régulièrement l’article.
• Entretien : Nettoyez et séchez l’objet avant de le stocker pour éviter tout dommage lié à l’humidité.
Avant utilisation :
Fixez le filet récupérateur de balles (#12) aux fermetures
auto-agrippantes (#19), comme indiqué en fig. 10.
Un tournevis est nécessaire pour ouvrir le compartiment à piles.
• Insérez 3 x piles 1,5V LR03.
• Remettez le couvercle du compartiment à piles et vissez le
compartiment.
• Fonctionne avec 3 piles 1,5V LR03 (non fournies).
• Les piles ne doivent être changées que par des adultes.
• N’utiliser que les piles spécifiées pour ce produit.
• Ne pas mélanger des piles usagées et des piles neuves ou des piles de
types différents.
• Placer les piles dans le sens de la polarité indiquée (+ / -).
• Ne court-circuitez pas les bornes de raccordement.
• Vérifier régulièrement que les piles ne fuient pas.
• Retirez des jouets les piles usagées.
• Oter les piles lorsque le produit n’est pas utilisé.
• Piles alcalines recommandées.
• Ne rechargez pas les piles non rechargeables.
• Les piles rechargeables ne doivent être rechargées que par des adultes.
• Retirez les piles rechargeables des jouets avant de les recharger.
• Déposer les piles usagées dans des points de collecte prévus à cet effet.
On peut y aller !
10
19

1 2 3 4 5
6 7 8 9 10
56.5 cm
x 6 42.5 cm
x 4 57.5 cm
x 2 60.5 cm
x 2 42 cm
x 4
11 12 13 14 15
x 1 x 1 x 1 x 4x 1
x 8 x 6 x 8x 2
16 17 18 19
32.5 cm
x 2 20.5 cm
x 2 9 cm
x 2 69 cm
x 2 56.5 cm
x 1
11
Istruzioni per il montaggio
IT
• Leggere attentamente e completamente queste informazioni prima di montare e utilizzare il prodotto!
• Si prega di notare le istruzioni di sicurezza per tutti gli utenti, conservare questo manuale per riferimenti futuri e, se
necessario, passarlo agli utenti successivi.
• Alcune immagini o disegni potrebbero non essere esattamente come il tuo prodotto. Leggere e comprendere il testo prima
di iniziare qualsiasi fase di assemblaggio.
• AVVERTENZA: Non adatto a bambini al di sotto dei 3 anni di età a causa di piccole parti che potrebbero essere ingerite.
Pericolo di soffocamento.
• Rimuovere tutto il materiale di imballaggio prima di dare questo prodotto al bambino.
• Prima di iniziare con l’installazione, verificare la completezza del contenuto.
• Attenzione: il montaggio deve essere eseguito solo da un adulto!
• Prima di ogni utilizzo verificare che l'articolo sia in perfette condizioni.
• Se il prodotto è danneggiato, interrompere il montaggio o lo smontaggio.
Collegare i tubi con i pezzi di raccordo, come indicato.
17
16
18
2
2
1
12
2
5
5
15
3
3
8
16
17
10
1
2
3
4

12
Fissare la parete posteriore (#11) con le 4 chiusure
in velcro ai tubi, come indicato. (Fig. 7)
Fissare la re (#12) con le chiusure in velcro al telaio,
come indicato. (Fig. 8 + 8A)
Inserire il tubo nel foro della boccola davanti alla rete,
come indicato nella fig. 9, e collegare il tubo 1 con il
tubo 16, come mostrato nella figura 9A.
17
1
1
1
6
7
7
6
16
4
15
9
5
7
8
9
9A
6
12
16
1
1
19
19
19
11
19
19

13
Se il gioco si trova in “modalità standby” e una palla viene lanciata nel canestro, il gioco si riattiva e il tabellone inizia un
conto alla rovescia di 5 secondi. Alla fine del gioco, spegnere il contatore con l’interruttore di accensione e
spegnimento (ON/OFF).
Indicazione: il tabellone si spegne automaticamente, passati 5 minuti dall’ultima palla lanciata nel canestro. Tuttavia,
suggeriamo di posizionare l’interruttore di accensione e spegnimento su “OFF”, se il gioco non viene ripreso per lungo tempo.
Istruzioni di gioco
• Non scalare il dispositivo o appendersi alla rete!
• Non modificare o rimuovere componenti originali del gioco di pallacanestro.
• Per utilizzare questo articolo, seguire le istruzioni e i suggerimenti seguenti.
• L’articolo deve essere montato da un adulto.
Cautela:
• Accertarsi che nessun componente dell'articolo sia danneggiato.
• Installazione / procedura
• Verificare il corretto montaggio del gioco di pallacanestro.
• Verificare lo stato del gioco di pallacanestro.
• Verificare l’applicazione corretta di rete e anello.
• Verificare la tenuta e la stabilità del gioco di pallacanestro.
• Durante l’uso: verificare regolarmente l’articolo.
• Manutenzione: pulire e asciugare l’oggetto prima dello stivaggio, al fine di evitare danni dovuti all’umidità.
Prima dell’uso:
Fissare la rete (#12) con le quattro chiusure in velcro (#19),
come mostrato nella fig. 10.
È necessario un cacciavite per aprire il vano batteria.
• Installa 3 batterie AAA.
• Riposizionare il coperchio del vano batteria e riavvitare il coperchio.
• Usare 3 pile della misura 1,5V LR03 (non incluse).
• Le pile devono essere cambiate solo da adulti.
• Usare solo pile specifiche per questo prodotto.
• Non mischiare pile vecchie e pile nuove o pile di tipi diversi.
• Posizionare le pile correttamente come specificato (+ / -).
• Non cortocircuitare i morsetti.
• Controllare regolarmente le pile per eventuali perdite.
• Togliere le batterie esaurite.
• Rimuovere le pile quando non in uso.
• Sono raccomandate le pile alcaline.
• Non ricaricare batterie non ricaricabili.
• Le batterie ricaricabili devono essere caricate solo da adulti.
• Togliere le batterie ricaricabili dal giocattolo prima di ricaricarle.
• Gettare le pile scariche nei vari punti di riciclaggio.
Ora è possibile iniziare!
10
19

1 2 3 4 5
6 7 8 9 10
56.5 cm
x 6 42.5 cm
x 4 57.5 cm
x 2 60.5 cm
x 2 42 cm
x 4
11 12 13 14 15
x 1 x 1 x 1 x 4x 1
x 8 x 6 x 8x 2
16 17 18 19
32.5 cm
x 2 20.5 cm
x 2 9 cm
x 2 69 cm
x 2 56.5 cm
x 1
14
Montage-instructies
NL
• Lees deze informatie eerst zorgvuldig en volledig door voordat u het product monteert en gaat gebruiken!
• Let op de veiligheidsinstructies voor alle gebruikers, bewaar deze handleiding voor toekomstig gebruik en geef deze zo
nodig door aan latere gebruikers.
• Sommige afbeeldingen of tekeningen lijken mogelijk niet precies op uw product. Lees eerst de tekst en zorg dat u deze
begrijpt voordat u met een montagestap begint.
• Waarschuwing! Niet geschikt voor kinderen jonger dan 3 jaar, omdat kleine onderdelen ingeslikt kunnen worden. Verstikkingsgevaar!
• Verwijder al het verpakkingsmateriaal voordat u het product aan uw kind geeft.
• Controleer eerst of de inhoud volledig is, voordat u met de montage begint.
• Attentie! De montage mag alleen door een volwassene worden uitgevoerd!
• Controleer voor elk gebruik of het artikel in perfecte staat verkeert.
• Als het product beschadigd is, stop dan onmiddellijk met de montage of demontage.
Verbind de buizen zoals weergegeven met de verbindingsstukken.
17
16
18
2
2
1
12
2
5
5
15
3
3
8
16
17
10
1
2
3
4

15
Bevestig de achterwand (11) zoals weergegeven met
de 4 klittenbandsluitingen aan de buizen. (Afb. 7)
Bevestig het net (12) zoals weergegeven met de
klittenbandsluitingen aan het frame. (Afb. 8 + 8A)
Steek buis 1 in het gat van de huls voor het net, zoals
weergegeven in afb. 9, en verbind buis 1 met buis 16,
zoals weergegeven in afb. 9A.
17
1
1
1
6
7
7
6
16
4
15
9
5
7
8
9
9A
6
12
16
1
1
19
19
19
11
19
19

16
Als het spel in de "slaapmodus" staat en er een bal in de basket wordt geworpen, wordt het spel automatisch weer
ingeschakeld en het elektrisch scorebord begint met een countdown van 5 seconden. Schakel het scorebord aan het einde
van het spel uit met de AAN/UIT-schakelaar (ON/OFF).
Opmerking: het scorebord wordt na 5 minuten uitgeschakeld als er gedurende deze tijd geen bal in de basket wordt
geworpen. Wij adviseren echter op de AAN/UIT-schakelaar op "OFF" te zetten als het spel gedurende langere tijd niet
wordt gebruikt.
Spelhandleiding
• Niet op het toestel klimmen of aan het net hangen!
• Verander of verwijder geen originele onderdelen van het basketbalspel.
• Volg de onderstaande aanwijzingen en adviezen, om het artikel te gebruiken.
• Het artikel moet door een volwassene gemonteerd worden.
Voorzichtig:
• Controleer of geen enkel onderdeel van het artikel beschadigd is.
• Installatie/werkwijze
• Controleer of het basketbalspel correct gemonteerd is.
• Controleer de toestand van het basketbalspel.
• Controleer of het net en de ring correct zijn aangebracht.
• Controleer de stevigheid en stabiliteit van het basketbalspel.
• Tijdens het gebruik: controleer het artikel regelmatig.
• Onderhoud: maak het artikel schoon en goed droog voordat u het opbergt, om beschadigingen door vocht te vermijden.
Voor gebruik:
Bevestig het ballennet (12) met de vier klittenbandsluitingen
(19), zoals weergegeven in afb. 10.
Gebruik een schroevendraaier om het batterijvak te openen.
• Plaats 3 LR03-batterijen van 1,5 V in het batterijvak.
• Breng de klep van het batterijvak weer aan en schroef het dicht.
• Er zijn 3 LR03-batterijen van 1,5 V nodig (niet inbegrepen).
• Batterijen mogen alleen door een volwassene worden vervangen.
• Gebruik alleen de vermelde batterijsoort.
• Gebruik geen oude en nieuwe batterijen of verschillende soorten batterijen
door elkaar.
• Let op de juiste polen (+/-).
• Batterijpolen en accuklemmen mogen niet worden kortgesloten.
• Controleer batterijen regelmatig op tekenen van lekkage.
• Haal lege batterijen uit het speelgoed.
• Verwijder de batterijen uit het speelgoed als het niet langer wordt gebruikt.
• Aanbevolen worden alkalische batterijen.
• Niet-oplaadbare batterijen mogen niet opnieuw worden opgeladen.
• Oplaadbare batterijen mogen alleen door volwassenen worden opgeladen.
• Verwijder oplaadbare batterijen uit het speelgoed, voordat ze worden opgeladen.
• Batterijen horen niet in het huisvuil maar bij speciale inzamelingspunten.
En dan kan het beginnen!
10
19

1 2 3 4 5
6 7 8 9 10
56.5 cm
x 6 42.5 cm
x 4 57.5 cm
x 2 60.5 cm
x 2 42 cm
x 4
11 12 13 14 15
x 1 x 1 x 1 x 4x 1
x 8 x 6 x 8x 2
16 17 18 19
32.5 cm
x 2 20.5 cm
x 2 9 cm
x 2 69 cm
x 2 56.5 cm
x 1
17
Instrucciones de montaje
ES
• ¡Lea esta información detenida y completamente antes de montar y usar el producto!
• Dé a conocer las instrucciones de seguridad a todos los usuarios, consérvelas para un uso posterior y páselas a los
futuros usuarios si es necesario.
• Es posible que algunas imágenes o dibujos no se vean exactamente como su producto. Lea y comprenda el texto antes de
comenzar cualquier paso de ensamblaje.
• ATENCIÓN: Riesgo de asfixia. No es apropiado para niños menores de 3 años, ya que podrían tragarse las piezas pequeñas.
• Retire todos los materiales de embalaje antes de darle el artículo al niño.
• Verifique que el contenido esté completo antes de comenzar el montaje.
• Atención: El montaje solo puede ser realizado por un adulto.
• Antes de cada uso, compruebe que el artículo esté en perfectas condiciones.
• Si el producto está dañado, interrumpa el montaje o desmontaje
Conecte los tubos con los conectores como se muestra.
17
16
18
2
2
1
12
2
5
5
15
3
3
8
16
17
10
1
2
3
4

18
Fije el panel trasero (#11) a los tubos con las 4 correas
de velcro como se muestra. (fig. 7)
Fije la red (#12) al marco con las tiras de velcro como
se muestra. (fig. 8 + 8A)
Inserte el tubo 1 en el orificio del manguito frente a la
red como se muestra en la fig. 9 y conecte el tubo 1 al
tubo 16 como se muestra en la fig. 9A.
17
1
1
1
6
7
7
6
16
4
15
9
5
7
8
9
9A
6
12
16
1
1
19
19
19
11
19
19

19
Cuando el juego está en "standby", si se lanza una pelota a la canasta, se encenderá y el marcador comenzará con una
cuenta atrás de 5segundos. Tras el final del juego, apague el contador usando el interruptor ON/OFF.
Nota: Si no se lanzan canastas, el marcador se apaga después de 5minutos. Sin embargo, si no va a usar el juego durante
un período de tiempo prolongado, le recomendamos colocar el interruptor en "OFF".
Instrucciones del juego
• ¡no se suba al dispositivo ni se cuelgue de la red!
• No modifique ni retire ningún componente original del juego.
• Siga las instrucciones y recomendaciones de uso que se muestran a continuación.
• El montaje debe llevarlo a cabo un adulto.
Atención:
• Asegúrese de que ninguna parte del artículo esté dañada.
• Instalación:
• Compruebe el correcto montaje del juego de baloncesto.
• Verifique el estado del juego de baloncesto.
• Compruebe la correcta sujeción de la red y el aro.
• Compruebe el apoyo y la estabilidad del juego de baloncesto.
• Durante el uso: Revise el producto con regularidad.
• Mantenimiento: Limpie y seque el producto antes de guardarlo para evitar daños por humedad.
Antes de usar:
Sujete la red lateral (#12) con las cuatro fijaciones de
velcro (#19) como se muestra en la fig.10.
Se requiere un destornillador para abrir el compartimento de la batería.
• Instale 3 pilas AAA.
• Vuelva a colocar la tapa del compartimento de la batería y cierre el
compartimento con tornillos.
• Use 3 pilas de tamaño 1,5V LR03 (no incluidas).
• Las pilas deben ser cambiadas sólo por adultos.
• Utilicese sólo pilas especificadas para este producto.
• No combinar pilas viejas y nuevas o pilas de diferentes tipos.
• Ponga las pilas en su posición correcta como se especifica (+ e -).
• No ponga en contacto los bornes de conexión ya que se puede producir un
cortocircuito.
• Revise las pilas regularmente para signos de escape.
• Extraiga las pilas del juguete una vez gastadas.
• Remueva las pilas cuando no esté en uso.
• Se recomiendan pilas alcalinas.
• No utilice el recargado de baterias para pilas no recargables.
• No recargar las pilas recargables sin la supervisión de un adulto.
• Extraiga las pilas recargables del juguete antes de proceder a su recarga.
• Coloque las pilas usadas en los puntos de colección designados.
¡Listo para jugar!
10
19

1 2 3 4 5
6 7 8 9 10
56.5 cm
x 6 42.5 cm
x 4 57.5 cm
x 2 60.5 cm
x 2 42 cm
x 4
11 12 13 14 15
x 1 x 1 x 1 x 4x 1
x 8 x 6 x 8x 2
16 17 18 19
32.5 cm
x 2 20.5 cm
x 2 9 cm
x 2 69 cm
x 2 56.5 cm
x 1
20
Navodila za sestavljanje
SL
• Prosimo, da ta navodila skrbno in v celoti preberete pred sestavljanjem in uporabo izdelka!
• Poskrbite, da so varnostna navodila in opozorila jasno vidna in znana vsakemu uporabniku ter jih predajte morebitnemu
novemu lastniku predmet.
• Nekatere slike ali risbe morda niso videti natančno tako, kot vaš izdelek. Prosimo, da pred določenim korakom montaže
besedilo preberete in ga razumete.
• POZOR: Ni primerno za otroke, mlajše od 3 let zaradi majhnih delov, ki jih lahko zaužijejo. Nevarnost zadušitve!
• Odstranite ves embalažni material, preden izdelek predate otroku.
• Preden začnete s sestavo preverite ali je vsebina popolna.
• Pozor: Montažo sme izvajati samo polnoletna oseba!
• Pred vsako uporabo preverite, ali se artikel nahaja v brezhibnem stanju.
• Če je izdelek poškodovan prenehajte z montažo ali demontažo.
Cevi povežite s povezovalnimi kosi, kot je prikazano.
17
16
18
2
2
1
12
2
5
5
15
3
3
8
16
17
10
1
2
3
4
Table of contents
Languages:
Other XTREM Toy manuals
Popular Toy manuals by other brands

Dynaflite
Dynaflite Daydream instruction manual

Hasbro
Hasbro TRANSFORMERS BUMBLEBEE manual

Eduard
Eduard 53 159 manual

Black Horse Model
Black Horse Model BEDE BD-5 Instruction manual book

GREAT PLANES
GREAT PLANES Super Sportster EP instruction manual

Hasbro
Hasbro FurReal Friends Jungle Cat 66529 instruction manual