xxodd xxodd User manual

USER MANUAL
【
Projector Nano Go 3
】
READ THIS USER MANUAL COMPLETELY BEFORE USAGE

Contents
Appearance, parts and name of product
Product specification
Charge the projector
Connection of projector
Startup and operation of projector
Volume adjustment
Motor focusing
Use the projector to charge other product
Important safety information
Trouble shooting
Trademarks

[Parts of the projector]
Top

Bottom

Side
1. Volume adjustment/FOCUS key
2. Mode key
3. Power key

Side
1. USB 5V OUT interface
2. Micro USB charging interface
3. HDMI/MHL interface
4. LENS

【
Specifications Projector Nano Go 3
】
Texas Instruments DLP Technology
Megabright LED lamp: 25 Lumen
LED Lamp: 20,000 hours lifetime
Up to 60” screen size
HDMI video/audio input
Compatible with HDMI for:
iPad 1st,2nd, 3d and 4th generation*, iPad
mini*, iPhone 4/4S and 5*, iPod 4th and 5th
generation* (Apple devices require an Apple
Digital A/V adapter (not included) for HDMI
use.
Most smartphones and tablets
Cameras and Camcorders with HDMI port
Mac & PC notebooks with HDMI port
Supports 5pin MHL-video/audio input via the
HDMI input port
An 11pin-to-5pin MHL adapter may be
required for 11pin MHL devices
1080p HD video input supported
640 x 360 WVGA 16:9 resolution
Contrast ratio 1500:1
100% offset
Short Focus Lens
Motor focus

Stereo speaker with digital control
Rechargeable 3400mAh battery
Up to 2.5 hours projection time
USB powerbank for smartphone (5V / 500mA)
USB Charge cable included
5pin MHL-HDMI cable included
HDMI-HDMI cable included
Dimension 68W x 10.5H x 12.6D (mm)
Weight: 155gram
Charger specification: DC 5V 2.1A input for projector.
(If using 5V 800mA charger when charging the projector,
then projector must be shut down when charging)
[Use instruction]
1. Charge the projector
1.1. Use the power adapter (not included) and USB
charge cable (included) to charge the projector. Using
non-standard power cable may cause charging
abnormity.

1.2. There are 4 charging LED indicators. The white
indicators will flash in turn when charging, and will stop
flashing and stay lightened when the charging is
completed. Attention: For the initial use, the battery of
the projector shall be fully charged for about 4-5 hours.
The working hour of projector is above 2.5 hours.
1.3.Press the power key to check the battery status.
When only one lightened LED indicator is left, it means
the battery of the projector is low. Connect the power
adapter and charge the projector promptly to avoid the
automatic power off when the battery is low.
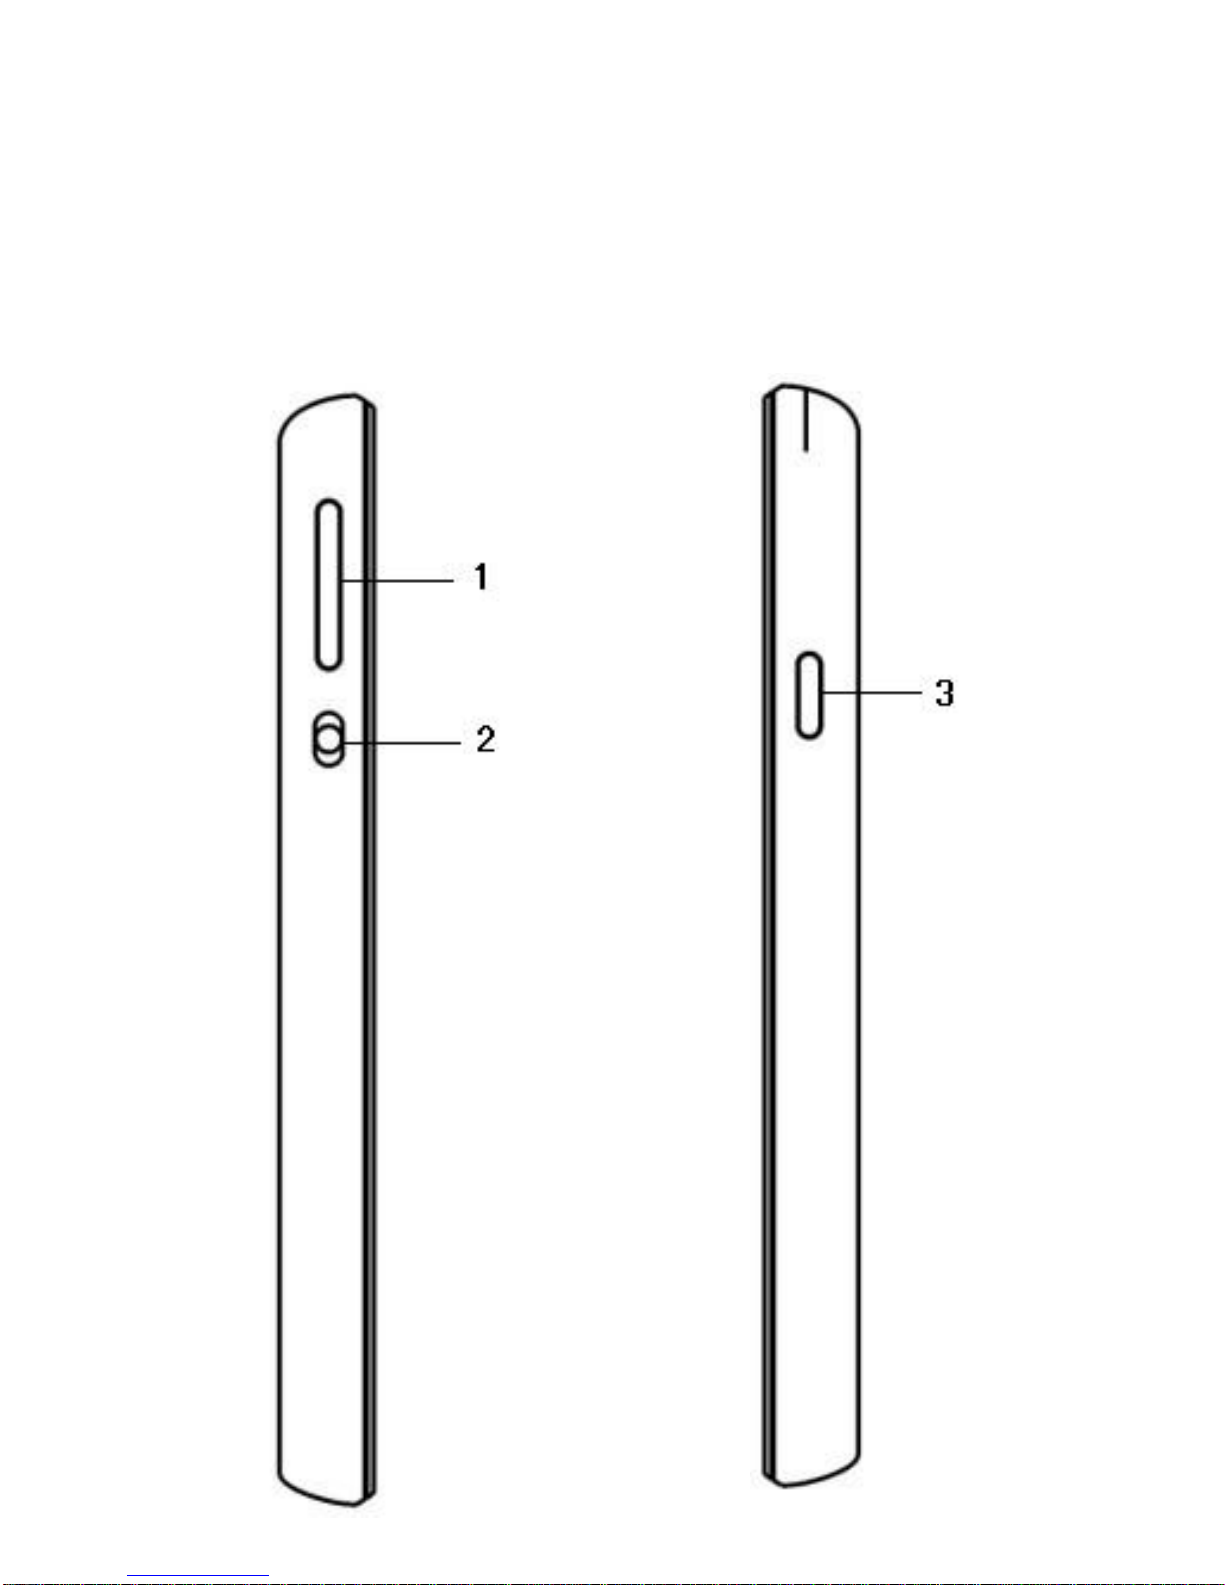
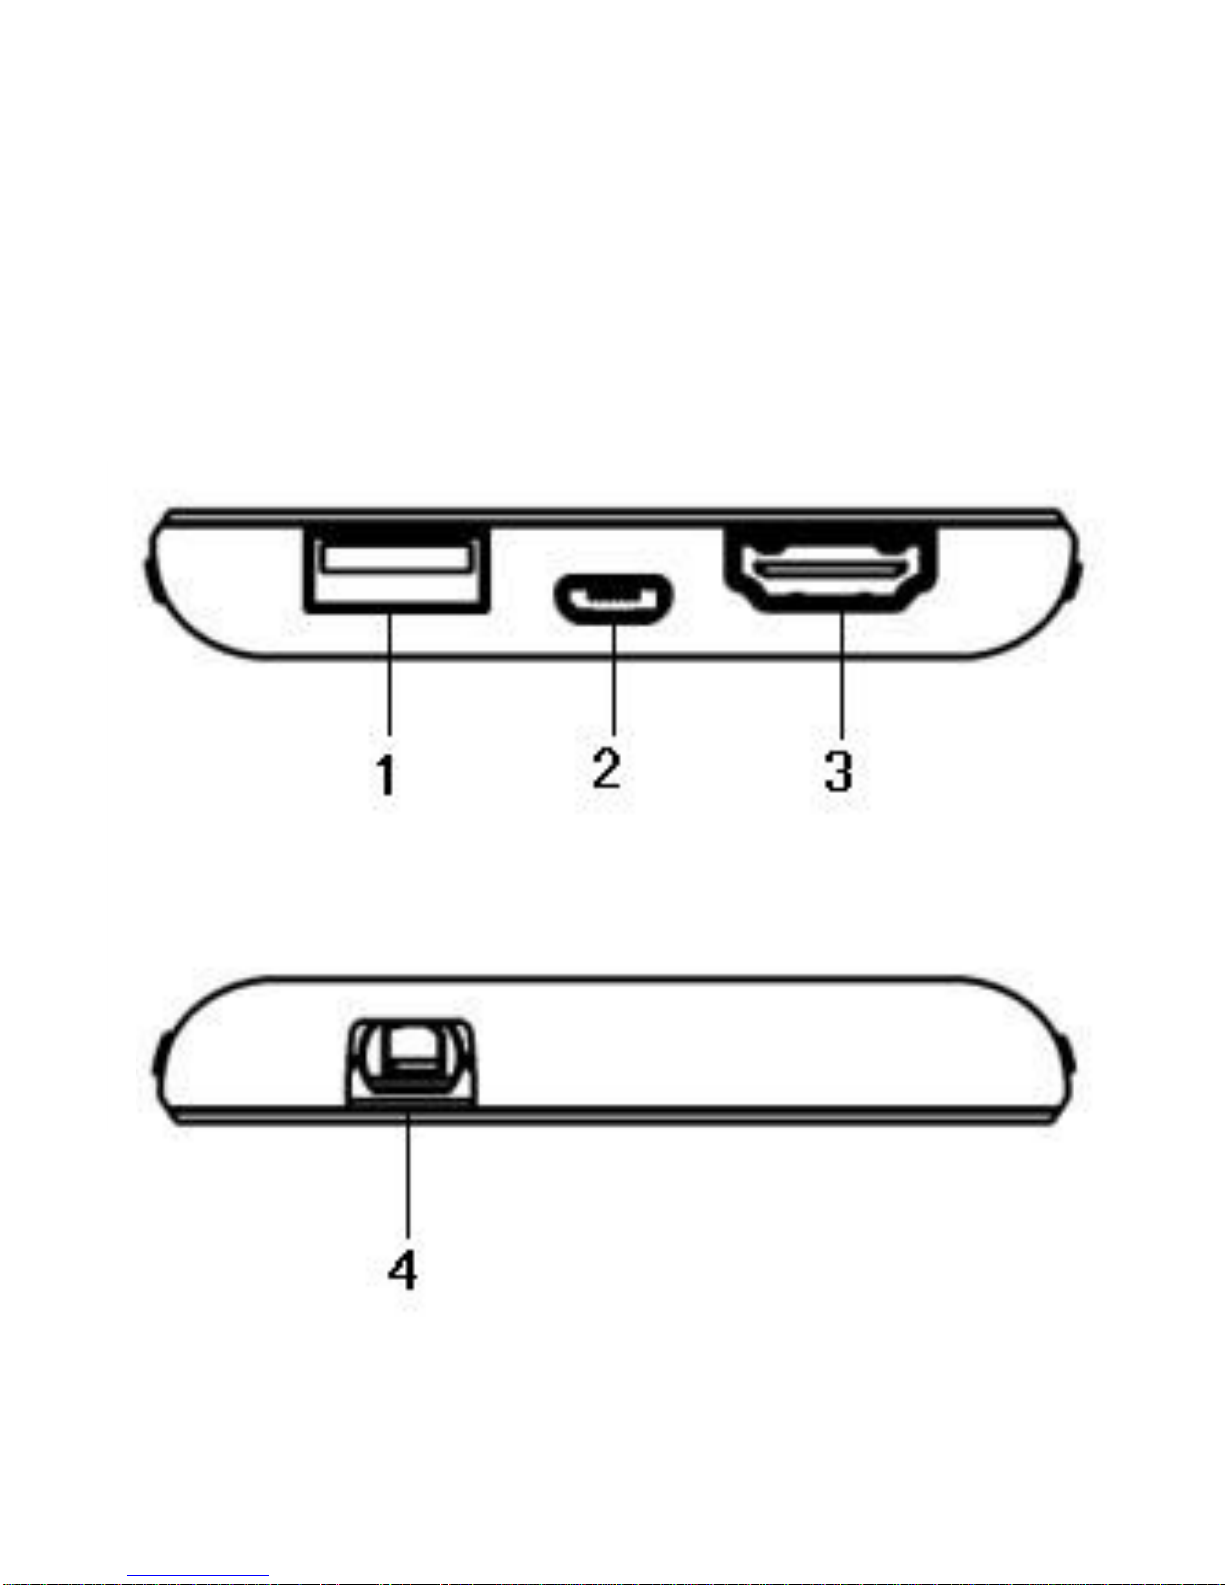
2. Connection of projector
2.1 Connect the power adapter with the power
connected to the USB power interface of the projector.
2.2. Connect one end of the HDMI cable (included in
the packaging) to the HDMI interface of the projector,
and other end to a device like notebook, smartphone,
tablet etc. (Notes:certain device may need a converter
to connect the HDMI data cable) Or connect the HDMI
interface of MHL cable (included in the packaging) to
the projector, and Micro-USB interface of the data
cable to the smartphone.

Attention! when connecting to an Apple device,
please use an Apple AV adapter (to be purchased
separately) to connect the HDMI data cable (included
in the packaging).
When connecting to other device, please inquire the
manufacturer or distributor of the product. The
connection may need other converters to connect the
HDMI data cable (such as Micro- or Mini-HDMI
converter).
3. Startup and operation of projector
3.1. Long press the power button (about 7 seconds) to
start the projector.
3.2. Choose and play your favorable movie or file by the
device connected to the projector.
3.3. The projector can work at any time and any place!
We recommend to aim the lens of projector at white
background (smooth and white background would be
preferred) if need picture effect with higher quality. The
dimension of projection image can be adjusted
according to the distance between the projector and

background. An image of 60" will be the best. Use the
projector in a dark ambient environment will improve
the image effect.
Attention: the projector will become warm at
both upper and down side during working.
This is a normal phenomenon of heat
emission which won’t impact the operation
of projector.
4. Volume adjustment
Move the mode key to the downwards position. Press
+ or - key to adjust the volume as per demands.
5. Motor focusing
Move the mode key upwards to the top. Press + or -
key and check the symbol “↑” and “↓” on screen to
adjust the image to the optimum status. When the
screen indicating the symbol of “”, it means the
focusing has arrived at the top end. When the screen
indicating the symbol of “”, it means the focusing
has arrived at the bottom end.

6. Use the projector to charge other product
The projector can be used for charging smartphones.
6.1. Connect one end of USB cable (to be purchased
separately) to a smartphone, and other end of USB
cable to the USB interface of the projector.
(fully charged).
6.2. The screen of smartphone will indicate
“charging” until the charging is completed.
Important safety information
Please carefully read the instructions in the user
manual before using the projector, and operate the
projector as per the instructions. Any damages
caused by failure of complying with instructions will
invalidate the warranty.
Warning
Please do not block any air vents. To ensure the
normal operation of projector and prevent
overheating, the location of projector shall not
influence the normal ventilation of projector.

To reduce the risk of electric shock, do not open the
housing of product. No part inside the product can
be repaired by user.
To reduce the risk of fire or electric shock, do not
expose the product to rain or moisture.
The lightning flash with
arrowhead symbol within an
equilateral triangle is
intended to alert the user to
the presence of uninsulated
“dangerous voltage” within
the product’s enclosure that
may be of sufficient
magnitude to constitute a risk
of electric shock to persons.

The exclamation point within
an equilateral triangle is
intended to alert the user to
the presence of important
operating and maintenance
(servicing) instructions in the
literature accompanying the
appliance.
Danger
To reduce the risk of electric shock, burn, fire and
injury:
1. Do not use the product during showering.
2. Do not locate the product at a place that may
cause the product falling into a bathtub or flume.
3. Do not expose the product to water or any kind of
liquid.
4. If the product falls into water, do not take it out by
hand, cut off the power immediately.
5. During operating, prevent the product from falling
into or being exposed to water or liquid.

Warning
1. Please pay special attention to child or mental
patient who is present or using the product.
2. Please operate the product as per the instructions
of user manual.
3. Please pull out the power plug during thunder
storm or when the product is idle.
4. Prevent any articles entering into the product.
5. Prevent treading or squeezing the power wire,
especially the plug, power outlet and vent.
6. Prevent the power cable to contact with heater or
any heat source. Use loose packaging to store the
product. Avoid the extreme bending of power wire.
7. Do not expose the product to direct sunlight or
any heat source, such as radiator, warming machine,
stove or any device that will generate heat
(including magnifier). Do not place the product on
the top of stereo equipment which will generate
radiant heat.
8. Prevent the cloth, plastic bag or paper material

blocking the air vent of products. Do not place the
product on the surface that may block the air vent,
such as sofa or bed.
9. Do not overload the power outlet. Only use the
exclusively appointed power voltage.
10. Do not move or place the product by pulling the
power cable
11. If the product cannot be used due to the damage
of power cable or plug, damages caused by falling,
or immersion, do not use the product. Do not repair
the damaged power cable or plug individually.
12. To avoid the electric shock, do not open the
product housing or repair the product. Improper
repair may expose you in dangerous voltage or other
hazardous.
13. Do not store the product in flammable or
explosive environment.
14. Hold the plug or connector when pulling out the
plug. Do not pull the power cable

Warning!
The product is with rechargeable battery
built in.
.Do not place the product in any area with high
temperature, moisture or direct sunlight.
. Do not disassemble the product.
.Do not put the product into fire or water, which
may cause explosion or injury.
. Keep the product out of the reach of children.
. Do not touch the product with damp hands.
.Please properly dispose the waste product.
.Do not discard the product as common household
rubbish.
.Please contact the local recycle center to properly
dispose the product.

Trouble shooting
Q: The projector cannot project video image.
A: Please charge the battery of device, and check
whether the interface of HDMI data cable is
correctly connected to the projector and device.
Q: The projection image is fuzzy.
A: Toggle the focusing adjustment button to adjust
the image to the optimal projection effect. The fuzzy
image may probably be caused by the selected
background. Please select smooth background for
projection.
Q: The projector has been fully charged and is
connected to my device, but still cannot project.
A: Check whether the data wire is correctly
connected.
Q: No signal – my device has no data output.
A: Check whether your device has been started up
and is fully charged.

[Trademarks]
HDMI, HDMI logo and High-
definition Multimedia Interface are trademarks or
registered trademarks of HDMI Licensing LLC in the
United States and other countries or districts.
iPad, iPhone, and iPod touch are trademarks of Apple
Inc., registered in the U.S. and other countries.
DLP and the DLP ® logo are trademarks of Texas
Instruments.
【
RISK GROUP 2
】
CAUTION: POSSIBLE HAZARDOUS OPTICAL
RADIATION EMITTED FROM THIS PRODUCT.
DO NOT STARE AT OPERATING LAMP.
MAY BE HARMFUL TO THE EYES.
This product is CE, FCC, ROHS compliant.
This manual suits for next models
1
Table of contents
Other xxodd Projector manuals