5P/N 10001646 Rev. AA
June 2015
GENERAL SAFETY INFORMATION
(CONTINUED)
MOVING HAZARDOUS LOADS
The hoists are not recommended for lifting materials that could
cause widespread damage if dropped. The lifting
or moving of materials that could explode or cause
chemical or radioactive contamination requires fail-safe,
redundant supporting devices that are not incorporated
into these hoists.
TEMPERATURE LIMITS IN EXPLOSIVE
ATMOSPHERES AND DUSTS
In order to determine the maximum surface temperature,
several tests have been performed with nominal load under
extreme conditions. The maximum surface temperature has
been determined at a room temperature of 68°F (20°C) to 72°F
(22°C) without dust deposit and without safety factors!
Based on these tests, the Yalelift range has been classified
in temperature class T4 (275°F/135°C maximum surface
temperature) for gases. The relevant values for dusts can be
found on page 2.
These values refers to a lowering process of up to 10 m without
disruption. For longer lowering processes, e.g. 15 m or more,
breaks must be made for cooling.
The hoist may be used at ambient temperatures between -4°F
(–20 C°) and 104°F (40°C). Consult the manufacturer in the case
of extreme working conditions.
The temperature range refers to -4°F (–20°C) up to 104°F
(40°C). In case of deviating loading or temperature ranges
consult the manufacturer.
Units for operation in areas with potentially explosive
gases/air resp. steam/air atmospheres or inflammable
mist
The temperatures of all equipment, protective systems
and components surfaces which can come into contact
with explosive atmospheres must not exceed the ignition
temperature of the combustible gas or liquid during normal
operation and in the case of malfunctions. However, where it
cannot be excluded that the gas or vapor can be heated to the
temperature of the surface, this surface temperature must not
exceed 80% of the ignition temperature of the gas measured
in °C. This value may only be exceeded in the case of rare
malfunctions.
Units for operation in dust /air atmospheres
In areas, which are explosive by inflammable dusts, the surface
temperature must not exceed 2/3 of the minimum ignition point
in degrees Celsius (°C) of the dust/air mixture. Temperatures
of surfaces, which can be subject to dangerous deposits of
ignitable dusts, must be one safety margin lower than the
minimum ignition temperature of the layer which can possibly
be generated by the respective dust. This requires a safety
margin of 75 K between the minimum ignition point of a dust
deposit (ignition temperature) and the surface temperature of
the unit. If the dust deposit exceeds a thickness of 5 mm, larger
safety margins are required.
Combustion and explosion characteristics of dusts:
Starch / milk powder / gelatine
Ignition temperature 390 °C x 2/3 = 260 °C max. permissible
surface temperature.
Wood / grinding dust
Ignition temperature 290 °C - 75 °C = 215 °C max. permissible
surface temperature.
Classification of the hoists
After intensive testing under extreme conditions the hoist series
Yalelift can be classified for correct operation in the general
industry as follows on page 2. The documents have been
checked by a nominated body and deposited at
TÜV Rheinland Industrie Service GmbH, Haumannplatz 4,
45130 Essen.
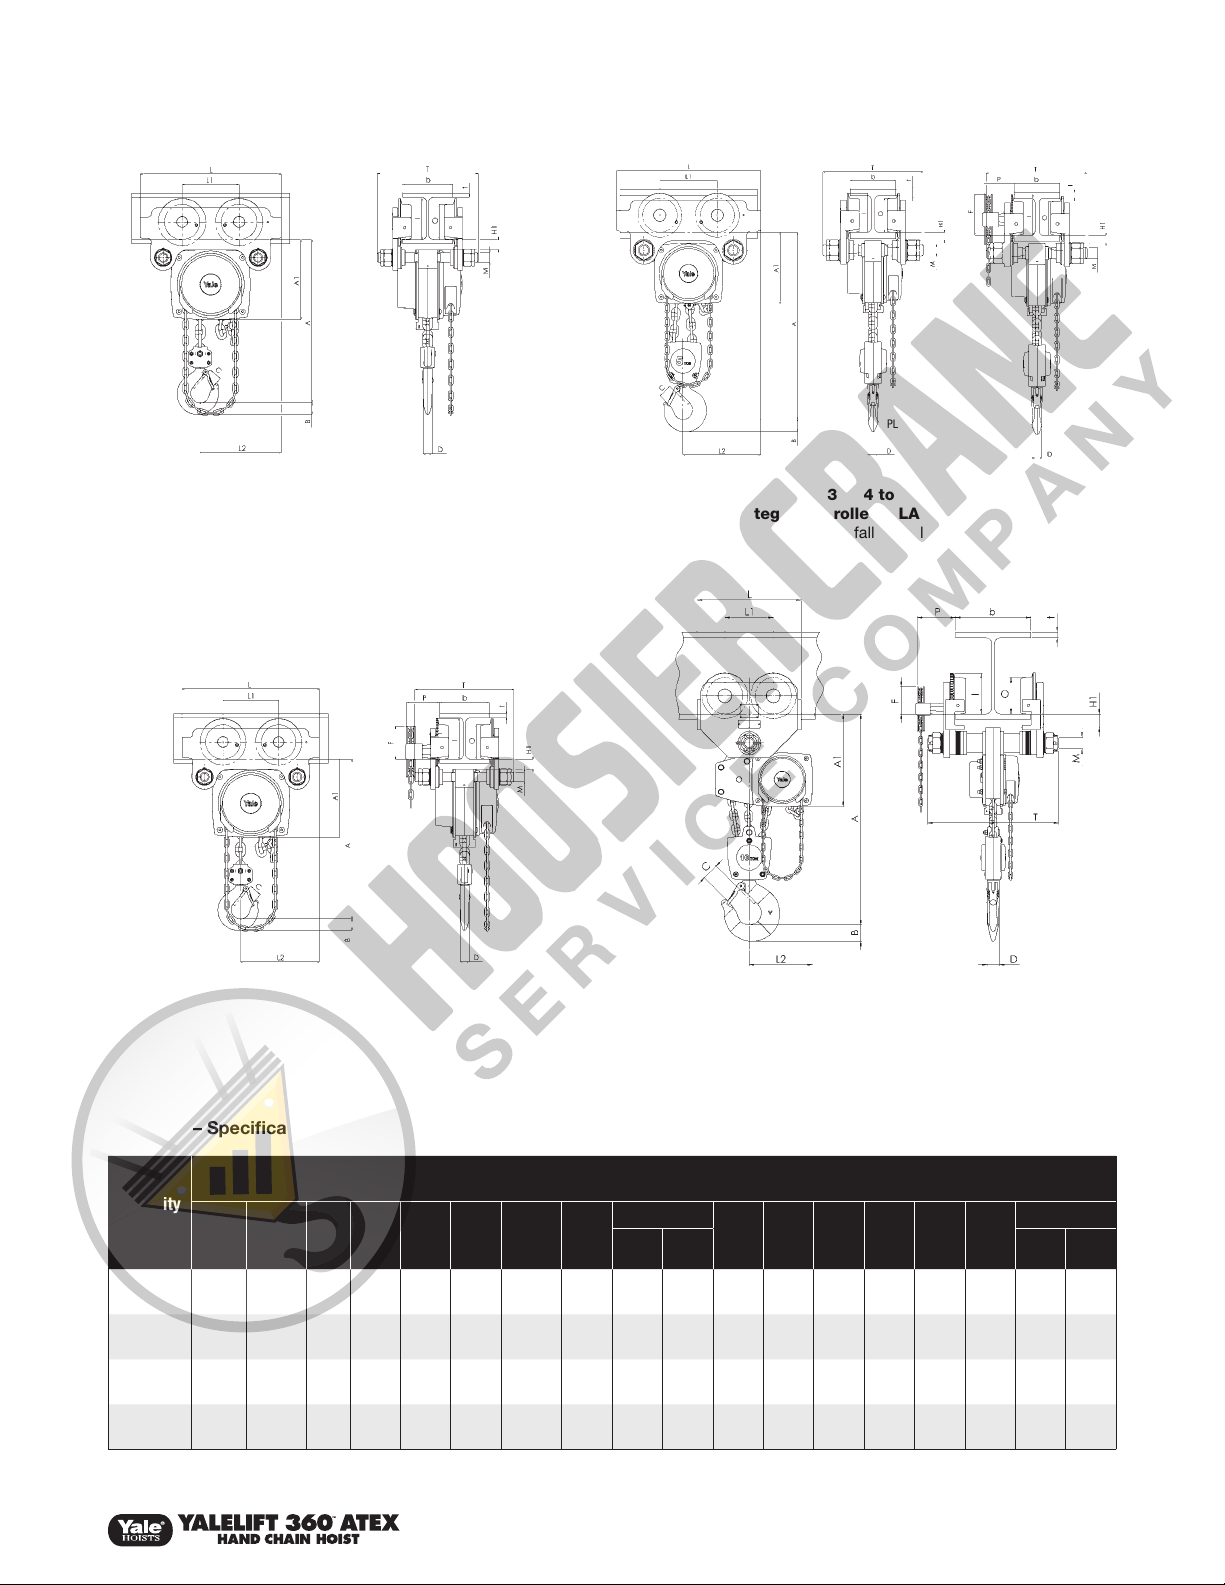
IDENTIFICATION
In order to exactly identify the product, you will find the identity
plate with all pertinent data on the gear cover. In case of queries
with regard to handling the product, which are not covered by
these operating instructions, please contact:
COLUMBUS McKINNON CORPORATION
140 John James Audubon Parkway
Amherst, NY 14224 U.S.A
Phone: 800-888-0985 • Fax: 716-689-5644
www.cmworks.com
SPARK FORMATION
Materials subject to danger of friction and impact
Individual sparks can be generated as a result of frictional
and/or impact processes and, as a consequence, can be the
cause dangers of ignition in gases or impact-sensitive dusts.
Increased danger of ignition may emanate from clashing of
special material pairings. These are non corrosion-resistant
steel or cast iron against magnesium or pertinent alloys. This
applies especially in case of rust (e.g. surface rust).
Especially at the friction points of the chain and load hook
rust (surface rust) may occur. For correct operation of the
product it must therefore be ensured that there is no rust at
these wear points and that in the application area there are
no material combinations of the above-mentioned aluminium
alloys and steel (exception: antirust steel) at possible friction,
impact or grinding points; thus spark formation by these
material combinations as a result of mechanical impact can be
excluded.
Hand and load chain
Always ensure that the hand chain, load chain and the load are
guided to exclude grinding and/or sliding contact with external
constructions or components. Depending on the degree of
corrosion, the conductive discharge capability of hand chains
and/or load chains can worsen to an effect that it is not
adequate any longer. For operation this means that rusty hand
chains and/or load chains must no longer be used.
Attention: The user has to operate the unit to avoid sparking from the
hand chain as well as from the load chain. YLITP/YLITG models must
always be operated from below.
For additional safety and to avoid sparking by impact or friction
during operation, the units are equipped with stainless steel
hand chains.
Units have copper-plated top and bottom hooks and are fitted
with stainless steel load chain.
Trolleys are always provided with buffer and solid bronze
wheels. Geared trolleys are equipped with stainless steel hand
chain.
Attachment points
Attachment points have to be selected to ensure that the
expected forces can be safely absorbed. The unit must align
freely under load in order to avoid impermissible additional
loading.
STATIC ELECTRICITY
In order to avoid electrostatic charging on plastic parts, the
user should wear suitable protective clothing, e. g. conductive
footwear, clothes and gloves. It is also advised that the product
is used on a conductive floor.
Cleaning only with a damp cloth (when cleaning these
components, make sure to apply only materials which do not
allow electrostatic charging).
Special feature of hydrogen (explosion group IIC): Hydrogen
only requires an extremely small energy for ignition. For this
reason, we recommend that prior to application of the unit a
release measurement be carried out. The spark for ignition may
be generated electrostatically or mechanically by handling of a
tool, for example.