Yamaha DD-35 User manual


2
PLEASE KEEP THIS MANUAL
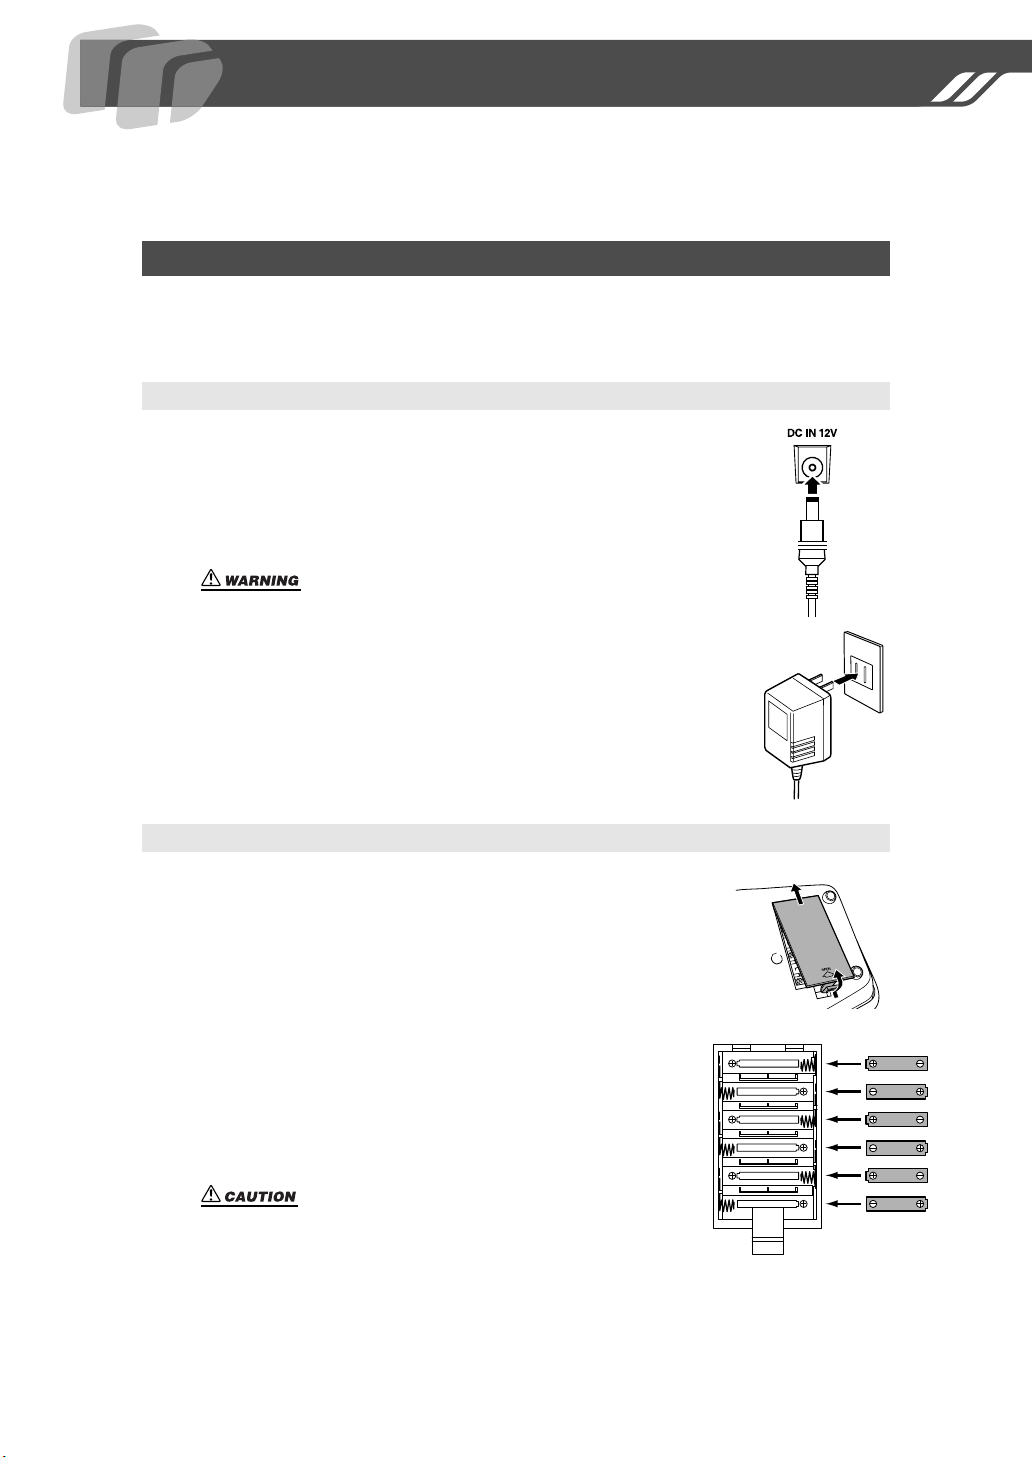
This product utilizes batteries or an external power supply (adapter). DO
NOT connect this product to any power supply or adapter other than one
described in the manual, on the name plate, or specifically recommended
by Yamaha.
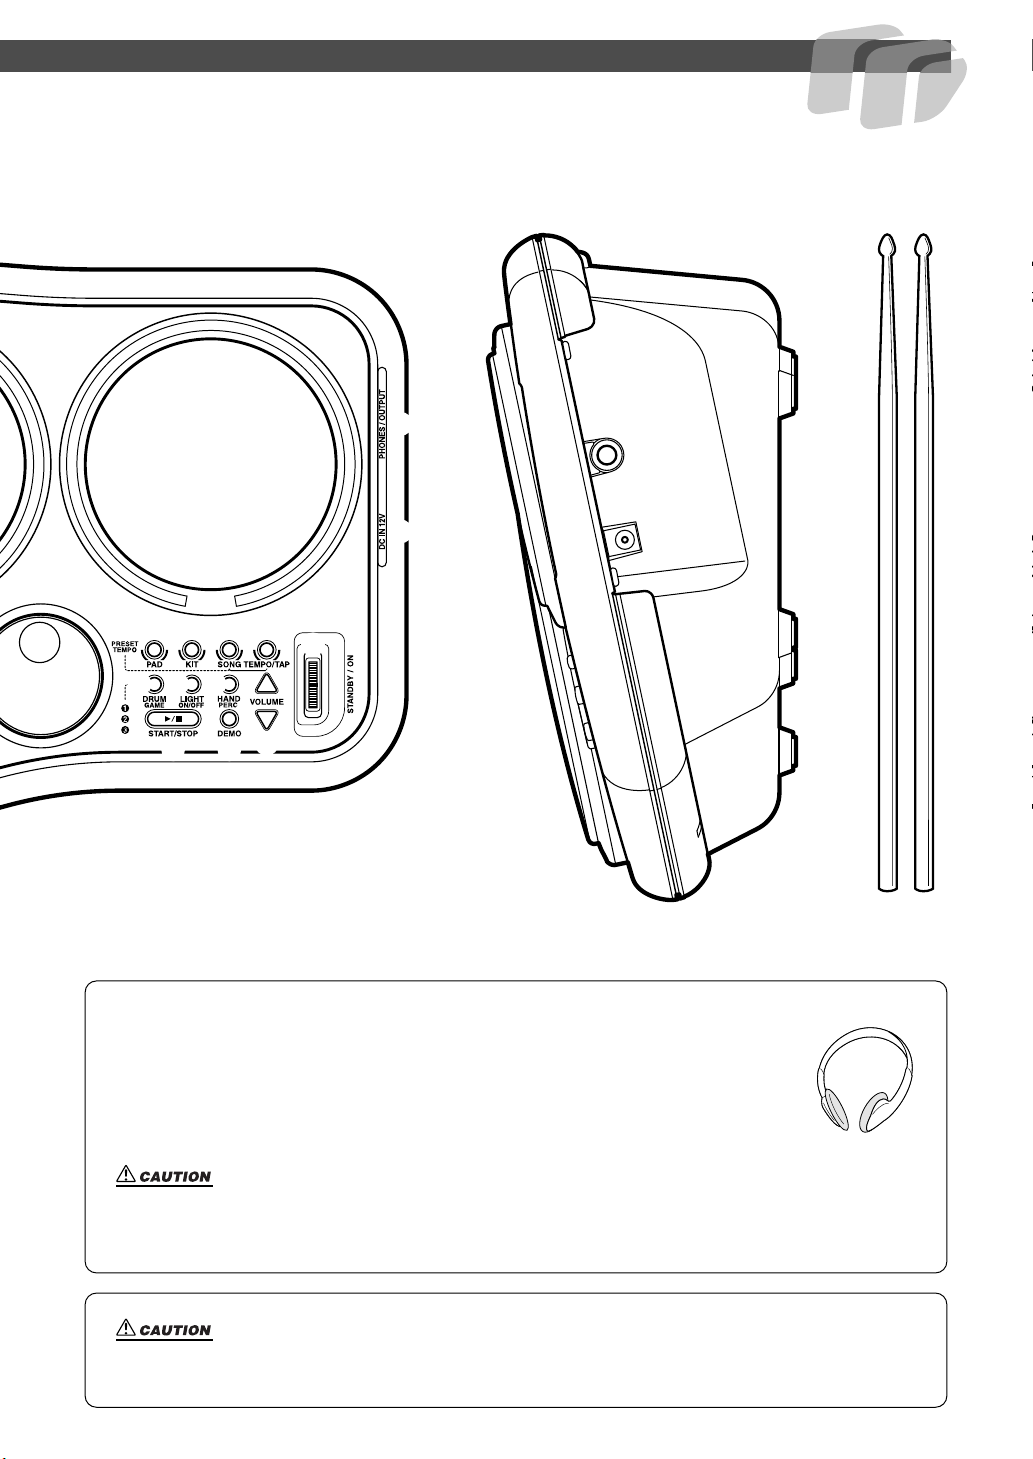
This product should be used only with the components supplied or; a
cart, rack, or stand that is recommended by Yamaha. If a cart, etc., is
used, please observe all safety markings and instructions that accom-
pany the accessory product.
SPECIFICATIONS SUBJECT TO CHANGE:
The information contained in this manual is believed to be correct at the
time of printing. However, Yamaha reserves the right to change or modify
any of the specifications without notice or obligation to update existing
units.
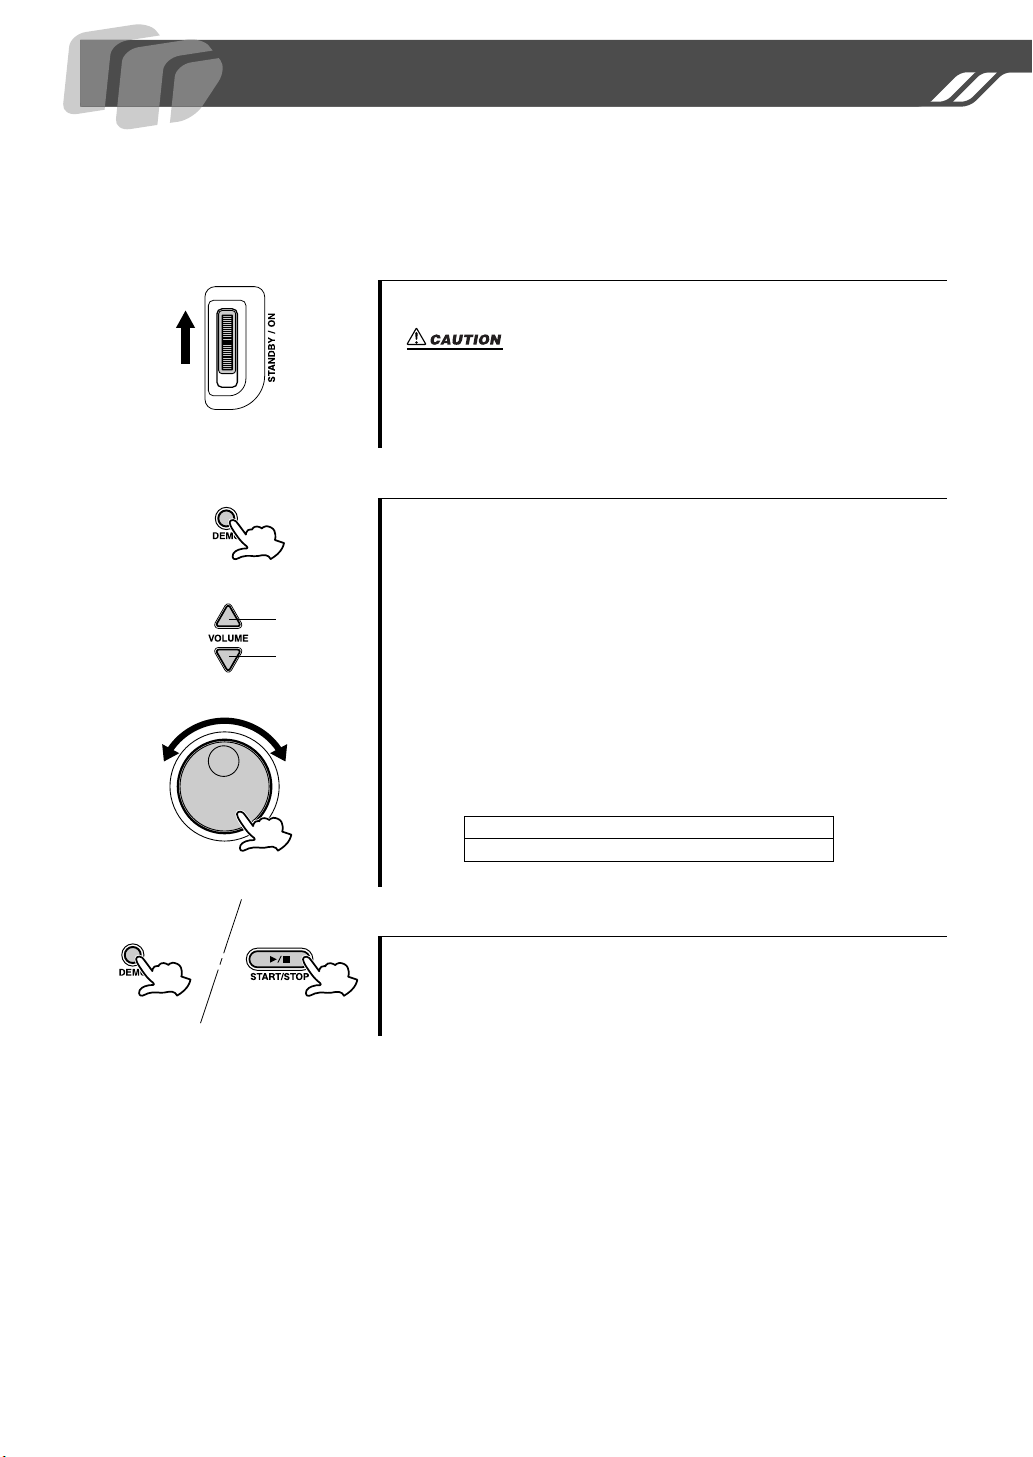
This product, either alone or in combination with an amplifier and head-
phones or speaker/s, may be capable of producing sound levels that
could cause permanent hearing loss. DO NOT operate for long periods of
time at a high volume level or at a level that is uncomfortable. If you expe-
rience any hearing loss or ringing in the ears, you should consult an audi-
ologist.
IMPORTANT: The louder the sound, the shorter the time period before
damage occurs.
NOTICE:
Service charges incurred due to a lack of knowledge relating to how a
function or effect works (when the unit is operating as designed) are not
covered by the manufacturer’s warranty, and are therefore the owners
responsibility. Please study this manual carefully and consult your dealer
before requesting service.
ENVIRONMENTAL ISSUES:
Yamaha strives to produce products that are both user safe and environ-
mentally friendly. We sincerely believe that our products and the produc-
tion methods used to produce them, meet these goals. In keeping with
both the letter and the spirit of the law, we want you to be aware of the fol-
lowing:
Battery Notice:
This product MAY contain a small non-rechargeable battery which (if
applicable) is soldered in place. The average life span of this type of bat-
tery is approximately five years. When replacement becomes necessary,
contact a qualified service representative to perform the replacement.
This product may also use “household” type batteries. Some of these
may be rechargeable. Make sure that the battery being charged is a
rechargeable type and that the charger is intended for the battery being
charged.
When installing batteries, do not mix batteries with new, or with batteries
of a different type. Batteries MUST be installed correctly. Mismatches or
incorrect installation may result in overheating and battery case rupture.
Warning:
Do not attempt to disassemble, or incinerate any battery. Keep all batter-
ies away from children. Dispose of used batteries promptly and as regu-
lated by the laws in your area. Note: Check with any retailer of household
type batteries in your area for battery disposal information.
Disposal Notice:
Should this product become damaged beyond repair, or for some reason
its useful life is considered to be at an end, please observe all local, state,
and federal regulations that relate to the disposal of products that contain
lead, batteries, plastics, etc. If your dealer is unable to assist you, please
contact Yamaha directly.
NAME PLATE LOCATION:
The name plate is located on the bottom of the product. The model num-
ber, serial number, power requirements, etc., are located on this plate.
You should record the model number, serial number, and the date of pur-
chase in the spaces provided below and retain this manual as a perma-
nent record of your purchase.
Model
Serial No.
Purchase Date
SPECIAL MESSAGE SECTION
92-BP (bottom)
1. IMPORTANT NOTICE: DO NOT MODIFY THIS UNIT!
This product, when installed as indicated in the instructions contained
in this manual, meets FCC requirements. Modifications not expressly
approved by Yamaha may void your authority, granted by the FCC, to
use the product.
2. IMPORTANT:
When connecting this product to accessories and/
or another product use only high quality shielded cables. Cable/s
supplied with this product MUST be used. Follow all installation
instructions. Failure to follow instructions could void your FCC autho-
rization to use this product in the USA.
3. NOTE:
This product has been tested and found to comply with the
requirements listed in FCC Regulations, Part 15 for Class “B” digital
devices. Compliance with these requirements provides a reasonable
level of assurance that your use of this product in a residential envi-
ronment will not result in harmful interference with other electronic
devices. This equipment generates/uses radio frequencies and, if not
installed and used according to the instructions found in the users
manual, may cause interference harmful to the operation of other
electronic devices. Compliance with FCC regulations does not guar-
antee that interference will not occur in all installations. If this product
is found to be the source of interference, which can be determined by
turning the unit “OFF” and “ON”, please try to eliminate the problem
by using one of the following measures:
Relocate either this product or the device that is being affected by the
interference.
Utilize power outlets that are on different branch (circuit breaker or
fuse) circuits or install AC line filter/s.
In the case of radio or TV interference, relocate/reorient the antenna.
If the antenna lead-in is 300 ohm ribbon lead, change the lead-in to
co-axial type cable.
If these corrective measures do not produce satisfactory results,
please contact the local retailer authorized to distribute this type of
product. If you can not locate the appropriate retailer, please contact
Yamaha Corporation of America, Electronic Service Division, 6600
Orangethorpe Ave, Buena Park, CA90620
The above statements apply ONLY to those products distributed by
Yamaha Corporation of America or its subsidiaries.
FCC INFORMATION (U.S.A.)
* This applies only to products distributed by YAMAHA CORPORATION OF AMERICA.
Entsorgung leerer Batterien (nur innerhalb Deutschlands)
Leisten Sie einen Beitrag zum Umweltschutz. Verbrauchte Batterien
oder Akkumulatoren dürfen nicht in den Hausmüll. Sie können bei
einer Sammelstelle für Altbatterien bzw. Sondermüll abgegeben wer-
den. Informieren Sie sich bei Ihrer Kommune.
(class B)
(battery)
OBSERVERA!
Apparaten kopplas inte ur växelströmskällan (nätet) sá länge som den
ar ansluten till vägguttaget, även om själva apparaten har stängts av.
ADVARSEL:
Netspæendingen til dette apparat er IKKE afbrudt,
sálæenge netledningen siddr i en stikkontakt, som er t endt — ogsá
selvom der or slukket pá apparatets afbryder.
VAROITUS:
Laitteen toisiopiiriin kytketty käyttökytkin ei irroita koko
laitetta verkosta.
(standby)

3
PRECAUTIONS
PLEASE READ CAREFULLY BEFORE PROCEEDING
* Please keep these precautions in a safe place for future reference.
WARNING
Always follow the basic precautions listed below to avoid the possibility of serious injury or even death from electrical
shock, short-circuiting, damages, fire or other hazards. These precautions include, but are not limited to, the following:
• Do not open the instrument or attempt to disassemble the internal parts or
modify them in any way. The instrument contains no user-serviceable
parts. If it should appear to be malfunctioning, discontinue use immedi-
ately and have it inspected by qualified Yamaha service personnel.
• Do not expose the instrument to rain, use it near water or in damp or wet
conditions, or place containers on it containing liquids which might spill
into any openings.
• If the AC adaptor cord or plug becomes frayed or damaged, or if there is a
sudden loss of sound during use of the instrument, or if any unusual
smells or smoke should appear to be caused by it, immediately turn off
the power switch, disconnect the adaptor plug from the outlet, and have
the instrument inspected by qualified Yamaha service personnel.
• Use the specified adaptor (PA-3B or an equivalent recommended by
Yamaha) only. Using the wrong adaptor can result in damage to the
instrument or overheating.
• Before cleaning the instrument, always remove the electric plug from the
outlet. Never insert or remove an electric plug with wet hands.
• Check the electric plug periodically and remove any dirt or dust which
may have accumulated on it.
CAUTION
Always follow the basic precautions listed below to avoid the possibility of physical injury to you or others, or damage to
the instrument or other property. These precautions include, but are not limited to, the following:
• Do not place the AC adaptor cord near heat sources such as heaters or
radiators, and do not excessively bend or otherwise damage the cord,
place heavy objects on it, or place it in a position where anyone could
walk on, trip over, or roll anything over it.
• When removing the electric plug from the instrument or an outlet, always
hold the plug itself and not the cord.
• Do not connect the instrument to an electrical outlet using a multiple-con-
nector. Doing so can result in lower sound quality, or possibly cause
overheating in the outlet.
• Unplug the AC power adaptor when not using the instrument, or during
electrical storms.
• Always make sure all batteries are inserted in conformity with the +/-
polarity markings. Failure to do so might result in overheating, fire, or
battery fluid leakage.
• Always replace all batteries at the same time. Do not use new batteries
together with old ones. Also, do not mix battery types, such as alkaline
batteries with manganese batteries, or batteries from different makers, or
different types of batteries from the same maker, since this can cause
overheating, fire, or battery fluid leakage.
• Do not dispose of batteries in fire.
• Do not attempt to recharge batteries that are not intended to be charged.
• When the batteries run out, or if the instrument is not to be used for a long
time, remove the batteries from the instrument to prevent possible leakage
of the battery fluid.
• Keep batteries away from children.
• If the batteries do leak, avoid contact with the leaked fluid. If the battery
fluid should come in contact with your eyes, mouth, or skin, wash imme-
diately with water and consult a doctor. Battery fluid is corrosive and may
possibly cause loss of sight or chemical burns.
• Before connecting the instrument to other electronic components, turn off
the power for all components. Before turning the power on or off for all
components, set all volume levels to minimum. Also, be sure to set the
volumes of all components at their minimum levels and gradually raise
the volume controls while playing the instrument to set the desired listen-
ing level.
• Do not expose the instrument to excessive dust or vibrations, or extreme
cold or heat (such as in direct sunlight, near a heater, or in a car during
the day) to prevent the possibility of panel disfiguration or damage to the
internal components.
• Do not use the instrument near other electrical products such as televi-
sions, radios, or speakers, since this might cause interference which can
affect proper operation of the other products.
• Do not place the instrument in an unstable position where it might acci-
dentally fall over.
• Before moving the instrument, remove all connected adaptor and other
cables.
• When cleaning the instrument, use a soft, dry cloth. Do not use paint thin-
ners, solvents, cleaning fluids, or chemical-impregnated wiping cloths.
Also, do not place vinyl, plastic or rubber objects on the instrument, since
this might discolor the panel or keyboard.
• Do not rest your weight on, or place heavy objects on the instrument, and
do not use excessive force on the buttons, switches or connectors.
• Do not operate the instrument for a long period of time at a high or
uncomfortable volume level, since this can cause permanent hearing loss.
If you experience any hearing loss or ringing in the ears, consult a physi-
cian.
Always turn the power off when the instrument is not in use.
Make sure to discard used batteries according to local regulations.
Yamaha cannot be held responsible for damage caused by improper use
or modifications to the instrument, or data that is lost or destroyed.
* The illustrations and LED displays as shown in this owner’s manual
are for instructional purposes only, and may be different from the
ones on your instrument.
(4)-7

4
Setting Up 5
Power Requirements............................................ 5
Front Panel 6
Playing the Demo Song 8
Play the Pads 9
Pad Names........................................................... 9
Hand Percussion ON/OFF ................................. 10
Assigning a Drum Kit to the Pads....................... 10
Assigning a Voice to Individual Pads
(“CU
” Custom Kit) ......................................... 11
Playing a Song 12
Selecting a Song ................................................ 12
Tap Start............................................................. 13
Adjusting the Tempo .......................................... 13
Pad Light ON/OFF.............................................. 14
Playing the Game 15
Selecting and Playing a Game Song ................. 15
Appendix 16
Troubleshooting ................................................. 16
Drum Voice List.................................................. 17
Song List ............................................................ 19
Drum Kit List....................................................... 20
Specifications ..................................................... 22
Contents
Congratulations!
Thank you for purchasing the Yamaha DD-35. The DD-35 has
been developed to respond and play like a drum set — but with
greater ease, flexibility and sophisticated functions. Before you
use the instrument, we recommend that you carefully read through
this manual.
●
Supplied Accesoories
• Drum Stick (x2)
• Owner’s Manual

5
Setting Up
This section contains information about setting up your DD-35 for playing. Make
sure to read this section carefully before using the instrument.
Although the DD-35 will run either from an optional AC adaptor or batteries,Yamaha recommends
use of an AC adaptor whenever possible. An AC adaptor is more environmentally friendly than
batteries and does not deplete resources.
q
Make sure that the
[STANDBY/ON]
switch of the DD-35 is set to
STANDBY.
w
Connect the AC adaptor (PA-3B or other adaptor specifically rec-
ommended by Yamaha) to the power supply jack.
e
Plug the AC adaptor into an AC outlet.
• Use ONLY a Yamaha PA-3B AC Power Adaptor (or other adaptor spe-
cifically recommended by Yamaha) to power your instrument from
the AC mains. The use of other adaptors may result in irreparable
damage to both the adaptor and the DD-35.
• Unplug the AC Power Adaptor when not using the DD-35, or during
electrical storms.
For battery operation the DD-35 requires six 1.5V “AA” size, R6P
(LR6) or equivalent batteries. (Alkaline batteries are recommended.)
When the batteries need to be replaced, the volume may be reduced,
the sound may be distorted, and other problems may occur. When this
happens, turn the power off and replace the batteries, as described
below.
q
Open the battery compartment cover located on the instrument’s
bottom panel.
w
Insert the six new batteries, being careful to follow the polarity
markings on the inside of the compartment.
e
Replace the compartment cover, making sure that it locks firmly in
place.
• When the batteries run down, replace them with a complete set of six
new batteries. NEVER mix old and new batteries.
• Do not use different kinds of batteries (e.g. alkaline and manganese)
at the same time.
• If the instrument is not to be in use for a long time, remove the bat-
teries from it, in order to prevent possible fluid leakage from the bat-
tery.
• Plugging or unplugging the AC power adaptor while the batteries are
installed will reset the DD-35 to the defaults.
Power Requirements
Using an AC Power Adaptor
Using Batteries
PA-3B

6
Front Panel
Front Panel
q
DISPLAY ........................................................ 10
w
DIAL ................................................................. 8
e
PAD button .................................................... 11
r
KIT button ..................................................... 10
t
SONG button..................................... 12, 14, 15
y
TEMPO/TAP button................................. 13, 14
u
DRUM GAME button..................................... 15
i
LIGHT ON/OFF button.................................. 14
o
HAND PERC button...................................... 10
!0
START/STOP button ..................... 8, 12, 13, 15
!1
DEMO button .................................................. 8
!2
VOLUME [
▲
], [
▼
] buttons .............................. 8
!3
STANDBY/ON Switch ..................................... 8
!4
Drum Pads (x4) ............................................... 9
Side Panel (Right)
!5
PHONES/OUTPUT Jack..................................7
!6
DC IN 12V (AC Adaptor) Jack ........................5
88
q
!4
Front Panel

7
Front Panel
Side Panel (Right)
w!3
!5
!6
!5
!2
!1!0
uio
erty
!6
Using a pair of headphones
A standard pair of stereo headphones can be plugged in here for private practice or late-
night playing. The internal speaker system is automatically shut off when a pair of head
phones is plugged into the PHONES/OUTPUT jack.
Do not listen with the headphones at high volume for long periods of time. Doing so may
cause hearing loss.
• Connect the DD-35 to external equipment only after turning off power for all devices. To prevent dam-
age to the speakers, set the volume of the external devices at the minimum setting before connecting
them. Failure to observe these cautions may result in electric shock or equipment damage.
• Use the sticks with caution. Do not use them for anything other than playing the instrument. Also,
to avoid damage or injury, refrain from waving them recklessly or throwing them.

8
Playing the Demo Song
The DD-35 features a demonstration song, specially created to show you the
dynamic possibilities of the instrument.
1
Turn on the power.
2
Start the Demo Song.
3
Stop the Demo Song.
Turn the
[STANDBY/ON]
switch ON.
• Even when the switch is in the “STANDBY” position, electricity is still flow-
ing to the instrument at the minimum level. When you are not using the DD-
35 for a long time, make sure you unplug the AC power adaptor from the wall
AC outlet, and/or remove the batteries from the instrument.
Press the
[DEMO]
button and the demo song starts playing.
●
MASTER VOLUME
The overall volume level of the DD-35 is controlled by two
VOL-
UME [
▲
], [
▼
]
buttons (9 volume levels L1 - L9).
Press the
VOLUME [
▲
]
button to increase the overall volume by one
level. Press the
VOLUME [
▼
]
button to decrease the overall volume
by one level. Holding down either of the buttons increases or
decreases the volume level rapidly.
The
DIAL
can also be used to adjust the volume.
To stop playback, press the
[DEMO]
button again or press the
[START/STOP]
button.
Large
Small
L1 ←L5 →L9
Small ←Volume Level →Large

9
Play the Pads
Strike the pad with the supplied drum sticks or your hand to play the drum voices.
When playing the pads with your hand, turn the Hand Percussion feature on by
pressing the [HAND PERC] button (“on
” is indicated).
The volume of the pads’ sounds responds to your playing; when you play soft the
volume is soft, and when you play strongly the volume is loud.
The actual loudness of the sound may vary according to which part of the pad is
struck.
Pad Names
Pad 1
1: Bass Drum
Pad 2
5: Snare Drum
Pad 3
23: Crash Cymbal
Pad 4
20: Hi-Hat Open
Ex. shown, Drum Kit 09
• If you hit a pad too strongly, the adjacent pad(s)
may inadvertently sound as well.

10
Play the Pads
You can play the pads of the DD-35 either with the supplied sticks or with your hands.
1
Press the [HAND PERC] button.
The DD-35 allows you to choose from 100 different Drum Kits (00 - 99 : see the “Drum Kit List”
page 20) quickly and easily. 100 of the kits have preset voice combinations that will be set to the
pads when the kit is selected.
Select some different kits and try playing them.
The DD-35 also has one Custom Drum Kit allowing you to assign the desired voices to the four
pads (see “Assigning a Voice to Individual Pads” page 11).
1
Press the [KIT] button.
2
Select a Drum Kit Number.
Hand Percussion ON/OFF
When you press the
[HAND PERC]
button, “on
” appears in the dis-
play, and the pad sensitivity is automatically adjusted for optimum
playing by hand.
• When Hand Percussion is on, a special set of sounds ideal for playing by
hand are automatically assigned to the pads (see the “Drum Voice List”
page 17).
• While “ on
” or “ oF
” is indicated in the display, the dial can also be used
to turn Hand Percussion on or off.
• When Hand Percussion is on, do not strike the pads with drumsticks or any-
thing other than your hands.
Assigning a Drum Kit to the Pads
Pressing the
[KIT]
button, the currently selected Drum Kit number
appears in the display.
Turn the
DIAL
to select a Drum Kit number. Drum Kit numbers will
increase as the
DIAL
is turned to the right (clockwise), and decrease
as the
DIAL
is turned to the left (counter-clockwise).
• Drum Kit number 09 is normally selected when the power is turned on.
• The “ CU
” Drum Kit is the Custom Kit. Changes made to any one of the
preset drum kits will be saved here (see “Assigning a Voice to Individual
Pads” page 11).
• When a song is selected, a suitable kit is automatically assigned for opti-
mum playing with the selected song.
• For some drum kits (90 - 99), the sound changes each time you strike the
pad.
on
Hand Percussion on
00
00 01 CU99

11
Play the Pads
The DD-35 contains a total of 148 high quality drum sounds (see the “Drum Voice List” page 17)
— and you can assign these freely to each of the four drum pads. Try assigning some different
voices and create your own “CU
” Custom Drum Kit.
• Any changes made to one of the preset drum kits will automatically be saved in the “ CU
”
Custom Drum Kit.
• Any data assigned to the custom kit will be replaced by factory default values (“ 09
”) when
the power is turned off.
• Both the Custom and “ 09
” drum kit contents are the same until modified (see the “Drum
Kit List” page 20).
1
Press and hold the [PAD] button.
2
Enable a pad for voice selection by simulta-
neously holding the [PAD] button and striking the
appropriate pad.
3
Select a Voice Number.
4
Play the Pads.
Assigning a Voice to Individual Pads (“CU
” Custom Kit)
Press and hold the
[PAD]
button, and the latest assigned voice number
is shown in the display.
The currently assigned voice number for the pad is shown in the dis-
play.
You can select the voice by repeatedly striking the pad, (while listen-
ing to the voice) or by turning the
DIAL
.
●
Striking the pad to select a voice.
While holding down the
[PAD]
button, strike the desired pad repeat-
edly, to increment through the voice numbers one-by-one.
●
Using the DIAL to select a voice.
Simultaneously hold down the
[PAD]
button and turn the
DIAL
clockwise to continuously step up through the voice numbers, and
turn the
DIAL
counter-clockwise to step down through the voice
numbers.
Repeat the previous steps 2 and 3 for any or all of the DD-35’s pads.
After you’ve assigned a voice to the desired pad, and you release the
[PAD]
button, the DD-35 automatically saves your edits to the custom
kit. You can now play the sounds you have assigned to the pads.
24
18
4700 01 46
00 01 4746
Voice number Display Comment
24 24 —
124 24 Values of 100 and over are indicated by a sin-
gle dot.
.

12
Playing a Song
The DD-35 features 100 different songs that can be used to provide accompaniment
(see the “Song List” page 19). Select one of the songs and have a listen.
The DD-35 also has special lesson songs (5 - 59 and 65 - 94), which feature the model
playing of a teacher. By trying to match the teacher’s performance, you can master
the various rhythm patterns. You can also use the Game function with these songs.
(See “Playing the Game” on page 15.)
Song numbers 60 - 64 are for playing a single, entire song. Song numbers 95 - 99 are
specifically for use with the Game function.
• The DD-35 has a total simultaneous polyphony of 16 notes.
1Press the [SONG] button.
2Select a song number.
3Press the [START/STOP] button.
Selecting a Song
Press the [SONG] button, the currently selected song number will
appear in the display.
Song numbers will increase in value as the DIAL is turned to the right
(clockwise) and decrease as the DIAL is turned to the left (counter-
clockwise). (See the “Song List” page 19.)
• Song number “ 00” is automatically selected whenever the power is
turned on.
• Selecting a song will also automatically select the best suited Drum Kit
for that song.
• The relative difficulty or playing level of each song is indicated in the
“Song List” on page 19.
Press the [START/STOP] button, the song will start playback.
To stop playback of the song, press the [START/STOP] button once
again.
• You can also use the TAP START function to start songs (see page 13).
00
00 01 9998

13
Playing a Song
The Tap Start function allows you to set the song’s overall tempo as well as start the accompani-
ment — simply by tapping out the rhythm.
The accompaniment will playback at the tempo with which the pads are struck.
1Press the [TEMPO/TAP] button.
2Play the Tap Start.
3Stop the Song Playback.
The song tempo can be set anywhere from 40 to 240 beats per minute. The higher the tempo value,
the faster the tempo.
1Press the [TEMPO/TAP] button.
Tap Start
While song playback is stopped, press the [TEMPO/TAP] button.
The DD-35 is set to Tap Start standby.
To cancel the Tap Start mode, simply press the [TEMPO/TAP] button
once again .
In the case of a song in 4/4, strike any pad four times, and the accom-
paniment will start at the desired tempo.
• The number of times needed to strike the pad will change according to
the following time signatures; 5/4, 5 times; 4/4, 4 times; 3/4, 3 times; 6/8,
2 times.
Press the [START/STOP] button and the song accompaniment will
stop.
Adjusting the Tempo
When you press the [TEMPO/TAP] button, the current tempo value
(40 - 240) appears in the display.
12
3
4
40
Tempo Display Comment
90 90 —
140 40 Values of 100 and over are indicated by a sin-
gle dot.
240 40 Values of 200 and over are indicated by two
dots.
.
. .

14
Playing a Song
2Set the Tempo.
When the Pad Light function is on, pads that sound during song playback light up. The pads also
light when they are struck.
Pad Light is also used with the Game function. When playing a Game Song, the pads light along
with the rhythm, indicating which pads are to be played.
1Press the [LIGHT ON/OFF] button.
2Try striking the pads.
Use the DIAL to select the TEMPO. Turn the DIAL to the right
(clockwise) to increase the Tempo value, and turn it to the left
(counter-clockwise) to decrease the value. (The Tempo range is 40 -
240.) To exit from the Tempo setting mode, press the [SONG] button,
or wait a second for the DD-35 to exit automatically.
• When both the [SONG] and [TEMPO/TAP]
buttons are pressed simultaneously, the pre-
set tempo of the currently selected song is
automatically applied.
●About the Beat Indicator
During song playback, the two beat lamps in
the display will flash in a specific pattern to help
you in keeping the beat.
Pad Light ON/OFF
When you press the [LIGHT ON/OFF] button, the current setting
(“on” or “oF” ) appears in the display. Press the [LIGHT ON/OFF]
button, repeatedly if necessary, until the desired setting is shown.
• You can also determine the setting by using the dial while “ on” or “ oF”
is indicated on the display.
• When the Game function is used, Pad Light is automatically set to “ on.”
The played pad lights up.
• Playing while looking at the lights for a long period of time may cause eye
strain and stiff neck/shoulders. For your health and comfort, we recommend
that you take a ten-minute break for every hour.
4040 41 39
For a song in 4/4 time, at a tempo of 80 bpm
Display Comment
1st beat of each mesure
2nd, 3rd, 4th beat
80
80
on

15
Playing the Game
The DD-35 features a variety of songs specifically designed to be played with the fun
and educational Game function. Select one of these special songs (05 - 99) and play
one of the three game types along with them — and see how well you can keep
rhythm with the song.
Game
q
..........In this game type, you don’t need to worry about hitting the right pad — any pad
will do. Just try to play the pad in time with the rhythm and the flashing lights.
Game
w
..........In this game type — a step up from Game 1 — you’ll need to play the specific
pads in rhythm as they light. If your timing is off or you hit the wrong pad, the pad
will not sound.
Game
e
..........In this game type (a step up from Game 2) you can play along with the song as you
like here
—
everything sounds just as you play it. However, if you miss a beat or
hit the wrong pad, the evaluation function will let you know!
* The DD-35 features a variety of lesson songs (5 - 59 and 65 - 94), specially designed for
learning and practicing purposes. You’ll hear the DD-35 announce “Ready!” and the
teacher’s model performance will play back. When the DD-35 announces “Go,” play the
rhythm yourself. This is an exceptionally easy and fun way to master the drums.
Song numbers 60 - 64 are for playing a single, complete song. This is an excellent way to
develop your timing and work on your ability to keep the rhythm for the length of an
entire song. The pads light to guide you through the song — try to hit each pad as it
lights, and master the rhythm.
The DD-35 also features special game songs (95 - 99). These arcade game-like songs
challenge you to hit the pads as soon as they light — without providing a rhythmic guide
for you to follow. Try them out and see how fast your response is.
DD-35 has a built-in evaluation function that monitors your playing, and just like a
real teacher, it tells you how well you performed in each game.
1
Press the [SONG] button, then use the dial to
select the desired demo song for game function.
2
Press the [DRUM GAME] button to select the type
of game and start the game.
3
Press the [START/STOP] button to stop the game.
Selecting and Playing a Game Song
Select from song numbers 05 - 99.
Press the
[DRUM GAME]
button repeatedly to select the desired
game type: 1, 2, 3, or off (“oF
”). (The DD-35 announces this step.)
To play back the song normally, select “oF
”.
When
[DRUM GAME]
is pressed, the Game is automatically started.
The DD-35 evaluates your playing and tells you the grade when game
is finished.
“OK”, “Good”, “Very Good”, “Excellent”

16
Appendix
Troubleshooting ..........................................................................
In many cases, problems or malfunctions that occur during use can be remedied
easily.
Please check the following list before deciding that your DD-35 is damaged.
If the suggested remedy is ineffective, take the DD-35 to an authorized Yamaha
dealer for proper diagnosis and repair. Do not attempt to repair this digital instru-
ment by yourself as serious damage may occur.
Problem Cause/Solution
A buzz or click occurs momentarily when
the DD-35 is turned ON or OFF
This is a normal power surge noise that occurs when the POWER
switch is operated
The LED display is completely dark.
When the pads are struck, the display is
dark and returns to “00”.
The batteries are low and should be replaced with a complete set
of six new batteries immediately. Ideally, an optional AC adaptor
PA-3B should be used to power the DD-35 (see page 5).
The custom pad voice assignments have
disappeared or defaulted.
No sound comes from the speakers. • The volume is set too low. Adjust the volume (see page 8).
• A plug is inserted into the PHONES/OUTPUT jack and should
be taken out (see page 7).
The selected voice does not sound when
the pad is struck.
The desired voice has not been assigned to the pad.
Use the PAD ASSIGN function to program the desired voice to
the appropriate pad (see page 11).
The drum pads suddenly light. If you are not touching or playing the DD-35, the pads will light
automatically.

Appendix
17
Drum Voice List............................................................................
●
Panel Voice List
Voice No. Voice Name
0 Bass Drum + Crash Cymbal
1 Bass Drum
2 Bass Drum Soft
3 Bass Drum Hard
4 Elec. Bass Drum
5 Snare Drum
6 Snare Drum Soft
7 Snare Drum Hard
8 Elec. Snare Drum
9 Sticks
10 Rim Shot
11 High Tom
12 Mid Tom
13 Low Tom
14 Floor Tom
15 Elec. High Tom
16 Elec. Mid Tom
17 Elec. Low Tom
18 Elec. Floor Tom
19 Hi-Hat Close
20 Hi-Hat Open
21 Elec. Hi-Hat Close
22 Elec. Hi-Hat Open
23 Crash Cymbal
24 Elec. Cymbal
25 Ride Cymbal
26 Hand Clap
27 Chinese Cymbal
28 Tambourine
29 Cowbell
30 Conga H Mute
31 Conga H Open
32 Conga Muff
33 Conga L Open
34 Bongo H
35 Bongo L
36 Timbale H
37 Timbale L
38 Samba Whistle H
39 Samba Whistle L
40 Agogo H
41 Agogo L
42 Cuica Mute
43 Cuica Open
44 Surdo Close
45 Surdo Open
46 Cabasa
47 Shaker
48 Maracas
49 Guiro Long
50 Guiro Short
51 Claves
52 Castanet
53 Wood Block H
54 Wood Block L
55 Triangle Mute
56 Triangle Open
57 Vibraslap
58 Bell Tree
59 Tamborim Solto
60 Tamborim Ponta
61 Tamborim Nylon Volta
62 Timpani H
63 Timpani L
64 One
65 Two
66 Three
67 Four
68 Applause
69 Explosion
70 FX
71 Omen-FX
72 FMTB2
73 FMTB1
74 Signal
75 Reverse
76 BLJ Trill
77 Sharp Hit
78 Scratch
79 Tweet
80 Ping Pong
81 OK
Voice No. Voice Name

18
Appendix
82 Good
83 Very Good
84 Excellent
85 Uhh + Hit
86 Uhh
87 Yo-Kurt
88 Ooh
89 Huea
90 Hihfh
91 Come On
92 GetUp!
93 Gallop 1
94 Gallop 2
95 Gallop 3
96 Horse
97 Goat
98 Cow
99 Dog
100 Cat
101 Rooster
102 Chick
103 Duck
104 Big Trash Can
105 Mid Trash Can
106 Small Trash Can
107 Lid Trash Can
108 China Small Gong
109 Tee Off
110 Falling Ball
111 Ball In Hole
112 Ball In Water
113 Cork
114 Glass
115 Apple
116 Foot Step
117 Door Squeak
118 Clown Horn
119 Rubber Duck
120 Spring
121 Buzzer
122 Laughing Man
123 Laughing Girl
124 Screaming
125 Oops
126 Kiss 1
127 Kiss 2
Voice No. Voice Name Voice No. Phrase Name
128 Drum Fill 1
129 Drum Fill 2
130 Hard Drum
131 Hard Drum Fill
132 Conga Play
133 Timbales Play
134 Vinyl Groove
135 Electro Fill
136 Scratch Play
137 Yo! Yo! Yo! Yo!
138 Applause(Fade In)
139 Comedy
140 Gallop(Fade Out)
141 Gallop(Fade In)
142 Hole In One
143 Water In One
144 Blast
145 Haunted House
146 Missed Shot
147 Celebration

Appendix
19
Song List......................................................................................
Song
No. Song Name Difficulty
Demo
0 Funk Rock
Demo
1 Hard Rock
2 Sound Effects
3 Salsa
4DJ
Pattern
5 8 Beat Pop Easy
6 Rock
7 Twist Normal
8 Love Song
9 Hard Rock
Difficult
10 Funk Rock
11 Thrash Metal
12 Contemporary R & B
13 16 Beat Normal
14 16 Beat Pop Difficult
15 Blues Rock Easy
16 Oldies
17 6/8 Jazzy Normal
18 Shuffle
19 Funk Difficult
20 Motor Town Easy
21 R & B Normal
22 Bossa Nova Easy
23 Samba Normal
24 Acid Jazz
Difficult25 Break Beats
26 Hip Hop
27 Dance Mix Easy
28 Big Band Normal
29 March
Fill in
30 8 Beat Easy
31 Groove Rock Normal
32 Pops
33 Hard Rock 1 Difficult
34 Hard Rock 2
35 Mellow Funk Easy
36 Fusion
Normal
37 16 Beat Funky
38 Love Ballad
39 Blues Shuffle
Latin
40 Son Normal
41 Mambo
42 Rumba Guaguanco Difficult
43 Cha Cha Cha Normal
44 Bolero
45 6/8 African Difficult
46 Songo Normal
47 Mozambique Difficult
48 Afro Cuban Normal
49 Samba Batucada Easy
50 Samba De Partido Alto Normal
51 Bossa Nova
52 Baion
Easy53 Calypso
54 Lambada
55 Merengue Difficult
56 Zouk
57 Reggae Easy
58 African Pops Difficult
59 JUJU
Song
60 Rock & Roll
Difficult
61 Hard Rock
62 Dance Pop
63 Salsa
64 Big Band Swing
Song Effect
65 SFX 1 Easy
Song
No. Song Name Difficulty
66 SFX 2
Easy
67 SFX 3
68 SFX 4
69 SFX 5
70 SFX 6 Normal
71 SFX 7
72 SFX 8 Easy
73 SFX 9 Difficult
74 SFX 10 Normal
75 SFX 11 Difficult
76 SFX 12 Easy
77 SFX 13 Normal
78 SFX 14
79 SFX 15 Easy
80 SFX 16 Difficult
81 SFX 17 Easy
82 SFX 18 Normal
83 SFX 19 Difficult
84 SFX 20
DJ
85 DJ 1 Easy
86 DJ 2 Normal
87 DJ 3 Easy
88 DJ 4
89 DJ 5 Normal
90 DJ 6
91 DJ 7 Difficult
92 DJ 8 Easy
93 DJ 9 Difficult
94 DJ 10
Hit The Spot
95 Hit The Spot 1 Easy
96 Hit The Spot 2 Normal
97 Hit The Spot 3
98 Hit The Spot 4 Difficult
99 Hit The Spot 5
Song
No. Song Name Difficulty
Demo: These songs demonstrate the drum sounds and rhythms. The pads light in sync with the rhythms.
Pattern: These are special loop-repeating patterns for drum practice. A variety of basic patterns are included in this type.
Fill in: These are special fill patterns appropriate for use with many rhythms.
Latin: These are special loop-repeating Latin rhythm patterns.
Song: These include drum and fill-in patterns, and are ideal for general practice purposes.
Song Effect: These enhanced songs feature effect processing.
DJ: These are special games with DJ-style beats.
Hit The Spot: These are special arcade-like games that challenge your reflexes — hit the pads as quickly as you can when they light.

20
Appendix
Drum Kit List................................................................................
Category Kit
No. Pad 1 Pad 2 Pad 3 Pad 4
Normal 0 0 Bass Drum + Crash Cymbal 5 Snare Drum 1 Bass Drum 20 Hi-Hat Open
1 0 Bass Drum + Crash Cymbal 5 Snare Drum 1 Bass Drum 128 Drum Fill 1
2 0 Bass Drum + Crash Cymbal 5 Snare Drum 1 Bass Drum 129 Drum Fill 2
3 0 Bass Drum + Crash Cymbal 5 Snare Drum 1 Bass Drum 131 Hard Drum Fill
4 0 Bass Drum + Crash Cymbal 5 Snare Drum 12 Mid Tom 14 Floor Tom
5 0 Bass Drum + Crash Cymbal 7 Snare Drum Hard 1 Bass Drum 13 Low Tom
6 0 Bass Drum + Crash Cymbal 7 Snare Drum Hard 1 Bass Drum 128 Drum Fill 1
7 0 Bass Drum + Crash Cymbal 7 Snare Drum Hard 1 Bass Drum 131 Hard Drum Fill
8 0 Bass Drum + Crash Cymbal 7 Snare Drum Hard 12 Mid Tom 14 Floor Tom
9 1 Bass Drum 5 Snare Drum 23 Crash Cymbal 20 Hi-Hat Open
10 1 Bass Drum 5 Snare Drum 19 Hi-Hat Close 20 Hi-Hat Open
11 1 Bass Drum 5 Snare Drum 25 Ride Cymbal 26 Hand Clap
12 3 Bass Drum Hard 7 Snare Drum Hard 1 Bass Drum 131 Hard Drum Fill
13 9 Sticks 6 Snare Drum Soft 23 Crash Cymbal 2 Bass Drum Soft
14 10 Rim Shot 5 Snare Drum 1 Bass Drum 20 Hi-Hat Open
15 10 Rim Shot 5 Snare Drum 1 Bass Drum 26 Hand Clap
16 10 Rim Shot 6 Snare Drum Soft 2 Bass Drum Soft 14 Floor Tom
17 10 Rim Shot 6 Snare Drum Soft 2 Bass Drum Soft 23 Crash Cymbal
18 10 Rim Shot 6 Snare Drum Soft 25 Ride Cymbal 0 Bass Drum +
Crash Cymbal
19 10 Rim Shot 28 Tambourine 12 Mid Tom 14 Floor Tom
20 11 High Tom 10 Rim Shot 12 Mid Tom 14 Floor Tom
21 11 High Tom 5 Snare Drum 1 Bass Drum 14 Floor Tom
22 11 High Tom 5 Snare Drum 12 Mid Tom 14 Floor Tom
23 11 High Tom 6 Snare Drum Soft 12 Mid Tom 14 Floor Tom
24 11 High Tom 12 Mid Tom 13 Low Tom 14 Floor Tom
25 12 Mid Tom 5 Snare Drum 1 Bass Drum 14 Floor Tom
26 12 Mid Tom 7 Snare Drum Hard 14 Floor Tom 131 Hard Drum Fill
27 12 Mid Tom 7 Snare Drum Hard 13 Low Tom 14 Floor Tom
28 12 Mid Tom 6 Snare Drum Soft 2 Bass Drum Soft 14 Floor Tom
29 12 Mid Tom 6 Snare Drum Soft 14 Floor Tom 19 Hi-Hat Close
30 13 Low Tom 6 Snare Drum Soft 1 Bass Drum 20 Hi-Hat Open
31 20 Hi-Hat Open 10 Rim Shot 1 Bass Drum 25 Ride Cymbal
32 23 Crash Cymbal 5 Snare Drum 1 Bass Drum 20 Hi-Hat Open
33 23 Crash Cymbal 6 Snare Drum Soft 2 Bass Drum Soft 19 Hi-Hat Close
34 23 Crash Cymbal 6 Snare Drum Soft 12 Mid Tom 14 Floor Tom
35 8 Elec. Snare Drum 5 Snare Drum 1 Bass Drum 20 Hi-Hat Open
36 63 Timpani L 6 Snare Drum Soft 2 Bass Drum Soft 62 Timpani H
37 128 Drum Fill 1 130 Hard Drum 131 Hard Drum Fill 129 Drum Fill 2
38 128 Drum Fill 1 5 Snare Drum 1 Bass Drum 129 Drum Fill 2
39 12 Mid Tom 6 Snare Drum Soft 4 Elec. Bass Drum 135 Electro Fill
Pad 1 Pad 3
Pad 2
Pad 4
Other manuals for DD-35
2
Table of contents
Other Yamaha Drum manuals

Yamaha
Yamaha DTX KP128 User manual

Yamaha
Yamaha DD-10 User manual

Yamaha
Yamaha DTX700 Mounting instructions

Yamaha
Yamaha DTS70 User manual

Yamaha
Yamaha KP125W User manual

Yamaha
Yamaha DTXPRESS User manual

Yamaha
Yamaha RS-80 Installation guide

Yamaha
Yamaha DTP901 User manual

Yamaha
Yamaha DD-3 User manual

Yamaha
Yamaha RX 5 User manual

Yamaha
Yamaha DD-7 User manual

Yamaha
Yamaha DTX750K User manual

Yamaha
Yamaha CSM-1345A User manual

Yamaha
Yamaha MBH-425 User manual

Yamaha
Yamaha RS-100 Installation guide

Yamaha
Yamaha DTXPRESS IV User manual

Yamaha
Yamaha QD-8313 User manual

Yamaha
Yamaha EMR-1 User manual

Yamaha
Yamaha RX-7 User manual

Yamaha
Yamaha DTX Drums PCY90AT User manual