Yamaha RX-17 User manual

DIGITAL RHYTHM PROGRAMMER
YAMAHA
AUTHORIZED
PRODUCT MANUAL

YAMAHA
DIGITAL RHYTHM PROGRAMMER
OWNER’S MANUAL

FCC INFORMATION (USA)
While the following statements are provided to comply with FCC Regulations in the United States,
the corrective measures listed below are applicable worldwide.
This series of Yamaha professional music equipment uses frequencies that appear in the radio
frequency range and if installed in the immediate proximity of some types of audio or video devices
(within three meters), interference may occur. This series of Yamaha combo equipment have been
type tested and found to comply with the specifications set for a class 8 computing device
in accordance with those specifications listed in subpart J of part 15 of the FCC rules. These rules
are designed to provide a reasonable measure of protection against such interference. However,
this does not guarantee that interference will not occur. If your professional music equipment
should be suspected of causing interference with other electronic devices, verification can be
made by turning your combo equipment off and on. If the interference continues when
your equipment is off, the equipment is not the source of interference. If your equipment does
appear to be the source of the interference, you should try to correct the situation by using one or
more of the following measures:
Relocate either the equipment or the electronic device that is being affected by the interference.
Utilize power outlets for the professional music equipment and the device being affected that are
on different branch (circuit breaker or fuse) circuits, or install AC line filters.
In the case of radio or TV interference, relocate the antenna or, if the antenna lead-in is 300 ohm
ribbon lead, change the lead-in the co-axial type cable.
If these corrective measures do not produce satisfactory results, please contact your authorized
Yamaha professional products dealer for suggestions and/or corrective measures.
If you cannot locate a franchised Yamaha professional products dealer in your general area
contact the professional products Service Department, Yamaha International, 6600 Orangethorpe
Ave., Buena Park, CA 90620, U.S.A.
If for any reason, you should need additional information relating to radio or TV interference,
you may find a booklet prepared by the Federal Communications Commission helpful:
“How to Identify and Resolve Radio-TV Interference Problems”. This booklet is available from
the U.S. Government Printing Office, Washington D.C. 20402 – Stock No. 004-000-00345-4.

Congratulations on your purchase of a Yamaha RX17 Digital Rhythm
Programmer! Your RX17 has been developed through over a century of
Yamaha research and design, and features advanced microcomputer control
plus high-quality digital percussion sounds, virtually indistinguishable from live
instruments. We suggest you read this manual carefully while operating the
RX17. All operations, “Modes”, “Functions” and “Jobs” are numbered for rapid
reference. Also, all descriptions of actual operations are surrounded by a
border, making them easy to locate. Here’s a chapter-by-chapter guide to this
manual.
CONTROL PANEL. Illustration of the RX17’s control panel, to which you can
refer at any time.
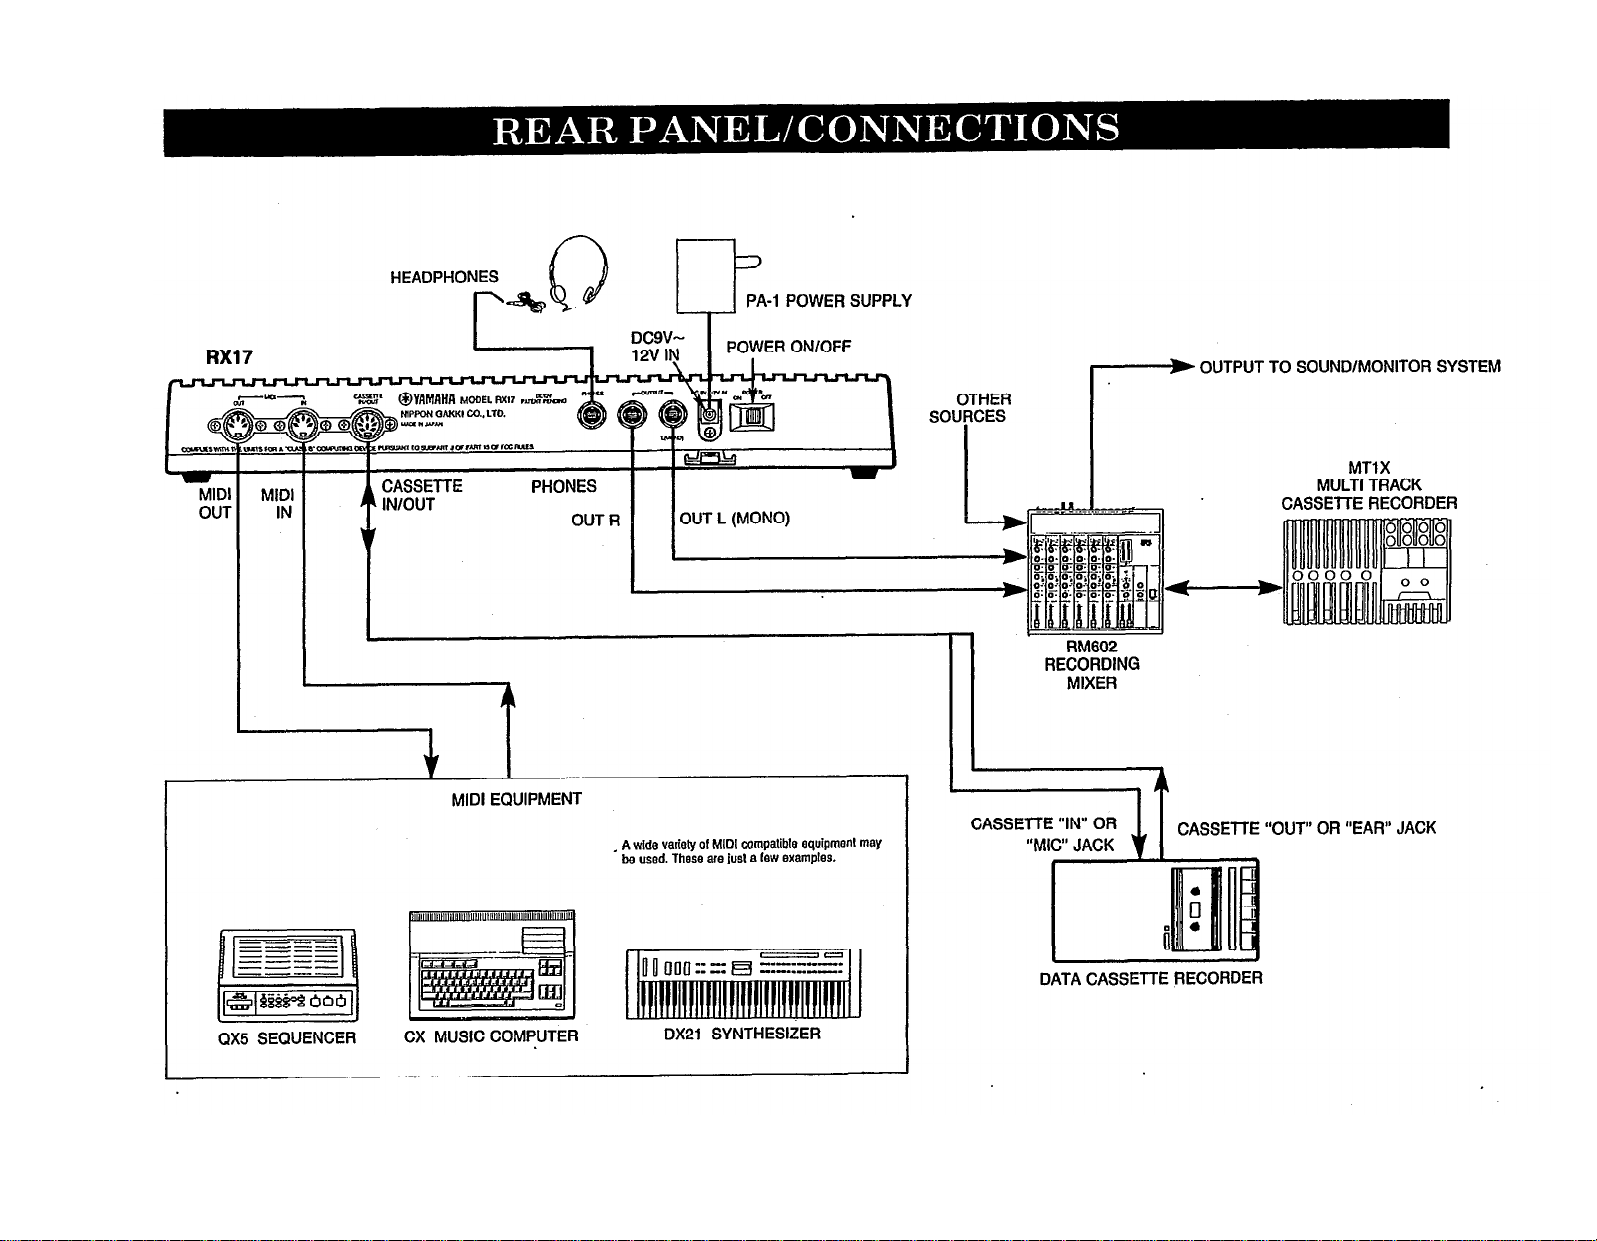
REAR PANEL/CONNECTIONS. Shows the functions of all connectors on the
RX17’s rear panel, and the type of equipment to which it can be connected.
PRECAUTIONS. It is highly recommended that you read this section. It will
ensure that you are using your RX17 under optimum conditions.
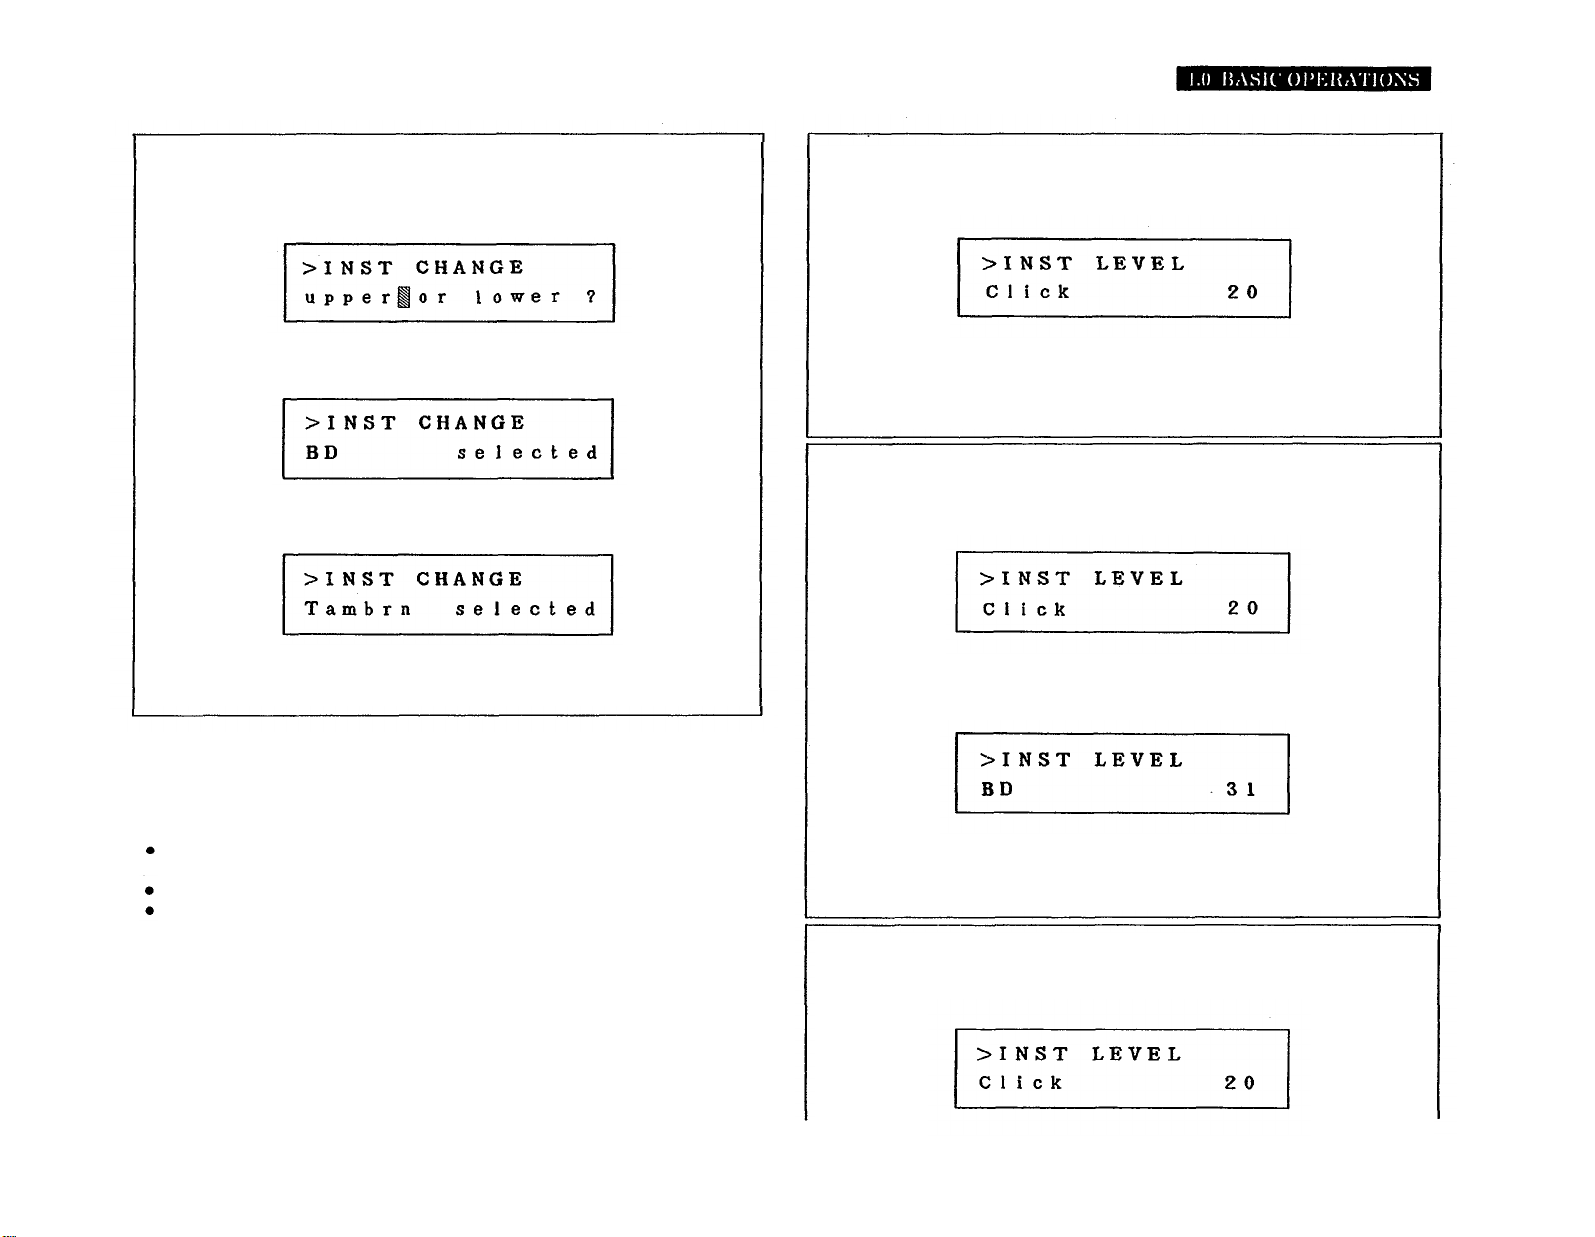
BASIC OPERATIONS. This chapter shows how to set up your RX17 and play
its “instruments”, adjust their level, pan positions and accent levels, and set
tempo.
PATTERN MODE. In the Pattern Mode you can write (record) and play rhythm
patterns. Patterns are phrases or groups of drum beats which, when played,
form a continuous rhythm accompaniment. You can also clear (erase) Patterns,
copy Patterns, and check the remaining Pattern memory.
SONG MODE. A Song is a number of Patterns placed in sequence to form a
rhythm accompaniment for a song or piece of music. You can clear (erase)
Songs, copy Songs, and check the remaining Song memory. You can set the
initial tempo of a Song, and also enter tempo changes, volume changes and
repeats.
CASSETTE MODE. The RX17 lets you “save” all Patterns and Songs onto
normal cassette tape, in the form of digital data. This data can be loaded (fed
back into the RX17) at any time. You can also “Verify” that data has been
correctly saved. In this way, you can save an unlimited number of Patterns
and Songs onto cassette, and build up a library of rhythm data.
MIDI MODE. The RX17 is fully compatible with MIDI (Musical Instrument Digital
Interface)-the technology that allows rhythm programmers, synthesizers
and sequence recorders to control each other by means of simple cable
connections. This Mode lets you select how the RX17 can control or be
controlled by other MIDI equipment, or even by a “Tape Sync” signal recorded
on tape.
HINTS AND TIPS. A chapter which you'll find useful once you’re familiar with
the operations of your RX17. This chapter provides you with performance notes
and a variety of tips on how you can creatively use the full potential of your
RX17. It will broaden your knowledge of the operations described in the MODE
chapters.
ERROR MESSAGES. If you see an error message on the LCD (Liquid Crystal
Display) of your RX17, refer to this chapter. You’ll find out whether an operation
has been executed incorrectly, or whether there is a technical malfunction.
The SPECIFICATIONS and BLOCK DIAGRAM are followed by the MIDI
IMPLEMENTATION CHART, for musicians who need specific information about
the MIDI technology utilized in the RX17. You can, however, fully operate the
RX17 with little or no technical know-how.
The PATTERN CHART and SONG CHART enable you to keep an accurate
written record of the rhythm programs you have created on your RX17. Photo-
copy these charts to provide enough for all your Patterns and Songs.
The QUICK GUIDE is a reference index which lets you easily locate any
particular operation on the RX17 – useful in those moments when you’re in a
hurry and can’t remember where in this manual an operation is described.
And now-it’s all up to you. Enjoy your Yamaha RX17 Digital Rhythm
Programmer!

INTRODUCTION – HOW TO USE THIS MANUAL 4.0 CASSETTE MODE 23
CONTROL
PANEL
1
REARPANEL/CONNECTIONS 2
4.1
SAVE
23
4.2LOAD
24
4.3
VERIFY
24
PRECAUTIONS 35.0 MIDI MODE
25
1.0BASICOPERATIONS 4
1.1
SETTING
UP
4
1.2
PLAYINGTHE
RX17'SINSTRUMENTS
4
1.3 INSTRUMENT CHANGE
4
1.4
LEVEL
5
1.5ACCENTS
6
1.6
PAN
6
1.7
TEMPO
6
5.1SYNC
25
5.2
MIDI CHANNEL MESSAGE 25
5.3
SET
RECEIVECHANNEL 26
5.4
TRANSMIT CHANNEL ASSIGN 26
5.5MIDI
NOTE
ASSIGN 26
5.6RECEIVE BULK
27
5.7
TRANSMIT
BULK 27
5.8
ECHO
BACK 28
6.0
HINTS
ANDTIPS
29
2.0PATTERNMODE 7
2.1
SELECTPATTERN
7
2.2
REAL
TIME
WRITE
8
2.3
STEPWRITE
9
2.4
CLEAR
PATTERN 11
2.5
CLEAR
ALL
PATTERNS
12
2.6
COPY
PATTERN
12
2.7
SHOW
REMAININGMEMORY 13
6.1
THE
INSTRUMENTS
29
6.2
PATTERN OPERATIONS
29
6.3 SONG OPERATIONS
30
6.4
CASSETTE
OPERATIONS 30
6.5
MIDI
OPERATIONS
30
3.0
SONGMODE
14
3.1
SELECT
SONG
14
3.2
EDITSONG
15
3.3 CLEAR SONG
20
3.4CLEARALLSONGS 21
3.5 COPY SONG
21
3.6
SHOW
REMAININGMEMORY 22
ERRORMESSAGES
34
SPECIFICATIONS 35
BLOCKDIAGRAM
36
MIDIIMPLEMENTATIONCHART 37
PATTERN
CHART 38
SONG CHART
39
QUICK GUIDE
40

11
1.
MASTER VOLUME slider control. 5.
CASSETTE MODE
key.
2.
TEMPO slider control. 6.MIDI MODE key.
3.
PATTERN MODE
key.
7.JOB key.
4.
SONG MODE key. 8.
Numeric Key Pad.
9. –1/NO and +1/YES keys.
10. keys.
11.STOP/CONTINUE
key.
12.
START
key.
13. INSTRUMENT keys.
14.
ACCENT key.
15.
LCD (Liquid CrystalDisplay).

2

3
Avoid placing the RX17 in locations exposed to direct sunlight or high temperatures,
excessively high or low humidity, high dust concentration, or vibration.
Be sure to connect the RX17 to an AC power supply that meets the power supply
specifications listed on the accompanying PA-1 12-volt AC convertor.
If there is any possibility of an electrical storm occurring nearby, remove the power
plug from the wall socket in advance.
Be sure to make all connections properly, as shown in the REAR PANEL/CONNECTIONS
section.
To avoid damaging your speakers and other playback equipment, turn off the power
of all related equipment before making connections.
Do not use excessive force in handling control switches and knobs.
To avoid broken cords and short circuits, be sure to unplug all connectors by
grasping the respective plugs-NOT the cords.
Remove the power plug from the AC wall socket if the unit is not to be used for an
extended period of time.
Remove all plugs and connections if the unit is to be moved, to prevent damage to
the cords and jacks.
Do not use solvents such as benzene or paint thinner to clean the unit. Do not use
insecticides or other pressurized spray products in proximity to the unit. Wipe off the
exterior with a soft cloth.
EFFECTS ON OTHER ELECTRONIC EQUIPMENT
Since this unit incorporates digital circuitry, simultaneous use of other equipment such as
TVs, radios, etc. in close proximity to the RX17 may cause noise and erroneous operation.
If this occurs, move the RX17 away from the affected units to eliminate the problem. It is
also a good idea to use separate line filters on each piece of equipment.
BACKUP BATTERY
The RX17 has a special lithium backup battery system to preserve data even when the
power is turned off. This battery has a life of approximately 5 years. When the battery voltage
is low, one of two special messages will appear on the RX17’s LCD (see the ERROR
MESSAGES chapter near the end of this manual). This means that you should have the
battery replaced. Do not attempt to replace the battery yourself. Refer this job to your
Yamaha dealer.
NOTE:
When the battery is replaced, all Pattern and Song data in the RX17 will be lost. Be
sure to save this data to tape or floppy disk before having the battery replaced.

44
1.1 SETTING UP
1. Connect the PA-1 AC convertor to the RX17 first, then to the AC power supply.
2. To hear the RX17, do one of the following:
A. Connect stereo headphones to the PHONES connector.
B. Connect the L(MONO) output to an amplifier, for mono playback.
C. Connect the R and L(MONO) outputs to a stereo amplifier or mixer, for stereo
playback.
3. Turn the RX17 power ON.
NOTE: A brief output pulse appears at the RX17 outputs when the power is initially
turned on. To prevent this from possibly damaging your speaker system, make sure the
master volume control of your amplifier or mixer is set to minimum before the RX17 is
turned ON. Better yet, turn the RX17 on first, then your sound system.
MIDI and cassette connections will be described later, in the appropriate chapters.
1.2
PLAYING THE RX17 INSTRUMENTS
The RX17 instruments can be played by tapping on the black instrument keys. While
playing, adjust the MASTER VOLUME slider until you can hear the RX17’s instruments
at a comfortable listening level. The sounds you will hear will normally correspond to the
instrument names written on the UPPER part of the instrument keys. You can easily
change instruments on the RX17, as described in the next section.
1.3
INSTRUMENT CHANGE
Each key on the RX17 features 2 instrument sounds. These are listed in the following
chart. The RX17 has a total of 26 highly realistic voices, providing powerful drum sounds
plus exciting Latin percussion sounds.
INSTRUMENT CHART
UPPER SET LOWER SET
BD
SD
TOM1
TOM2
TOM3
HH OPEN
HH CLOSED
RIDE
CRASH
COWBEL
CLAPS
TIMBALE H
TIMBALE L
Bass Drum TMBRN
Snare Drum RIM SHOT
High Tom-tom CONGA Hm
Medium Tom-tom
CONGA Ho
Low Tom-tom CONGA L
Hi-hat (open)
BONGO H
Hi-hat (closed)
BONGO L
Ride cymbal
AGOGO H
Crash cymbal
AGOGO L
Cowbell
WHISTLE
Claps
SHAKER
High Timbale
CUICA H
Low Timbale
CUICA L
Tambourine
Snare Drum rim shot
High Conga (muted)
High Conga (open)
Low Conga
High Bongo
Low Bongo
High Agogo
Low Agogo
Whistle
Shaker
High Cuica
Low Cuica
You can change all instruments, or individual instruments, between the UPPER and
LOWER instruments.
NOTE 1: Instrument Change operations can be carried out at any time except during a
cassette operation or MIDI Bulk Dump (operations 5.6 and 5.7).
NOTE 2: The Instrument Change operation will NOT change instruments already
programmed in a Pattern or Song.
The following pairs of instruments can NOT be played together, because they reproduce
the sound of two different ways of playing the same instrument.
CONGA Hm / CONGA Ho
CUICA H / CUICA L
SD / RIM SHOT
HH OPEN / HH CLOSED
This also applies when writing Patterns. For example, if in the Step Write mode you enter
a SD note, then enter a RIM SHOT note on the same beat, the SD note will be erased.
1.3.1 ALL INSTRUMENT CHANGE
1. Press INST CHANGE
2. Use the or key to select UPPER or LOWER. The flashing cursor will move to
the selected set.
3. Press +1/YES to make the change. The LCD will briefly show
then return to the display shown before pressing INST CHANGE.

1.3.2 SINGLE lNSTRUMENT CHANGE 1.4.1 CLICK LEVEL
1. Press INST CHANGE 1. Press LEVEL
2. Press the key corresponding to the instrument you wish to change. 2. Use the –1 NO key to reduce the Click level, or the +1 YES key to increase the
Click level. RANGE: 0 (OFF)–31.
3. Press LEVEL again to return to the mode the RX17 was in before the Click Level
operation.
1.4.2 INSTRUMENT LEVEL
3. Press the same instrument key again to change the instrument. 1. Press LEVEL
5
4. Press INST CHANGE again to return to the mode the RX17 was in before the
Instrument Change operation.
1.4 LEVEL
The
MASTER VOLUME
slider controls the overall level of the RX17. There are, however,
three other level operations possible.
l CLICK LEVEL lets you change the level of the click signal that you will hear as a
timing guide when writing a Pattern in Real Time.
l INSTRUMENT LEVEL lets you change the level of individual instruments.
l ACCENT LEVEL lets you change the Accent level of individual instruments (refer to
section 1.5 for an explanation of Accents).
NOTE 1: These operations can be carried out at any time except during a cassette
operation or MIDI Bulk (operations 5.6 and 5.7).
NOTE 2: The –1 NO and +1 YES keys are used for level change, as well as many
other operations. Pressing and releasing these keys causes a change of one unit.
Holding them down causes a rapid and continuous change.
2. Press the instrument key corresponding to the instrument whose level you wish to
change.
3.
Use the –1 NO or +1 YES key to change the Instrument level. RANGE: 0 (OFF)– 31.
4. Press LEVEL again to return to the mode the RX17 was in before the Instrument
Level operation.
1.4.3 ACCENT LEVEL
1. Press LEVEL

6
2. Press and hold the green
ACCENT
key and then press the instrument key corresponding
to the instrument whose Accent level you wish to change.
3. Use the –1 NO or +1 YES key to change the Accent level. RANGE: ±31.
4. Press LEVEL again to return to the mode the RX17 was in before the Accent Level
operation.
NOTE: If you have set a plus Accent level and an exclamation mark appears on the
LCD (as in the above example) it means that the combined Accent level plus Instrument
level is above 31 (the maximum possible Instrument Level). In this case, the Accent will
not have as much effect as you intended. For example, if the level of a voice is 24, the
maximum possible Accent level is 31 minus 24 = 7, so an Accent level of, say +10 is
impossible.
If you have set a minus Accent level and the exclamation mark appears, it means that
the combined Accent Level plus Instrument level is zero or less, and the voice will not
sound when accented.
1.5 ACCENTS
Pressing any instrument key while holding the green
ACCENT
key causes that instrument
to sound at its accented level. This applies whether the RX17 is being played in real
time, or programmed in either the Real Time Write or Step Write Modes. Accents allow
you to add natural dynamics to your drum patterns. You can even enter negative Accent
values, which will reduce the level of the instrument. See 1.4.3 ACCENT LEVEL.
1.6 PAN
If you are using both the RX17’s stereo outputs, you will find that the instruments are
heard at different positions in the stereo sound image. You can easily alter the stereo
position of individual instruments.
NOTE 1: This operation can be carried out at any time except during a cassette
operation or MIDI Bulk (operations 5.6 and 5.7).
NOTE 2:
15 Pan positions are possible, from Left to Right. These correspond to positions
1/15 thru 15/1 on an RX15 Digital Rhythm programmer.
1. Press PAN
2. Press the instrument key corresponding to the instrument that is to have its Pan
position set. On the LCD the cursor will flash at the current pan position.
3.Use the –1 NO or +1 YES key to change the Pan position. The cursor will move to
the new position.
4. Press PAN again to return to the mode the RX17 was in before the Pan operation.
1.7 TEMPO
The playback and writing speed of Patterns and the playback speed of Songs can be
varied at any time by moving the TEMPO slider. You can also display the Tempo on the
LCD, for precise Tempo setting.
NOTE: This operation can be carried out at any time except during a cassette operation,
during Initial Tempo setting (operation 3.2.7) or during MIDI Bulk (operations 5.6 and
5.7).
1.7.1 TEMPO
1. Press TEMPO
2.
Use the
–1 NO
or
+1 YES
key, or the
TEMPO
slider, to change the Tempo. RANGE:
40–250 quarter-notes per minute.
NOTE: The TEMPO slider allows you to change the tempo in increments of 3 units in
the range 40–166, and in increments of 4 units in the range 166–250. The –1 NO
and +1 YES keys should be used for exact tempo setting.
3.
Press
TEMPO
again to return to the mode the RX17 was in before the Tempo operation.
1.6.1 INSTRUMENT PAN

On the RX17, a “Pattern” means a one bar sequence, which repeats when you play it
back. You “write” (enter) each note of a Pattern, by pressing the instrument keys. Pattern
Writing can be done in two ways: Real Time (see 2.2) or Step Write (see 2.3). The
Quantize feature allows you to set the “fineness” of Pattern Writing, i.e., the shortest
notes that may be written (see 6.2.2. and 6.2.3 for a full explanation of Quantize). The
RX17 lets you create up to 100 Patterns, numbered 00 thru 99.
2.0.1 ENTERING THE PATTERN MODE
When you turn on the RX17, the Patterns Mode’s first Function (Select Pattern) is
automatically selected. Once you have selected a Pattern, you can play it, or use other
Functions to edit its Accent Levels, or to copy, clear (erase) or write on it (to enter
additional notes). If you’ve selected an empty Pattern, you can then begin writing a new
Pattern.
If the RX17 is in another Mode, press PATTERN to enter the Pattern Mode. The LCD
will show
The Function numbers (1 thru 7) allow you to select the Pattern Mode’s seven main
Functions. This is done by using the
or
keys to move the cursor to the appropriate
Function number. The LCD will then display the selected function. You can also move
the cursor by holding JOB and pressing the Numeric Key corresponding to the Function
number. If you press only JOB, the cursor will move to Function 1.
To exit the Pattern Mode, press any other Mode key.
Pattern Mode Functions are numbered 2.1 thru 2.7 in this chapter.
2.1 SELECT PATTERN
1. Press PATTERN The flashing cursor will indicate Function 1.
You will see a “w” in the right upper corner of the LCD if the Pattern already contains
data (“w” stands for “written”). This makes it easy for you to select an empty Pattern,
should you wish to write a new Pattern.
In the Pattern Select Mode, there are two methods of selecting Patterns.
–1 NO and +1 YES keys
This is a convenient way of selecting an adjacent or nearby Pattern.
Pressing the –1/NO key selects the Pattern number immediately BELOW the current
Pattern number.
Pressing the +1/YES key selects the Pattern number immediately ABOVE the current
Pattern number.
Each of these keys when held down causes a continuous and rapid Pattern number
change.
NUMERIC KEY PAD
This is a more convenient way of selecting a Pattern in a distant number range.
Use the Numeric Key Pad to enter a two-digit Pattern number. Pattern numbers below
10 must be preceded by a zero. For example, for Pattern 5, enter “0” then “5”.
NOTE: The RX17 contains a variety of factory-preset Patterns in Pattern locations 50
thru 99. We suggest that you listen to all of them–you will find many of them immediately
usable, while others can be edited to create your own Patterns. These Patterns are listed
and fully described in the accompanying RX17 PATTERN BOOK. See 2.1.2 LOADING
THE PRESET PATTERNS for a description of how to recall the preset Patterns.
2.1.1 PATTERN PLAY
The Pattern Play function will repeatedly play the selected Pattern until you stop play.
1. After selecting a Pattern, press START
New Patterns can be selected during play, using either of the two methods described
in 2.1 SELECT PATTERN (except that holding down the –1 NO and +1 YES keys will
NOT produce continuous Pattern number change. The asterisks will be replaced by the
new Pattern number, and the newly selected Pattern will begin playing immediately after
the last beat of the previous Pattern.
7

8
2. To stop play, press STOP/CONTINUE.
3. To restart play, press START to play from the beginning of the Pattern, or STOP/
CONTINUE to play from the point at which play was stopped.
During Pattern play, you can change the Tempo using the TEMPO slider, or using
operation 1.7.1.
2.1.2 LOADING THE PRESET PATTERNS
NOTE: This operation also loads the RX17’s preset Songs into Song locations 0–3.
The preset Patterns in Pattern locations 50–99 are there to be played, edited, copied
or cleared as you wish. However, they are permanently stored in the RX17, and can be
re-loaded into the Pattern locations at any time.
BEFORE turning the RX17’s power on, hold down the +1 YES key and the STOP/
CONTINUE key. Keep holding these keys while turning the power on.
The preset Patterns will now be loaded into Pattern locations 50–99.
NOTE: All previous data in Patterns 50-99 will be erased. If this data is important,
save it to tape (operation 4.1) BEFORE executing the Load Preset Patterns operation.
2.1.3 USING THE PATTERN CHART
Near the end of this manual you will find a Pattern Chart. You can copy this chart and
use the copies to keep an absolutely accurate written record of Patterns that you have
created on your RX17. This chart accommodates the data of a 4/4 Pattern written at the
maximum Quantize setting of 1/48. Longer Patterns may be recorded by using two
Pattern Charts. Enter data as follows:
Enter Note Markers (solid dots) at the intersections of the lines.
Indicate accented notes using a circle.
If you have used the Accent Edit function to alter the Accent Level of any notes, write
the new Accent Level next to the Note Markers for those notes.
Enter the Level, Accent Level and Quantize setting of each instrument.
Enter the Pan setting of each instrument, using a number from 1 – 15. 1 means Left;
15 means Right; 8 means Center. Other positions are numbered corresponding to
the mark at which the cursor is set on the LCD Pan display.
2.2 REAL TIME WRITE
This is the first of two ways of writing Patterns on the RX17. It lets you “play” a Pattern
on the instrument keys, while listening to a click guide. You can add instruments and
rhythms until the Pattern is complete. The advantage of this method is that you can
actually hear the Pattern being built up as you write it, as opposed to Step Write, where
a Pattern is built up without hearing it.
NOTE: You can also execute Real Time writing of Patterns using an external MIDI
keyboard to “play” the RX17’s instruments. This is highly convenient because all 26
RX17 instruments can be assigned to a keyboard (compared to using the RX17’s
instrument keys, with a maximum of 13 instruments available at anyone time). Another
advantage is that the RX17 will accept MIDI Key Velocity data, so that the harder you
play a key on your MIDI synthesizer, the louder the RX17’s note will be. See 6.5.3 MIDI
NOTE RECEIVE for an explanation of the settings required for this MIDI application.
2.2.1 ENTERING REAL TIME WRITE
1. After selecting a Pattern, select Function 2.
2.
Press
+1 YES
to enter Real Time Write. The LCD will show the Pattern LENGTH display.
NOTE: If you decide you do NOT want to enter Real Time Write, press PATTERN to
return to Select Pattern.
2.2.2 SETTING PATTERN LENGTH
Providing you have selected an empty Pattern, you can now set the time signature
(length) of your Pattern. Pattern Lengths are displayed in 16th notes. For example, 16/16
(the default Pattern Length displayed when you call an empty Pattern) is equivalent to
a bar of 4/4 time (4 quarter-notes per bar); 12/16 indicates a bar of 3/4 time, and so on.
Use the –1 NO and +1 YES keys to set the time signature. RANGE: 1/16–32/16.

9
2.2.3 SETTING QUANTIZE
Quantize when used in Real Time Write is an automatic timing correction device. Any
notes you play that do not fall exactly on the beat are moved to the nearest beat. For
example, if you set Quantize to 1/16, all notes played will be moved to the nearest
16th note. This is a convenient way of creating timing-perfect Patterns. Quantize is
set as follows:
1. After setting the Pattern Length, press to move the cursor to “2”.
2. Use the –1 NO and +1 YES keys to set the Quantize. You can step forwards or
backwards through the range of Quantize settings: 1/8, 1/16, 1/32, 1/12, 1/24, 1/48.
NOTE:
You can call the Quantize function while writing a Pattern (see 2.2.4 ENTERING
NOTES) as follows.
1. Press STOP/CONTINUE
2. Select Job 2. Set the Quantize using the +1 YES or –1 NO keys.
3. Press START to return to Real Time Write and continue entering notes.
2.2.4 ENTERING NOTES
1. Once the Pattern Length and Quantize have been set, press START to commence
writing. You’ll hear a Click track (a rhythm guide) indicating quarter-notes, with an
Accent on the first beat of each bar.
2. You can now enter notes by tapping the instrument keys. As soon as you enter the
first note, a “w” will appear next to the Pattern number on the LCD, indicating that
data has been “written” into the Pattern. You can enter accented notes by holding
the green ACCENT key while you tap an instrument key.
The RX17 will continue cycling through the Pattern. repeating everything that you
have entered. You can add more notes until the Pattern is complete.
3. Once you’ve written a Pattern, press STOP. The LCD will return to the Pattern
Length or Quantize display (according to which of these two operations was the last
one executed prior to Pattern writing). This enables you to change the Quantize
setting (see operation 2.2.3) if desired. You could then continue writing the Pattern
by pressing START again.
4. If you want to play the Pattern, press PATTERN after pressing STOP/CONTINUE.
The LCD will return to the Select Pattern display. You can now play your Pattern by
pressing
START.
You can then, if you wish, re-enter Real Time Write, to add or delete
notes in the Pattern.
2.2.5 DELETING NOTES
During Pattern writing, a note can be deleted (cleared) by holding the BEAT CLEAR
key, and tapping the appropriate instrument key when you hear the selected note. The
next time the Pattern recycles, you will not hear the selected note.
2.2.6 DELETING INSTRUMENTS
Entire instrument parts can be deleted (erased) from a Pattern, by entering Step Write
and using operation 2.3.7.
2.2.7 ACCENT EDIT
After writing a Pattern, you can alter the level of any note in the Pattern, by entering Step
Write and using operation 2.3.8.
2.3 STEP WRITE
This is the second way to write Patterns on the RX17. It lets you create a Pattern, using
the instrument keys to enter notes one at a time, until the Pattern is complete. This is an
ideal way for creating perfectly-timed Patterns, especially if reading from a score. It also
allows you to create Patterns that are too complex or fast to be played in Real Time.
During Step Write, the notes you enter are clearly shown on the LCD in the form of a
Dot Display, described in 2.3.4 ENTERING NOTES.
2.3.1 ENTERING STEP WRITE
1. After selecting a Pattern, select Function 3.
2. Press +1 YES to enter Step Write. The LCD will show the Pattern LENGTH display.
NOTE 1:
If you decide you do NOT want to enter Step Write, press
PATTERN
to return
to Select Pattern.
NOTE 2: If you selected a Pattern that already contains data, step 2 of this operation
will call up the Step Write Dot Display, described in 2.3.4 ENTERING NOTES.

10
2.3.2 SETTING PATTERN LENGTH
See operation 2.2.2.
2.3.3 SETTING QUANTIZE
In the Step Write mode, Quantize allows you to set the minimum note length that can
be entered. For example, if you set Quantize to 1/16, the shortest note that can be
entered is a 16th note (16 notes in a bar of 4/4). Quantize is set as follows:
1. After setting the Pattern Length, press to move the cursor to “2”.
2. Use the –1 NO and +1 YES keys to set the Quantize. You can step forwards or
backwards through the range of Quantize settings: 1/08, 1/16, 1/32, 1/12,
1/24, 1/48.
NOTE: You can call the Quantize function from the Dot Display (see 2.3.4 ENTERING
NOTES) as follows.
1. Press JOB.
2. Set Quantize as previously described.
3. Press START to return to the Dot Display and continue entering notes.
2.3.4 ENTERING NOTES
1. Once the Pattern Length and Quantize have been set, press START to commence
writing. The LCD will show the Dot Display. The initial Dot Display will be the one
corresponding to Hi Hat Closed.
This display shows 4 quarter-notes to the bar, indicated by the vertical pairs of small
dots. The Quantize indicates 16 beats to the bar, each beat indicated by a horizontal
dash. The flashing cursor prompts you to input a note or rest on the first beat of bar
1. You can now choose either of the following options (2A or 2B):
2A. Enter a note by tapping the HH CLOSED key. An accented note can be entered
by holding down the green ACCENT key while pressing HH CLOSED. The note
will be shown in the form of a Note Marker. The cursor will move to the next beat.
2B.
You can move the cursor to the next beat by pressing +1 YES. This also enters a
rest in the Pattern.
In either case the beat will advance one count, and you can enter the next Hi-Hat
Closed note. This process continues up to the last beat of the Pattern. When you
reach the last beat, further pressings of
HH CLOSED
or
+1 YES
will not move the
cursor, but will cause an “> End <” message to flash on the LCD.
If you have entered a note on the last beat, the LCD will show the Accent Level of
that note (this will be zero if you did not enter an accent). This allows you to edit
(change) the Accent Level, and hence the level of this note. See 2.3.8 ACCENT EDIT.
3.
To select another instrument at any time, press the appropriate instrument key. That
instrument’s Dot Display will appear, with the cursor at the same position as the
previous Dot Display. No note will be entered until the second time you press the
instrument key. You can enter the second instrument’s part, then select another
instrument simply by pressing its key, and build up your Pattern. Notes from up
to 11 instruments can be entered on the same beat.
4. Once you’ve written a Pattern, press STOP/CONTINUE. The LCD will return to the
Select Pattern display. You can now play your Pattern by pressing
START.
You can
then, if you wish, re-enter Step Write, to add or delete notes in the Pattern.
2.3.5 STEPPING THROUGH A PATTERN
During Step Write, you can step through a Pattern forwards or backwards by using +1
YES or –1 NO respectively. As you pass each beat you will hear the instrument(s)
entered at that beat. You can also step through rapidly by holding down either key.
When you reach the end of a Pattern, an “> End <" message will flash on the LCD.
When you return to the beginning of a Pattern, a “>Top <” message will flash on the LCD.
NOTE: The –1 NO key, does NOT enter any data. It is ONLY for stepping backwards
through the Pattern.

11
2.3.6 DELETING NOTES
Notes can be deleted (erased) by stepping through a Dot Display until you locate the
erroneous note, then holding the BEAT CLEAR key, and tapping the appropriate
instrument key. The Note Marker will disappear, and the cursor will move to the next beat.
2.3.7 DELETING INSTRUMENTS
Entire instrument parts can be deleted (erased) from a Pattern, as follows.
1. From a Dot Display, press JOB Then use to move the cursor to “3”, to select
Function 3.
2.
Press the instrument key corresponding to the instrument you wish to delete. Its name
will appear on the LCD.
3. Press +1 YES to continue this operation. (Or press START to return to the Dot
Display, if you do NOT wish to delete the instrument).
4. Press +1 YES to delete the selected instrument. The LCD will return to the (now
empty) Dot Display of the selected instrument. (Or press –1 NO to cancel this
operation, and return the LCD to the previous display).
2.3.8 ACCENT EDIT
When you step through a Pattern (see operation 2.3) ,a message such “Ac=+08”
appears on the LCD whenever the cursor reaches a Note Marker.
This indicates that the note was recorded with an Accent Level of +8. An Accent level
of 00 indicates that no Accent was used.
You can edit (alter) the Accent Level of the note at which the cursor is flashing. This in
effect allows you alter the level of each note, to add expressive dynamics to your
Patterns.
Hold down ACCENT and use +1 YES or –1 NO to raise or lower the Accent Level
respectively. RANGE: ±31. See 1.5 ACCENTS for a note about Accent Level limits.
2.3.9 DOT DISPLAYS FOR LONG PATTERNS
The Dot Display only accomodates 16 beats. Your Pattern may have more beats than
this, depending on its Length, and on the Quantize setting. For example a 6/4 bar
(Length: 24/16) with a Quantize setting of 1/24 will contain 36 beats.
In this case, when the cursor reaches the limit of the displayed portion of the Dot Display
(going in either direction) the Dot Display will start to “scroll” (move across the LCD) so
that succeeding portions of the Dot Display will appear, one beat at a time.
2.3.10 DOT DISPLAYS: THE “X” MARKER
When “X” Markers appear on a Dot Display, they indicate notes that were entered at a
different Quantize setting than the current Quantize setting. In other words, these notes
fall “in between” the beats on the Dot Display.
The Accent Level of these notes will NOT be displayed, and can NOT be edited. If you
wish to edit Accent Levels, change the Quantize setting (see 2.3.3 SETTING QUANTIZE)
to the setting at which the notes were entered.
2.4 CLEAR PATTERN
You can instantly clear (erase) a whole Pattern. This would be done, for example, if the
RX17’s Pattern memory were full and you wanted to write another Pattern.
1. Alter selecting the Pattern you wish to clear, select Function 4.

12
2.
Press
+1 YES
to continue this operation. (Or press
PATTERN
to return to the Select
Pattern display, if you do NOT wish to clear the Pattern).
3.
Press +1 YES to clear the selected Pattern (or press –1 NO to cancel this operation).
The LCD will show
then return to the Select Pattern display.
2.5 CLEAR ALL PATTERNS
You can instantly clear (erase) all 100 Patterns. This would be done, for example, if the
RX17’s Pattern memory were full and you wanted to write more Patterns. Use operation
4.1 to save the Patterns on tape before this operation, if you wish to preserve the Patterns
for later use. You can also save Patterns via MIDI, by using a MIDI data storage device
such as the Yamaha MDF-1 MIDI Data Filer (see operation 5.7).
1. Press PATTERN and select Function 5.
2.
Press
+1 YES
to continue this operation (or press PATTERN to return to the Select
Pattern display, if you do NOT wish to clear all Patterns).
3. Press +1 YES to clear all Patterns (or press –1 NO to cancel this operation and
return to the Select Pattern display). The LCD will show
then return to the Select Pattern display.
2.6 COPY PATTERN
The Pattern Copy function lets you copy any selected Pattern to another destination in
the RX17’s Pattern memory. This is useful if you want to copy a Pattern in order to alter
it to create a new Pattern, while retaining the original Pattern. It is also useful if you want
to have the Patterns in a particular order in the RX17’s memory (so that, for example,
you can easily play one Pattern followed by the adjacent Pattern, by pressing +1 YES
during play).
1. After selecting the Pattern you wish to copy, select Function 6.
2.
Use the Numeric Key Pad to enter the number of the Pattern destination to which the
selected Pattern will be copied.
3. Press +1 YES.
You can now cancel this operation by pressing –1 NO, if you do NOT wish to copy
to the selected destination (if, for example, it already contains data). The LCD will
return to the Select Pattern display.
4. To copy the Pattern, press +1 YES. The LCD will show

13
then return to the Select Pattern display.
2.7 SHOW REMAINING MEMORY
This function allows you to check the remaining Pattern memory of the RX17, as a
percentage of its total Pattern memory capacity.
Press PATTERN and select Function 7.

14
The function of the Song Mode is to allow you to connect different Patterns in order to
form a drum sequence for an entire song or piece of music. The RX17 lets you create
up to 10 Songs, numbered 0 thru 9. Each Song can contain up to 999 Parts, and the
maximum number of Parts of all 10 Songs combined is 1200. A Part can contain not only
a Pattern, but also a Repeat Command, a Tempo Change or a Volume Change.
3.0.1 ENTERING THE SONG MODE
All Song operations are preceded by pressing SONG to enter the Song Mode. The LCD
will show
The Function numbers (1 thru 6) allow you to select the Song Mode’s six main Functions.
This is done by using the or
keys to move the cursor to the appropriate Function
number. The LCD will then display the selected function. You can also move the cursor
by holding JOB and pressing the Numeric Key corresponding to the Function number.
If you press only JOB, the cursor will move to Function 1.
To exit the Song Mode, press any other Mode key.
Song Mode Functions are numbered 3.1 thru 3.6 in this chapter.
3.1 SELECT SONG
1. Press SONG. The flashing cursor will indicate Function 1.
You will see a “w” in the right upper corner of the LCD if the Song already contains data
(“w” stands for “written”). This makes it easy for you to select an empty Song, when you
wish to write a new Song.
In the Song Select Mode, there are two methods of selecting Songs.
–1 NO and +1 YES keys
Pressing the
–1 NO
key selects the Song number immediately BELOW the current Song
number.
Pressing the +1 YES key selects the Song number immediately ABOVE the current
Song number.
NUMERIC KEY PAD
Use the Numeric Key Pad to enter a Song number.
NOTE: The RX17 contains a variety of factory-programmed Songs in Song locations 0
thru 3. We suggest that you listen to all of them-they will give you a good idea of the
flexibility and musical power of the RX17. You may find these Songs to be immediately
usable, or you can edit them to to create your own Songs. These Songs are listed and
fully described in the accompanying RX17 PATTERN/SONG BOOK. See 2.1.2 LOADING
THE PRESET PATTERNS for a description of how to recall the preset Songs.
3.1.1 SONG PLAY
1. After selecting a Song, press START
As the Song plays, Part numbers and Pattern numbers will be displayed. If a Part
contains anything other than a Pattern (i.e., a Volume Change, Tempo Change or
Repeat) it will not be displayed.
2. To stop play, press STOP/CONTINUE.

15
3. To restart play, press START to play from the beginning of the Song, or STOP/
CONTINUE, to play from the point at which play was stopped. If you stopped play
during a repeat section, the repeat command will be ignored when you continue play.
If you stopped play in the middle of a Pattern, pressing –1 NO or +1 YES before
pressing the STOP/CONTINUE key will cause play to restart from the beginning of
the previous Pattern, or the beginning of the next Pattern, respectively. You can also
use the -1 NO and +1 YES keys to locate any Part in the Song from which playback
can restart.
While a Song is stopped, you can use the Numeric keys to select another Song,
without having to press the SONG key. The LCD will return to the Song Select display.
During Song play, you can change the Tempo using the TEMPO slider, or using
operation 1.7.1.
3.1.2 USING THE SONG CHART
Near the end of this manual you will find a Song Chart. You can copy this chart and use
the copies to keep an absolutely accurate written record of Songs that you have created
on your RX17. This chart accommodates the data of a Song containing 128 Parts. Longer
Songs may be recorded by using two or more Song Charts. Enter data as follows:
Enter Pattern numbers in the “PTN” column.
If a Part contains data other than a Pattern, write this information in the “Other Data”
column as follows:
Enter the amount of Volume Changes.
Enter the amount and duration of Tempo Changes.
Enter Begin Repeat Signs.
Enter End Repeat signs and the number of Repeats.
3.2 EDIT SONG
The Edit Song function lets you connect Patterns to form a Song. You can also enter
Volume Changes, Tempo Changes and Repeats. Each of these data is entered into a
Part. Songs can contain up to 999 Parts.
Briefly, Song editing is done as follows:
1. Enter Song Edit.
2. Enter data in the first Part. Then use the +1 YES key to move to the next Part, and
enter data there. Continue in this way until the Song is complete.
3. Once you have entered all the Parts of your Song, press STOP/CONTINUE to exit
the Edit Song Mode. You can now play your Song, by pressing START.
Here are some important pointers about the Edit Song Function:
You can move backwards through a Song using the –1 NO key. This lets you go
back to check a Part. Any time a Part is displayed, you can change its data using
the Numeric Key Pad.
Holding down a –1 NO or +1 YES key lets you move rapidly through a Song,
backwards or forwards respectively.
You can delete, copy or insert Parts in a Song that has already been edited. You can
set the Initial Tempo of a Song, to automatically play it at the correct Tempo. And you
can use the Search Part operation to automatically locate a selected Part in a Song.
These operations are selected by entering Song Edit, pressing JOB then selecting a
Job number using the and keys. You can also select Jobs by holding down
JOB and pressing the appropriate Numeric Key. Job numbers are as follows:
JOB 1 SET INITIAL TEMPO
JOB 2 SEARCH PART
JOB 3 COPY PART
JOB 4
DELETE PART
JOB 5
INSERT PART
The Initial Tempo display appears when you press JOB
If, prior to pressing JOB, you had located the empty Part at the end of the Song, only
Job numbers 1 thru 3 would be displayed, as Jobs 4 and 5 would not be needed (there’s
no data to delete, and no need to insert a Part–you can enter data in the normal way).
At any time, once you’re in Edit Song, you can return to the Song Select display simply
by pressing STOP/CONTINUE, and play your Song or select other functions.
It’s a good idea to keep a written record of a Song, as you edit it. See the SONG
CHART later in this manual.
3.2.1 ENTERING EDIT SONG
1. After selecting a Song, select Function 2.
2. Press +1 YES to enter Edit Song.
Other manuals for RX-17
2
Table of contents
Other Yamaha Drum manuals

Yamaha
Yamaha DTXTREME IIs User manual

Yamaha
Yamaha RX-15 Manual

Yamaha
Yamaha DTX550K User manual

Yamaha
Yamaha DTX6 User manual

Yamaha
Yamaha RX-120 User manual

Yamaha
Yamaha DTX520K User manual

Yamaha
Yamaha DTXPLORER User manual

Yamaha
Yamaha DTXPLORER User manual

Yamaha
Yamaha DTX8K-X User manual

Yamaha
Yamaha YDD-60 User manual

Yamaha
Yamaha RX-15 User manual

Yamaha
Yamaha DD-12 User manual

Yamaha
Yamaha DD-5 User manual

Yamaha
Yamaha DTX Drums PCY90AT User manual

Yamaha
Yamaha DTX700 User manual

Yamaha
Yamaha DTX920K User manual

Yamaha
Yamaha DTXTREME IIs User manual

Yamaha
Yamaha DTPK95MSP User manual

Yamaha
Yamaha DD-45 User manual

Yamaha
Yamaha DTX500 User manual