manuals.online logo
Brands
  1. Home
  2. •
  3. Brands
  4. •
  5. Yamaha
  6. •
  7. Drum
  8. •
  9. Yamaha RS-80 User manual

Yamaha RS-80 User manual

Other Yamaha Drum manuals

Yamaha DTX XP100SD User manual

Yamaha

Yamaha DTX XP100SD User manual

Yamaha DTXPLORER User manual

Yamaha

Yamaha DTXPLORER User manual

Yamaha DTXPLORER User manual

Yamaha

Yamaha DTXPLORER User manual

Yamaha DTX400K User manual

Yamaha

Yamaha DTX400K User manual

Yamaha 2 Technical manual

Yamaha

Yamaha 2 Technical manual

Yamaha MBH-915 User manual

Yamaha

Yamaha MBH-915 User manual

Yamaha KP125 User manual

Yamaha

Yamaha KP125 User manual

Yamaha DTXPRESS IV User manual

Yamaha

Yamaha DTXPRESS IV User manual

Yamaha RS-80 Installation guide

Yamaha

Yamaha RS-80 Installation guide

Yamaha RX 5 User manual

Yamaha

Yamaha RX 5 User manual

Yamaha DD-3 User manual

Yamaha

Yamaha DD-3 User manual

Yamaha PCY135 User manual

Yamaha

Yamaha PCY135 User manual

Yamaha DTX700 User manual

Yamaha

Yamaha DTX700 User manual

Yamaha DTP4KSP User manual

Yamaha

Yamaha DTP4KSP User manual

Yamaha DTX400 Series Mounting instructions

Yamaha

Yamaha DTX400 Series Mounting instructions

Yamaha DD-6 User manual

Yamaha

Yamaha DD-6 User manual

Yamaha DTP901 User manual

Yamaha

Yamaha DTP901 User manual

Yamaha RS-75 Installation guide

Yamaha

Yamaha RS-75 Installation guide

Yamaha DTX402K User manual

Yamaha

Yamaha DTX402K User manual

Yamaha DD-14 User manual

Yamaha

Yamaha DD-14 User manual

Yamaha DD65 YDD-60

Yamaha

Yamaha DD65 YDD-60

Yamaha PCY10 User manual

Yamaha

Yamaha PCY10 User manual

Yamaha RS-60A Installation guide

Yamaha

Yamaha RS-60A Installation guide

Yamaha DTXTREME User manual

Yamaha

Yamaha DTXTREME User manual

Popular Drum manuals by other brands

Audiothingies DoubleDrummer user manual

Audiothingies

Audiothingies DoubleDrummer user manual

Roland TD-9K Setup guide

Roland

Roland TD-9K Setup guide

Sudoku LEXUS owner's manual

Sudoku

Sudoku LEXUS owner's manual

Cherub WRW-206 owner's manual

Cherub

Cherub WRW-206 owner's manual

Roland CR-80 owner's manual

Roland

Roland CR-80 owner's manual

V-Drums V-Tour TD-9KX2 Setup guide

V-Drums

V-Drums V-Tour TD-9KX2 Setup guide

Roland CR-80 owner's manual

Roland

Roland CR-80 owner's manual

Roland TR-808 Operation manual

Roland

Roland TR-808 Operation manual

Koma Elektronik RH 301 user manual

Koma Elektronik

Koma Elektronik RH 301 user manual

Roland TR-8 Operation guide

Roland

Roland TR-8 Operation guide

Casio RZ-1 manual

Casio

Casio RZ-1 manual

Pintech E-Gig Care and instruction guide

Pintech

Pintech E-Gig Care and instruction guide

Krüger & Matz Warrior KM0764 quick start guide

Krüger & Matz

Krüger & Matz Warrior KM0764 quick start guide

Alesis DM10 MKII Pro Assembly guide

Alesis

Alesis DM10 MKII Pro Assembly guide

Roland TD-4K Setup guide

Roland

Roland TD-4K Setup guide

Opti-Med JM-D1 Series user manual

Opti-Med

Opti-Med JM-D1 Series user manual

Mattel Syntronics instructions

Mattel

Mattel Syntronics instructions

Alesis Performance Pad Quick start owner's manual

Alesis

Alesis Performance Pad Quick start owner's manual

manuals.online logo
manuals.online logoBrands
  • About & Mission
  • Contact us
  • Privacy Policy
  • Terms and Conditions

Copyright 2025 Manuals.Online. All Rights Reserved.

ee
w
q
w
ty
w
w
A
B
C
D
E
F
G
H
H
H
H
H
I
I
J
J
K
K
r
PrintedinTaiwan
Electronic Drum Rack System
RS-80 Assembly Instructions
■RS-80 Rack Stand Parts ■RS-80+Pad grouping : Set up example
* Before assembling the rack stand, make sure all of the parts shown below
are included.
Left Side Assembly (x1)
AB
Right Side Arm (x1)
Right Side As-
sembly (x1)
C
H
Hex Rod Cylinder (x6)
N
Assembly Instructions
(this sheet)
Module Holder Clamp (x1)
G
M
Tuning Key (x1)
F
Module Holder (x1)
(4 screws included)
L
Cable Band (x10)
K
Cymbal Holder (x2)
J
Drum Pad Clamp (Long) (x3)
Center Pipe Assembly (x1)
D
I
Drum Pad Clamp (Short) (x2)
E
Center Bar (x1)
rKP80
Kick Pad
tHH80
Hi-hat Control Pedal
qDTX
Drum Trigger Module
wTP80S/TP80
Drum Pad
ePCY80S/PCY80
Cymbal Pad
●Pad and Drum Trigger Grouping (option)
Thank you for purchasing the Yamaha Electronic Drum Rack System RS-80.
Before using, thoroughly read this assembly manual, and use this product safely and correctly.
* Specifications are subject to change without notice.
yFoot Pedal
* FP-820 etc.
5Attach the Drum Pad Clamps
5-1 Insert the Hex Rod Cylinders
H
into the Drum Pad Clamps
IJ
, and tighten the fixing bolts.
5-2 Attach the Drum Pad Clamps (Short)
I
to the snare drum
and floor tom positions.
The Drum Pad Clams (Long)
J
should be attached to the hi-
hat and tom tom positions.
5-3 Insert the Hex Rod Cylinders
H
in the pads, adjust the posi-
tion of the pad and tighten the fixing bolts.
1Insert the Right Side Assembly
C
pipe into the Right Side Arm
B
,
and tighten the fixing bolts.
■RS-80 Assembly
* A screw driver (+ or -) is necessary to complete the assembly.
2Insert the Left Side Assembly
A
pipe and the Right Side Assembly
C
pipe into the Center Bar
E
, and tighten the fixing bolts.
Make sure that the Left and Right Side Assemblies are not reversed.
Over-tightening of the fixing bolts may result in damage.
Take care when tightening fixing bolts and screws.
3Above the Center Bar
E
, attach the Center Pipe
D
, and tighten
the fixing bolts.
Tighten
Tighten Tighten
Tighten
Center Bar
E
Step 3
Step 2
Step 1
Left Side Assembly
A
Right Side Arm
B
Attach the Center Pipe
D
Right Side Assembly
C
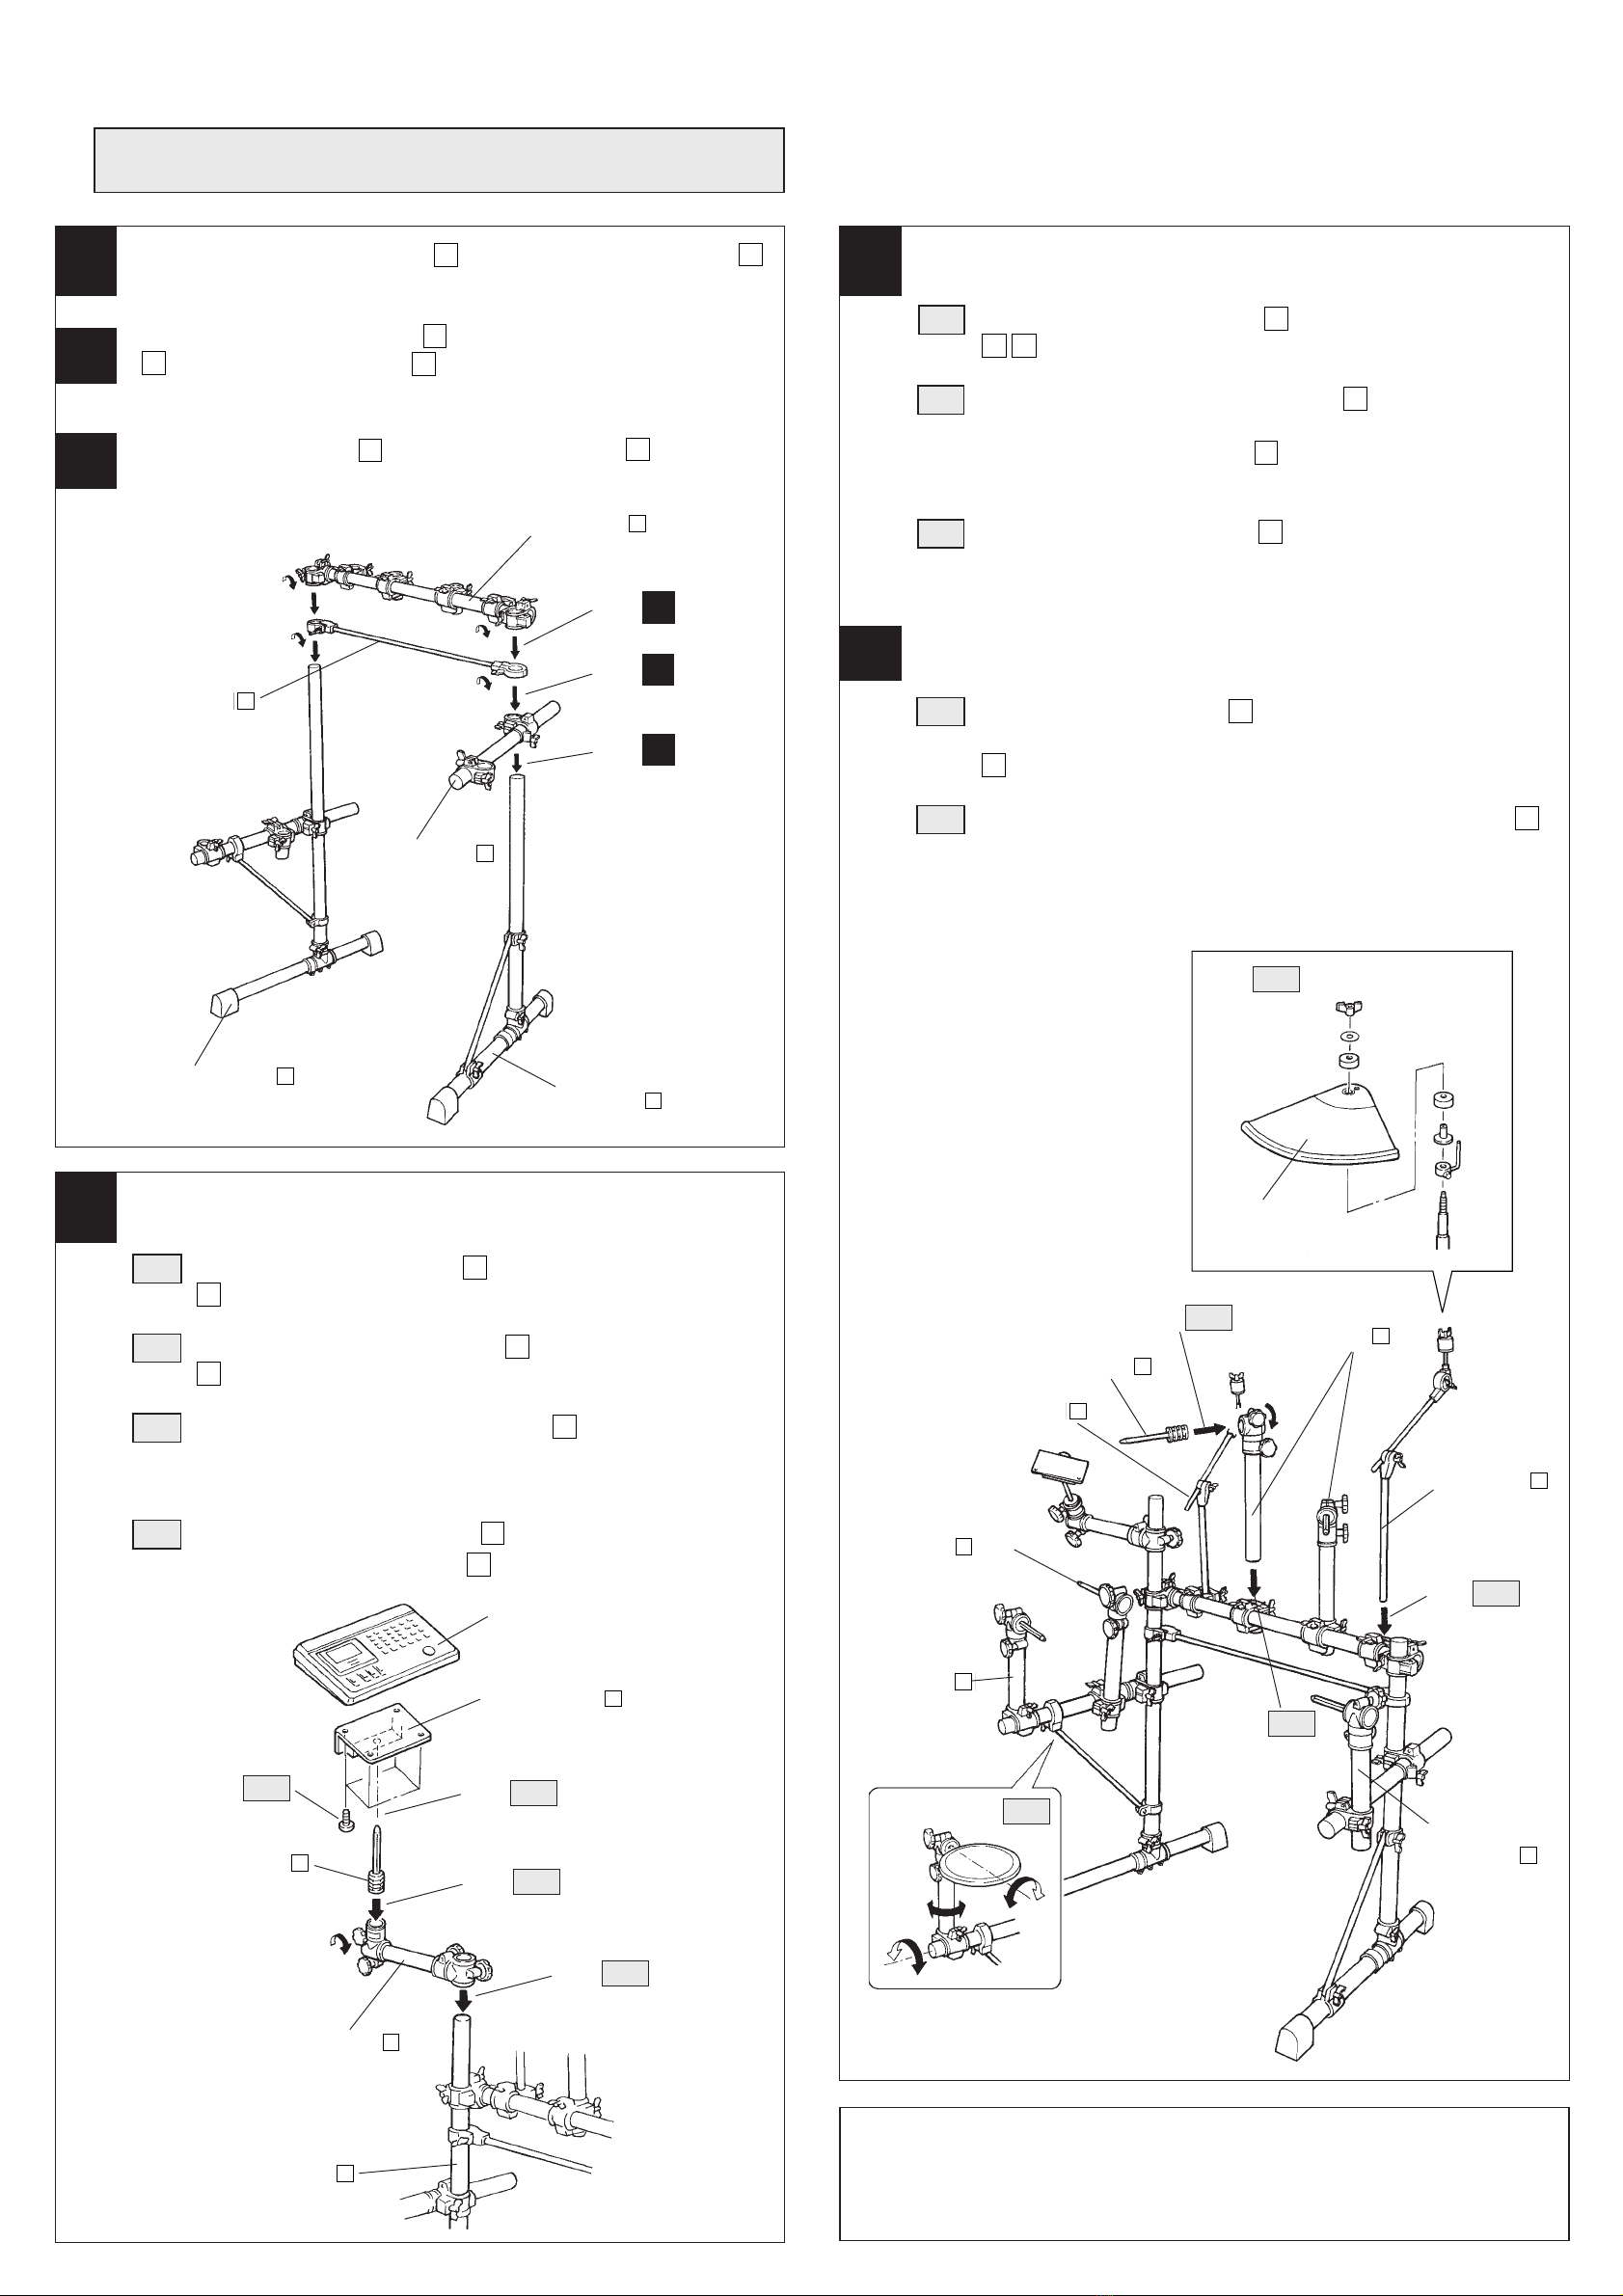
4Attach the Module Holder
4-1 Insert the Hex Rod Cylinder
H
into the Module Holder Clamp
G
, and tighten the fixing bolts.
4-2 Attach the Module Holder Clamp
G
to the Left Side Assembly
A
pipe.
4-3 Attach the DTX to the Module Holder
F
. With a screwdriver,
use the screws included with the Module Holder to attach the
holder to the bottom of the DTX.
4-4 Attach the Module Holder
F
(with the DTX attached)
to the Module Holder Clamp
G
.
Hex Rod Cylinder
H
Attach the Module Holder
G
Tighten
DTX
Module Holder
F
Left Side Assembly
A
Step 4-3
Step 4-2
Step 4-1
Step 4-4
After the above assembly is complete, set the Kick Pad, Hi-Hat Con-
trol Pedal, etc. into position and connect the necessary cables. To
keep cable out of the way while playing, use the supplied Cable Bands
to hold the cables to the rack systems’s pipes.
Drum Pad
Clamp(short)
I
Drum Pad Clamp
(Long)
J
Step 5-1 Drum Pad Clamp
(Long)
J
Hex Rod Cylinder
H
Cymbal Holder
K
Tighten
Cymbal Holder
K
Step 6-1
Drum Pad
Clamp(short)
I
Step 5-2
Step 6-2
Step 5-3
Cymbal Pad
6Attach the Cymbal Holders
6-1 Insert the Cymbal Holders
K
into the Cymbal Holder Clamps
that are attach to the left and right sides of the Center Pipe
D
, and tighten all fixing bolts.
6-2 Attach the Cymbal Pad to the Cymbal Holders
K
,
adjust the position and tighten the fixing bolts. (Refer to the
Cymbal Pad’s Owner’s Manual for instructions on attaching
the cymbal pad to the cymbal holder.)