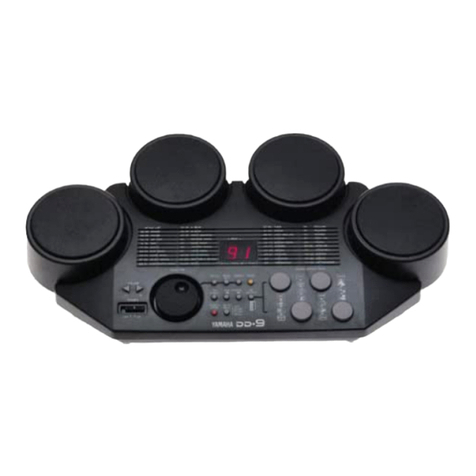
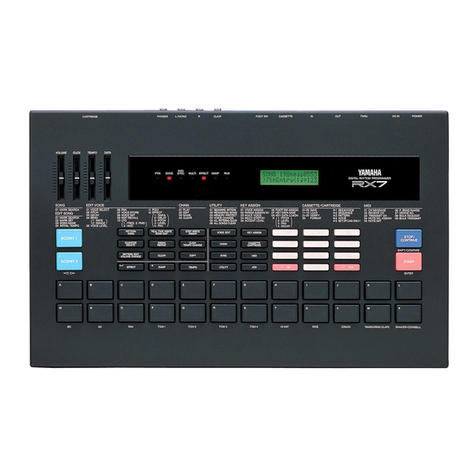
Yamaha DD-10 User manual

Owner's
Guide
Bedienungsanleitung
Manuel
TEE
Manual
de
instrucciones
YAMAHA
>
37T
DIGITAL
DRUM
BANK
==
RR
YAMAHA

This
Digital
Drum
Bank
00-10
can
be
used
with
a
shoulder
strap.
The
strap
is
stored
in
the
side
of
the
package.
Attach
it
as
follows:
Contents
.
Nomenclature....................
esee
.
Playing
Back
the
Demonstration
.....
How
To
Use The
Auto
Rhythm
СесПОП
AA
евреи
.
Taking
Advantage
Of
Manual
Percussion
...........................
.
Programming
Your
Own
Rhythm
Pattern
Adding
More
Effect..
.
Using
MIDI
Capability.
.
External
Jacks..........
Optional
Accessories..
.
Taking
Care
Of
Your
Digital
Drum
Bank
.
Specifications
DONO
m
Aa
oma
e
o
=
Dieses
Digital
Drum
Bank
DD-10
kann
mit
einem
Schulterriemen
verwendet
werden.
Den
Gurt
finden
Sie
seitlich
in
der
Packung.
Befestigen
Sie
ihn
so:
Inhalt
1.
Bezeichnung
der
Teile.........
2.
Demonstrations-Wiedergabe
...
3.
Verwendung
der
Sektion
Auto
Rhythm...
4.
Ausnützen
der
Móglichkeiten
von
Manual
Percussion
.........................
5.
Programmieren
von
eigenen
Rhythmusmustern
..........................
.
Und
noch
mehr
Effekte.........
.
Gebrauch
der
MIDI-Fáhigkeiten
.
.
Externe
Buchsen
..................
.
Sonderzubehör
.................
.
Pflege
des
Digital
Drum
Bank.
js
.
Technische
Daten
...........................
=
ооо
J
е
‚юм
|
On
peut
se
servir
de
la
batterie
numérique
DD-10
avec
une
bandouliére,
placée
sur
le
cóté
de
P’emballage.
La
fixer
de
la
façon
suivante:
Table
des
matiéres
.
Nomenclature
2.
Démonstration
3.
Utilisation
de
la
section
du
rythme
automatique
.........................
4.
Avantages
des
percussions
таппие!Їе$..........................................
5.
Programmation
de
motifs
rythmiques
personnels
6.
Ajout
d'effet...............
7.
Utilisation
de
la
fonct
8.
Prises
externes................
9.
Accessoires
en
option
....
10.
.
Entretien
de
la
batterie
numérique
..14
|
11.
врестсайопв.
нн
Este
banco
de
batería
digital
DD-10
puede
emplearse
con
una
correa
de
bandolera.
La
correa
se
encuentra
al
lado
del
paquete.
Colóquela
como
se
indica:
Indice
1.
Nomenclatura
...............................
2.
Reproducción
de
demostración
..........
3.
Cómo
emplear
la
sección
de
ritmos
automáticos
..........
cesses
4.
Cómo
sacar
partido
a
la
percusión
manual...........................
5.
Programación
de
sus
propios
patrones
rítmicos
...........................
6.
Adición
de
más
efecto:
7.
Empleo
de
la
capacidad
de
MIDI
8.
Tomas
externas.....................
9
0
.
Accesorios
opcionales
.
Cuidado
de
su
banco
de
batería
e
О
see

Before
Playing
Inserting
Batteries
Remove
the
battery
compartment
cover
on
the
bottom
of
the
instrument
and
insert
six
1.5V
SUM-2
(AM-2),
R-14
(LR-14),
“C”
size
or
equivalent
batteries
(sold
separately),
making
sure
that
the
polarities
are
placed
as
directed
inside
of
the
com-
partment.
Replace
the
cover,
ensuring
that
it
locks
securely
in
place.
Optional
Power
Adaptors
Household
current:
Power
Adaptor
РА-1/РА-1В/РА-4
is
available
for
household
current.
No
other
adaptor
is
usable,
so
when
you
purchase
a
power
adaptor
please
ensure
that
К
is
model
РА-1/РА-1В/РА-4.
Note:
If
the
LED
indicator
goes
off
or
returns
to
“00”
while
playing,
battery
power
has
been
consumed.
The
batteries
must
then
be
replaced.
For
An
Even
Bigger
Sound
Although
you'll
be
happy
with
the
sound
from
the
built-in
speaker,
you
can
enhance
and
create
an
even
more
satisfying
sound
if
you
connect
the
Digital
Drum
Bank
to
a
bigger
speaker
system.
Try
using
your
home
stereo
unit.
Vor
dem
Spielen
Einlegen
der
Batterien
Den
Batteriefachdeckel
am
Boden
des
Instruments
abnehmen
und
sechs
1,5-V-
Batterien
des
Formats
R-14
(**C”-Zelle)
oder
entsprechende
Batterien
einlegen
(nicht
mitgeliefert)
und
dabei
sicherstellen,
daß
die
Batterien
mit
richtiger
Polaritát
(Ausrichtung
von
Plus-
und
Minuspol),
wie
an
der
Seite
des
Batteriefachs
angegeben,
eingelegt
werden.
Den
Batteriefachdeckel
wieder
aufsetzen
und
sicherstellen,
daß
er
richtig
einrastet.
Als
Sonderzubehór
erháltliche
Adapter
Für
Netzstrom:
Das
Netzteil
Yamaha
PA-1/
РА-1В/РА-4
steht
fiir
Netzstrombetrieb
zur
Verfügung.
Von
der
Verwendung
anderer
Netzteile
wird
abgeraten.
Hinweis:
Wenn
die
LED-Anzeige
erlischt
order
beim
Spielen
auf
“00”
zurückkehrt,
ist
der
Batteriestrom
zu
schwach.
Neue
Batterien
müssen
eingelegt
werden.
Für
noch
besseren
Sound
Auch
wenn
Sie
mit
dem
Sound
vom
einge-
bauten
Lautsprecher
zufrieden
sein
dürften:
Noch
besserer
Sound
wird
erzielt,
wenn
das
Digital
Drum
Bank
an
einen
gróferen
Lautsprecher
angeschlossen
ist.
Dazu
kann
z.B.
Ihre
Stereoanlage
dienen.
Avant
de
commencer
à
jouer
Insertion
des
piles
Déposer
le
couvercle
du
logement
des
piles,
situé
sur
le
fond
de
l'instrument
et
y
insérer
six
piles
de
1,5
volt
SUM-2
(AM-2)
ou
R-14
(LR-14),
de
format
“С”
ou
des
piles
équivalentes
(vendues
séparément).
S'assurer
que
les
polarités
sont
diposées
comme
illustré
dans
le
du
logement.
Remettre
le
couvercle
en
place
et
s'assurer
Qu'il
se
ferme
correctement.
Adaptateurs
d'alimentation
en
option
Courant
secteur:
Adaptateur
d'alimenta-
tion
PA-1/PA-1B/PA-4
est
disponible
pour
le
fonctionnement
sur
courant
secteur.
Comme
aucun
autre
type
d'adaptateur
n'est
utilisable,
veiller
que
l'adaptateur
acquis
est
bien
le
modéle
PA-1/PA-1B/PA-4.
Remarque:
Si,
pendant
l'exécution
d'un
morceau,
le
témoin
à
LED
disparait
ou
s'éteint,
c'est
que
les
piles
sont
épuisées
et
doivent
étre
remplacées.
Obtention
d'un
son
plus
puissant
et
plus
homogéne
Bien
que
les
haut-parleurs
incorporés
offrent
un
son
satisfaisant,
il
est
néan-
moins
possible
de
l'améliorer
et
de
créer
un
son
de
meilleure
qualité
si
l'on
raccorde
la
batterie
numérique
à
des
enceintes
acoustiques
plus
volumineuses.
Essayer
avec
celles
de
votre
chaine
stéréo.
Antes
de
comenzar
a
tocar
Inserción
de
las
pilas
Extraiga
la
tapa
del
compartimiento
de
las
pilas
de
la
parte
inferior
del
instrumento
e
inserte
seis
pilas
de
1,5У
SUM-2
(AM-2),
R-14
(LR-14),
tamaño
“С”
o
equivalentes
(opcionales),
con
la
polaridad
indicada
en
la
parte
lateral
de
su
compartimiento.
Vuelva
a
colocar
la
tapa,
asegurándose
de
que
quede
encajada
en
su
lugar.
Adaptadores
de
alimentación
opcionales
Corriente
de
la
red:
Para
la
corriente
de
la
red
está
disponible
el
adaptador
de
alimentación
PA-1/PA-1B/PA-4.
No
emplee
ningün
otro
tipo
de
alimentador.
Nota:
Si
en
indicador
le
LED
se
apaga
o
pasa
а
“00”
mientras
esté
tocando.
Las
pilas
se
habrán
agotado.
En
tal
caso
tendrá
que
reemplazar
las
pilas.
Para
conseguir
un
sonido
todavía
mejor
Aunque
estará
satisfecho
con
el
sonido
emitido
por
el
altavoz
incorporado,
podrá
obtener
un
sonido
todavía
más
satisfactorio
conectando
el
banco
de
batería
digital
a
un
sistema
mayor
de
altavoces.
Pruebe
a
emplear
su
sistema
estéreo.

|
Nomenclature
|
Bezeichnung
der
Teile
|
Nomenclature
|
Nomenclatura
RHYTHM
PATTERNISELECT
РООТ
PEDAL
A
MÉIN
A
p-—'—
A
ENIHMPATTEBNISE
CAE)
ode
70-97
i
Оз
О?
Оз
Оов)
eragoen
BO
SWING
BOSSA
помине
FUNK
1
і
Ei
a
B
зимна
p
Os
O
5
о
6
EL
uL
verz
TS
SWING
HI-HAT
89
SWING
REGGAE
93
JAZZ
WALTZ
99
PROGRAMMED
PATTERN
POWER
OFF
$
FON
VOLUME
MIN
T
III
ТЕМАХ
ТАЯТ.
RESTART]

(1)
Power
Switch
@
Volume
Control
(3)
Percussion
Selectors
(4)Pattern
Program
Selectors
(Clear
Button
(6)
Demonstration
On/Off
(2MIDI
Mode
Selector
(8)
Metronome
Selector
(9)
Tempo
Controls
(9
Synchro
Break
Mode
Selector
(D
Rhythm
Pattern
Select
Button
(2
Start/Restart
Selector
p
(14)
Roll
Function
Button
(15)
Percussion
Button
0
(16)
Percussion
Pads
1—8
(Percussion
Button
9
(8)
Intro/Fill
in
Selectors
19
Manual
Tempo
Control
Q9
LED
indicator
Qo
Speakers
G)
Foot
Pedals
Attention
Before
starting
to
play,
please
remove
the
protective
film
covering
the
indica-
tion
panel.
CONetzschalter
(2)Lautstärkeregler
(3)Perkussion-Wahltasten
(4)Muster-Programmwahltasten
(5)Lóschtasten
(6)Vorführung
Ein/Aus
(7)MIDI-Betriebsartschalter
(8)Metronom-Wahlschalter
(9)Temporegler
(OBetriebsartschalter
Synchro
Break
(i)
Wahltaste
Rhythm
Pattern
(2
Wahltaste
Start/Fortsetzung
(ISStopp
(2
Rollfunktion-Taste
(15)
Perkussion-Taste
0
(iSPerkussionsfelder
1—8
(MPerkussion-Taste
9
(i8
Wahltasten
Intro/Fill
(i9Manueller
Temporegler
Q)LED-Anzeige
Lautsprecher
@)Fußpedale
Vorsicht
Vor
dem
Spielbeginn
die
Schutzfolie
über
dem
Anzeigefeld
entfernen.
Interrupteur
d’alimentation
(POWER)
Réglage
d'intensité
sonore
(VOLUME)
Sélecteurs
de
percussion
(PERCUS
SELECT)
@®Selecteurs
de
programmation
de
motif
(PATTERN
PROGRAM)
(5)
Touche
d'annulation
(CLEAR)
(6)
Touche
de
marche/arrét
de
la
démonstration
(DEMO
ON/OFF)
Sélecteur
de
mode
MIDI
(MIDI
MODE)
(8)Sélecteur
de
métronome
(METRONOME)
(3)
Réglages
du
tempo
(TEMPO)
(i)
Sélecteur
de
mode
d'interruption
synchronisée
(SYNCHRO
BREAK
MODE)
@
Touche
de
sélection
de
motif
rythmique
(RHYTHM
PATTERN
SELECT)
Sélecteur
de
mise
en
route/remise
en
route
(START/
RESTART)
(i3
Arrét
(STOP)
(14)
Touche
de
fonction
de
roulement
(ROLL)
(15
Touche
de
percussion
0
(i9
Coussinets
de
percussion
1
à
8
(17
Touche
de
percussion
9
(i
Sélecteurs
d'introduction/remplissage
(INTRO
FILL-IN)
(9
Réglage
du
tempo
manuel
(MANUAL
TEMPO)
Gd
Témoin
à
LED
Haut-parleurs
(2)
Pédales
Attention
Avant
de
commencer
à
jouer,
prière
d'enlever
la
pellicule
de
protection
du
panneau
d'affichage.
(1)
Interruptor
de
alimentación
(2)
Control
de
volumen
(3)
Selectores
de
percusión
(4)
Selectores
de
programas
de
patrones
(5)
Botón
de
borrado
(6)
Selector
de
activación
/
desactivación
de
la
demostración
Selector
de
modo
de
MIDI
Selector
de
metrónomo
Botones
selectores
de
patrones
rítmicos
Selector
de
inicio/reinicio
Parada
Botón
de
función
de
redoble
Botón
de
percusión
0
Pulsadores
de
percusión
1—8
17)
Botón
de
percusión
9
(18)
Selectores
de
preludio/relleno
(19
Control
manual
de
tempo
Indicador
de
LED
Altavoces
Pedales
Atención
Antes
de
comenzar
a
tocar,
quite
la
película
protectora
que
cubre
el
panel
de
indicación.

Playing
Back
The
Demonstration
The
Digital
Drum
Bank
DD-10
is
pro-
grammed
with
a
demonstration.
To
hear
this
rhythm,
do
the
following.
1.
Switch
On
Slide
the
POWER
switch
CO
to
the
“ON”
position.
The
LED
indicator
@
will
then
illuminate.
2.
Adjust
the
Volume
Slide
the
VOLUME
control
@
about
three-quarters
of
the
way
toward
MAX.
to
set
the
volume
level.
3.
Start
the
Demonstration
Press
the
DEMO
ON/OFF
selector
(6).
The
demonstration
rhythm
will
then
start.
@
The
demonstration
is
played
auto-
matically
and
repeatedly.
@
The
TEMPO
controls
(9)
can
be
used
to
vary
the
tempo
up
and
down.
4.
Stop
the
Demonstration
Press
the
DEMO
ON/OFF
selector
(6)
again
or
the
STOP
button
13
to
stop
the
demonstration.
Demonstrations-
Wiedergabe
Das
Digital
Drum
Bank
DD-10
ist
mit
einem
Vorführrhythmus
programmiert.
Zur
Wieder-
gabe
dieses
Vorführinhalts
folgendermaßen
vorgehen.
1.
Einschalten
Den
Ein/Aus-Schalter
POWER
(1)
in
Einstellung
“ON”
stellen.
Die
LED-Anzeige
leuchtet
auf.
POWER
OFF
I
|
ON
2.
Die
Lautstürke
einstellen
Den
Lautstárkeregler
VOLUME
(2)
etwa
drei
Viertel
in
Richtung
MAX.
schieben,
um
den
Lautstárkepegel
auf
einen
angemessenen
Wert
einzustellen.
MIN
|
3.
Demonstration
starten
Drücken
Sie
die
Wahltaste
DEMO
ON/OFF
(6).
Der
Demonstrations-Rhythmus
startet
jetzt.
€
Die
Demonstration
wird
automatisch
und
wiederholt
gespielt.
€
Mit
den
TEMPO-Reglern
(9)
kónnen
Sie
das
Tempo
variieren
(schneller,
langsamer)
=
Démonstration
La
batterie
numérique
DD-10
est
pro-
grammée
avec
une
démonstration.
Pour
pouvoir
écouter
ce
rythme,
procéder
comme
suit.
1.
Mettre
l'instrument
sous
tension
Glisser
l'interrupteur
POWER
(1)
sur
la
position
ON.
Le
témoin
à
LED
Q9
s'allume.
VOLUME
2.
Ajuster
l'intensité
sonore
Pour
ajuster
le
niveau
de
l'intensité
sonore,
glisser
le
réglage
VOLUME
@
aux
trois-
quarts
vers
la
position
MAX.
II
ET
|
MAX
3.
Lancer
la
démonstration
Appuyer
sur
le
sélecteur
DEMO
ON/OFF
(6).
Le
rythme
de
démonstration
retentit.
@
La
démonstration
s'effectue
automati-
quement
et
de
manière
répétée.
e
Les
réglages
TEMPO
(9)
peuvent
être
utilisés
pour
faire
varier
le
tempo.
DEMO
O
ON/OFF
4.
Stoppen
der
Demonstration
Drücken
Sie
die
Wahltaste
DEMO
ON/OFF
(6)
erneut
oder
die
Taste
STOP
®
zum
Stoppen
der
Demonstration.
4.
Arréter
la
démonstration
Appuyer
de
nouveau
sur
le
sélecteur
DEMO
ON/OFF
(6)
ou
appuyer
sur
la
touche
STOP
(3)
pour
arréter
la
démonstration.
Reproducción
de
demostración
El
banco
de
batería
digital
DD-10
ha
sido
programado
con
un
ritmo
de
demostración.
Para
escuchar
este
ritmo,
realice
lo
siguiente.
1.
Conexión
de
la
alimentación
Deslice
el
interruptor
POWER
(1)
hasta
la
posición
“ОМ”.
El
indicador
de
LED
@
se
encenderá.
2.
Ajuste
del
volumen
Para
ajustar
el
nivel
del
volumen,
deslice
el
control
VOLUME
(2)
aproximadamente
tres
cuartas
partes
de
su
recorrido
hacia
МАХ.
3.
Inicio
de
la
demostración
Presione
el
selector
DEMO
ON/OFF
(6).
El
ritmo
de
demostración
se
iniciará.
e
El
ritmo
de
demostración
se
reproducirá
atomática
y
continuamente.
€
Para
aumentar
у
disminuir
el
tempo
podrá
emplear
los
controles
TEMPO
(9).
Pata
detener
la
demostración,
vuelva
a
presionar
el
selector
DEMO
ON/OFF
(6),
4.
Parada
de
la
demostración
|
о
el
botón
STOP
(3.

How
То
Use The
Auto
Rhythm
Section
This
section
offers
you
an
extraordinary
total
of
98
different
programmed
rhythms,
all
of
which
are
listed
on
the
top
panel.
PCM
digital
technology
ensures
lifelike
reproduction.
1.
Start
A
Programmed
Rhythm
Pattern
When
the
POWER
switch
is
“ОМ”,
the
LED
indicator
will
display
the
numerals
“00”,
meaning
the
“8
beat”
rhythm
15
automatically
selected.
Press
the
START/
RESTART
selector
(d,
and
the
8
beat
rhythm
will
begin
to
play.
2.
Stop
The
Rhythm
Press
the
STOP
button
(3
and
the
rhythm
will
stop.
3.
Select
Another
Rhythm
Pattem
Select
any
rhythm
pattern
you
desire
using
the
10
RHYTHM
PATTERN
SELECT
buttons
(located
at
the
top
of
the
control
panel.
The
two
numerals
of
the
rhythm
pattern
you
select
will
be
displayed
by
the
LED
indicator.
4.
Start
the
Rhythm
Pattem
Press
the
START/RESTART
selector
©,
and
the
rhythm
pattern
you
have
selected
will
begin.
Verwendung
der
Sektion
Auto
Rhythm
Diese
Sektion
bietet
die
außergewöhnlich
hohe
Anzahl
von
insgesamt
98
verschiedenen
Programmrhythmen,
die
alle
auf
der
Front-
platte
aufgeführt
sind.
PCM-Digitaltechnologie
garantiert
klangechte
Wiedergabe.
1.
Starten
eines
programmierten
Rhythmus-
musters
Wenn
der
Netzschalter
POWER
in
Stellung
“ON”
ist,
zeigt
die
LED-Anzeige
die
Ziffern
“00”.
Das
bedeutet,
daß
als
Vorgabe
auto-
matisch
der
Rhythmus
**8
Beat”
eingestellt
ist.
Die
Taste
START/RESTART
(2
drücken,
und
der
8-Beat-Rhythmus
beginnt
zu
spielen.
STAR
RESTART
Utilisation
de
la
section
du
rythme
automatique
Cette
section
offre
le
choix
extraordinaire
de
98
rythmes
programmés
différents,
tous
énumérés
sur
le
panneau
supérieur.
La
technologie
numérique
PCM
assure
une
reproduction
naturelle.
1.
Lancer
un
motif
rythmique
programmé
Lorsque
l'interrupteur
POWER
est
commuté
sur
ON,
le
témoin
à
LED
affiche
les
chiffres
“00”,
ce
qui
signifie
que
le
rythme
“8-beat”
(8
temps)
est
automatiquement
sélectionné.
Appuyer
sur
le
sélecteur
START/RESTART
()
et
le
rythme
“8-beat”
retentit.
T/
$
2.
Stoppen
des
Rhythmus
Die
Taste
STOP
(3)
drücken,
und
der
Rhythmus
stoppt.
3.
Wahl
eines
anderen
Rhythmus
Ein
gewiinschtes
Rhythmusmuster
mit
den
10
Tasten
RHYTHM
PATTERN
SELECT
@
oben
auf
dem
Bedienfeld
wáhlen.
Die
beiden
Kennziffern
des
gewáhlten
Rhythmusmusters
erscheinen
in
der
LED-Anzeige.
2.
Arréter
le
rythme
Appuyer
sur
la
touche
STOP
(3
et
le
rythme
s'arréte.
3.
Sélectionner
un
autre
motif
rythmique
Choisir
un
motif
rythmique
souhaité
par
les
dix
touches
RHYTHM
PATTERN
SELECT,
(1)
situées
sur
le
dessus
du
panneau
de
contróle.
Les
deux
chiffres
du
rythme
sélectionné
sont
indiqués
par
le
témoin
à
LED.
RHYTHM
PATTERN
SELECT
От
Ог
Оз
Oo
O4
Os
Ов
Q7
Os
Os
Ос
4.
Start
des
Rhythmusmusters
Die
Taste
START/RESTART
(
drücken,
und
das
gewáhlte
Rhythmusmuster
beginnt
zu
spielen.
4.
Lancer
le
motif
rythmique
Appuyer
sur
le
sélecteur
START/RESTART
@
et
le
motif
rythmique
choisi
s'exécute.
Cómo
emplear
la
sección
de
ritmos
automáticos
Esta
sección
ofrece
un
extraordinario
total
de
98
ritmos
programados
diferentes,
todos
los
cuales
están
indicados
en
el
panel
superior.
La
tecnología
digital
de
PCM
asegura
una
reproducción
natural.
1.
Inicio
del
patrón
rítmico
programado
A
Cuando
ponga
el
interruptor
POWER
en
“ON”,
el
indicador
de
LED
visualizará
los
números
“00”,
para
indicar
que
se
ha
selec-
cionado
automáticamente
el
ritmo
“8
beat”.
Presione
el
selector
START/RESTART
(2,
y
el
ritmo
de
8
tiempos
comenzará
a
reproducirse.
2.
Parada
del
ritmo
Presione
el
botón
STOP
(9
y
el
ritmo
se
parará.
3.
Selección
de
otro
patrón
rítmico
Seleccione
el
patrón
rítmico
que
desee
empleando
los
botones
10
RHYTHM
PATTERN
SELECT
4)
situados
en
la
parte
superior
del
panel
de
control.
Los
dos
números
del
patrón
rítmico
que
seleccione
se
visualizarán
en
el
indicador
de
LED.
4.
Inicio
del
patrón
rítmico
Presione
el
selector
START/RESTART
(2,
y
se
iniciará
el
patrón
rítmico
que
haya
seleccionado.

5.
Adding
Fill-Ins
Press
the
INTRO
FILL-IN
1
or
2
selector
49
when
the
auto
rhythm
is
playing
to
add
a
fill-in
pattern
that
is
suited
to
that
particular
rhythm.
€
The
fill-in
effect
will
be
added
at
the
end
of
the
bar
that
was
being
processed
when
the
selector
was
pressed.
When
you
press
the
INTRO
FILL
IN
1
or
2
selector
6
to
start
the
auto
rhythm,
you
will
obtain
an
interesting
intro
effect.
6.
Set
the
Tempo
Adjust
the
tempo
as
you
like
using
the
TEMPO
controls
@;
4
is
for
increasing
the
tempo
and
V
15
for
decreasing
the
tempo.
If
you
wish
to
select
the
preset
tempo,
press
both
selectors
at
the
same
time.
The
tempo
Indication
dot
will
be
flashed
on
the
beat
of
the
rhythm.
The
3,
4,
5
beat—The
dot
will
be
flashed
brighter
on
the
first
beat.
The
7
beat—It
will
be
flashed
brighter
on
the
first
and
fifth
beat.
And
if
you
change
the
tempo
while
playing,
the
LED
indicator
which
displays
the
rhythm
number
will
then
change
to
the
tempo
number
for
1
second.
Notes:
1.
The
rhythm
will
be
played
back
at
the
preset
tempo,
which
is
particularly
suited
to
each
rh
ythm.
2.
If
you
change
the
rhythm
while
a
rhythm
is
being
played
back,
the
tempo
will
remain
at
the
same
level—it
will
not
change
when
you
change
the
pattern.
3.
A
programmed
pattern
is
selected
when
you
press
two
RHYTHM
PATTERN
SELECT
buttons.
If
you
make
a
mistake
when
selecting
a
pattern,
press
the
"C"
button.
4.
if
you
press
the
DEMO
ON/OFF
button
while
a
programmed
rhythm
is
being
played
back,
the
demonstration
will
begin
from
the
beginning.
5.
Hinzufügen
von
Fill-In
Drücken
Sie
die
Tasten
INTRO-FILL-IN
1
oder
2
(8),
wáhrend
der
Auto-Rhythmus
Spielt.
Sie
hóren
dann
die
für
den
Rhythmus
passenden
Fill-In's.
9
Der
Fill-In
Effekt
wird
an
das
Ende
des
Taktes
eingefügt,
der
im
Moment
des
Tastendrucks
gespielt
wurde.
Wenn
Sie die
Taste
INTRO-FILL
1
oder
2
drücken,
um
den
Auto
Rhythmus
zu
starten,
hóren
Sie
einen
interessanten
Intro-
Effekt!
6.
Einstellen
des
Tempos
Das
Tempo
nach
Wunsch
mit
den
Reglern
TEMPO
(9)
einstellen;
A
dient
zum
Erhóhen
des
Tempos
und
Y
zum
Senken
des
Tempos.
Wenn
das
“Ргеве??-Тетро
gewählt
werden
soll,
beide
Tasten
gleich-
zeitig
drücken.
Der
Punkt
der
Tempoanzeige
blinkt
mit
den
Rhythmus.
Takt
3,
4,
5—Der
Punkt
blinkt
stárker
beim
ersten
Taktschlag.
Takt
7—Der
Punkt
blinkt
stárker
beim
ersten
und
fünften
Taktschlag.
Wenn
Sie
das
Tempo
wáhrend
des
Spielens
ándern,
wird
die
LED-Anzeige,
die
bisher
die
Rhythmus-Nummer
zeigte,
dann
für
eine
Sekunde
das
Tempo
anzeigen.
Hinweise:
1.
Für
jeden
Rhythmus
ist
ein
“Preset””-
Tempo
vorprogrammiert,
was
sich
für
den
jeweiligen
Rhythmus
gut
eignet.
2.
Wenn
der
Rhythmus
geündert
wird,
wáhrend
ein
Rhythmus
wiedergegeben
wird,
bleibt
das
Tempo
gleich—es
ändert
sich
nicht,
wenn
das
Muster
geändert
wird.
3.
Sie
kónnen
die
programmierten
Muster
anwählen,
wenn
Sie
die
beiden
Tasten
RHYTHM
PATTERN
SELECT
drücken.
Wenn
Sie
bei
der
Wahl
eines
Musters
einen
Fehler
machen,
die
Taste
“С”
drücken.
4.
Wenn
die
Taste
DEMO
ON/OFF
gedrückt
wird,
während
ein
programmierter
Rhythmus
wiedergege-
ben
wird,
beginnt
die
Vorführung
von
Anfang
an.
5.
Ajout
de
motifs
de
remplissage
Lorsque
le
rythme
automatique
S'exécute,
appuyer
sur
le
sélecteur
FILL-IN
1
ou
2
19
pour
ajouter
un
motif
de
remplissage
qui
sied
à
ce
rythme
en
particulier.
€
L'effet
de
remplissage
est
ajouté
à
la
fin
de
la
barre
en
cours
d'exécution
lorsque
le
sélecteur
a
été
enclenché.
Lorsqu'on
appuie
sur
le
sélecteur
INTRO
FILL
IN
1
ou
2
(43)
pour
lancer
le
rythme
automatique,
on
obtient
alors
un
effet
d'introduction
intéressant.
6.
Réglage
du
tempo
A
l'aide
des
réglages
TEMPO
(9),
ajuster
le
tempo
selon
ses
préférences;
le
réglage
A
est
utilisé
pour
augmenter
le
tempo,
tandis
que
le
réglage
V
est
utilisé
pour
le
diminuer.
Si
l'on
souhaite
prérégler
le
tempo
actuel,
appuyer
simultanément
Sur
ces
deux
sélecteurs.
Le
point
d'indication
du
tempo
se
met,
à
alignotor
sur
le
battement
du
rythme.
Mesure
à
3,
4,
5
temps:
Le
point
clignote
plus
clairement
au
premier
battement.
Mesure
à
7
temps:
Le
point
alignote
plus
clairement
aux
premier
et
au
cinquième
battements.
De
plus,
si
l'on
change
de
tempo
au
cours
de
la
performance,
le
témoin
à
DEL,
qui
indique
le
chiffre
du
rythme,
affiche,
pendant
une
seconds,
le
chiffre
du
tempo.
Remarques:
1
Le
rythme
est
reproduit
au
tempo
préréglé,
adapté
à
chaque
rythme.
2
Sil'on
modifie
un
rythme
en
cours
d'exécution,
le
tempo
restera
au
méme
niveau:
il
ne
change
pas
lorsqu'on
change
de
motif.
3
Lorsqu'on
appuie
sur
une
touche
RHYTHM
PATTERN
SELECT,
un
motif
programmé
est
sélectionné.
Si
l'on
commet
une
erreur
lors
du
choix
d'un
motif,
appuyer
sur
la
touche
"C".
4
Si
l'on
appuie
sur
la
touche
DEMO
ON/OFF
pendant
qu'un
rythme
programmé
est
reproduit,
la
démonstration
va
commencer
à
рами
du
début.
5.
Adición
de
rellenos
Para
añadir
un
patrón
de
relleno
adecuado
Presione
el
selector
INTRO/FILL
IN
1
o
2
(48)
cuando
se
esté
reproduciendo
el
ritmo
automático
para
añadir
un
patrón
de
relleno
adecuado
a
tal
ritmo
particular.
e
El
efecto
de
relleno
se
añadirá
al
final
del
compás
que
se
esté
procesando
cuando
presione
el
selector.
Cuando
presione
el
selector
INTOR/FILL
IN
102
para
iniciar
el
ritmo
automático,
obtendrá
un
interesante
efecto
de
preludio.
6.
Ajuste
del
tempo
Ajuste
el
tempo
a
su
gusto
empleando
los
controles
TEMPO
(9):
A
es
para
incrementar
el
tempo,
y
Y
para
disminuirlo.
Si
desea
seleccionar
el
tempo
actual,
presione
ambos
selectores
al
mismo
tiempo.
El
punto
de
indicación
del
tempo
parpadeará
acompasado
con
el
ritmo.
3,
4,
y
5
tiempos—El
punto
parpadeará
con
más
brillo
en
el
primer
tiempo.
7
tiempos—Parpadeará
con
más
brillo
en
los
tiempos
primero
y
quinto.
Si
cambia
el
tempo
mientras
esté
tocando,
el
indicador
de
LED
que
visualiza
el
número
del
ritmo
cambiará
al
número
de
tempo
durante
1
segundo.
Notas:
1.
El
ritmo
se
reproducirá
con
el
tempo
actual,
que
es
el
particularmente
adecuado
a
cada
ritmo.
2.
Si
cambia
el
ritmo
mientras
se
esté
reproduciendo
un
ritmo,
el
tempo
permanecerá
al
mismo
nivel,
es
decir,
no
cambiará
cuando
usted
cambie
el
patrón.
3.
Un
patrón
programado
se
seleccionará
con
los
botones
RHYTHM
PATTERN
SELECT.
Si
comete
un
error
al
seleccionar
un
patrón,
presione
el
botón
“С”.
4.
Si
presiona
el
selector
DEMO
ON/OFF
mientras
se
esté
reproduciendo
un
ritmo
programado,
la
demostración
comenzará
desde
el
principio.

Taking
Advantage
Of
Manual
Percussion
When
the
POWER
switch
©
is
“ON”,
it
is
possible
to
hear
percussion
sounds
when
tapping
the
Percussion
Pads
located
in
the
center
of
the
control
panel.
|
POWER
(1)
auf
“ОМ”)
den
Perkussions-
Avantages
des
percussions
|
manuelles
Lorsque
l'interrupteur
POWER
()
est
commuté
sur
ON,
il
est
possible
d'entendre
les
sons
des
percussions
lorsque
l'on
frappe
du
doigt
les
coussinets
de
percus-
sions
(9,
situés
au
centre
du
panneau
de
contróle.
Vielfáltige
Möglichkeiten
mit
Manual
Percussion
Sie
hóren
bei
eingeschaltetem
Gerát
(Schalter
klang,
wenn
Sie
die
Perkussionsfelder
(9
in
der
Mitte
des
Kontrollfeldes
““anklopfen”.
ә
©
Olio
oro:
ОС
зе
эү?
es
O
OS
O
O
O
в
Сбто
засаг
рагидо
а
la
percusión
manual
Cuando
ponga
el
interruptor
POWER
(1)
en
“ОМ”,
podrá
oír
sonidos
de
percusión
si
golpea
los
pulsadores
de
percusión
situados
en
el
centro
del
panel
de
control.
e
Usted
podrá
obtener
ocho
tipos
diferentes
de
sonidos
de
percusión
a
la
vez.
Cuando
conecte
por
primera
vez
la
alimentación,
a
los
pulsadores
se
les
asignarán
los
sonidos
de
percusión
correspondientes
a
los
instrumentos
indicados
en
verde
(en
la
esquina
superior
izquierda
de
cada
pulsador
de
percusión).
®
Si
desea
probar
otros
sonidos
de
percusión,
emplee
los
botones
PERCUS:SELECT
(3)
de
la
parte
superior
del
panel
de
control.
®
Los
pulsadores
de
percusión
disponen
de
la
función
de
“Respuesta
al
toque”,
lo
que
significa
que
podrá
obtener
diferentes
niveles
de
volumen
dependiendo
de
lo
fuerte
que
los
golpee.
€
You
can
obtain
eight
different
types
of
|
€
Sie
kónnen
jeweils
acht
verschiedene
€
Huit
différents
types
de
sons
de
percus-
percussion
sounds
at
one
time.
When
Perkussionsklànge
gleichzeitig
erhalten.
sions
sont
disponibles
simultanément.
the
power
is
initially
switched
on,
the
Immer
beim
ersten
Einschalten
des
Lorsque
l'alimentation
est
fournie,
les
percussion
sounds
corresponding
to
Instrumentes
werden
die
mit
Grün
Sons
des
percussions
qui
correspon-
the
instruments
illustrated
in
green
(to
gekennzeichneten
Instrumente
(oben
links
dent
aux
instruments
illustrés
en
vert
the
upper
left
of
each
Percussion
Pad)
neben
jedem
Perkussionsfeld)
den
Feldern
(en
haut,
sur
la
gauche
de
chaque
are
assigned
to
the
pads.
zugeordnet.
coussinet
de
percussion)
sont
assignés
€
If
you
wish
to
try
the
other
percussion
|
€
Wenn
andere
Perkussionsklánge
auspro-
aux
coussinets.
sounds,
use
the the
PERCUS
SELECT
biert
werden
sollen,
die
Tasten
PERCUS
Si
l'on
souhaite
essayer
d'autre
sons
buttons
(3)
at
the
top
of
the
control
SELECT
(3)
oben
am
Bedienfeld
de
percussion,
utiliser
les
sélecteurs
panel.
р
verwenden.
|
d
а
PERCUS
SELECT
(3),
situés
sur
le
€
The
Percussion
Pads
are
equipped
€
Die
Perkussionsfelder
sind
mit
einer
dessus
du
panneau
de
contróle.
with
а
*Touch
Response"
function,
Berührungsfunktion
(‘Touch
Response")
Les
coussinets
de
percussions
sont
which
means
that
you
can
obtain
two
ausgestattet,
was
bedeutet,
daB
Sie
zwei
équipés
d'un
fonction
"Réponse
de
different
volume
levels
depending
on
verschiedene
Lautstárkepegel
je
nach
Touche",
gráce
à
laquelle
on
peut
how
hard
you
tap
the
pad.
Anschlagstárke
hóren.
obtenir
deux
niveaux
différentes
d'intensité
sonore,
selon
la
fagon
dont
on
tape
plus
ou
moins
fort
sur
les
coussinets.
О!
CUSTOM
О?
Оз
Pad
|
1:
Green
|
2:
Blue
|
3:
White
Feld
|
1:
Grün
|
2:
Blau
3:
Weiß
Coussinet
|
1:
Vert
2
Bleu
|
[3
Blanc
1
|
Тот Тот
Г
'
Cabasa
Crash
бута!
1
Тот
Тот
1
Cabasa
Crash
Cymbal
1
Тот
Tom
1
|
Cabasa
Crash
Symbal
2
|
Tom
Tom
2
Claves
Splash
Symbal
2
|
Tom
Tom
2
Claves
Splash
Cymbal
2
Tom
Tom
2
|
Claves
Splash
Symbal
3
|
Tom
Tom
3
Agogo
Low
Synth
Tom
Low
3
Tom
Tom
3
Agogo
tief
Synth
Tom
tief
3
Tom
Tom
3
|
Agogo
bas
|
Synth
Tom
bas
4
|
Тот
Tom
4
Agogo
High
|
Synth
Tom
High
4
Tom Tom
4
Agogo
hoch
|
Synth
Tom
hoch
4
Tom
Tom
4
|
Agogo
haut:
Synth
Tom
haut
5
|Snare
Drum
Conga
Low
Synth
Snare
5
Snare
Drum
Conga
tief
Synth
Snare
5
Snare
Drum
|
Conga
bas
|Synth
Snare
6
Rim
Shot
Conga
High
|
Castanet
6
Rim
Shot
Conga
hoch
Kastagnette
6
Rim
Shot
Conga
haut|
Castagnettes
7
Hi-Hat
Bongo
Low
Hand
Clap
7
Hi-Hat
Bongo
tief
Hándekiatschen
7
Hi-Hat
Bongo
bas
|
Claquement
de
(Closed)
|
(geschlossen)
(fermé)
main
8
¡Ride
Symbal
|
Bongo
High
|
Cow
Bell
8
Ride
Cymbal
Bongo
hoch
¡
Kuhglocke
8
Ride
Symbal|
Bongo
haut
Cloche
de
vache
Pulsador
|
1:
Verde
|
2:
Azul
13:
Blanco
Ё
1
Tom-tom
1
Сабаѕа
Platillo
abrumador
2
Tom-tom
2
Claves
Platillo
ruidoso
3
Tom-tom
3
Agogo
bajo|
Tambor
de
sintetizador
bajo
4
Tom-tom
4
Agogo
alto
|
Tambor
de
sintetizador
alto
$
Tambor
pequeño
|
Conga
baja|
Tambor
pequeño
'
de
sintetizador
6
Golpe
en
el
borde
|
Conga
alta
|
Castañuelas
de
la
caja
7
Platillos
(cerrados)
Bongo
bajo
|
Palmas
8
Platillo
repetido
|
Bongo
alto
|
Cencerro

EZ
u
u
o
VE
ия:
e
Two
additional
manual
percussion
sounds
are
provided
by
the
two
black
buttons
located
on
either
side
of
the
large
Percussion
Pads.
€
The
button
labeled
“0”
(3
(on
the
left
side
of
the
large
percussion
pads)
is
Hi-Hat
(Open/Closed
Control),
and
the
button
on
the
right
labeled
“9”
@
is
Bass
Drum.
—
When
you
use
these
two
percussion
sounds,
we
recommend
that
you
utilized
the
Foot
Pedals,
which
plug
into
one
of
the
jacks
on
the
back
side
of
the
instrument.
Pedal
L
1$
connected
with
button
“0”,
and
Pedal
R
is
connected
with
button
“9”.
The
sound
which
heard
by
the
connection
of
Pedal
and
Button
is
as
follows:
—
Stepping
Pedal
L
—Hi-Hat
(Closed).
—
Tapping
Percussion
Pad
7
in
PERCUS
SELECT
1
position,
stepping
with
the
Pedal
L—Hi-Hat
(Closed).
—
Tapping
Pad
7
without
stepping
the
Pedal
L
—Hi-Hat
(Open).
Note:
It
will
not
be
sound
by
pressing
the
“0”
button.
After
connecting
the
Pedal,
no
sound
also
can
be
heard
by
pressing
“0”
button
and
the
function
of
Pedal
L
and
Button
“0”
will
be
reversed.
—
Tapping
Pad
7
pressing
with
Button
“0”
—
Hi-Hat
(Open).
—
Tapping
Pad
7
without
pressing
Button
“0”
—Hi-Hat
(Closed).
Roll
effect
By
pressing
and
holding
down
the
ROLL
function
button
(3),
you
can
obtain
a
percussion
sound
roll
for
each
sound
(1—9).
SET
THE
CUSTOM
PERCUSSION
You
can
arrange
to
assign
any
percussion
sound
to
any
pad
by
doing
the
following.
1.
Press
one
of
the
PERCUS
SELECT
@
buttons.
2.
After
simultaneously
pressing
the
“С”
button
and
one
of
the
numeric
buttons,
tap
one
of
the
Percussion
Pads.
The
percussion
sound
you
tapped
will
then
be
assigned
to
the
pad
cor-
responding
to
the
number
you
selected.
3.
Press
the
“1”
and
“2”
buttons
in
the
PERCUS
SELECT
section
simultaneously.
4.
Then
press
the
Percussion
Pad
you
O
Sie
verfügen
über
zwei
zusátzliche
Perkussionsklánge
durch
die
beiden
schwarzen
Tasten,
die
an
beiden
Seiten
der
großen
Perkussionsfelder
liegen.
е
Die
mit
“0”
markierte
Taste
49
(links
von
den
großen
Perkussionsfeldern)
ist
Hi-Hat
(óffnen/schlieBen-Steuerung),
und
die
Taste
rechts
daneben
mit
der
Markierung
“9”
Q)
ist
die
Bass
Drum.
—
Bei
der
Verwendung
dieser
beiden
Perkussionsklánge
empfehlen
wir,
die
Fußpedale
einzusetzen,
die
in
eine
der
Buchsen
an
der
Rückseite
des
Instru-
ments
eingesteckt
werden.
Pedal
L
wird
mit
der
Taste
**0”?
verbunden,
und
Pedal
R
mit
der
Taste
“9”.
Der
Klang,
den
Sie
mit der
Verbindung
Fußschweller
und
Taste
hören,
ist
wie
folgt:
—
Fußpedal
L
—
Hi-Hat
(geschlossen).
—
Perkussionsfeld
7
in
der
PERCUS
SELECT
1
Position,
bei
Auftreten
auf
Fupedal
Г.
=
Hi-Hat
(geschlossen).
—
Den
Fuß
vom
Pedal
L
nehmen
und
Feld
L
auschlagen
=
Hi-hat
(offen).
Hinweis:
Sie
hören
keinen
Ton,
wenn
Sie
nur
die
Taste
“0”
drücken.
Nach
Anschluß
des
Pedals
hören
Sie
keinen
Klang
bei
Drücken
der
Taste
“0”,
und
die
Funktionen
von
Pedal
L
und
Taste
“0”
sind
vertauscht.
—
Anschlagen
von
Feld
7
bei
Drücken
von
Taste
“0”
=
Hi-Hat
(offen).
—
Anschlagen
von
Feld
7
ohne
Drücken
von
Taste
**0”
=Hi-Hat
(geschlossen).
Trommelwirbel-Effekt
Durch
Drücken
und
Halten
der
Tasten
ROLL
(9
erhalten
Sie
den
Wirbeleffekt
für
jeden
Klang
(1—9).
CUSTOM
PERKUSSION
Persönlich
gewählte
Perkussionsklänge
können
den
Perkussionsfeldern
auf
folgende
Weise
zugeordnet
werden.
1.
Eine
der
Tasten
PERCUSSION
SELECT
drücken.
2.
Nachdem
gleichzeitig
die
Taste
“С”
und
eine
der
Zifferntasten
gedrückt
wurde,
eines
der
Perkussionsfelder
anklopfen.
Der
angeschlagene
Perkussionsklang
wird
dann
dem
Feld
zugewiesen,
dessen
Nummer
eingestellt
ist.
3.
Die
Tasten
“1”
und
“2”
in
der
Sektion
PERCUS
SELECT
gleichzeitig
drücken.
4.
Dann
das
Perkussionsfeld
drücken,
zu
dem
der
Klang
zugeordnet
wurde,
um
@
Deux
sons
de
percussion
manuelle
sont
disponibles
sur
les
deux
touches
noires,
situées
de
part
et
d'autre
des
grands
coussinets
de
percussion.
e
La
touche
marquée
“0”
(5)
(sur
la
gauche
des
grands
coussinets
de
percussion)
est
la
touche
du
“Hi-Hat”
(Contrôle
Ouvrir/fermer)
et
la
touche
marquée
“9”
(7,
située
sur
la
droite,
est
la
touche
de
la
grosse
caisse.
—
Lorsqu'on
utilise
ces
deux
sons
de
percussion,
il
est
conseillé
d'utiliser
des
pédales
qui
se
branchent
dans
une
des
prises,
à
l'arriére
de
l'instrument.
La
pédale
“L”
est
raccordée
à
la
touche
“0”
et
la
pédale
“R”,
à
la
touche
“9”.
Le
son
qui
peut
étre
audible
par
le
raccordement
de
la
pédale
et
de
la
touche
est
le
suivant:
—
Pression
sur
Pédale
L—Hi-Hat
(fermé).
—
Tapotement
sur
le
coussinet
de
percussion
7
en
mode
PERCUS
SELECT
1
et
poussée
sur
la
pédale
L—Hi-Hat
(fermé).
—
Tapotement
du
coussinet
7
et
pédale
}
L
reláchée
—Hi-Hat
(ouvert).
Remarque:
Aucun
Son
ne
sera
émis
si
l'on
appuie
seulement
sur
la
touche
"0".
Aprés
avoir
raccordé
la
pédale,
aucun
son
n'est
audible
lorsqu'on
appuie
sur
la
touche
“0”,
en
outre,
la
fonction
de
la
pédale
L
et
de
la
touche
“0”
sont
inversées.
—
Tapotement
du
coussinet
7
avec
touche
“0”
enclenchée
—Hi-Hat
(ouvert).
—
Tapotement
du
coussinet
7
avec
touche
“0”
reláchée
—Hi-Hat
(fermé).
Effet
de
roulement
En
maintenant
la
touche
de
fonction
ROLL
49
enfoncée,
il
est
possible
d'obtenir
un
effet
de
roulement
pour
chaque
son
(1
à
9).
PERCUSSION
PERSONNALISEE
ll
est
possible
d'assigner
n'importe
quel
Son
de
percussion
à
n'importe
quel
coussinet
en
procédant
comme
suit.
1.
Appuyer
sur
un
des
sélecteurs
PERCUS
SELECT
(3).
2.
Appuyer
simultanément
sur
la
touche
“С”
et
sur
une
touche
numérique,
et
tapoter
ensuite
un
coussinet
de
percussion.
Ce
son
de
percussion
Sera
ensuite
assigné
au
coussinet
correspondant
au
numéro
choisi.
3.
Appuyer
simultanément
sur
les
touches
*1"
et
"2"
de
la
section
PERCUS
SELECT.
4.
Ensuite,
appuyer
sur
le
coussinet
de
O
Mediante
los
dos
botones
negros
situados
a
cada
lado
de
los
pulsadores
de
percu-
sión
grandes
podrán
obtenerse
dos
sonidos
de
percusión
manual
adicionales.
e
El
botón
marcado
con
**0”
(3)
(situado
a
la
izquierda
de
los
pulsadores
de
percusión
grandes)
corresponde
a
los
platillos
(control
de
apertura/cierre),
y
el
de
la
iz-
quierda
marcado
con
“9”?
(1)
corresponde
al
bombo.
—
Cuando
emplee
estos
dos
sonidos
de
percusión,
le
recomendamos
utilizar
los
pedales,
que
podrá
enchufar
en
una
de
las
tomas
de
la
parte
superior
del
instrumento.
El
pedal
L
se
conecta
al
botón
“0”,
y
el
R
al
botón
“9”.
El
sonido
que
podrá
oírse
mediante
la
conexión
del
pedal
y
el
botón
es
como
sigue:
—
Al
pisar
el
pedal
L
—
Platillos
(cerrados).
—
Al
golpear
el
pulsador
7
de
percusión
de
PERCUS
SELECT
1
con
el
pedal
L
pisado
—Platillos
(cerrados).
—
Al
golpear
el
pulsador
7
con
el
pedal
L
soltado
—Platillos
(abiertos).
Nota:
Si
solamente
presiona
el
botón
“0”,
no
obtendrá
sonido
alguno.
Después
de
conectar
el
pedal,
no
oirá
ningún
sonido
al
presionar
el
boton
“0”,
y
la
función
del
Pedal
L
e
el
Botón
“0”
se
invertira.
—
Al
golpear
el
pulsador
7
con
el
botón
“0”
presinado—
Platillos
(abiertos).
—
Al
golpear
el
pulsador
7
con
el
botón
“0”
soltado—
Platillos
(cerrados).
Efecto
de
redoble
Si
mantiene
presiondo
el
botón
de
función
ROLL
(2,
podrá
obtener
un
redoble
con
sonido
de
percusión
para
cada
sonido
(1—9).
PERCUSIÓN
AJUSTABLE
Usted
podrá
asignar
sonidos
de
percusión
ajustables
a
los
pulsadores
de
percusión
realizando
lo
siguiente.
1.
Presione
uno
de
los
botones
PERCUS
SELECT
(3).
2.
Golpee
uno
de
los
pulsadores
de
percusión
para
asignar
el
sonido
ajustado
a
tal
pulsador,
у
el
botón
“С”
de
la
sección
RHYTHM
PATTERN
SELECT.
3.
Presione
simultáneamente
los
botones
“1”
y
“2”
de
la
sección
PERCUS
SELECT.
4.
Después
presione
el
pulsador
al
que
haya
asignado
el
sonido
para
oír
el el
sonido
de
percusión
ajustado.
И
M
eue
А
c
nu

assigned
the
sound
to
to
hear
the
customed
percussion
sound.
e
This
data
will
be
stored
even
if
power
is
off,
as
long
as
battery
power
is
sufficient.
MENU
EE
ben
Programming
Your
Own
Rhythm
Pattem
The
DD-10
can
be
programmed
to
play
your
own
rhythm
pattern
for
use
as
an
auto
rhythm.
Enjoy
playing
in
an
ensemble
using
your
customized
rhythms.
1.
Press
either
the
“98”
or
“99”
button
in
the
PATTERN
PROGRAM
section
(2).
An
8
beat
rhythm
will
then
start
and
the
LED
indicator
will
flash
and
display
the
number
of
the
button
you
pressed.
2.
You
can
input
any
percussion
sound
available
from
Percussion
Pads
0—9
and
overlay
that
sound
on
top
of
the
8
beat
rhythm.
3.
If
you
wish
to
delete
any
percussion
sound,
either
preset
or
one
you
have
overlayed
onto
the
rhythm,
press
the
corresponding
percussion
pad
and
the
CLEAR
button
(8)
simultaneously.
4.
Press
the
STOP
button
(i3
when
you
have
finished
your
programming.
The
number
of
the
rhythm
will
be
displayed
on
the
LED
indicator.
5.
Press
the
START/RESTART
selector
to
hear
your
customized
rhythm
pattern.
6.
If
you
wish
to
program
a
pattern
based
on
another
rhythm,
input
the
rhythm
after
pressing
one
of
the
PATTERN
PROGRAM
selectors.
€
if
you
wish
to
clear
all
data,
press
the
“С”
button
and
Program
Selector
98
or
99
simultaneously.
All
data
will
be
cleared
and
the
keyboard
will
return
to
the
preset
setting.
€
Touch
Response
and
the
Holl
effect
are
available
for
programming.
®
Programmed
data
is
retained
while
battery
power
is
sufficient
even
if
the
power
is
off.
e
After
clearing
all
percussion,
the
metronome
will
sound
automatically;
press
the
metronome
selector
to
stop
it.
ААА
9
den
Klang
zu
überprüfen.
€
Diese
Daten
werden
auch
dann
bewahrt,
wen
das
Gerát
gespeichert,
solange
die
Batteriestárke
ausreicht.
Programmieren
von
eigenen
Rhythmus-
mustern
Das
DD-10
kann
programmiert
werden,
um
eigene
Rhythmusmuster
zur
Verwendung
als
Auto-Rhythmus
zu
spielen.
So
kónnen
Sie
in
einem
Ensemble
mit
Ihren
eigenen
Rhythmen
spielen.
1.
Entweder
Taste
“98”
oder
“99”
in
der
Sektion
PATTERN
PROGRAM
drücken
(4).
Ein
8-Beat-Rhythmus
startet,
und
die
LED-Anzeige
blinkt
und
zeigt
die
Nummer
der
gedrückten
Taste
an.
2.
Jetzt
kónnen
Sie
jeden
Klang
der
Perkus-
sionsfelder
0—9
eingeben.
Diese
Sounds
werden
den
8-Beat-Rhythmus
überlagern.
3.
Wenn
ein
Perkussionsklang
gelóscht
werden
soll,
sowohl
ein
vorgegebener
als
auch
ein
den
8-Beat-Rhythmus
über-
lagernder,
drücken
Sie
das
betreffende
Perkussionsfeld
und
die
Taste
CLEAR
©
gleichzeitig.
4.
Die
Taste
STOP
(3
drücken,
wenn
die
Programmierung
beendet
ist.
Die
Nummer
des
Rhythmus
wird
auf
der
LED-Anzeige
angezeigt.
5.
Die
Wahltaste
START/RESTART
drücken,
um
das
persónlich
bearbeitete
Rhythmusmuster
zu
hóren.
6.
Wenn
Sie ein
Muster
basierend
auf
einem
anderen
Rhythmus
programmieren
wollen,
geben
Sie
den
Rhythmus
nach
dem
Drücken
einer
der
Wahltasten
PATTERN
SELECT
ein.
€
Wenn
alle
Daten
gelóscht
werden
sollen,
die
Taste
“С”
und
den
Programm-
Selector
98
oder
99
gleichzeitig
drücken.
Alle
Daten
werden
gelóscht
und
die
Tastatur
kehrt
auf
die
vorgegebenen
Werte
zurück.
€
Die
Effekte
Touch
Response
und
Roll
stehen
zur
Programmierung
zur
Verfügung.
€
Auch
bei
ausgeschaltetem
Gerát
werden
percussion
sur
lequel
le
son
de
per-
cussion
personnalisée
a
été
assigné.
€
Ces
données
seront
mises
en
mémoire
méme
si
l'interrupteur
est
commute
sur
arrêt,
tant
que
les
piles
seront
suffisamment
puissantes.
Programmation
de
motifs
rythmiques
personnels
Le
DD-10
peut
étre
programmé
pour
reproduire
son
propre
motif
rythmique
et
l'utiliser
en
tant
que
rythme
automatique.
Jouer
comme
un
ensemble
est
désormais
possible,
gráce
aux
rythmes
personnalisés.
1.
Appuyer,
soit
sur
la
touche
"98",
soit
sur
la
touche
“99”
de
la
section
PATTERN
PROGRAM
(4)
Un
rythme
à
huit
temps
s'exécute
et
le
témoin
à
LED
clignote
et
affiche
le
numéro
de
la
touche
enclenchée.
2.
П
est
possible
d'entrer
tout
son
de
percussion
disponible
sur
les
coussi-
nets
de
percussion
de
0
à 9
et
de
superposer
ce
son
sur
ce
rythme
à
huit
temps.
3.
Si
l'on
souhaite
effacer
un
son
de
percussion,
programmé
ou
superposé
par
l'utilisateur,
appuyer
simultanément
sur
le
coussinet
de
percussion
corres-
pondant
et
sur
la
touche
CLEAR
6).
4.
Lorsque
la
programmation
est
achevée,
appuyer
sur
la
touche
STOP
(3.
Le
numéro
du
rythme
est
affiché
par
le
témoin
à
LED.
5.
Pour
entendre
le
motif
rythmique
personnel,
appuyer
sur
le
sélecteur
START/RESTART.
6.
Si
l'on
souhaite
programmer
un
motif
basé
sur
un
autre
rythme,
entrer
celui-
ci
aprés
avoir
appuyé
sur
un
des
sélecteurs
PATTERN
PROGRAM.
€
Si
l'on
souhaite
effacer
toutes
les
données,
appuyer
simultanément
sur
la
touche
“С”
et
le
sélecteur
de
pro-
gramme
98
ou
99;
toutes
les
données
disparaitront
et
le
clavier
reviendra
à
l'arrangement
préétabli.
€
La
réponse
au
toucher
et
l'effet
de
roulement
sont
disponibles
pour
la
programmation.
A
A
A
Er
Te
аа
e
Estos
datos
permanecerán
almacenados
aunque
desconecte
la
alimentación,
siempre
y
cuando
las
pilas
tengan
carga
suficiente.
Programación
de
sus
propios
patrones
rítmicos
Usted
podrá
programar
el
DD-10
para
reproducir
su
propio patrón
rítmico
a
fin
de
emplearlo
como
ritmo
automático.
Disfrute
tocando
un
conjunto
empleando
sus
ritmos
ajustados.
1.
Presione
el
botón
“98”
о
“99”
de
la
sección
PATTERN
PROGRAM
(2).
Se
iniciará
un
ritmo
de
8
tiempos,
y
el
indicador
de
LED
parpadeará
y
visualizará
el
nümero
del
botón
presionado.
2.
Usted
podrá
introducir
cualquier
sonido
de
percusión
disponible
desde
los
pulsadores
0—9
y
superponer
tal
sonido
sobre
el
ritmo
de
8
tiempos.
3.
Si
desea
borrar
cualquier
sonido
de
percusión,
el
que
haya
ajustado,
o
el
superpuesto
sobre
el
ritmo,
presione
simultáneamente
el
pulsador
de
percusión
correspondiente
y
el
botón
CLEAR
6).
4.
Cuando
finalice
la
programación,
presione
el
botón
STOP
(3.
El
número
del
ritmo
se
visualizará
en
el
indicador
de
LED.
5.
Para
oír
el
patrón
rítmico
ajustado,
presione
el'selector
START/
RESTART.
6.
Si
desea
programar
un
patrón
basado
en
otro
ritmo,
introduzca
el
ritmo
después
de
presionar
uno
de
los
selectores
PATTERN
PROGRAM.
€
Si
desea
borrar
todos
los
datos,
presione
el
botón
“С”
y,
simultáneamente,
el
selector
de
programa
98
o
99.
Todos
los
datos
se
borrarán
y
el
teclado
volverá
al
estado
preajustado.
€
Los
efectos
de
respuesta
al
toque
y
de
redoble
estarán
disponisbles
para
la
programación.
€
Los
datos
programados
se
mantendrán
si
las
pilas
tienen
carga
suficiente.
€
Después
de
borrar
toda
la
percusión,
el
metrónomo
sonará
automáticamente.

—
A A
^V
ASA
e
Eleven-track
programming
is
available.
Adding
More
Effect
MANUAL
TEMPO
Press
the
MANUAL
TEMPO
control
several
times
which
depends
on
the
beat
of
the
rhythm
in
accordance
with
the
tempo
you
want.
A
rim
shot
will
then
sound
and
the
rhythm
will
start.
The
LED
indicator
will
display
the
tempo.
e
It
will
be
effected
while
the
rhythm
is
running.
SYNCHRO
BREAK
MODE
Press
the
SYNCHRO
BREAK
MODE
selector
(0
when
playing
a
programmed
rhythm
pattern.
Н
you
tap
any
Percussion
Pad,
the
auto
rhythm
will
not
sound
for
one
bar;
you
can
use
this
space
to
insert
some
ad-lib
playing.
e
While
using
SYNCHRO
BREAK
MODE,
Synchro
Break
Mode
dot
in
the
LED
indicator
will
be
illuminated.
METRONOME
By
pressing
the
METRONOME
selector
(8),
you
can
confirm
the
tempo
by
means
of
a
metronome
count.
You
should
also
find this
useful
when
programming
your
own
customized
patterns.
programmierte
Daten
gespeichert,
wenn
der
Batteriestrom
ausreicht.
€
Nach
dem
Lóschen
aller
Perkussionsin-
halte
ertónt
automatisch
das
Metronom;
den
Metronomschalter
driicken,
um
es
auszuschalten.
е
Programmierung
auf
11
Spuren
ist
möglich.
Und
noch
mehr
Effekte
MANUELLES
TEMPO
Den
Regler
MANUAL
TEMPO
(9
vier
Mal
entsprechend
dem
gewünschten
Tempo
drücken.
Ein
Rim
Shot
erklingt,
und
der
Rhythmus
beginnt.
Die
LED-Anzeige
zeigt
das
Tempo
an.
E
T
Ajout
d'effet
€
Les
données
programmées
sont
retenues
si
la
puissance
des
piles
est
suffisante.
`
Après
avoir
effacé
toutes
les
percussions,
le
métronome
se
mettra
en
marche
automatiquement;
pour
l'arrêter,
appuyer
sur
le
sélecteur
de
métronome.
On
peut
disposer
d'une
programma-
tion
à
onze
pistes.
TEMPO
MANUEL
Appuyer
quatre
fois
sur
le
réglage
MANUAL
TEMPO
(9
en
fonction
du
tempo
souhaité.
Un
"rim
shot”
s'exécute
et
le
rythme
démarre.
Le
témoin
à
LED
affiche
le
tempo.
@
Diese
Funktion
arbeitet,
wührend
der
Rhythmus
láuft.
e
||
sera
exécuté
tout
au
long
du
rythme.
MANUAL
TEMPO
О
BETRIEBSART
SYNCHRO
BREAK
Die
Betriebsartentaste
SYNCHRO
BREAK
MODE
(9
drücken,
wenn
ein
programmiertes
Rhythmusmuster
gespielt
wird.
Wenn
ein
Perkussionfeld
angeklopft
wird,
ertónt
der
Auto-Rhythmus
einen
Takt
lang
nicht;
dieser
Platz
kann
zum
Einfiigen
von
Improvisation
verwendet
werden.
e
Bei
Verwendung
von
Modus
SYNCHRO
BREAK,
leuchtet
der
Punkt
für
Synchro
Break
in
dem
LED-Display
auf.
33
Or
L
reur
T
METRONOM
Durch
Drücken
der
Wahltaste
METRONOME
kann
das
Tempo
mittels
Metronomzáhlung
bestátigt
werden.
Das
ist
auch
beim
Programmieren
von
persónlich
bearbeiteten
Mustern
nützlich.
MODE
D'INTERRUPTION
SYNCHRONISEE
Lorsqu'on
exécute
un
motif
rythmique
programmé,
appuyer
sur
le
sélecteur
SYNCHRO
BREAK
MODE
(9.
Si
l'on
frappe
un
des
coussinets
de
percussion,
le
rythme
automatique
s'interrompra
pendant
la
durée
d'une
barre,
cet
espace
peut
permettre
une
improvisation.
e
En
mode
SYNCHRO
BREAK,
le
point
du
témoin
à
DEL
du
mode
d'interrup-
tion
synchronisée
s'allume.
SYNCHRO
BREAK
MODE
METRONOME
En
appuyant
sur
le
sélecteur
METRONOME
(8),
il
est
possible
de
vérifier
le
tempo
en
S'aidant
du
comptage
par
métronome.
Cette
fonction
s'avére
aussi
pratique
lors
de
la
programmation
de
motifs
rythmi-
ques
personnels.
METRO-
О
МОМЕ
10
Para
detener
el
metrónomo,
presione
el
selector
de
metrónomo.
€
Es
posible
la
programación
de
once
pistas.
Adición
de
más
efectos
TEMPO
MANUAL
Presione
varias
veces
el
control
MANUAL
TEMPO
de
acuerdo
con
el
tempo
que
desee.
Sonará
un
golpe
en
el
borde
de
la
caja
y
se
iniciará
el
ritmo.
Е]
indicador
de
LED
visualizará
el
tempo.
@
Se
verá
afectado
cuando
el
ritmo
esté
activado.
MODO
DE
INTERRUPCIÓN
SINCRONIZADA
Cuando
reproduzca
un
ritmo
programado,
presione
el
selector
SYNCHRO
BREAK
MODE
(9.
Si
golpea
cualquier
pulsador
de
percusión,
el
ritmo
automático
no
sonará
durante
un
compás;
usted
podrá
emplear
este
espacio
para
insertar
cierta
interpreta-
ción
improvisada.
O
Mientras
emplee
el
modo
SYNCHRO
BREAK
MODE,
el
punto
del
modo
de
interrupción
sincronizada
del
indicador
de
LED
permanecerá
encendido.
METRONOMO
Presionando
el
selector
METRONOME
(6),
podrá
confirmar
el
tempo
mediante
una
cuenta
de
metrónomo.
Esto
será
también
muy
útil
para
programar
sus
propios
patrones.

Y
|
Utilisation
de
la
Empleo
de
la
fonction
MIDI
capacidad
de
MIDI
La
batterie
numérique
DD-10
est
munie
El
banco
de
batería
digital
DD-10
dispone
d'une
prise
d'entrée
MIDI
qui
permet
le
de
una
toma
MIDI
IN
que
permite
la
cone-
raccordement
d'autres
instruments
de
xión
a
otros
instrumentos
musicales
equipados
musique
également
équipés
de
prises
con
MIDI
para
ejecuciones
sincronizadas.
MIDI,
ce
qui
permet
de
les
utiliser
en
synchronisation.
O
MIDI
|
MODE
@
Le
DD-10
est
équipé
d'une
fonction
@
El
DD-10
dispone
de
una
función
de
,
Gebrauch
der
MIDI-
Fähigkeiten
Das
Digital
Drum
Bank
DD-10
ist
mit
einer
Buchse
MIDI
IN
ausgestattet,
wodurch
Verbindung
mit
anderen
Musikinstrumenten,
die
mit
MIDI
ausgestattet
sind,
möglich
ist
und
synchronisiert
gespielt
werden
kann.
Using
MIDI
Capability
The
Digital
Drum
Bank
DD-10
is
equipped
with
a
MIDI
In
jack,
thus
enabling
con-
nection
with
other
musical
instruments
equipped
with
MIDI
for
synchronized
performances.
€
The
DD-10
is
equipped
with
a
MIDI
€
Das
DD-10
ist
mit
einer
Dateneingabe-
input
function.
Connect
the
MIDI
cable
running
from
the
MIDI
OUT
jack
of
another
instrument
to
the
MIDI
IN
jack
of
the
DD-10.
funktion
ausgestattet.
Das
MIDI-Kabel
von
der
Buchse
MIDI
OUT
eines
anderen
Instruments
mit
der
Buchse
MIDI
IN
des
DD-10
verbinden.
d'entrée
de
données.
Raccorder
le
cáble
MIDI
de
la
prise
MIDI
OUT
d'un
autre
instrument
à
la
prise
MIDI
IN
du
DD-10.
introducción
de
datos.
Conecte
el
cable
MIDI
de
la
toma
MIDI
OUT
de
otro
instrumento
a
la
toma
MIDI
IN
del
DD-10.
SETTING
THE
MIDI
RECEIVE
CHANNEL
To
set
any
of
16
MIDI
RECEIVE
CHANNELS,
press
the
MIDI
MODE
selector
(7)
and
a
numeric
button
(01—16)
simultaneously.
REGLAGE
DU
CANAL
DE
RECEPTION
MIDI
Pour
régler
les
16
CANAUX
DE
RECEP-
TION
MIDI,
appuyer
simultanément
sur
le
sélecteur
MID!
MODE
(7)
et
sur
une
touche
numérique
de
01
à
16).
Remarque:
Noter
que
la
DD-10
ne
recevra
pas
le
signal
en
provenance
de
l'autre
appareil
MIDI
si
celui-ci
ne
se
trouve
pas
sur
le
méme
canal,
car
l'information
sur
le
mode
des
notes"
et
le
"changement
de
programme"
sont
des
"messages
de
canal".
MODE
MIDI
Grâce
au
sélecteur
MIDI
MODE
(2),
trois
modes
MID!
sont
disponibles.
AJUSTE
DEL
CANAL
DE
`
RECEPCIÓN
DE
MIDI
Para
ajustar
cualquiera
de
los
16
camales
de
|
recepción
de
MIDI,
presione
simultáneamente
d
el
selector
MIDI
MODE
@
у
un
botón
|
numérico
(01—16).
|
Nota:
Sin
embargo,
el
DD-10
no
recibirá
la
señal
procedente
de
otro
equipo
MIDI
que
no
esté
en
el
mismo
canal
porque
la
“información
de
notas
de
teclas”
y
el
“cambio
de
programa”
son
“mensajes
de
canal”.
EINSTELLEN
DES
MIDI-
EMPFANGSKANALS
Um
einen
der
16
MIDI-EMPFANGSKANALE
(MIDI
RECEIVE
CHANNEL)
einzustellen,
den
Schalter
MIDI
MODE
(7)
und
eine
Zifferntaste
(01
bis
16)
gleichzeitig
drücken.
Hinweis:
Das
DD-10
empfüngt
nicht
Signale
anderer
MIDI-Geráte,
wenn
diese nicht
auf
dem
gleichen
Kanal
ausgegeben
werden.
Das
liegt
daran,
daß
“Tasten-Noten-Information””
und
“Programmánderung”
“Kanalmeldungen”
sind.
Note:
But
DD-10
will
not
receive
the
signal
from
other
MIDI
equipment
which
is
not
in
same
channel.
Because
the
“Key
note
information”
and
“Program
change”
are
“Channel
message”.
MIDI
MODE
By
using
the
MIDI
MODE
selector
@,
you
can
choose
any
of
two
MIDI
modes.
BETRIEBSART
MIDI
Durch
Verwendung
der
Wahltaste
MIDI
MODE
@
kann
eine
von
drei
MIDI-
MODO
MIDI
|
Empleando
el
selector
MIDI
MODE
(2),
podrá
elegir
cualquiera
de
los
tres
modos
MIDI.
1.
Press
the
MIDI
MODE
selector
and
input
"00"
using
the
“0”
buttons
in
the
RHYTHM
PATTERN
SELECT
section.
This
will
put
the
DD-10
in
the
MID!
key
note
Mode.
e
Key
notes
will
be
received
on
the
basic
channel.
.
Press
the
MIDI
MODE
selector
and
input
"99"
using
the
“9”
buttons
in
the
RHYTHM
PATTERN
SELECT
section.
This
will
put
the
DD-10
in
the
MIDI
self-pattern
mode.
€
Real
time
signal
reception
(start,
Stop,
and
timing
clock).
€
Rhythm
pattern
will
be
synchronized
by
the
timing
clock
of
the
other
instrument.
If
the
timing
signal
is
not
received,
the
rhythm
pattern
wil!
be
synchronized
by
the
DD-10's
own
timing
clock.
Betriebsarten
gewáhlt
werden.
1.
Die
Wahltaste
MIDI
MODE
drücken
und
“00”
mit
der
Taste
“0”
in
der
Sektion
RHYTHM
PATTERN
SELECT
eingeben.
Dadurch
wird
das
DD-10
in
MIDI-Noten-
Betriebsart
gestellt.
€
Tastaturnoten
werden
auf
dem
Grund-
kanal
empfangen.
2.
Die
Wahltaste
MIDI
MODE
drücken
und
“99”
mit
den
“9°
Tasten
in
der
Sektion
RHYTHM
PATTERN
SELECT
eingeben.
Dadurch
wird
das
DD-10
in
MIDI
Selbstmuster-Betriebsart
gestellt.
€
Echtzeit-Signalempfang
(Start,
Stopp
und
Uhrsignal).
€
Das
Rhythmusmuster
wird
durch
das
Uhrsignal
des
anderen
Instruments
synchronisiert.
Wenn
das
Zeitgabesignal
nicht
empfangen
wird,
wird
das
Rhythmusmuster
durch
die
eingebaute
1.
Appuyer
sur
le
sélecteur
MIDI
MODE
et
entrer
"00"
par
la
touche
“0”
de
la
section
RHYTHM
PATTERN
SELECT.
Cette
action
fait
passer
le
DD-10
en
mode
tonique
MIDI.
€
Les
toniques
sont
recues
sur
le
canal
de
base.
2.
Appuyer
sur
le
sélecteur
MIDI
MODE
et
entrer
“99”
par
les
“9”
touches
de
la
section
RHYTHM
PATTERN
SELECT.
Cette
action
fait
passer
le
DS
en
mode
de
motif
automatique
€
Réception
du
signal
temporel
réel
(marche,
arrét
et
minuteur).
€
Le
motif
rythmique
est
synchronisé
par
le
minuteur
de
l'autre
instrument.
Si
le
signal
de
minutage
n'est
pas
recu,
le
motif
rythmique
sera
synchro-
nisé
par
le
minuteur
du
DD-10.
1.
Presione
el
selector
MIDI
MODE
e
introduzca
*00”
empleando
el
botón
**0"'
de
la
sección
RHYTHM
PATTERN
SELECT.
Esto
pondrá
el
DD-10
en
el
mode
de
notas
de
teclas
MIDI.
€
Las
notas
de
teclas
se
recibirán
en
el
canal
básico.
2.
Presione
el
selector
MIDI
MODE
e
introduzca
“99”
empleando
los
*'9"'
botones
de
la
sección
RHYTHM
PATTERN
SELECT.
Esto
pondrá
el
DD-10
en
el
modo
de
patrón
automático
MIDI.
€
Recepción
de
sefiales
en
tiempo
real
(inicio,
parada,
y
reloj
de
temporización).
€
El
patrón
rítmico
se
sincronizará
mediante
el
reloj
de
temporización
del
otro
instrumento.
Si
la
señal
de
tem-
porización
no
se
recibe,
el
patrón
rítmico
se
sincronizará
mediante
el
reloj
de
temporización
del
propio
€
Receiving
"Program
Change"
signal.
Uhr
des
DD-10
synchronisiert.
е
Réception
du
signal
"Changement
DD-10.
€
Empfang
des
Programmánderung-
de
Programme".
€
Recepción
de
la
señal
de
“Сато
de
Signals.
programa”.
11

Extemal
Jacks
You
will
find
six
jacks
on
the
back
side
of
the
instrument.
These
jacks
are
for
connecting
optional
accessories
and
other
equipment.
1.
Extemal
Power
source
(DC9-12V
IN)
jack
©
АС
power
.Connect
the
optional
АС
power
adaptor
PA-1/PA-1B/PA-4
to
the
DC9-12V
IN
jack.
2.
AUX OUT
(L
+
R/L),
AUX
OUT
В
jacks
For
connecting
to
a
stereo
system
or
other
equipment.
e
Connect
using
both
of
these
jacks
for
Stereo,
only
L
+
R/L
for
Monaural.
e
Impedance:
|
+
R—500
ohms,
L—1
kohms
3.
Headphones
Connect
a
set
of
headphones
to
this
jack
and
you
can
enjoy
playing
without
disturbing
others.
€
Impedance:
100
ohms
4.
Foot
pedal
jack
Connect
the
foot
pedal
to
this
Jack
for
controlling
buttons
“0”
and
“9”.
5.
MIDI
IN
For
connection
to
other
MIDI
equipment.
Externe
Buchsen
An
der
Rückseite
des
Instruments
befinden
Sich
sechs
Buchsen.
Diese
Buchsen
dienen
zum
Anschluf
von
Sonderzubehór
und
anderen
Geráten.
P
1.
Externe
Betriebsstromversorgung
(DC
9-12V
IN)
€
Netzstrom
Hier
das
als
Sonderzubehór
erháltliche
Netzteil
PA-1/PA-1B/PA-4
anschließen.
2.
Buchsen
AUX
OUT
(L+R/L),
AUX
OUT
R
Zum
Anschlufi
an
eine
Stereoanlage
oder
andere
Geráte.
€
Für
Stereo
beide
Buchsen
und
für
Mono
nur
Г.
+
R/L
anschließen.
€
Impedanz:
L+
R—500
Ohm,
L—1
kOhm
3.
Kopfhörer
(HEADPHONES)
Schließen
Sie
an
diese
Buchse
Kopfhörer
an,
und
Sie
können
spielen,
ohne
andere
zu
stören.
€
Impedanz:
100
Ohm
4.
Fußpedalbuchse
(FOOT
PEDAL)
Das
Fußpedal
an
diese
Buchse
anschließen,
um
die
Tasten
“0”
und
“9”
zu
steuern.
5.
MIDI
IN
Zum
Anschluß
an
andere
MIDI-Geráte.
Prises
externes
Six
prises
ont
été
prévues
à
l'arrière
de
l'instrument.
Ces
prises
servent
au
raccordement
d'accessoires
en
option
et
à
d'autres
appareils.
+01
1
1.
Prise
d'alimentation
exteme
en
courant
continu
(DC
IN
9-12V)
€
Alimentation
secteur
Brancher
l'adaptateur
d'alimentation
secteur
PA-1/PA-1B/PA-4,.
en
option,
à
la
prise
DC
IN
9-12V.
2.
Prises
de
sortie
(AUX
OUT
L+RIL),
(A
Pour
le
raccordement
d'une
perdi
stéréo
ou
d'un
autre
appareil.
e
Procéder
au
raccordement
en
utilisant
soit
les
deux
prises
pour
obtenir
la
stéréophonie,
soit
la
prise
L
+
R/L
pour
obtenir
la
monophonie.
€
Impédance:
|
+
R—500
ohms,
L—1
kohm
3.
Prise
de
casque
d'écoute
Y
brancher
un
casque
d'écoute
pour
apprécier
son
jeu
sans
déranger
personne.
€
Impédance:
100
ohms
4.
Prise
pour
pédale
Y
brancher
une
pédale
pour
pouvoir
contrôler
les
touches
“0”
еї
“
5.
Prise
d'entrée
MIDI
(MIDI
IN)
Pour
le
raccordement
d'autres
appareils
ur
appare
r^s
vrs
sn
Tomas
externas
En
la
parte
posterior
del
instrumento
podrá
ver
seis
tomas.
Estas
tomas
se
emplean
para
conectar
accesorios
opcionales
y
otros
equipos.
1.
Toma
de
alimentación
exterior
(DC9-12V
IN)
€
Alimentación
de
CA
Conecte
el
adaptador
de
alimentación
de
CA
opcional
PA-1/PA-1B/PA-4
a
la
toma
DC-9-12V
IN.
2.
Tomas
de
salida
auxiliar
(AUX
OUT
L+R/L),
(AUX
OUT
В)
Para
conexión
a
un
sistema
estéreo
u
otro
equipo.
€
Realice
la
conexión
empleando
ambas
tomas
para
estéreo,
о
L
+
R/L
para
monoaural.
Ф
Impedancia:
L+
R—500
ohmios,
L—1
kilohmio
3.
Auriculares
Si
conecta
un
juego
de
auriculares
a
esta
toma
podrá
disfrutar
del
instrumento
sin
molestar
a
otros.
€
Impedancia:
100
ohmios
4.
Toma
para
pedal
Conecte
el
pedal
a
esta
toma
para
controlar
los
botones
“0”
y
“9”.
5.
Entrada
de
MIDI
(MIDI
IN)
Para
conexión
a
otros
equipos
MIDI.

Optional
Accessories
e
AC
Power
Adaptor
(PA-1/PA-1B/PA-4)
Transforms
AC
voltage
to
DC
voltage.
€
Headphones
(HPE-3/YH-35)
Specially
designed
lightweight
dynamic
headphones
with
extra-soft
ear
pads.
Availability
of
some
optional
accessories
will
vary
from
country
to
country.
Sonderzubehór
O
Netzteil
(PA-1/PA-1B/PA-4)
Wandelt
Netzspannung
in
Gleichspannung
um.
O
Kopfhörer
(HPE-3/YH-35)
Speziell
entwickelte,
leichte
dynamische
Kopf-
hórer
mit
besonders
weichen
Ohrpolstern.
In
einigen
Wohngebieten
kónnen
nicht
alle
Sonderzubehórteile
im
Handel
erháltlich
sein.
3
Accessoires
en
option
€
Adaptateur
d'alimentation
secteur
(PA-1/PA-1B/PA-4)
Transforme
le
courant
secteur
en
courant
continu.
e
Casque
d'écoute
(HPE-3/YH-35)
Casque
d'écoute
dynamique
et
léger,
de
conception
spéciale,
muni
de
coussinets
ultra-doux
pour
les
oreilles.
La
disponibilité
de
certains
accessoires
en
option
varie
selon
les
pays.
Accesorios
opcionales
@
Adaptador
de
alimentación
de
CA
(PA-1/PA-1B/PA-4)
Transforma
la
tensión
de
CA
en
tensión
de
CC.
€
Auriculares
(HPE-3/YH-35)
Auriculares
dinámicos
y
ligeros
especialmente
disefiados
con
almohadillas
auriculares
extremadamente
suaves.
Los
accesorios
opcionales
varían
con
el
país.
13

14
Taking
Care
Of
Your
Digital
Drum
Bank
Your
Digital
Drum
Bank
DD-10
will
remain
in
excellent
playing
condition
if
care
is
taken
concerning
the
following.
1.
When
you
use
AC
power
or
a
car
battery,
be
sure
to
use
the
optional
PA-1/PA-1B/PA-4
or
CA-1
adaptors.
Before
use,
read
the
adaptor
instruc-
tions
carefully.
2.
The
optional
car
battery
adaptor
is
only
for
use
with
a
negative
ground
12V
battery.
Ensure
that
this
is
the
case
before
connecting
the
adaptor.
3.
Do
not
set
the
VOLUME
at
MAX
when
you
connect
the
DD-10
to
a
stereo
system.
Use
the
stereo
system's
volume
control
to
adjust
the
sound
level.
4.
Avoid
placing
the
instrument
in
excessively
humid
areas.
5.
Do
not
tap
the
Percussion
Pads
with
drum
stick
or
other
objects;
use
your
hands
only.
6.
Do
not
subject
the
unit
to
physical
shock,
and
avoid
placing
anything
heavy
on
it.
7.
The
Digital
Drum
Bank
should
not
be
placed
in
direct
sunlight
for
a
long
time.
8.
Do
not
place
the
instrument
near
any
heating
appliance,
or
leave
it
inside
a
car
in
direct
sunlight
for
any
length
of
time.
Direct
sunshine
can
raise
the
interior
temperature
of
a
car
with
closed
doors
and
windows
to
as
high
as
80°С
(176°F).
Temperatures
in
excess
of
60°C
(140°F)
can
cause
physical
and/or
electrical
damage
not
covered
by
warranty.
9.
Use
a
dry
damp
cloth
for
cleaning.
Pflege
des
Digital
Drum
Bank
Ihr
Digital
Drum
Bank
DD-10
bleibt
immer
in
gutem
spielbereitem
Zustand,
wenn
es
sachgemäß
behandelt
wird.
1.
Wenn
Netzstrom
oder
Autobatteriestrom
zum
Betrieb
verwendet
wird,
immer
ein
geeignetes
Netzteil
(PA-1/PA-1B/PA-4)
bzw.
den
geeigneten
Autobatterieadapter
(CA-1)
verwenden.
Vor
der
Verwendung
immer
die
Bedienungsanleitung
der
Adapter
gründlich
durchlesen.
2.
Der
Autobatterieadapter
ist
nur
auf
Verwendung
mit
einer
12-V-Autobatterie
mit
negativer
Masse
ausgelegt.
Vor
der
Verwendung
sicherstellen,
daf
die
Auto-
batterie
entsprechend
ausgelegt
ist.
3.
Nicht
die
Lautstárke
auf
Maximalwert
stellen,
wenn
DD-10
an
eine
Stereoanlage
angeschlossen
wird.
Den
Lautstárkepegel
mit
dem
Lautstárkeregler
der
Stereo-
anlage
einstellen.
4.
Das
Instrument
nicht
an
Orten
mit
sehr
hoher
Luftfeuchtigkeit
aufstellen.
5.
Nicht
die
Perkussionsfelder
mit
einen
Schlagstock
oder
anderen
harten
Gegenstánden
schlagen;
immer
nur
die
Hánde
verwenden.
6.
Das
Instrument
vor
Stößen
schützen
und
keine
schweren
Gegenstánde
darauf
stellen.
7.
Das
Digital
Drum
Bank
DD-10
nicht
lángere
Zeit
in
direktem
Sonnenlicht
aufstellen.
8.
Das
Instrument
nicht
in
der
Náhe
von
Heizkórpern
aufstellen
oder
in
einem
ge-
parkten
Fahrzeug
im
Sonnenlicht
stehen
lassen.
Bei
direktem
Sonnenlicht
kann
die
Temperatur
im
Inneren
eines
geparkten
Fahrzeugs
bei
geschlossenen
Türen
und
Fenstern
bis
zu
80?C
erreichen.
Tempera-
turen
von
über
60°С
kónnen
schon
mechanische
und/oder
elektrische
Scháden
am
Instrument
hervorrufen,
die
nicht
durch
die
Garantie
gedeckt
sind.
9.
Zum
Reinigen
einen
leicht
angefeuchteten,
weichen
Lappen
verwenden.
US
Entretien
de
la
batterie
numérique
La
batterie
numérique
DD-10
restera
en
parfait
état
á
condition
d'observer
les
précautions
suivantes.
1.
A
l'usage
de
l'alimentation
secteur
ou
de
la
batterie
de
voiture,
veiller
à
utiliser
les
adaptateurs
PA-1/PA-1B/PA-4.
ou
CA-1.
Avant
de
les
utiliser,
lire
attentivement
leur
mode
d'emploi.
2.
L'adaptateur
pour
batterie
de
voiture,
en
option,
ne
peut
être
utilisé
qu'avec
une
batterie
de
12V
à
masse
négative.
Avant
de
raccorder
l'adaptateur,
confirmer
que
la
batterie
est
bien
celle
du
type
recommandé.
3.
Ne
pas
placer
le
réglage
VOLUME
sur
la
position
MAX
lorsqu'on
raccorde
le
00-10
à
une
спате
stéréo.
Utiliser,
dans
ce
cas,
le
réglage
d'intensité
sonore
de
la
chaine
pour
ajuster
le
niveau
de
l'intensité
sonore.
4.
Eviter
de
placer
l'instrument
dans
des
endroits
particulièrement
humides.
5.
Ne
pas
frapper
les
coussinets
de
percussions
avec
des
baguettes
ou
d'autres
objets;
employer
uniquement
les
mains.
6.
Ne
pas
faire
subir
de
choc
à
l'appareil
et
éviter
d'y
déposer
tout
objet
lourd.
7.
Ne
pas
exposer
la
batterie
numérique
au
rayonnement
solaire
direct
pendant
une
période
prolongée.
8.
Ne
pas
placer
l'instrument
à
proximité
d'un
appareil
de
chauffage,
ni
le
laisser
dans
un
véhicule
garé
en
plein
Soleil
et
ce,
pendant
une
période
prolongée.
En
effet,
si
les
portes
et
les
fenétres
du
véhicule
sont
fermées,
le
soleil
peut
faire
monter
la
température
de
l'habitacle
jusqu'à
80°С
(176°Р).
Les
températures
supérieures
à
60°С
(140°F)
peuvent
provoquer
des
dom-
mages
physiques
et/ou
électriques,
non
couverts
par
la
garantie.
9.
Pour
nettoyer
l'instrument,
utiliser
un
chiffon
sec
ou
légérement
humide.
Cuidado
de
su
banco
de
batería
digital
Su
banco
de
batería
digital
DD-10
estará
siempre
en
excelentes
condiciones
si
tiene
cuidado
de
lo
siguiente.
1.
Para
emplear
la
alimentación
de
CA
o
de
una
batería
de
automóvil,
asegürese
de
utilizar
los
adptadores
opcionales
РА-1/РА-1В/РА-4
o
СА-1,
respectiva-
mente.
Antes
de
emplear
un
adaptador,
lea
cuidadosamente
su
manual
de
instrucciones.
2.
El
adaptador
de
batería
de
automóvil
opcional
es
solamente
para
baterías
de
12V
con
negativo
a
masa.
Antes
de
conectar
el
adaptador,
compruebe
si
éste
es
el
caso
de
su
automóvil.
3.
Cuando
haya
conectado
el
DD-10
a
un
sistema
estéreo,
no
ponga
el
control
VOLUME
en
MAX.
Para
ajustar
el
nivel
del
sonido
emplee
el
control
de
volumen
del
sistema
estéreo.
.
Evite
colocar
el
instrumento
en
lugares
extremadamente
húmedos.
.
No
golpee
los
pulsadores
de
percusión
con
palillos
ni
demás
objetos;
emplee
las
manos.
6.
No
someta
el
instrumento
a
golpes,
y
evite
colocar
objetos
pesados
sobre
él.
7.
El
banco
de
batería
digital
no
deberá
colocarse
a
la
luz
solar
durante
mucho
tiempo.
8.
No
coloque
el
instrumento
cerca
de
aparatos
calefactores,
ni lo
deje
en
un
automóvil
aparcado
bajo
el
sol.
La
luz
solar
directa
puede
hacer
que
el
interior
de
un
automóvil
con
las
ventanillas
cerradas
aumente
hasta
80°С.
Las
tem-
peraturas
superiores
a
60°С
pueden
causar
daños
físicos
y/o
eléctricos
que
no
cubre
la
garantía.
9.
Para
limpiar
el
instrumento,
emplee
un
райо
suave
ligeramente
humedecido.
a
A

Specifications
Percussion
Pad
8
(large)
pads,
2
(small)
pads
Auto
Rhythm
Patterns
(00-97)
8
beat,
50's
Rock'n'Roll,
Light
Rock,
Soft
Rock'n'Roll,
Stow
Rock
1,2,
Pop
Rock
1,2,
Rhythm
&
Blues,
Hard
Rock,
Heavy
Metal,
16
Beat,
Old
16
Beat,
Hard
16
Beat,
Soft
16
Beat,
Disco,
Disco
Rap,
Funk,
Heavy
Funk,
Hard
Funk,
Computer
Rock,
Computer
Funk,
Computer
16,
Computer
Disco,
Jazz
Samba
1,2,
Samba
Combo
1,2,
Samba
Carnival,
Bossa
Nova,
Mambo
1,2,
Mambo
Fast,
Disco
Mambo,
Son
Afro,
Rhumba,
Rhumba
Fast,
Cha-Cha-Cha,
Baion,
Beguine,
Tango,
Tamborito,
Merengue,
Conga
1,2,
Reggae
1,2,
Jingo,
Salsa,
Calypso
Rock,
Calypso
R&B,
Afro
Rock,
Afro
Dance,
Turkish
March,
Indian
Beat,
Hula
Dance,
Country,
Habanera,
Japanese
Taiko,
March,
Rock
Waltz,
16
Waltz,
Funk
Waltz,
Bassa
Waltz,
Flamenco,
5
Beat
Rock,
5
Beat
Funk,
5
Beat
Bossa,
7
Beat
Rock,
7
Beat
Bossa,
Modern
Jazz
1,2,
Swing,
Swing
Hi-Hat,
Big
Band,
Shuffle,
Disco
Shuffle,
Calypso
Shuffle,
Boogie
Woogie
1,2,
Swing
Bossa,
Latin
Swing
1,2,
Swing
Reggae,
Computer
Swing,
Rock-a-Ballad,
Slow
Blues,
12
Beat
Jazz,
Funky
12
Beat,
16
Shuffle,
16
Shuffle
Funk,
16
Shuffle
Disco,
March
12/8,
Jazz
Waltz,
Rock-a-Waltz,
Bolero,
Swing
5
Beat,
Swing
7
Beat
Instrument
Voices
Tom
Tom
1,2,3,4,
Snare
Drum,
Rim
Shot,
Hi-
Hat
(open),
Ride
Symbal,
Cabasa,
Claves,
Agogo
(low),
Agogo
(high),
Conga
(low),
Conga
(high),
Bongo
(low),
Bongo
(high),
Crash
Symbal,Splash
Symbal,
Synth
tom
(low),
Synth
tom
(high),
Synth
Snare,
Castanet,
Hand
Clap,
Cow
bell,
Hi-Hat
(Closed),
Bass
Drum
Percussion
Select
1,2,3,
Custom
Pattem
Program
98,
99,
Clear
Demonstration
Demo
on/off
Rhythm
Pattem
Select
(10
Buttons)
1,2,3,4,5,6,7,8,9,0,C
Other
controls
Power
Switch,
Volume,
Tempo,
MIDI
Mode,
Metronome,
Syncro
Break
Mode,
Roll,
Restart/Start,
Stop,
Intro/Fill
In
1,2,
Manual
Tempo
Auxiliary
Jacks
DC
9—
12У
in,
Aux
out
L/L
+
В,
Aux
out
В,
Headphones,
Foot
pedal,
MIDI
In
Main
Amplifier
1.3W
(RMS)
x2
Speakers
10
cm
(4")
x
2,
6
ohms
Rated
Voltage
DC
9V:
six
1.5V
SUM-2
(AM-2),
R-14
(LR-14),
"C"
size
or
equivalent
batteries
AC
Power
adaptor
(PA-1,
PA-1B,
PA-4)
or
Car
Technische
Daten
Perkussionsfeld
8
(große),
2
(kleine)
Felder
Auto-Rhythmus-Muster
(00-97)
8-Beat,
50er
Rock’n
Roll,
Light
Rock,
Soft
Rock'n
Roll,
Slow
Rock
1,
2,
Pop
Rock
1,2,
Rhythm
&
Blues,
Hard
Rock,
Heavy
Metal,
16-Beat,
Old
16-Beat,
Hard
16-Beat,
Soft
16-Beat,
Disco,
Disco
Rap,
Funk,
Heavy
Funk,
Hard
Funk,
Computer
Rock,
Computer
Funk,
Computer
16,
Computer
Disco,
Jazz
Samba
1,2,
Samba
Combo
1,2,
Samba
Carnival,
Bossa
Nova,
Mambo
1,2,
Mambo
Fast,
Disco
Mamba,
Son
Afro,
Rhumba,
Rhumba
Fast,
Cha-Cha-
Cha,
Baion,
Beguine,
Tango,
Tamborito,
Merengue,
Conga
1,2,
Reggae
1,2,
Jingo,
Salza,
Calypso
Rock,
Calypso
Rock
and
Blues,
Afro
Rock,
Afro
Dance,
Turkish
March,
Indian
Beat,
Hula
Dance,
Country,
Habanera,
Japanischer
Taiko,
March,
Rock
Waltz,
16-Waltz,
Funk
Waltz,
Bassa
Waltz,
Flamenco,
5-Beat
Rock,
5-Beat
Funk,
5-Beat
Bossa,
7-Beat
Rock,
7-Beat
Bossa,
Modern
Jazz
1,2,
Swing,
Swing
Hi-Hat,
Big
Band,
Shuffle,
Disco
Shuffle,
Calypso
Shuffle,
Boogie
Woogie
1,2,
Swing
Bossa,
Latin
Swing
1,2,
Swing
Reggae,
Computer
Swing,
Rock-a-Ballad,
Slow
Blues,
12-Beat
Jazz,
Funky
12-Beat,
16-Shuffle,
16-Shuffle
Funk,
16-Shuffle
Disco,
March
12/8,
Jazz
Waltz,
Rock-a-Waltz,
Bolero,
Swing
5-Beat,
Swing
7-Beat
Instrumentalstimmen
Tom Tom
1,2,3,4,
Snare
Drum,
Rim
Shot,
Hi-
Hat
(offen),
Ride
Cymbal,
Cabasa,
Claves,
Agogo
(tief),
Agogo
(hoch),
Conga
(tief),
Conga
(hoch),
Bongo
(tief),
Bongo
(hoch),
Clash!
Cymbal,
Splash
Cymbal,
Synth
tom
(tief),
Synth
tom
(hoch)
Synth
Snare,
Kastagnette,
Hándeklatschen,
Kuhglocke,
Hi-Hat
(geschlossen),
Bass
Drum
Perkussionswahl
1,
2,
3,
CUSTOM
Musterprogramm
98, 99,
CLEAR
Vorführung
DEMO
ON/OFF
Rhythmusmusterwahl
(10
Tasten)
1,2,3,4,5,6,7,8,9,9,
C
Andere
Regler
Netzschalter,
Lautstárke,
Tempo,
MIDI-
Betriebsart,
Metronom,
Betriebsart
Synchro
Break,
Wirbel,
Restart/Start,
Stopp,
Intro/Fill
In
1,2,
Manual
Tempo
Weitere
Buchsen
DC
9—12V
IN,
AUX
OUT
L/L
+R,
AUX
OUT
В,
Kopfhórer,
FuBpedal,
MIDI
IN
Eingebauter
Verstárker
1,3
W
(Effektivwert)
x
2
Lautsprecher
10
cm
x
2,
6
Ohm
Nennspannung
Gleichstrom
9
V:
Sechs
R-14
Batterien
(“С”)
oder
entsprechende
1,5-V-Batterien
Netzteil
(PA-1,
PA-1B,
PA-4)
oder
Autobatterie-
adapter
(CA-1)
11
s.
Sen
LI
Spécifications
Coussinet
de
percussion
8
grands
coussinets,
2
petits
coussinets
Motifs
rythmiques
automatiques
(00
à
97)
8
temps,
Rock'n'Roll
des
années
50,
Rock
léger,
Rock'n'Roll
doux,
Rock
lent,
Pop
Rock
1,2,
Rhythm
4
Blues,
Hard
Rock,
Heavy
Metal,
16
temps,
vieux
16
temps,
16
temps
Hard,
16
temps
Soft,
Disco,
Disco
Rap,
Funk,
Heavy
Funk,
Hard
Funk,
Rock
informatisé,
Funk
informatisé,
16
temps
informatisé,
Disco
informatisé,
Jazz
Samba
1,2,
Samba
Combo
1,2,
Samba
carnaval,
Bossa
Nova,
Mambo
1,2,
Mambo
rapide,
Mambo
Disco,
Son
africain,
Rhumba,
Rhumba
rapide,
Cha-
cha-cha,
Baion,
Beguine,
Tambo,
Tamborito,
Merengue,
Conga
1,2,
Reggae
1,2,
Jingo,
Salsa,
Rock
calypso,
Rhythm
&
Blues
calypso,
Rock
africain,
Danse
africaine,
Marche
turque,
Mesure
indienne,
Danse
Hula,
Country,
Habanera,
Taiko
japonais,
Marche,
Valse
rock,
Valse
à
16
temps,
Valse
funk,
Valse
bassa,
Flamenco,
Rock
à
5
temps,
Funk
à
5
temps,
Bossa
à 5
temps,
Rock
à
7
temps,
Bossa
à
7
temps,
Modern
Jazz
1,2,
Swing,
Swing
Hi-Hat,
Big
Band,
Shuffle,
Shuffle
Disco,
Shuffle
Calypso,
gs
Woogie
1,2,
Bossa
Swing,
Swing
latin
1,2,
Reggae
Swing,
Swing
informatisé,
Ballade
rock,
Blues
lent,
Jazz
à
12
temps,
12
temps
funky,
Shuffle
à
16
temps,
Funk
Shuffle
à
16
temps,
Disco
Shuffle
à
16
temps,
Marche
12
à 8
temps,
Valse
jazz,
Valse
rock,
Boléro,
5
temps
swing,
7
temps
swing.
Voix
instrumentales
Tom
Tom
1,2,3,4,
Snare
Drum,
Rim
Shot,
Hi-
Hat
(ouvert),
Ride
Symbal,
Cabasa,
Claves,
Agogo
(lent),
Agogo
(rapide),
Conga
(lent),
Conga
(rapide),
Bongo
(lent),
Bongo
(rapide),
Symbal,
Clash
Splash
Symbal,
Synth
Tom
(lent),
Synth
Tom
(rapide),
Synth
Snare,
Castagnettes,
Claquement
de
main,
Cloche
de
vache,
Hi-Hat
(fermé),
Grosse
caisse
Sélection
des
percussions
1,
2,
3,
personnelles
Programmation
de
motif
98,
99,
annulation
Démonstration
Marche/arrét
Sélection
des
motifs
rythmiques
(10
touches)
1,
2, 3,
4, 5, 6,
7,
8, 9,
0,
C
Autres
réglages
Interrupteur
d'alimentation,
intensité
sonore,
tempo,
mode
MIDI,
métronome,
mode
d'interruption
synchronisée,
roulement,
mise
en
route/remise
en
route,
arrêt,
introduction!
remplissage
1,2,
tempo
manuel.
Prises
accessoires
Prise
d'entrée
DC
IN
9-12V,
prise
de
sortie
AUX
OUT
L/L
+
R,
AUX
OUT
R,
prise
de
casque
d'écoute,
prise
de
pédale,
prise
d'entrée
MIDI
Amplificateur
principal
1,3W
(efficace)
x
2
Especificaciones
Pulsadores
de
percusión
8
(grandes)
y
2
(pequenos)
Patrones
rítmicos
(00-97)
8
beat,
50's
Rock'n'Roll,
Light
Rock,
Soft
Rock'n'Roll,
Slow
Rock
1,2,
Pop
Rock
1,2,
Rhythm
&
Blues,
Hard
Rock,
Heavy
Metal,
16
Beat,
Old
16
Beat,
Hard
16
Beat,
Soft
16
Beat,
Disco,
Disco
Rap,
Funk,
Heavy
Funk,
Hard
Funk,
Computer
Rock,
Computer
Funk,
Computer
16,
Computer
Disco,
Jazz
Samba
1,2,
Samba
Combo
1,2,
Samba
Carnival,
Bossa
Nova,
Mambo
1,2,
Mambo
Fast,
Disco
Mambo,
Son
Afro,
Rhumba,
Rhumba
Fast,
Cha-Cha-Cha,
Baion,
Beguine,
Tango,
Tamborito,
Merengue,
Conga
1,2,
Reggae
1,2,
Jingo,
Salsa,
Calypso
Rock,
Calypso
R&B,
Afro
Rock,
Afro
Dance,
Turkish
March,
Indian
Beat,
Hula
Dance,
Country,
Habanera,
Japanese
Taiko,
March,
Rock
Waltz,
16
Waltz,
Funk
Waltz,
Bassa
Waltz,
Flamenco,
5
Beat
Rock,
5
Beat
Funk,
5
Beat
Bossa,
7
Beat
Rock,
7
Beat
Bossa,
Modern
Jazz
1,2,
Swing,
Swing
Hi-Hat,
Big
Band,
Shuffle,
Disco
Shuffle,
Calypso
Shuffle,
Boogie
Woogie
1,2,
Swing
Bossa,
Latin
Swing
1,2,
Swing
Reggae,
Computer
Swing,
Rock-a-Ballad,
Slow
Blues,
12
Beat
Jazz,
Funky
12
Beat,
16
Shuffle,
16
Shuffle
Funk,
16
Shuffle
Disco,
March
12/8,
Jazz
Waltz,
Rock-a-Waltz,
Bolero,
Swing
5
Beat,
Swing
7
Beat
Voces
instrumentales
Tom-tom
1,
2,
3,
y
4,
Tambor
pequeño,
Golpe
en
el
borde
de
la
caja,
Platillos
(abiertos),
Platillo
repetido,
Cabasa,
Claves,
Agogo
(bajo),
Agogo
(alto),
Conga
(baja),
Conga
(alta),
Bongo
(bajo),
Bongo
(alto),
Platillo
abrumador,
Platillo
ruidoso,
Tambor
sintetizador
(alto),
tambor
pequeño
de
sintetizador,
Castañuelas,
Palmas,
Cencerro,
Platillos
(cerrados),
Trombón
Selección
de
percusión
1,
2,
y
3,
y
Ajustable
Programas
de
patrones
98, 99,
y
Borrado
Demostración
Activación/desactivación
Selección
de
patrones
rítmicos
(10
botones)
1,2,3,4,5,6,7,8,9,
y
C
Otros
controles
Interruptor
de
alimentación,
Volumen,
Tempo,
Modo
MIDI,
Metrónomo,
Modo
de
interrupción
sincronizada,
Redoble,
Inicio/reinicio,
Parada,
Preludio/relleno
1
y
2,
y
Tempo
manual
Tomas
auxiliares
Entrada
de
9—12V
CC,
Salida
auxiliar
de
los
canales
izquierdo/izquierdo
+
derecho,
Salida
auxiliar
del
canal
derecho,
Auriculares,
Pedal,
Entrada
de
MIDI
Amplificador
principal
1,3W
(eficaces)
x
2
Altavoces
10
cm
x
2,
6
ohmios
Tensión
nominal
9V
CC,
seis
pilas
de
1,5V
SUM-2
(AM-2),
R-14
(LR-14),
tamaño
“С”,
o
equivalentes
Adaptador
de
alimentación
de
CA
(PA-1,
РА-1В,
15

16
м
ььЪъЪуЪ
у
чт
Battery
Adaptor
(CA-1)
Dimensions
(W
x
D
x
H)
543
mm
173
mm
x
72
mm
(21-3/8"
x6-7/8"
x
2-718”)
Weight
2.0
kg
(4.2
Ibs.)
including
batteries
Original
Accessories
Foot
pedal
(L,R),
Shoulder
strap
УымЫ—
—_
_—__
_—
_
____
______
_
_
a.o..oo
Y
gz2AEYTIPITEOE6Ó6OEEE€E€E€+
=m=m
t
WE
Specifications
subject
to
change
without
notice.
Abmessungen
(B
x
T
x
H)
543
mm
x
173
mm
x
72
mm
Gewicht
2,0
kg
einschlieBlich
Batterien
Mitgeliefertes
Zubehór
Fußpedal
(L, К),
Schulterriemen
Änderungen
bei
Design
und
technischen
Daten
ohne
Vorankündigung
vorbehalten.
Haut-parleur
10cm
de
diam.
x
2,
6
ohms
Tension
nominale
DC
9V:
six
piles
de
1,5V
SUM-2
(AM-2),
R-14
(LR-14),
de
format
C
ou
piles
équivalentes
Adaptateur
d'alimentation
secteur
(PA-1/PA-1B/PA-4)
ou
adaptateur
de
batterie
de
voiture
(CA-1)
Dimensions
(Lx
P
x
H)
543
mm
х
173
mm
x
72
mm
Poids
2,0kg
piles
comprises
ires
fournis
Pédale
(L,
R),
bandouliére
Les
spécifications
sont
sujettes
à
modifications
sans
préavis.
о
PA-4)
o
adadaptador
de
batería
de
automóvil
(CA-1)
Dimensiones
(An
x
Prf
x
Al)
543
mm
x
173
mm
x
72
mm
Peso
2,0
kg,
incluyendo
las
pilas
Accesorios
opcionales
Pedal
(L,
R),
y
correa
de
bandolera
Especificaciones
sujetas
a
cambio
sin
previo
aviso.
Wichtiger
Hinwei
Hiermit
wird
bes:
funk-entstórt
ist.
Ya
Digital
Perkussion
Typ
DD-10
(Gerát,
Typ,
Bezeichnung)
Name
des
Importeurs
is
für die
Benutzung
in
der
Bundesrepublik
Deutschland.
Bescheinigung
des
Herstellers/Importeurs'
cheinigt,
daß
der/die/das
in
Übereinstimmung
mit
den
Bestimmungen
der
VERFÜGUNG
1046/84
(Amtsblattverfügung)
Der
Deutschen
Bundespost
wurde
das
Inverkehrbringen
dieses
Gerátes
angezeigt
und
die
Berechtigung
zur
Überprüfung
Serie
auf
Einhaltung
der
Bestimmungen
eingeráunt.
*This
applies
only
to
products
distributed
by
YAMAHA
Europe
GmbH.
*Dies
bezicht
sich
nur
auf
die
von
der
YAMAHA
EUROPA
GmbH
vertriebenen
Produkte.
*Ceci
ne
s'applique
qu'aux
produits
distribués
par
Yamaha
Europe
GmbH.
*Esto
se
aplica
solamente
a
productos
distribuidos
por
Yamaha
Europa
GmbH.

00-10
MIDI
Implementation
Chart
Recoginized
Function
Remarks
mode
“00”
mode
“99”
Basic
Channel
Default
1—16* 1—16*
*memorized
Changed
1—16*
1—16*
Default
Mode
3
OMNI
OFF
Mode
Messages
х x
Altered
*
*
x
x
x
x
*
k
x
*%*
H
Xx
RAR
Note
38--75
x
Number:
True
Voice
*
PERERA
ER
Note
ON
O
9nH,
x
Velocity
у=1—
127
Note
OFF
х
АНег
key's
x
x
Touch
Ch's
x
x
Pitch
Bender
Control
Change
Prog
x
O
0—99
Change
:
True
#
SE
0—99
*1
System
Exclusive
Е
х
System
:
Song
Pos
x
x
:
Song
Sel
x
Common
:
Tune
x x
System
:
Clock
x
О
*2
Real
Time
:
Commands
x
О
*3
Aux
:
Local
ON/OFF
x
x
:
All
Notes
OFF
x x
Message
:
Active
Sense
O
O
:
Reset
x
x
Notes
*1
=
recognized
as
preset
rhythm
patternnumber
*2
=
internal/external
clock
auto
change
*3
=
start,
stop
only
Mode
1:
OMNI
ON,
POLY
Mode
3:
OMNI
OFF,
POLY
Mode
2:
OMNI
ON,
MONO
Mode
4:
OMNI
OFF,
MONO
О:
Yes
x:
No

YAMAHA
YAMAHA
CORPORATION
P.O.Box
1,
Hamamatsu,
Japan
The
serial
number
of
this
product
may
be
found
on
the
bottom
of
the
unit.
You
should
note
this
serial
number
in
the
space
provided
below
and
retain
manual
as
a
permanent
record
of
your
purchase
to
aid
identification
in
the
event
of
theft.
Model
No.
DD-10
Serial
No.
Concerning
Warranty
This
product
was
made
for
international
distribution,
and
since
the
warranty
for
this
type
of
product
varies
from
marketing
area
to
marketing
area,
please
con-
tact
the
selling
agency
for
information
concerning
the
applicable
warranty
and/or
service
policies.
Die
Seriennummer
befindet
sich
an
der
Unterseite
des
Instrumentes.
Wir
empfehlen,
diese
Nummer
sicher-
heitshalber
an
der
unten
vorgesehenen
Stelle
einzutragen,
um
sie
auch
im
Falle eines
Diebstahls
jederzeit
zur
Hand
zu
haben.
Modell
№.
DD-10
Serien-Nr.
Hinweis
zur
Garantie
Dieses
Produkt
wird
international
vertrieben,
und
die
Garantiebedingungen
sind
von
Vertriebsland
zu
Vertriebsland
verschieden.
Ihr
Hándler
gibt
Ihnen
gerne
ganauere
Informationen
zu
den
in
Ihrem
Land
gültigen
Garantie-und/oder
Servicebedingungen.
Le
numéro
de
série
de
ce
produit
figure
sur
le
fond
de
l'appareil.
Il
conviendra
de
noter
ce
numéro
de
série
dans
l'espace
réservé
ci-dessous
et
de
con-
server
ce
manuel:
celui-ci
constitute
le
document
permanent
de
votre
achat
et
permet
l'identification
en
cas
de
vol.
№.
de
modele
DD-10
№.
de
série
_
Remarque
relative
à
la
garantie
Ce
modéle
est
destiné
à
étre
distribué
à
l'échelle
internationale.
Etant
donné
que
les
conditions
de
garantie
pour
ce
type
de
produit
varient
en
fonction
des
zones
de
commercialisation,
priére
de
prendre
contact
avec
l'agence
chargée
des
ventes
pour
tous
renseignements
relatifs
aux
conditions
de
garantie
et
de
service
aprés-vente.
El
número
de
serie
de
este
producto
se
encuentra
en
la
parte
inferior
de
la
unidad.
Sírvase
anotar
este
nümero
de
serie
en
el
espacio
proporcionado
debajo
y
guarde
este
manual
como
comprobante
de
compra,
para
ayudar
a
la
identificación
en
caso
de
robo.
N.°
de
modeio.
DD-10
`
№.
de
serie
Concerniente
a
la
garantía
Este
producto
ha
sido
fabricado
para
ser
distribuido
internacionalmente
y,
como
la
garantía
para
este
tipo
de
producto
variá
en
relación
a
su
área
de
comercialización,
sirvase
consultar
al
agente
de
ventas
sobre
la
información
en
torno
a
la
garantía
aplicable
y/o
el
de
servicio,
postventa.
D
Ò
3805
Printed
in
Japan
Other manuals for DD-10
3
Table of contents
Other Yamaha Drum manuals

Yamaha
Yamaha DTXTREME IIs Instruction Manual

Yamaha
Yamaha DTPK95MSP User manual

Yamaha
Yamaha DTP4KSP User manual

Yamaha
Yamaha DTX900 User manual

Yamaha
Yamaha RX-21 User manual

Yamaha
Yamaha DD-9 User manual

Yamaha
Yamaha DTX400K Service manual

Yamaha
Yamaha DD-20 User manual

Yamaha
Yamaha YDD-60 User manual

Yamaha
Yamaha KU100 User manual

Yamaha
Yamaha RX-17 User manual

Yamaha
Yamaha HH-65 User manual

Yamaha
Yamaha XP105T-X User manual

Yamaha
Yamaha DD-10 User manual

Yamaha
Yamaha PCY100 User manual

Yamaha
Yamaha RHH135 User manual

Yamaha
Yamaha DTS70 User manual

Yamaha
Yamaha KP100 User manual

Yamaha
Yamaha DTX750K User manual

Yamaha
Yamaha RX-8 User manual