Yamaha Electone EL-900 User manual

Model
Serial No.
Purchase Date
SPEC IA LM ESSA G ESEC TIO N
PR O D U C TSA FETY M A R K IN G S:Yamaha electronic prod-
ucts may have either labels similar to the graphics shown
below or molded / stamped facsimiles of these graphics on
the enclosure. The explanation of these graphics appears on
this page.
Please observe all cautions indicated on this page and those
indicated in the safety instruction section.
EN V IR O N M EN TA LISSU E S: Yamaha strives to produce
products that are both user safe and environmentally
friendly.
We sincerely believe that our products and the production
methods used to produce them, meet these goals. In
keeping with both the letter and the spirit of the law, we want
you to be aware of the following:
B A TT ER Y N O TIC E: This product MAY contain a small
nonrechargeable battery which (if applicable) is soldered in
place. The average life span of this type of battery is
approximately five years. When replacement becomes
necessary, contact a qualified service representative to
perform the replacement.
W A R N IN G : Do not attempt to recharge, disassemble, or
incinerate this type of battery. Keep all batteries away from
children. Dispose of used batteries promptly and as
regulated by applicable laws. Note: In some areas, the
servicer is required by law to return the defective parts.
However, you do have the option of having the servicer
dispose of these parts for you.
D ISPO SA LN O T IC E: Should this product become
damaged beyond repair, or for some reason its useful life is
considered to be at an end, please observe all local, state,
and federal regulations that relate to the disposal of
products that contain lead, batteries, plastics, etc.
N O TIC E:Service charges incurred due to lack of knowledge
relating to how a function or effect works (when the unit is
operating as designed) are not covered by the
manufacture's warranty, and are therefore the owner's
responsibility.
Please study this manual carefully and consult your dealer
before requesting service.
N A M E PLA T E LO C A T IO N :The graphic below indicates the
location of the name plate. The model number, serial
number, power requirements, etc., are located on this plate.
You should record the model number, serial number, and
the date of purchase in the spaces provided below and
retain this manual as a permanent record of your purchase.
CAUTION: TO REDUCE THE RISK OF
ELECTRIC SHOCK, DO NOT REMOVE
COVER (OR BACK). NO USER-SERVICEABLE
PARTS INSIDE. REFER SERVICING TO
QUALIFIED SERVICE PERSONNEL.
C A U TIO N
RISK OF ELECTRIC SHOCK.
DO NOT OPEN
See the name plate for graphic symbol markings.
92-469-➀
IM PO R TA N T N O TIC E :All Yamaha electronic products are
tested and approved by an independent safety testing
laboratory in order that you may be sure that when it is
properly installed and used in its normal and customary
manner, all foreseeable risks have been eliminated. DO NOT
modify this unit or commission others to do so unless
specifically authorized by Yamaha.
Product performance and/or safety standards may be
diminished. Claims filed under the expressed warranty may
be denied if the unit is/has been modified. Implied warranties
may also be affected.
SPE C IFIC A TIO N SSU B JEC TTO C H A N G E :The information
contained in this manual is believed to be correct at the time
of printing. However, Yamaha reserves the right to change or
modify any of the specifications without notice or obligation
to update existing units.
The exclamation point within the
equilateral triangle is intended to alert
the user to the present of important
operating and maintenance
(servicing) instructions in the
literature accompanying the product.
The lightning flash with arrowhead
symbol within the equilateral triangle
is intended to alert the user to the
presence of uninsulated "dangerous
voltage" within the product's
enclosure that may be of sufficient
magnitude to constitute a risk of
electrical shock.
Downloaded from: http://www.usersmanualguide.com/

• Take care that the key cover does not pinch your fingers, and do not insert a
finger or hand in the key cover gap.
• Never insert or drop paper or metallic or other objects between the slits of
the key cover and the keyboard. If this happens, immediately turn off the
power and remove the electric plug from the outlet and have the instrument
inspected by qualified Yamaha service personnel.
• Do not place the instrument against a wall (allow at least 3 cm/one-inch
from the wall), since this can cause inadequate air circulation, and possibly
result in the instrument overheating.
• Do not operate the instrument for a long period of time at a high or
uncomfortable volume level, since this can cause permanent hearing loss. If
you experience any hearing loss or ringing in the ears, consult a physician.
■USING THE BENCH
• Do not play carelessly with or stand on the bench. Using it as a tool or step-
ladder or for any other purpose might result in accident or injury.
• Only one person should sit on the bench at a time, in order to prevent the
possibility of accident or injury.
• If the bench screws become loose due to extensive long-term use, tighten
them periodically using the included tool.
■SAVING USER DATA
• Always save datato a floppy disk frequently, in order to help prevent the loss
of important data due to a malfunction or user operating error.
Yamaha cannot be held responsible for damage caused by improper use or
modifications to the instrument, or data that is lost or destroyed.
Always turn the power off when the instrument is not in use.
• Do not open the instrument or attempt to disassemble the internal parts or
modify them in any way. The instrument contains no user-serviceable parts.
If it should appear to be malfunctioning, discontinue use immediately and
have it inspected by qualified Yamaha service personnel.
• Do not expose the instrument to rain, use it near water or in damp or wet
conditions, or place containers on it containing liquids which might spill
into any openings.
• If the power cord or plug becomes frayed or damaged, or if there is a sudden
loss of sound during use of the instrument, or if any unusual smells or
smoke should appear to be caused by it, immediately turn off the power
switch, disconnect the electric plug from the outlet, and have the instrument
inspected by qualified Yamaha service personnel.
• Only use the voltage specified as correct for the instrument. The required
voltage is printed on the name plate of the instrument.
• Before cleaning the instrument, always remove the electric plug from the
outlet. Never insert or remove an electric plug with wet hands.
• Check the electric plug periodically and remove any dirt or dust which may
have accumulated on it.
CAUTION
Always follow the basic precautions listed below to avoid the possibility of physical injury to you or others, or damage to the
instrument or other property. These precautions include, but are not limited to, the following:
• Do not place the power cord near heat sources such as heaters or radiators,
and do not excessively bend or otherwise damage the cord, place heavy
objects on it, or place it in a position where anyone could walk on, trip over,
or roll anything over it.
• When removing the electric plug from the instrument or an outlet, always
hold the plug itself and not the cord. Pulling by the cord can damage it.
• Do not connect the instrument to an electrical outlet using a multiple-
connector. Doing so can result in lower sound quality, or possibly cause
overheating in the outlet.
• Remove the electric plug from the outlet when the instrument is not to be
used for extended periods of time, or during electrical storms.
• Before connecting the instrument to other electronic components, turn off
the power for all components. Before turning the power on or off for all
components, set all volume levels to minimum. Also, be sure to set the
volumes of all components at their minimum levels and gradually raise the
volume controls while playing the instrument to set the desired listening
level.
• Do not expose the instrument to excessive dust or vibrations, or extreme
cold or heat (such as in direct sunlight, near a heater, or in a car during the
day) to prevent the possibility of panel disfiguration or damage to the internal
components.
• Do not use the instrument near other electrical products such as televisions,
radios, or speakers, since this might cause interference which can affect
proper operation of the other products.
• Do not placetheinstrument in an unstable position whereit might accidentally
fall over.
• Before moving the instrument, remove all connected cables.
• When cleaning the instrument, use a soft, dry cloth. Do not use paint thinners,
solvents, cleaning fluids, or chemical-impregnated wiping cloths. Also, do
not place vinyl, plastic or rubber objects on the instrument, since this might
discolor the panel or keyboard.
• Do not rest your weight on, or place heavy objects on the instrument, and do
not use excessive force on the buttons, switches or connectors.
(1)B-5
PRECAUTIONS
PLEASE READ CAREFULLY BEFORE PROCEEDING
* Please keep these precautions in a safe place for future reference.
WARNING
Always follow the basic precautions listed below to avoid the possibility of serious injury or even death from electrical shock,
short-circuiting, damages, fire or other hazards. These precautions include, but are not limited to, the following:
Downloaded from: http://www.usersmanualguide.com/

4
G M (G eneralM ID ISystem Level1)isanadditiontotheM ID Istandardw hichensuresthatany
G M -com patiblem usicdatacanbeaccuratelyplayedbyanyG M -com patibletonegenerator,
regardlessofm aker.TheG M m arkisaffixedtoallsoftw areandhardw areproductsthatsupport
theG eneralM ID Istandard.
X G isanew M ID Iform atcreatedbyY am ahaw hichsignificantlyim provesandexpandsuponthe
G eneralM ID Istandardbyprovidingagreatervarietyofhigh-qualityvoicesplusconsiderably
enhancedeffectoperationムw hilebeingfullycom patiblew ithG M .
ProductsbearingtheSO N D IU S-X G logoarelicensedunderpatentsofStanfordU niversityandY am ahaas
listedontheinternetw ebsite,<http://w w w .sondius-xg.com >.
IncludedItem s
R egistrationM enuD isk
3.5"2H D FloppyD isk
O w nerユsM anual
C ongratulations!
Y ouaretheproudow nerofafineelectronicorgan,E lectoneEL -900.
TheY am ahaEL-900Electonecom binesthem ostadvancedA W M
tonegenerationtechnologyw ithstate-of-the-artdigitalelectronicsand
featurestogiveyoustunningsoundqualityw ithm axim um m usicalenjoym ent.
A largeL iquidC rystalD isplayandsophisticatedyeteasy-to-useinterfacealsogreatly
enhancetheoperabilityofthisadvancedinstrum ent.
Inordertom akethem ostoftheElectoneandextensiveperform ancepotential,
w eurgeyoutoreadthem anualthoroughlyw hiletryingout
thevariousfeaturesdescribed.
K eepthem anualinasafeplaceforlaterreference.
TurningtheElectoneofferasesallpanelsettingsyouhavem ade.W hentheElectoneisturned
on,B asicR egistration1isautom aticallyselected.Ifyouhavem adepanelsettingsyouw ishto
keep,savethem toR egistrationM em orybeforeturningtheElectoneoff.
・T hescreendisplaysandillustrationsasshow ninthisow nerユsm anualareforinstructionalpurposesonly,andm ayappearsom ew hatdifferentfrom thoseonyourinstrum ent.
・C opyingofthecom m erciallyavailablem usicsequencedataisstrictlyprohibitedexceptforyourpersonaluse.
Downloaded from: http://www.usersmanualguide.com/

5
TableofC ontents
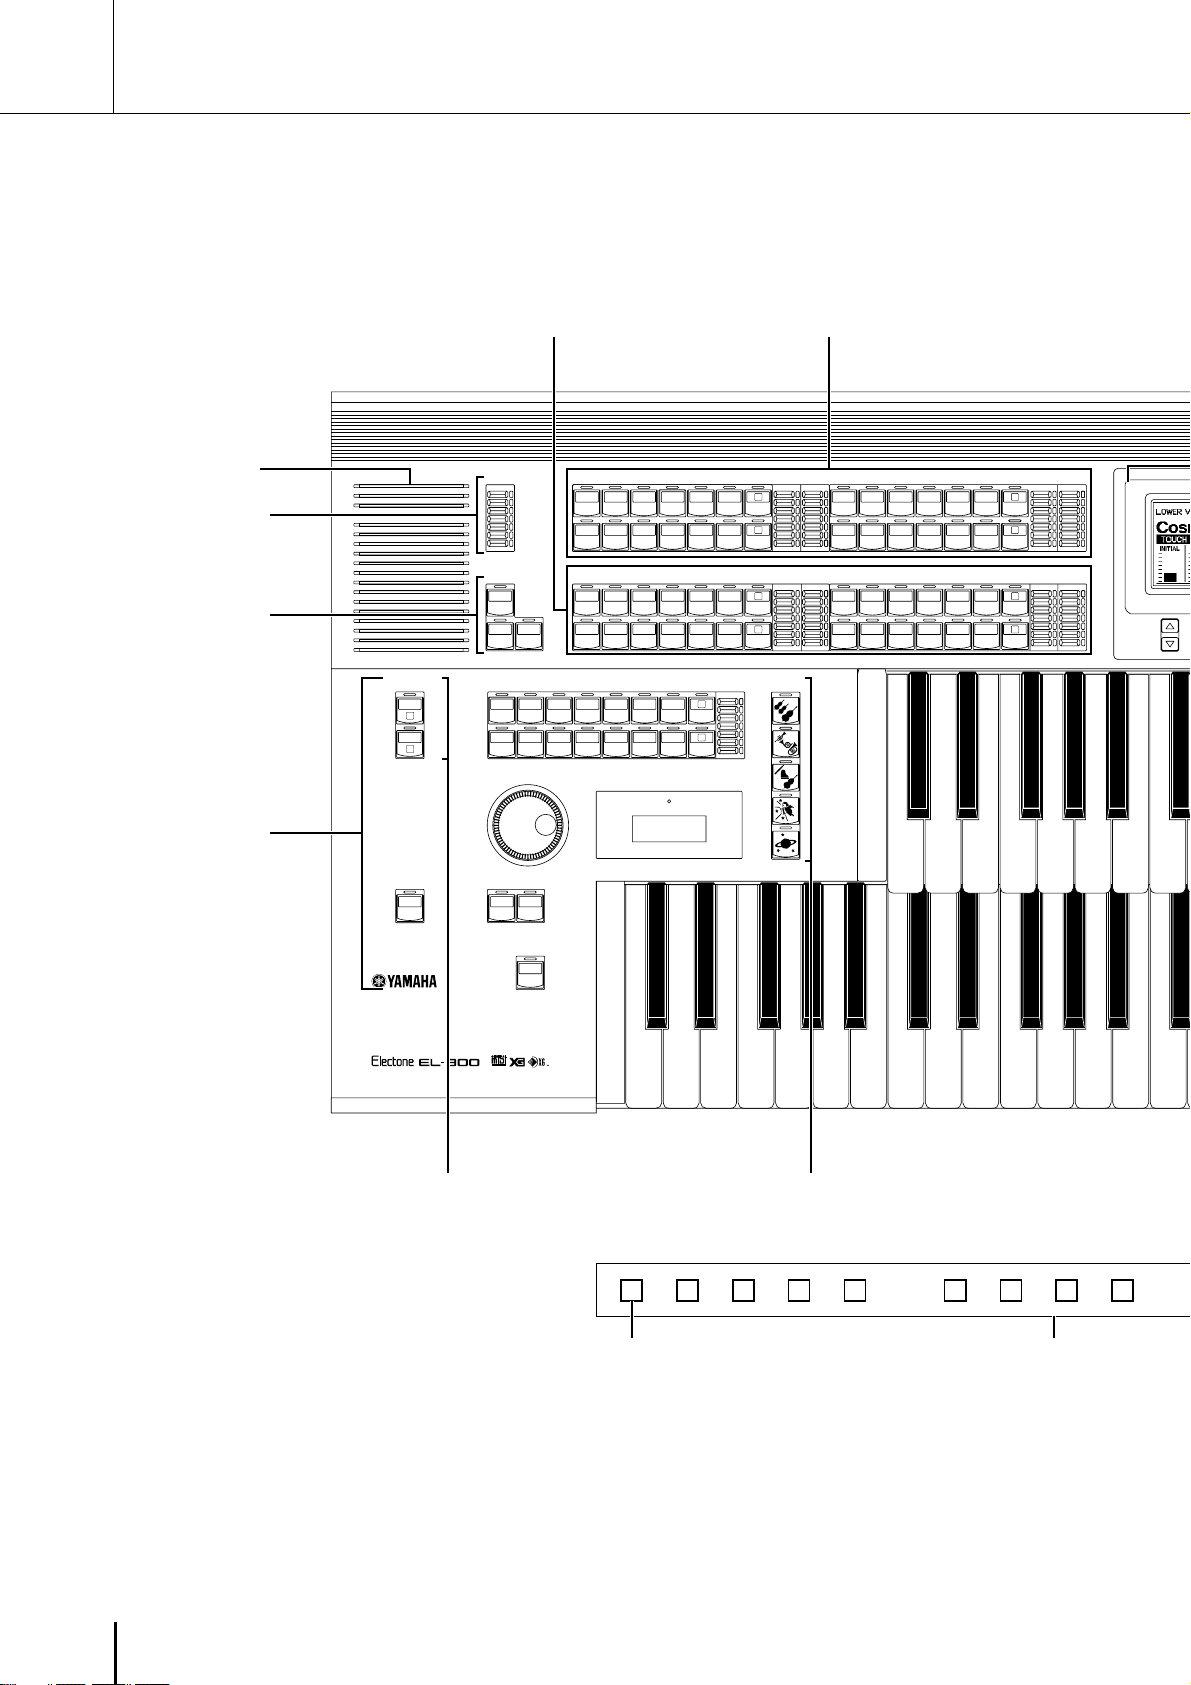
PanelLayout..............................................6
M ainFeatures............................................9
1 Q uickIntroductoryG uide..................10
1 G ettingStarted ....................................................10
2 B asicR egistrations ..............................................11
3 R egistrationM enuD isk ......................................12
4 B asicO peration ...................................................19
5 U singtheL C D D isplay .......................................20
6 V oiceList ............................................................24
2V oiceSections.....................................26
1 SelectingV oicesfrom thePanel .........................26
2 SelectingV oicesfrom theD ottedB uttons..........30
3 V oiceM enus .......................................................32
3FluteV oices(O rganSounds) .............40
1 C reatingFluteV oices .........................................40
2 SavetoU serFluteV oice .....................................42
3 U singPresetandU serV oices .............................43
4V oiceC ontrolsandEffects .................44
1 Selectingfrom V oiceC onditionPages ...............45
[PA G E 1] ............................................................37
1) TouchTone ...................................................45
2) Pitch ...............................................................46
3) Feet................................................................46
4) Pan .................................................................46
5) R everb ............................................................46
6) V olum e ..........................................................46
[PA G E 2] ............................................................46
1) Effect(O n/O ff) ..............................................46
2) B rilliance ........................................................47
[PA G E 3] ............................................................47
1) V ibrato ...........................................................47
2) TouchV ibrato ...............................................48
3) Slide(L eadV oiceO nly) ................................48
4) Tune(L eadV oiceO nly)................................48
2 Selectingfrom EffectSetPages...........................48
1) T rem olo/C horus ............................................49
2) Sym phonic/C eleste ........................................49
3) D elay ..............................................................49
4) Flanger...........................................................50
5) D istortion ......................................................51
3 Selectingfrom thePanel.....................................52
1) R everb ..................................................................52
2) Sustain ..................................................................55
3) T rem olo/C horus ..................................................56
5R hythm andA ccom panim ent............59
1 SelectingR hythm sfrom thePanel.....................59
2 R hythm C onditionPage .....................................62
3 D ottedB uttonsandU serR hythm s.....................64
4 R hythm M enus ...................................................66
5 A utom aticA ccom panim ent-A utoB assC hord
(A .B .C .)...............................................................68
6 A ccom panim entC ontrols ..................................70
7 Preset/U serK eyboardPercussion .......................71
8 M elodyO nC hord(M .O .C .)...............................79
6R egistrationM em ory .........................80
1 StoringR egistrations...........................................80
2 SelectingR egistrations........................................80
3 SavingtheR egistrationD atatoD isk ..................81
4 R egistrationShift ................................................82
7 M usicD iskR ecorder...........................87
1 Precautions .........................................................87
2 Form attingaD isk ...............................................89
3 R ecordingムPunchInR ecording .....................90
4 R ecordingR egistrations(andB ulkD ata)...........96
5
R ecallingR ecordedR egistrations(andB ulkD ata) ....
97
6 R eplacingR egistrations ......................................97
7 PlaybackムA boutX G Songs .............................98
8 O therFunctions ...............................................102
8 V oiceEdit...........................................110
1 EditingaV oice..................................................110
2 SavingY ourN ew V oice ....................................115
3 Q uittingV oiceEdit...........................................117
4 R ecallinganE ditedV oice .................................117
5 SelectingV oicesfrom aV oiceD isk(O ptional)....118
6 V oiceE ditingB asics..........................................119
9 R hythm PatternProgram and
R hythm SequenceProgram ..............125
O utlineoftheR hythm Program m ingO peration .125
1 R hythm PatternProgram ..................................126
1) EnteringR hythm PatternProgram .............126
2) PercussionSoundsU sedfor
R hythm PatternProgram ............................128
3) StepW riteandR ealTim eW rite .................130
4) SelectingStepW riteor
R ealT im eW riteO peration .........................130
5) SettingtheB eat/Q uantizeV alues ................130
6) E nteringPercussionSoundsto
aR hythm Pattern ........................................131
7) Editingw ithStepW rite...............................132
8) Editingw ithR ealT im eW rite .....................136
9) SelectingA ccom panim entPatternsム
Low erR hythm ic ..........................................137
10) SavingR hythm Patterns.............................140
11) Q uittingR hythm PatternProgram ............141
12) R ecallingU serR hythm Patterns................142
13)SelectingPatternsfrom aPatternD isk
(O ptional) ..................................................143
2 R hythm SequenceProgram ..............................144
1) SelectingaSequence....................................144
2) Program m ingaSequence ............................145
3) Q uittingR hythm SequenceProgram ..........148
4) PlayingR hythm Sequences .........................148
5) PlayingA llSequencesinO rder...................149
10 Footsw itches,K neeL everand
ExpressionPedals...........................151
1 Footsw itch ........................................................151
2 K neeL ever ........................................................153
3 ExpressionPedals .............................................155
11TransposeA ndPitchC ontrols .......157
12M ID I ................................................158
13A ccessoryJacksandC ontrols........160
14A ppendix .........................................161
M ID I ......................................................................161
M ID ID ataForm at.................................................167
M ID IIm plem entationC hart.................................178
Troubleshooting ....................................................181
Specifications.........................................................184
Index......................................................................186
1
Voice Sections
2
Quick Introductory Guide
Flute Voices
(Organ Sounds)
3
Voice Controls
and Effects
4
Rhythm and
Accompaniment
5
Registration Memory
6
Music Disk Recorder
7
Voice Edit
8
Rhythm Pattern
Program and
Rhythm Sequence
Program
9
Footswitches, Knee Lever
and Expression Pedals10
Transpose and
Pitch Controls
11
13
MIDI
Accessory Jacks
and Controls
14 Appendix
12
Downloaded from: http://www.usersmanualguide.com/

6
PanelLayout
BASIC
REGIST.
1
2
3
4
5
UPPER KEYBOARD VOICE 1
M.
/TO DIS K
13 14 15 16 1 2 3 4
VIBRA-
PHONE
LOWER
PEDAL
KEYBOARD
PERCUSSION
SYNCHRO
START
INTRO.
ENDING START
FILL IN
HORN
LOWER KEYBOARD VOICE 1
ORGAN PIANO GUITAR COSMIC TUTTI
STRINGS BRASS CLARI-
NET SAXO-
PHONE CHORUS
ORGAN PIANO GUITAR VIBRA-
PHONE COSMIC TUTTI
STRINGS BRASS SAXO-
PHONE CHORUS HARMO-
NICA
UPPER KEYBOARD VOICE 2
HORN
BRILLIANCE
LOWER KEYBOARD VOICE 2
ORGAN PIANO GUITAR VIBRA-
PHONE COSMIC TUTTI
STRINGS BRASS CLARI-
NET SAXO-
PHONE CHORUS
BRILLIANT
MELLOW
VOLUME
MAX
MIN
SUSTAIN
UPPER
(KNEE)
LOWER
(KNEE) PEDAL
REVERB
MAX
MIN
TEMPO
MARCH WALTZ SWING BOUNCE SLOW
ROCK
TANGO LATIN 1 LATIN 2 8 BEAT 16 BEAT
USER 1 USER 2 USER 3 USER 4 A B
USER 5 USER 6 USER 7 USER 8 C D
RHYTHM
SEQ.
1SEQ.
2
SEQ.
3SEQ.
4
BAR/BEAT
TEMPO
BRILLIANCE
BRILLIANT
MELLOW
VOLUME
MAX
MIN
VOLUME
MAX
MIN
BRILLIANCE
BRILLIANT
MELLOW
VOLUME
MAX
MIN
BRILLIANCE
BRILLIANT
MELLOW
VOLUME
MAX
MIN
CLARI-
NET
ORGAN PIANO GUITAR VIBRA-
PHONE COSMIC TUTTI
STRINGS BRASS CLARI-
NET CHORUS HARMO-
NICA
SAXO-
PHONE 1
2
1
2
1
2
1
2
1
2
1
2
REVERB
(page 52)
SUSTAIN
(page 55)
Rhythm Section
(page 59)
BASIC REGIST.
(page 11)
KEYBOARD PERCUSSION
(page 71)
LOWER KEYBOARD VOICE 1, 2
(page 26) UPPER KEYBOARD VOICE 1, 2
(page 26)
Monitor Speaker
Registration Memory Buttons
(page 62)
M./TO DISK Button
(page 80)
FrontPanel
Downloaded from: http://www.usersmanualguide.com/

7
5 6 7 8 9 10 11 12 D.
PAUSE STOP PLAY SONG SELECT RECORD
UPPER LOWER PEDAL CONTROL UPPER LOWER PEDAL CONTROL
CUSTOM PLAY
SHIFT
POWER
RECORD PLAY
FORMAT
SONG
REPEAT FROM SONG DEL.
SONG COPY
TO
MUSIC DISK RECORDER
TEMPO–+
LEAD VOICE 1
VIOLIN FLUTE
OBOE TRUM-
PET TO
LOWER
BRILLIANCE VOLUME
BRILLIANCE
PEDAL VOICE 1
ELEC.
BASS
CONTRA
BASS
TUBAORGAN
BASS TO
LOWER
VOICE
EDIT
HOLDCOARSE
PATTERNSEQUENCE
RHYTHM
PROGRAM
L. FLUTE
VOICE TREMOLO
(FAST)
U. FLUTE
VOICE
FOOT
SW. REGIST.
SHIFT EXP.
PITCH/MIDI
VOICE
DISPLAY EFFECT
SET A. B. C.
M. O. C.
DISPLAY SELECT
DATA CONTROL
PAGE
CONTRAST
BRILLIANT
MELLOW
MAX
MIN
LEAD VOICE 2
VA
ACOUS-
TIC
VA
VIRTUAL
VA
ELEC-
TRONIC
VA
CUSTOM SOLO
(KNEE)
BRILLIANCE VOLUME
BRILLIANT
MELLOW
MAX
MIN
VOLUME
BRILLIANT
MELLOW
MAX
MIN
BRILLIANCE
PEDAL VOICE 2
ELEC.
BASS
CONTRA
BASS
TUBAORGAN
BASS TO
LOWER
VOLUME
BRILLIANT
MELLOW
MAX
MIN
MASTER VOLUME
1
1
1
1
LEAD VOICE 1, 2
(page 26)
LCD Display
(page 20) DISPLAY SELECT
(page 8)
PEDAL VOICE 1, 2
(page 26)
MASTER VOLUME
(page 11)
MUSIC DISK
RECORDER
(page 87)
POWER
(page 10)
Monitor Speaker
LED (Lamp in-use) Eject Button
D. (Disable) Button
(page 80)
Floppy Disk Slot
Downloaded from: http://www.usersmanualguide.com/

8
VOICE
EDIT
HOLDCOARSE
PATTERN SEQUENCE
RHYTHM
PROGRAM
L. FLUTE
VOICE TREMOLO
(FAST)
U. FLUTE
VOICE
FOOT
SW. REGIST.
SHIFT EXP.
PITCH/MIDI
VOICE
DISPLAY EFFECT
SET A. B. C.
M. O. C.
DISPLAY SELECT
DATA CONTROL
PAGE
LCD Display (page 20) Page Buttons (page 28)
DATA CONTROL Buttons (page 21)
VOICE DISPLAY Button (page 28)
EFFECT SET Button (page 48)
A.B.C./M. O. C.Button (page 69)
FOOT SW. Button (page 151)
REGIST SHIFT Button (page 82)
EXP./PITCH/MIDI Button (page 155)
VOICE EDIT Button (page 110)
RHYTHM PATTERN PROGRAM Button (page 126)
RHYTHM SEQUENCE Button (page 144)
TREMOLO (FAST) Button (page 58)
L.FLUTEVOICE Button (page 40)
U.FLUTE VOICE Button (page 40)
HOLD Button (page 23)
COARSE Button (page 23)
Contrast Dial (page 23)
MIDI Jacks (page 160)
Knee Lever (page 153)
Jacks (page 180)
Speaker Unit
Monitor Speakers
Left-Footswitch (page 151)
Right-Footswitch (page 82)
Expression Pedal (page 11)
Upper Keyboard
Front Panel (page 6)
Lower Keyboard
Keyboard Cover/Music Stand
Second Expression Pedal (page155)
Pedalboard
CONTRAST
LC D /D isplaySelect
O thers
Downloaded from: http://www.usersmanualguide.com/

9
M ainFeatures
Y ourY am ahaElectoneispackedw ithm anysophisticatedfunctions.Y etisam azinglyeasyto
use.T hem ainfeaturesarebrieflydescribedheresothatyoucanquicklyunderstandthe
capabilitiesofyourE lectone.
Includedam ongthem ainfeaturesare:
1A stoundinglyTrue-to-lifeSounds
Thenew A W M (A dvancedW aveM em ory),FM (FrequencyM odulation)andV A (V irtualA coustic
Synthesis)tonegenerationtechnologiescom binedw ithauthentictouchresponse,com pletedby
addingbreathtakingメH orizontal-touchfeature,モforindividualinstrum entvoices,m akethisE lectone
atrulyexpressivem usicalinstrum ent.
Y oucanenjoyplayingatotalof207voices(173A W M /FM voicesand34V A voices)usingthetouch
responseandsolom odefunctions.(page26)
2Lim itlessV arietyofO rganSounds
TheE lectonealsohasseparatevoicesectionsthatfeatureclassicorgansounds-from jazzandpopto
churchandtheater-andletsyoueasilycreateyourow norgansoundsbyadjustingthevolum esof
thevariousflutefootages.(page40)
3O riginalV oiceC reation
TheE lectonealsoprovideseasy-to-usevoiceeditingtoolsform anipulatingthesophisticatedA W M
andFM tonegenerationtechnologies,allow ingyoutocreateyourow noriginalElectonevoices
(exceptforV A voices).(page110)
4
D ynam icandProgram m ableR hythm Patterns
TheR hythm sectionoftheE lectonefeaturesauthenticdrum andpercussionsounds,usedbyexpert
rhythm program m ersincreatingatotalof66rhythm patterns,rangingacrossallstylesofm usic.
(page59)
A longw iththeK eyboardPercussionfunction(page71),w hichletsyouplay120differentpercussion
soundsfrom thekeyboard,theR hythm PatternProgram andR hythm SequenceProgram functions
letyourecordyourow nrhythm patternsandconnectthem tom akesongs.(page125)
5W ideV arietyofEffects
Electonevoicescanalsobeenhancedw ithafullrangeofhigh-qualitydigitaleffects,rangingfrom
Trem oloandR everbtoFlanger,D elayandD istortion.PanandR everbcanbeappliedtoeachvoice
andeachpercussionsoundindependently.(page44)
6V ersatileFunctionsoftheM usicD iskR ecorder
TheElectonealsofeaturesaM usicD iskR ecorder(M D R )forrecordingyourregistrationsand
perform ancestoafloppydisk.Inaddition,theM D R allow syoutocopyasongfrom adiskto
another,duplicateadisk,andplayandsavecom m erciallyavailableX G songdata.(page87)
7LargeLC D forSystem atic,IntuitiveO peration
Thelarge(480x160fulldot)LC D displayprovidescom prehensiveandeasy-to-understandcontrol
overvirtuallyalloftheoperationsoftheElectone.
Downloaded from: http://www.usersmanualguide.com/

10
Quick Introductory Guide
1
1Q uickIntroductoryG uide
1G ettingStarted
1Plugthepow ercordintoanappropriateelectricaloutlet.
2TurnontheE lectonebypressingthePO W ER sw itch.
POWER
W henyouturnontheE lectone,thefollow ingdisplaysw illappear
oneaftertheotherontheLC D display:
®
Thislastdisplayshow sthecurrentlyassignedvoicesettingsforeach
voicesection,asw ellastheoverallbalancebetw eentheU pperand
Low ervoices.
W hentheElectoneisturnedon,B asicR egistration1isautom atically
selected.
O nlyusethevoltagespecifiedascorrect
fortheElectone.Therequiredvoltageis
printedonthenam eplateoftheE lectone.
Y am ahaproductsarem anufactured
specificallyforthesupplyvoltageinthe
areaw heretheyaretobesold.Ifyou
shouldm ove,orifanydoubtexistsabout
thesupplyvoltage,pleaseconsultw itha
qualifiedtechnician.
W hetheryouareanadvancedElectoneperform erorhavenevertouchedanelectronickeyboardinyourlife,
w erecom m endthatyoutakethetim etogothroughthisbasicsection.Itshow syouinthesim plestpossible
m annerhow tostartplayingyourE lectone.T hebasicoperationsandfunctionsthatyoulearninthissection
w illalsobeim portantw henyoulaterusetheElectoneユsm oreadvancedfeatures.
Downloaded from: http://www.usersmanualguide.com/

11
Quick Introductory Guide
1
3SettheM A ST ER V O LU M Econtrol.
TheM A STE R V O LU M Econtrolisanoverallcontrolw hichaffects
thevolum eoftheentireinstrum ent.
MASTER VOLUME
4PresstheE xpressionpedaldow nw ithyourfoot.
O nceyouhavesettheM A STE R V O LU M Econtroltoasuitablelevel,
youcanusetheE xpressionpedaltochangethevolum ew ithyour
footasyouplay.
Maximum volume Minimum volume
2B asicR egistrations
TheB asicR egistrationsectionhasfivefactorypresetregistrations,each
w ithadifferentsetofvoicesfortheU pper/Low erkeyboardsand
Pedalboardandeachspeciallysuitedforplayinginadifferentm usic
style.
ToselectB asicR egistrations:
W henyouturnthepow eron,theElectoneautom aticallyselectsB asic
R egistration1.PresstheB A SIC R E G IST .buttonstoselecteachB asic
R egistration.
Thechartbelow liststhevoicesthathavebeensetfortheU pper/L ow er
keyboardsandPedalboardineachofthefiveB asicR egistrations.
Upper Keyboard
Voice 1
Lower Keyboard
Voice 1
PedalVoice 1
Basic
Registration 1
Strings 1
Strings 1
Contra Bass1
Basic
Registration 2
Brass 1
Horn1
Tuba
Basic
Registration 3
Flute 1
Piano 1
Contra Bass 1
Basic
Registration 4
Cosmic 1
Cosmic 2
Cosmic 2
Basic
Registration 5
Synth. Brass 1
Cosmic 3
Synth. Bass 1
TurningtheE lectoneofferasesallpanel
settingsyouhavem ade.W henthe
Electoneisturnedon,B asicR egistration
1isautom aticallyselected.
Ifyouhavem adepanelsettingsyouw ishtokeep,savethem toR egistration
M em ory(page80)beforeturningtheElectoneoff.Y oucan,how ever,
restorethepanelsettingsthatw erem adebeforetheE lectonew aslast
turnedoff.Seepage86form oreinform ation.
BASIC
REGIST.
1
2
3
4
5
Downloaded from: http://www.usersmanualguide.com/

12
Quick Introductory Guide
1
3R egistrationM enuD isk
TheE lectoneincludesconvenientR egistrationsthatletyoucom pletely
andinstantlychangethevoicesandothersettingsforallofthekeyboards,
evenasyouplay.E achregistrationispre-program m edtobeusedfora
specificm usicstyleorinstrum entalcom bination.
Includedw ithyourE lectoneisaR egistrationM enuD isk.Thediskis
packedw ith80differenttypesofregistrations,includingvoiceandrhythm
selections.E achregistrationispre-program m edtobeusedforaspecific
m usicstyleorinstrum entalcom bination.
Toselectregistrationsfrom theR egistrationM enuD isk:
1PuttheincludedR egistrationM enuD isk(w iththelabelofthedisk
facingupw ardandtheslidingshutterfacingforw ard)intotheD isk
slot,locatedjustundertheM usicD iskR ecorderattherightsideof
theElectone.
O nceyouユvesecurelyinsertedthediskintotheslot,theLC D D isplay
onthepanelw illautom aticallychangetoshow theavailable
R egistrationM enus.
Therearedozensofregistrationsonadisk,butupto16canonlybe
show nintheLC D D isplayatatim e.
Thepagenum bers1through5show natthetoprightcornerofthe
LC D indicatethisR egistrationM enuD iskcontainsfivepages.
N O T E:
Seepage87form oreinform ationonthe
M usicD iskR ecorder.
N O T E:
Seepage14forthecom pletelistofthe
R egistrationM enus.
N O T E:
W hileyouareintheV oiceEditm odeor
R hythm Pattern/SequenceProgram m ode,
theR egistrationM enuscannotbe
displayedontheLC D .
2PressthePagebuttontoselectthevariousm enuメpagesモof
registrationsavailableonthedisk.
PAGE
W henthepagenum bersaredisplayedatthetoprightcorner,
youcanselectthepagesbypressingthePagebuttons,[s]to
selectnextpageand[w ]toselectpreviouspage.
Downloaded from: http://www.usersmanualguide.com/

13
Quick Introductory Guide
1
3Selectoneoftheregistrationsshow nontheLC D bypressingthe
appropriateD ataC ontrolbutton.
U pto16registrationselectionsareshow nontheL C D ,andthe16
D ataC ontrolbuttonscorrespondtothoseselections.
TheD ataC ontrolbuttonsareusedtoselectvoices,rhythm sand
variousfunctions.Theyarealsousedtoraiseorlow ervolum es
andlevels,asw ellasm ovethecursorupanddow n,rightand
left.
N O T E:
Inadvertentlypressinganotherbuttonon
thepanelm aychangethecontentofthe
LC D duringtheR egistrationM enu
operation.InthiscasepressPLA Y button
ontheM usicD iskR ecordersection,to
retrievetheR egistrationM enudisplay.
Downloaded from: http://www.usersmanualguide.com/

14
Quick Introductory Guide
1
Orchestra1 1Strings 1 2Strings 2 Violin 4 4
5Horn 3 6Strings 1 7Contrabass 1 8
Orchestra2 1Horn 3 2Horn 1 4
5Tremolo Strings 6Strings 2 7Contrabass 1 8
Orchestra3 1 2 English Horn 4
5Strings 2 6 7 8Contrabass 1
Orchestra4 1Strings 1 2Brass 1 Piccolo 4
5Strings 1 6Brass 2 7Timpani 8
Orch.Pops1 1Strings 2 2Chorus 2 Whistle 4Slow Rock 2
5Strings 2 6Chorus 2 7Upright Bass 8
Orch.Pops2 1Cosmic 1 2Celesta 4Slow Rock 1
5Strings 2 6Chorus 2 7Upright Bass 8
Orch.Pops3 1Strings 2 2Harpsichord Violin 4 48 Beat 1
5Strings 1 6Horn 3 7Elec. Bass 1 8
Musical 1Tutti 1 2Strings 2 Piccolo 4Polka 1
5Horn 1 6Strings 1 7Contrabass 1 8
Strs.Ens.1 1Strings 3 2Strings 2 Violin 4 4
5Strings 3 6Strings 2 7Contrabass 1 8
Strs.Ens.2 1Strings 2 2Synth. Strings 1 4
5Strings 2 6 7Contrabass 1 8
Strs.Ens.3 1Strings 1 2Strings 2 Strings 5 4
5Strings 1 6 7Contrabass 1 8
Strs.Ens.4 1Strings 2 2Strings 2 (16') 4
5Strings 2 6 7Contrabass 1 8
SoloVln. 1Violin 4 2Violin 1 4
5Strings 2 6 7Contrabass 1 8
Strs.Quart 1Violin 1 24
5Violin 3 6 7Cello 8
Pizz.Strs. 1Pizzicato Strings 24
5Pizzicato Strings 6Pizzicato Strings 7Pizzicato Strings 8
Pizz.Ens. 1Pizzicato Strings 2Pizzicato Strings (16') 4
5Pizzicato Strings 6Pizzicato Strings 7Pizzicato Strings 8
R egistrationM enuList
Page1:Strings
1
:UPPER KEYBOARD VOICE 1
2
:UPPER KEYBOARD VOICE 2 :LEAD VOICE 1
4
:RHYTHM
5
:LOWER KEYBOARD VOICE 1
6
:LOWER KEYBOARD VOICE 2
7
:PEDAL VOICE 1
8
:PEDAL VOICE 2
The numbers in the parentheses indicate that the “feet”settings for the assigned voice are different from the default.
Downloaded from: http://www.usersmanualguide.com/

15
Quick Introductory Guide
1
Marching Band 1 1Brass 1 (16') 2Brass 1 (8') 4March 1
5Brass 1 6 7Tuba 8
Marching Band 2 1Glockenspiel 2Piccolo 4March 2
5Brass 1 6 7Tuba 8
BigBand1 1Tutti 3 2Trumpet 1 4Swing 3
5Trombone 2 6 7Upright Bass 8
BigBand2 1Tutti 3 2Trumpet 3 4Swing 2
5Guitar 2 6 7Upright Bass 8
BigBand3 1Trombone 2 2Trombone 2 4Swing 3
5Sax Ensemble 1 6 7Upright Bass 8
BigBand4 1Muted Trombone 2Muted Trombone 4Swing 2
5Piano 1 6 7Upright Bass 8
BigBand5 1Saxphone 2 2Saxphone 2 4Swing 1
5Brass 4 6 7Upright Bass 8
BigBand6 1Sax Ensemble 1 2Sax Ensemble 1 4Swing 1
5Muted Trombone 6 7Upright Bass 8
Fanfare 1Brass 2 2Trumpet 1 4
5Brass 4 6 7Tuba 8
Horn.Ens. 1Horn 3 24
5Trombone 1 6 7Tuba 8
Afrocuban 1 2 Trumpet 3 4Swing 6
5Piano 2 6 7Upright Bass 8
JazzBallad 1 2 Flugelhorn 4Jazz Ballad
5Piano 1 6 7Upright Bass 8
Dixie1 1Clarinet 2 24Dixieland 2
5Banjo 6 7Upright Bass 8
Dixie2 1 2 Trombone 1 4Dixieland 1
5Honky Tonk Piano 6 7Upright Bass 8
SaxFusion1 1 2 Saxphone 2 416 Beat 3
5Elec. Piano 2 6 7Elec. Bass 1 8
SaxFusion2 1 2 Saxphone 2 (8') 4Bounce 3
5Synth. Strings 2 6Elec. Piano 1 7Elec. Bass 2 8
Page2:B rass
1
:UPPER KEYBOARD VOICE 1
2
:UPPER KEYBOARD VOICE 2 :LEAD VOICE 1
4
:RHYTHM
5
:LOWER KEYBOARD VOICE 1
6
:LOWER KEYBOARD VOICE 2
7
:PEDAL VOICE 1
8
:PEDAL VOICE 2
Downloaded from: http://www.usersmanualguide.com/

16
Quick Introductory Guide
1
Wood.Ens. 1Clarinet 1 2Flute 1 4
5Bassoon 2 6 7Contrabass 1 8
Menuet 1 2 Flute 1 4
5Harp 6 7Contrabass 1 8
Sw an 1 2 Oboe 1 4
5Tremolo Strings 6 7Contrabass 2 8
PolkaEns.1 1 2 Clarinet 1 4Polka 1
5Horn 3 6 7Pizzicato Bass 8
PolkaEns.2 1 2Glockenspiel Piccolo 4Polka 1
5English Horn 6 7Pizzicato Bass 8
Pops1 1 2 Flute 2 4Slow Rock 1
5Elec. Piano 1 6 7Elec. Bass 3 8
Pops2 1 2 Oboe 2 48 Beat 5
5Pizzicato Strings 6 7Pizzicato Bass 8
Pops3 1 2 Whistle 48 Beat 1
5Elec. Piano 1 6 7Elec. Bass 1 8
Jazz.Cla. 1 2 Clarinet 2 4Jazz Ballad
5Strings 2 6 7Upright Bass 8
Folklore 1 2 Pan Flute 4Country 2
5Guitar 1 6 7Pizzicato Bass 8
Folk.Harm. 1 2 Harmonica 1 4
5Strings 2 6 7Contrabass 1 8
BluesHarp 1 2 Harmonica 2 4Slow Rock 3
5Guitar 2 6 7Upright Bass 8
Tango 1Harmonica 2 2Bandoneon (4') Violin 1 4Tango 2
5Piano 1 6Strings 2 7Pizzicato Bass 8
Chanson 1Accordion 2Harmonica 2 4Waltz 1
5Accordion 6 7Pizzicato Bass 8
Jazz.Org.1 1Jazz Organ 2 2Jazz Organ 2 (4') 4Bossanova 2
5Pop Organ 1 6 7Organ Bass 1 8
Jazz.Org.2 1Pop Organ 2 2Jazz Organ 1 Jazz Organ 3 4Swing 2
5Pop Organ 1 6 7Organ Bass 1 8
Page3:L ead
1
:UPPER KEYBOARD VOICE 1
2
:UPPER KEYBOARD VOICE 2 :LEAD VOICE 1
4
:RHYTHM
5
:LOWER KEYBOARD VOICE 1
6
:LOWER KEYBOARD VOICE 2
7
:PEDAL VOICE 1
8
:PEDAL VOICE 2
Downloaded from: http://www.usersmanualguide.com/

17
Quick Introductory Guide
1
Piano1 1Piano 1 24
5Piano 1 6 7Pizzicato Bass 8
Piano2 1Piano 2 248 Beat 5
5Piano 2 6Strings 2 7Elec. Bass 1 8
E.Piano1 1Elec. Piano 1 2416 Beat 3
5Elec. Piano 1 6 7Elec. Bass 3 8
E.Piano2 1Elec. Piano 2 248 Beat 1
5Elec. Piano 2 6 7Elec. Bass 3 8
HonkyTonk 1Honky Tonk Piano 24Dixieland 1
5Honky Tonk Piano 6 7Upright Bass 8
Country 1 2 Whistle 4Country 1
5Guitar 1 6 7Upright Bass 8
BossaGuit. 1 2 Guitar 2 4Bossanova 1
5Elec. Piano 1 6Strings 2 7Upright Bass 8
SambaGuit. 1Guitar 3 24Samba 2
5Guitar 1 6 7Upright Bass 8
Samba 1Marimba 2 4 Samba 1
5Piano 1 6 7Upright Bass 8
Canzone 1Mandolin 2Chorus 3 Violin 3 4Tango 1
5Strings 4 6 7Pizzicato Bass 8
Reggae 1Steel Drum 24Reggae 2
5Pop Organ 1 6 7Elec. Bass 1 8
Japan 1 2 Shakuhachi 4
5Koto 6 7Koto 8
MusicBox 1Music Box 2Whistle 4Slow Rock 1
5Chorus 2 6Strings 2 7Pizzicato Bass 8
X'masChime 1Synth. Chime 2Chime Glockenspiel 4Polka 1
5Theatre Organ 1 6Chorus 2 7Organ Bass 2 8
Oldies 1Elec. Guitar 2 248 Beat 3
5Elec. Guitar 1 6 7Elec. Bass 3 8
HeavyMetal 1Distorted Guitar 2Distorted Guitar 4Bounce 3
5Elec. Guitar 1 6 7Elec. Bass 2 8
Page4:D ecay
1
:UPPER KEYBOARD VOICE 1
2
:UPPER KEYBOARD VOICE 2 :LEAD VOICE 1
4
:RHYTHM
5
:LOWER KEYBOARD VOICE 1
6
:LOWER KEYBOARD VOICE 2
7
:PEDAL VOICE 1
8
:PEDAL VOICE 2
Downloaded from: http://www.usersmanualguide.com/

18
Quick Introductory Guide
1
Fusion1 1 2 Soprano Sax 48 Beat 4
5Elec. Guitar 2 6 7Elec. Bass 3 8
Fusion2 1Elec. Guitar 1 2Elec. Guitar 2 416 Beat Funk 1
5Elec. Piano 1 6Strings 2 7Elec. Bass 2 8
Dance1 1Synth. Brass 2 2Synth. Brass 2 4Dance Pop 2
5Elec. Guitar 1 6 7Elec. Bass 2 8
Dance2 1Brass 3 2Brass 3 (16') Trumpet 4 4Dance Pop 4
5Elec. Guitar 1 6 7Elec. Bass 2 8
Dance3 1Cosmic 3 2Cosmic 4 48 Beat 2
5Elec. Guitar 1 6Synth. Strings 1 7Elec. Bass 3 8
Dance4 1Synth. Brass 1 2Synth. Brass 2 Synth. Brass 1 4Dance Pop 3
5Cosmic 3 6Elec. Guitar 1 7Elec. Bass 2 8
Dance5 1Glockenspiel 2Synth. Brass 1 (16') Synth. Bass 3 4Dance Pop 1
5Piano 2 6Synth. Strings 1 7Elec. Bass 2 8
Funk 1 2Brass 2 Trumpet 3 416 Beat 4
5Elec. Guitar 1 6 7Elec. Bass 2 8
Pops1 1Synth. Brass 1 2Glockenspiel Recorder 48 Beat 4
5Elec. Piano 1 6Synth. Strings 2 7Elec. Bass 1 8
Pops2 1 2 Whistle 48 Beat 5
5Piano 2 6 7Elec. Bass 1 8
JazzySax. 1 2 Saxphone 2 48 Beat 5
5Piano 2 6 7Elec. Bass 1 8
Jazz.Waltz 1 2 Flugelhorn 4Jazz Waltz 2
5Elec. Piano 1 6Cosmic 4 7Elec. Bass 1 8
Orch.Syn.1 1Tutti 4 2Brass 2 Synth. Brass 2 4Bounce 3
5Clavi (8') 6Synth. Clarinet 1 7Synth. Bass 3 8
Orch.Syn.2 1Brass 3 2Synth. Brass 1 Trumpet 4 416 Beat 3
1Elec. Piano 1 6Cosmic 3 7Elec. Bass 3 8
Cosmic1 1Cosmic 7 2Cosmic 1 Whistle (4') 4
5Cosmic 5 6Cosmic 1 7Cotrabass 2 8
Cosmic2 1Cosmic 6 2Cosmic 3 (4') Marimba 4
5Cosmic 9 6Chorus 2 7Cotrabass 2 8
Page5:Synth
1
:UPPER KEYBOARD VOICE 1
2
:UPPER KEYBOARD VOICE 2 :LEAD VOICE 1
4
:RHYTHM
5
:LOWER KEYBOARD VOICE 1
6
:LOWER KEYBOARD VOICE 2
7
:PEDAL VOICE 1
8
:PEDAL VOICE 2
Downloaded from: http://www.usersmanualguide.com/

19
Quick Introductory Guide
1
4B asicO peration
Setting Registration
Shift/Footswitch
/Knee Lever
Registration Set-up
Select the voice
(Voice Menu)
Finely adjust the voice
(Voice Condition)
Add effects
(Effect Set)
Add reverb
Voice Edit
(User Voice)
Select the rhythm
(Rhythm Menu)
Finely adjust the rhythm
(Rhythm Condition)
Rhythm Program
(User Rhythm
/Rhythm Sequence)
Select the keyboard
to play
* The Controls and Effects may
be applied differently depending
on the selected type of Controls
and Effects. See page 44 for
more information.
Playing back
Recording the performance
Saving the
registration data
Loading the
registration data
Expression Pedal
Adjust the total volume
(Master Volume)
Playing Electone
Music Disk Recorder
Downloaded from: http://www.usersmanualguide.com/

20
Quick Introductory Guide
1
5U singtheLC D D isplay
ThissectionintroducesyoutheconvenientcontrolfunctionsoftheLC D
display.T heLC D displayletsyouseeataglancethecurrentsettings
andprovideseasy-to-understandgraphicrepresentationofallparam eters.
Selectingavoice/rhythm
1Pressthepanelvoice/rhythm buttonw hichyouw anttouse(For
exam ple,presstheST R IN G SbuttonintheU pperK eyboardV oice1
section).
UPPER KEYBOARD VOICE 1 BRILLIANCE
BRILLIANT
MELLOW
VOLUME
MAX
MIN
ORGAN PIANO GUITAR VIBRA-
PHONE COSMIC TUTTI
STRINGS BRASS CLARI-
NET CHORUS HARMO-
NICA
SAXO-
PHONE 1
2
Thefollow ingdisplayw illappear,show ingalltheavailablevoices/
rhythm sinthecategory(StringsC ategoryinthiscase).
2PresstheD ataC ontrolbuttoncorrespondingtothevoiceyouw ant
toplay(Strings3inthiscase).
Theselectedvoice/rhythm w illbeshow ninthereversedbox.
Downloaded from: http://www.usersmanualguide.com/
Other manuals for Electone EL-900
1
Table of contents
Other Yamaha Keyboard manuals

Yamaha
Yamaha CBX-K2 User manual

Yamaha
Yamaha PortaSound VSS-30 User manual

Yamaha
Yamaha Computer-related User manual

Yamaha
Yamaha PSR-E263 User manual

Yamaha
Yamaha PortaTone PSR-12 User manual

Yamaha
Yamaha PortaSound PSS-7 User manual

Yamaha
Yamaha Pocket Miku User manual

Yamaha
Yamaha PSR-EW400 User manual

Yamaha
Yamaha CBX-K1 User manual

Yamaha
Yamaha Portatone PSR-275 User manual