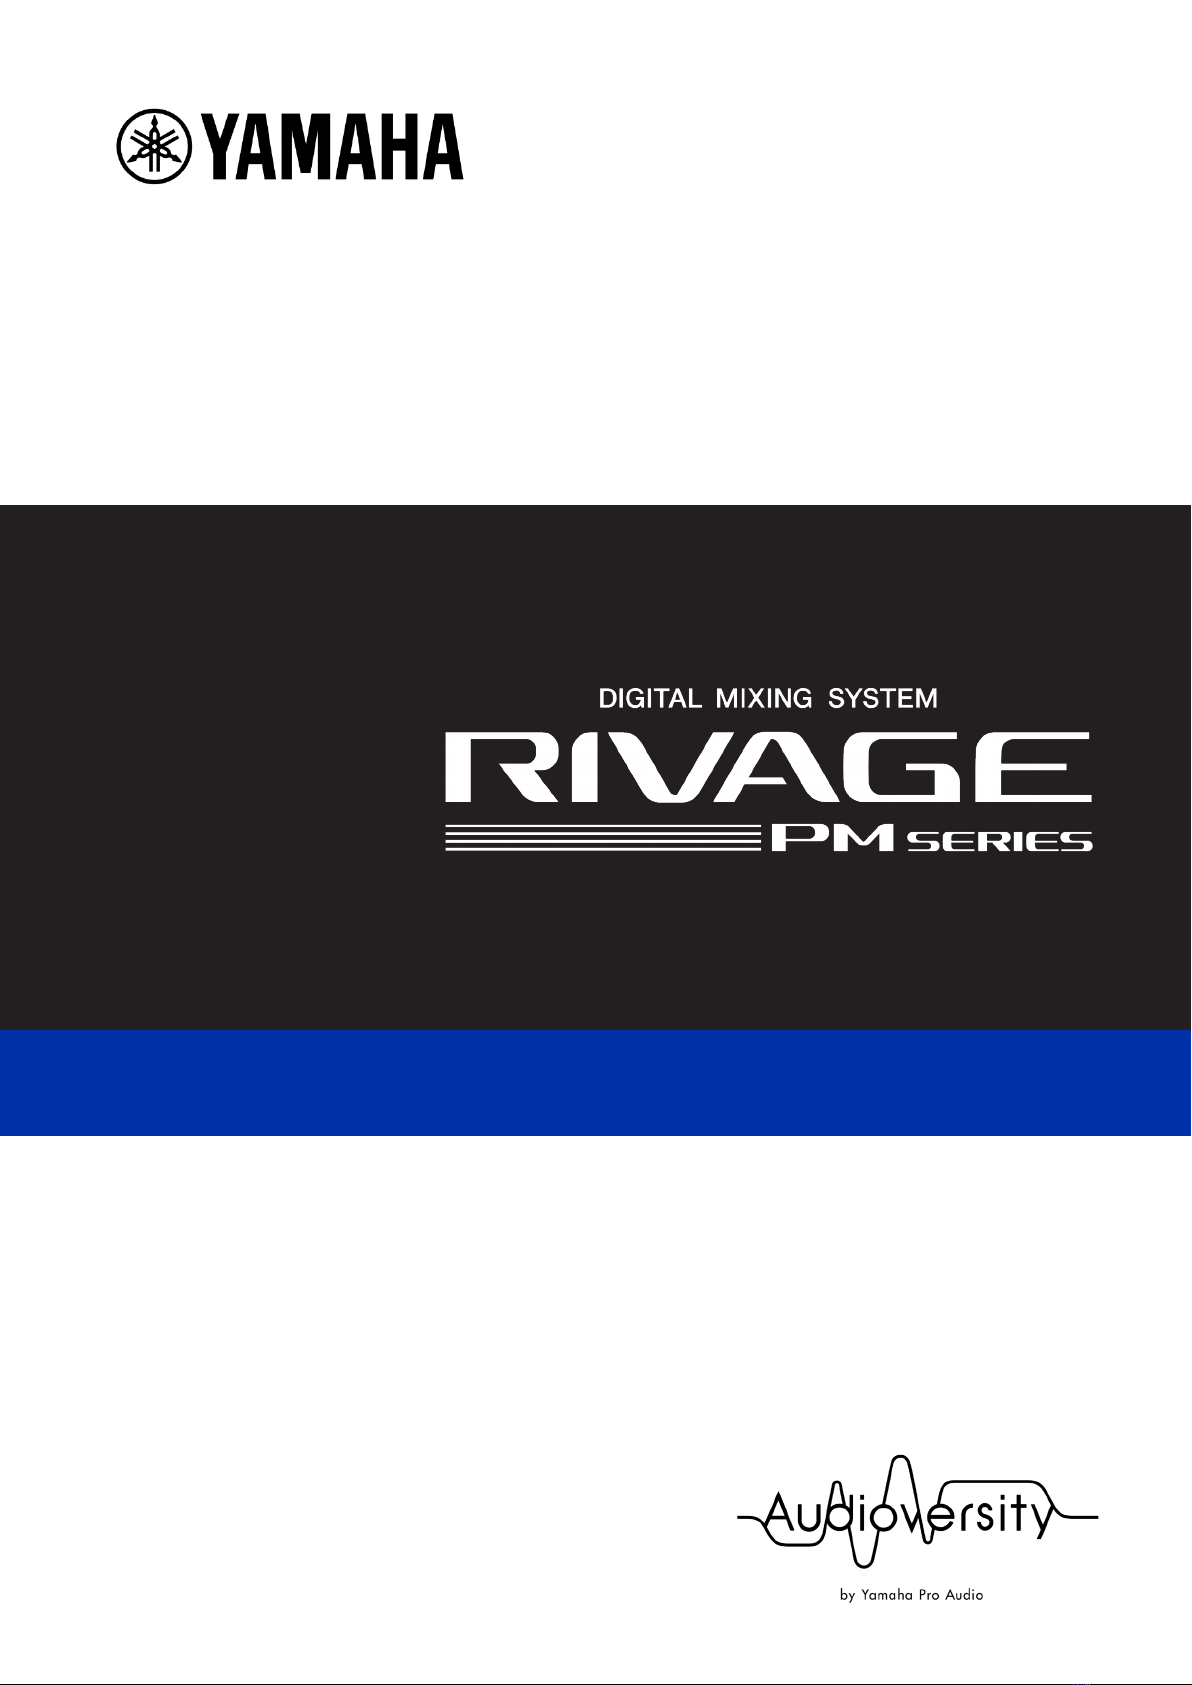
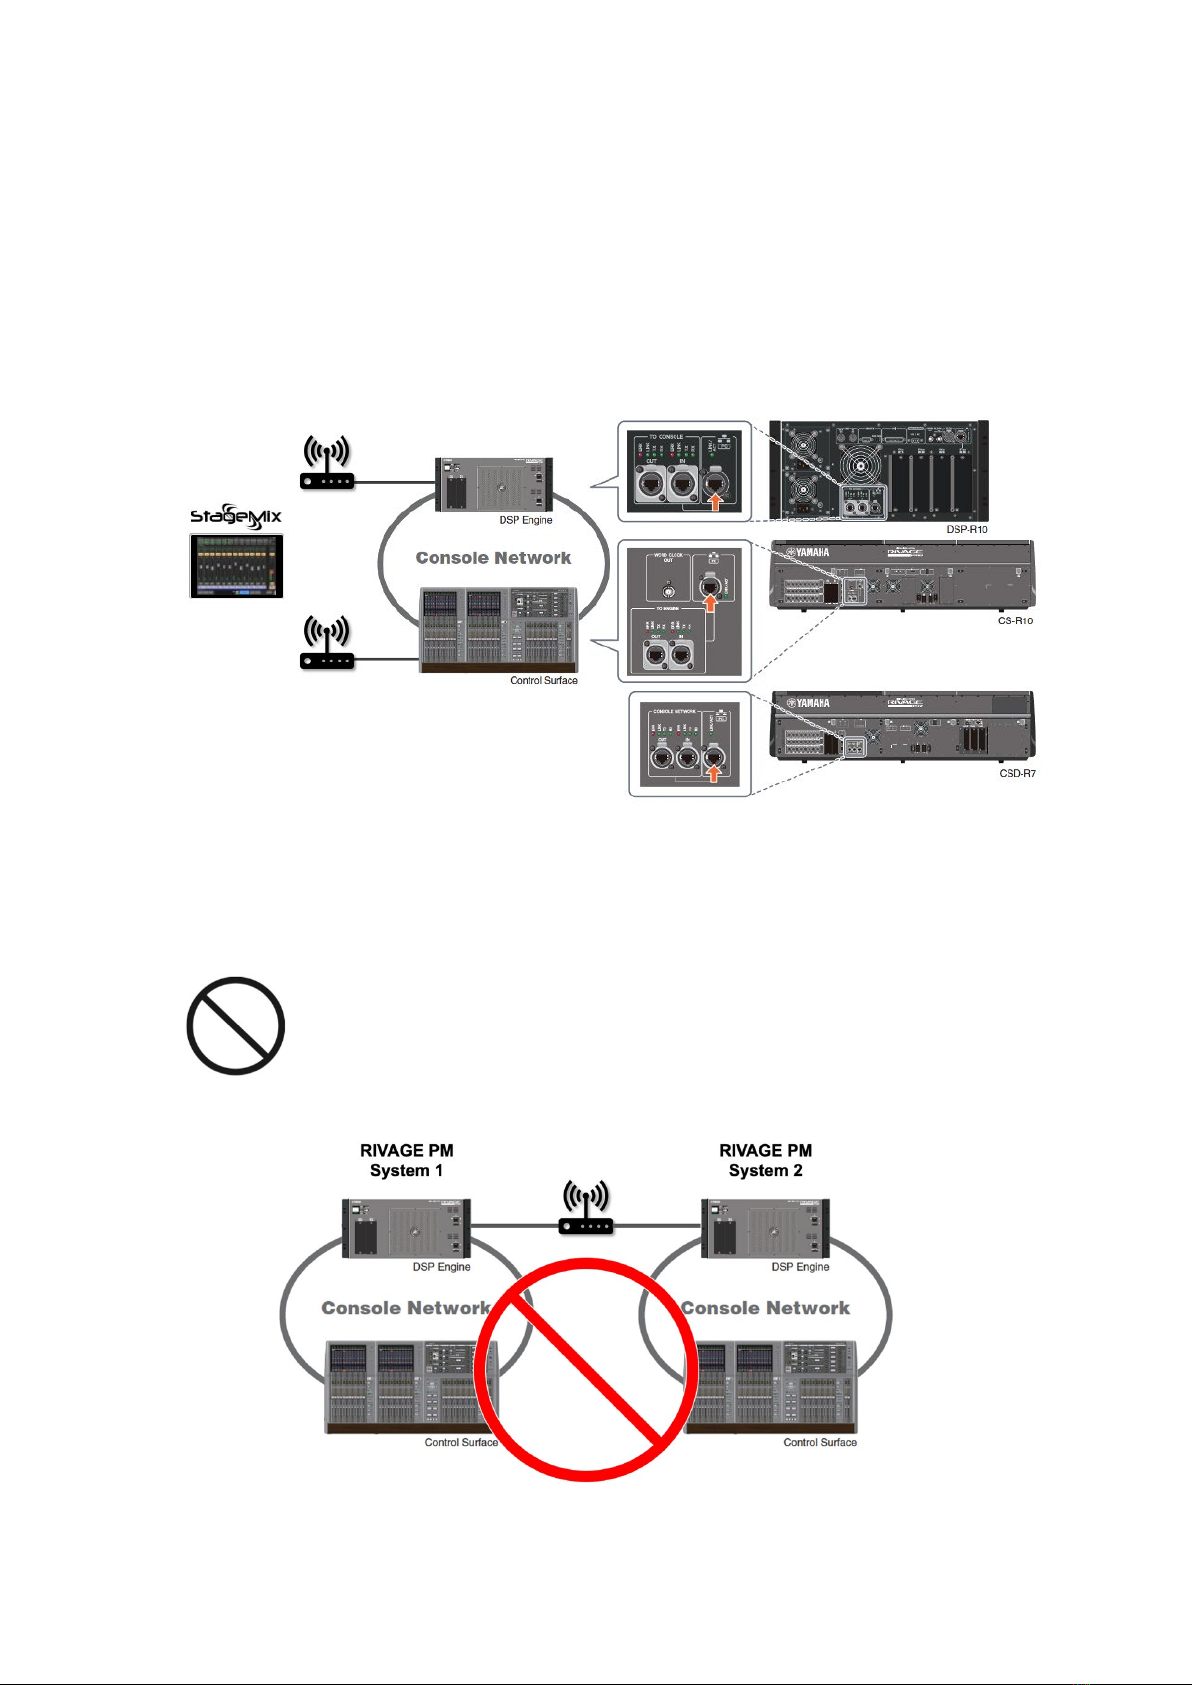
Yamaha Audioversity Rivage Pm Series User manual

Network Setup Guide

2
Table of Contents
1. About the RIVAGE PM Network Setup Guide...................................................... 3
2. Control Network Setup
(RIVAGE PM Editor/RIVAGE PM StageMix/MonitorMix) ..................................... 3
2.1. Connecting to the NETWORK [PC] Connector ............................................. 4
2.2. Configuring the NETWORK [PC] Connector for
PM Editor/StageMix/MonitorMix .................................................................... 4
2.3. Connection Examples.................................................................................... 8
3. Dante Network Settings...................................................................................... 14
What is Dante?....................................................................................................... 14
3.1. Connecting a Device to the Dante Connector ............................................. 14
3.2. Configuring HY144-D/-SRC......................................................................... 16
3.3. Connection Examples.................................................................................. 20
FAQ ............................................................................................................................ 27

3
1. About the RIVAGE PM Network Setup Guide
This guide explains how to set up Control and Dante networks for the RIVAGE PM system.
As the RIVAGE PM system can have multiple configurations, follow this guide to ensure the
system is set up properly.
2. Control Network Setup (RIVAGE PM Editor/RIVAGE
PM StageMix/MonitorMix)
The RIVAGE PM can be controlled from the RIVAGE PM Editor (PM Editor), RIVAGE PM
StageMix (StageMix), and MonitorMix via a connected computer through the NETWORK
[PC] connector port designated below. Follow this procedure to set up the connection.
Each component’s NETWORK [PC] connectors

4
2.1. Connecting to the NETWORK [PC] Connector
Use an Ethernet cable (CAT5e or higher) to connect a computer or an access point to the
NETWORK [PC] connector. The following devices can be connected to the NETWORK [PC]
connector.
•A computer running PM Editor
•A Wi-Fi device for connecting StageMix (access point/router)
•A Wi-Fi device for connecting MonitorMix (access point/router)
Do not connect any devices other than the above.
If there is more than one RIVAGE PM system, do not connect the
NETWORK [PC] connector of the RIVAGE PM systems
to the same
network. Or do not share one access point with multiple RIVAGE PM
systems.
2.2. Configuring the NETWORK [PC] Connector for PM
Editor/StageMix/MonitorMix
Apply the appropriate settings to the NETWORK [PC] connecter to use PM Editor, StageMix,
and MonitorMix.
RIVAGE PM Editor
PM Editor does not require any specific settings between the NETWORK [PC] connector of
the RIVAGE PM DSP engine and the control surface.
Simply set the computer’s IP address within the following range to connect it with the installed
PM Editor.
IP Address 192.168.53.1– 192.168.53.32
Subnet Mask 255.255.255.0

5
RIVAGE PM StageMix
The IP settings for StageMix can be made in the CONSOLE IP SETTING field.
1. Press the SETUP button on the menu bar to access the SETUP screen, and then
press the NETWORK popup button.
2. On the FOR MIXER CONTROL tab, press the IP ADDRESS button to open the
CONSOLE IP SETTING screen. Then, specify an IP address and subnet mask.
The following IP addresses cannot be used for CONSOLE IP SETTINGs.
•192.168.53.xxx /24
172.17.xxx.xxx /16 - 172.24.xxx.xxx/16
(These are reserved for RIVAGE PM systems.)
•169.254.xxx.xxx /16 (Link-local addresses)
•Multicast addresses
•The IP address assigned to DSP ENGINE IP SETTING

6
3. Press the ENABLE button to turn it on.
MonitorMix
The IP settings for MonitorMix can be made in the DSP ENGINE IP SETTING field.
1. Press the SETUP button on the menu bar to access the SETUP screen. Then, press
the NETWORK popup button.

7
2. On the FOR MIXER CONTROL tab, press the IP ADDRESS button to open the DSP
ENGINE IP SETTING screen. Then, specify an IP address and subnet mask.
The following IP addresses cannot be used for DSP ENGINE IP SETTINGs.
•192.168.53.xxx /24
172.17.xxx.xxx /16 - 172.24.xxx.xxx/16
(These are reserved for RIVAGE PM systems.)
•169.254.xxx.xxx /16 (Link-local addresses)
•Multicast addresses
•IP address assigned to CONSOLE IP SETTINGs
•IP addresses in the same subnet as the HY144-D/-SRC’s assigned Dante network
3. Press the ENABLE button in the DSP ENGINE IP SETTING field to turn it on.
NOTICE
•Always apply the IP address to CONSOLE IP SETTING and DSP ENGINE IP SETTING
before turning the ENABLE button ON for use with the StageMix or MonitorMix apps.
Also, when you are not using the function, turn the ENABLE button off.

8
2.3. Connection Examples
This section offers connection examples for RIVAGE PM systems using PM Editor / StageMix
/ MonitorMix, as well as precautions when connecting and setting up the system.
Example 1: Connection with the RIVAGE PM Editor
A computer with PM Editor is connected to the NETWORK [PC] connector of a DSP engine
or control surface using an Ethernet cable.
NOTE:
•Up to two PM Editors can be connected to one RIVAGE PM system.

9
Example 2: Connection with StageMix
A Wi-Fi device (e.g., access point or router) for StageMix is connected to the NETWORK
[PC] connector of a DSP engine or control surface using an Ethernet cable.
Make sure that the Ethernet cable is connected to the LAN port of the Wi-Fi device.
Please note that StageMix is only operable while the control surface is turned on.
1. Open the NETWORK screen of the RIVAGE PM system to specify the IP address and
subnet mask in the CONSOLE IP SETTING.
2. Press the ENABLE button in the CONSOLE IP SETTING field to turn it on.
Do not share a Wi-Fi access point with more than one RIVAGE PM system
by connecting their NETWORK [PC] connectors to the access point.

10
NOTE:
•Up to two StageMix apps can be connected to one console surface.
Example 3: Connection with MonitorMix
A Wi-Fi device (e.g., access point or router) for MonitorMix is connected to the NETWORK
[PC] connector of a DSP engine or control surface using an Ethernet cable.
Make sure that the Ethernet cable is connected to the LAN port of the Wi-Fi device.

11
1. Open the NETWORK screen of the RIVAGE PM system and specify the IP address
and subnet mask for the DSP ENGINE IP SETTING.
2. Press the ENABLE button in the DSP ENGINE IP SETTING field to turn it on.
Do not share a Wi-Fi access point with more than one RIVAGE PM system
by connecting their NETWORK [PC] connectors to the access point.
NOTE:
•Up to ten MonitorMix apps can be connected to one RIVAGE PM system.

12
Example 4: Connection with StageMix and MonitorMix in one system
A Wi-Fi device (e.g., access point or router) for StageMix and MonitorMix is connected to the
NETWORK [PC] connector of a DSP engine or control surface using an Ethernet cable.
Make sure that the Ethernet cable is connected to the LAN port of the Wi-Fi device.
StageMix and MonitorMix can be used together by connecting them to the same access point
or two different access points.
1. Open the NETWORK screen of the RIVAGE PM system and specify the IP addresses
and subnet masks for both the CONSOLE IP SETTING and DSP ENGINE IP SETTING.
See below to set these settings properly.
When sharing one Wi-Fi access point:
Specify a unique IP address in the same subnet for both the CONSOLE IP SETTING and
the DSP ENGINE IP SETTING.
•Example of IP settings
IP Address
Subnet Mask
CONSOLE IP
192.168.0.10
255.255.255.0
StageMix
192.168.0.xxx
255.255.255.0
DSP ENGINE IP
192.168.0.20
255.255.255.0
MonitorMix
192.168.0.xxx
255.255.255.0
Wi-Fi Access Point
192.168.0.1
255.255.255.0

13
When using two separate Wi-Fi access points in different subnets:
Specify an IP address in a different subnet (network address) for both the CONSOLE IP
SETTING and the DSP ENGINE IP SETTING.
•Example of IP settings
IP Address
Subnet Mask
CONSOLE IP
192.168.0.10
255.255.255.0
StageMix
192.168.0.xxx
255.255.255.0
Wi-Fi Access Point for StageMix
192.168.0.1
255.255.255.0
DSP ENGINE IP
192.168.1.10
255.255.255.0
MonitorMix
192.168.1.xxx
255.255.255.0
Wi-Fi Access Point for MonitorMix
192.168.1.1
255.255.255.0
2. Press the ENABLE buttons of the CONSOLE IP SETTING and DSP ENGINE IP
SETTING to turn them on.
Do not share a Wi-Fi access point with more than one RIVAGE PM system
by connecting their NETWORK [PC] connectors to the access point.

14
3. Dante Network Settings
By installing an HY144-D/-SRC, a Dante device can be used as a RIVAGE PM system
component. Up to 24 units can be mounted to a single HY144-D/-SRC and up to 48 units
can be controlled for a single DSP engine. In addition, the maximum number of channels that
can be controlled per mounted device is 128.
What is Dante?
Dante is a network audio protocol developed by Audinate. It allows the management of
device control signals and multiple audio signals at different sampling frequencies and bit
rates in a network that supports Gigabit Ethernet.
For details about Dante, see the Audinate website.
http://www.audinate.com/
Or Yamaha also provides a variety of information regarding Dante on our website.
http://www.yamahaproaudio.com/
3.1. Connecting a Device to the Dante Connector
See the following information to set up a network to connect and use Dante devices in a
RIVAGE PM system.
Only Dante devices or a computer with Dante Controller can be connected to the Dante
connector of the HY144-D/-SRC. Do not connect any other devices to the connector.
Also, make sure to establish a physically separate connection between the Dante network
and the control network.

15
Network Connection Example
Do not connect a Dante Network switch to a Control Network switch in which
the PM Editor, StageMix, or MonitorMix are connected.
Prohibited Connection Example

16
To use multiple HY144-D/-SRCs, Yamaha recommends that all the cards be used in the same
Dante network. However, if you would like to connect the cards to multiple Dante networks
that are physically separated, specify an IP address in a different subnet for each Dante
network.
And make sure to connect all the installed HY144-D cards on the Dante network.
3.2. Configuring HY144-D/-SRC
Specify the Primary/Secondary IP and SLOT IP settings for Dante devices.
IP settings for Dante devices (Primary/Secondary)
The IP settings for Dante devices can be specified in the Dante Primary/Secondary IP
settings for each HY144-D/-SRC, which can be found on the Network Config tab in the Device
View window of the Dante Controller software.

17
To set up SLOT IP
The SLOT IP settings are for control communications between the HY144-D/-SRC and the
DSP engine. To remotely control a supported device, adjust the SLOT IP settings.
1. Press the SETUP button in the menu bar to access the SETUP screen, and then press
the SYSTEM CONFIG button.
2. Press the HY SLOT tab where an HY144-D/-SRC card is installed to display the HY
SLOT window.

18
3. Press the NETWORK button.
4. Input the SLOT IP SETTING.
Make sure to specify an IP address that is in the same subnet as the Dante network. The
following IP addresses cannot be used for the STATIC IP of the SLOT IP SETTING.
•192.168.53.xxx /24
172.17.xxx.xxx /16 - 172.24.xxx.xxx/16
(These are reserved for RIVAGE PM systems.)
•169.254.xxx.xxx /16 (Link-local addresses) *1
•Multicast addresses
Use an IP address in a different subnet from the IP address that was assigned in the DSP
ENGINE IP SETTING.
*1 To use a link-local address, use the AUTO (DHCP) to set the IP address.

19
To set up DANTE CONTROL ID
The Dante Control ID needs to be set to remotely control the Rio series head amps.
To use multiple HY144-D/-SRC cards, set a unique ID for each card (except for ID OFF).
1. Open the HY SLOT window, and then press the DANTE SETUP button.
2. Choose the ID number from the DANTE CONTROL ID field.
To connect more than four cards*1 in one network, set the fifth and subsequent cards OFF.
However, please note that the cards whose ID is set to off cannot remotely control the head
amps.
For details about ID settings, see the RIVAGE PM Operation Manual.
*1 This includes multiple DSP engines in the same Dante network.

20
3.3. Connection Examples
This section gives you connection examples of a RIVAGE PM system with Dante devices
and provides precautions when connecting and setting up your system.
Example 1: A single Dante network
AUTO IP Setting
The AUTO option automatically determines the Primary/Secondary IP and SLOT IP for the
Dante device. Make sure that the Primary/Secondary IP and SLOT IP for each Dante device
is set to AUTO (DHCP), which is the default.
Table of contents
Other Yamaha Recording Equipment manuals

Yamaha
Yamaha QY70 Manual

Yamaha
Yamaha CDR-HD1000 User manual

Yamaha
Yamaha TX-7 User manual

Yamaha
Yamaha TX16W User manual

Yamaha
Yamaha D24 Installation and operation manual

Yamaha
Yamaha MagicStomp User manual

Yamaha
Yamaha MDF2 User manual

Yamaha
Yamaha SPX1000 User manual

Yamaha
Yamaha QY 300 Instruction Manual

Yamaha
Yamaha TX-802 User manual

Yamaha
Yamaha MY8-SDI-ED User manual

Yamaha
Yamaha D1030 User manual

Yamaha
Yamaha TF Series User manual

Yamaha
Yamaha SPX90 II User manual

Yamaha
Yamaha MagicStomp User manual

Yamaha
Yamaha CS1D User manual

Yamaha
Yamaha M7CL-48 User manual

Yamaha
Yamaha DEQ5 User manual

Yamaha
Yamaha Magicstomp Effects User manual

Yamaha
Yamaha TX-7 User manual