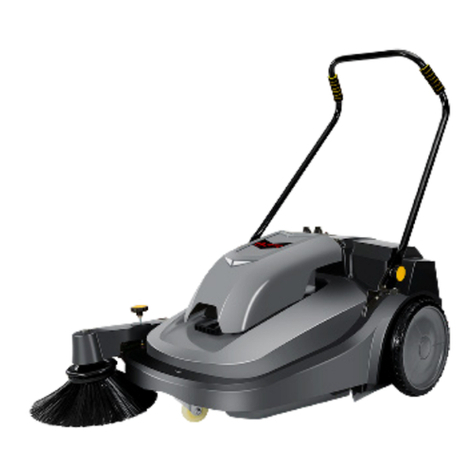
YANGZI YZ-S6 User manual

YZ-S6
Floor Sweeper
instruction manual
安 徽 扬 子 工 业 科 技 有 限 公 司
ANHUI YANGZI INDUSTRIAL TECHNOLOGY CO., LTD.

1

2
Instruction Manual
YZ-S6
Operating instructions for sweeper
1.
The sweeper needs to be installed and maintained by professionals. Users are not
allowed to install and repair or disassemble or modify the components of the sweeper
without authorization
2.
Do not stack inflammable and explosive materials near the sweeper, or there will be
fire danger
3.
In thunderstorm weather, please turn off the power switch of the sweeper, otherwise
the sweeper may be damaged by lightning
4.
In case of any abnormal situation of the sweeper, such as abnormal noise, smell,
smoke, rapid temperature rise and leakage, please immediately cut off the power
switch, and then inform our customer service center
Thank you very much for choosing our products. Before putting the sweeper
into use, please read the manual carefully and strictly follow it to achieve the
best cleaning effect and prolong the service life of the machine. If you have any
comments and suggestions, please contact us.
We warmly and quickly serve you.

3
YZ-S6
Instruction Manual
technical parameters
SERIAL NTMBER
PROJECT
COMPANY
PARAMETER
1
Sweeping width
mm
1450
2
Side brush width
mm
2*260
3
Width of main
brush
mm
590
4
Walking motor
w
1200
5
Side brush motor
w
2*90
6
Roller brush motor
w
800
7
Battery capacity
v/ah
48/80
8
Garbage capacity
L
170
9
Walking speed
km/h
0-10
10
working hours
h
3-4
11
work efficiency
m²/h
9600
12
Total weight
kg
580
13
Product size
mm
1600*1450*1450

4
Instruction Manual
YZ-S6
Performance characteristics
Overview of sweeper:
1.
Adopt advanced high performance maintenance free battery, no side leakage, no
harmful gas
2.
Led front lighting, suitable for night work.
3.
Large dust filter screen, can completely clean dust, automatic cleaning filter screen
4.
Steel chassis, strong bearing capacity, durable tire, with hydraulic disc brake device.
Operating instructions for sweeper:
1.
This machine is only used as a cleaning tool. If it is used for other purposes beyond the
instructions in this guide, we will not be responsible for any damage caused.
2.
The sweeper can clean the general garbage, and it is not suitable to clean the rope
wire, poisonous and harmful and high temperature sundries, so as to avoid winding and
burning the main part and side brush, so as to prevent it from working normally.
3.
This machine can only be used by authorized and trained personnel.
4.
When the machine stops working, it must be parked on the flat ground.
5.
Irrelevant personnel and children should be removed from the scene when the machine
is in use.
6.
The power key switch must be turned off when opening the hood or machine
maintenance and repair.
7.
When transporting the sweeper, make sure it is firmly attached to the transport vehicle.
8.
Make sure the battery is in a ventilated area when charging. Do not charge when the
sweeper stops working or when it is running. When the power is lower than 20%, the
battery should be charged in time, so as to prolong the battery life.
9.
When the work is finished, the key should be pulled out in time to avoid the sweeper
adjustment and replacement of main brush and side brush
The main function of the side brush is to use its own rotation to collect the garbage
from both sides to the middle, and collect the garbage from the main brush to the
dustbin. The advantage of the side brush is that it can sweep out the garbage at the edges
and dead corners, and improve the cleaning efficiency.

5
1.
Adjustment of side brush
Under normal working conditions, the brush should
be at the left position above the ground. If the brush
is too low from the ground, it is easy to cause load
heating overload and accelerate the wear of
brush hair. Motor burned out, brush height
adjustment method: adjust the panel side brush button
2.
Replacement of side brush
Screw out the screw 1,
remove the side brush, screw
out the screw 2, and replace
the side brush
The height of the main
brush contacting the ground should be 2-4mm. When the main brush contacts the
ground too low, the normal operation of the machine will be affected, and the parts are
easy to heat up, thus reducing the service life of the machine.
3.
Adjustment of main brush
The height of the main brush contacting the ground can be determined by adjusting
the limit screw.
replacement of main brush
Screw out the screws 1 to
4, remove the rocker arm
and left baffle, and pull
out the main brush.
When replacing, pay
attention to the installation
direction of the main brush, and do not reverse the direction.

6
Instruction Manual
YZ-S6
filter cleaning and replacement
The waste filter element needs to be inspected regularly. When the filter is blocked and
cannot be cleaned or damaged, it needs to be replaced.
Removal method of filter element
Screwoffthe screw
on the filter base
plate at the rear of
the car and pull the
filter out as a whole.
Note: in the
replacement, you need
to apply grease to the oil seal, align it with the air outlet, and connect it slowly.

7
YZ-S6
Instruction Manual
operation precautions
PROBLEM
REASON
TREATMENT
Large leaves or large garbage
particles are leaked during
sweeping
Working too fast
Reduce the working speed
Brush height
Adjust brush height
The bristles are deformed or
entangled with filaments
Remove the entanglement
The sweeper leaves dust on
the floor or dust from the
side shields
Filter clogged
Clean the filter
Skin damage
Check the baffle and replace
it if damaged
Cleaning is not thorough,
leaving paper scraps, leaves
or other garbage
The lifting height of front
bumper is notcorrect
Check the baffle and replace
it if damaged
The brush is pressed too low
Adjust brush height
The brush wears too fast
Thebristlesareentangled
with filaments
Remove the entanglement
Too much noise at work
The bearing is broken
Replace the bearing
Brush overpressure
Reduce brush pressure
The brush does not rotate
when it works
The drive belt is damaged
Replace the belt
Brush and fan motor do not
work
Motor damage
Replace the motor

8
Instruction Manual
YZ-S6
electric dust shaker does not
work
Excessive motor load
Check and reduce the load
The switch is broken
Replace the fuse
The fuse is burnt out
Check and reduce the load
Motor damage
Replace the motor
Bearing wear
Replace the bearing
The electric dust shaker
does not work
Problems of controller, fuse,
drive motor, governor and
brake switch
Check the input and output
voltage, alarm signal,
indicator light, fuse, drive
motor and connecting
circuit.
The car can't move forward
or backward
Pedal governor damaged
Replace the governor
Brake pedal position fault
Reset the brake pedal
and check if it is in good
condition
Brake switch failure
Replace the brake switch
Controller damage
Replace the brake switch
The battery doesn't charge
Charger does not work
Check the charger input
power
The battery is burnt out
Replace the battery
Charger
Check whether there is
output of charger
Loose battery terminals
Check and tighten the
battery terminals
Batterydischargingtoofast
Insufficient charging time
Increase charging time
The battery is burnt out
Replace the battery
Charger damaged
Replace charger

Warranty conditions:
Inspection Certificate
Warranty Card
Number:
Number:
Name
Tell
Mailing address
Purchase time
Bill
number
Product number
Fuselage
number
Replacement
parts
Date
Fault description:
1.
Within the date of purchase, the motor is guaranteed for one year (if it is more than 7 days from the date of
purchase, no replacement, onlywarranty).
2.
Before using the equipment, you must understand the instructions and safety instructions.
3.
During the warranty period, the artificial damage of warranty accessories will not be guaranteed.
4.
During the warranty period, users who do not follow the operation instructions or dismantle and repair by
themselves will not be guaranteed. (if repair is needed, the cost of production will be charged)
5.
The buyer shall takethe invoice to the place designated by the seller for repair, or send the machine back to our
company for repair. (return freight, insurance paid by yourself)
Model
Motor
Accessories
Power cable
Switch
Shell
Suction
Control
Fuselage
Function
Manual
Package
Table of contents
Other YANGZI Blower manuals